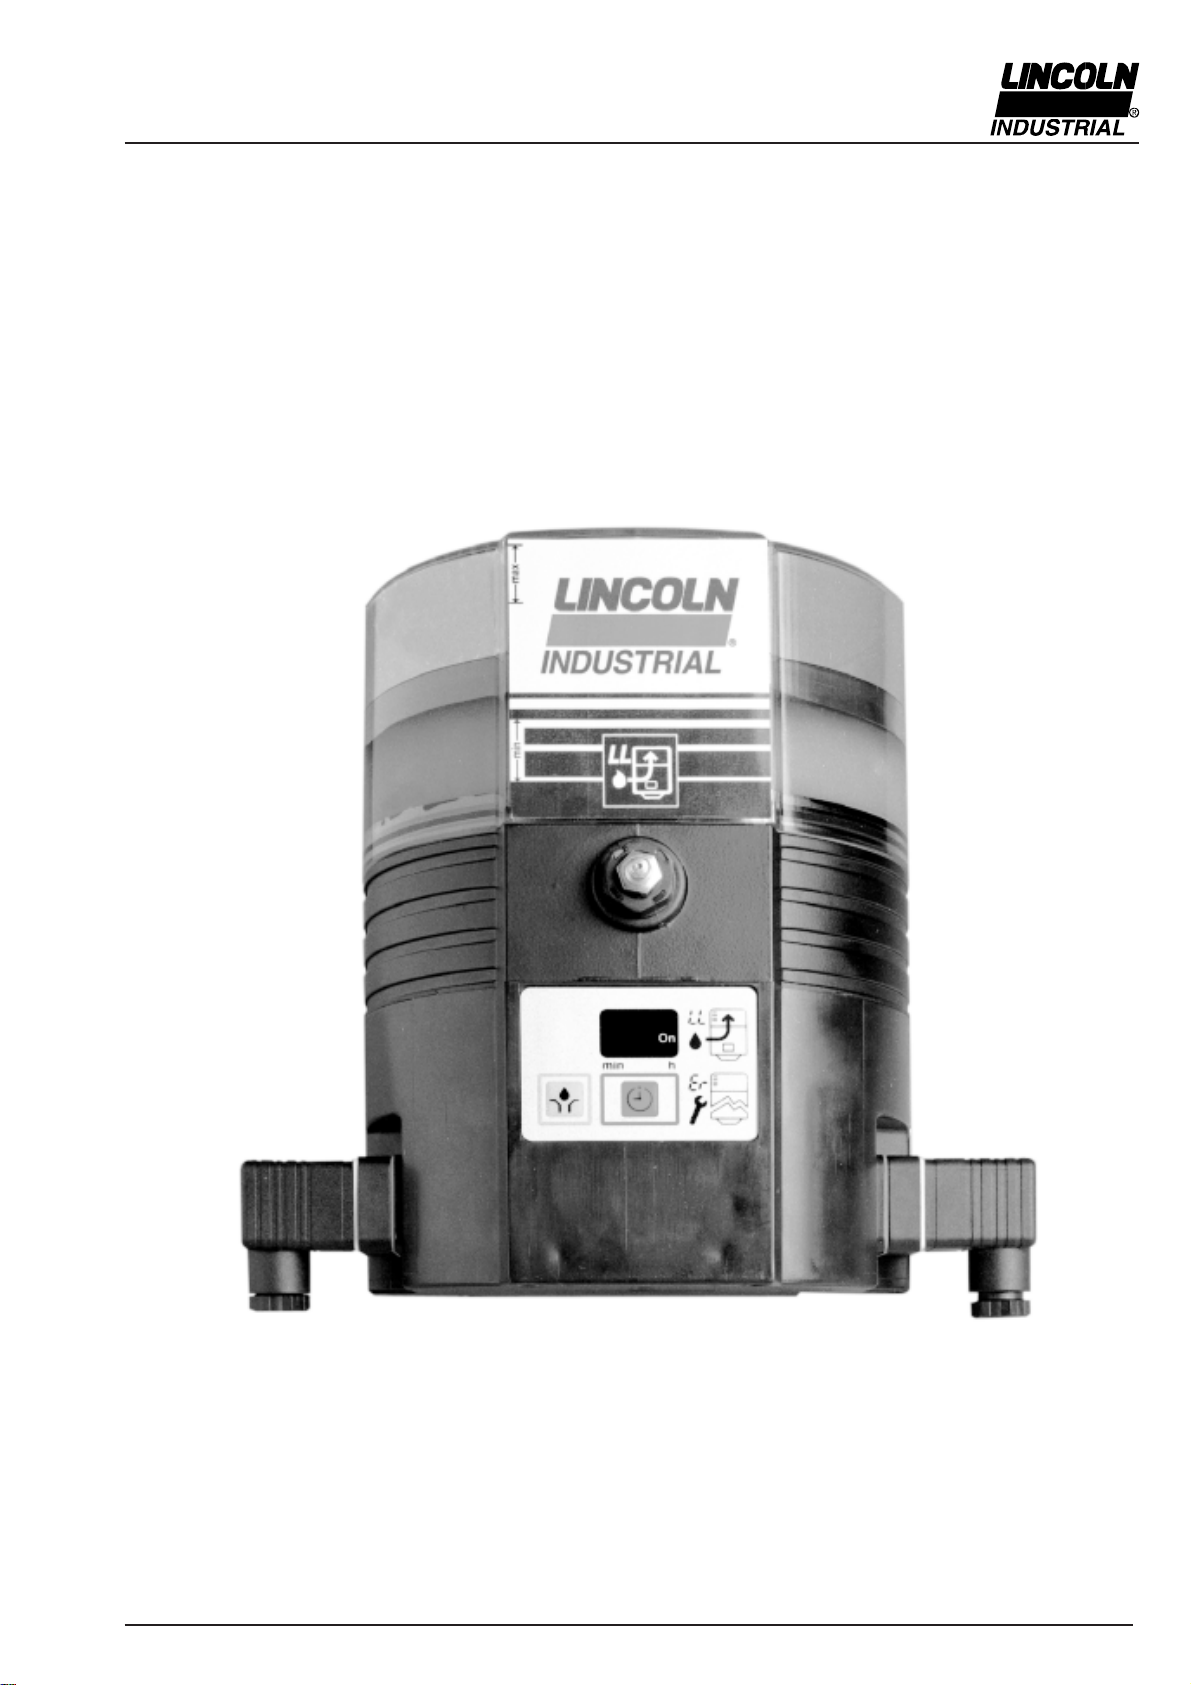
Lincoln industrial QLS 301 Owner's manual

QLS 301 Lubrication System
2.1A-380006-A99 April 1999 Form 402865 Section - Q3 Page - 9
QLS 301
InstallationandOperationInstructions
4197a99
810-55230-1

Page Number 2 of 24
QLS 301
Subject to modifications
2.1B-38006-A99 Form 402865
InstallationandOperationInstructions
Table of Contents
Safety Instructions ......................................................2
Installation Instructions...............................................3
Pump ............................................................................3
SSV Divider Block .........................................................3
Crossporting of the SSV Divider Block.........................3
Check valves .................................................................4
Feedback of supplied lubricant....................................4
Installing Zerk-Locks onto grease fittings ...................4
Connecting Feed Lines ................................................5
Filling of reservoir....................................................5
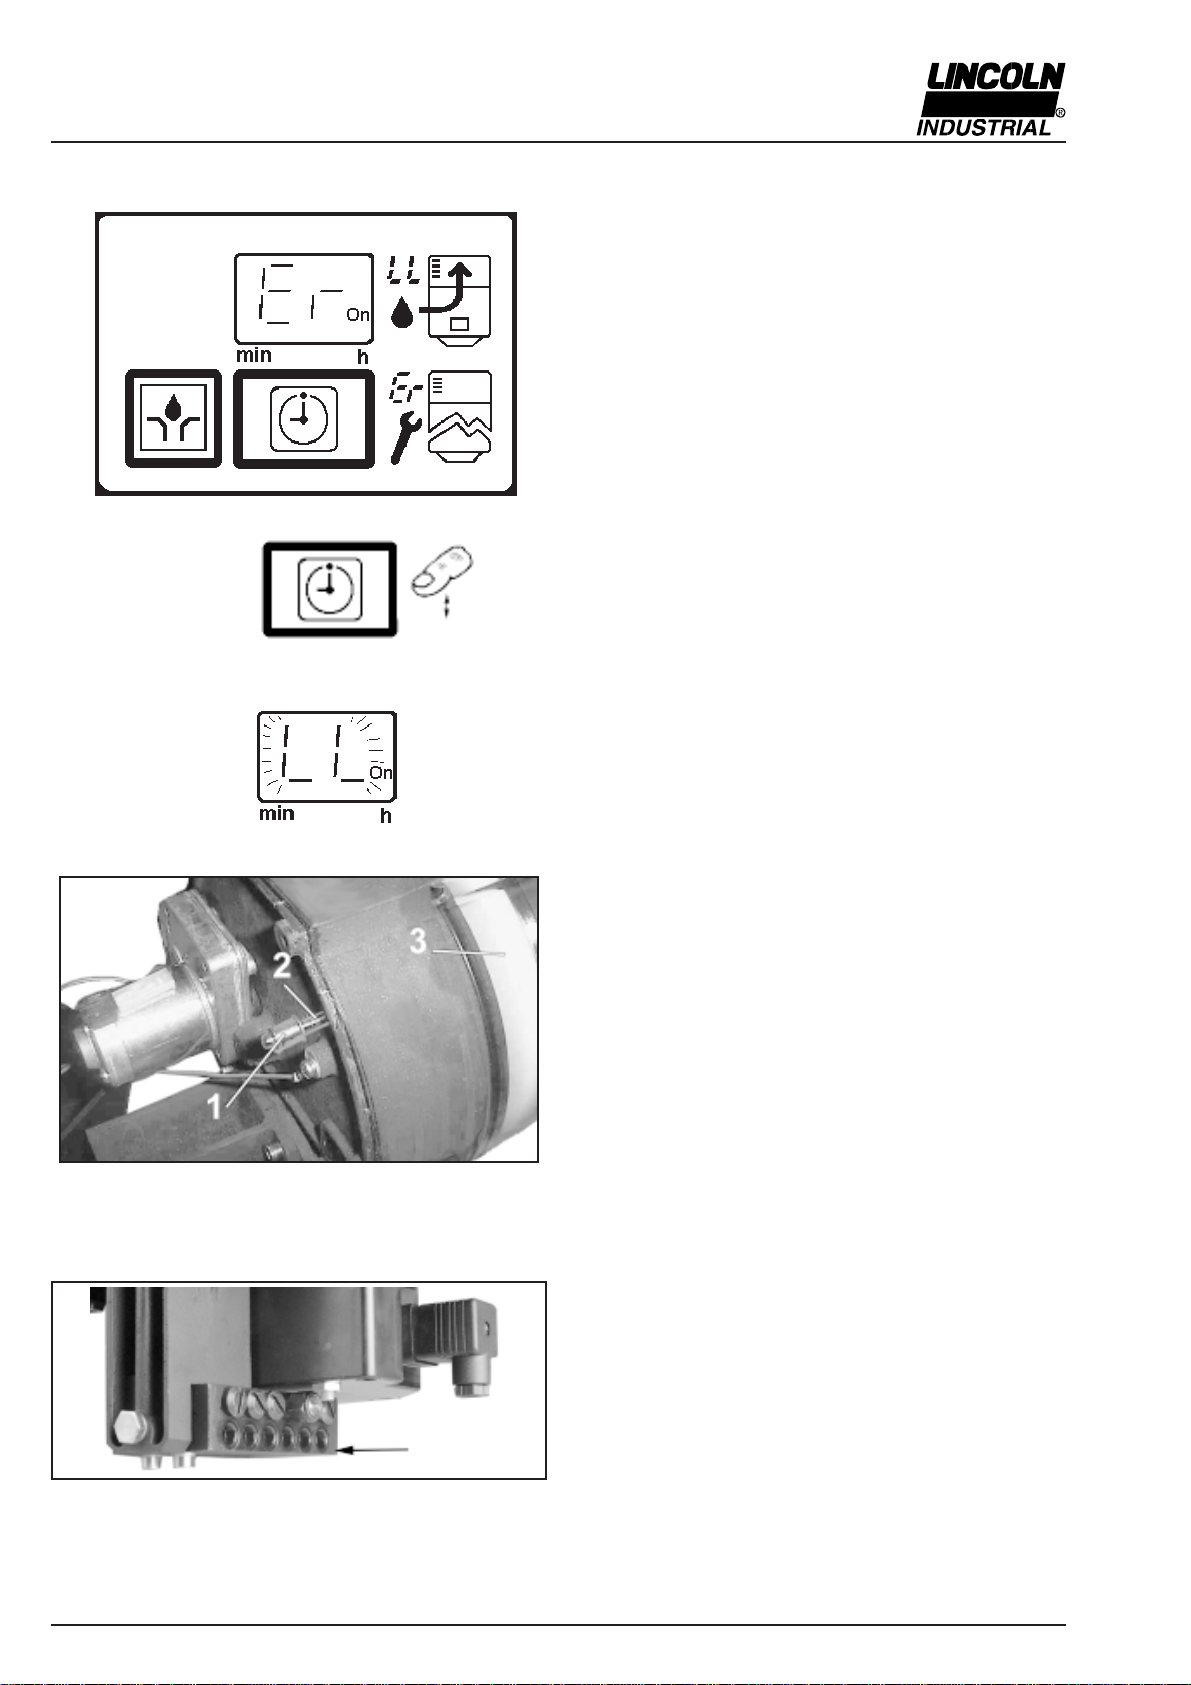
Setting of lubrication cycle time intervall ................5
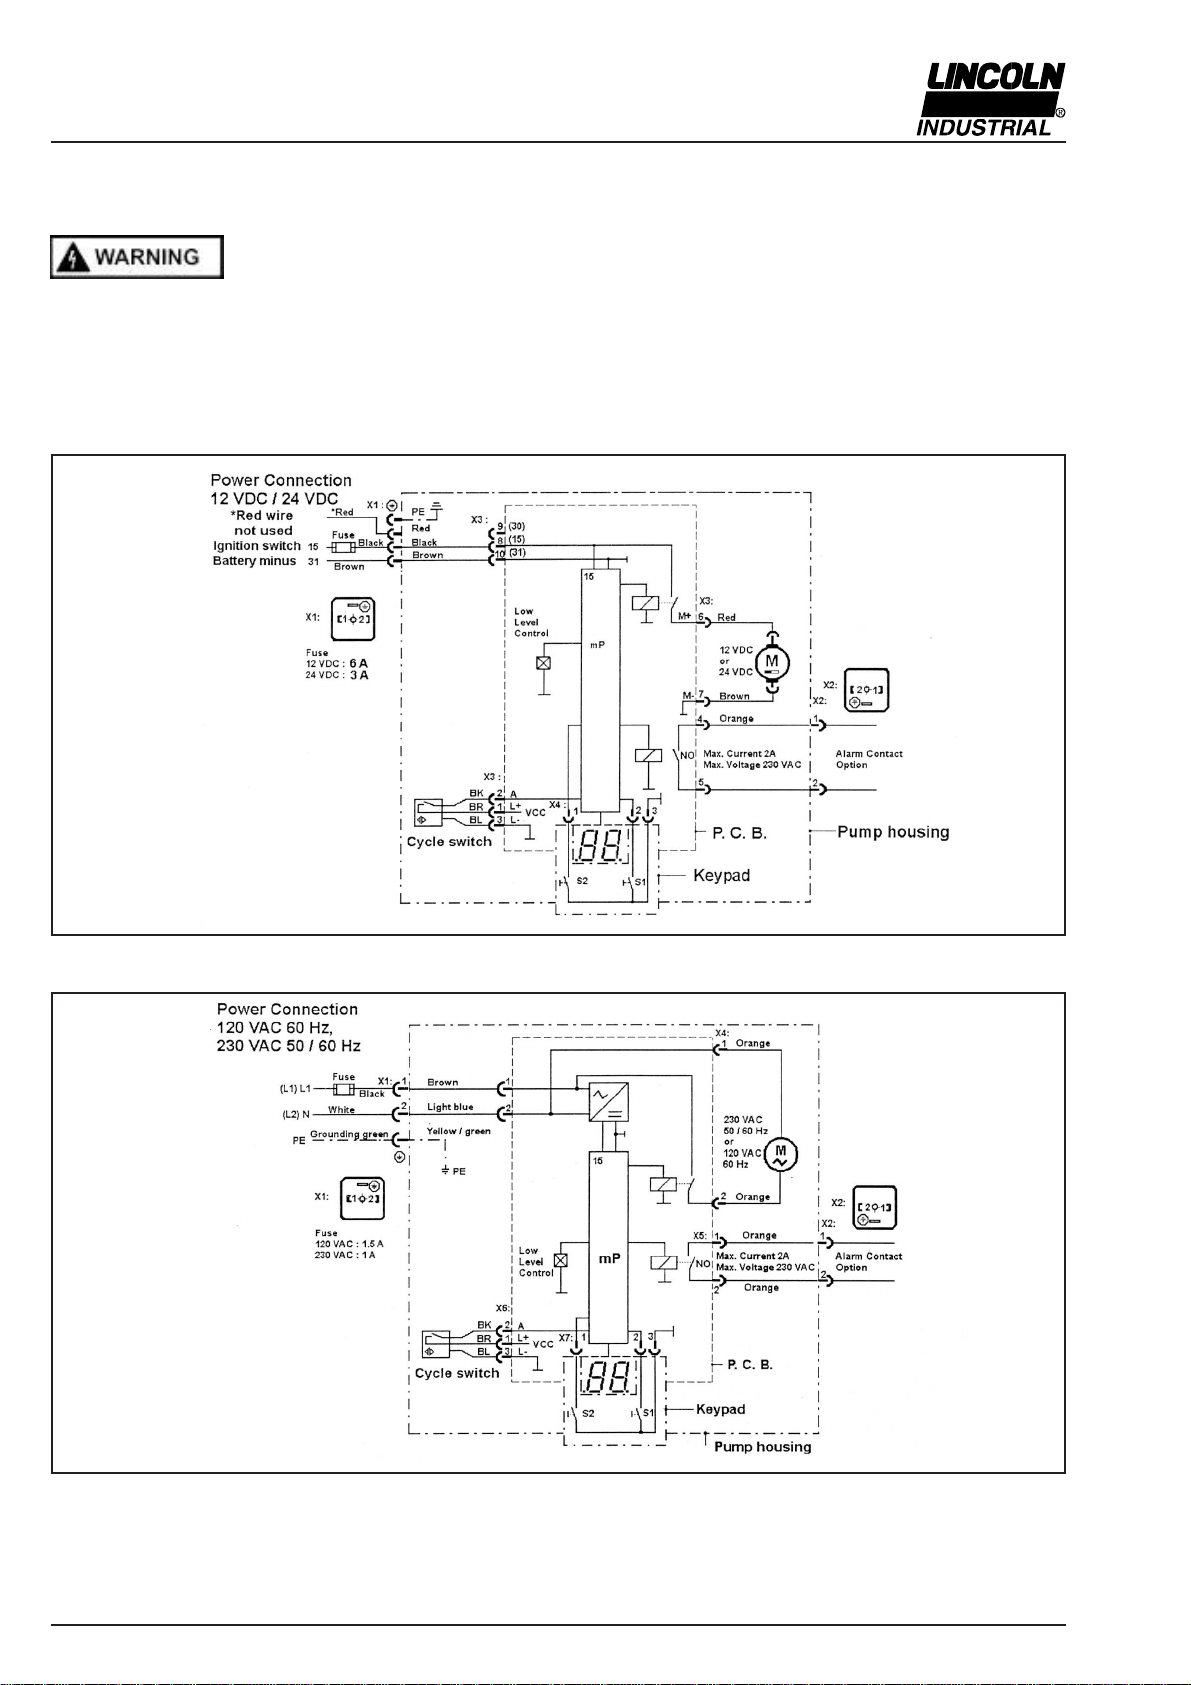
Electrical Connection Diagrams ..................................6
QLS 301Selection Guide ..............................................7
Description of QLS 301 ...............................................8
Operating of QLS 301 ..................................................8
Pressure relief valve .....................................................9
Pump Display Window ................................................. 9
Monitoring time/malfunction .........................................9
Acknowledging the malfunction............................10
Low-level control ...................................................10
Acknowledging the low level indication................10
Malfunction/low level indication ............................10
Monitoring relay ...........................................................10
Metering of the lubricant .............................................10
Setting and operation
of the QLS 301 ............................................................ 11
Display mode .............................................................. 11
Operating mode ..........................................................12
Programming mode ...................................................13
Maintenance, Repair and Test ..................................14
Maintenace..................................................................14
Refilling reservoir ..................................................14
Repair..........................................................................14
Functional Test ............................................................14
Troubleshooting .........................................................15
Technical Data ............................................................17
Dimensions ................................................................18
Service Part of the QLS 301......................................19
Manufacturer’s declaration .........................................24
Safety Instructions
Appropriate Use
• Use QLS 301 only for the delivery of lubricants. The pump
is designed for intermittent operation. QLS 301 is desi-
gned of supplying lubricant to a maximum of 18 lube
points per cycle.
• Do not use QLS 301 with SSV block in bottom mounting
position for mobile applications. Don’t install the pump
in areas exposed to shock.
General safety Instructions
• Do not over pressurize reservoir when filling the pump.
Refill QLS 301 pump with clean lubricant.
• Incorrect use may result in bearing damage caused by
poor or over-lubrication.
• Each outlet used must be equipped with an appropriate
check valve see page 4, Fig.3.
• Unauthorized modifications or changes to an installed
system are not recommended and will void warranty. Any
modifications must be subject to prior consultation with
the manufacturer of the QLS 301.
Regulations for prevention of accidents
• To prevent accidents, observe all city, state and federal
safety regulation of the country in which the product will
be used.
For pumps with 120 VAC and 230 VAC, switch off the power
supply before beginning maintenance or repair work.
• QLS 301 operates automatically. However, a regular
check (approximately every 2 weeks) should be made to
ensure that lubricant is being dispensed from all lubricant
points.
• Used or contaminated lubricants must be disposed of in
accordance with local environmental regulations, see
technical data sheets of lubricants.
• The manufacturer of the centralized lubrication system
will not accept any liability for:
- damage due to the use of greases which are not or are
only conditionally pumpable in centralized lubrication
systems.
- damage caused by insufficient lubricant and irregular
refilling of pump.
- damage caused by the use of contaminated lubricants.
- damage caused by inadequate disposal of used or
contaminated lubricants.
- damage caused by unauthorized modification of system
componenets.
- damage caused by the use of unapproved parts (voids
the pump warrenty).
Operation, Repair and Maintenace
• Repairs should only be performed by authorized
personnel who are familliar with the instructions.
Explanation of symbols:
= explanation
* = describes and action
- = listing within a section
• QLS 301 must only operate with mounted or connected
SSV divider blocks.
• Pump must be regularly refilled with clean lubricant.

Subject to modifications
Page Number 3 of 242.1B-38006-A99
QLS 301
Form 402865
InstallationandOperationInstructions
Installation
• Do not remove, modify or alter any safety equipment
already installed on the machine.
• QLS 301 pump must be kept away from the sources of
heat (see Operating Temperature Specification).
• Follow installation instructions of the OEM regarding
minimum distances between the drilled holes and
welding procedures.
• Use following recommendations to select an installation
location:
- Keep the feed lines as short as possible.
- Provide access to fill, clean and visually monitor the
pump operation.
• Installing QLS 301 pump with the reservoir upright is
perferred, but pump may be installed with the reservoir in
horizontal without affecting its operation.
• The QLS 301 may only be installed by qualified person-
nel. The connection (N/L/PE) of the supply voltage must
be made according to VDE 0100 and VDE 0160.
• Install a protective and lock out device for isolating and
disconnecting the QLS 301. Before beginning the instal-
lation work, disconnect the electrical supply .
• Failure to observe the safety instructions, e. g. touching
electrically charged parts when the system is opened, or
improper handling of the QLS 301 may cause serious
injury or death.
• If the values specified in the Technical Data are excee-
ded, the device may overheat. It may damage the QLS
301 and thus impair the electric safety.
InstallationInstructions
Pump • Use drilling template to mark and drill mounting holes of
the QLS 301. Drilling template and mounting bolts are
included in the package.
SSV Divider Block Crossporting of the SSV divider blocks
• The outlets of the SSV divider block can be combined to
increase the amount of lubricant for a particular outlet. To
do this, simply plug the unused outlets with the closure
plug (see Fig. 2), provided in the accessory kit.
• Lubricant from a plugged outlet is redirected to the next
outlet on the same side of the SSV divider block in
descending numerical order (see Fig.1). For instance
plugging outlets 5 and 3 will triple the amount of lubricant
at outlet 1.
•Do not plug outlet numbers 1 and 2 on SSV 8, 12 and 18
of pump models with SSV divider block installed on the
bottom.
Fig.1 - Single double and tripple lubricant output
x -Outlet quantity (single, double, etc.)
1... 10 Outlet numbers
A - Clamping ring (brass)
4163a98
Fig. 2 - Closure plug, provided in the accessory kits
* Install a closure plug in each outlet port hole which is not
required, see Fig. 1 or 4.
1014a99

Page Number 4 of 24
QLS 301
Subject to modifications
2.1B-38006-A99 Form 402865
InstallationandOperationInstructions
Installing Zerk-Locks onto grease fittings ( for inch size
accessory kits only)
• The Zerk-Lock fitting consists of the Zerk-Lock body,
insert and a Quicklinc fitting.
* Place the Zerk-Lock body over the grease fitting and place
the staking tool firmly against the Zerk-Lock insert.
(Staking tool is included in the accessory kits, see page
8).
* Strike the tool sharply with a hammer until the Zerk-Lock
insert partially crimps onto the grease fitting.
Fig. 5 - Place the Zerk-Lock
body over the grease fitting
Direct (internal) feedback feature
• All pumps with the back mouted SSV divider block,
starting from serial No. 998000100C/001 are assembled
with outlet 2 plugged for direct feedback capability. To
change the outlet 2 for bearing lubrication, replace
closure plug with check valve (Fig. 3).
• On all pumps with previous serial numbers, never close
outlet 1.
Fig. 4 - Internal feedback of supplied lubricant, only on back-
side mounted SSV divider blocks
Check valves
* Install one complete check valve in each outlet port hole
which will be used, see Fig. 1 and 4.
* For feedlines (dia. 6x1.5 mm, 1/4“ I.D., provided in the
accessory kits) use check valves with standard collar and
knurled flange.
Fig. 3 -Check valve, push-in type
4180a99
x -Outlet quantity (single, A - Clamping ring (brass)
double, etc.) R - Return line borehole
1... 10 Outlet numbers
Fig. 6 - Installation of Zerk-
Locks with staking tool
4201a99
4188b99
Note: To feed back unneeded lubricant quantities from bot-
tom - side mounted divider block to the reservoir, connect
unneeded outlet via feedline to plug 5 (Fig. 14) for external
return line.
Lubrication points
Installing Quicklinc fittings into lube points
(for metric size accessory kits only)
* Remove hydraulic lube fittings from lube points and
install appropriate Quicklinc-fittings into the bore holes of
the lube points.
4200a99
• All pumps with the back mouted SSV divider block,
starting from serial No. 998000100C/001 have the
cabability to feed back unused lubricant from closed
outlets directly to the reservoir internally (see R Fig. 4).
Note: The pumps with previous serial numbers have capabi-
lity to feed back the lubricant directly to the reservoir only
from even outlets. For instance on a SSV 6 devider block, the
outlets 2, 4, 6 are closed.
* To achieve this the outlet 2 should be closed with a
closure plug (see Fig. 2). For instance (see Fig. 4) the
lubricant from outlets 1, 2 and 4 will be internally feed
back to the reservoir, outlet 3 will have double amount
and outlet 6 will have single amout of lubricant.

Subject to modifications
Page Number 5 of 242.1B-38006-A99
QLS 301
Form 402865
InstallationandOperationInstructions
* Screw the Quicklinc fitting into the Zerk-Lock body and
tighten until parts resist further tightening, (about 1-1/2
turns).
• If the lines are not primed, prime all lubrication feed lines
before connecting them to the Zerk-Locks.
• Connect feed lines (dia. 6x1.5 mm, 1/4’’) from the check
valves directly to existing grease fittings using the Zerk-
Lock fittings included with the accessory kit.
Note: Push the end of the line firmly into the Quicklinc fitting
until it is fully seated in the body. The primed feed lines are
marked with white lines (Fig.8, 9) as an installation aid.
Fig. 7 - Screwing Quicklinc fitting into the Zerk-Lock body
Note: Quicklinc hex. is 12 mm. Zerk-Lock body hex is 1/2
’’
.
* Move the Zerk-Lock and tube fitting from side to side on
the grease fitting to insure the Zerk-Lock is firmly seated.
Fig. 9 - Feed line insert into the fitting up to the next white mark
4157a98
• Cut the pressure plastic tube off at one of the white lines
before it is mounted. Then insert the plastic pressure
tube into the fitting up to the next white mark. This will
ensure a correct installation of the pressure plastic tube
in the threaded tube fitting.
Connection of Feed Lines • Measure, cut and route the feedlines included in the kit.
Avoid sharp bends of the plastic tubing and the moving
parts of the machine that could damage the lubrication
lines. Minimum bending radius is 50 mm(2 in).
• Secure the lubrication lines to the machine using nylon
ties, clamps or straps provided in the accessory kit.
Fig. 8 Feed line installed in the Quicklinc fitting
* Cut the fed line off at one of the white lines before it is
mounted.
* Then insert the feed line into the fitting up to the next
white mark.
• This will ensure a correct installation of the feed line in
the tube fitting.
Filling of reservoir
* Fill the reservoir with clean suitable lubricant.
* Expel all air from under follow plate. Make sure that the
follower plate seal moves above the vent hole to ensure
that all air pockets are vented.
Fig. 10 - Vent hole on reservoir 4204a99 Setting of lubrication cycle time interval
* Set the lubrication cycle time interval (see page 13).
4203a99
4202a99
Other manuals for QLS 301
1
Table of contents
Other Lincoln industrial Lubrication System manuals

Lincoln industrial
Lincoln industrial AM 08 User manual

Lincoln industrial
Lincoln industrial Airless Spray System 85415 User manual

Lincoln industrial
Lincoln industrial B Series User manual

Lincoln industrial
Lincoln industrial QLS 301 Owner's manual

Lincoln industrial
Lincoln industrial VSG-KR User manual
Popular Lubrication System manuals by other brands

SKF
SKF UFD20 Series Assembly instructions

Groeneveld
Groeneveld Multiline AC Series installation manual

MATO
MATO eHybrid-Greaser 230V operating instructions

Timken
Timken M-Power 300 installation instructions

MEMOLUB
MEMOLUB HPS instructions

IMI
IMI norgren Micro-Fog L68C Installation & maintenance instructions