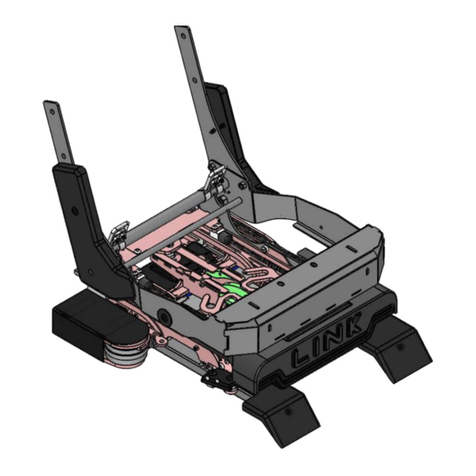
Link LK-TRV18PL User manual

LINK
INSTALLATION MANUAL
LK-TRV18PL
CHEVY TRAVERSE
2018 & UP
DRIVER FRONT
POWER SEAT

19
18
17
15
22
20 21
23 24
ITEM
PART NUMBER
QTY
DESCRIPTION
1
LK000L-01
1
Short Model LINK -Left-
2
LK-UNI-004L
1
004 Assembly Top Bearing Plate -Left-
3
LK-TER18L-03
1
Seat adapter - Left-
4
L-LK912
1
Communication Cable Support
5
PRD 339-136P
4
Socket Shoulder Screw Zinc Plated 3/8 x 1/2 x 5/16-18 THD
6
PRD 333-107
4
Nylon Insert Locknut 5/16-18
7
LK710B
1
Chain Covert -Black-
8
PRD 110-106
2
Round washer head tapping screw #8 x 3/4
9
LK750LB
1
Pivot Cover -Left- Black
10
LK730LB
1
Outside Cover -Left- Black
11
LK731LB
1
Intside Cover -Left- Black
12
PRD 251-177
4
Trim Panel Clip Ø1/4'' x 3/4'' Black
13
LK700B
1
Link Covert -Black-
14
LK720LB
1
Pivot Motor Cover -Left- Black
15
LK960
1
LINK Wired Control
6
LK-TRV18L-01
1
Floor Adapter - Left -
17
LK-ACA17L-02
1
Door Spacer Kit - Left -
18
LK-SILC14-04
2
Seat Fixing
19
LK-TRV18-07
1
Ventilated Seat Kit
20
LK-TRV18L-08
1
Power Seat Kit With Memory
21
LK-TER18-BK
1
Bolt Kit
22
LK-TRV18L-AB
1
Air Bag Kit -Left-
23
EW-CK-00
1
12V Power Supply Wiring Kit
24
LK-UNI-650
1
Manual Backup Tool Kit
LK-TRV18L
ADAPT SOLUTIONS
|[email protected]|866.641.0419|418.889.9838 fax
PART NUMBER
LINK Chevrolet Traverse 2018 & Up -Left-
DESCRIPTION
LINK CHEVROLET TRAVERSE 2018 & UP
1 of 4

14
13
12
9
11
8
7
6
10
10
15
2
1
16
4
3
5
ITEM
PART NUMBER
QTY
DESCRIPTION
1
LK000L-01
1
Short Model LINK -Left-
2
LK-UNI-304L
1
004 Top Bearing Plate -Left-
3
LK-UNI-404
1
404 Cam Pusher
4
LK-UNI-504L
1
504L Pusher Frame -Left-
5
PRD 333-107
1
Nylon Insert Locknut 5/16-18
6
PRD 192-141
1
Spring Tensions Pin 3/16 x 3/4
7
SN 681-129
1
Wave Disc Spring 0.325 id x 0.546 od x 0.007 thickness
8
SN 654-006
1
Nylon Spacer id .317" od .500"
9
PRD 339-116P
1
Socket Shoulder Screw Zinc Plated 5/16 x 1/2 x 1/4-20 THD
10
PRD 337-213P
3
Button head socket cap screw Zinc Plated 5/16-18 x 3/4
11
SN 654-007
1
Nylon Spacer id .375" od .625"
12
PRD 339-135P
1
Socket Shoulder Screw Zinc Plated 3/8 x 3/8 x 5/16-18 THD
13
PRD 192-151
1
Spring Tension Pin 1/4 x 3/4
14
PRD 192-135
1
Spring Tension Pin 5/32 x 3/4
15
PRD 192-309
1
Spiral Spring Tensions Pin 3/16 x 3/4
16
LK750LB
1
Pivot Cover -Left- Black
LK-TRV18L
ADAPT SOLUTIONS
|[email protected]|866.641.0419|418.889.9838 fax
PART NUMBER
LINK Chevrolet Traverse 2018 & Up -Left-
DESCRIPTION
LINK CHEVROLET TRAVERSE 2018 & UP
2 of 4

3 4
5
1
2
ITEM
PART NUMBER
QTY
DESCRIPTION
1
LK-TRV18L-01
1
Floor Adapter - Left -
2
PRD 22136
1
Flat Socket Cap Screw M10-1.50 x 40mm G10.9
3
PRD 332-164P
4
Socket Head Cap Screw Zinc Plated 3/8-16 x 7/8
4
PRD 332-166P
4
Socket Head Cap Screw Zinc Plated 3/8-16 x 1 1/4
5
LK720LB
1
Pivot Motor Cover -Left- Black
LK-TRV18L
ADAPT SOLUTIONS
|[email protected]|866.641.0419|418.889.9838 fax
PART NUMBER
LINK Chevrolet Traverse 2018 & Up -Left-
DESCRIPTION
LINK CHEVROLET TRAVERSE 2018 & UP
3 of 4

15
1
15
13 12
3141210
4
11
9
10
3
11
3
4
4
84
3
2
7
65
1617
18
L-LK912
ITEM
PART NUMBER
QTY
DESCRIPTION
1
LK-TER18L-03
1
Seat adapter - Left-
2
L-LK912
1
Communication Cable Support
3
PRD 339-136P
4
Socket Shoulder Screw Zinc Plated 3/8 x 1/2 x 5/16-18 THD
4
PRD 333-107
4
Nylon Insert Locknut 5/16-18
5
LK730LB
1
Outside Cover -Left- Black
6
LK731LB
1
Intside Cover -Left- Black
7
PRD 251-177
4
Trim Panel Clip Ø1/4'' x 3/4'' Black
8
LK-SILC14-04
2
Seat Fixing
9
PRD 130-108
4
Slotted Hexagon Washer Head Tapping Screw #8 x 1/2
10
PRD 339-167P
2
Socket Shoulder Screw Zinc 1/2 x 1 x 3/8-16 THD
11
PRD 333-108
2
Nylon Insert Locknut 3/8-16
12
PRD 341-108P
2
Flat Washer Zinc Plated I.D. 3/8 USS
13
PRD 303-222P
1
Hex Cap Bolt Zinc Plated 7/16-20 x 1 G5
14
PRD 303-226P
1
Hex Cap Bolt Zinc Plated 7/16-20 x 1½ G5
15
PRD 110-104
3
Round washer head tapping screw #8 x 1/2
16
LK710B
1
Chain Covert -Black-
17
PRD 110-106
2
Round washer head tapping screw #8 x 3/4
18
LK700B
1
Link Covert -Black-
LK-TRV18L
ADAPT SOLUTIONS
|[email protected]|866.641.0419|418.889.9838 fax
PART NUMBER
LINK Chevrolet Traverse 2018 & Up -Left-
DESCRIPTION
LINK CHEVROLET TRAVERSE 2018 & UP
4 of 4

*ESTIMATED he ig ht a nd insta lla tio n time (b a se mo d e l).
HIG HER TRIM LEVELS REQ UIRED A DDITIO NA LINSTA LLA TIO N TIME.
ADAPT SOLUTIONS
05-2020
LINK REFERENCES
LK- TRV18L
Se a t he ig ht: 3” hig he r tha n O EM lo we st (3” a d justa b le se a t)
*Tra nsfe r he ig ht: 19”|A ve ra g e insta ll: 10- 14 hrs.
O EM shro ud s must b e trim me d .
Se a t a djustm e nts| FRO NT: 1¼ ”le ss tha n O EM| BAC K: ½”mo re tha n O EM
Lo we r B p illa rshro ud ne e d s to b e c ut|STENCIL PRO VIDED.
O EM wire ha rne ss m ust b e c ut a nd e xte nd e d unde r se a t.
Ple ase sp e c ify if e q uipp e d with ve nte d se at. (add . p arts & tim e )
Adapt Solutions’ signature TALL programing NO TAVAILABLE.
Ava ila b le fo r mo d e l with PO WER SEA TS O NLY
O EM wire ha rne ss m ust be c ut a nd e xte nde d unde r se a t.
O EM shro uds m ust b e trimm e d .
Lo we r B pilla r shro ud ne e ds to be c ut| STENC IL PRO VIDED.

LINK Chevy Traverse/Buick Enclave 2018 & up |Driver front (Power Seat) p. 2
WARNINGS
PLEASE REVIEW BEFORE STARTING THE INSTALLATION
Look through the entire manual to understand the installation process.
Watch the tutorial videos that are found on the tablet.
During the installation use the ‘BYPASS’ mode to move the LINK.
Do not use the pendant or ‘PENDANT’ mode until you have reset the home position.
The LINK is designed to ALWAYS use the original seat. The biggest challenge this will present for the installer will
be extending the vehicle’s original seat wire harness, as this MUST be done. The general process does not vary, but
the exact steps will vary due to the trim level, the model and seat options from the vehicle manufacturer. Keeping
this in mind, we have made an effort to clearly describe the process required in this manual. However, it is possible
that the pictures in this manual do not match exactly the specific vehicle you are working on.
SEAT WIRING EXTENSION PROCESS
The wiring must be extended 80 inches. This extension is placed near the seat connectors that are under the seat.
The extension (80 inches) then passes under the LINK and loops around the back of the OEM seat –allowing the
seat and the LINK to travel in and out of the vehicle. Depending on the make, model and seat options, there are
components that must be disconnected, bypassed and/or relocated. On vehicle models with a seat position memory
function, the forward/backward, tilt and height adjustments as well as seat memory are replaced by the LINK.
However, the seat recline function is retained. (EXAMPLE: In the Ford F150, 2009-2014 model; the seat height, tilt,
forward and backward adjustment motors are disconnected and removed with the seat frame, but the recline motor
is retained. The control and memory box are relocated to the floor under the seat, next to the seat connectors. The
seat position sensor is also relocated to the floor under the seat. The wiring harness is then extended from this point
under the seat.)
PLEASE NOTE: If the ignition is turned on while extending a wire harness that includes airbags, this may cause the
airbag light to stay on following the installation.
ADAPT SOLUTIONS CANNOT BE HELD RESPONSIBLE FOR FAULTY WIRE EXTENSIONS.
Please use caution during the installation.
ANDROID TABLET –LINK I.T. SOFTWARE
If this is your first installation of a LINK, you will have also purchased an Android tablet that is required for the
installation and maintenance of the LINK product. This tablet will have the LINK IT software already installed. We
have prepared quick, easy and to the point tutorial videos imbedded into the software. Take a moment and watch
the video that shows all the features of the tablet. To do this, open the LINK IT app and tap on ‘INFO’. Make sure
your volume is turned up and tap on App-101. The video will start automatically.
REDUCED POWER MODE
A safeguard is integrated in the LINK system. Following any changes to the preset or sequence of the LINK, the
unit will enter a reduced power mode. This is to allow you to visually inspect the movements of the LINK to ensure
it is not damaging the vehicle or itself during its first cycle. On the tablet, a yellow bar will appear at the top of the
screen to indicate you are in reduced power mode. To exit, simply run the LINK a full cycle. NOTE:It is possible that
the LINK will stop during this cycle as power is reduced. Visually confirm nothing is impeding the movements and
then simply press the IN or OUT button again to continue the cycle. During the installation, if the 12V power is
removed and replaced at the same time as the 9V battery (LINK memory back up) is unplugged or fully drained, the
LINK will enter reduced power mode. Simply run a full cycle to exit. PLEASE NOTE: You will find an explanation of
this mode on a YELLOW tag attached to the hand pendant. Please explain the functions of the reduced power mode
to the LINK user (your client).
For technical support call 866.641.0419 or email tech@adaptsolutions.com
Please have the serial number of the unit on hand before placing your call.

LINK Chevy Traverse/Buick Enclave 2018 & up |Driver front (Power Seat) p. 3
BEFORE STARTING THE INSTALLATION:
Make sure the steering wheel adjustment is fully UP and IN to allow maximum clearance for the driver seat. When
installing the LINK with hand controls, we strongly suggest that the hand controls be installed after the LINK.
1. Remove the driver side OEM seat and place it on a workbench or table. In the next few steps, you will be taking
apart much of the seat. You may wish to take your own pictures and notes to help you reassemble it. Start by
removing the four OEM seat bolts keeping for reinstallation of the LINK floor adapter later. After, disconnect
the seat belt from the seat belt pre-tensioner and then unplug the seat wiring floor connector.

LINK Chevy Traverse/Buick Enclave 2018 & up |Driver front (Power Seat) p. 4
2. Unhook the elastic bands holding the fabric flap in place.
3. Remove the left-hand side seat trim over the seatbelt pretensioner. Then unplug and remove the seatbelt
pretensioner.

LINK Chevy Traverse/Buick Enclave 2018 & up |Driver front (Power Seat) p. 5
4. Detach left-hand side trim that holds the power seat controls. Remove the wiring clips near the power seat
controls and then remove the two power-seat switch housings from the trim. Unplug the lumbar adjustment
and power seat controls.
5. Unplug the connecter for the seat height adjustment motor and remove the wiring clip.
6. Remove the right-hand side seat trim by removing the two screws and carefully prying it free.

LINK Chevy Traverse/Buick Enclave 2018 & up |Driver front (Power Seat) p. 6
7. Now unplug and remove the seatbelt receiver. Then unplug the seat cushion connector.
8. Remove the seat cushion, seat fan ducting and the seat-cushion support frame.

LINK Chevy Traverse/Buick Enclave 2018 & up |Driver front (Power Seat) p. 7
9. Tilt the seat up and unplug the rest of the wiring connectors.
10. Remove the screw from the back of the seat trim support, then unbolt the seatback on both sides to remove the
seat back. Note: there are no connectors for the wiring into the seat back and the wiring will follow the seat back.
11. Remove the interior plastic trims at the rear of the seat base.

LINK Chevy Traverse/Buick Enclave 2018 & up |Driver front (Power Seat) p. 8
12. Remove the three bolts holding the control box to the seat pan and then remove the control box. Remove the
screws from the seat pan, and the bolts at the back with the plastic clips. Remove the seat pan.
13. Remove the control box from its bracket.

LINK Chevy Traverse/Buick Enclave 2018 & up |Driver front (Power Seat) p. 9
14. The wiring harness extension can now be made using the provided multibrand cable. Extend the OEM wire
harness with the provided connectors and 18-gauge multi-strand extension. Start the extension six (6) inches from
the floor connector. For best results, extend one wire at a time. Test continuity of each wire through the
extension to avoid errors. (If you wish to keep a record of your wire extensions for reference, you will find a lined
sheet at the very end of this manual for that purpose.)
WIRING BEFORE EXTENTION
LK-TRV18L

LINK Chevy Traverse/Buick Enclave 2018 & up |Driver front (Power Seat) p. 10
WIRING EXTENTION

LINK Chevy Traverse/Buick Enclave 2018 & up |Driver front (Power Seat) p. 11

LINK Chevy Traverse/Buick Enclave 2018 & up |Driver front (Power Seat) p. 12
15. Run the power from the battery to the LINK. To do this, thread the red power cable (+) under the doorstep
moulding and through the firewall. Make sure you pass through a grommet in the firewall to prevent the cable
from chaffing. Install the circuit breaker near the battery and then connect the battery to the circuit breaker.
Attach the black ground wire (-) to the vehicle’s frame, under the doorstep moulding using a self-tapping screw.
Locate a spot where the sheet metal is doubled-up to ensure a proper ground.

LINK Chevy Traverse/Buick Enclave 2018 & up |Driver front (Power Seat) p. 13
16. Unzip and peel back the fabric flap on the seatback and then relocate the seat control box in to the seatback. Be
careful to avoid the lumbar support adjustment if present. Reconnect the control box and seat back connectors.
Secure the cables with zips ties and route the connectors for the seat adjustment switches out the bottom left
corner of the seatback along with the wiring extension. Also, run the seat belt, seat belt pre-tensioner, seat fan,
heated seat connectors out of the back of the seat to the locations where they will be reconnected. Close the
seatback.

LINK Chevy Traverse/Buick Enclave 2018 & up |Driver front (Power Seat) p. 14
17. Remove the LINK from the shipping box and set it on a table or workbench. Connect auxiliary 12V power to the
LINK. The LINK will ‘beep’ during the installation. (See LINK Audible Warnings chart for further references.)
18. Next, connect the LINK to the Android tablet via Bluetooth. Connect the Bluetooth module (small, blue and
white, 4-pronged connector) to the LINK pendant plug. Make sure the tablet and LINK are connected. (Detailed
explanations are found in the video tutorial, under INFO.) Using the LINK IT application, open ‘BYPASS’. Press
the ‘PIVOT OUTWARD’ button to move the LINK out just enough to see the eight (8) bolt holes.

LINK Chevy Traverse/Buick Enclave 2018 & up |Driver front (Power Seat) p. 15
19. The seat fan must be modified so it can be reinstalled to the LINK. Start by detaching the OEM fan from the fan
ducting. Now remove the fan from the seat cushion support. Remove the fan from its casing by removing the
four screws and a wiring support clip.
Table of contents
Other Link Automobile Accessories manuals

Link
Link LK-EXL11R User manual

Link
Link G5 VOODOO PRO User manual

Link
Link LK-RAV19R User manual

Link
Link 60K AIR LINK User manual

Link
Link LK-JOU08R User manual

Link
Link LK-F150C09L User manual

Link
Link LK-F250C11R User manual

Link
Link LK-WRG18L User manual

Link
Link DD2000-XLC Manual

Link
Link LK-SILX07R User manual
Popular Automobile Accessories manuals by other brands

ULTIMATE SPEED
ULTIMATE SPEED 279746 Assembly and Safety Advice

SSV Works
SSV Works DF-F65 manual

ULTIMATE SPEED
ULTIMATE SPEED CARBON Assembly and Safety Advice

Witter
Witter F174 Fitting instructions

WeatherTech
WeatherTech No-Drill installation instructions

TAUBENREUTHER
TAUBENREUTHER 1-336050 Installation instruction