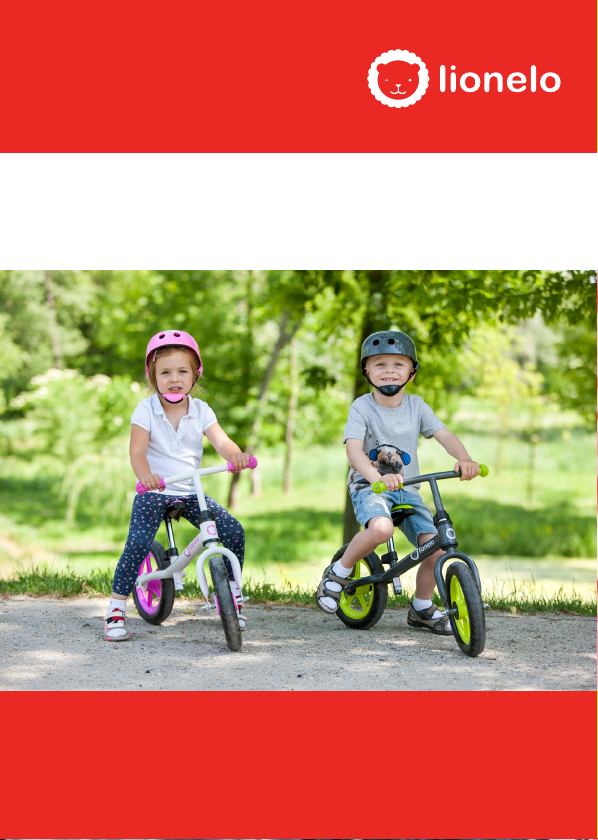
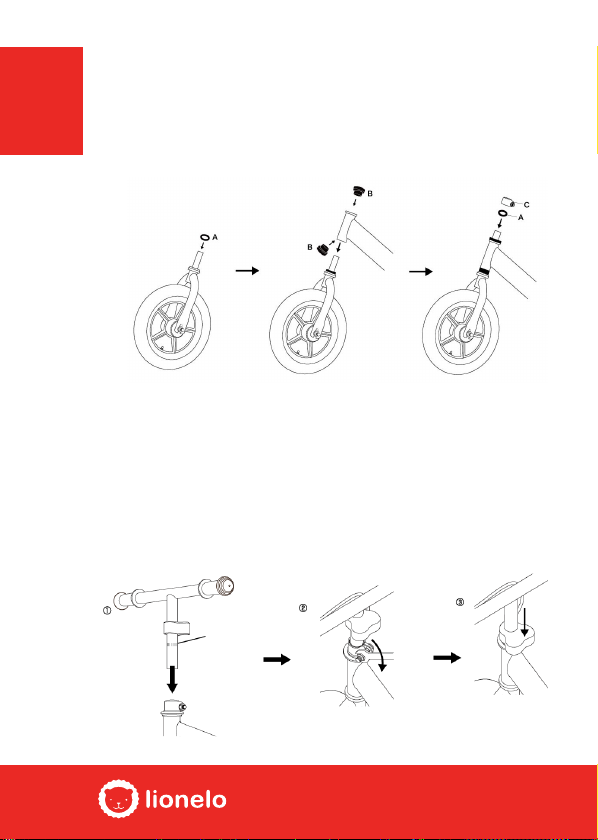
Lionelo FIN PLUS User manual

1
FIN PLUS
Instrukcja obsługi
User manual
WWW.LIONELO.COM
rowerek biegowy
balance bike


WWW.LIONELO.COM 2

PL
33
Wstęp
Drogi Kliencie!
Dziękujemy za obdarzenie nas zaufaniem i wybranie marki
Lionelo.
Nasze produkty wykonywane są z największą starannością,
by zapewnić Twojemu dziecku komfort korzystania, równo-
cześnie dbając o jego bezpieczeństwo. Dzięki wykorzysta-
niu wysokiej jakości materiałów i nowoczesnych rozwiązań
technologicznych oddajemy w Twoje ręce produkt idealny do
codziennego użytkowania.
Przed użyciem produktu zapoznaj się dokładnie
z poniższą instrukcją obsługi.
Produkt był testowany i jest zgodny z normami:
EN71-1:2014; EN71-2:2011+A1:2014; EN71-3:2013+A1:2014
Jeśli masz jakiekolwiek uwagi lub pytania do zakupionego
produktu, skontaktuj się z nami:
pomoctechniczna@lionelo.com

PL
44
Instrukcja obsługi
Uwaga: Montaż musi być przeprowadzony przez osobę dorosłą.
Niezastosowanie się do tych ostrzeżeń i instrukcji montażu
może spowodować poważne obrażenia lub śmierć.
Środki ostrożności:
• Zabawka przeznaczona do użytku na powierzchni płaskiej
i bez przeszkód. Nigdy nie należy używać w pobliżu scho-
dów, skośnych podjazdów, pojazdów silnikowych, wzgórz,
powierzchni mokrej, piaskowej i żwirowej, alejek, dróg
publicznych, basenów lub obszarów, w których może istnieć
prawdopodobieństwo ruchu i inne zagrożenia dla dziecka.
• Upewnij się, że twoje dziecko nosi solidne, pełne buty oraz odpo-
wiednio dostosowany kask i inne ochraniacze. Upewnij się,
że buty są prawidłowo zamocowane.Nie pozwalaj na używanie
rowerku więcej niż jednej osobie.
• Nie pozwalaj na używanie rowerku więcej niż jednej osobie.
• Upewnij się, że Twoje dziecko jest fizycznie w stanie
kontrolować rower i że rozumie, jak zwolnić i zatrzymać
się. Zawsze utrzymuj dziecko w zasięgu wzroku.
• Przed każdą jazdą należy sprawdzić czy rowerek nie jest
uszkodzony, nie ma luźnych lub brakujących części. Upewnij
się, że wszystkie śruby i szybkozłączki są prawidłowo dokręco-
ne i czy komponenty są dobrze zamocowane. NIE używaj tego
produktu, jeśli brakuje jakiejś części lub jest uszkodzona bądź
zerwana. NIE zastępować części zamiennikami.

PL
5
• Niezmontowany rower i dostarczone opakowanie zawie-
ra niewielkie części i plastikowe torby, które są niebez-
pieczne dla małych dzieci - trzymaj je w miejscu niedo-
stępnym dla dzieci. Wszelkie plastikowe worki i inne
materiały z opakowań należy zutylizować.
• Odpowiedni dla dzieci w wieku: 2 - 6 lat.
• Maksymalna waga obciążenia: 27kg.
• Zachowaj tą instrukcje do późniejszego wykorzystania.
Czyszczenie:
Produkt wymaga regularnej konserwacji. Czyszczenie i konser-
wacja rowerku musi być wykonywana wyłącznie przez osobę
dorosłą.
Konserwacja:
Smarować ruchome części tylko wtedy, gdy jest to koniecz-
ne z zastosowaniem smaru na bazie silikonu. Okresowo
sprawdzić dokręcenie śrub i pozostałych części. Wymie-
nić lub naprawić części, tylko gdy zachodzi taka potrzeba.
Używaj tylko certykowanych części zamiennych. Aby unik-
nąć tarcia, które może uniemożliwić prawidłowe działanie
rowerka, upewnić się, że wszystkie ruchome części plastiko-
we umieszczone wzdłuż metalowej ramy są czyste od kurzu,
brudu lub piasku. Rower należy przechowywać w suchym
miejscu. Długotrwałe narażenie na bezpośrednie działanie
promieni słonecznych może spowodować odkształcenie
części z tworzyw sztucznych.

PL
6
Schemat montażu:
kierownica
siodełko
linia bezpieczeństwa
linia
bezpieczeństwa
rama
przednie widełki
koło
tylne
koło
przednie
podkładka podkładki
plastikowe
zacisk osłona
zacisku
klucz

PL
7
Instalacja widełek:
Nałóż podkładkę A na trzpień widełek. Nałożyć podkładki
plastikowe B, na prowadnice widełek w ramie. Nałożyć ramę
na trzpień widełek. Następnie nałożyć podkładkę i zacisk.
Postępuj jak na poniższym rysunku.
Instalacja i regulacja kierownicy:
Nałóż na trzpień kierownicy osłonę zacisku. Włóż kierownicę
w uchwyt ramy. Ustaw kierownicę, aby była prostopadle do przed-
niego koła. WAŻNE! UPEWNIJ SIĘ, że linia bezpieczeństwa
na kierownicy, jest poniżej górnej części uchwytu ramy. Dokręcić
śrubę na zacisku, aby usztywnić kierownicę. Upewnij się że kierow-
nica została poprawnie i mocno dokręcona. Nałóż osłonę na zacisk.

PL
8
Instalacja koła:
Włóż koło wewnątrz widełek. Nałóż podkładki na śrubę i dokręć
nakrętki, upewnij się, że koła są prawidłowo zainstalowane.
Instalacja i regulacja siodełka:
Włóż siodełko do rury pod siodłowej ramy.
WAŻNE! UPEWNIJ SIĘ, że znak MINIMAL na rurce siodeł-
ka JEST PONIŻEJ górnej części rury pod siodłowej ramy.
Dokręcić śrubę na opasce, aby usztywnić siodełko. Upewnij
się, że siodełko zostało poprawnie i mocno dokręcone.
Zdjęcia mają charakter poglądowy, rzeczywisty wygląd produktów może różnić
się od prezentowanego na zdjęciach.

9
EN
Introduction
Dear Customer!
Thank you for the bestowal of trust in us and choosing the
brand Lionelo.
Our child restraint systems are made with the utmost care
to ensure comfortable journeys and, above all, maximum
safety of your child. Implementation of high quality mate-
rials and modern technologies allows us to provide users
with a product that is perfectly suited for everyday use.
The product has been tested and meets all the requirements
of the following standards:
EN71-1:2014; EN71-2:2011+A1:2014; EN71-3:2013+A1:2014
Before using the product, please read the included
user manual carefully.
In case of any questions or comments on the purchased
product, please contact us:
pomoctechniczna@lionelo.com

10
EN
User manual
Note: The assembly of the product must be performed by an adult.
Failure to comply with this provision and the assembly instruc-
tions could result in serious injury or even death.
Precautions:
• Use the toy on a flat surface in the area free from any
obstacles. Do not use this bike near stairs, sloping drive-
ways, motor vehicles, hills, swimming pools, on wet, sandy
or gravel surfaces, alleys, public roads or areas with the like-
lihood of trafc and other hazards to a child.
• Make sure your child wears solid boots, proper helmet and other
pads. Make sure their boots are properly laced.
• Do not allow to use the bike by more than one person at
the same time.
• Make sure your child is physically able to control the bike, and
they know how to slow down and stop. Always keep the child
in sight.
• Before each use, please make sure the bike is not damaged
and has no loose or missing parts. Ensure that all the screws
and connectors have been properly tightened and all parts of
the bike are secured well. DO NOT use this product if any part
is missing, damaged or broken. DO NOT substitute any parts
with replacements.

11
EN
• Both the not assembled bike and shipping box contain
small parts and plastic bags that are dangerous for small
children - keep them out of their reach. All plastic bags
and other packing materials must be disposed of.
• Suitable for children aged: 2 - 6.
• Maximum weight: 27kg.
• Please keep this user manual for future reference.
Cleaning:
The product requires regular maintenance. Cleaning and main-
tenance of the bike must be performed by an adult only.
Maintenance:
Oil the moving parts only when it is necessary using sili-
cone-based grease. Check tightness of bolts and other parts
periodically. Replace or repair the parts of the bike only when
it is needed. Always use recommended spare parts only. In
order to avoid friction that can lead to incorrect operation
of a bicycle, make sure that all plastic moving parts along
the metal frame are clean of dust, dirt and sand. The bike
should be stored in a dry place. Prolonged exposure to direct
sunlight can cause deformation of plastic parts.

12
EN
Assembly diagram:
Handlebar
Saddle
Safety line
Safety
line
Frame
Front fork
Rear
wheel
Front
wheel
Shim Plastic
shims
Clamp Clamp
cover
Wrench

13
EN
Fork installation:
Place the A shim on the fork’s stem. Put the plastic shims
(B) onto the fork socket of a frame. Place the frame on the
fork’s stem. Then, apply the shim and the clamp. Follow the
steps shown in the picture below.
Handlebar installation / adjustment :
Place the clamp cover onto the handlebar’s stem. Insert the handle-
bar into the frame clamp. Turn the handlebar so that it is perpendic-
ular to the front wheel. IMPORTANT! MAKE SURE the safety line
mark on the handlebar is below the upper part of the frame’s clamp.
Tighten the clamp screw in order to secure the handlebar. Make sure
the handlebar has been properly installed. Put the cover on the clamp.

14
EN
Wheel installation:
Insert the wheel inside the fork. Place the shims on the screw
and tighten them. Make sure both wheels are properly installed.
Saddle installation / adjustment:
Place the clamp cover onto the handlebar’s stem. Insert the
saddle into the saddle-tube of the frame. IMPORTANT! MAKE
SURE the safety line mark on the saddle tube is BELOW
the upper part of the saddle-tube of the frame. Tighten the
clamp screw in order to secure the saddle. Make sure the
saddle has been properly installed. Put the cover on the clamp.
The pictures in this manual are for illustrative purposes only. Therefore, they may
differ from the actual product.

15
Einleitung
Sehr geehrte Kunden!
Wir bedanken uns für Ihr Vertrauen und Auswahl der Marke
Lionelo.
Unsere Produkte werden mit äußerster Sorgfalt hergestellt,
um Ihrem Kind einen Nutzungskomfort bei gleichzeitiger
Sorge um seine Sicherheit zu gewähren. Dank den hochwer-
tigen Materialien und innovativen technologischen Lösungen
geben wir zu Ihren Händen ein Produkt über, das perfekt für
den täglichen Gebrauch ist.
Vor dem Gebrauch des Produktes lesen Sie bitte
sorgfältig die vorliegende Bedienungsanleitung durch.
Falls Bemerkungen oder Fragen zum gekauften Produkt,
nehmen Sie mit uns Kontakt auf:
pomoctechniczna@lionelo.com
DE

16
Bedienungsanleitung
Achtung: Die Montage muss von einer erwachsenen
Person ausgeführt werden.
Nichtbeachtung dieser Warnungen und der Montageanlei-
tung kann sehr schwere Verletzungen oder einen Tod verur-
sachen.
Sicherheitshinweise:
1. Das Spielzeug wird für Verwendung auf einer ebenen Fläche und
ohne Hindernisse bestimmt. Es soll niemals in der Nähe von Treppen,
schrägen Fahrzeugen, Kraftfahrzeugen, Hügeln, Naß-, Sand- und Kies-
flächen, Alleen, Verkehrsstraßen, Schwimmbecken oder Gebieten, auf
denen eine Wahrscheinlichkeit des Verkehrs und anderer Bedrohun-
gen für das Kind vorkommt, verwendet werden.
2. Vergewissern Sie sich, dass Ihr Kind feste, geschlossene Schuhe,
einen richtig angepassten Helm und andere Schützer hat. Verge-
wissern Sie sich, dass die Schuhe richtig angezogen wurden.
3. Lassen Sie nicht, das Laufrad von mehr als einer Person benutzt wird.
4. Vergewissern Sie sich, dass Ihr Kind körperlich das Laufrad kontrol-
lieren kann und dass es versteht, wie man beschleunigen oder halten
kann. Lassen Sie Ihr Kind nie unbeaufsichtigt.5. Before each use,
please make sure the bike is not damaged and has no loose or miss-
ing parts. Ensure that all the screws and connectors have been prop-
erly tightened and all parts of the bike are secured well. DO NOT use
this product if any part is missing, damaged or broken. DO
NOT substitute any parts with replacements.
5. Vor jeder Fahrt soll man überprüfen, ob das Laufrad nicht
beschädigt wurde, keine losen Teile hat oder es keine Teile fehlt. Verge-
wissern Sie sich, dass alle Schrauben und Schnellkupplungen richtig
festgeschraubt wurden und ob alle Teile richtig befestigt wurden.
DE

17
BENUTZEN Sie dieses Fahrzeug nicht, wenn es ein Teil fehlt, ein Teil
defekt oder gebrochen ist. Ersetzen Sie die Teile mit den Ersatzteilen
NICHT.
6. Das nicht aufgebaute Laufrad und die gelieferte Verpackung bein-
halten kleine Plastikteile und Plastiktüten, die gefährlich für Kleinkind-
er sein können. Sie sollen außer der Reichweite der Kinder aufbe-
wahrt werden. Alle Plastiktüten und andere Materialien aus Verpack-
ungen sollen recycelt werden.
7. Das Laufrad ist für die Altersgruppe der Kinder zwischen: 2-5
Jahren geeignet.
8. Maximale Gewichtsbelastung: 25kg
9. Diese Anleitung soll für spätere Verwendung aufbewahrt werden.
Reinigung:
Das Produkt benötigt eine regelmäßige Wartung. Reinigung und
Wartung des Laufrads sollen nur von einer erwachsenen Person
ausgeführt werden.
Wartung:
Die beweglichen Teile nur dann schmieren, wenn es erforderlich ist.
Dazu soll ein Silikonschmiermittel verwendet werden. Periodisch die
Befestigung der Schrauben und anderer Teile überprüfen. Die Teile
nur bei Bedarf ersetzen oder reparieren. Nur die zertizierten Ersatz-
teile verwenden. Um eine Reibung zu vermeiden, die ein richtiges
Funktionieren des Laufrads verhindern kann, vergewissern Sie sich,
dass alle bewegliche Plastikelemente, die sich einem Metallrahmen
entlang benden, nicht verstaubt, schmutzig oder sandig sind. Das
Laufrad soll an einem trockenen Platz aufbewahrt werden. Langes
Aussetzen der direkten Sonneneinstrahlung kann die Deformation
der Kunststoffteile verursachen.
DE

18
Montageschema:
Lenker
Sitz
Sicherheitslinie
Sicherheitslinie
Rahmen
Vordere Gabel
Hinterrad
Vorderrad
Unterlegscheibe Plastik-
Unterlegscheiben
Klemme Klemmenge-
häuse
Schlüssel
DE

19
Montage der Gabel:
Die Unterlegscheibe A auf Bolzen der Gelenke aufsetzen. Die
Plastik-Unterlegscheiben B auf Führungsschiede der Gelen-
ke in Rahmen aufsetzen. Der Rahmen auf Bolzen der Gelen-
ke aufsetzen. Dann Unterlegscheibe und Klemme aufsetzen.
Nach vorliegender Abbildung fortsetzen.
Montage und Einstellung des Lenkers:
Auf Bolzen des Lenkers ein Klemmengehäuse aufsetzen. Der Lenk-
er in Rahmenhalter einstecken. Der Lenker so einstellen, dass er sich
senkrecht zu Vorderrad befindet. WICHTIG! VERGEWISSERN
SIE SICH, dass die Sicherheitslinie sich unter dem oberen Teil des
Rahmenhalters befindet. Schraube a der Klemme festdrehen, um den
Lenker zu verstärken. Vergewissern Sie sich, dass der Lenker richtig
und stark befestigt wurde. Gehäuse auf Klemme aufsetzen.
DE
Table of contents
Languages:
Other Lionelo Bicycle manuals

Lionelo
Lionelo Kori User manual

Lionelo
Lionelo Casper User manual

Lionelo
Lionelo DAN User manual

Lionelo
Lionelo TIM PLUS User manual

Lionelo
Lionelo Bart Air User manual

Lionelo
Lionelo Bart Tour User manual

Lionelo
Lionelo Ben User manual

Lionelo
Lionelo Haari User manual

Lionelo
Lionelo Tris User manual

Lionelo
Lionelo Alex User manual