Lionelo Arie User manual

Arie
Balance bike
Rowerek biegowy
Laufrad
Беговел
La bici senza pedali per bambini
Vélo d’équilibre
Bicicleta sin pedales
Loopfiets
Balansinis dviratukas
Odrážedlo
Futóbicikli
Bicicletă de echilibru
www.lionelo.com
Manual de usuario
Handleiding
Naudojimo instrukcija
Návod k obsluze
Használa utasítás
Manual ulizare
User manual
Instrukcja obsługi
Bedienungsanleitung
Инструкция по эксплуатации
Manuale d’uso
Manuel de l’Ulisateur

‑ 2 ‑
1
3
6
2
4
7
51
14
10
9
2
8
2
3
11
13 12
3
A
4
5

‑ 3 ‑ EN
EN
Dear customer!
Should you have any remarks or quesons concerning the product, please do not
hesitate to contact us: [email protected]
Producer:
BrandLine Group Sp. z o. o.
ul. A. Kręglewskiego 1, 61-248 Poznań, Poland
Important
Please read this manual before you start using the product to see its funcons
and use them in accordance with intended use. Keep this manual for future
reference.
Warnings:
• The bike is intended for children aged 3-6 and up to 30 kg heavy.
• The bike is intended for one person only.
• The bike must be assembled, disassembled and adjusted by an adult only
and away from children.
• When using the product, please wear a protecve equipment (helmet, guards).
• Do not let your child stand on the seat or arms.
• Do not use the bike on a sloping or uneven surface.
• Do not use the bike near roads.
• Do not use the bike near potenally dangerous areas (e.g. swimming pool).
• The child who uses the bike should be supervised by an adult.
• The child who uses the bike must wear footwear.
• Handle the toy carefully. It is necessary to have skills which prevent falls or
collisions causing user’s and other persons’ bodily injuries.
• Keep plasc packaging out of reach of children as they pose a suocaon risk.
• Before every use, check the bike for any damage, loose connecons or miss-
ing components.
• Do not use the product if any component is missing or damaged. This being
the case, contact the manufacturer’s authorized service center.
• Do not tow the bike behind the car or other vehicle.

‑ 4 ‑EN
• Keep the product away from sources of heat, high temperatures, hot surfac-
es, sources of ignion, naked ame, oil and sharp edges.
• Store the bike in a dry place.
• Do not use the product if weather is unfavorable (e.g. frost, rain, snow, black ice).
The safest areas for using the bicycle are those with lile or no vehicular trac, such
as private areas,playgrounds, schoolyards, and school playgrounds.
Product descripon (g. 1)
1. An-skid arms
2. Handlebars
3. Saddle
4. Front fork
5. Crossbar
6. Rear wheel
7. Front wheel
8. Masking collar
9. Safety mark under handlebars
10. Clamping ring
11. Safety mark under saddle
12. Saddle hole in crossbar
13. Saddle xing ring
14. Front wheel fork cap
How to assemble
1. Handlebars (g. 2)
Remove the handlebars xing ring (10) and front wheel fork cap (14) from the
front fork (4). Insert the front fork with wheel in the bike crossbar hole. Put these
items back on the protruding fork shank in the following order: front wheel fork
cap (14) and handlebars xing ring (10). Next release the nut on the ring (14) and
insert the handlebars (2) in the front fork. Adjust the height of the handlebars
to the child’s height - handlebars depth marker (9) cannot be visible, must be
inside the crossbar. Tighten up the nut on the ring (14) and cover it (8). Once
the process is completed, make sure the handlebars have been xed securely. If
not - ghten up the nut on the ring unl the stability is acceptable.
Note! When assembling, make sure the front fork with a wheel is assembled
in the crossbar properly. The bike should be assembled, disassembled and ad-
justed by an adult only.
2. Saddle (g. 3).
Insert the saddle pipe in the saddle hole in the crossbar (12). Adjust the saddle
height to the child’s height - saddle depth mark (11) cannot be visible, must
be inside the crossbar. Tighten up the nut on the saddle xing ring (13). Once
the process is completed, make sure the saddle has been xed securely. If not,
ghten up the nut on the ring unl the stability is acceptable.

‑ 5 ‑ EN | PL
3. Brake (g. 4 and 5)
Before you use the bike, make sure the brake has been adjusted properly. When you
unscrew the internal nut, you will ghten the brake cable. Tighten up the external
nut too (see g. 4). If you ghten up the adjustment bolt, you will cause the brake
handle to get closer to the handlebars while brake cable tension will rise (g. 5).
How to use
It is necessary to sit on the saddle, grab both arms of the handlebar
properly and then push alternately feet against the ground. When the child gathers
speed on the bike, it must li feet to ride freely. This way the child can learn to
keep balance. To turn, the child must turn the handlebars in a proper direcon
and keep its balance. To brake, ground must be touched with feet.
How to maintain and clean
Wash the bike with a wet cloth, then wipe it dry. Do not use causc or abrasive
cleaning agents.
The pictures are for reference only. The real design of the products may dier from the
pictures presented.
PL
Drogi Kliencie!
Jeśli masz jakiekolwiek uwagi lub pytania do zakupionego produktu, skontaktuj
się z nami: [email protected]
Producent:
BrandLine Group Sp. z o. o.
ul. A. Kręglewskiego 1, 61-248 Poznań, Polska
Ważne informacje
Prosimy o przeczytanie tej instrukcji przed przystąpieniem do obsługi produktu,
aby zapoznać się z jego funkcjami i wykorzystać go zgodnie z przeznaczeniem.
Zatrzymaj te instrukcję do przyszłego zastosowania.
Ostrzeżenia:
• Rowerek przeznaczony jest dla dzieci w wieku od 3 – 6 lat oraz o wadze do 30 kg.

‑ 6 ‑PL
• Rowerek przeznaczony jest dla jednej osoby.
• Rowerek powinien być montowany, demontowany i regulowany tylko przez
osobę dorosłą i z dala od dzieci.
• Podczas użytkowania produktu należy mieć na sobie sprzęt ochronny (kask,
ochraniacze).
• Nie pozwól dziecku stawać na siedzeniu lub rączce.
• Nie używaj rowerka na pochyłej lub nierównej powierzchni.
• Nie używaj rowerka w pobliżu ruchu drogowego.
• Nie korzystaj z rowerka nieopodal potencjalnie niebezpiecznych miejsc (np. basen).
• Dziecko korzystające z rowerka powinno być pod nadzorem osoby dorosłej.
• Dziecko korzystające z rowerka powinno mieć założone obuwie.
• Zabawkę należy obsługiwać ostrożnie. Niezbędne są umiejętności umożli-
wiające uniknięcie upadków lub kolizji powodujących obrażenia ciała użyt-
kownika lub innych osób.
• Trzymaj plaskowe opakowania z dala od dzieci, gdyż stwarzają one ryzyko
uduszenia.
• Przed każdym użyciem sprawdź, czy rowerek nie ma uszkodzeń, polu-
zowanych połączeń lub brakujących elementów. Nie używaj produktu, jeśli
brakuje jakiegoś jego elementu lub jeśli jest uszkodzony. W takim wypadku
należy skontaktować się z autoryzowanym serwisem producenta.
• Nie ciągnij rowerka za samochodem lub innym pojazdem.
• Trzymaj produkt z dala od źródeł ciepła, wysokich temperatur, gorących
powierzchni, źródeł iskrzenia, otwartego ognia, oleju oraz ostrych krawędzi.
• Przechowuj rowerek w suchym miejscu.
• Nie powinno się korzystać z produktu podczas niesprzyjających warunków
atmosferycznych (np. mróz, deszcz, śnieg, oblodzenia).
• Najbezpieczniejsze tereny do jazdy na rowerku to obszary o ograniczonym
lub wyłączonym ruchu samochodowym, takie jak tereny prywatne, rekrea-
cyjne, place zabaw, boiska szkolne.
Opis produktu (rys. 1)
1. Rączki antypoślizgowe
2. Kierownica
3. Siodełko
4. Przedni widelec
5. Rama
6. Tylne koło
7. Przednie koło
8. Kołnierz maskujący
9.
Znacznik bezpieczeństwa pod
kierownicą
10. Obejma zaciskowa

‑ 7 ‑ PL
Montaż
1. Kierownica (rys. 2)
Zdejmij z przedniego widelca (4) obejmę mocującą kierownicy (10) i nasadkę
widelca koła przedniego (14). Wsuń przedni widelec z kołem w otwór na ra-
mie rowerka. Nałóż z powrotem na wystający trzpień widelca w następującej
kolejności: nasadkę widelca koła przedniego (14) i obejmę mocującą kierown-
icy (10). Następnie poluzuj nakrętkę na obejmie (14) i wsuń kierownicę (2) w
przedni widelec rowerka. Dostosuj wysokość kierownicy do wzrostu dziecka,
prowadzącego rowerek - znacznik głębokości osadzenia kierownicy (9) nie może
być widoczny, musi znajdować się wewnątrz ramy. Zacieśnij mocno nakrętkę
na obejmie (14) i zakryj ją osłoną (8). Po zakończonym procesie upewnij się, czy
kierownica zamontowana jest stabilnie. Jeśli okaże się, że nie jest – zacieśnij
nakrętkę na obejmie mocniej aż do osiągnięcia wymaganej stabilności.
Uwaga! Podczas montowania upewnij się, że przedni widelec z kołem mon-
towany jest w ramie w sposób prawidłowy. Rowerek powinien być montowa-
ny, demontowany i regulowany tylko przez osobę dorosłą.
2. Siodełko (rys. 3).
Wsuń rurę podsiodłową do otworu na siodełko w ramie (12). Dostosuj wysokość
siodełka do wzrostu dziecka, prowadzącego rowerek – znacznik głębokości osadze-
nia siodełka (11) nie może być widoczny, musi znajdować się wewnątrz ramy.
Zacieśnij mocno nakrętkę na obejmie mocującej siodełko (13). Po zakończonym pro-
cesie upewnij się, czy siodełko zamontowane jest stabilnie. Jeśli okaże się, że nie jest
– zacieśnij nakrętkę na obejmie mocniej aż do osiągnięcia wymaganej stabilności.
3. Hamulec (rys. 4 i 5)
Przed użyciem rowerka należy upewnić się, że hamulec jest odpowiednio wyreg-
ulowany. Odkręcenie wewnętrznej nakrętki spowoduje napięcie linki hamulca.
Należy dokręcić też zewnętrzną nakrętkę (jak wskazuje rys. 4). Dokręcenie śruby
regulacyjnej spowoduje zbliżenie rączki hamulca do kierownicy i zwiększenie
napięcia linki hamulcowej (rys. 5).
Użytkowanie
Należy usiąść na siedzisku, mocno uchwycić obydwie rączki kierownicy, a następnie
odpychać się naprzemiennie stopami od podłoża. Po rozpędzeniu się należy unieść
11. Znacznik bezpieczeństwa pod
siodłem
12. Otwór na siodełko w ramie
13. Obejma mocująca siodełka
14. Nasadka widelca koła przedniego

‑ 8 ‑PL | DE
DE
Sehr geehrter Kunde!
Falls Sie Fragen oder Anmerkungen zu dem gekauen Produkt haben, setzen Sie
sich mit uns in Verbindung: [email protected]
Hersteller:
BrandLine Group Sp. z o. o.
ul. A. Kręglewskiego 1, 61-248 Poznań, Polen
Wichge Informaonen
Bie, die vorliegende Bedienungsanleitung vor dem Gebrauch des Gerätes
durchlesen, um seine Funkonen kennen zu lernen und es besmmungsgemäß
zu verwenden. Bewahren Sie diese Bedienungsanleitung für spätere Nutzung auf.
Warnungshinweise:
• Das Laufrad ist für die Kinder im Alter von 3 bis 6 Jahren und mit einem
Gewicht von 30 kg besmmt.
• Das Laufrad ist nur für eine Person geeignet.
• Das Laufrad soll nur durch einen Erwachsenen und weit von den Kindern
monert, demonert und eingestellt werden.
• Während des Gebrauchs des Produktes soll man Schutzausrüstung
(Schutzhelm, Schützer) tragen.
• Lassen Sie dem Kind nicht auf dem Sitz oder Fahrradgri stehen.
• Benutzen Sie das Laufrad nicht auf geneigter oder unebener Fläche.
• Benutzen Sie das Laufrad nicht in der Nähe vom Straßenverkehr.
stopy aby jechać swobodnie. W ten sposób dziecko powinno uczyć się jak zach-
ować równowagę. Skręcanie następuje poprzez przekręcenie kierownicy w kierunku
skrętu oraz balansowanie ciałem. Hamować należy dotykając stopami podłoża.
Konserwacja i czyszczenie
Przemywaj rowerek wilgotną szmatką, po czym wycieraj do sucha. Nie używaj
żrących lub ściernych środków do czyszczenia produktu.
Zdjęcia mają charakter poglądowy, rzeczywisty wygląd produktów może się różnić od prezentowanego
na zdjęciach.

‑ 9 ‑ DE
• Benutzen Sie das Laufrad nicht in der Nähe von potenziell gefährlichen Plät-
zen (z.B. Schwimmbad).
• Das Kind soll das Laufrad nur unter Aufsicht einer erwachsenen Person benutzen.
• Ein Kind, das dieses Laufrad benutzt, soll die Schuhe tragen.
• Das Spielzeug soll man vorsichg benutzen. Notwendig sind die Fähigkeit-
en, die ermöglichen, einen Sturz oder eine Kollision zu vermeiden.
• Bewahren Sie die Plaskverpackungen weit von den Kindern auf, weil sie
eine Ersckungsgefahr verursachen.
• Vor jedem Gebrauch prüfen Sie, ob das Laufrad nicht defekt ist, es keine
losen Verbindungen oder fehlenden Elementen hat. Bie das Produkt nicht
benutzen, wenn irgendwelches Element fehlt oder defekt ist. In einem sol-
chen Fall bie Kontakt mit dem Herstellerservice aufnehmen.
• Ziehen Sie das Laufrad nicht hinter einem Auto oder einem anderen Fahrzeug.
• Das Produkt soll weit von den Wärmequellen, hohen Temperaturen, heißen
Flächen, direkten Sonnenstrahlung, Funkenquellen, oenem Feuer, Ölen
und scharfen Kanten verwendet werden.
• Lagern Sie das Laufrad soll an einem trockenen Platz.
• Bei widrigen Weerbedingungen (z.B. Frost, Regen, Schnee oder Vereisung)
benutzen Sie das Produkt nicht.
• Die sichersten Bereiche für das Radfahren sind Bereiche mit begrenztem
oder keinem Autoverkehr, wie z. B.: Privatbereiche, Spielplätze, Schulhöfe,
Erholungsgebiete.
Beschreibung des Produkts (Abb. 1)
1. An-Rutsch-Fahrradgrie
2. Lenker
3. Sael
4. Vordere Gabel
5. Rahmen
6. Hinterrad
7. Vorderrad
8. Abdeckansch
9.
Sicherheitsmarkierung unter dem
Lenker
10. Klemmschelle
11.
Sicherheitsmarkierung unter dem
Sael
12.
Önung für den Sael am Rahmen
13.
Befestigungsschelle für die
Saelmontage
14. Aufsatz der Gabel des Vorderrads
Montage
1. Lenker (Abb. 2)
Enernen Sie die Befesgungsschelle für das Lenker (10) und Aufsatz der Gabel

‑ 10 ‑DE
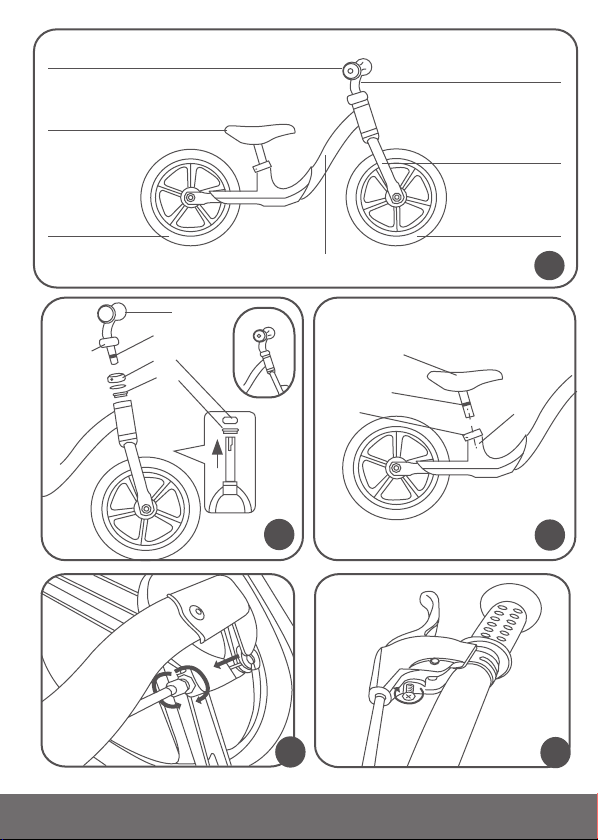
des Vorderrads (14) vor der vorderen Gabel (4). Setzen Sie vordere Gabel mit
dem Rad in die Önung am Rahmen des Laufrads. Setzen Sie wieder auf eine
Scha der Gabel in folgender Reihe auf: Aufsatz der Gabel des Vorderrads (14)
und Befesgungsschelle für das Lenker (10). Lockern Sie die Muer an Befes-
gungsschelle (14) und stecken Sie den Lenker (2) in vordere Gabel des Laufrads
ein. Passen Sie die Höhe des Lenkers an die Größe des Kindes an, das mit dem
Laufrad fährt - Sicherheitsmarkierung unter dem Sael (9) kann nicht sichtbar
sein, sie muss sich im Inneren des Rahmens benden. Ziehen Sie fest die Muer
an der Befesgungsschelle (14) an und decken Sie diese mit einem Abdeck-
ansch (8) ab. Nach Beendigung des Prozesses prüfen Sie, ob der Sael stabil
befesgt wird. In einem anderen Fall, ziehen Sie die Muer an der Schelle fester
an, bis die erforderliche Stabilität erzielt wird.
Achtung! Bei der Montage prüfen Sie, ob vordere Gabel mit dem Rad am
Rahmen richg monert ist. Das Laufrad soll nur durch eine erwachsene Per-
son monert, demonert und eingestellt werden.
2. Sael (Abb. 3).
Stecken Sie das Sitzrohr in die Önung für den Sael am Rahmen (12) ein. Pas-
sen Sie die Höhe des Saels an die Größe des Kindes an, das mit dem Laufrad
fährt – Tiefmarkierung der Befesgungslöcher für die Sitzmontage (11) kann
nicht sichtbar sein, sie muss sich im Inneren des Rahmens benden. Ziehen Sie
die Muer an der Befesgungsschelle des Saels (13) an. Nach Beendigung des
Prozesses prüfen Sie, ob der Sael stabil befesgt wird. In einem anderen Fall,
ziehen Sie die Muer an der Schelle fester an, bis die erforderliche Stabilität
erzielt wird.
3. Bremse (Abb. 4 und 5)
Vor dem Gebrauch des Laufrads prüfen Sie, ob die Bremse richg eingestellt
wurde. Abschrauben der inneren Muer verursacht Spannen der Bremsseile.
Man soll die äußere Muer (laut Abb. 4) zuschrauben.
Zuschrauben der Einstellschraube verursacht, dass der Handbremsgri sich an
Lenker nähert und Spannen der Bremsseile (Abb. 5) verstärkt.
Gebrauch
Man soll sich auf dem Sael setzen, fest die beiden Fahrradgrie greifen und sich mit den
Füßen abwechselnd vom Boden abstoßen. Nachdem das Laufrad in Fahrt kommt, soll
man die Füße heben, um bequem zu fahren. Auf diese Weise soll das Kind lernen, wie im
Gleichgewicht zu bleiben. Das Abbiegen erfolgt durch Drehen des Lenkers in Abbiegerich-

‑ 11 ‑ DE | RU
RU
Уважаемый клиент!
Если у вас есть какие-то вопросы или замечания, касающиеся приобретённого
продукта, пожалуйста,свяжитесь с нами: [email protected]
Производитель:
BrandLine Group Sp. из о. о.
ул. A. Kręglewskiego 1, 61-248 Познань, Польша
Важная информация
Пожалуйста, прочитайте данное руководство перед использованием
продукта, чтобы ознакомиться с его функциями и использовать данный
продукт по назначению. Сохраните данную инструкцию для дальнейшего
использования.
Меры предосторожности:
• Велосипед рассчитан на детей от 3 до 6 лет и весом до 30 кг.
• Велосипед рассчитан на одного человека.
• Велосипед должен собираться, разбираться и регулироваться только
взрослым и вдали от детей.
• При использовании продукта на ребенке должна быть соответствующая
одежда (шлем, наколенники).
• Не позволяйте ребенку стоять на сиденьи или ручке.
• Не используйте велосипед на наклонной или неровной поверхности.
• Не используйте велосипед рядом с местами дорожного движения.
• Не используйте велосипед рядом с потенциально опасными местами
(например, бассейном).
tung und Balancieren. Man soll so bremsen, dass die Füße den Boden berühren.
Instandhaltung und Reinigung
Wischen Sie das Laufrad mit einem feuchten Tuch ab, dann reiben es trocken.
Benutzen Sie keine Ätz- oder Schleifmiel zur Reinigung des Produktes.
Die Fotos sind anschaulich, das tatsächliche Aussehen der Produkte kann von der gezeigten Abbildung
abweichen.

‑ 12 ‑RU
• Ребенок, использующий велосипед, должен находиться под
присмотром взрослого.
• Ребенок, использующий велосипед, должен носить обувь.
• С продуктом следует обращаться осторожно. Навыки необходимы,
чтобы избежать падений или столкновений, которые могут причинить
вред пользователю или другим людям.
• Храните пластиковую упаковку в недоступном для детей месте, так
как она может стать причиной удушения.
• Перед каждым использованием убедитесь, что велосипед не имеет
повреждений, ослабленных соединений или недостающих частей.
Не используйте продукт, если не хватает какого-либо элемента или
имеются повреждения. В этом случае обратитесь в авторизованный
сервисный центр производителя.
• Не тяните велосипед за автомобилем или другим транспортным средством.
• Держите изделие вдали от источников тепла, высоких температур,
горячих поверхностей, искр, открытого огня, масла и острых краев.
• Храните велосипед в сухом месте.
• Вы не должны использовать продукт в неблагоприятных погодных
условиях (например, мороз, дождь, снег, обледенение).
• Самые безопасные районы для езды на велосипеде - это зоны с
ограниченным или отключенным автомобильнымдвижением, такие как:
частные площадки, детские площадки, школьные площадки, зоны отдыха.
Описание продукта (рис. 1)
1. Нескользящие ручки
2. Руль
3. Сиденье
4. Передняя вилка
5. Рама
6. Заднее колесо
7. Переднее колесо
8. Маскирующий зажим
9. Маркер глубины руля
10. Зажимное кольцо
11. Маркер глубины сиденья
12. Отверстие под сиденье в раме
13. Зажимное кольцо
14. Вилка переднего колеса
Сборка
1. Руль (рис. 2)
Снимите с передней вилки (4) зажимное кольцо, придерживающие руль
(10) и вилку переднего колеса (14). Вставьте переднюю вилку с колесом в

‑ 13 ‑ RU
отверстие на раме велосипеда. Вставьте обратно на выступающий штифт
вилки в следующем порядке: адаптер вилки переднего колеса (14) и зажим
рулевого колеса (10). Затем ослабьте гайку на кронштейне (14) и вставьте
рулевое колесо (2) в переднюю вилку велосипеда. Отрегулируйте высоту
рулевого колеса в соответствии с ростом ребенка, ориентируясь на то, что
индикатор глубины рулевого колеса (9) не должен быть виден, он должен
находиться внутри рамы. Надежно затяните гайку на кронштейне (14) и
закройте ее крышкой (8). После завершения процесса убедитесь, что рулевое
колесо установлено надежно. Если окажется, что это не так - плотно затяните
гайку на кронштейне, пока она не достигнет необходимой устойчивости.
Внимание! При монтаже убедитесь, что передняя вилка с колесом
правильно установлена в раме. Велосипед должен быть собран, разобран
и отрегулирован только взрослым.
2. Сиденье (рис. 3).
Вставьте трубку седла в отверстие для сиденья на раме (12). Отрегулируйте
высоту седла в соответствии с ростом ребенка, направляя велосипед -
маркер глубины седла (11) не должен быть виден, он должен находиться
внутри рамы. Надежно затяните гайку на зажимном кольце кронштейна
(13). После завершения процесса убедитесь, что сиденье надежно
установлено. Если окажется, что это не так - плотно затяните гайку на
кронштейне, пока она не достигнет необходимой устойчивости.
3. Тормоз (рис. 4 и 5)
Перед использованием велосипеда убедитесь, что тормоз правильно
отрегулирован. Откручивание внутренней гайки приведет к натяжению
тормозного троса. Необходимо затянуть наружную гайку (как показано
на рис. 4). Затягивание регулировочного винта приблизит ручку тормоза к
рулевому колесу и увеличит натяжение тормозного троса (рис. 5).
Использование
Следует сесть на сиденье, крепко взяться за обе ручки руля, а затем
попеременно оттолкнуться ногами от земли. После ускорения поднять
ноги, чтобы свободно двигаться. Таким образом, ребенок должен научиться
балансировать. Поворот осуществляется путем поворота рулевого колеса
в направлении поворота и балансировки тела. Торможение следует
проводить, касаясь земли ногами.

‑ 14 ‑RU | IT
IT
Genle Cliente!
In caso di un qualsiasi commento o domanda sul prodoo acquistato, non esitate
a contaarci: [email protected]
Produore:
BrandLine Group Sp. z o. o.
ul. A. Kręglewskiego 1, 61-248 Poznań, Polonia
Informazioni importan
Si prega di leggere questo manuale prima di ulizzare il prodoo per scoprire
le sue funzioni e ulizzarlo per lo scopo previsto. Conservare queste istruzioni
per un uso futuro.
Avvermen:
• La biciclea è stata progeata per bambini dai 3 ai 6 anni e con un peso
no a 30 kg.
• La biciclea è progeata per una sola persona.
• La biciclea deve essere montata, smontata e regolata solo da un adulto e
lontano dai bambini.
• Quando si ulizza il prodoo, indossare disposivi di protezione (casco, protezioni).
• Non lasciare che il bambino sa in piedi sul sedile o sulla maniglia.
• Non ulizzare la biciclea su superci inclinate o irregolari.
• Non ulizzare la biciclea in prossimità del traco.
• Non ulizzare la biciclea in prossimità di aree potenzialmente pericolose
(ad es. piscina).
• Un bambino che usa la biciclea dovrebbe essere seguito da un adulto.
• Un bambino che usa la biciclea dovrebbe indossare le scarpe.
• Maneggiare il giocaolo con cura. Sono richieste competenze per evitare
Обслуживание и чистка
Помойте велосипед влажной тканью и вытрите насухо. Не используйте
едкие моющие средства или моющие средства приводящие к коррозии.
Изображения, представленные в инструкции, могут отличаться от действительных.

‑ 15 ‑ IT
cadute o collisioni che causano lesioni all’utente o ad altri.
• Tenere gli imballaggi di plasca lontano dalla portata dei bambini in quanto
presentano un rischio di soocamento.
• Prima di ogni ulizzo controllare che la biciclea non presen danni, col-
legamen allenta o par mancan prima di ogni ulizzo. Non ulizzare il
prodoo se è mancante o danneggiato. In questo caso, contaare un centro
di assistenza autorizzato del produore.
• Non trascinare la biciclea dietro un’auto o un altro veicolo.
• Tenere il prodoo lontano da fon di calore, alte temperature, superci cal-
de, scinlle, amme libere, olio e spigoli vivi.
• Conservare la biciclea in un luogo asciuo.
• Il prodoo non deve essere ulizzato in condizioni climache avverse (ad es.
gelo, pioggia, neve, ghiaccio).
• I terreni più sicuri per andare in biciclea sono le zone di traco limitato o esc-
luso, come: aree private, campi da gioco,campi sporvi scolasci, zone ricreave.
Descrizione del prodoo (g.1)
1. Maniglie anscivolo
2. Manubrio
3. Sella
4. Forcella anteriore
5. Telaio
6. Ruota posteriore
7. Ruota anteriore
8. Flangia di mascheramento
9.
Marcatore di sicurezza sotto
manubrio
10. Staa di ssaggio
11. Marcatore di sicurezza soo sella
12. Foro per la sella nel telaio
13. Staa di ssaggio sella
14.
Cappuccio della forcella della ruota
anteriore
Montaggio
1. Manubrio (g. 2)
Rimuovere dalla forcella anteriore (4) la staa di ssaggio del manubrio (10) e
il cappuccio dalla forcella della ruota anteriore (14). Inlare la forcella anteriore
con la ruota nel foro nel telaio della biciclea. Di nuovo applicare sul perno
sporgente nell’ordine seguente: cappuccio della forcella della ruota anteriore
(14) e staa di ssaggio al manubrio (10). Quindi allentare il dado della staa
(14) e inserire il manubrio (2) nella forcella anteriore della biciclea. Regolare
l’altezza del manubrio all’altezza del bambino che guida la biciclea - l’indicatore
di profondità del manubrio (9) non deve essere visibile e deve trovarsi all’interno
del telaio. Serrare bene il dado sulla staa (13) e coprirlo con il coperchio (8).

‑ 16 ‑IT | FR
Al termine del processo, accertarsi che il manubrio sia montato saldamente. In
caso contrario, serrare il dado sulla staa no a raggiungere la stabilità richiesta.
Aenzione! Durante il montaggio, assicurarsi che la forcella anteriore con la
ruota sia montata correamente sul telaio. La biciclea deve essere montata,
smontata e regolata solo da un adu.
2. Sella (g. 3).
Inserire il tubo soo sella nel foro della sella nel telaio (12). Regolare l’altezza
della sella all’altezza del bambino che guida la biciclea - l’indicatore di profon-
dità della sella (11) non deve essere visibile e deve trovarsi all’interno del telaio.
Serrare saldamente il dado sulla staa di ssaggio della sella (13). Al termine
del processo, assicurarsi che la sella sia montata saldamente. In caso contrario,
serrare il dado sulla staa no a raggiungere la stabilità richiesta.
3. Freno (g. 4 i 5)
Prima di ulizzare la biciclea assicurarsi che il freno sia regolato correamente.
Svitando il dado interno si tende il cavo del freno. Serrare anche il dado esterno
(come mostrato in g. 4). Stringendo la vite di regolazione si avvicina la maniglia
del freno al manubrio e si aumenta la tensione del cavo del freno (g. 5).
Ulizzo
Occorre sedersi sul sedile, tenere saldamente entrambi i manubri e poi spingersi
alternavamente con i piedi da terra. Dopo l’accelerazione, sollevare i piedi per
muoversi liberamente. In questo modo, il bambino dovrebbe imparare a man-
tenere l’equilibrio. La rotazione si eeua ruotando il manubrio nel senso di
rotazione e di bilanciamento con il corpo. Frenare toccando il suolo con i piedi.
Manutenzione e pulizia
Pulire la biciclea con un panno umido e asciugarla. Non ulizzare detergen
causci o abrasivi per pulire il prodoo.
Le foto sono a solo scopo illustravo, l’aspeo eevo dei prodo può esserediverso da quelle presen-
tate nelle immagini
FR
Cher client !
Si vous avez des quesons ou remarques relaves au produit acheté, n’hésitez
pas à nous contacter à l’adresse : [email protected]

‑ 17 ‑ FR
Producteur:
BrandLine Group Sp. z o. o.
ul. A. Kręglewskiego 1, 61-248 Poznań, Pologne
Renseignements importants
Veuillez lire cee noce d’ulisaon avant de commencer à manipuler le pro-
duit an de connaître ses foncons et l’uliser conformément à son usage
prévu. Gardez le mode d’emploi pour référence ultérieure.
Averssements :
• Le vélo est desné aux enfants à l’âge allant de 3 - à 6 ans et de poids
jusqu’à 30 kg.
• Le vélo est desné à l’usage par une seule personne.
• Le vélo devrait être assemblé, désassemblé et ajusté uniquement par un
adulte et hors de portée des enfants an d’éviter les blessures.
• Lors de l’ulisaon du produit, il est nécessaire de porter l’équipement de
protecon (casque, protège-genoux).
• Ne pas laisser à l’enfant de se mere debout sur le siège.
• Ne pas laissez la poussee sur une surface inclinée ou irrégulière.
• Ne pas uliser le vélo à proximité du trac rouer.
• Ne pas uliser le vélo à proximité des lieux potenellement dangereux (p.ex.
d’une piscine).
• L’enfant ulisant le vélo devrait être surveillé par un adulte.
• L’enfant ulisant le vélo devrait porter des chaussures.
• Il est nécessaire d’être prudent lors de l’ulisaon du jouet. Des capacités
permeant d’éviter les chutes ou les collisions entraînant des blessures cor-
porelles de l’ulisateur ou d’autres personnes sont requises.
• Tenir les emballages en plasque hors de portée des enfants parce qu’ils
présentent un risque d’étranglement.
• Avant chaque ulisaon, vérier que le produit n’est pas abîmé, qu’il n’a pas de
xaons desserrées ou d’éléments manquants. Ne pas uliser le produit s’il y a
un élément cassé ou manquant. Dans ce cas-là, il est nécessaire de contacter
le service du fabricant.
• Ne pas trainer le vélo derrière une voiture un autre véhicule.
• Uliser le produit loin des sources de chaleur, des hautes températures, des surfac-
es chaudes, des sources d’éncelage, du feu ouvert, des huiles et des arêtes vives.

‑ 18 ‑FR
• Tenir le vélo dans un endroit sec.
• Ne pas uliser le produit lors des condions atmosphériques défavorables
(p.ex. le gel, la pluie, la neige, le givrage).
• Les zones les plus sûres pour les cyclistes sont celles où la circulaon au-
tomobile est limitée ou inexistante, comme lesaires privées, les terrains de
jeux, les cours d’école, les cours de récréaon et les aires de jeux scolaires.
Descripon du produit (Fig. 1)
1. Poignées andérapantes
2. Guidon
3. Selle
4. Fourchee avant
5. Cadre
6. Roue arrière
7. Roue avant
8. Collier masquant
9. Repère de sécurité sous le guidon
10. Collier de serrage
11. Repère de sécurité sous la selle
12. Ouverture pour la selle dans le cadre
13. Collier de xaon de la selle
14.
Capuchon de la fourchee de roue
avant
Assemblage
1. Guidon (Fig. 2)
Enlevez le collier de xaon du guidon (10) et le capuchon de la fourchee de
roue avant (14) de la fourchee avant (4). Insérez la fourchee avant avec la
roue dans l’ouverture sur le cadre du vélo. Meez de nouveau sur la ge sail-
lante de la fourchee, puis, dans l’ordre suivant : le capuchon de la fourchee
de roue avant (14) et le collier de xaon du guidon (10). Ensuite, desserrez
l’écrou sur le collier (14) et insérez le guidon (2) dans la fourchee avant du vélo.
Ajustez la hauteur du guidon à la taille de l’enfant ulisant le vélo - le repère de
profondeur d’inseron du guidon (9) ne peut pas être visible, il doit se trouver
à l’intérieur du cadre. Serrez fermement l’écrou sur le collier (14) et cachez-le à
l’aide d’un cache-écrou (8). Après avoir ni le procédé, assurez-vous que le gui-
don est installé de façon stable. S’il s’avère que non - serrez l’écrou sur le collier
plus fermement jusqu’à ce que vous aeigniez la stabilité requise.
Aenon ! Lors de l’assemblage, assurez-vous que la fourchee avant avec la
roue est installée correctement dans le cadre. Le vélo devrait être assemblé,
démonté et ajusté uniquement par un adulte.
2. Selle (Fig. 3).
Insérez le tube de sous selle dans l’ouverture pour la selle dans le cadre (12).
Ajustez la hauteur de la selle à la taille de l’enfant ulisant le vélo - le repère de

‑ 19 ‑ ES‑ 19 ‑ FR | ES
profondeur d’inseron du guidon (11) ne peut pas être visible, il doit se trouver à
l’intérieur du cadre. Serrez fermement l’écrou sur le collier de xaon de la selle
(13) Après avoir ni le procédé, assurez-vous que la selle est installée de façon
stable. S’il s’avère que non - serrez l’écrou sur le collier plus fermement jusqu’à
ce que vous aeigniez la stabilité requise.
3. Frein (Fig. 4 i 5)
Avant de commencer à uliser le vélo, il est nécessaire de s’assurer que le frein
est correctement réglé. Le desserrage de l’écrou interne entraîne que le câble de
frein sera tendu. Il convient de serrer également l’écrou externe (comme indiqué
sur la Fig. 4). Le serrage du boulon de réglage entraîne que la poignée de frein
s’approchera au guidon et la tension du câble de frein sera élevée (Fig. 5).
Ulisaon
Il convient de s’asseoir sur la selle, saisir fermement les deux poignées du guidon
et puis de se pousser du sol en alternance avec les pieds. Après avoir gagné de
la vitesse, il convient de soulever les pieds pour aller librement. De cee façon,
l’enfant devrait apprendre comment maintenir l’équilibre. Pour tourner, il faut
tourner le guidon dans le sens de rotaon et de balancer le corps. Pour freiner,
il faut toucher le sol avec les pieds.
ENTRETIEN ET LAVAGE
Neoyez le vélo avec un chion humide, essuyez-le jusqu’à ce qu’il soit sec. Ne
pas uliser des agents de neoyage corrosifs ou abrasifs.
Les images sont à tre indicaf seulement, l’apparence réelle des produits peut diérer de celle présentée
dans les images.
ES
¡Apreciado cliente!
Si enes algún comentario o pregunta sobre algún producto que hayas comprado,
por favor contacta con nosotros: [email protected]
Fabricante:
BrandLine Group Sp. z o.o.
A. Kręglewskiego 1, 61-248 Poznań, Polonia

‑ 20 ‑ES
Información importante
Por favor, lee este manual antes de ulizar el producto para familiarizarte con
sus funciones y ulizarlo de acuerdo con su uso previsto. Guarda este manual
para futuras referencias.
¡Advertencia:
• El producto está desnado a niños con una edad comprendida entre 3 y 6
años y con un peso de hasta 30 kg.
• El triciclo está diseñado para ser usado por una persona.
• La bicicleta solo debe ser montada, desmontada y regulada por un adulto y
encontrándose lejos de los niños.
• Durante el uso, es necesario ulizar equipo de protección (casco, coderas).
• No permitas el niño hijo se ponga de pie en el sillín.
• No ulices la bicicleta en supercies inclinadas o desiguales.
• No ulices la bicicleta cerca de zonas con tráco de vehículos.
• No ulice la bicicleta cerca de lugares potencialmente peligrosos (por ejem-
plo, piscinas).
• No dejes que el niño use el disposivo sin la supervisión de un adulto.
• Un niño que usa una bicicleta debe usar zapatos.
• El juguete debe manipularse con cuidado. Se necesitan habilidades para
evitar caídas o colisiones que lo lasmen a usted oa otras personas.
• Mantén las bolsas de plásco fuera del alcance de los niños, ya que presen-
tan riesgo de asxia.
• Antes de cada uso, compruebe si la bicicleta está dañada, si hay conexiones suel-
tas o si faltan piezas. No ulice el producto si falta alguna pieza o está dañada. En
este caso, póngase en contacto con el punto de servicio autorizado del fabricante.
• No remolques la bicicleta con un coche u otro vehículo.
• Mantén el producto alejado del calor, altas temperaturas, supercies calien-
tes, chispas, llamas abiertas, aceite y bordes alados.
• Guarda la bicicleta en un lugar seco.
• En condiciones atmosféricas desfavorables (tales como: nieve, lluvia o hielo),
el niño no debe usar la bicicleta
• Las áreas más seguras para los ciclistas son aquellas con poco o ningún tráco
vehicular, tales como áreas privadas, paosde recreo, áreas de recreo escolares.
Table of contents
Languages:
Other Lionelo Bicycle manuals

Lionelo
Lionelo Kori User manual

Lionelo
Lionelo Casper User manual

Lionelo
Lionelo Tris User manual

Lionelo
Lionelo TIM PLUS User manual

Lionelo
Lionelo Bart Air User manual

Lionelo
Lionelo Bart Tour User manual

Lionelo
Lionelo Alex User manual

Lionelo
Lionelo Haari User manual

Lionelo
Lionelo Dan plus User manual

Lionelo
Lionelo DAN User manual