manuals.online logo
Brands
  1. Home
  2. •
  3. Brands
  4. •
  5. Little Tikes
  6. •
  7. Scooter
  8. •
  9. Little Tikes Viro Rides Vega User manual

Little Tikes Viro Rides Vega User manual

Other Little Tikes Scooter manuals

Little Tikes Glow Stick Scooter User manual

Little Tikes

Little Tikes Glow Stick Scooter User manual

Little Tikes Learn to Turn 640094M User manual

Little Tikes

Little Tikes Learn to Turn 640094M User manual

Little Tikes 638152E4 User manual

Little Tikes

Little Tikes 638152E4 User manual

Little Tikes Lean to Turn Scooter User manual

Little Tikes

Little Tikes Lean to Turn Scooter User manual

Little Tikes Lean to Turn User manual

Little Tikes

Little Tikes Lean to Turn User manual

Popular Scooter manuals by other brands

Segway Robotics Loomo Product information guide

Segway Robotics

Segway Robotics Loomo Product information guide

HL Corp ESX3 instruction manual

HL Corp

HL Corp ESX3 instruction manual

F-Wheel DYU S1 instructions

F-Wheel

F-Wheel DYU S1 instructions

Handicare Fortress 2000 SERIES owner's manual

Handicare

Handicare Fortress 2000 SERIES owner's manual

HYOSUNG SF 50 B manual

HYOSUNG

HYOSUNG SF 50 B manual

HOMCOM 371-004 Assembly instruction

HOMCOM

HOMCOM 371-004 Assembly instruction

Kinroad XT125T-10 instruction manual

Kinroad

Kinroad XT125T-10 instruction manual

PLAYTIVE AS-2448 Instructions for use

PLAYTIVE

PLAYTIVE AS-2448 Instructions for use

Ebinger DONKEY XL User instructions

Ebinger

Ebinger DONKEY XL User instructions

Flyer Mountain Original instruction manual

Flyer

Flyer Mountain Original instruction manual

BackCountry eBikes Storm owner's manual

BackCountry eBikes

BackCountry eBikes Storm owner's manual

Pride Boxter owner's manual

Pride

Pride Boxter owner's manual

equipmed FreeRoam II user manual

equipmed

equipmed FreeRoam II user manual

WESTHILL BIKES LINK user manual

WESTHILL BIKES

WESTHILL BIKES LINK user manual

BAnff eProdigy series Assembly manual

BAnff

BAnff eProdigy series Assembly manual

Winther 475 Assembly instruction

Winther

Winther 475 Assembly instruction

Jetson JBZL17 user manual

Jetson

Jetson JBZL17 user manual

Carrera impel manual

Carrera

Carrera impel manual

manuals.online logo
manuals.online logoBrands
  • About & Mission
  • Contact us
  • Privacy Policy
  • Terms and Conditions

Copyright 2025 Manuals.Online. All Rights Reserved.

1 2
3 4
5 6
Use the included wrench to remove the nuts
from the handlebar bolts.
Use an Allen wrench to remove the screw from the brake. Push up rmly on the brake to remove the handlebar grip
and slide the brake o of the handlebar.
Push up rmly on the throttle to remove the handlebar grip
and slide the throttle o of the handlebar.
Lift up the handlebar and remove the
handlebar covering and bolts.
Use an Allen wrench to remove the screw from the throttle.
Replacing the Handlebar
NOTE: BEFORE BEGINNING, ENSURE THE UNIT IS TURNED OFF.
IMPORTANT: An ADULT must make all repairs. Thoroughly inspect all parts after making modications. DO NOT RIDE until
you are sure the proper repairs have been made and the unit is assembled according to the manufacturer’s specications.
If you are unsure of any repairs, contact consumer service.
7 8
1
2
910
Little Tikes Consumer Service || 2180 Barlow Road Hudson, Ohio 44236 U.S.A. || 1-800-321-0183
1118-0-E
11 12
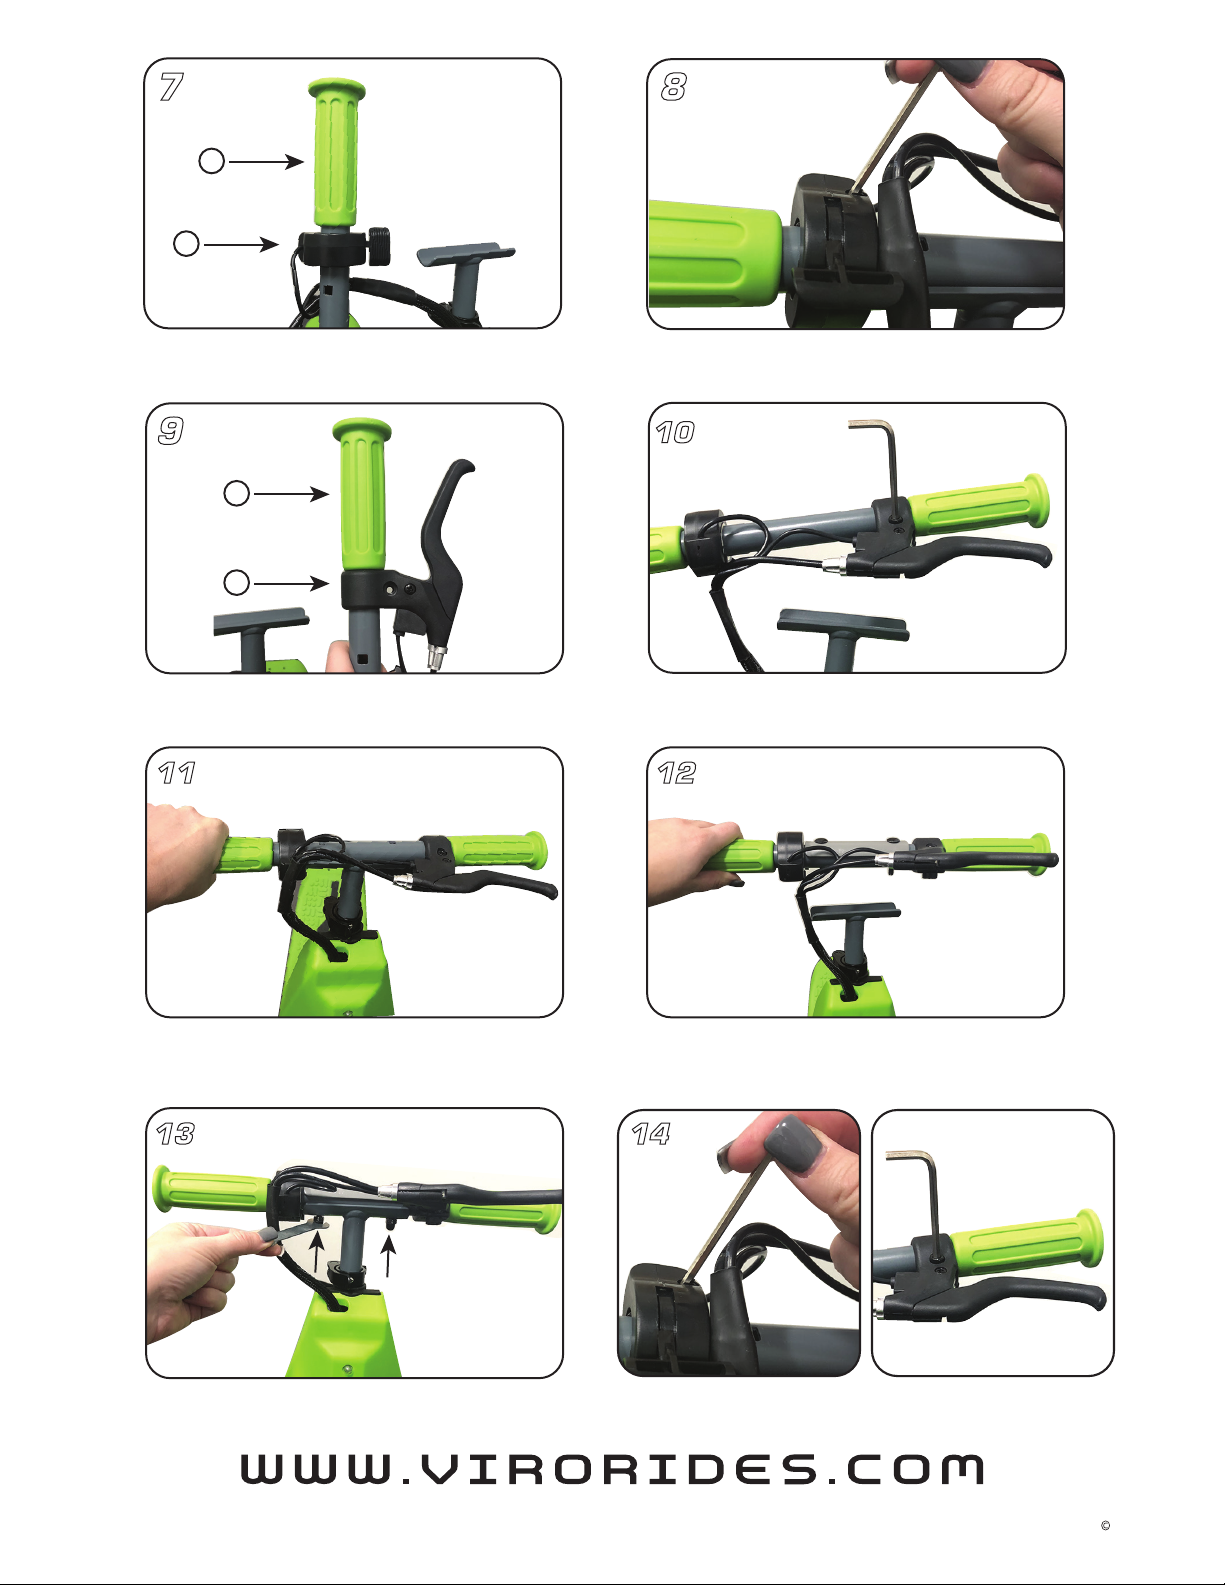
Take the new handlebar and slide on the throttle. The
throttle should not go past the square opening for the bolt.
Then, slide the new grip all the way onto the handlebar.
Place the handlebar on the T bar with the throttle lever
facing the deck and the brake facting away from the deck.
Align the bolt openings on the handlebar with the openings
on the T bar, and hold it in place.
Place the handlebar covering and two bolts over the new
handlebar.
Replace the throttle screw, and tighten it with an Allen
wrench. The lever on the throttle should face the deck.
Do not fully tighten to leave room for adjustment.
Replace the brake screw, and tighten it with an Allen wrench.
The brake should face outward, away from the deck.
Do not fully tighten to leave room for adjustment.
Little Tikes
Illustrations are for reference only. Styles may vary from actual contents.
1
2
On the opposite side of the handle, slide on the brake. The
brake should not go past the square opening for the bolt.
Then, slide the new grip all the way onto the handlebar.
13 14
Adjust the brake and throttle by twisting to the desired
position. Then, tighten rmly with an Allen wrench.
Replace the nuts under the handlebar and secure with the wrench.