LSC MANTRA LITE User manual

Lighting Control
for LEDs, Moving Lights & Dimmers
Quick Start Guide
Version V 1.1 June 2016

Mantra Lite Quick Start Guide
Document number: MAN-T01U-A2
Disclaimer
LSC Lighting Systems (Aust) Pty. Ltd. has a corporate policy of
continuous improvement, covering areas such as product design and
documentation. In light of this policy, some detail contained in this
manual may not match the exact operation of your product.
Information contained in this manual is subject to change without
notice.
In any event, LSC Lighting Systems (Aust) Pty. Ltd. cannot be held
liable for any direct, indirect, special, incidental, or consequential
damages or loss whatsoever (including, without limitation, damages
for loss of profits, business interruption, or other pecuniary loss)
arising out the use or the inability to use this product for its intended
purpose as expressed by the manufacturer and in conjunction with
this operating manual.
Servicing of this product is recommended to be carried out by LSC
Lighting Systems (Aust) Pty. Ltd. or its authorized service agents.
No liability will be accepted whatsoever for any loss or damage
caused by service, maintenance or repair by unauthorized
personnel.
In addition, servicing by unauthorized personnel may void your
warranty.
LSC Lighting Systems’ products must only be used for the purpose
for which they were intended
© 2015
LSC Lighting Systems (Aust) Pty. Ltd.
ABN 21 090 801 675
65-67 Discovery Road
Dandenong South, Victoria 3175 Australia
Tel: +61 3 9702 8000 Fax: +61 3 9768 2631
web: www.lsclighting.com

Contents
1Overview ..................................................... 4
2Help............................................................ 4
3Undo........................................................... 4
4Getting Connected ........................................ 5
5Front Panel .................................................. 6
6Touch Screen ............................................... 7
7Controlling Fixture Intensity........................... 8
8Controlling Fixture Parameters ....................... 9
9Selecting Fixtures ......................................... 9
10 Controlling Colour........................................10
11 Controlling Pan/Tilt ......................................12
12 Automatic Fixture De-select ..........................13
13 Animate Apps..............................................13
14 Clearing Fixtures .........................................15
15 Recording Your Work ...................................16
16 Playback.....................................................17
17 Latest Takes Precedence ..............................20
18 Editing Cues................................................21
19 Save/Load ..................................................21
20 Patching Fixtures .........................................22
21 Fixture Editor ..............................................24
22 Rig View .....................................................24

Page 4
1Overview
This “Quick Start Guide” provides basic information on
patching, controlling intensity, colour & position,
creating a simple animation plus recording and
playback. Training videos plus the “Mantra Operation
Manual” containing full descriptions of all functions are
available at: mantralite.lsclighting.com
Mantra comes with a “Demo” show pre-loaded so that
you can familiarise yourself with the controls before
patching your own fixtures. If you don’t need the
demo show and want to patch your own fixtures now
go straight to section 20.
Mantra can control up to 24 lighting fixtures. The
fixtures that you control might be……
A conventional lighting dimmer.
A multi-colour LED fixture.
A multi-colour fixture with additional controls for
pan and tilt and/or beam shapes.
Each fixture is patched to a Yellow fader and button.
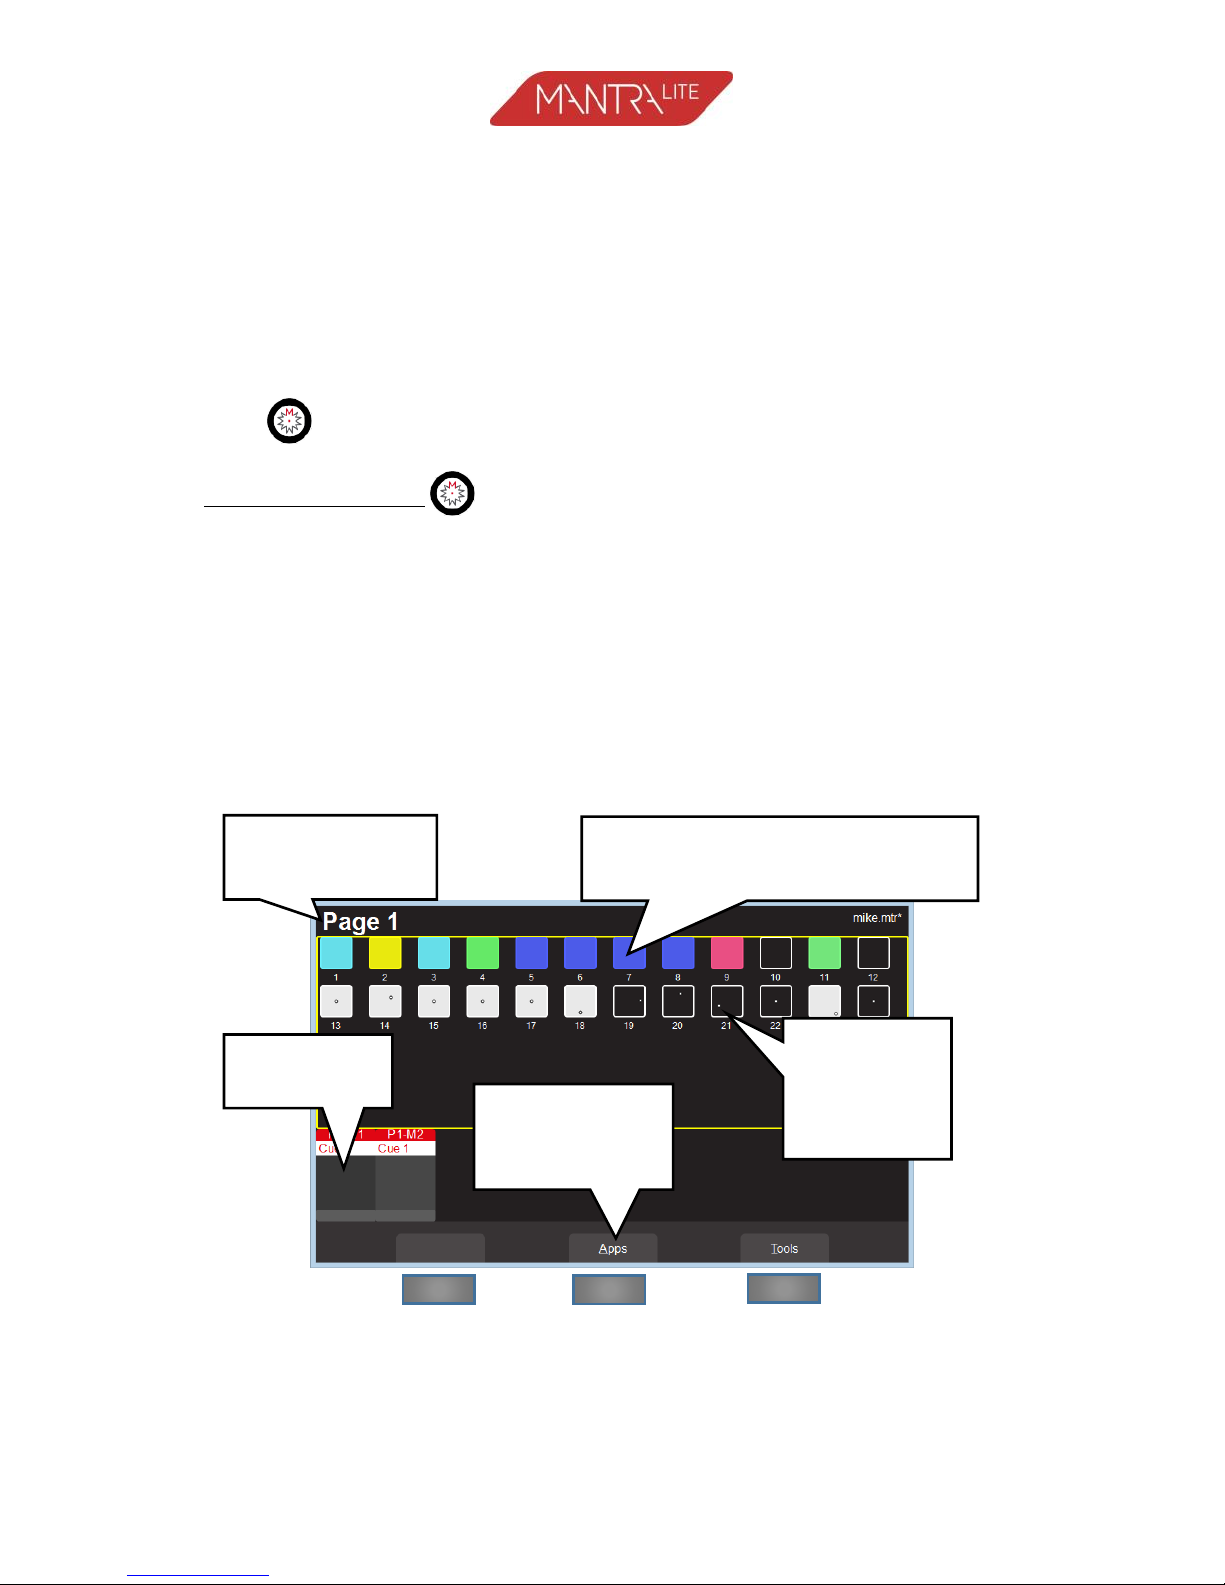
2Help
Context sensitive help is available on the touch screen
for many functions of the Mantra. Tap the button
to open the help screen. Tap to close.
3Undo
To quickly undo the last action double tap .
To undo more than one action tap once to see the
list of your actions.
Touch Undo to undo an action and step down the list.
Touch Redo to redo an action and step up the list.
Tap the [Back] button to finish.
Note: The undo list is automatically cleared whenever
you save your show, start a new show or load an
existing show.

Page 5
4Getting Connected
4.1 Power Input
Two models of MantraLite are available:
The MANTRA/LT has an IEC mains input (90
volts to 260 volts).
The MANTRA/LT/E has 12 volt DC power input.
An external mains power pack is supplied.
4.2 DMX 512 Output
Connect a DMX data cable from the DMX512 output
(one universe of 512 channels) to the DMX512 input of
your first fixture (dimmer, LED or Mover) and loop to
the next fixture/s. Only use specific DMX cable (never
use audio cable) and always terminate the end of the
DMX line. Set the required DMX addresses on your
equipment. Patch each fixture to a yellow fixture
fader. See section 20 for more details on patching.
4.3 Ethernet Network Connector
The RJ45 Ethernet connector can be used to output
Streaming ACN (sACN) and ArtNet. These are lighting
control protocols that send DMX lighting data over a
network or to a lighting visualiser program running on
a computer. It can also be used to connect the
MantraLite to the internet to upload custom fixture
templates. See the “Mantra Operator Manual” at
mantralite.lsclighting.com for details.
4.4 USB Connectors
The two USB connectors can be used to connect:
A USB keyboard.
A memory stick for show backup and software
upgrades.
A USB LED desk lamp (up to 250mA).

Page 6
5Front Panel
The 24 Yellow fixture faders control fixture intensity.
Moving a fixture fader automatically selects that
fixture allowing its other parameters such as colour or
position to be controlled by Apps on the touch screen.
Moving a fader to zero deselects the fixture.
The Yellow “Fixture Master” has overall intensity
control of the yellow fixture faders.
The current output can be recorded into any of the Red
playbacks by tapping [Record] then tapping a Red
playback button of your choice [1-10].
24 Fixture Faders
and Buttons
(Yellow)
10 Playback
Faders and
Buttons
(Red)
Playback
Pages
Playback
Master
(Red)
Fixture
Master
(Yellow)
Record
Output
Help
Undo
Touchscreen
Back
Select

Page 7
Different looks can be recorded on different Red
Playback faders so that you can easily change the entire
look on stage by using the Red Playbacks.
See section 15 for more details.
6Touch Screen
If the touch screen is not on the “Home” screen, tapping
the [Back] button steps back through the screens
to the “Home” screen.
Double tapping [Back] quickly returns to the “Home”
screen from any screen.
The “Home” screen is divided into two sections:
The top section (yellow border) has fixture icons
that show the intensity, colour and position (if
applicable) of the patched fixtures.
The bottom section shows the contents of the
red Playbacks.
The 3 buttons below the touch screen have different
functions for different screens. Their current function
Fixture Icons show intensity,
colour and position
Playback
Contents
Dot shows
position of
moving
fixtures
Red Playback
Page Number
Current
function of
button below

Page 8
is shown on the screen above each button. You can
tap the button or touch the screen to operate them.
Touching anywhere in the top “fixtures section” of the
“Home” screen or touching Apps opens the “Apps”
screen. Apps are used to control the parameters of
selected fixtures. Move a yellow fader to automatically
select that fixture. Use an App to adjust the
parameter. Other methods of selecting fixtures are
described in section 9.
The bottom section of the “Home” screen has Playback
icons showing the contents of each Playback (if any).
Touching any playback icon to modify it. See 16.2
7Controlling Fixture Intensity
The 24 (yellow) fixture faders (under the overall control
of the yellow fixture master) control the intensity of the
fixtures that are patched to them. To see the output of
a fixture:
Fade up the Yellow Master.
Fade up a fixture fader to set its Intensity.
7.1 Flash
When the touch screen is on the “Home” screen, the
buttons below the yellow faders act as intensity
[FLASH] buttons. You can set the flash intensity level
in the Tools/Setup screen.
If a red fader contains a single cue then its button acts
as intensity [FLASH] button.
If a red fader contains a cue-list then its button “steps”
the cue-list. See section 16.

Page 9
8Controlling Fixture Parameters
Mantra uses “Apps” on the touch screen to control the
parameters of selected fixtures. From the “Home”
screen, open the “Apps” page by touching anywhere in
the top half of the touch screen or touching Apps.
Apps Screen
There are 4 columns that have Apps for their type of
parameter:
Intensity, Colour, Pan/Tilt, Other.
Touch the App for the parameter that you want to
control.
9Selecting Fixtures
When you use an App, you need to select the fixtures
that you want to control with that App. Fixtures that
have attributes that can be controlled by the selected
App will flash their buttons indicating that they are
available for selection. When a fixture is selected its
button is lit. Multiple fixtures can be selected at the
same time. Fixtures can be selected using several
methods:
Move a yellow fader to automatically select that
fixture. Move the fader to zero to de-select it.
Tap the button below a yellow fader to select
that fixture. Tap again to deselect it.
“Clear”
See section 14

Page 10
To select a range of fixtures, hold the first
button and tap the last button in the range. This
work low to high number and high to low
number.
Tap [Select] to use previous selections or
to select None.
10 Controlling Colour
10.1 Picker
From the “Home” screen, open the “Apps” page
(described above) then touch the colour Picker app
icon. Fixtures that have colour attributes will flash
their buttons. Select the fixtures (described above)
then drag your finger to change the colour. The colour
is selected when you lift your finger from the screen.
The side of the colour picker app shows the recently
selected colours. Touch any of the recent colours to
re-use them.
10.2 Fan
When multiple fixtures are selected you can fan their
colours to create rainbow effects.
Recently
selected
colours
Fine Control
Fan
Red Green Blue sliders
for individual control

Page 11
Touching Fan selects “Directional” fanning. Drag to
fan the colours across the selected fixtures.
Touching Fan again selects “Symmetrical” fanning.
Drag to fan the colours with your finish colour in the
centre of your fixture selection.
Touching Fan again turns fanning off.
Your fixture selection order is used by the Fan App.
Experiment with different orders of selection to get
different colour effects.
Previous selections can be re-used by tapping the
[Select] button.
10.2.1 Sliders
Touching Sliders opens the “Colour Sliders” screen
that provides individual sliders for Red, Green and
Blue allowing accurate setting of colours.
Colour Sliders
+and –buttons are provided for small
increments.
Decimal values of the Red, Green, Blue sliders
are shown on the right.
Hexadecimal values of the Red, Green, Blue sliders are
shown at the top. If you touch inside the Hex:# box you
RGB values in
Hexadecimal
Set

Page 12
can enter exact values using the keyboard that appears.
Enter your values (in Hex) then touch Set.
10.3 Gels
The colour Gels app is similar to the “Picker” app but
has 100 commonly used colour gels to choose from.
11 Controlling Pan/Tilt
From the “Home” screen, open the “Apps” page then
touch the Pan/Tilt Position app icon. Fixtures that have
Pan/Tilt attributes will flash their buttons. Select the
fixtures then drag your finger around the touchscreen
to move the beam around the stage. You don’t have to
touch the current position icon to move a fixture, you
can touch and drag anywhere on the screen and the
selected fixture(s) will follow your movements.
11.1 Flip
Touching Flip Pan or Flip Tilt reverses the direction
of movement. These settings are useful if the fixture
movement is opposite to the movement on the touch
screen.
11.2 Centre
Touching Centre moves the selected fixtures to their
centre position.
11.3 Fan
When multiple fixtures are selected you can fan their
positions to create symmetrical patterns.
Touching Fan selects “Centred” fanning. Drag to fan
the positions around the centre fixture.
Touching Fan again selects “Directional” fanning. Drag
to fan the positions around the first fixture in your
selection.

Page 13
Touching Fan again selects “V–Shape” fanning. This
pan works best when fixtures are already fanned into
a line. Drag to pull the line of fixtures into a V shape.
Touching Fan again turns fanning off.
Your fixture selection order is used by the Fan App.
Experiment with different orders of selection to get
different shapes. Previous selections can be re-used by
tapping the [Select] button.
12 Automatic Fixture De-select
When you open an App, fixtures that have attributes
that can be controlled by that App flash their buttons
indicating that they are available for selection. When
you select fixtures their buttons are lit. After you have
used the App to change any parameter of the selected
fixtures, the buttons of the un-selected fixtures stop
flashing. This tells you that selecting another fixture
will cancel the previous selection and start a new
selection process. This speeds up operations because
you don’t have to de-select fixtures once you have set
their parameters.
For example: Open the Colour Picker App and fade up
fixtures 1 and 2. They are automatically selected. Pick
a colour. Fade up fixture 3 and 4. This de-selects 1
and 2 and selects 3 and 4. Pick a colour for 3 and 4.
Automatic fixture de-select can be overridden by
holding the [Select] button whilst selecting
additional fixtures.
13 Animate Apps
Animate Apps provides a simple and intuitive way of
creating chases and moving patterns. They work with
2 or more selected fixtures and they shift the
parameters (such as colour or intensity or position)
from one fixture to the next and loop the settings of
the last selected fixture back to the first. There must

Page 14
be at least one different setting amongst all of the
selected fixtures so that you can see the different
setting being shifted from one fixture to the next.
Example 1:
Let’s create a 2 colour animation using RGB LED
fixtures 1 through 4:
From the “Home” screen, open the “Apps” page
then touch the Colour Picker app icon.
Fade up fixtures 1, 2 and 3. This automatically
selects them.
Select a colour (say Red) by touching the colour
picker.
Fade up fixture 4. This automatically deselects
the previous selection and selects fixture 4.
Select a different colour (say Blue).
Tap [Back] once to return to the Apps
screen then open the Colour Animate app.
Select all 4 fixtures by fading them up to full or
tapping their buttons then touch Create.
The animation runs and the blue steps through
the 4 fixtures.
Fixture 1
Fixture 2
Fixture 3
Fixture 4
Step 1
Step 2
Step 3
Step 4
Step 1
Example 2:
Let’s create a 4 fixture intensity animation (a chase)
using fixtures 1 to 4:
Fade up the fixture 1 to full and fade down
fixtures 2, 3 and 4 to zero.
Open the Intensity Animate app icon.

Page 15
Select fixtures 1 through 4 by holding fixture
[1] button and tapping fixture [4] button (or
tap them individually).
Touch Create and the animation runs as an intensity
chase.
Fixture 1
Fixture 2
Fixture 3
Fixture 4
Step 1
Step 2
Step 3
Step 4
Step 1
All animation Apps have controls for:
Speed in BPM (Beats Per Minute).
Crossfade: When set to “0%”, the animation
snaps from step to step. When set to “100%”, it
fades from step to step. In between settings
give a proportional crossfade and a pause.
Direction: Forward, Reverse, Centre Out or
Centre In.
The only limitation for animations is that there must
be at least 2 fixtures selected and there must be at
least one different setting in one of the fixtures.
Multiple animations can be running simultaneously.
14 Clearing Fixtures
If you have used any Apps to control fixture attributes
such as selecting a colour or position or created an
animation(s), you can clear these settings and restore
the fixture(s) to its default settings (open, white,
centred beam) and delete any animations.
From the “Apps” screen, touch Clear then make your
choices from the screen.
Note: Recording a cue (see below) that contains an
animation automatically clears that animation from the
yellow faders.

Page 16
15 Recording Your Work
When you have adjusted the intensity and colour of
your fixtures and possibly created an animation(s) you
can record the current output of the MANTRA onto a Red
Playback fader.
To record the current output onto a Red Playback fader,
tap [Record] then tap the button below the Red
Playback fader of your choice [1-10]. All of the
attributes of any fixture with an intensity level greater
than 0% will be included and the recording is called a
cue.
To include fixtures with no intensity, after taping
[Record], tap [Select], then tap (and light) the
buttons of any fixtures with no intensity that you want
to include in the cue.
The look on stage can now be played back from the
recorded cue (see Playback below). This frees up the
yellow faders ready for you to create another lighting
look and to record it into another cue.
If you record a cue to a Red Playback that already
contains a single cue and choose “Add”, then you
automatically create a "Cue-list". See section 16.1
The Red "Playback Master" fader has overall intensity
control of the Red playbacks.
15.1 Pages
There are 10 red playback faders and 10 pages of
memory giving a total of 100 memories. Each memory
can contain either a single cue or a "cue-list" which
can contain up to 250 cues.
Repeated taps of the [Page] button will step
through the 10 pages of memory.
To switch directly to a page number; HOLD
[Page] and TAP a red fader button [1 to
10].

Page 17
The current page number is shown in the top left corner
of the “Home” screen and the contents of the red
playback faders are shown along the bottom.
16 Playback
To playback a recorded cue, fade up the Red Playback
Master to full and fade up the Red Playback fader where
you recorded the cue (remember to select the correct
page). You might want to fade down the Yellow master
(or all of the yellow fixture faders) after you bring up
the Red playback, so that you only see the recorded
look on the output.
Different looks can be recorded in different cues so that
you can easily change the entire look on stage by only
using the Red Playbacks.
Unlike the Yellow Fixture faders that only control
intensity, the Red Playback faders control all of the
parameters of the fixture that have been recorded in
the cue. This allows you to crossfade from one Playback
to another with a smooth transition of intensity, colour
and position. See Latest Takes Precedence (LTP) below.
16.1 Cue-lists
If a Red Playback contains a cue-list you can crossfade
to the next cue in the list by tapping its playback
button (below its fader). The crossfade uses the “fade
in” and “fade out” times in the cues (see below).
To crossfade in the reverse direction HOLD the
[Back] button whilst tapping the playback button.

Page 18
The current cue has a white background. A pointer
indicates when a fade is in progress.
The cue-list can be manually played as a “list” or
automatically played as a “chase” (see below).
16.2 Modifying Playbacks
If you touch a playback icon you can modify its
contents.
Touch a cue to select/de-select it. Multiple cues can be
selected. You can:
Change “Fade In” time and a “Fade Out” times.
Duplicate cues.
Re-order the cues.
Re-name cues.
Delete cues.
Delete the entire memory (all cues in the list).
Jump directly to any cue in the list. Useful if you
have a long cue-list and you want to quickly
Touch the
Playback icon to
modify the cue-list
Use as Chase
Selected Cue
Current
Cue
Playing as a
“list”
Fade in
progres
s

Page 19
playback a cue without stepping through all of
the intermediate cues.
Use the list as a chase or a cue-list.
16.3 Chase
To change a cue-list into an automatically stepping
“Chase” touch its playback icon then select “Use as
Chase”. The list will automatically increment through
the steps using the speed and crossfade settings.
Traditionally chases will snap (instantly switch) from
step to step but you may also set a crossfade value so
that it will fade from step to step. Chases
automatically stop when their red fader is at zero.
You can manually step a chase by tapping its playback
button (below its red fader). Hint: Set a low speed if
you want to manually step the chase.
To manually step in the reverse direction HOLD the
[Back] button whilst tapping the playback button.
16.4 Page Freeze
A “PAGE FREEZE” feature prevents the contents of an
“active” Red playback fader from being changed if its
Chase Speed in
Beats Per Minute
Percentage of the step
time that is used to
crossfade between steps

Page 20
level is above 0% when a page is changed. Each
playback icons colour shows its page status.
17 Latest Takes Precedence
The value for each parameter of a fixture (intensity,
colour, position, etc.) that appears on the output is
determined by a method known as LTP (Latest Takes
Precedence) and by fader position. An LTP action
occurs when a red fader is raised above zero. When
this occurs, the fader will take control of its parameters
and they will fade to their levels in that fader following
the fader movement and fade times. When that fader
reaches 100%, it fully overrides all other faders
containing parameter values for the same fixtures.
For example:
We have 3 cues recorded on red playback faders 1 to 3
with a single LED fixture in each cue. In the first fader
the fixture is red, in the second it is blue and in the
third it is yellow.
Fade up fader 1 to full. The fixture fades to red.
Fade up fader 2 to full. The fixture fades to blue.
Fade down fader 1 and nothing happens because
fader 2 is the latest (LTP) and it is at full.
Fade up fader 3 and the fixture fades to yellow
because fader 3 is the latest.
Fade down fader 3 and the fixture fades back to
blue (the previous latest).
Remember that when the latest red fader to be raised
from zero is at full, other faders controlling the same
fixtures can be faded down without having an effect.
Red =
current page
Black = not
current page
Other manuals for MANTRA LITE
3
Table of contents
Other LSC Lighting Equipment manuals
Popular Lighting Equipment manuals by other brands

Berker
Berker 2949 Operation and assembly instructions

dehn
dehn HVI power installation instructions

Bestway
Bestway H2OGO! Slime Blast instructions

Neptun
Neptun Compact 950 ABS Installation and operating instructions, service instruction

Life
Life CIRCOLINA G10q T9 instructions

Sygonix
Sygonix SY-5170824 operating instructions