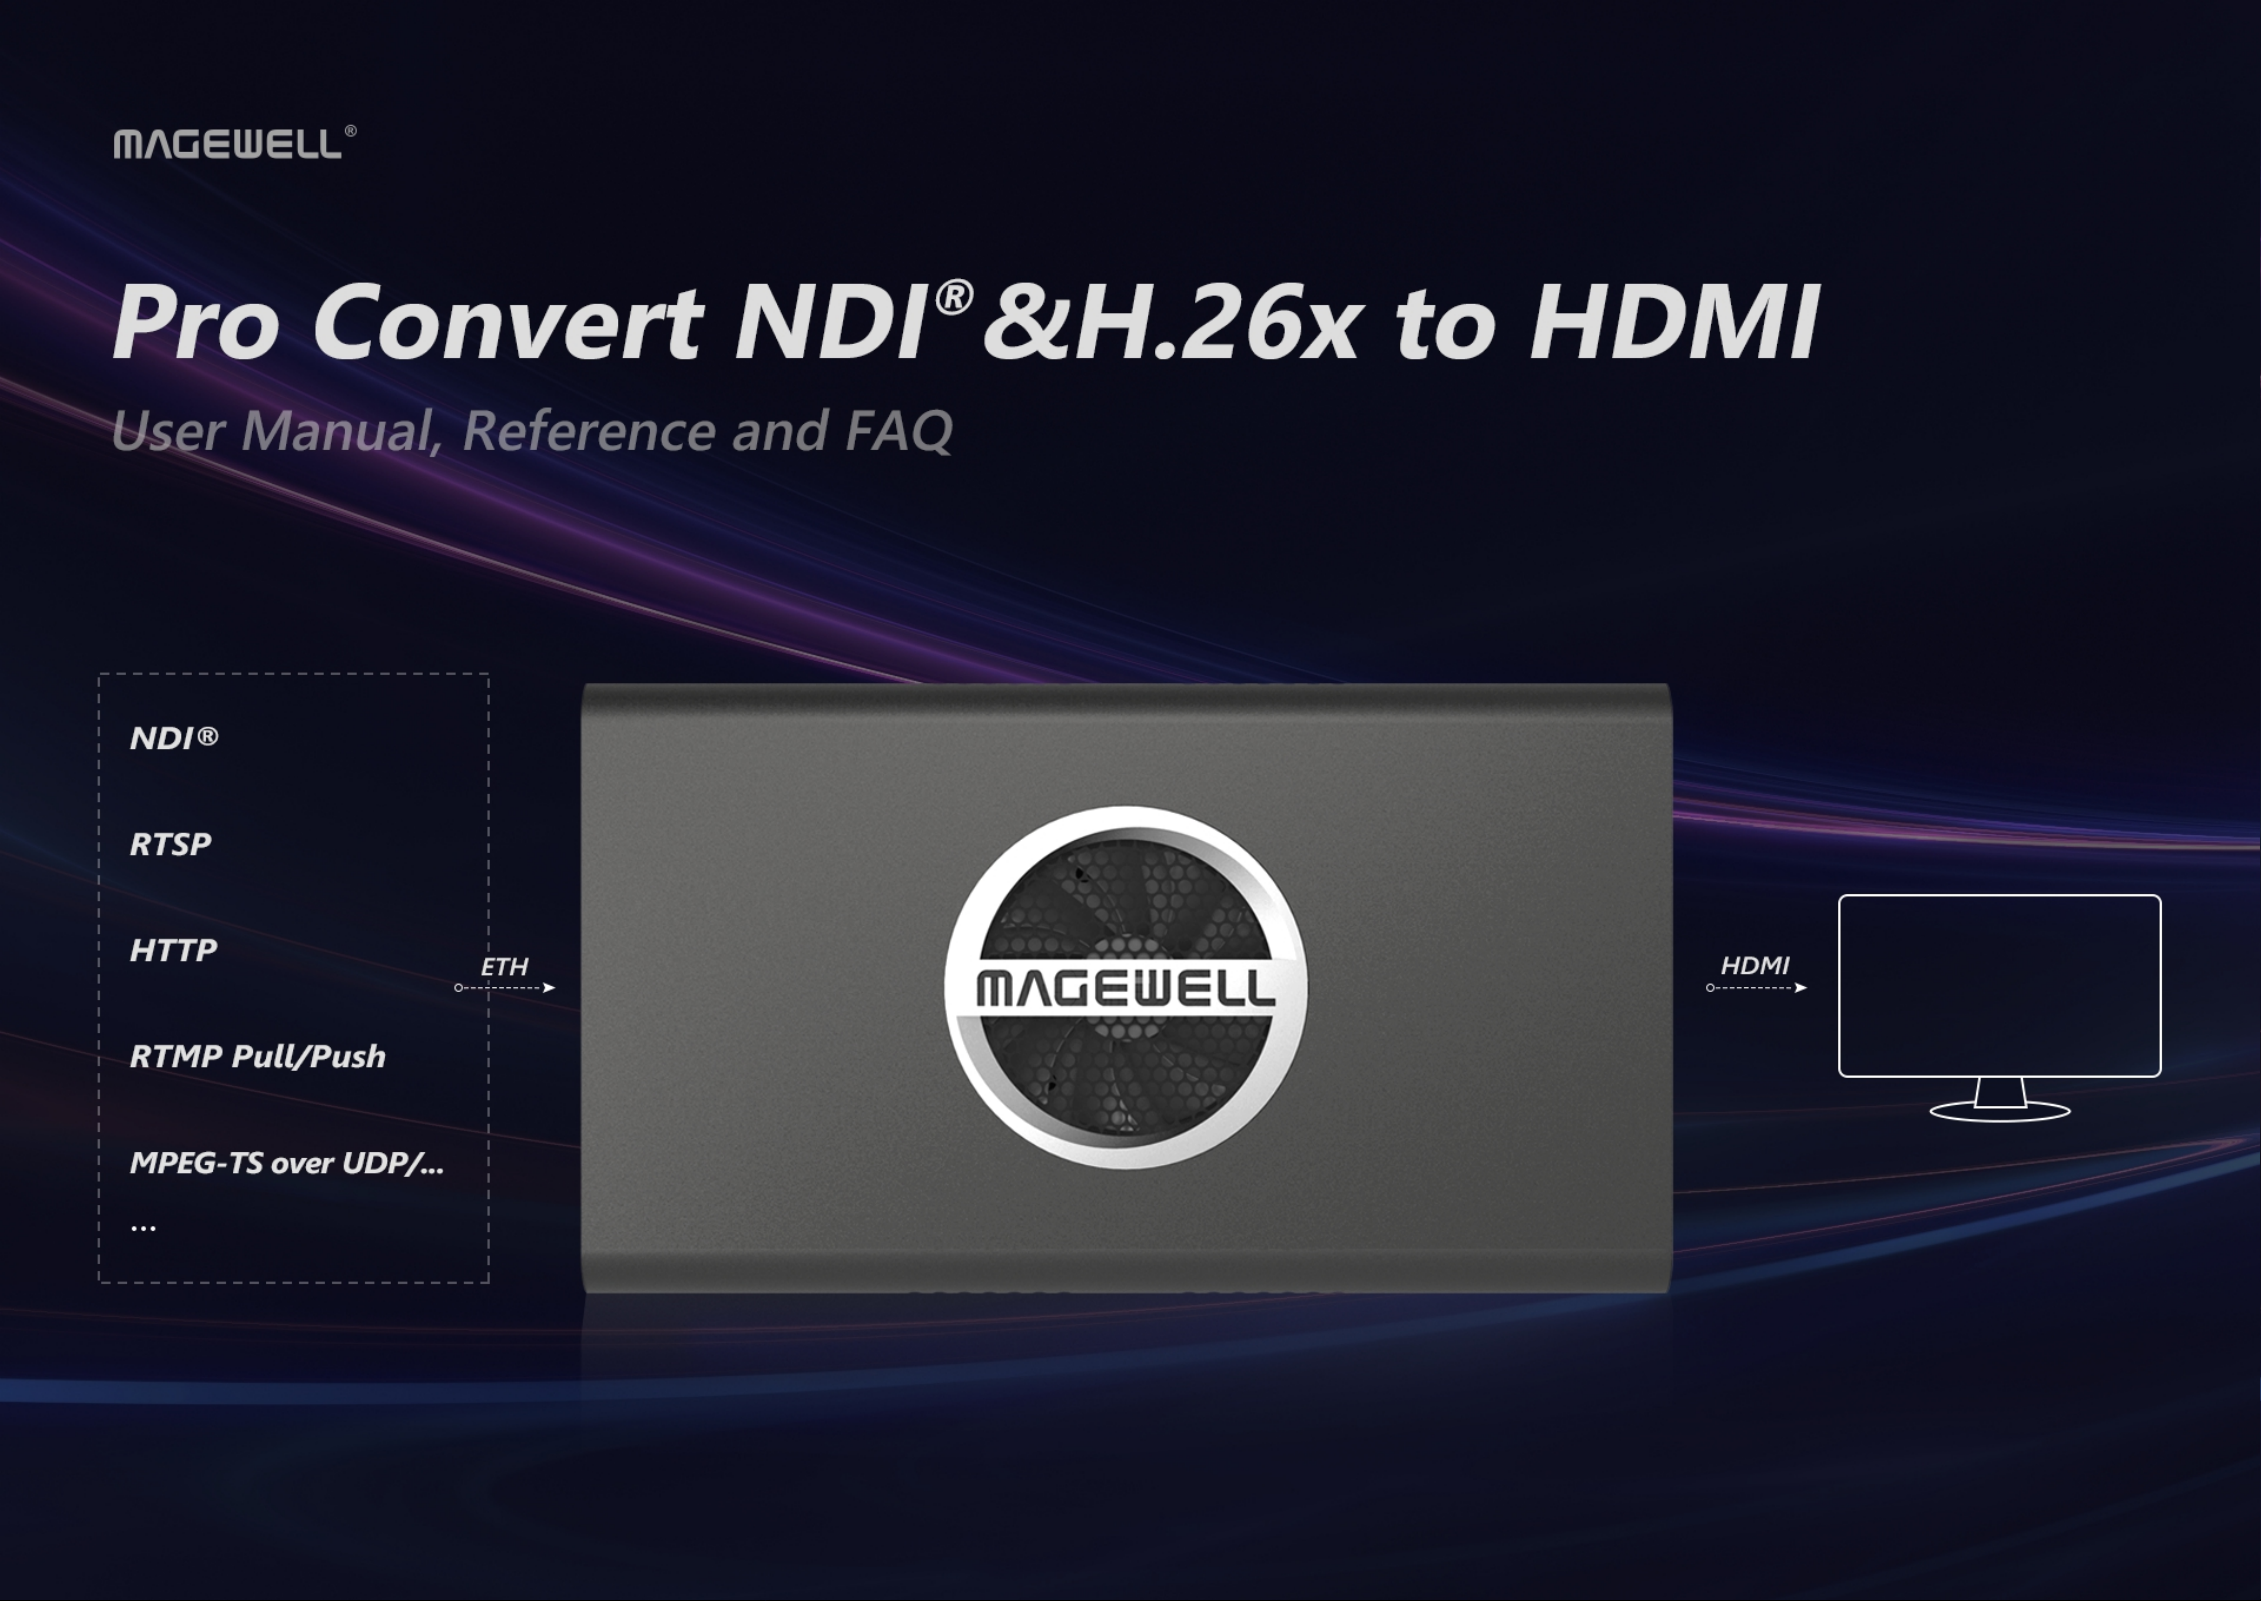
Magewell Pro Convert for NDI to HDMI 4K User manual


03
Getting Started
03Overview
03Key Features
04System Requirements
05
Installation
05Safety Information
06Interfaces & Indicators
10Connections
12
Web UI Configuration
12Accessing the Web UI
16Signing In/Out
17Dashboard
22Signal
24Video
29Audio
31EDID
32Source
29Audio
31EDID
32Source
42System
50Rebooting/Resetting Pro Convert
52
On-Screen Options Menu
Configuration
53Accessing the Options Menu
54Options
56Source
57Video
63Audio
64PTZ
66Resolution
67System
68
FAQ
79
Support
80
Warranty
TABLE OF CONTENTS
2

Overview
Pro Convert family decoders convert live NDI, H.264 and H.265 streams into
high-quality outputs for connection to baseband devices such as monitors and
projectors. The low-latency decoder simplifies the use of NewTek’s popular
media-over-IP technology in applications such as digital signage and video
walls.
The ultra-compact Pro Convert devices are ideal for both in-studio and
portable field use. The decoder features DHCP-based automatic network
configuration, while a browser-based interface provides access to status
monitoring and advanced features such as hardware-based up/down/cross-
conversion. On-device buttons also enable users to select source content and
match the output format to their target display without requiring a computer.
Key Features
Getting Started
TM
Support for decoding streams of NDI, RTSP, HTTP, HLS, RTMP Pull/Push
and MPEG-TS over UDP/SRT/RTP in H.264 or H.265 format.
■
Support for decoding embedded audio.
■
Support for PoE (Power over Ethernet).
■
Support for plug-and-play.
■
Support for Ethernet over USB.
■
Support for web-based UI remote control and on-device control buttons.
■
3

System Requirements
Network
Supported Web Browser for the Web UI
Pro Convert Decoder
This User Guide is intended to provide guidance to use the Pro Convert
decoders, including:
Magewell keeps releasing best decoders for you. The lastest product
information refers to Pro Convert Decoder Family.
Gigabit Ethernet
■
Google Chrome version 49 and above
■
Microsoft Internet Explorer 11
■
Microsoft Edge
■
Mozilla Firefox version 61 and above
■
Apple Safari 11.1 and above
■
Opera 55.0.2994.44 and above
■
Pro Convert for NDI to HDMI 4K
■®
Pro Convert for NDI to HDMI
■®
Pro Convert H.26x to HDMI 4K
■
Pro Convert H.26x to HDMI
■
4

Installation
Safety Information
Electrical Safety
Operation Safety
Seek professional assistance before using an adapter or extension cord. These devices could interrupt the grounding circuit.
■
Make sure that you are using the correct power adapter for the local voltage. If you are not sure about the voltage of the electrical outlet you are using, contact
your local power company.
■
If the power adapter is broken, do not try to fix it by yourself. Contact a qualified service technician or your retailer for help.
■
Before using the product, make sure all cables are correctly connected and the power cables are not damaged. If you notice any damage, contact your dealer
immediately.
■
To avoid short circuits, keep paper clips, screws, and staples away from connectors, slots, sockets and circuitry.
■
Avoid dust, humidity, and temperature extremes. Do not place the product in any area where it may become wet.
■
Place the product on a stable surface.
■
If you encounter technical problems with the product, contact your dealer or the Magewell Support Team via support@magewell.net.
■
5

Interfaces & Indicators
Pro Convert for NDI to HDMI
Note: The SD card function is not available currently.
®
6

Pro Convert for NDI to HDMI 4K
Note: The SD card function is not available currently.
®
7

Pro Convert H.26x to HDMI
Note: The SD card function is not available currently.
8

Pro Convert H.26x to HDMI 4K
Note: The SD card function is not available currently.
9

Figure 1. Pro Convert H.26x to HDMI
Figure 2.Pro Convert H.26x to HDMI 4K
Cable your device for power, network, output and device control.
Connections
Interfaces and cables varies according to signal supported by Pro Convert. Here takes Pro Convert for NDI to HDMI as an example to describe the cabling.
®
Plug in the USB cable to the power interface.
■
For power supply: connect the other end of the USB cable to the power
adapter.
■
For Ethernet over USB (RNDIS/ECM): connect the other end of the USB
cable to your computer.
■
Plug in the Ethernet cable to the network interface.
■
For PoE: connect the other end of the Ethernet cable to a PoE switch or
a PoE adapter for power and Ethernet connection.
■
For Ethernet connection: to ensure high speed transmission, it is
recommended to connect the Pro Convert unit to a gigabit network.
■
Plug in the HDMI cable to connect the AV equipment to the OUT interface,
such as a monitor, a video switcher or a projector.
■
An android TV is not recommended if low latency matters.
■
Connect a wired or wireless keyboard or mouse to the USB HOST interface
to make it more convenient to control advanced settings without requiring a
computer.
■
10

Figure 3. Pro Convert for NDI to HDMI
Figure 4. Pro Convert for NDI to HDMI 4K
®
®
11

Accessing the Web UI
If you know your device's IP address, type it into your web browser to display
the Web UI. Alternatively, you can access the Web UI in one of the following
ways.
Solution 1: For Windows7/8/8.1/10 users, you can find and access your Pro
Convert device as a Network device in a File Explorer window.
Solution 2: Using the Ethernet over USB function.
Solution 3: Using the on-screen menu Options.
Figure 1 Connections
Solution 1: using Windows File Explorer
This method is available for Windows7/8/8.1/10 users.
Web UI Configuration
Pro Convert allows you to control your device via a web-based user interface. With the Web UI, you can monitor the device’s working status, input signal status, and
custom parameters for your sessions. We take the Web UI of Pro Convert for NDI to HDMI as an example to describe its functionalities.
®
Connect your decoder via Ethernet and power it up as shown on the
left figure.
Step 1
Open a File Explorer window in one of the following ways.Step 2
Click on the Start button and find File Explorer in the Start
menu.
■
Press the Windows logo key + E.
■
Select the folder icon on the taskbar.
■
12

Figure 2 Find your Pro Convert device in the Network > Other Devices section
Select the Network at the bottom of the list of items on the left side
of the File Explorer.
Step 3
Turn on the network discovery function if prompted.Step 4
Find your Pro Convert device in the Other Devices section, where it
will be shown as "Pro Convert + #board index + (serial number)".
Step 5
The serial number (marked on your device) will be in a form like
"A410180706006".
■
The board index (the rotary switch number on your device) is
shown like "06" or "#06".
■
Double click the decoder icon to open the Web UI of the device in
your web browser.
Step 6
13

Solution 2: using Ethernet over USB
RNDIS (For Microsoft)/ECM (For Mac/Linux) provides a virtual Ethernet link to
the computer's operating system.
The pop-up web UI of the connected device will be shown in your
browser.
Please do not change it unless there is a conflict in your network.
Connect the device and your computer using a USB cable as shown
on the left.
Step 1
Type the Ethernet over USB IP address in your web browser. The
default address is 192.168.66.1.
Step 2
Do not connect more than one Pro Convert device
simultaneously to the same system via Ethernet over USB.
14

Figure 1 Select System in Options menu
Figure 2 Check the WebGUI
Solution 3: using the on-screen menu Options
Connect your decoder via Ethernet, power it up and connect a
presentation device as shown in the Figure1. Connections.
Step 1
Press the on-device MENU button, click the mouse or the
keyboard(if connected), to display the Options overlaid on the
output.
Step 2
Go to the System option and check for the device WebGUI URL or
scan the WebGUI QR to open the web UI in your web browser within
the same LAN with your decoder.
Step 3
15

Signing In/Out
The Web UI allows multi-users to have read/write access to make configuration
settings at the same time after logging-in. However, to avoid configuration
conflicts, we do not recommend you to operate one device simultaneously.
Note that the Reboot function requires administrative rights.
Signing In: enter your account and password in the SIGN IN page.Step 1
The default administrator account name and password are as
follows:
Username: Admin
Password: Admin
■
It is recommended to change the admin password after login
(see modify the admin password). Unlike the password, the
administrator username cannot be modified.
■
Your account will sign out automatically if there is no operation
performed within ten minutes.
■
Signing Out: click the drop-list icon behind your username at
the top-right of the Web UI, and select Sign out.
Step 2
16

Checking Basic Information
Checking the Current Working Status
Dashboard
The Dashboard tab in the web UI can show the real-time status and parameters of the Pro Convert device. Click and enter the Dashboard tab to check current device
status.
Device name shows the name of your Pro Convert unit.
Only the Administrator can modify the device name in the System >
Network tab. For detailed information, refer to Setting Device Name.
■
Serial number shows the serial number of your unit, which is also marked
on your device.
■
Hardware version shows the hardware version of your unit.
■
Firmware version shows the current firmware version that’s installed in your
unit. Only the Administrator can update the firmware, via the System >
Firmware tab. For detailed information, refer to Updating the Firmware.
■
Output shows whether an output device is connected to the Pro Convert
device.
■
CPU shows the current CPU usage (the load on the processor, shown as a
percentage) of the Pro Convert device.
CPU usage increases when the device is handling more complex video
processing tasks (e.g. decoding at higher resolutions and frame rates).
■
Memory shows current memory usage.
■
17

You can find out the free memory in System > Report tab, subject to
administrative rights.
Temperature shows the current temperature of the unit's processor.
Keeping the device free from dust and avoiding a high-temperature work
environment may help to avoid overheating of the device. If the core
temperature is approaching 100℃, please try to lower the temperature by
ensuring a supply of cooler air.
■
Board Index shows the rotary switch number.
You can change the number on the rotary switch to set a different Board
Index.
■
Up Time shows the elapsed time since your device’s last boot-up.
■
SD Card shows the capacity of current inserted SD card.
This function is not available now.
■
Fan Speed shows the current speed of fan, which automatically changes
according to temperature.
NOTE: This parameter is ONLY available for 4K products.
■
18

Checking Ethernet Status
Checking Ethernet over USB Status
Connection shows Ethernet network connection status.
■
IP Address shows Ethernet IP Address. You can manually change it in the
System > Network tab with administrative rights.
■
Send shows the current Ethernet transmission speed.
■
Receive shows the current Ethernet receive speed.
■
Connection shows Ethernet over USB connection status.
■
IP Address shows Ethernet over USB IP Address.
By default, it is 192.168.66.1. You can manually change it in the System >
Network tab, with administrative rights.
■
Send shows current Ethernet over USB send speed.
■
Receive shows current Ethernet over USB receive speed.
■
19

Checking Source Status
Settings of decoded video stream refers to the Source tab.
General shows video source information.
■
Type shows the decoding stream type which is specified in the Source
tab.
■
Connection shows whether a stream data is received by your decoder.
■
Tally shows the decoded stream "on-air" status.
NOTE: This group of parameters is ONLY available for NDI decoders.
■
®
Preview shows whether the decoded source stream is being
previewed. If yes, it shows On and is green, otherwise, it is Off and
grey.
■
Program shows whether the decoded source stream is being
programmed. If yes, it shows On and is red, otherwise, it is Off and
grey.
■
QoS shows the number of frames dropped in the previous second.
■
Video drop samples shows dropped video samples in the previous
second.
■
Audio drop samples shows dropped audio samples in the previous
second.
■
Decoding shows the decoding speed in the previous second.
■
Video shows the video bitrate for the previous second.
■
Audio shows the audio bitrate for the previous second.
■
20
This manual suits for next models
3
Table of contents
Other Magewell Media Converter manuals

Magewell
Magewell Ultra Encode AIO User manual

Magewell
Magewell Director Mini User manual

Magewell
Magewell Pro Convert AES67 User manual

Magewell
Magewell Ultra Stream HDMI User manual

Magewell
Magewell ULTRA STREAM User manual

Magewell
Magewell Ultra Encode User manual

Magewell
Magewell ULTRA STREAM User manual

Magewell
Magewell XI006AUSB User manual

Magewell
Magewell Ultra Stream SDI User manual

Magewell
Magewell Ultra Encode User manual