Magewell Ultra Encode AIO User manual


03
Preface
03Introduction
04Key Features
04System Requirements
05
Tutorial
05Part 1. Ultra Encode Setup
09Part 2. YouTube Setup
10
Installation
10Safety Information
11FCC Compliance Statement
12Interfaces & Indicators
14Installing the Encoder in a 1U Rack
15
Get Started With Ultra Encode
15Access Web UI
18Initialization
15Access Web UI
18Initialization
19
Web UI Configuration
19Access the Web UI
21Sign In/Out
22Dashboard
25Input
34Encode
38Live
59Record
71Overlay
77General
80Network
85User Admin
89Firmware
90Cloud
92About
95
FAQ
98
Support
TABLE OF CONTENTS
2

Introduction
Ultra Encode AIO offers systems integrators, streaming professionals, and OEM
partners a flexible and affordable encoding solution for applications including
live streaming, AV over IP, remote contribution, IP production workflows and
much more. This device is ideal for high-quality live streaming of content
including sports, education, and live events as well as IP-based production and
AV-over-IP.
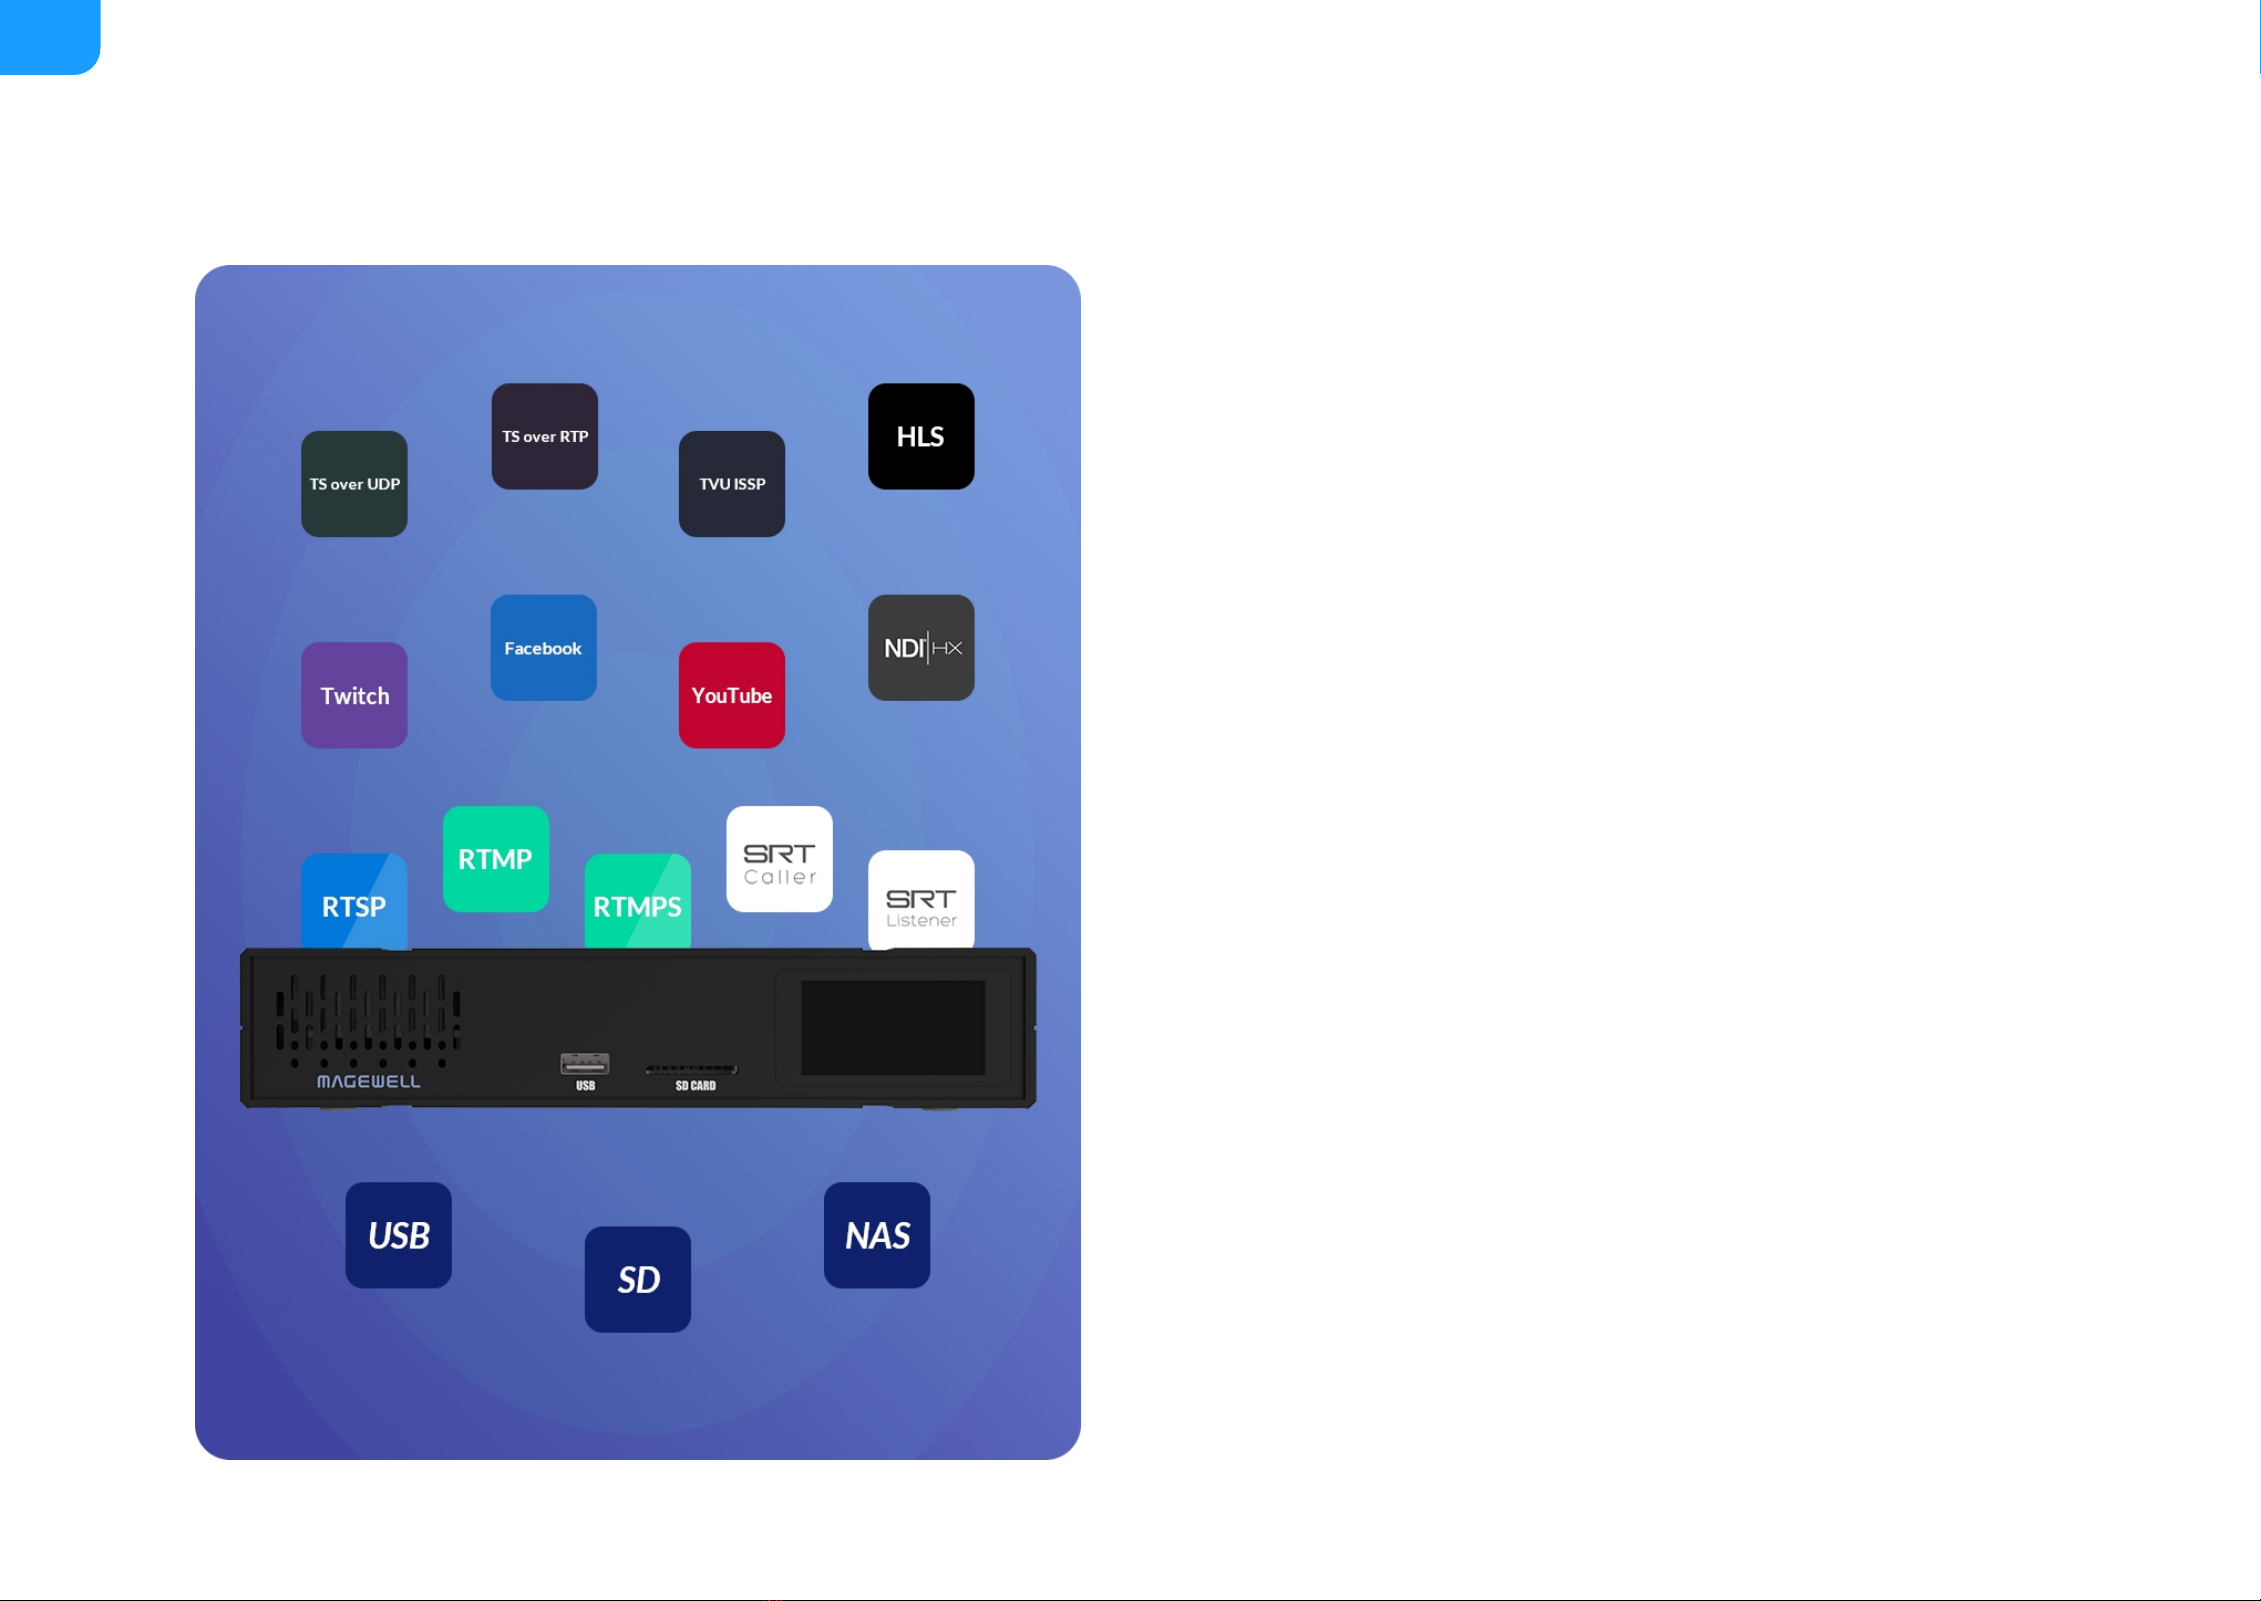
Encoder supports multiple video encoding formats – including H.264, H.265
(HEVC), NDI |HX2, and NDI |HX3 – and a wide array of delivery protocols
including RTMP, RTMPS, SRT, RTSP, RTP, HLS, TS over UDP, TS over RTP, and
TVU’s ISSP technology. Up to eight channels of audio can be encoded in AAC
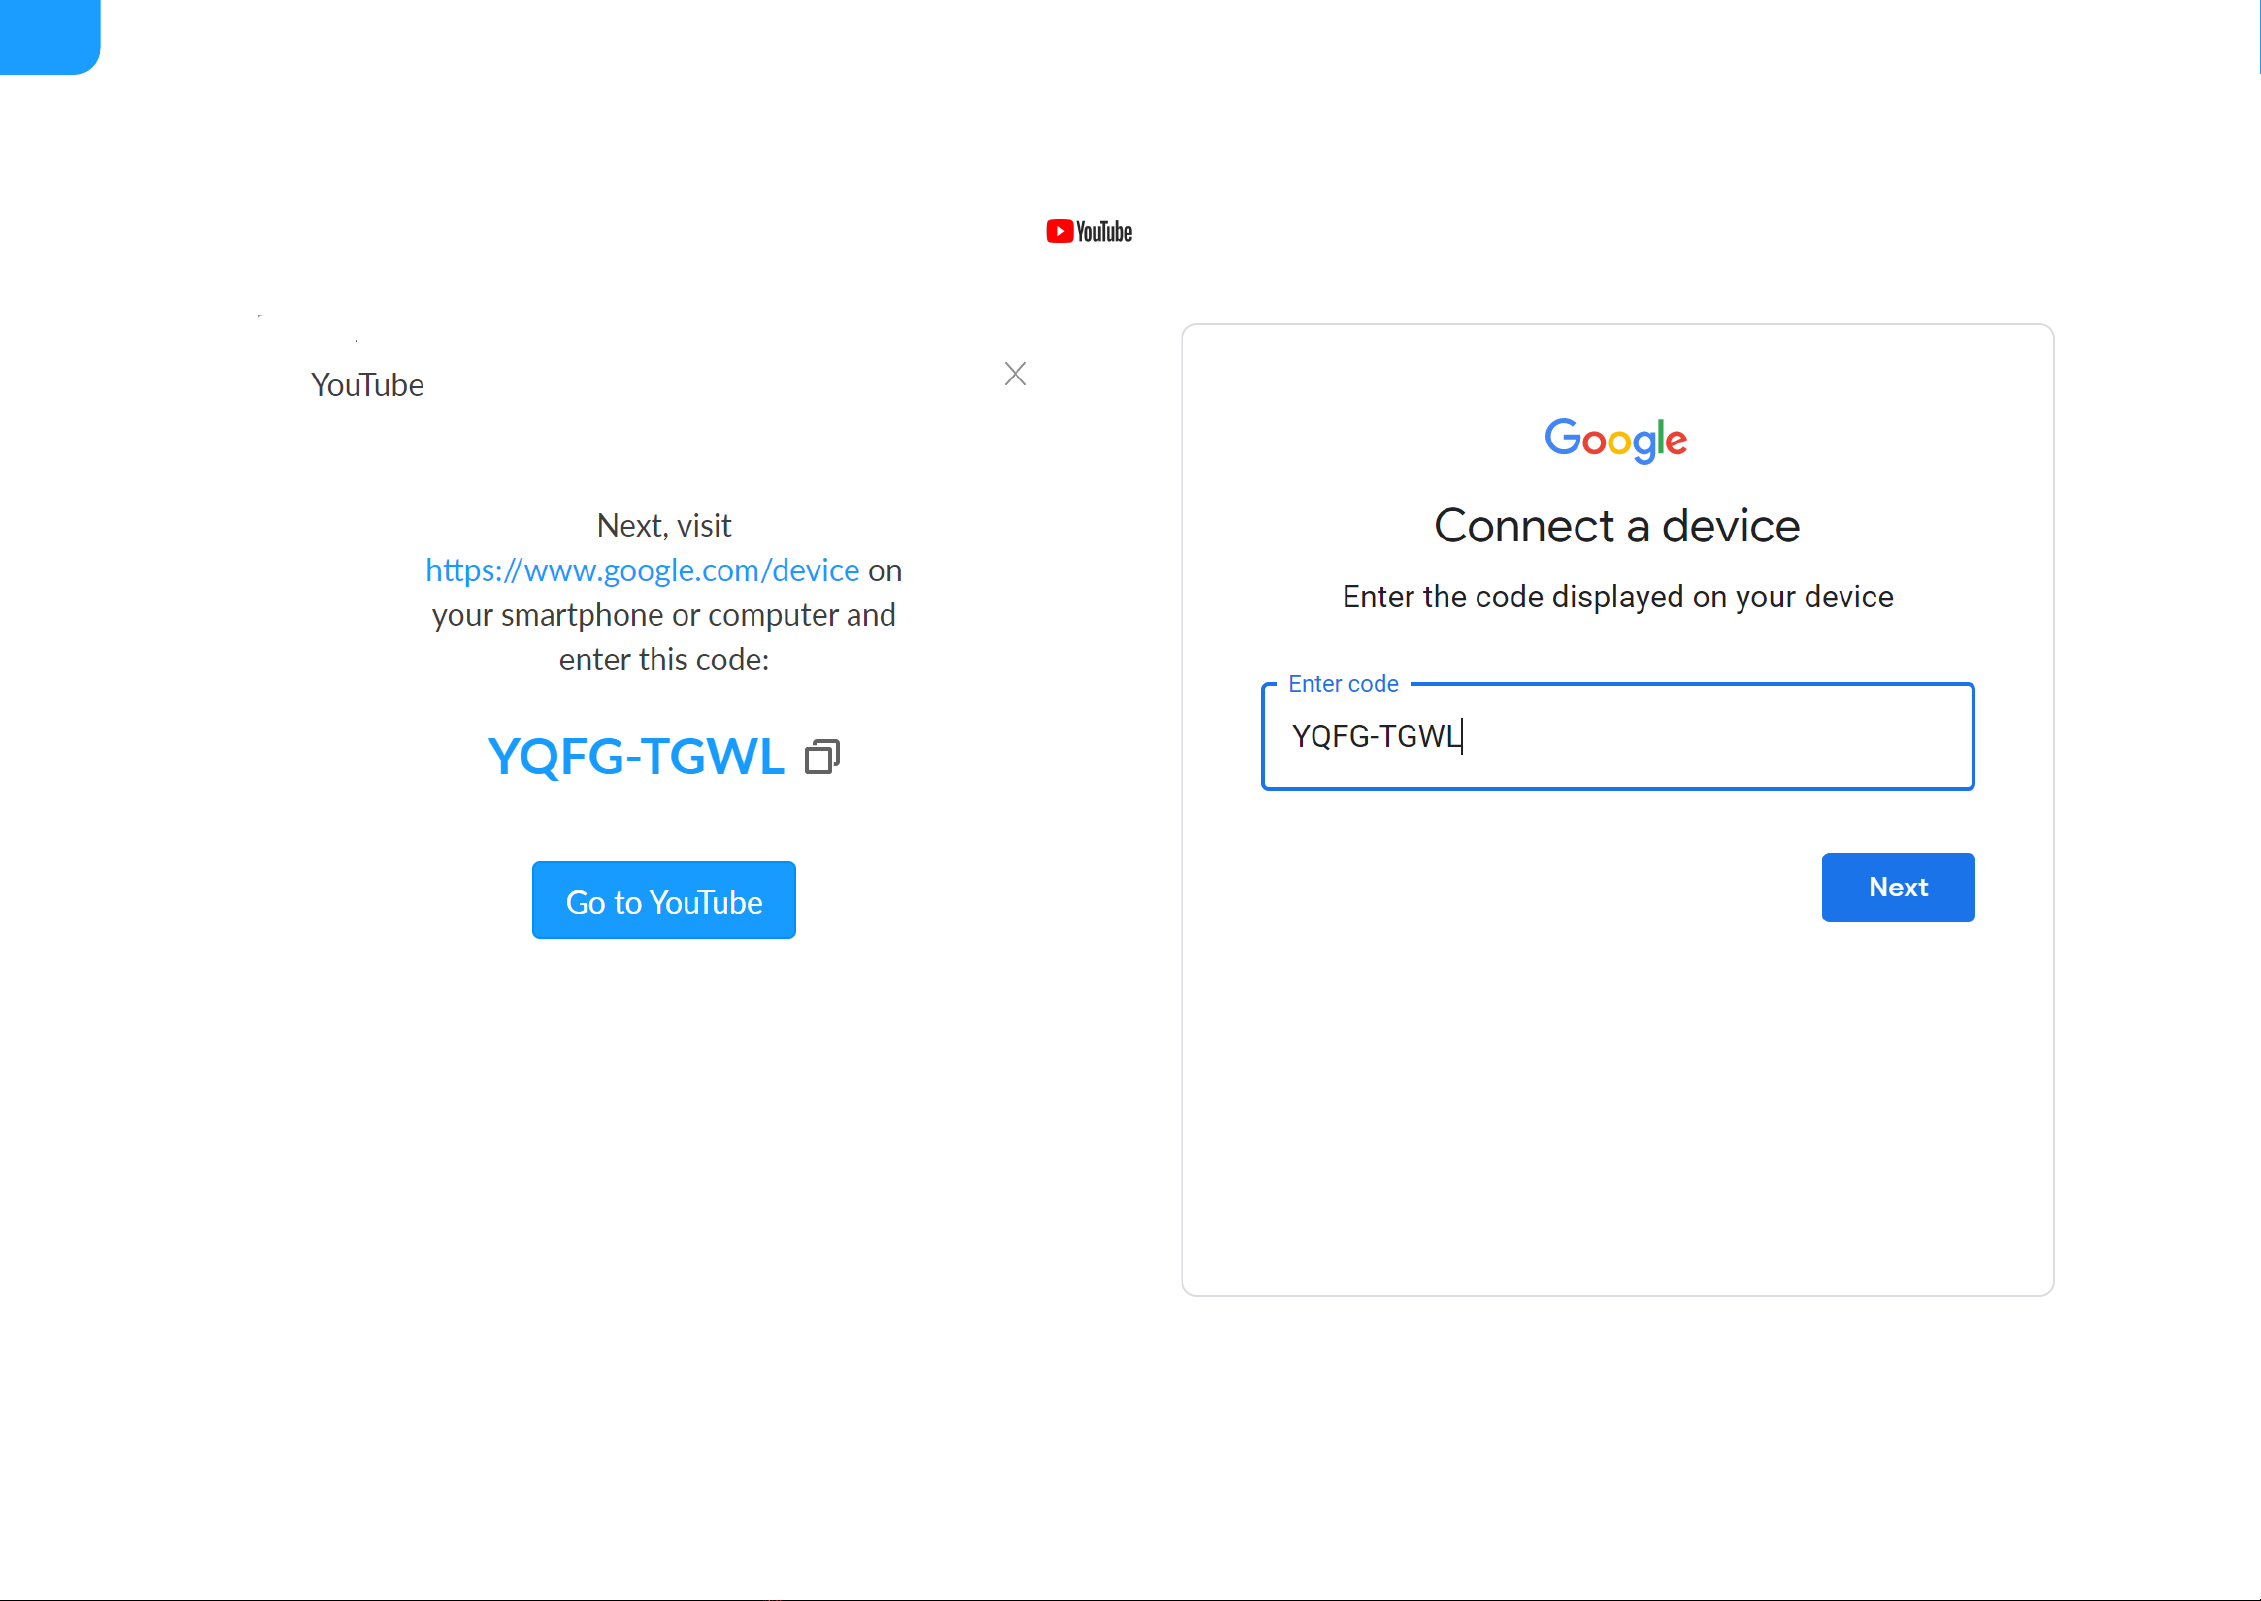
format. What’s more, scheduler for Twitch, YouTube and Facebook Live and
other servers helps fix this problem by allowing you to schedule your streams
directly from Web UI. It features easy-to-use controls where you can set up the
day’s streams in advance or reschedule them with just a few clicks. The
recording function allows you to archive your encoded content to storage
media, such as SD card, USB flash drive, NFS/CIFS server, etc., which is
convenient for you to carry out follow-up work such as archiving and review.
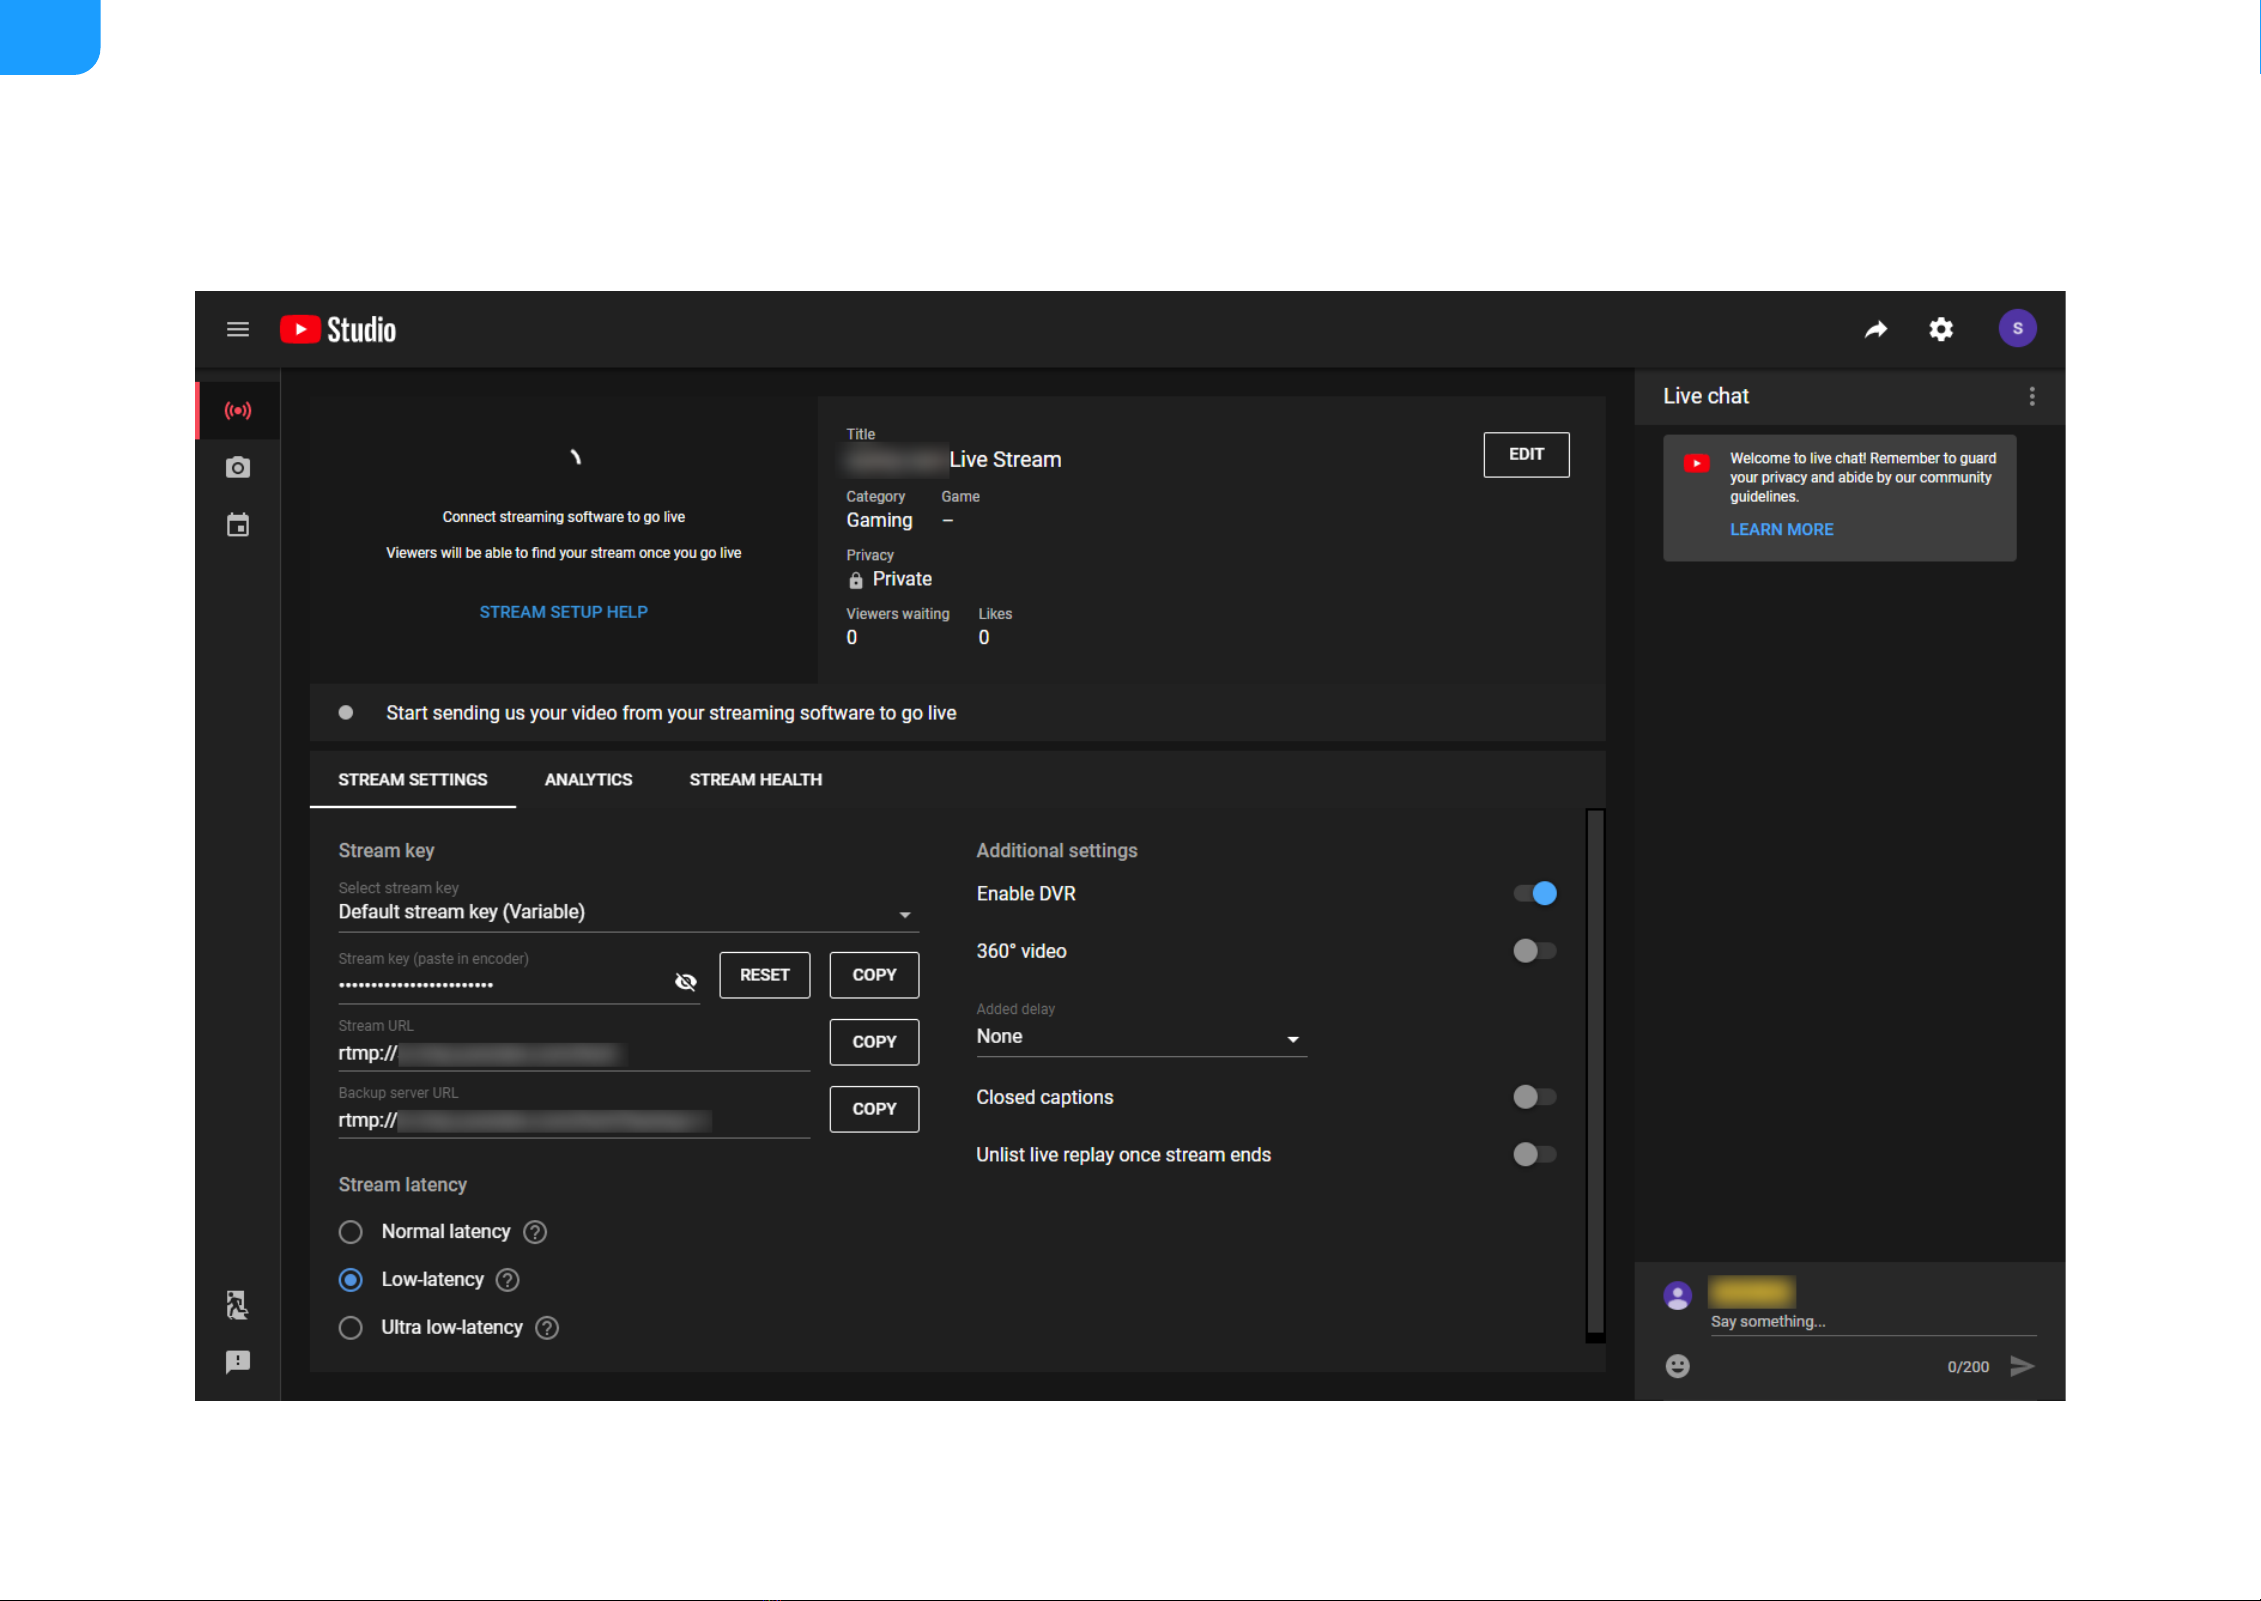
Encoder is ideal for broadcast video and audio, natively support live broadcast
for Facebook, YouTube, and Twitch, as well as your own site, with multi-
platform distribution. To customize encoder perfectly for your session, we have
Web UI, where device work status, a thumbnail preview window and tabs for
streaming settings, analytics, and stream health monitoring are provided.
Preface
® ®
3

Key Features System Requirements
Network
Web UI Supported Web Browser
Supported Product
Support RTSP/RTMP/RTMPS/SRT Caller/SRT Listener/NDI |HX2/NDI |HX
3/HLS/TS over UDP/TS over RTP/TVU ISSP streaming protocols
■® ®
Dual stream encoding - main-stream and sub-stream
■
8 overlays for main and sub streams each
■
Specify main stream or sub stream for each streaming session
■
Multi-streaming to various video platforms simultaneously and up to 8
schedules are supported for each session.
■
H.264 and H.265 (HEVC) Video encoders
■
Recording main or sub streams to SD card, USB drive, and NAS. Up to 8
schedules are supported for each task.
■
AAC Audio encoder
■
Web UI - a remote network management system - provides webpage
configuration with kinds of customization for device functions
■
10/100/1000Mbps Ethernet
■
Wi-Fi 802.11 a/b/g/n/ac
■
USB 4G/5G mobile broadband modem (not included)
■
USB Net
■
Microsoft Edge
■
Mozilla Firefox version 61 and above
■
Google Chrome version 49 and above
■
Apple Safari 11.1 and above
■
Opera 55.0.2994.44 and above
■
Ultra Encode AIO
■
4

Tutorial
Let’s learn by example.
Throughout this tutorial, we’ll walk you through the creation of a basic YouTube live streaming with Ultra Encode.
It’ll consist of two parts:
Part 1. Ultra Encode setup
Part 2. YouTube setup
Part 1. Ultra Encode Setup
1. Find Ultra Encode
1. Connect the encoder to a LAN and power it up.
2. Connect input signal.
3. Access Web UI:
Tap on the LCD touch screen of the device front panel until you see a QR code, scan the QR code, or type the IP address below the QR code into your web
browser.
Scanner (like smartphone) should be connected to the same local network as your device.
When the IP address shows 192.168.48.1, follow the steps below to join the device AP and access the Web UI.
i. Plug included Wi-Fi antenna when you want to connect to a wireless network.
ii. In your smartphone/tablet/laptop, turn on WLAN, search for and join the device AP named Ultra Encode + (Serial number).
The AP names after your gear's Serial number, and the password is the last 8-number of the serial number by default. For example, a serial number
313210101001 indicates the initial AP password is 10101001.
We recommend that the distance between the Web UI and the encoder should be within 10m.
iii. In your web browser, enter 192.168.48.1 to open the Web UI.
■
5

Scan the QR code
Sign In
Log in with your username and password.
Tap on the LCD screen, you can find the Web UI QR code, record and live status, network connection status and so on.
6

2. Add YouTube streaming session
1. In the left control pane, go to Live tab. Click Add Server and choose .
2. Go to YouTube https://www.google.com/device, and paste the code prompted.
3. Follow the page instructions to log in and trust your device.
7

4. Choose the Event where you want to show your video clips.
Then you can simply save the server with default parameters for streaming.
5. Go back to the Live tab and turn on the switch before YouTube icon to start the streaming session.
Now the encoder is ready to bring your content to YouTube directly with all these settings.
8

Part 2. YouTube Setup
Create a live stream task in YouTube Studio to go live, and specify the Title, Category, Privacy, etc.
9

Electrical Safety Operation Safety
Installation
Safety Information
Seek professional assistance before using an adapter or extension cord.
These devices could interrupt the grounding circuit.
■
Make sure that you are using the correct power adapter for the local
voltage. If you are not sure about the voltage of the electrical outlet you
are using, contact your local power company.
■
If the power adapter is broken, do not try to fix it by yourself. Contact a
qualified service technician or your retailer for help.
■
Before using the product, make sure all cables are correctly connected and
the power cables are not damaged. If you notice any damage, contact your
dealer immediately.
■
To avoid short circuits, keep paper clips, screws, and staples away from
connectors, slots, sockets and circuitry.
■
Avoid dust, humidity, and temperature extremes. Do not place the product
in any area where it may become wet.
■
If you encounter technical problems with the product, contact your dealer
or the Magewell Support Team via support@magewell.net.
■
10

FCC Compliance Statement
This device complies with Part 15 of the FCC Rules. Operation is subject to the following two conditions:
(1) this device may not cause harmful interference, and cause undesired operation
(2) this device must accept any interference received, including interference that may cause undesired operation.
FCC Statement
This device has been tested and found to comply with the limits for a Class B digital device, pursuant to Part 15 of the FCC Rules. These limits are designed to provide
reasonable protection against harmful interference in a residential installation. This device generates, uses and can radiate radio frequency energy and, if not installed
and used in accordance with the instructions, may cause harmful interference to radio communications.
However, there is no guarantee that interference will not occur in a particular installation. If this device does cause harmful interference to radio or television reception,
which can be determined by turning the device off and on, the user is encouraged to try to correct the interference by one or more of the following measures:
Changes or modifications not expressly approved by the party responsible for compliance could void the user's authority to operate the equipment.
FCC Radiation Exposure Statement
The antennas used for this transmitter must be installed to provide a separation distance of at least 20cm from all persons and must not be co-located for operating
in conjunction with any other antenna or transmitter.
Reorient or relocate the receiving antenna.
■
Increase the separation between the device and receiver.
■
Connect the device into an outlet on a circuit different from that to which the receiver is connected.
■
Consult the dealer or an experienced radio/TV technician for help.
■
11

Interfaces & Indicators
Ultra Encode AIO
Plug included Wi-Fi antenna when you want to connect to a wireless network.
12

Indicators status is as follows.
HDMI/SDI IN
STATUS
REC
LIVE
Multiple indicators flash:
Indicators
On: input signal detected.
■
Breathing: input signal undetected.
■
On: The device has started and ready to work.
■
Off: The Device cannot start.
■
On: the encoder is recording to at least one destination.
■
Breathing: none of the rec sessions is enabled.
■
On: the encoder is streaming to at least one streaming address.
■
Breathing: none of the live sessions is enabled.
■
All but STATUS indicator lights flash once simultaneously: system is booting
up or rebooting.
■
The indicator lights flash in turn from HDMI IN, to Live : firmware is
updating.
■
If any other status appear, please try to unplug and re-plug in the
power cable to recover your encoder.
13

Installing the Encoder in a 1U Rack
Ultra Encode AIO provides substantial performance in a space-saving design. These encoders are easy to deploy and offer flexibility to expand later on.
You can install two devices side by side in a 1U rack with provided short rack ears and retainer plate, see Fig1, or one device with provided long rack ears, see Fig2.
Fig1 Two units united installation with short rack ears
Fig2 One unit installation with long rack ears
14

Access Web UI
Manage your device via wired networks, USB NET, or Wi-Fi.
1. Connect your device to your LAN and power it up.
2. Access Web UI:
Get Started With Ultra Encode
To ensure a smooth video, you are recommended to connect to a
wired network.
Tap on the LCD touch screen of the device front panel until you see a
QR code, scan the QR code, or type the IP address below the QR code
into your web browser.
Scanner (like smartphone) should be connected to the same local
network as your device.
When the IP address shows 192.168.48.1, follow the steps below to join
the device AP and access the Web UI.
i. Plug included Wi-Fi antenna when you want to connect to a
wireless network.
ii. In your smartphone/tablet/laptop, turn on WLAN, search for and
join the device AP named Ultra Encode + (Serial number).
The AP names after your gear's Serial number, and the password
is the last 8-number of the serial number by default. For example,
a serial number 313210101001 indicates the initial AP password is
10101001.
■
15

We recommend that the distance between the Web UI and the
encoder should be within 10m.
iii. In your web browser, enter 192.168.48.1 to open the Web UI.
Tap on the LCD screen, you can find the Web UI QR code,
record and live status, network connection status and so on.
Via File Explorer on Windows 7 and above
i. Open File Explorer in your PC, then locate your device in Network
> Other Devices.
ii. Double click the device icon to open the sign in page of Web UI.
■
Via USB NET, IP Address: 192.168.66.1
i. Connect the device CONFIG (a USB-C port on the back panel) to
your computer using USB cable.
ii. Type the USB NET IP address 192.168.66.1 in your web browser to
access the Web UI.
■
Via device Wi-Fi AP, IP Address: 192.168.48.1
Refer to the steps to join the device AP and access the Web UI.
■
16

17

Initialization
Follow the instructions of the Web UI to perform the device initialization and set
a new device name.
18

Fig1 Find your device in Windows > Network
Access the Web UI
A free tool, Web UI, is provided to monitor and manage device status and
configuration. If you know your device's IP address, type it into your web
browser to access the Web UI. Alternatively, you can access the Web UI via
wired Ethernet, USB NET, or Wi-Fi following the steps below.
Connect your device to your LAN and power it up.
Access Web UI:
Web UI Configuration
To ensure a smooth video, you are recommended to connect to a
wired network.
Tap on the LCD touch screen of the device front panel until you see a QR
code, scan the QR code, or type the IP address below the QR code into
your web browser.
Scanner (like smartphone) should be connected to the same local network
as your device.
When the IP address shows 192.168.48.1, follow the steps below to join the
device AP and access the Web UI.
1. Plug included Wi-Fi antenna when you want to connect to a wireless
network.
2. In your smartphone/tablet/laptop, turn on WLAN, search for and join
the device AP named Ultra Encode + (Serial number).
The AP names after your gear's Serial number, and the password is
the last 8-number of the serial number by default. For example, a serial
number 313210101001 indicates the initial AP password is 10101001.
■
19

Fig2 USB NET connection
Fig3 AP connection
We recommend that the distance between the Web UI and the
encoder should be within 10m.
3. In your web browser, enter 192.168.48.1 to open the Web UI.
Tap on the LCD screen, you can find the Web UI QR code, record
and live status, network connection status and so on.
Via File Explorer on Windows 7 and above
1. Open File Explorer in your PC, then locate your device in Network >
Other Devices.
2. Double click the device icon to open the sign in page of Web UI.
■
Via USB NET, IP Address: 192.168.66.1
1. Connect the device CONFIG (a USB-C port on the back panel) to your
computer using USB cable.
2. Type the USB NET IP address 192.168.66.1 in your web browser to
access the Web UI.
■
Via device Wi-Fi AP, IP Address: 192.168.48.1
Refer to the steps to join the device AP and access the Web UI.
■
20
Table of contents
Other Magewell Media Converter manuals

Magewell
Magewell Ultra Stream HDMI User manual

Magewell
Magewell ULTRA STREAM User manual

Magewell
Magewell Pro Convert for NDI to HDMI 4K User manual

Magewell
Magewell Ultra Encode User manual

Magewell
Magewell Pro Convert AES67 User manual

Magewell
Magewell Ultra Stream SDI User manual

Magewell
Magewell ULTRA STREAM User manual

Magewell
Magewell Ultra Encode User manual

Magewell
Magewell Director Mini User manual

Magewell
Magewell XI006AUSB User manual