Magewell ULTRA STREAM User manual


03
Getting Started
03Overview
03Key Features
04System Requirements
05
Installation
05Safety Information
06Interfaces & Indicators
09
Configuration
09Network
14Live Streaming
27Record Videos to Your Smartphone
29Record Videos to USB Flash Drive
32Manage Album
33Modify Device Name
33Change Device Password
34Control Volume
35Reset
33Change Device Password
34Control Volume
35Reset
36Check Device Status
37Check Record and Streaming Status
39
Update Firmware
40
FAQ
51
Support
52
Warranty
TABLE OF CONTENTS
2

Overview
Ultra Stream encoder makes live streaming remarkably simple even for non-
professional users, enabling them to record or stream high-quality video with
one click using on-device buttons or an intuitive smartphone app. Designed for
users who want to stream but may have minimal technical knowledge, the
encoder is ideal for everyone from church volunteers and educators to
corporate communicators and live event organizers.
Users can stream to popular services including YouTube, Facebook Live or
Twitch or to a custom-specified server. Streams can be output to a third-party
service and custom server simultaneously, while real-time video preview in the
app allows easy monitoring. In addition to outputting live streams, Ultra Stream
can record video as files to a directly-connected USB drive, embedded storage
or the associated smartphone.
Key Features
Getting Started
Streaming to Facebook, Twitch and YouTube platforms
■
Support for streaming to 2 servers simultaneously
■
Recording to USB flash drive
■
Recording to mobile device
■
Remotely control recording and streaming
■
Device configuration using Web UI
■
3

System Requirements
Network
Supported Mobile Clients
Supported Web Browser
App
10/100/1000Mbps Ethernet
■
IEEE 802.11 a/b/g/n/ac
■
Android 5.0 and above
■
iOS 9.0 and above
■
iPhone 5s and above
■
iPod Touch 5
■
iPod Touch 6
■
Microsoft Internet Explorer 11
■
Microsoft Edge
■
Mozilla Firefox version 61 and above
■
Google Chrome version 49 and above
■
Apple Safari 11.1 and above
■
Opera 55.0.2994.44 and above
■
For Android 5.0 and above, search Ultra Stream or Magewell in the
Google Play or scan the QR code to download the Ultra Stream App.
■
For iOS 9.0 and above, search Ultra Stream or Magewell in the App Store
to download the Ultra StreamApp.
■
4

Installation
Safety Information
Electrical Safety
Operation Safety
Seek professional assistance before using an adapter or extension cord. These devices could interrupt the grounding circuit.
■
Make sure that you are using the correct power adapter for the local voltage. If you are not sure about the voltage of the electrical outlet you are using, contact
your local power company.
■
If the power adapter is broken, do not try to fix it by yourself. Contact a qualified service technician or your retailer for help.
■
Before using the product, make sure all cables are correctly connected and the power cables are not damaged. If you notice any damage, contact your dealer
immediately.
■
To avoid short circuits, keep paper clips, screws, and staples away from connectors, slots, sockets and circuitry.
■
Avoid dust, humidity, and temperature extremes. Do not place the product in any area where it may become wet.
■
If you encounter technical problems with the product, contact your dealer or the Magewell Support Team via support@magewell.net.
■
5

Interfaces & Indicators
Ultra Stream HDMI
6

Ultra Stream SDI
7

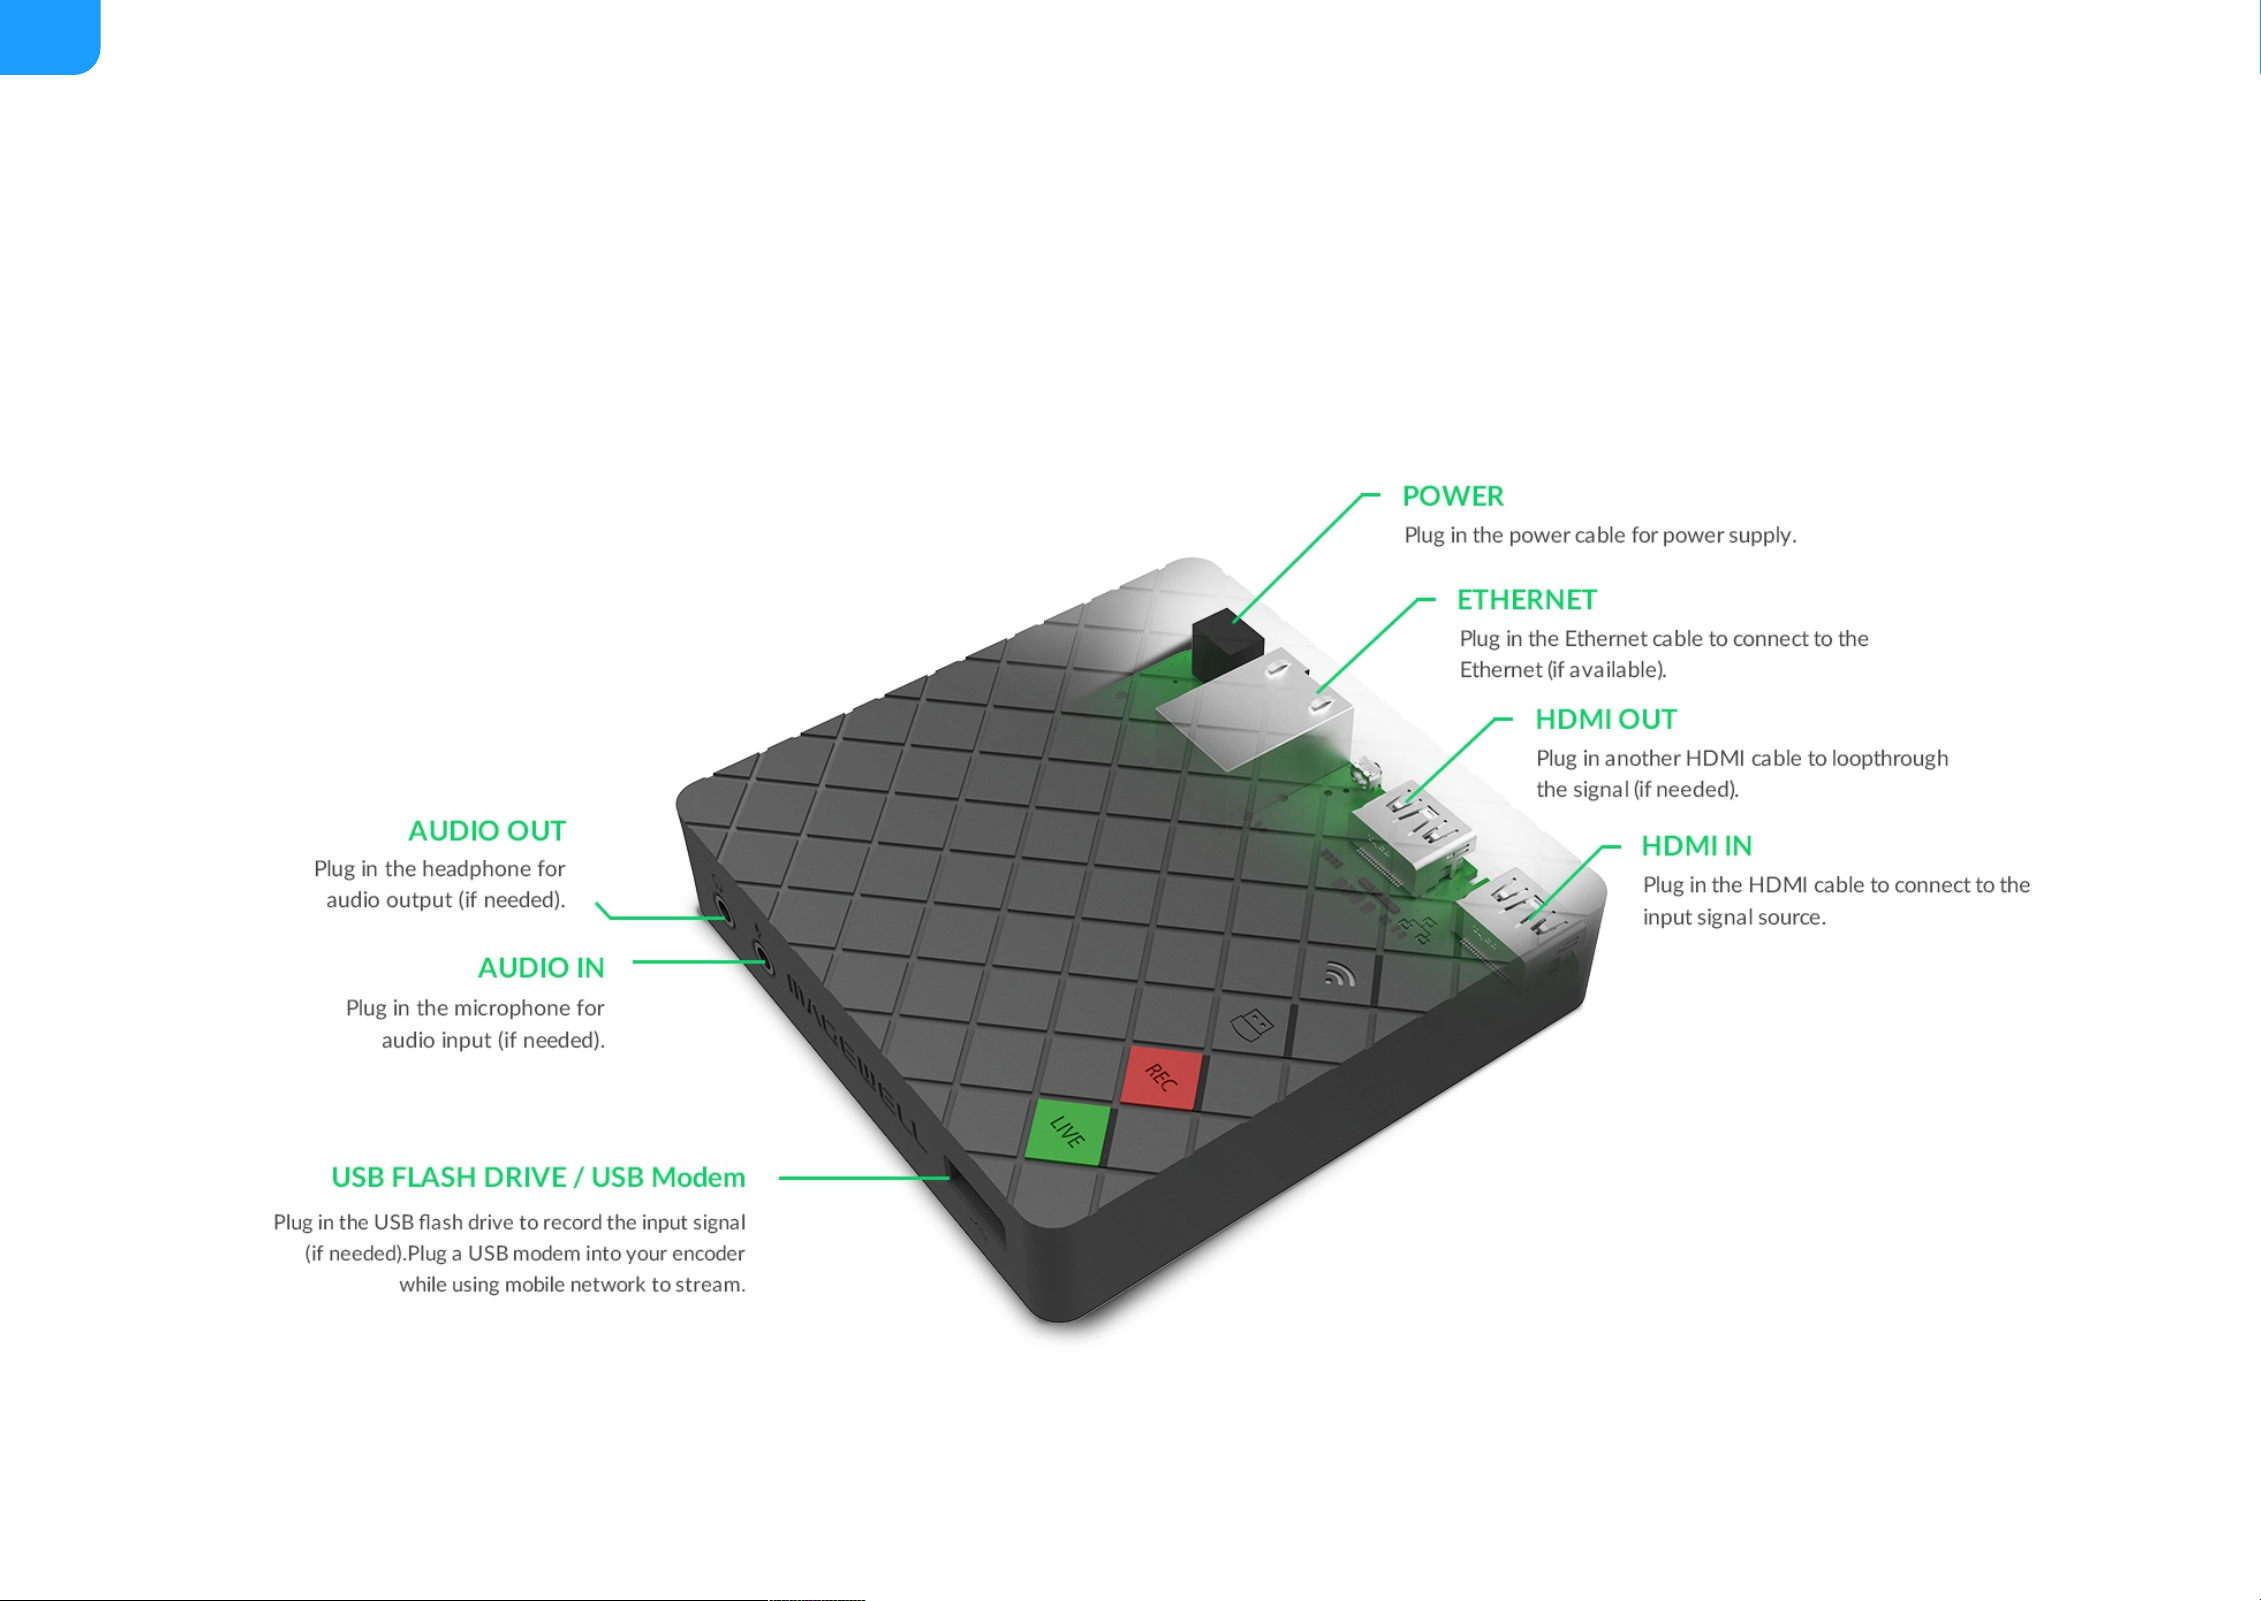
Descriptions of indicators status are as follows. The indicators are located on
the device panel as shown in Interfaces.
HDMI/SDI IN
Ethernet
Wi-Fi
USB
RECREC
LIVELIVE
Descriptions of multiple indicators status are as follows.
Indicators
On: input signal is detected.
■
Pulsing slow: input signal is not detected.
■
On: Ethernet is connected.
■
Pulsing slow: Ethernet is disconnected.
■
On: network is detected.
■
Pulsing slow: network is not detected.
■
Flashing: the encoder is connecting to Wi-Fi.
■
On: USB is available.
■
Pulsing slow: USB is unavailable.
■
Flashing: there is insufficient storage on the USB.
■
On: the encoder is recording to USB.
■
Pulsing slow: input signal is not detected.
■
Off: the USB flash drive is unavailable.
■
Flash once and then restore to its former state: recording failed.
■
On: the encoder is streaming to at least one streaming address.
■
Pulsing slow: at least one streaming server is configured.
■
Flashing: the encoder is connecting to at least one streaming address.
■
Off: neither of the stream servers are configured.
■
Flashes once and then restore to its former state: live steaming failed to
start.
■
The indicator lights flash in turn from HDMI/SDI IN to LIVE: system is
booting up.
■
The indicator lights flash in turn from LIVE to HDMI/SDI IN: firmware is
updating.
■
All indicator lights flash once simultaneously and then flash in turn from
HDMI/SDI to LIVE: the encoder is rebooting.
■
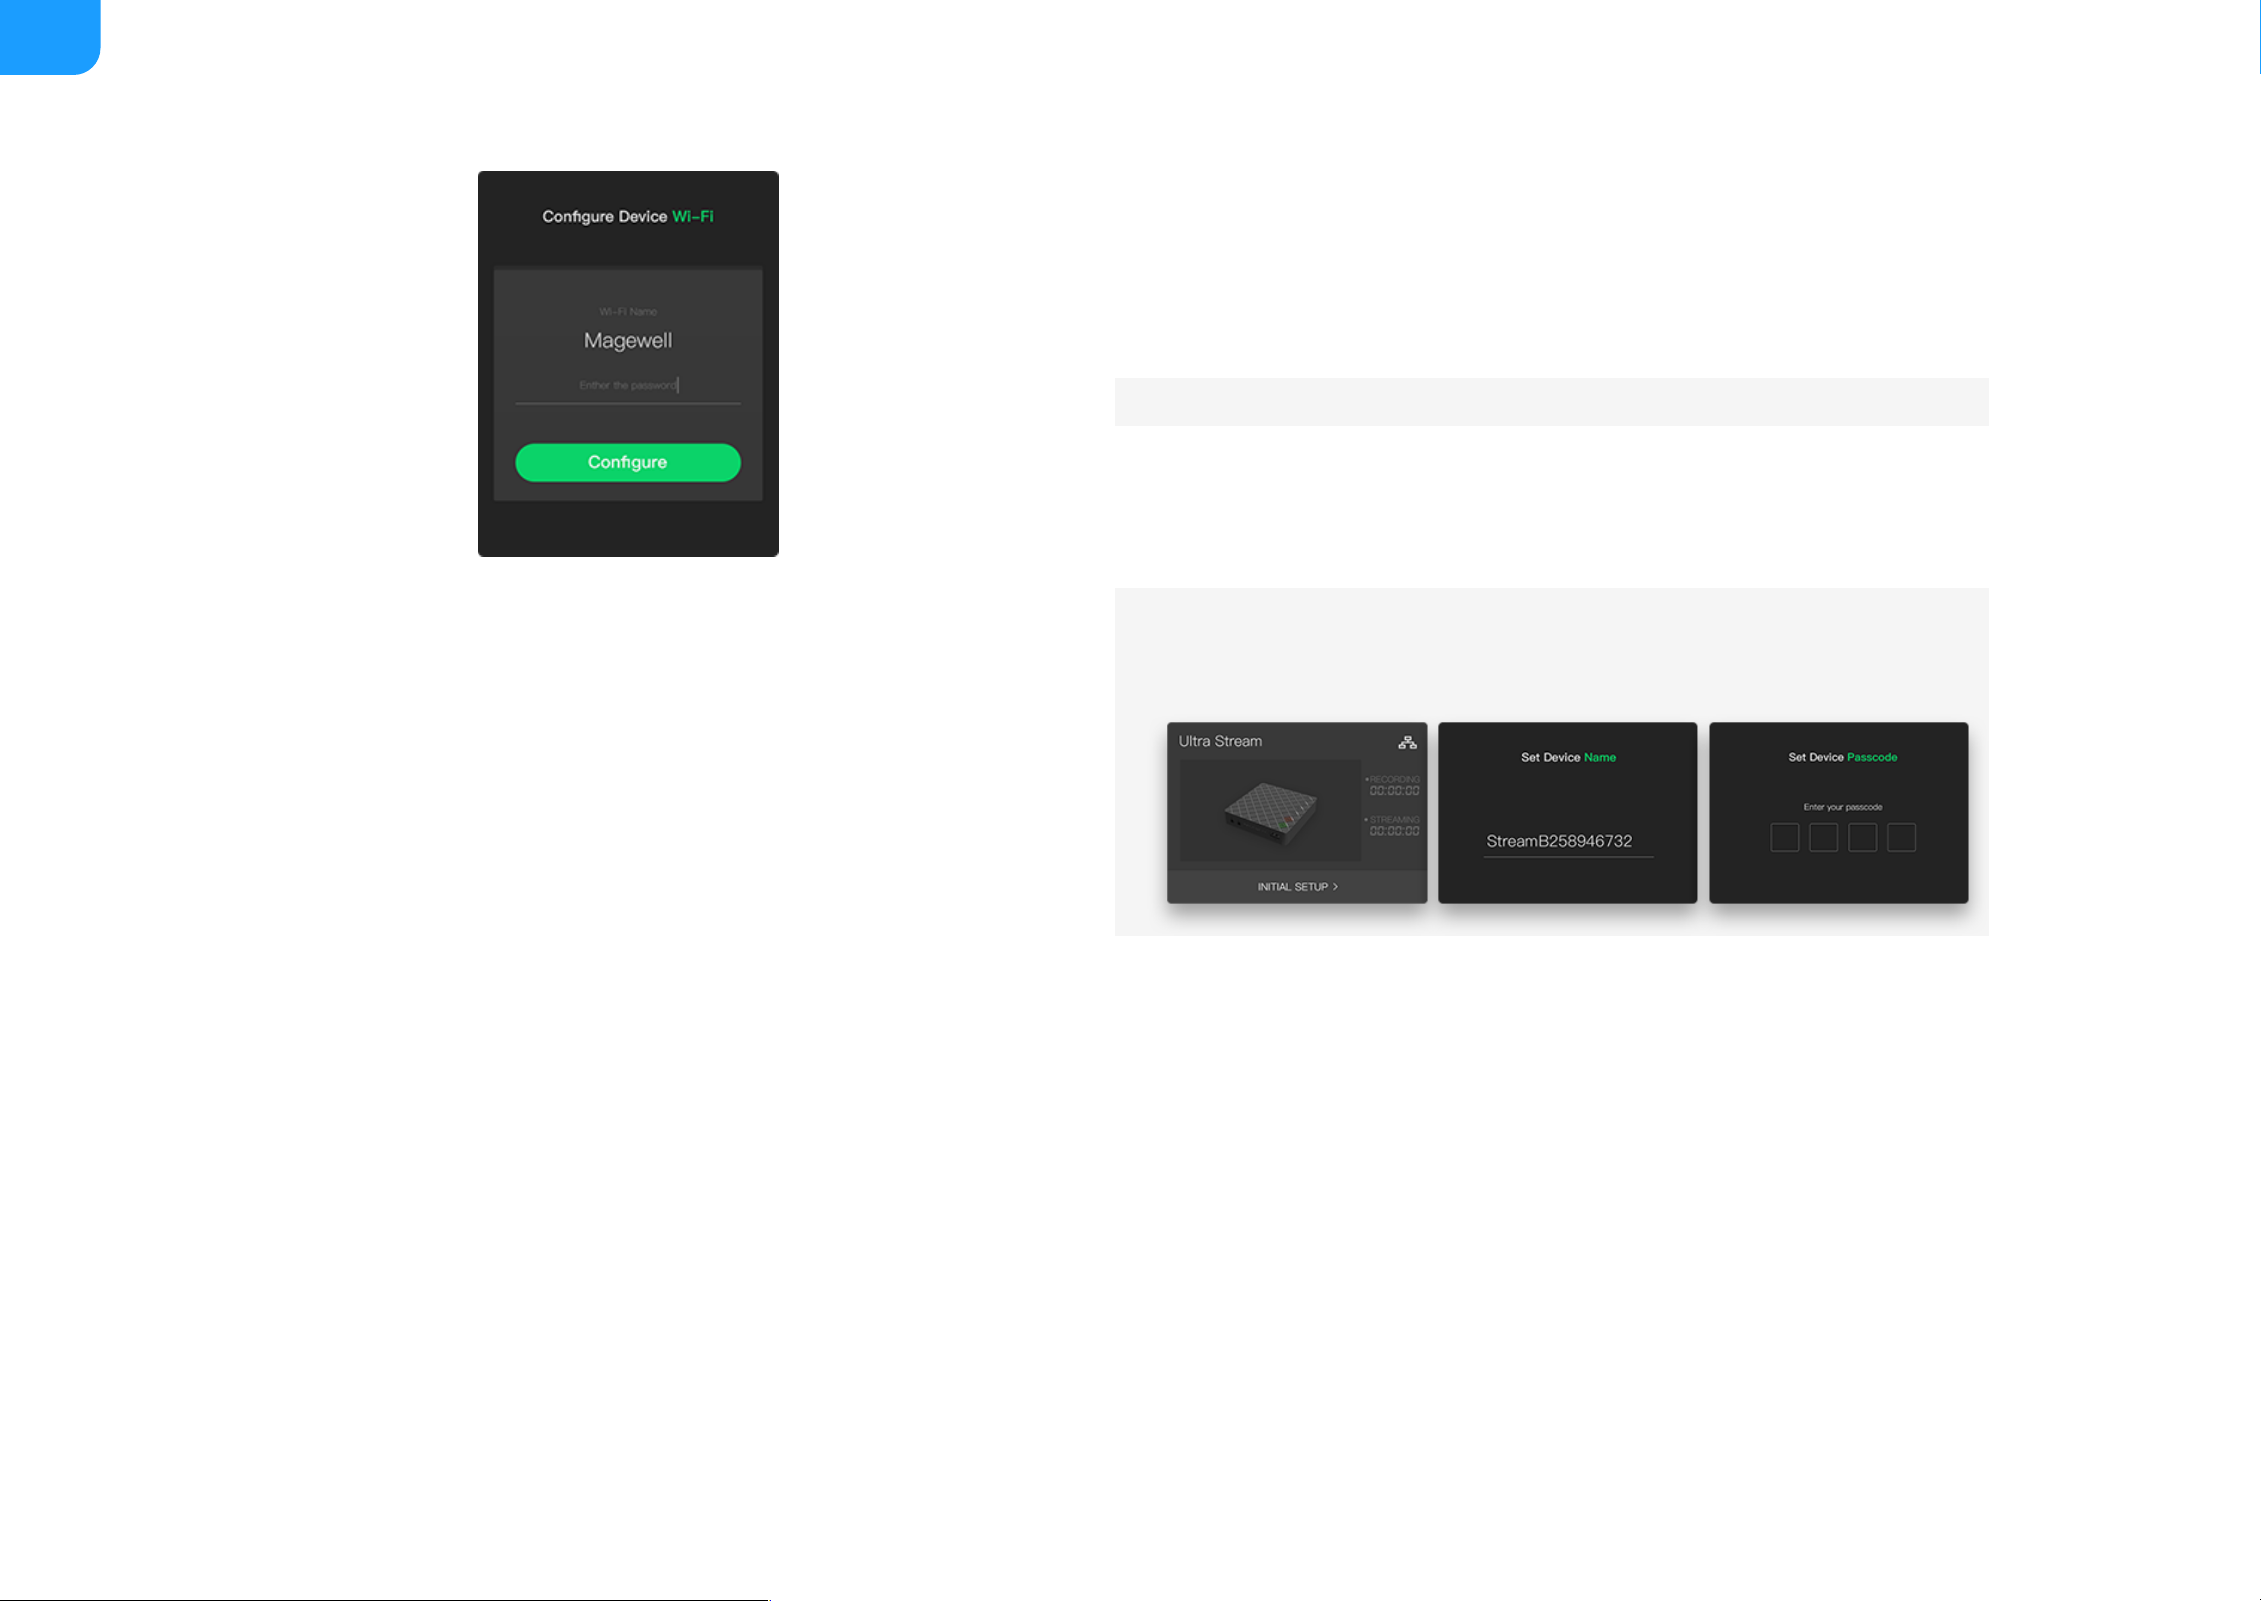
All indicator lights flash once simultaneously and then restore to their
former state: in the device list of Ultra Stream app, choose an encoder and
tap the device status icon at the upper right corner, and all the indicators on
that encoder will light.
■
If any other status appear, please try to unplug and re-plug in the
power cable to your encoder.
8

Connect via Wi-Fi
1. Plug the power cable into your encoder.
The LED indicators will light in rotation as the unit boots. Wait for about 1
minute and the boot up will be done.
2. Tap the Ultra Stream app icon on your phone.
3. Turn on Wi-Fi and Bluetooth on your phone, and make it discoverable to
nearby devices.
4. Tap the Ultra Stream app icon on your phone, then the app will search
for devices automatically.
Configuration
Network
There are 3 ways for the Ultra Stream app to discover the encoders, via Ethernet, Wi-Fi and Bluetooth. If there are multiple ways to detect the unit simultaneously, the
priority is: Ethernet > Wi-Fi > Bluetooth.
To ensure smooth live streaming experience, connecting to a wired
Ethernet network is recommended.
Turn on Location Services and authorize to the app for Android 6.0
and above.
■
Your phone and encoder must be connected to the same Wi-Fi
network.
■
Your phone and encoder must be close to each other (less than 10m
apart).
■
9

5. Select your encoder and tap CONFIGURE DEVICE Wi-Fi.
Enter the device passcode in Pair to device, if the encoder has a
passcode.
6. Enter the Wi-Fi password in Configure Device Wi-Fi and tap Configure.
If there is no password, go to the next step.
7. If the connection between app and encoder is established successfully, it
will automatically go to the LOCAL interface.
If you are connecting via Wi-Fi for the first time, initialize the encoder
following the on-screen instructions: set the device name and passcode.
10

Connect via Ethernet
1. Plug the power cable and Ethernet cable into your encoder.
The LED indicators will light in rotation as the unit boots. Wait for about 1
minute and the boot up will be done. Now the Ethernet indicator will be
on.
2. Tap the Ultra Stream app icon on your phone.
3. Search for devices in the app.
Turn on Wi-Fi and Bluetooth on your mobile device as requested by
the app, then the app will search for devices automatically.
Showing in the top right corner of a device indicates that the
encoder is paired to the app; showing indicates the encoder is not
paired.
■
The wireless network your mobile device is connected to and
the wired network the encoder is connected to must be within
the same network.
If there is not an available Wi-Fi network, you can connect to your
encoder by enabling its AP (Access Point) mode.
Turn on Wi-Fi and Bluetooth on your mobile device, then the app will
search for devices automatically.
Showing at the top right corner of a device indicates that the
encoder is connected to the app.
■
11

Connect via AP Mode
You can turn on the AP mode of the encoder in your Ultra Stream app to make
your unit an Access Point, if there is neither a Wi-Fi nor an Ethernet network in
your working environment. The encoder can communicate with the wireless
clients, such as your smart phone, ipod, etc.
1. Plug the power cable into your encoder.
The LED indicators will light in rotation as the unit boots. Wait for about 1
minute and the boot up will be done.
2. Tap the Ultra Stream app icon on your phone.
3. Turn on Wi-Fi and Bluetooth on your phone, and make it discoverable to
nearby devices.
4. Tap the Ultra Stream app icon on your phone, then the app will search for
devices automatically.
5. Select your encoder and tap "CONNECT".
6. Enter the device passcode in "Pair to device", if the encoder has a
passcode.
Turn on Location Services and authorize to the app for Android
6.0 and above.
■
Your phone and encoder must be close to each other (less than
10m apart, the closer, the better.).
■
Showing in the top right corner of a device indicates that the
encoder is paired to the app.
■
Showing indicates the encoder is not paired.
■
12

If you are connecting via AP Mode for the first time, initialize the encoder
following the on-screen instructions: set the device name and passcode.
13

Modify Encoding Parameters
By default, live streaming uses the encoding parameters of sub stream.
1. From the device list, tap to enter the SETTINGS interface.
2. Tap to enter the Encoding Parameters.
3. Tap Live Stream to Server, choose the main or sub stream, then tap .
4. Customize encoding parameters for your choice.
Live Streaming
To set Customize Main Stream.
i. Turn on Customize Main Stream.
ii. Select proper resolution, frame rate, and bit rate, then tap .
iii. Click and enter Advanced Set, select proper Code type,
Encoding Profile, Keyframe Interval, Quantization Range, Bit
Rate Stats Duration, then tap Done.
■
Code type includes H.264 and HEVC (high-efficiency video
coding, H.265). Only H.264 codec can be used to live stream.
■
Encoding profile is related to the code type, corresponding to
different algorithm parameters.
H.264 offers 3 different sets of capabilities for encoding,
including Baseline, Main, and High profile. By default, H.264
uses High profile, the most efficient and powerful profile.
HEVC uses Main profile for compression.
■
Quantization range should be the same as that of the input
signal. Options are Limited range (default) and Full range.
■
14

Selections of Keyframe interval include 1 (default), 2, 5, 10, 30,
60 seconds.
To ensure a clear and smooth streaming, the keyframe interval
value is recommended to be less than or equal to 2 seconds. A
longer interval brings a better picture quality, but requires
more time for the viewers to see the image.
■
Selections of Bit rate stats duration include 1, 5, 10, 30, 60
(default) seconds.
A longer Bit rate stats duration is better for motion video. A
shorter period brings stable encoding bit rate which is easy for
network transmission.
■
To set Customize Sub Stream.
i. Tap Edit Settings below Customize Sub Stream.
ii. Select proper resolution, frame rate, and bit rate, then tap .
iii. Click and enter Advanced Set, select proper Encoding Profile,
Keyframe Interval, Quantization Range, Bit Rate Stats Duration,
then tap "Done".
■
Encoding profile
Sub Stream uses H.264 codec. It offers 3 different sets of
capabilities for encoding, including Baseline, Main, and High
profile. By default, it is High profile, the most efficient and
powerful profile.
■
Quantization range should be the same as that of the input
signal. Options are Limited range (default) and Full range.
■
Selections of Keyframe interval include 1 (default), 2, 5, 10, 30,
60 seconds.
■
15

5. Tap "AAC Bitrate", select proper parameter, then tap .
All audio streams will be affected by modifying the "AAC Bitrate".
Add Voice Comment during Streaming
Plug in a microphone to your encoder audio jack , then you can stream and
record your narration and comments.
To ensure a clear and smooth streaming, the keyframe interval
value is recommended to be less than or equal to 2 seconds. A
longer interval brings a better picture quality, but requires
more time for the viewers to see the image.
Selections of Bit rate stats duration include 1, 5, 10, 30, 60
(default) seconds.
A longer Bit rate stats duration is better for motion video. A
shorter period brings stable encoding bit rate which is easy for
network transmission.
■
16

Live Streaming to an RTMP Server
1. From the device list, tap to enter the SETTINGS interface.
2. Tap to enter the Streaming Server settings.
3. Tap + Add Server, select .
4. Enter URL and Stream Key.
A green check icon will be displayed at the end of the line if you pass
the verification.
5. Turn on Authentication Needed, if your live streaming service provider
requires.
Obtain the User Name and Password from your live streaming service
provider.
6. Choose the prime network for streaming.
By default, the network connection priority is: Mobile Broadband >
To ensure smooth live streaming experience, connecting to a wired
Ethernet network is recommended.
Obtain the streaming server address and stream key from your live
streaming service providers.
■
Full address example:rtmp://192.168.1.136:1935/live.
"rtmp://" can be omitted, and is not case sensitive; :1935 can be
omitted, and the value range is 0 to 65535.
If the RTMP address is a domain name, live can be omitted. If the
RTMP address is an IP address, live cannot be omitted.
■
The stream key does not support /.
■
17

Ethernet > Wi-Fi.
The device scans the available network according to the order and
connect to it for streaming. If the current network is disconnected, the unit
automatically re-scans according to the priority.
Plug a USB modem into your encoder while using mobile network to
stream.
7. Tap Test to check the connection between the server and encoder.
8. When prompted, tap OK.
9. (Optional) To add other streaming servers, repeat step 3 to 5.
10. (Optional) Choose where you want to post your live broadcast.
You can stream simultaneously to 2 servers at most.
11. (Optional) To delete a server: touch the server and slide to the left, tap
Delete. When prompted, tap Confirm.
18

Live Streaming to Twitch
You can stream to Twitch if you have a Twitch account.
1. From the device list, tap to enter the SETTINGS interface.
2. Tap to enter the Streaming Server settings.
3. Tap + Add Server, select , follow the on-screen instructions to login
and select server.
Your username and identification icon will be displayed after login.
4. Choose the prime network for streaming.
By default, the network connection priority is: Mobile Broadband >
Ethernet > Wi-Fi.
The device scans the available network according to the order and
connect to it for streaming. If the current network is disconnected, the unit
automatically re-scans according to the priority.
Plug a USB modem into your encoder while using mobile network to
stream.
5. Tap Test to check the connection between the server and encoder.
6. when prompted, tap OK.
7. (Optional) To add other Twitch accounts, repeat step 3 to 5.
8. (Optional) Choose where you want to post your live broadcast.
You can stream simultaneously to 2 accounts at most.
To ensure smooth live streaming experience, connecting to a wired
Ethernet network is recommended.
19

9. (Optional) To delete a server: touch the server and slide to the left, tap
Delete. When prompted, tap Confirm.
20
Other manuals for ULTRA STREAM
1
Table of contents
Other Magewell Media Converter manuals

Magewell
Magewell Ultra Encode AIO User manual

Magewell
Magewell Pro Convert AES67 User manual

Magewell
Magewell Ultra Stream HDMI User manual

Magewell
Magewell Pro Convert for NDI to HDMI 4K User manual

Magewell
Magewell ULTRA STREAM User manual

Magewell
Magewell XI006AUSB User manual

Magewell
Magewell Director Mini User manual

Magewell
Magewell Ultra Encode User manual

Magewell
Magewell Ultra Encode User manual

Magewell
Magewell Ultra Stream SDI User manual