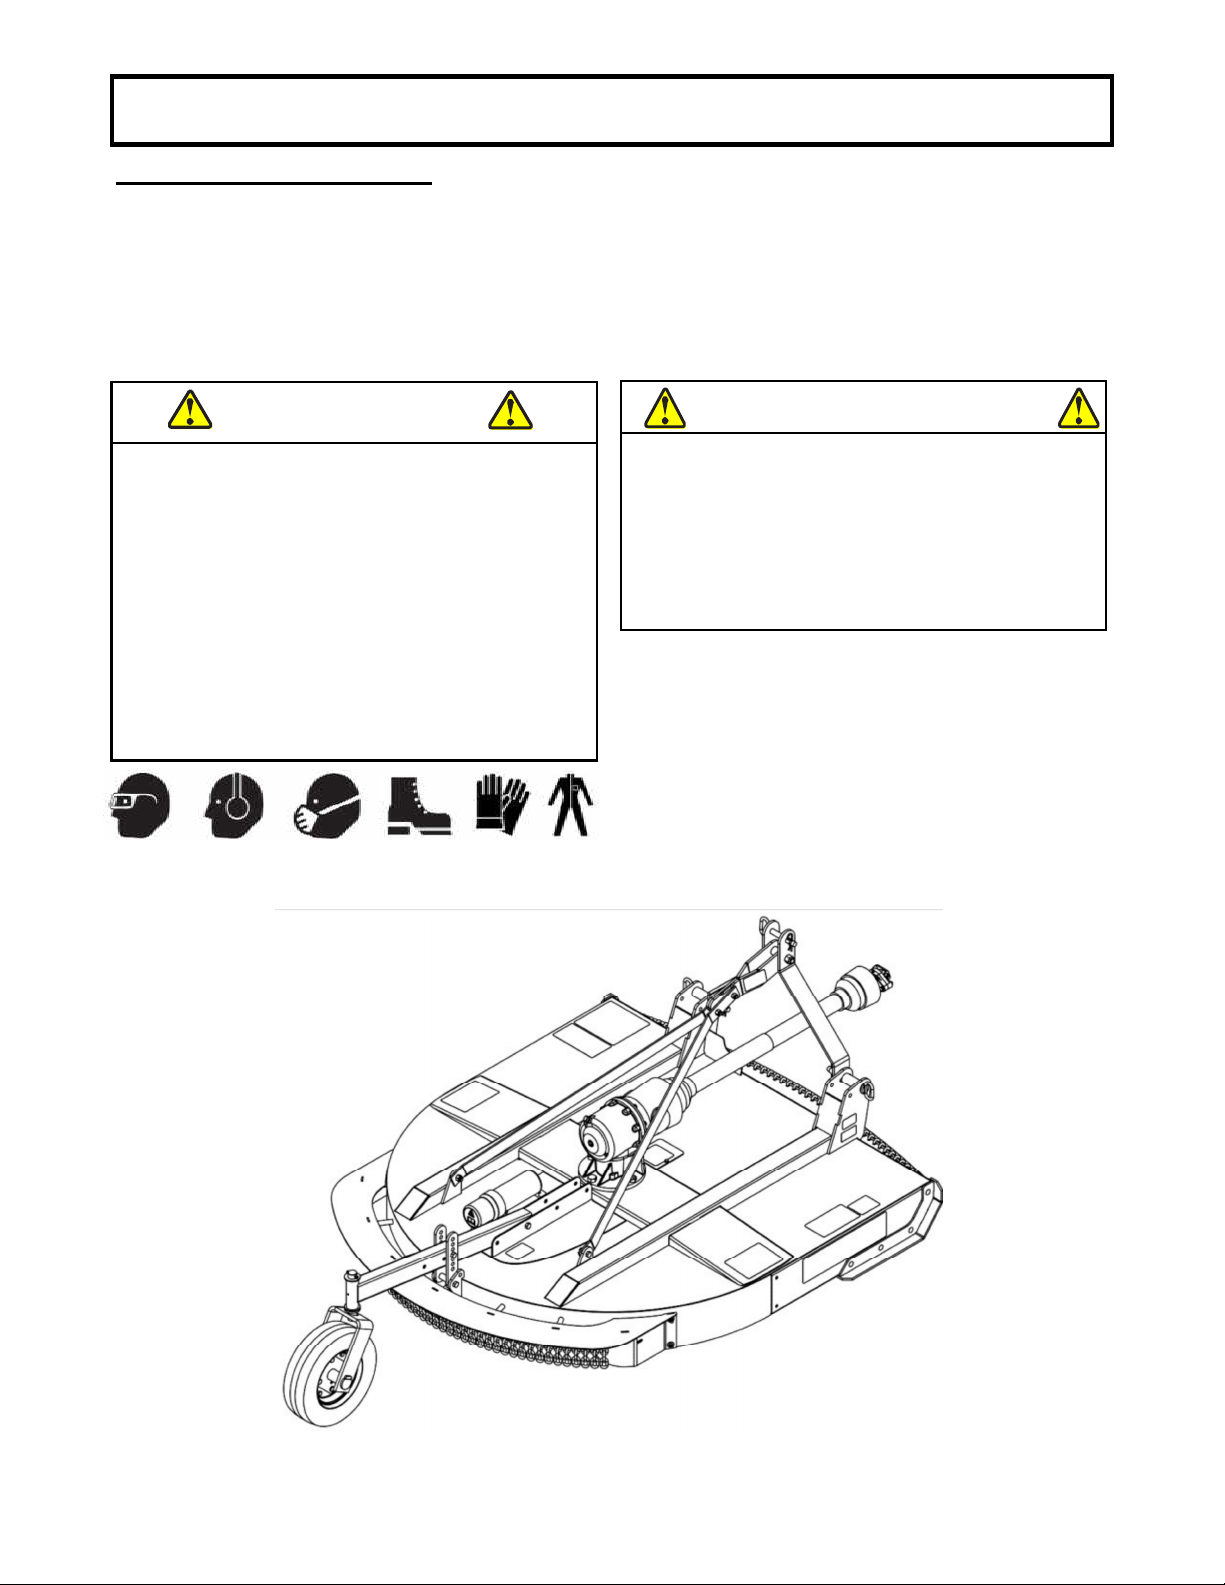
Mahindra BCG48R User manual

1
BEFOREOPERATINGYOUREQUIPMENT,
READ&FOLLOWALLSAFETYRULES&INSTRUCTIONS
OFTHISOPTION,THEIMPLEMENTANDTHEVEHICLE.
107802_EN R
-
06092015
*ASSEMBLY *REPAIRPARTS
*OPERATION *MAINTENANCE
*107802 *

2
TABLEOFCONTENTS
iii
ASSEMBLY
.........................................................................................................................................................
1
Frontchainguard
........................................................................................................................................
2
Rearchainguard
.........................................................................................................................................
2
ADJUSTMENT
.........................................................................................................................................................
4
OPERATION
.........................................................................................................................................................
5
MAINTENANCE
........................................................................................................................................................
6
PARTSBREAKDOWNANDPARTSLIST
BCG48F
........................................................................................................................................................
8
BCG60F
.......................................................................................................................................................
10
BCG72F
........................................................................................................................................................
12
BCG48R
.......................................................................................................................................................
14
BCG60R
......................................................................................................................................................
16
BCG72R
.......................................................................................................................................................
18
TORQUESPECIFICATIONTABLE
.......................................................................................................................
21
PAGE

1
ASSEMBLY
ASSEMBLYINSTRUCTIONS
IMPORTANT:UNLESSOTHERWISESPECIFIEDTORQUEALLBOLTSACCORDINGTOTORQUESPECI-
FICATIONTABLE(SEETABLEOFCONTENTS)WHENSTATED:TIGHTENFIRMLY.REFERTOPARTS
BREAKDOWNSECTIONFORPARTIDENTIFICATION.
Donottightenhardwaretothecorrecttorqueuntilassemblyiscompletedorunlessspecified.
NOTE:Inthismanual:
Therightandleftsideisdeterminedbysittinginthedriver’sseatfacingforward.
Illustrationsmayvaryfromonemodeltotheother.
WARNING
THISACCESSORYISHEAVY!
To avoid risk of strain injury, NEVER lift the
accessory by hand alone when handling the
components or assembly. Use proper lifting
deviceandseekassistance.
When accessory is off the ground, NEVER be
underneath the accessory. Serious injury
including possibility of death could occur if
accessoryweretodropsuddenly.
Alwayswearprotectiveshoesandappropriate
gloveswhenmanipulatingorusingthis
equipment.
Always make sure to wear the appropriate safety
equipmentrequired(glasses,muffs,mask…).
Overallviewwithfront&rearchainguards.
DANGER
TOPREVENTINJURIES:
Always secure cutter deck in the up position with
solid supports before servicing underside of cutter.
Never work under equipment supported by
hydraulics.Hydraulicscandropequipmentifcontrols
are actuated or if hydraulic lines burst. Either
situation can drop the cutter instantly even when
powertothehydraulicsisshutoff.

2
ASSEMBLY
Installation:
Install front chain guard as shown with following
items:
Toinstallitems2A,temporaryremovebothitemsB.
ReinstallbothitemsBastheywere.
Tightenallboltstocorrecttorque.
Frontchainguardinstallation
FRONTCHAINGUARD
Preparation:
Removefrontshieldasshownwithfollowingitems:
Removefrontshield
REF. ENGLISHDESCRIPTION QTY.
1 Frontshield 1
2 Carriagebolt3/8"n.c.x1"GR5 5
3 Flatwasher7/16"hole 5
4 NylonInsertlockNut3/8"n.c. 5
Note:Theseitemswillbereinstalledlater.
REF. ENGLISHDESCRIPTION QTY.
1 Adjustmentlever 2
2 Sleeve 1
3 Hex.bolt1/2"n.c.x41/4"GR5 1
4 Hex.bolt1/2"n.c.x31/2"GR5 1
5 NylonInsertlockNut1/2"n.c. 2
REARCHAINGUARD
Preparation:
Removeadjustmentleversasshownwithfollowing
items:
Removeadjustmentlevers
REF. ENGLISHDESCRIPTION QTY.
1 Frontchainguardassembly 1
2 Carriagebolt3/8"n.c.x11/4"GR5 5
3 Flatwasher7/16"hole 5
4 NylonInsertlockNut3/8"n.c. 5
B Hex.bolt5/16"n.c.x1"GR5 2

3
ASSEMBLY
Installation:
Install rear chain guard assembly as shown with
followingitems:
Rearchainguardinstallation
Tightenallboltstocorrecttorque.
Preparation:
Removerearshieldasshownwithfollowingitems:
Removerearshield
REF. ENGLISHDESCRIPTION QTY.
1 Wheelsupport 1
2 Hex.bolt1/2"n.c.x31/2"GR5 1
3 NylonInsertlockNut1/2"n.c. 1
Preparation:
Removetailwheelassemblyasshownwithfollowing
items:
Removetailwheelassembly.
Note:Theseitemswillbereinstalledlater.
REF. ENGLISHDESCRIPTION QTY.
1 Rearshield 1
2 Carriagebolt3/8"n.c.x1"GR5 11
3 Flatwasher7/16"hole 11
4 NylonInsertlockNut3/8"n.c. 11
REF. ENGLISHDESCRIPTION QTY.
1 Rearchainguardassembly 1
2 Hex.bolt3/8"n.c.x43/4"GR5 7
3 Flatwasher7/16"hole 22
4 Spacer 7
5 Hex.bolt3/8"n.c.x11/4"GR5 4
6 NylonInsertlockNut3/8"n.c. 11

4
ASSEMBLY
Whenrearchainguardisinstalled,tailwheelmustbe
movedbackbyonesetofholes.
Makesuretopositionthewheelsupportcorrectly.
Selectholecorrespondingtoyourimplement.
Referto(4’,5’or6’)onpicture.
Install tail wheel assembly as shown with following
items:
Tailwheelinstallation
Adjustmentleversinstallation
REF. ENGLISHDESCRIPTION QTY.
1 Wheelsupportasembly 1
2 Hex.bolt1/2"n.c.x31/2"GR5 1
3 NylonInsertlockNut1/2"n.c. 1
Selectholecorrespondingtodesiredheight:
“A”forthelowestcuttingheight.
“G”forthehighestcuttingheight
Select hole “X” or “Y” to have adjustment lever as
verticalaspossible.
Install adjustment levers as shown with following
items:
REF. ENGLISHDESCRIPTION QTY.
1 Adjustmentlever 2
2 Sleeve 1
3 Hex.bolt1/2"n.c.x41/4"GR5 1
4 Hex.bolt1/2"n.c.x31/2"GR5 1
5 NylonInsertlockNut1/2"n.c. 2
Tightenallboltstocorrecttorque.
Tightentocorrecttorque.
TailwheelHeightAdjustment
Fromowner’smanualofrotarycutter:
referto“Adjustment”sectionforpropersetting.
See« DeckLeveling&HeightAdjustments »
ADJUSTMENT
XY

5
OPERATION
OPERATOR’SRESPONSIBILITY
It is essential that no one operates the Rotary Cutter without first having read, fully understood and become
totallyfamiliarwiththeoperator'sManualoftherotarycutter.
Makesuretocomplywithallsafetyinstructionsaboutoperationandmaintenanceofthisimplement.
DANGER
TOPREVENTINJURIES:
Always disconnect main driveline from tractor PTO
before servicing underside of cutter. PTO can be
engaged if tractor is started causing damage to
cutter,seriousinjuryordeath
DANGER
TOPREVENTINJURIES:
Allguardsandshieldsmustbeinstalledandingood
workingconditionatalltimesduringcutteroperation.
DANGER
TOPREVENTINJURIES:
Keep others away while cutter is operating. It can
discharge objects at high speeds. Even with guards
properly installed and in good condition, the cutter
still can discharge objects at high speeds. Stop
blade rotation if a bystander is within at least 300
feet.
DANGER
TOPREVENTINJURIES:
Neverplacehandsorfeetunderthedeckorattempt
tomakeadjustmentstothecutterwithPTOengaged.
Cutterbladesrotatingathighspeedscannotbeseen
and are located close to the deck housing. Body
extremitiescanbecutoffinstantly.
WARNING
TOPREVENTINJURIES:
Always disengage PTO, engage parkingbrake, shut
off tractor, remove ignition key, and wait for all
moving parts to come to a complete stop before
dismountingfromtractor.
WARNING
TOPREVENTINJURIES:
Always disengage PTO before lifting cutter up and
neveroperatecutterintheraisedposition.Thecutter
can discharge objects at high speeds resulting in
seriousinjuryordeath.
WARNING
TOPREVENTINJURIES:
Do not operate cutter with loose hardware. Loose
hardware can result in a breakdown which could
resultinseriousinjuryordeath.
WARNING
TOPREVENTINJURIES:
Clear area to be cut of debris and other unforeseen
removableobjectsbeforecutting.Markanypotential
hazards that cannot be removed such as tree
stumps, posts, rocks, holes, and drop
-
offs with a
visibleflag.
FIELDOPERATION
BEFOREOPERATION:
Makesurethereisnothingunderthecutter(tools,
block,feet,hands,etc.)thatshouldnotbethere.
DURINGOPERATION:
IMPORTANT:
Frequentlystopandinspectsafelycutterforloose
boltsandnuts.Tightenallloosehardwareas
indicatedintheTorquespecificationtable.

6
MAINTENANCE
ALWAYSPRACTICESAFEMAINTENANCE
Properservicingandadjustmentisthekeytothelonglifeofanyimplement.Carefulandsystematicinspection
canavoidcostlydowntime,maintenance,andrepairs.
Neverallowuntrainedpersonneltoservicemachine.
Usejacktosupportequipmentwhenrequired.
Carefullyreleasepressureinequipmentfromstoredenergy.
Checkallboltsafterusingtheunitforseveralhourstobesuretheyaretight.
Inspectcutterforloose,damaged(chainlinkforexample)orwornpartsandadjustorreplaceasneeded.
Checkfordamageoftheprotectivestructuresasguardsandreplacedamagedpartsasnecessary.
The parts on your Rotary Cutter have been specially designed and should only be replaced with genuine
Mahindraparts.
Donotalterthecutterinawaywhichwilladverselyaffectitsperformance.
Alwaysmakesuretoweartheappropriatesafetyequipmentrequired(glasses,muffs,mask…).

7
NOTES
_____________________________________________________________________________________________
_____________________________________________________________________________________________
_____________________________________________________________________________________________
_____________________________________________________________________________________________
_____________________________________________________________________________________________
_____________________________________________________________________________________________
_____________________________________________________________________________________________
_____________________________________________________________________________________________
_____________________________________________________________________________________________
_____________________________________________________________________________________________
_____________________________________________________________________________________________
_____________________________________________________________________________________________
_____________________________________________________________________________________________
_____________________________________________________________________________________________
_____________________________________________________________________________________________
_____________________________________________________________________________________________
_____________________________________________________________________________________________
_____________________________________________________________________________________________
_____________________________________________________________________________________________
_____________________________________________________________________________________________
_____________________________________________________________________________________________
_____________________________________________________________________________________________
_____________________________________________________________________________________________
_____________________________________________________________________________________________

8
O/L=ObtainLocally/ObtenirLocalement
Donotusenumbersinparenthesis.Forinternaluseonly.
Nepasutiliserlesnumérosentreparenthèses.Pourutilisationinterneseulement.

9
O/L=ObtainLocally/ObtenirLocalement
Donotusenumbersinparenthesis.Forinternaluseonly.
Nepasutiliserlesnumérosentreparenthèses.Pourutilisationinterneseulement.

10
O/L=ObtainLocally/ObtenirLocalement
Donotusenumbersinparenthesis.Forinternaluseonly.
Nepasutiliserlesnumérosentreparenthèses.Pourutilisationinterneseulement.

11
O/L=ObtainLocally/ObtenirLocalement
Donotusenumbersinparenthesis.Forinternaluseonly.
Nepasutiliserlesnumérosentreparenthèses.Pourutilisationinterneseulement.

12
O/L=ObtainLocally/ObtenirLocalement
Donotusenumbersinparenthesis.Forinternaluseonly.
Nepasutiliserlesnumérosentreparenthèses.Pourutilisationinterneseulement.

13
O/L=ObtainLocally/ObtenirLocalement
Donotusenumbersinparenthesis.Forinternaluseonly.
Nepasutiliserlesnumérosentreparenthèses.Pourutilisationinterneseulement.

14
O/L=ObtainLocally/ObtenirLocalement
Donotusenumbersinparenthesis.Forinternaluseonly.
Nepasutiliserlesnumérosentreparenthèses.Pourutilisationinterneseulement.

15
O/L=ObtainLocally/ObtenirLocalement
Donotusenumbersinparenthesis.Forinternaluseonly.
Nepasutiliserlesnumérosentreparenthèses.Pourutilisationinterneseulement.

16
O/L=ObtainLocally/ObtenirLocalement
Donotusenumbersinparenthesis.Forinternaluseonly.
Nepasutiliserlesnumérosentreparenthèses.Pourutilisationinterneseulement.

17
O/L=ObtainLocally/ObtenirLocalement
Donotusenumbersinparenthesis.Forinternaluseonly.
Nepasutiliserlesnumérosentreparenthèses.Pourutilisationinterneseulement.

18
O/L=ObtainLocally/ObtenirLocalement
Donotusenumbersinparenthesis.Forinternaluseonly.
Nepasutiliserlesnumérosentreparenthèses.Pourutilisationinterneseulement.
This manual suits for next models
5
Table of contents
Other Mahindra Farm Equipment manuals