Medel AudioLink Ma070301 User manual

Cochlear Implants
User Manual
AudioLink
AW37299_2.0 (English)


1
Table of Contents
1. Introduction ......................................................................................................... 2
2. Intended use– Indications– Contraindications ................................................... 3
Intended use .................................................................................................................3
Indications.....................................................................................................................3
Contraindications..........................................................................................................4
3. AudioLink ............................................................................................................. 5
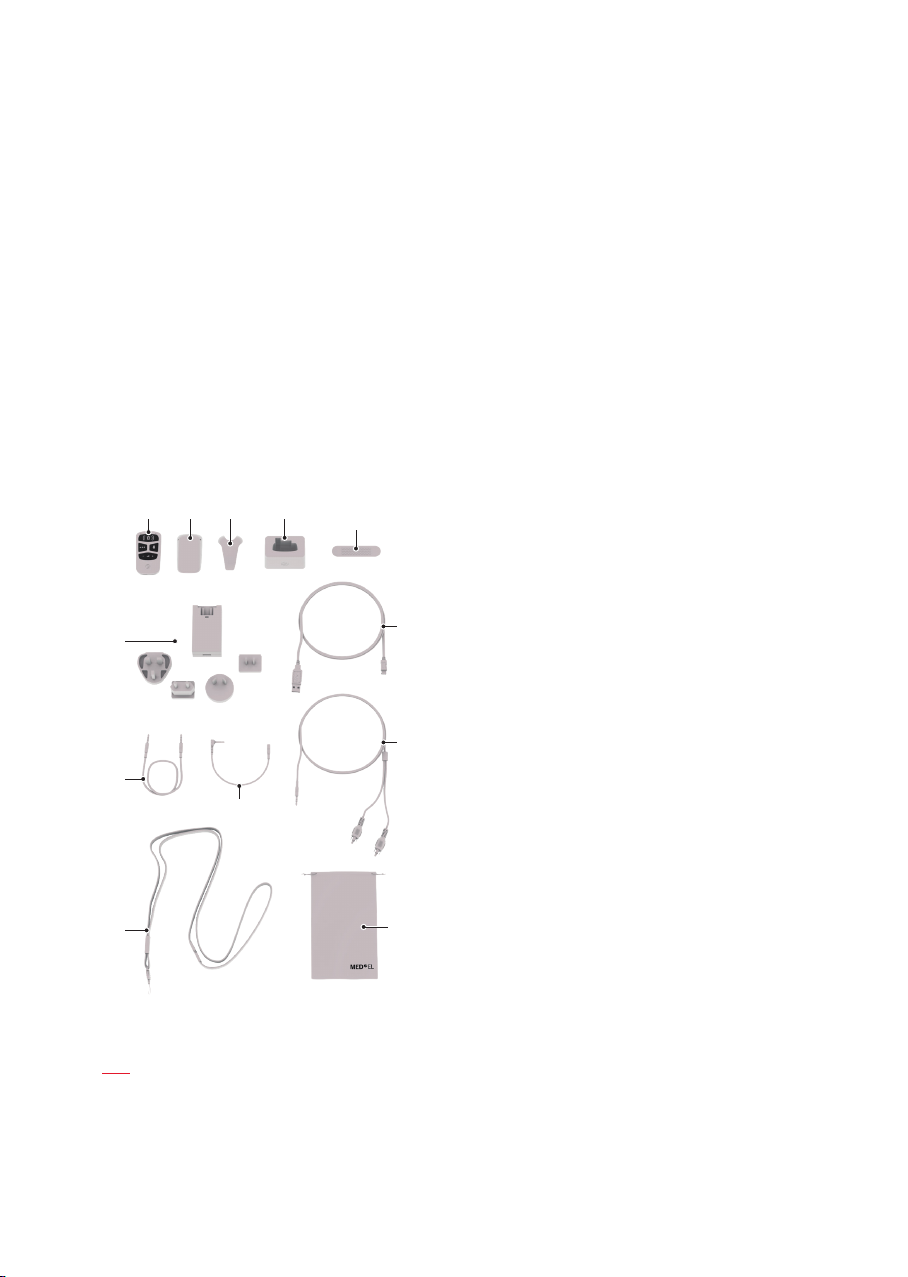
System components......................................................................................................5
AudioLink overview .......................................................................................................6
Using AudioLink for the rst time.................................................................................7
AudioLink functions .................................................................................................... 13
AudioLink indicator lights ...........................................................................................20
4. Care and maintenance ........................................................................................22
Maintenance ...............................................................................................................22
Disposal.......................................................................................................................23
Cables..........................................................................................................................23
Battery ........................................................................................................................24
5. Troubleshooting ................................................................................................. 26
6. General precautions and warnings..................................................................... 27
7. Technical data .................................................................................................... 29
Symbols.......................................................................................................................32
Regulatory statements................................................................................................34
Guidance and manufacturer’s declaration .................................................................35
8. Appendices ........................................................................................................ 38
Supplies and accessories ............................................................................................38
Warranty .....................................................................................................................38
Manufacturer address.................................................................................................38
9. Contact MED‑EL ................................................................................................. 39

Introduction
2
1. Introduction
This user manual provides information and instructions for the MED‑EL AudioLink
(Ma070301). It contains important information on handling and operation of the device.
Please read these instructions carefully and completely so that you are familiar with the
operation and maintenance of AudioLink.
AudioLink is an optional component of the MED‑EL Cochlear Implant System to be used
with compatible MED‑EL audio processors. Please read the user manual of your audio
processor carefully before reading this manual.
NOTE: You are the operator of your/the recipient’s AudioLink, therefore we recom‑
mend that you read this manual in its entirety. Do not perform any maintenance
activities other than those described in this manual (e.g. changing the battery).
Do not hesitate to contact your healthcare provider or local MED‑EL representative with
any additional questions you may have.
Symbols used in this user manual
Information indicating a hazardous situation that, if not avoided, could result
inminor injury or inconvenience for the user and/or property damage.
Information indicating a hazardous situation that, if not avoided, could result
indeath or serious injury.
Information relevant for parents, guardians, or carers of children who use
thesystem.

Intended use– Indications– Contraindications
3
2. Intended use– Indications–
Contraindications
Intended use
AudioLink is an optional, external part of the MED‑EL Cochlear Implant System.
AudioLink is intended to be used as a wireless connection between compatible MED‑EL
audio processors and electronic devices (mobile phones, smartphones, tablets, etc.)
equipped with Bluetooth®¹ wireless technology.
In combination with a mobile or smartphone, AudioLink provides the functionality of a
Bluetooth®headset where the incoming audio signal is wirelessly streamed to the audio
processor(s).
AudioLink is intended to be used to wirelessly stream audio signals from an audio
source featuring Bluetooth®wireless technology or an analog audio source to the
audioprocessor(s).
AudioLink is intended to be used as a wireless remote microphone.
AudioLink provides a general communication and data pathway between an electronic
device featuring Bluetooth®wireless technology running a specic MED‑EL software and
the audio processor(s).
Indications
AudioLink is an optional component of the MED‑EL Cochlear Implant System and is
indicated for use by recipients who have received a compatible MED‑EL audio processor.
Additionally, persons interacting with a MED‑EL Cochlear Implant user (e.g. parents of
implanted children, audiologists, teachers of implanted children, etc.) can use AudioLink.
AudioLink is indicated to be used in typical everyday environments (home, ofce,
outdoor, etc.) and also in clinical environments (audiologist’s ofce, etc.).
1 The Bluetooth®word mark and logos are registered trademarks owned by the Bluetooth SIG, Inc. and any
use of such marks by MED‑EL is under license.

Intended use– Indications– Contraindications
4
AudioLink is indicated to be used every day during a recipient’s waking hours. There are
no restrictions in the frequency of use.
The user of AudioLink does not need any special skills or elevated level of education,
however, for children under the age of ve years and those who, for a variety of
reasons, lack the ability to appropriately handle and manipulate small parts, the parents
and/or carer shall operate the device.
Contraindications
A recipient must not receive an AudioLink if the individual is known to be intolerant of
the materials used in AudioLink.
AudioLink is not intended to be used in environments where RF transmissions are
prohibited.

AudioLink
5
3. AudioLink
AudioLink wirelessly connects your audio processor(s) with electronic devices (smart‑
phones, tablets, etc.). AudioLink can be used to watch TV, listen to music via the phone
or a connected device, take phone calls and as a remote microphone. Information from
the AudioLink is transmitted to the audio processor(s) via a 2.4GHz radio frequency
(RF) link.
AudioLink is not necessary for the function of your audio processor.
System components²
AudioLink main unit
AudioLink battery
AudioLink clip
Docking station
AudioLink opening tool
USB power adapter with
country‑specic input plugs
Micro USB cable
Stereo cable with two 3.5 mm
audiojacks
Adapter cable with a 2.5mm
audio jack and 3.5mm socket
Stereo cable with a 3.5 mm
audiojack and RCA connectors
Lanyard
Pouch
2 Not all products in this document are currently approved or available in all countries. Please contact your
local MED‑EL representative for information on current product availability in your country.

AudioLink
6
AudioLink overview
In its basic conguration AudioLink consists of the AudioLink main unit (hereafter
referred to as main unit) and the AudioLink battery (hereafter referred to as battery).
Microphone
Groove
Status light
Main button & Connectionsymbols:
Shows connection between devices,
indicates successful pairing and
switches AudioLink ON/OFF
Mix button: Switches between audio
input from the AudioLink microphone
only or mixed input from AudioLink and
the audio processor microphone(s)
Mic button: Activates the remote
microphone functionality
Volume button: Increases (+) and
decreases (–) the volume
Lanyard opening
Attachment clip
Rubber socket cover
Audio socket (2.5mm stereo)
Micro USB socket

AudioLink
7
Using AudioLink for the rst time
Assembling AudioLink
To assemble AudioLink, proceed as follows:
Your AudioLink is delivered disassembled.
Attach the battery to the main unit, starting at the
bottom at a 45° angle.
Starting at the bottom, press the two parts together
until the battery fully snaps into the main unit.
AudioLink is now switched on. This is indicated by the
status light slowly pulsing green.
Optional: Connect the AudioLink clip to AudioLink
by aligning the clip with the back of AudioLink and
applying pressure until the designated holes in the clip
snap into place.
Optional: To attach the lanyard, remove the AudioLink
clip from AudioLink by slightly lifting one side of the
clip with your ngernail or with the AudioLink opening
tool. Insert the thin string of the lanyard into the hole
of the AudioLink clip and thread the other end of the
lanyard through the resulting loop. Tighten the loop
and reattach the AudioLink clip to AudioLink.

AudioLink
8
CAUTION
Do not touch the battery contacts with your hands or metal objects.
PARENTAL GUIDANCE
Do not use the lanyard with children under 3 years to avoid the risk of
strangulation. Keep the lanyard out of the reach of children under 3 years.
NOTE: Your AudioLink is delivered with the battery not fully charged. We recommend
that you fully charge the device before using AudioLink.
Charging AudioLink
To charge AudioLink, proceed as follows:
Choose the appropriate input plug for the
USBpower supply. Connect the input plug with
the USB power supply by pushing down the
plug until it clicks into place. Then connect the
microUSB cable.
Pull aside the rubber socket cover.
Plug the micro USB cable into the
charging socket of AudioLink.
Connect the USB power supply to a power
outlet(100‑240V AC, 50–60 Hz).

AudioLink
9
The status light will be orange while charging.
When the status light turns green, AudioLink is
fullycharged. Optional: Disconnect the micro USB
cable from the charging socket and the USB power
supplyfrom the power outlet.
You can also use the AudioLink docking station to charge the battery (see chapter
Streaming audio from TV on how to use the AudioLink docking station).
You can still use all functions of AudioLink while it is charging or connected to a charger
as long as AudioLink is switched on. When switched off, AudioLink automatically changes
to standby mode while being charged. It will take approximately three hours to charge a
fully depleted battery.
CAUTION
Only use the provided USB power supply and cable to prevent any damage to
the device and to avoid any injuries.
Switching AudioLink ON/OFF
To switch ON AudioLink, proceed as follows:
Press the main button for approximately 2 seconds.
Release the main button. When AudioLink is success‑
fully switched ON, the status light illuminates in green
or orange.
AudioLink is automatically switched ON and in standby mode during charging.

AudioLink
10
To switch OFF AudioLink, proceed as follows:
Press the main button for approximately 2 seconds.
Release the main button. When AudioLink is switched
OFF, the status light does not illuminate.
AudioLink switches off automatically when not used for approximately 5 minutes
andnot powered via USB.
Pairing your audio processor with AudioLink
If you want to use AudioLink with your audio processor, you need to pair your audio
processor with AudioLink.
To pair your audio processor with AudioLink, proceed as follows:
Switch off the audio processor.
Press the main button for approximately 2seconds
to switch on AudioLink and make sure it is in
standbymode (only the status light is active,
i.e.orange or green).
Place the coil on the top side of AudioLink,
approximately over the Volume button.
Switch on the audio processor.
If the pairing process is successful, the left and right
connection symbol will briey illuminate simultaneously.

AudioLink
11
Optional for bilateral users: Repeat pairing for the second processor. If AudioLink is
paired with two audio processors, i.e. for the left and the right ear, it automatically
tries to synchronise and stream to both audio processors. However, synchronisation
might not be simultaneous and if an audio stream is active during that time, audio
quality might be degraded (for up to 25seconds). You can only pair one audio
processor for each side.
AudioLink will automatically try to resynchronise to the audio processor(s) if it loses
connection. If it is not possible to resynchronise to the audio processor(s) within
25seconds, AudioLink returns to standby mode (unless streaming audio via a stereo
cable connection).
NOTE: The audio processor(s) must be paired with AudioLink before any other
connection to an external device can be established.
Pairing AudioLink with a Bluetooth®device
To pair AudioLink to an electronic device with Bluetooth®functionality, proceed as
follows:
Ensure that AudioLink is switched on and in
standbymode (only the status light is active,
i.e.orange or green).
Simultaneously press the Mix button and Mic button
for approximately 2 seconds. AudioLink is now in
Bluetooth®pairing mode (indicated by a fast blinking
Bluetooth®connection symbol). The Bluetooth®pairing
mode is active for 60 seconds. AudioLink must be in
pairing mode to be visible to other electronic devices.
Turn on Bluetooth®on your mobile device and
scanforother Bluetooth®devices.
NOTE: Refer to the user manual of the Bluetooth®
device for instructions on Bluetooth®connections.
Bluetooth
Bluetooth

AudioLink
12
After a few seconds the device should nd a
new Bluetooth®device called MED‑EL AudioLink.
Select thisdevice and start pairing.
NOTE: Further interaction might be required.
If asked for a code, enter ‘0000’. Otherwise just
conrm the pairing.
Bluetooth
Bluetooth
MED‑EL AudioLink
Not Connected
After successful pairing, the Bluetooth®device will
automatically connect to AudioLink. This is indicated
by a slowly pulsing Bluetooth®connection symbol
on your AudioLink.
You can manually connect or disconnect AudioLink
on the device. Bluetooth®functionality is only
provided if AudioLink is connected.
Bluetooth
Bluetooth
MED‑EL AudioLink
Connected
NOTE: AudioLink can only be connected to one Bluetooth®device at the same time.
If necessary, you can delete the stored Bluetooth®pairings as follows:
Ensure that AudioLink is switched on and in
standbymode (only the status light is active,
i.e.orange or green).
Simultaneously press the Mix button and Mic button
for approximately 2 seconds. AudioLink is now in
Bluetooth®pairing mode (indicated by a fast blinking
Bluetooth®connection symbol).
Press Volume + and Volume – simultaneously
for approximately 1.5seconds. The Bluetooth®
connection symbol will stop blinking, indicating
that all stored Bluetooth®pairings have been
successfully deleted from your AudioLink.

AudioLink
13
AudioLink functions
AudioLink offers the following input modes:
• Answer phone calls
• Stream TV audio via cable connection between AudioLink and TV
• Stream music via a connected device
• Use the AudioLink as a remote microphone
If one audio streaming mode is currently active and another mode is activated, AudioLink
will change to the mode with the higher priority. Phone calls have the highest priority,
followed by the remote microphone and, nally, the streaming options requiring a
cable connection. For example: If you receive a phone call while streaming via a cable
connection, streaming (lower priority) will be interrupted until you terminate the
phonecall (higher priority).
There is a delay when terminating streaming and returning to standby mode (only the
status light is active, i.e. orange or green). It will take approximately 5 seconds between
switching off streaming (e.g. pressing the Microphone button in active remote micro‑
phone mode) and returning to standby mode.
While audio streaming is active, you have several options to adjust the volume level of
the streamed audio signal:
• Via the source device (mobile phone, TV, etc.), if possible. This option is recommended.
• Via AudioLink (Volume button).
• Directly on the audio processor(s) (FineTuner Echo, AudioKey, etc.). This option is
not recommended. If you decide to change the volume on your audio processor(s),
make sure to readjust the volume setting before terminating streaming to avoid
uncomfortably loud sensations.
PARENTAL GUIDANCE
To prevent accidental volume changes, keep AudioLink out of reach of
youngchildren.
Making phone calls via Bluetooth®
With AudioLink you can stream phone calls directly to your audio processor(s) (including
calls via WhatsApp, Skype, Hangouts, Facetime, etc.). The voice of your conversation
partner is streamed from the phone to AudioLink via Bluetooth®and forwarded to the
audio processor(s). Your voice is picked up by the integrated microphone of AudioLink
and returned to the mobile phone via Bluetooth®.

AudioLink
14
To use AudioLink for phone calls, proceed as follows:
Switch on AudioLink.
Ensure that a Bluetooth®connection between AudioLink
and your phone is established (see chapter Pairing
AudioLink with a Bluetooth®device). This is indicated by
a slowly pulsing Bluetooth®connection symbol.
During a phone call the integrated AudioLink micro‑
phone will be used instead of the microphone
of the phone. You should wear AudioLink in a way
that the microphone can pick up your voice. It is
recommended to wear AudioLink close to your mouth,
e.g. on the upper body, attached to a collar, shirt
pocket, etc. with the AudioLink clip or the lanyard.
Do not cover the microphone. For best sound recep‑
tion of the integrated microphone, make sure that
the front of AudioLink always faces away from your
body and that the top of AudioLink faces upwards.
To start a phone call, proceed as you usually would on your mobile phone.
When you receive a phone call, the ring tone will be streamed to the
audioprocessor(s), even if your phone is in silent mode:
• To answer the phone call, briey press the main
button of AudioLink.
• In case you want to reject the phone call,
press the main button of AudioLink a little longer
(approx. 2seconds).
• To terminate an active phone call, briey press
the main button again.
You can also answer, reject and terminate phone calls directly on the mobile phone.
NOTE: By default, your audio input is a mix of the AudioLink signal and the audio
processor microphones. You can change this setting with the Mix button.

AudioLink
15
Streaming audio from TV
With AudioLink you can stream from your TV (or other consoles and devices) directly to
your audio processor(s). The signal is transmitted over a cable connection to AudioLink
and then streamed to your device(s).
To connect AudioLink to a TV, proceed as follows:
Connect the stereo cable with RCA (or cinch) connec‑
tors with the TV. To do so, insert the red and white
audio plug into the appropriate RCA sockets on the TV
(typically located on the side or the back of the TV).
NOTE: If your TV does not have RCA input sockets,
use commercially available RCA adapters.
TV
Connect the 3.5 mm audio jack of the stereo cable
withthe AudioLink docking station.
Pull the rubber socket cover aside and turn it
to the back to access the connectors.
Place AudioLink in the AudioLink docking station.
Make sure that the rubber socket cover is posi‑
tioned in the designated groove of the AudioLink
dockingstation.
Switch on the TV and set the output volume to a medium level. If necessary,
change the TV settings so that the RCA connectors are set as an output signal
instead of input. If your TV does not support such settings, we recommend
using the 3.5mm jack stereo cable in combination with the provided adapter
asdescribed in chapter Streaming audio via stereo cable.

AudioLink
16
Once an audio signal is received from the TV, AudioLink
automatically synchronises to the audio processor(s).
Once synchronised, AudioLink starts streaming to
the audio processor(s). The corresponding left/right
connection symbol starts pulsing slowly.
To stop the streaming mode, unplug the cable from AudioLink. Audio streaming
stops automatically when no audio signal is received from the source device for
approx. 3.5 minutes. If you have the Fine Tuner Echo remote control, you may
use the Fine Tuner Echo to deactivate the stream by pressing the music symbol.
Please refer to the FineTuner Echo and/or audio processor user manual for further
information.
It is recommended to use the stereo cable with RCA connectors and the AudioLink
docking station for TV streaming as signal quality improves.
NOTE: Do not forget to put the rubber socket cover back over the connectors
afterremoving AudioLink from the AudioLink docking station.
NOTE: By default, your audio input is a mix of TV signal and the audio processor
microphone signal. You can change this setting with the Mix button.
Streaming audio via stereo cable
You can stream the signal of any compatible audio source (e.g. tablet, PC, laptop) to
your audio processor by establishing a wired connection to AudioLink. Use the provided
stereo cables with the 2.5 mm to 3.5mm audio adapter cable and proceed as follows:
Connect the stereo cable with two 3.5 mm audio
jacks to the target audio source (or the AudioLink
dockingstation).
Audio source
Connect the 3.5 mm audio socket of the audio adapter
cable to the 3.5 mm audio jack of the stereo cable.

AudioLink
17
Connect the 2.5 mm audio jack of the audio adapter
cable to the audio socket of AudioLink.
Start audio playback on your device. We recommend
setting the output volume ofthe source device to a
medium level.
If an audio signal is received from your device,
AudioLink automatically synchronises to the audio
processor(s). Once synchronised, AudioLink starts
streaming to the audio processor(s). The corresponding
left/right connection symbol starts pulsing slowly.
To stop streaming, unplug the cable from AudioLink. Audio streaming stops
automatically when no audio signal is received from the source device for
approx.3.5 minutes.
You can also use the AudioLink docking station for streaming via cable connection.
Please refer to chapter Streaming audio from TV for information on how to establish
the connection to the audio source (use the stereo cable with two 3.5 mm audio jacks
instead of the stereo cable with RCA connectors).
NOTE: By default, your audio input is a mix of the audio source signal and the audio
processor microphone signal. You can change this setting with the Mix button.
Using the remote microphone
In remote microphone mode, AudioLink picks up surrounding acoustic signals with
itsintegrated microphone and streams them to the audio processor(s).
The remote microphone feature of AudioLink can be used in several situations:
Meeting room situation:
Place AudioLink in a stationary position (e.g. in the middle
of a table) to pick up the voices of all participants.
The AudioLink docking station can be used to position the
AudioLink properly.

AudioLink
18
Conversation/school situation:
The conversation partner wears AudioLink so that the
microphone can pick up the partner’s voice which is then
streamed to your audio processor(s). Your conversation
partner can wear AudioLink on the upper body, attached
to a collar, shirt pocket, etc. with the AudioLink clip or
use the lanyard.
To use the remote microphone function, proceed as follows:
Switch on AudioLink.
Press the Mic button of AudioLink.
AudioLink synchronises to the audio processor(s)
and starts streaming (indicated by slow pulsing of
the corresponding left/right connection symbol).
The microphone symbol will also illuminate.
To terminate the remote microphone mode, press the Mic button of AudioLink again.
NOTE: By default, the audio input will be the AudioLink microphone only and the
microphones of the audio processor(s) will be deactivated. You can change this
setting with the Mix button.
Table of contents
Other Medel Hearing Aid manuals

Medel
Medel SONNET User manual

Medel
Medel SONNET User manual

Medel
Medel OPUS 2 User manual

Medel
Medel Samba Assembly instructions

Medel
Medel OPUS 2 User manual

Medel
Medel Samba User manual

Medel
Medel SAMBA Instruction manual

Medel
Medel SONNET (Me1310) User manual

Medel
Medel Samba User manual

Medel
Medel SONNET User manual

Medel
Medel ADHEAR System Instruction manual

Medel
Medel Mi1250 SYNCHRONY 2 User manual

Medel
Medel OPUS 2 Technical Document

Medel
Medel OPUS 2 Operating instructions

Medel
Medel hearLIFE DUET 2 Assembly instructions

Medel
Medel RONDO User manual

Medel
Medel Sonnet Operating instructions

Medel
Medel ADHEAR System User manual

Medel
Medel SONNET (Me1310) User manual

Medel
Medel SONNET 2 User manual