Medeli SP4200 User manual

Medeli SP4200
Instructions
Anders Borg, 2023-02-24, revision 10
Introduction............................................................................................................................................................2
Auto Accompaniment.............................................................................................................................................3
Harmony .................................................................................................................................................................4
Performance Assistant............................................................................................................................................5
Function..................................................................................................................................................................6
Registration Memory..............................................................................................................................................7
Record.....................................................................................................................................................................8
Song ........................................................................................................................................................................9
Lesson Mode.........................................................................................................................................................10
Chord Dictionary...................................................................................................................................................11
USB .......................................................................................................................................................................12
MIDI Functions......................................................................................................................................................13
Voices, Styles and Songs.......................................................................................................................................14
Tips .......................................................................................................................................................................15
Reference.............................................................................................................................................................. 15

Introduction
I enjoy this stage piano a lot, in part because of its oddities, and despite it being launched 2017 it’s in my
opinion still worth every penny, at least for home use, and with the stand with pedal unit, its many voices,
styles, songs, connectors etc., yet…
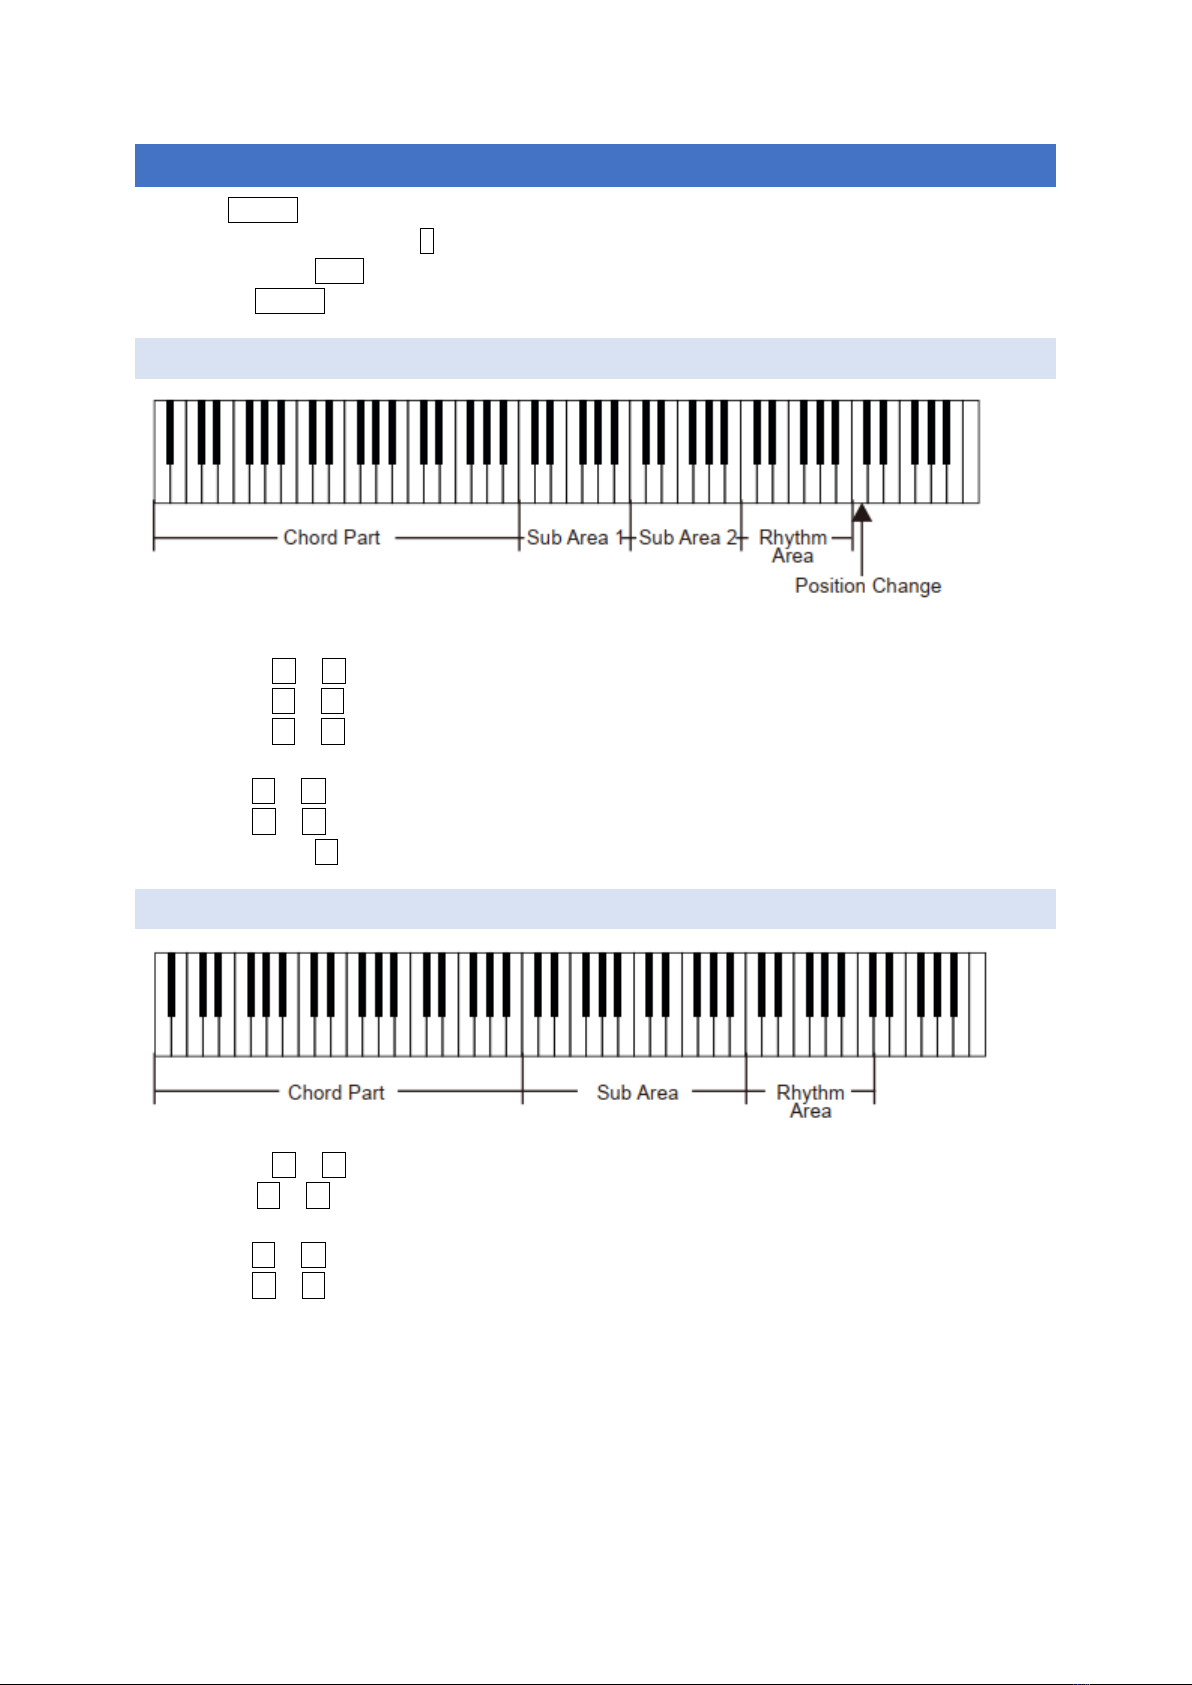
Mileage may vary, but I found the owner’s manual to be quite confusing, and hard to grasp how to use each
feature, especially recording. Also, the UI/UX design of the piano is rather poor (Function times out, Record
works in mysterious ways, etc.). With the number of buttons at hand, this could have been done much better.
The instructions are based on practical research, and I use it myself, so any new insights will be added over
time.
It’s not complete, but rather drilling down into the topics I found needed clarification at the time. I might go
through Performance in more detail, a rather unique and odd feature, but quite pleasing when you get the
hang of it. And you are supposed to be able to upload Yamaha-compatible styles to it (I got instructions from
Medeli support that don’t work). They partly deny this, as Medeli keyboards don’t support Yamaha CASM. Etc.
It’s intentionally split up into one page per topic, so you get the full description of each topic on one (printed
or viewed) page. The text is also intentionally brief but hopefully to the point. I don’t point out whether you
need to press Shift, as that’s obvious from the function (rather than button) name.
It works as well with Thomann SP-5600 (that I have), Kurzweil KA-120, Beale Stageperformer 1000, Classic
Cantabile SP-250, Fame SP-4, and possible other rebrands of the Medeli SP4200. I don’t guarantee it works
with any other Medeli piano or keyboard, even if they are also based on the A2S synth engine, as Medeli tends
to switch things around in each instrument.
Thomann tried to improve on the original manual, but rather made it even worse (other clone providers didn’t
make that mistake). Stunningly, all manuals still list drum sets as “Chinese Instruments” in the Voice list. That’s
impressive. And why did they remove the Chinese instruments from the international version? I would have
appreciated them.
Feel free to point out omissions and errors. Please also mention any other clones based on the SP4200.
You can contact me at anders.borg@abiro.com.

Auto Accompaniment
Select
1. Either press Style or a quick selection button.
2. Select the desired style.
Prepare
1. Press any of Fill A, Fill B, Fade, Intro/Ending, Sync Start based on your needs.
2. Press a chord to start accompaniment if you pressed Sync Start earlier, or press Start/Stop.
Chord Mode
Press Chord Mode for:
1. A.B.C.: Use the left part of the keyboard to play simplified or full (recommended) chords.
2. Full Range: The whole keyboard is used to play full chords. Release the chord (with possible sustain) to
play the melody (accompaniment will not trigger on single notes).
3. No auto chords; Use this for no accompaniment at all or just rhythms.
O.T.S.
1. Press O.T.S. to activate it (A.B.C. is also activated).
2. Press M1 to M4 for different instruments.
Notes
•Rhythms without A.B.C.: Deactivate Chord Mode and press Start/Stop.
•A.B.C. chords without accompaniment: Don’t press Start/Stop or Sync Start.
•Choose a new style when accompaniment is stopped unless you want the tempo of the first style to be
used with the new one.
•If you find the accompaniment to be too loud you can lower it with Accomp v and save a registration
possibly with A.B.C. and other settings activated suitable for accompaniment play.
•I’ve found using accompaniment for correct timing much better than using Metronome, as it’s more
natural and interesting, even with only rhythm playing, and can be varied with the accompaniment-
related buttons. The metronome is also quite sharp sounding, not blending well with softer instruments,
and it’s not possible to lower its volume via the mixer.

Harmony
Harmony makes it easy to add harmony and other note effects to one or more notes you play with the right
hand, based on played chords or automatically, depending on type.
Use
1. Press Function^ until you see Duet (by default).
2. Go through the list of harmony types with ●until you see the one you want. See Function for a list of
harmony types.
3. Wait until Function exits.
4. Activate by pressing Harmony.
5. 1+5, Octave, Echo, Tremolo, and Trill don't need Chord Mode A.B.C. activated. The others do.
6. You can deactivate Harmony or choose some other harmony type via Function^.
Notes
•From a MIDI perspective also the auto-generated notes are sent, so if you record what’s being played,
they are recorded as well.

Performance Assistant
1. Press Perform. The display should show Perform to the right.
2. Select SteelGtr or Piano with ●.
3. Select beat with +/Yes.
4. Exit with Perform.
Guitar
•Black keys: Noises (same for each octave)
•Chord Part A0 to B3: Similar to A.B.C..
•Sub Area 1 C4 to B4: Broken chords.
•Sub Area 2 C5 to A5: Play strings 1 to 6.
•Rhythm Area:
oC6 to G6: Rhythms
oA6 to B6: Endings
•Position Change C7: High position. The display shows Perform.H.
Piano
•Chord Part A0 to B3: Similar to A.B.C..
•Sub Area C4 to B5: Phrases.
•Rhythm Area:
oC6 to G6: Rhythms
oA6 to C7: Endings

Function
Press Function^ and step to each setting.
Setting
Display
Range
Default
Tune
nnn Tune
-50 to 50
0
Beat Type
nnn Beat
0,2 to 9
4
Split Point
nnn Split Pt
1 to 88
34 (F#3)
Sustain Pedal
nnn selected
Sustain Pedal, Soft Pedal, Start/Stop Accompaniment,
Select Memory
Sustain
Pedal
Soft Pedal
nnn selected
Soft Pedal, Start/Stop Accompaniment, Select Memory
Soft Pedal
Harmony Type
nnn selected
Duet, Standard Trio, Full Chord, Rock Duet, Country Duet,
Country Trio, Block, 4 Close 1, 4 Close 2, 4 Open, 1+5,
Octave 1, Octave 2, Strum, Echo 1 to 4, Tremolo 1 to 4,
Trill 1 to 4
Duet
Equalizer Type
nnn selected
Pop, Rock, Classical, Jazz, Dance, Reset
Reset
Reverb Type
nnn selected
Room 1, Room 2, Room 3, Hall 1, Hall 2, Hall 3, Church 1,
Church 2, Delay, Pan Delay
Hall 1
Reverb Level
nnn Rev Lev
0 to 127
Voice
Chorus Type
nnn selected
Chorus 1, Chorus 2, GM Chorus 1, GM Chorus 2, Flanger
1, Flanger 2, Rotary 1, Rotary 2
GM Chorus
2
Chorus Level
nnn Chr Lev
0 to 127
Voice
MIDI In Channel
nnn Receive
1 to 16, All
All
MIDI Out Channel
nnn Transmit
1 to 16
1
Auto Power Off
nnn PowerOff
Off, 30, 60
30
Notes
•Harmony types in italics require Chord Mode A.B.C..
•Harmony types Echo, Tremolo and Trill are synced with Tempo and get shorter with increasing numbers.
•Pressing Yes/No at the same time resets to the default value, as shown in Default.

Registration Memory
You can store up to 48 registrations (8 banks by 6 memories), that are combinations of selected voice, style,
tempo, mixer, and most other settings.
The display shows selected bank and memory under Memory.
Registrations are only accessible when O.T.S. is off.
Select
1. Possibly press Bank (cycle 1 to 8).
2. Press M1 to M6.
Store
1. Possibly press Bank (cycle 1 to 8).
2. Hold Store and then press M1 to M6.
3. Confirm with +/Yes.
Notes
•A registration saves almost all settings (voice, style, function, mixer, tempo. Start from scratch (power on
state) and make only needed changes, so you don’t get surprises when you select it later.
•Preferably set the volumes equal via Mixer and Accomp for all registrations so that you can switch
between them without volume differences.

Record
1. Press Record.
2. Choose what song to save to (RecSong1 to RecSong5 = Song 121 to 125). If you choose one that’s already
been recorded to, you can add tracks to it, or delete tracks from it.
3. You can leave recording mode at this point via Voice etc.
4. Press Record again to enter recording preparation mode. REC is displayed.
5. An empty melody track is selected automatically (shown flashing on the display). Possibly choose some
other with Melody n.
6. Select a Voice and Tempo. You can even select a registration.
7. Press Accomp if you want to save accompaniment to a track. If you do you can now select a style and a
chord mode (A.B.C. is recommended). You can even change this while recording.
8. If you only want to record accompaniment, you can silence all other tracks. That serves as a good
foundation for later melody tracks.
9. You can delete some or all tracks by pressing Record for more than 2 seconds (Delete? Is shown). Delete
with +/Yes. If you delete all tracks the song is deleted too.
10. Press Start/Stop or just start playing to record, possibly with accompaniment.
11. Press Record to stop recording or to leave without recording.
12. The recorded song with all parts will now play automatically on repeat. Stop with Start/Stop.
13. Press Record to go back to step 2.
Notes
•You can save recorded songs to a USB stick as MIDI files. See the USB section.

Song
Play
1. Press Song twice (if you don’t it will auto-play all songs after each other).
2. Select a song. Recorded songs are at 121 to 125.
3. Press Start/Stop to play the selected song. The song will count in one beat (seen on the display).
4. The song will repeat after completion unless you press Start/Stop again.
Control
1. Hold >> or << for fast forward/backward.
2. Press || to pause or play.
3. Press ↻to set loop start and end. While looping press ↻to leave loop mode.
4. Press Start/Stop to stop playing.
Exit
1. Press Voice etc to leave song mode.

Lesson Mode
Prepare
2. Press Song twice.
3. Select the song you want to use for the lesson.
4. Press Lesson. Lesson is shown on the display.
5. Press Lor R, or Land Rsimultaneously, depending on what hand(s) you want to train. See the selection
under Lesson.
6. Select type of lesson by pressing Lesson. See the selection under Lesson.
1. Only tests timing.
2. Only tests pitch.
3. Both timing and pitch are tested.
7. Press Start/Stop to start the lesson.

Chord Dictionary
Use this feature to learn how chords are played. Chord types and chord notes are printed above the keybed
for your reference. A.B.C. is activated automatically.
Chord Learning Mode
1. Press Dict once so Dict. 1 is shown.
2. Use C4 to B5 to select a chord type.
3. Use C6 to B6 to select a chord root.
4. The display shows what the chord is called and the position for that chord.
5. Play that chord in the A.B.C. area A0 to B3 for a vocal confirmation.
6. Continue from 2.
7. Exit by pressing Dict twice.
Chord Examining Mode
1. Press Dict twice so Dict. 2 is shown.
2. The display shows a random chord name, without showing how to play it.
3. Try to play the correct chord in the A.B.C. area within 3 seconds for an OK (warning: very loud!).
4. After that time the chord will be shown.
5. Play that chord position for an OK if you didn’t manage before.
6. Continue from 2.
7. Exit by pressing Dict once.

USB
Prepare
1. Insert a USB stick.
2. Press USB Device to enter.
3. ●chooses menu, +/Yes selects operation, -/No exits.
4. Press USB Device to exit.
Play
1. Move to Play with ●and select it with +/Yes.
2. Navigate the file tree with ●.
3. Enter a folder with +/Yes.
4. Back up by pressing +/Yes on ..
5. Play a song with Start/Stop.
Load
1. Move to Load with ●and select it with +/Yes.
2. Select what you want to load: LoadSong, LoadSty, LoadMem.
3. Navigate to a file as before.
4. Select the file with +/Yes.
5. Select what user song or style to store it to. Doesn’t apply to memory.
6. Load with +/Yes.
Save
1. Move to Save with ●and select it with +/Yes.
2. Select what you want to save: SaveSong, SaveSty, SaveMem.
3. Select what song or style to save.
4. Name the file using the keybed (see the symbols above the keys). The file name can max have 8 symbols.
5. Save with +/Yes.
6. You can’t overwrite existing files.
Delete
1. Move to Delete with ●and select it with +/Yes.
2. Select what you want to delete: UserSong, UserSty, UserMem.
3. Navigate to a file as before.
4. Select the file with +/Yes.
5. Delete with +/Yes.
Format
1. Move to Format with ●and select it with +/Yes.
2. Format with +/Yes.

MIDI Functions
•The PCSUITE software mentioned in the manual is named Pootute and can be downloaded from Medeli.
Supposedly you should be able to import Yamaha-compatible styles with Pootute, but I’ve not succeeded.
•I don’t know how to create user styles via the instrument if it’s now possible.
•Traditional MIDI will be deactivated if you also use MIDI over USB, so you can only use either/or.
Understandable but annoying all the same.
•Much more can be controlled via MIDI than directly via built-in controllers, not the least vibrato,
modulation, filter cutoff/resonance, panning, attack/release/decay, portamento etc. Via a suitable MIDI
controller, they can be used in real time.
•To evaluate this, and for live use, I made a MIDI controller based on Arduino, MIDI Shield, BLE Shield,
Android phone and an application with all controllers available as continuous 1D or 2D pads on one page.
•MIDI-OX is also great for evaluating controllers.
•Verified controllers:
oControl Change:
▪Effect: 1, 5, 6, 7, 10, 11, 32, 64, 65, 66, 67, 71, 72, 73, 74, 75, 76, 77, 78, 80, 81, 91, 93,
98, 99, 100, 101, 120, 121, 122, 123, 126, 127
▪No noticeable effect: 4, 122 (see below)
▪Not evaluated yet: 20
oPitch Bend: The range can be changed with Pitch Bend Sensitivity (RPN 0) up to two octaves up
and down. When using Pitch Bend on the piano only a coarse value is sent.
oProgram Change: Is used with Bank Select to reach all available voices.
•Channel Pressure (Aftertouch) doesn’t seem to have any effect by default. What should be affected can be
controlled via SYSEX. This also goes for Modulation and Pitch Bend.
•There are also two customizable CCs (even their CC numbers can be set).
•Local Control Off (CC 122) is not supported, which is a bummer. The alternative is to silence the voice
volumes via the Mixer: Upper1, Upper2, Lower. Save this to a registration memory.
•What’s being played via the keybed is not affected by incoming CCs etc, so after setting voice volumes to
0, you need to route outgoing MIDI to incoming MIDI via an external MIDI controller for the effects to be
heard with what’s being played.
•There are also numerous RPNs, NRPNs and SYSEX with similar controllers, but not all the same. Most of
those haven’t been verified.
•The MIDI controller specification for Medeli instruments using the A2S engine can be ordered from Medeli
in Hong Kong. It covers controller-related CCs, RPNs, NRPNs and SYSEX.
•Note that several of the CCs and volume are reset when changing voice (directly via Voice or via a
registration).
•It sends All Sound Off when a drum kit is selected and the previous voice was not a drum kit. This is
probably a safety thing, so that there are no stray notes.

Voices, Styles and Songs
Voices
•001-077 Piano
o001 Acoustic
o018 Harpsichord
o023 Combinations
o030 Electric
o054 Wood & Bells
•078-107 Organ
o078 Organ
o091 Church
o096 Reed
o100 Accordion & Harmonica
•108-141 Guitar
o108 Acoustic
o119 Electric Clean
o131 Electric Distortion
•142-166 Bass
o142 Acoustic
o155 Synth
•167-210 Strings & Orchestral
o167 Violin
o181 Harp etc
o186 Ensemble
o192 Synth
o197 Voice
o206 Hit
•211-271 Brass
o211 Trumpet
o214 Trombone
o218 Tuba
o220 Muted
o223 French
o226 Section
o229 Synth
o244 Sax
o256 Oboe
o260 English
o264 Bassoon
o268 Clarinet
•272-294 Pipe
o272 Piccolo
o276 Flute
o281 Recorder
o284 Pan
o287 Bottle
o289 Shakuhachi
o291 Whistle
o293 Ocarina
•295-344 Synth Lead
•345-384 Synth Pad
•385-409 Synth SFX
•410-427 Ethnic Misc.
o419 Sitar
o412 Banjo
o414 Shamisen
o416 Koto
o419 Kalimba
o421 Bag Pipe
o423 Fiddle
o426 Shanai
•428-487 Percussive
•488-528 SFX
•529-591 Combined
•592-600 Drum Sets
o592 Standard
o593 Room
o594 Power
o595 Electronic
o596 Analog
o597 Jazz
o598 Brush
o599 Orchestra
o600 SFX
Styles
•001-010 8 Beat
•011-030 16 Beat
•031-060 Pop & Ballad
•061-075 Rock
•076-094 Ballroom
•095-105 Dance
•106-135 Soul & Funk
•136-145 Country
•146-162 Latin
•163-180 Waltz & Traditional
•181-190 World
•191-230 Pianist
Songs
•001-018 Folk & Country
•019-071 Golden & Pop
•072-100 Classical
•101-105 Piano Hanon
•106-120 Piano Beyer

Tips
•Deactivate DSP if you feed the audio into a mixer, as it adds noticeable noise (especially through
headphones), and you are likely to use external effects anyway that are much better. Without it the sound
is remarkably clean. Otherwise keep it on for a more pleasing speaker or headphone sound.
Reference
•A.B.C. = Auto Bass Chord
•O.T.S. = One Touch Setting
Other manuals for SP4200
1
Table of contents
Other Medeli Musical Instrument manuals

Medeli
Medeli DP268 User manual

Medeli
Medeli DP370 User manual

Medeli
Medeli DP263 Operating instructions

Medeli
Medeli DP88 User manual

Medeli
Medeli SP4200/WH User manual

Medeli
Medeli SP-40 Series User manual

Medeli
Medeli Grand200 User manual

Medeli
Medeli DP250 User manual

Medeli
Medeli sp 5100 User manual

Medeli
Medeli Sp5500S User manual

Medeli
Medeli CDP6000 User manual

Medeli
Medeli Cdp5000w User manual

Medeli
Medeli SP4200 User manual

Medeli
Medeli DP660 User manual

Medeli
Medeli SDP-4 User manual

Medeli
Medeli CDP5000 User manual

Medeli
Medeli DP388 User manual

Medeli
Medeli UP81 User manual

Medeli
Medeli Grand 1000 User manual

Medeli
Medeli GRAND1000 User manual