mft BackBox User manual

Variabilný nosič batožiny na ťažné zariadenie
variable rear-mounted carrier systems

1
Technické údaje Technical data 2
Súčiastky Component parts 3 - 5
Bezpečnostné inštrukcie Safety instructions 6 - 9
Montáž ŠPZ Mounting of the number plate 10 - 11
Uchytenie na vozidlo Mounting to the vehicle 12 - 15
Uchytenie boxu Mounting of the box 16 - 25
Plnenie boxu Loading of the box 26 - 29
Odstránenie z vozidla Removal from the vehicle 30 - 33
Údržba a výstrahy Maintenance and precautions 34
Rozšírenia Extensions 34
Obsah / Contents

2 3
Technickéúdaje
Dĺžka: 530 mm
Šírka: 1500 mm
Výška: 530 mm
Objem: 300 l
Váha základne: ca. 8 kg
Maximálna nosnosť základne:
82,5 kg
Pozor na nosnosťťažného zariadenia!)
Váha BackBoxu: 19 kg
Maximálna nosnosť BackBoxu: 57 kg
Číslo položky: 1500
Údaj o váhe: +/- 5 Percent
Je zakázané:
Technical data
Length: 530 mm
Width: 1500 mm
Height: 530 mm
Volume: 300 l
Weight of the BackCarrier: approx. 8 kg
Maximum load of the BackCarrier:
82.5 kg
(Please note the bearing load of the trailer
hitch!)
Weight of the BackBox: 19kg
Maximum load of the BackBox: 57 kg
Item number: 1500
Declaration of weight +/- 5 percent
Forbidden are:
Ľavé svetlo
Vodiaca lišta (obe strany)
Vložka (obe strany)
Veko
Zámok
Pravé svetlo
Držiak poznávacej značky
Left light
Guide rail (on both sides)
Insert (on both sides)
Cover
Lock
Right light
Number plate bracket
1
2
3
4
5
6
7
1
2
3
4
5
6
7
1
3
4
6
7
5
2
BackBox : BackBox :
Korozívne tekutiny
corrosive liquids
Ťažké kovové predmety
heavy metal objects
Horľaviny
inflammable objects
Umývať v auto umývárke
car washing systems
Zvieratá
pets
Popol/piesok
ashes/sand
Ostré objekty
sharp objects
Výbušniny
explosive objects

4 5
BackCarrier:
8Uťahovacia ružica
9Uzáver
10 Páka uzáveru
11 Bezpečnostná páčka (obe strany)
BackCarrier :
8Fastening hand wheel
9Clamp
10 Lever lock
11 Securing lever (on both sides)
Clip
13 Kľuka 13 Folding crank
8
910
11
12 Vyklápacie madlo 12
12
Ďalšie súčasti:
14 Kľúč A (BackCarrier)
15 Kľúč B (BackBox)
Kľúč C (úchyt poznávacej značky)
Further components:
14 Key A (BackCarrier)
15 Key B (BackBox)
16 16 Key C (number plate bracket)
14 15 16
13

6 7
Všeobecné informácie
Vozidlo by malo byť vybavené 13-kolíkovou zá-
suvkou podľa nemeckého nariadenia o povoľo-
vaní cestnej premávky z 1. 1. 90.
Ak je osvetlenie BackBoxu zapnuté,
hmlovka vozidla musí byť vypnutá kon-
taktom alebo relé zapojením.
Na BackBox je potrebné namontovať platnú
tabuľku s evidenčným číslom zodpovedajúcu
evidenčnému číslu vozidla.
V exportných krajinách je potrebné dodržiavať
príslušné schvaľovacie podmienky a zákonné
požiadavky.
Adaptér e-s / BackBox má prevádzkovú
licenciu ES ako nezávislá technická jednotka:
E4*79/488*2007/15*0232*00
Die zulässige Stützlast der Anhängerkupplung
darf nicht überschritten werden.
Váha BackCarrieru: cca. 8 kg
Váha BackBoxu: 19 kg
Maximálne zaťaženie BackBoxu: 57kg
Užitočné zaťaženie systému: min. 50 kg
Je potrebné dodržať špecifické údaje vozidla.
Špecifikácie hmotnosti sa môžu v dôsledku
technických zmien líšiť až o 5 percent.
General information
The vehicle should be equipped with a 13-pin
socket, according to the German Road Traffic
Licensing Regulations of 01.01.90.
The vehicle’s fog lamp must be switched off via
contact or relay if the BackBox lighting is
plugged in.
Annumber plate, corresponding to the vehicle’s
registered number plate, must be mounted on the
BackBox.
In export countries, the relevant approval conditions
and legal requirements must be observed.
The e-s adapter / BackBox is licensed
within the EC as a self-contained technical unit:
E4*79/488*2007/15*0232*00
Povné vertikálne zaťaženie ťažného zariadenia
sa nesmie prekročiť.
Weight of the BackCarrier: approx. 8 kg
Weight of the BackBox: 19 kg
Maximum load of the BackBox: 57 kg
System payload: min. 50 kg
Additional specific information of the vehicle
must be observed.
Declaration of weight can deviate up to 5 per-
cent because of technical modifications.
Montáž
Ak máte akékoľvek otázky počas inštalácie
alebo prevádzky, obráťte sa na autorizovaný
servis. Vyhradzujeme si právo na zmeny
technických detailov v porovnaní s
obrázkami v návode na montáž.
Jednotlivé kroky návodu a všetky
bezpečnostné pokyny sa musia presne
dodržiavať. Pri správnej montáži a manip-
ulácii nemôže dôjsť k poškodeniu vozidla
a prívesu.
mft transport systems GmbH nepreberá
žiadnu zodpovednosť za škody
spôsobené nedodržaním pracovného pos-
tupu a bezpečnostných pokynov.
Pre montáž BackCarrier musí byť guľová
hlava zbavená mastnoty, čistá a nepoško-
dená.
Preprava
Upozorňujeme, že všetky zámky BackBoxu a
BackCarrier musia byť vždy zamknuté.
Nikdy nepoužívajte BackBox bez príslušných
vložiek.
Nesmú sa prepravovať žiadne zvieratá ani
ľudia, ľahko horľavé, výbušné alebo ostré
predmety, popol/piesok, ťažké kovové pred-
mety alebo korozívne kvapaliny. (Viď str. 2)
Assembly
If you have any questions when assembling or
handling this product, please use aqualified
service center. Technical details are subject to
change and may differ from the figures in the
installation instructions.
Each individual step of these instructions must
be followed exactly. If the BackBox is in-
stalled and handled properly it will not damage
the vehicle and its trailer hitch.
mft transport systems GmbH is not liable for
damages caused by disregard of the assembly
sequence and safety instructions.
The towball must be clean, undamaged, and
free from grease for the assembling of the
BackCarrier.
Transport
Ensure that all locks on the BackBox and
the carrying module are always locked.
Never use the BackBox without the rela-
ted inserts.
Do not transport pets and people, easily inflam
mable, explosive or sharp objects, ashes/sand,
heavy metal objects or corrosive liquids.
(See page 2)
Sicherheitshinweise / Safety instructions
Sicherheitshinweise / Safety instructions

8 9
Pred jazdou
Pred každou jazdou treba skontrolovať
funkciu všetkých svetiel a bezpečné
uchytenie BackBoxu. Za stav a bezpečné
uchytenie BackBoxu je podľa zákona o ces-
tnej premávke zodpovedný výlučne vodič
alebo vlastník vozidla.
Po prvotnej montáži je nutné po prejdení
cca 15 km skontrolovať všetky upevňovacie
prvky BackBoxu, aby sa zabezpečilo ich
pevné utiahnutie a v prípade potreby ich
znovu nastaviť.
Test pravidelne opakujte na dlhších cestách
alebo na zlých cestách. Nesprávne
pripevnený BackBox sa môže odpojiť od
vozidla a spôsobiť nehodu.
Je potrebné pred jazdou skontrolovať
všetky funkcie BackBoxu, aj keď je prázdny.
Veko kufra je možné otvárať len vtedy, keď
je BackBox sklopený. Buďte opatrní s elek-
trickými dverami batožinového priestoru a
elektrickými kabrioletmi. Mohlo by dôjsť k
zraneniu osôb alebo poškodeniu vozidla a
BackBoxu.
Nikdy nepoužívajte nosič BackCarrier bez
alebo s poškodenou sklápacou kľukou a/
alebo s poškodenou hliníkovou prítlačnou
časťou na konci kľuky, pretože môže spad-
núť a spôsobiť zranenie osôb a škodu na
majetku.
Nikdy nepoužívajte BackCarrier na vozidle
bez BackBoxu, pretože svetlá sú pripev-
nené iba k BackBoxu.
Before travelling
Before travelling check the lights if they are fully
functioning and if the BackBox is securely
fixed. According to the Road Traffic Regultions,
only the vehicle owner or the driver is respon-
sible for the condition and the secure fixing of
the BackBox and BackCarrier!
After the first installation, all fastening elements
of the BackBox must be checked after a
test drive of approx. 15 km and be tightened if
necessary.
Repeat this test regularly, especially if the road
conditions are bad. An improperly mounted
BackBox can detach and cause an accident.
Each function of the BackBox must be
checked before travelling even if it is empty.
The boot can be opened only when the
BackBox is folded down. Be careful with
automatic boot lids and electric convertible
roofs. People may be injured or the vehi-
cle and the BackBox damaged.
Never use the BackCarrrier with a damaged or a
missing folding crank and/or with a damaged
aluminium spring catch at the end of the crank.
Otherwise the BackCarrier may slip or fall off
from the trailer hitch and cause personal injuries
and damage properties.
Never use the BackCarrier at the vehicle
without the BackBox because lights only
exist on the BackBox.
Bezpečnostné opatrenia
počas jazdy
Sledujte BackBox pravidelne cez spätné
zrkadlo počas jazdy. Ak spozorujete zmenu
na BackBoxe, okamžite zastavte, hľadajte
príčinu a pokračujte v jazde až po odstránení
problému.
Čo sa týka Backboxu a nákladu, platia
ustanovenia nemeckého Zákona o cestnej
premávke a nemeckého Nariadenia o cestnej
premávke. Odporúčaná maximálna rýchlosť je
160 km/h. Pri jazde do zahraničia dodržiava-
jte príslušné dopravné predpisy.
Zmenené ovládanie vozidla
Vzhľadom na to, že BackBox vyčnieva za
vozidlo, je tu veľký sklon k pretáčavosti,
zmenená reakcia na bočný vietor a zmenená
funkcia brzdenia najmä pri prejazde zákruta-
mi. Rýchlosť vždy upravte podľa stavu
vozovky a poveternostných podmienok.
Venujte zvýšenú pozornosť aj na zmenenú
dĺžku vozidla pri parkovaní alebo cúvaní. Aby
sa predišlo poškodeniu BackBoxu, počas
jazdy z alebo do kopca ako aj pri prejazde
cez re-tardéry,treba počítať s výškou
Backboxu nad V každom prípade musí byť
rýchlosť znížená na primeranú úroveň.
Údržba
BackBox sa odporúča pravidelne čistiť a
udržiavať vhodnými čistiacimi prostriedkami,
aby ste si produkt mohli užívať dlhšie.
(Viď strana34)
Precautions during travel
Check regularly the BackBox using the
rear-view mirror during your journey. Stop im-
mediately if you notice any significant change
of the carrier. Identify the problem and continue
your journey after solving it only.
The BackBox and its load apply to the
provisions of the Road Traffic Regulations. The
recommended maximum speed with a loaded
transport module is 160 km/h. When driving
abroad, observe the applicable traffic regula
tions.
Changed handlingofthe vehicle
Due to the fact that the BackBox juts out
beyond the vehicle, there is a great tendency
to oversteer, a changed reaction to cross-
winds
and a changed braking function, especially
when navigating curves. Always adjust your
speed according to the road, weather, and
wind
conditions.
Please also pay attention to the changed
length
of the vehicle while parking or driving in re-
verse.
In order to avoid bumping, the BackBox
must be allowed clearance while driving up or
down very steep inclines or while driving over
ramps, for instance in trafficcalmed areas. In
any case, the speed must be reduced to an
appropriate
level.
Maintenance
Maintenance
It is recommended that the BackBox is
cleaned and maintained regularly with suitable
detergents so that you can enjoy the product for
a longer time. (See page 34)
Sicherheitshinweise / Safety instructions
Sicherheitshinweise / Safety instructions
10 11
BackBox
BackBox
3.
držiak evidenčného čísla
number plate bracket
evidenčné číslo
number plate
kľúč C
key C
Plastové výčnelky
plastic nibs
4.
1. 2.
úchytky
fasteners
kľúč C
key C
držiak evidenčného čísla
number plate bracket
držiak evidenčného čísla
number plate bracket
úchytky
fasteners
evidenčné číslo
number plate
držiak EČV
bracket
Úchyt
fastener
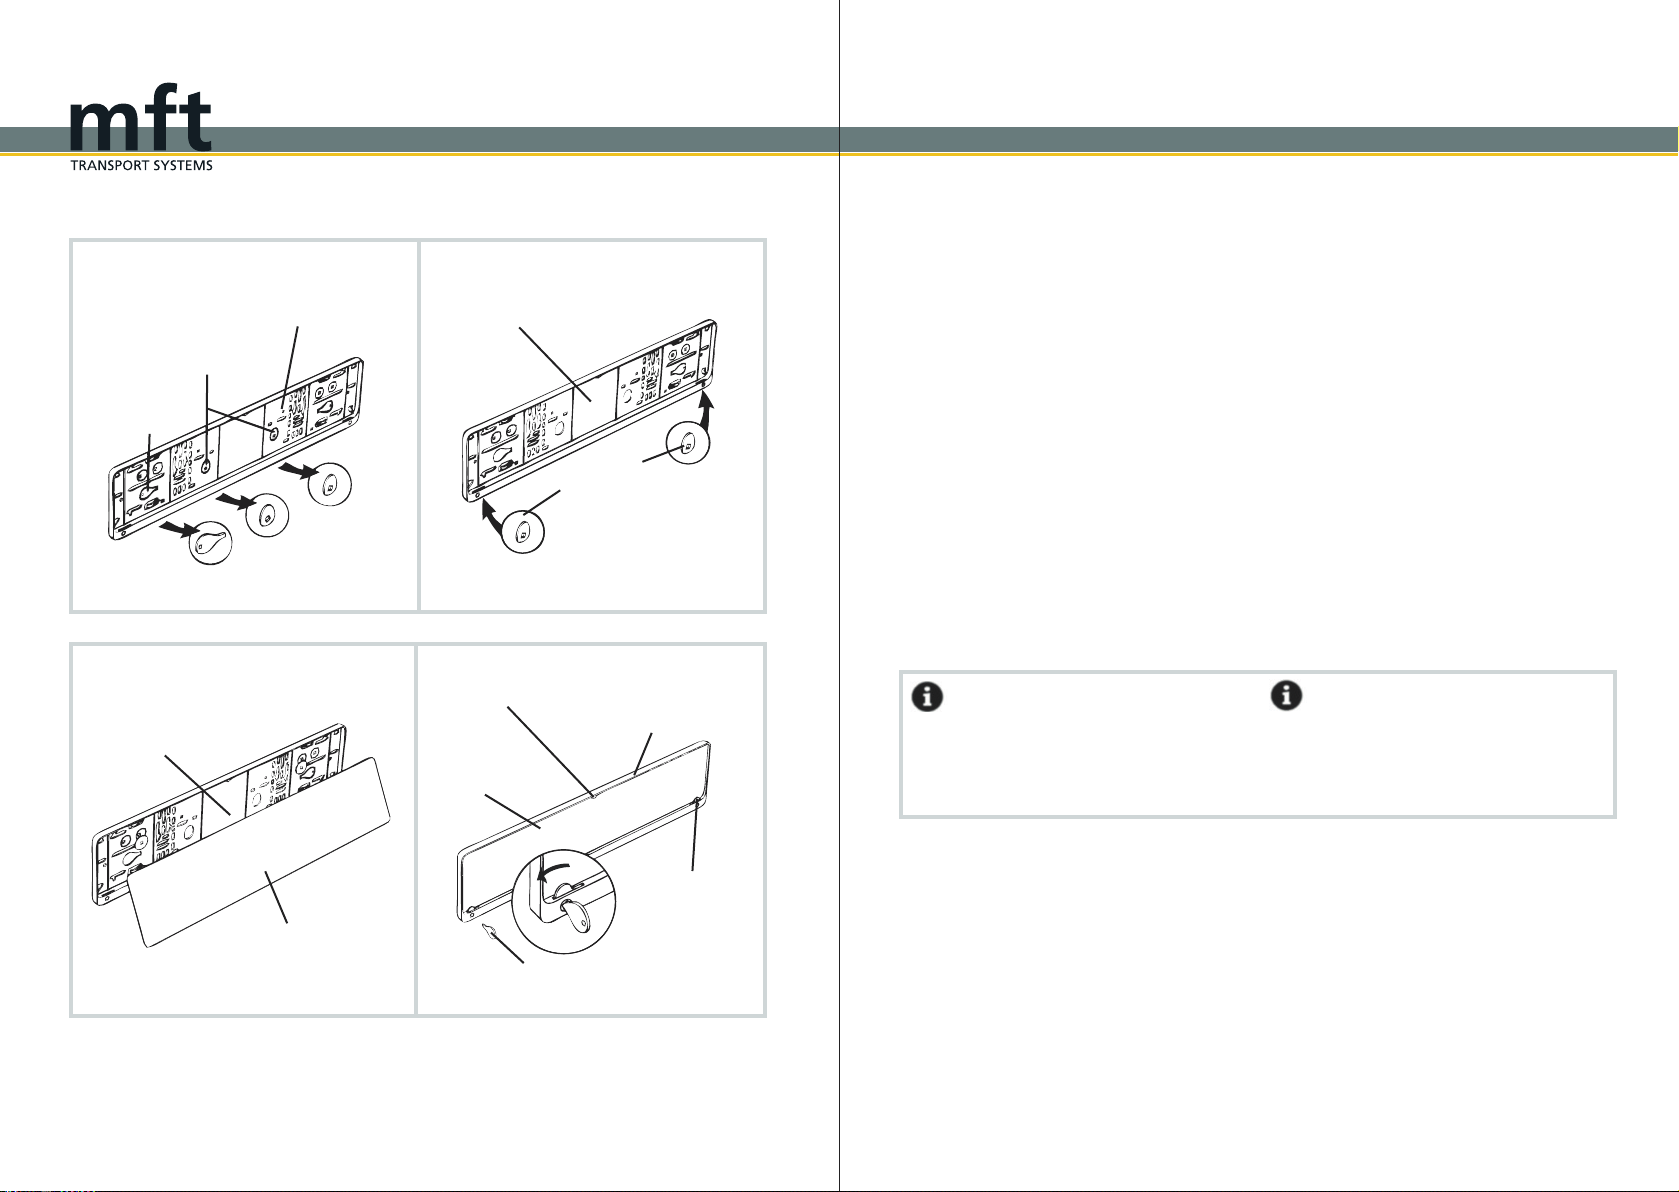
Montáž evidenčného čísla
na držiak EVČ
1. Vyberte dveoznačené úchytky a kľúč C
(16) zo základne ŠPZ (7).
2. Poistky vložte zospodu do určených otvorov
vľavo a vpravo a nechajte ich zapadnúť na
miesto.
3. Vložte ŠPZ do základnej dosky ŠPZ (7)
zospodu tak, aby okraj ŠPZ držali plastové
výstupky v hornej časti a dva držiaky v spod-
nej časti.
4. EČV pozdĺž okraja zatlačte do držiaka
EČV (7) a zaistite spodné úchytky
kľúčom C (16).
Informácia
Na BackBoxe musí byť namontovaná platná
poznávacia značka vozidla - zhodná s EVČ
vozidla.
Fitting the number plate to the num-
ber plate bracket
1. Remove the two labelled fasteners and one
key C (16) from the number plate bracket (7).
2. Insert the fasteners on the right and left side
from below into the provided slots and let it click
into place.
3. Insert the number plate into the number plate
bracket (7) from the bottom upwards, so that the
edges are held by the plastic nibs and by the
fasteners from below.
4. Press the number plate along the edge into
the number plate bracket (7) and secure the
bottom fasteners with the key C (16).
Information
An unstamped (unvalidated) number plate, cor-
responding to the vehicle’s registered number
plate, must be mounted on the BackBox .
Montáž držiaka EČV / Mounting of the number plate
12 13
hliníkový držiak pružiny
aluminium spring catch
sklápacia kľuka
folding crank
1. - 2.
klempa
clamp
sklápacia páka
lever lock
3
sklápacia kľuka
folding crank
Sicherungshandrad
fastening hand wheel
2
3. - 4.
klempa
clamp
ťažné zariadenie
towbar
Halbschalen
half-shells
uzáver
clamp
ťažné zariadenie
towbar
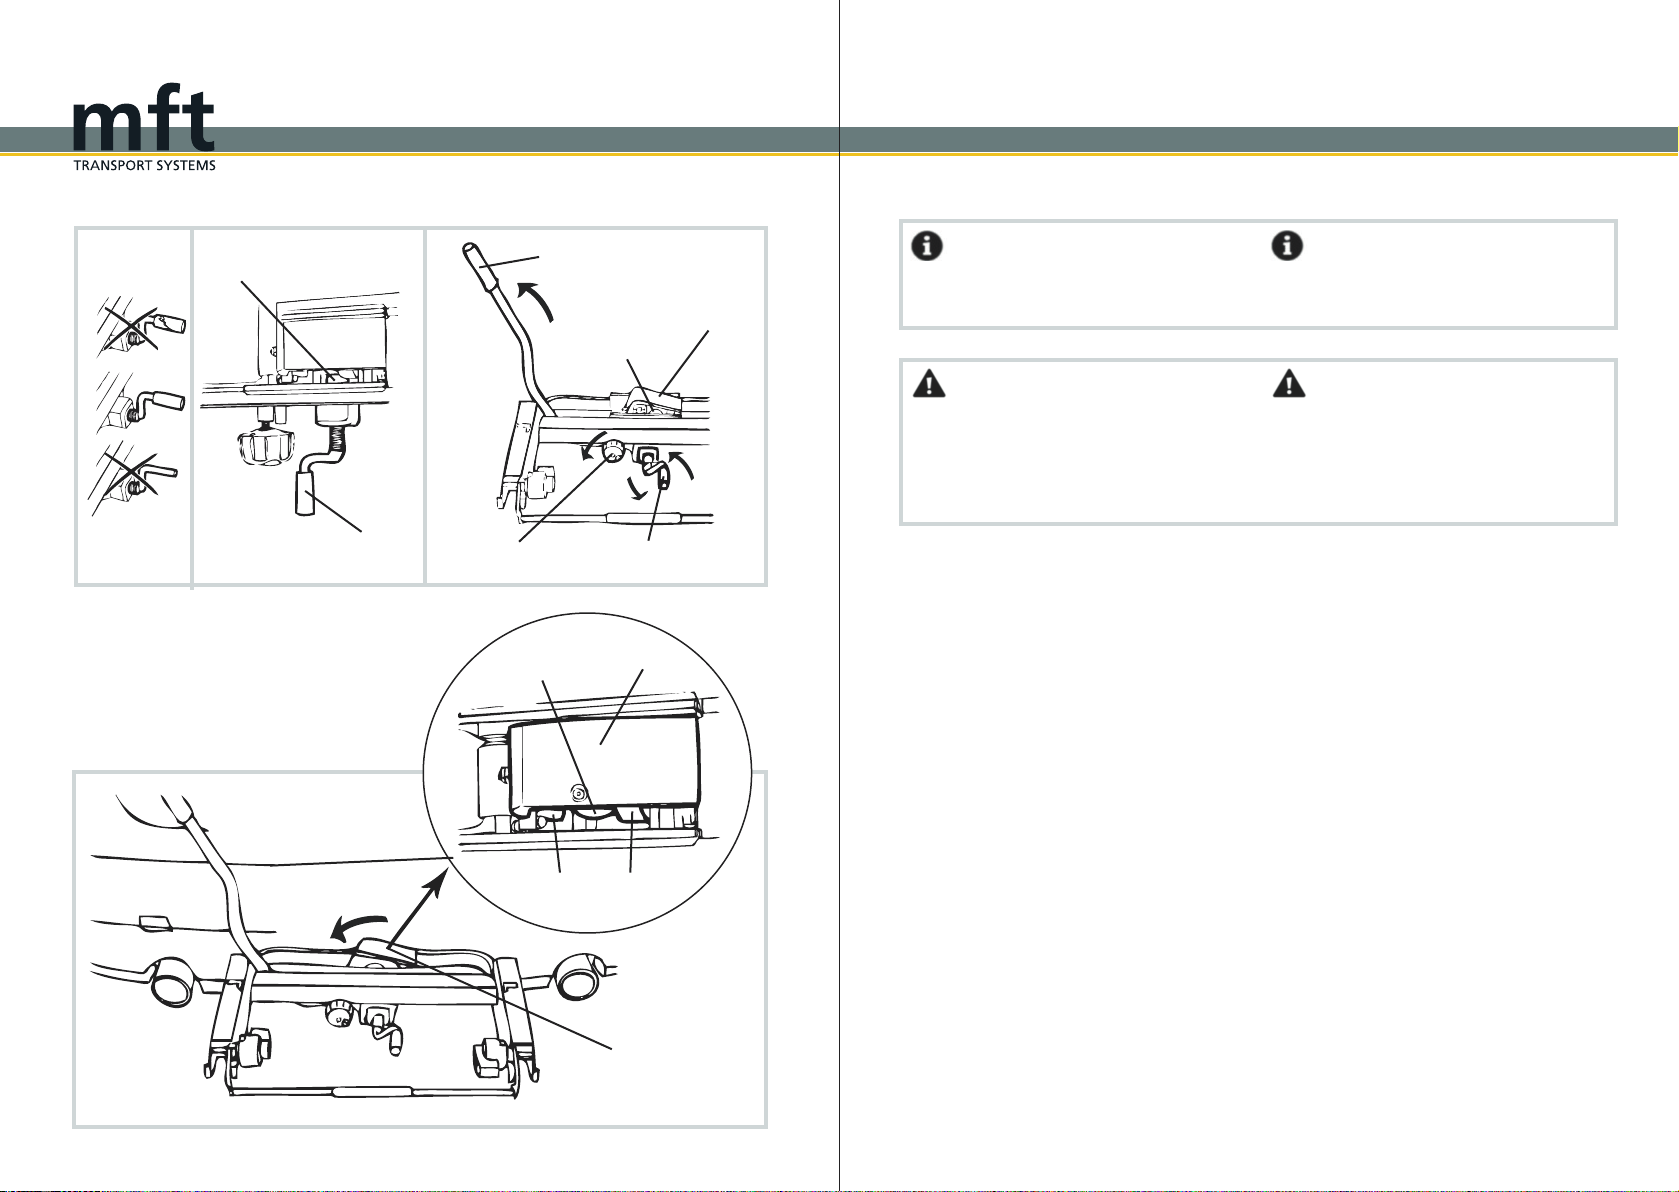
Informácia
Nikdy nepoužívajte BackCarrier bez na-
montovaného BackBoxu.
Pozor!
Nikdy nepoužívajte BackCarrier s poškodenou
alebo chýbajúcou sklopnou kľukou (13) a/ale-
bo s poškodenou hliníkovou pružinou na konci
kľuky. V opačnom prípade BackCarrier
môže skĺznuť alebo spadnúť.
Montáž základne BackCarrier
na ťažné zariadenie
Pred montážou základne musí byť ťažná guľa
čistá, nepoškodená a zbavená mastnoty.
1. Pred montážou BackCarrier na
ťažného zariadenia musíte odskrutkovať
sklopnú kľuku (13), kým sa nezastaví.
2. Odskrutkujte uzáver (8) pákového zámku
(10), kým sa páka (10) nedá otvoriť.
3. Umiestnite BackCarrier na ťažné zariade-
nie a držte ho vo vodorovnej polohe.
4. Jemným zatlačením na uzáver (9) uvediete
pološkrupiny na ľavej a pravej strane do
polohy. Páka (10) sa samostatne preklopí do
zatvorenej polohy.
Pokračuje na ďalšej strane
Information
Never use the BackCarrier at the vehicle
without the BackBox.
Attention!
Never use the BackCarrier with a dam-
aged or missing folding crank (13) and/or with a
damaged aluminium spring catch at the end of
the crank. Otherwise, the BackCarrier
may slip or fall off.
Mounting the BackCarrier
to the trailer hitch
The towball must be clean, undamaged, and
free from grease for the assembling of the
BackCarrier.
1. Before mounting the BackCarrier on
the trailer hitch you have to unscrew the folding
crank (13) till it stops.
2. Unscrew the fastening hand wheel (8) of the
lever lock (10) until the lever lock (10) can be
opened.
3. Place the BackCarrier on the trailer
hitch and hold it in horizontal position.
4. By pressing gently on the clamp (9) you will
bring the half-shells on the left and right side
into position. The lever lock (10) swings inde-
pendently into the closed position.
Continues on the next page
Montáž na vozidlo / Mounting to the vehicle
1

14 15
5. Push the lever lock (10) down.
Attention!
If the lever lock (10) cannot be pushed down
without resistance, check again if the clamp (9)
is positioned correctly.
6. Screw in the fastening hand wheel (8) com-
pletely and lock it with the key A (14) in order
to prevent the lever lock (10) from becoming
loose.
7. For secure fitting of the BackCarrier,
completely screw in the folding crank (13) till
the aluminium spring catch presses against the
neck of the towbar.
Attention!
The threaded bolt of the fastening hand wheel
(8) must pass the lever lock (10), so that the
lever lock (10) cannot unintentionally spring up.
5. Zatlačte páku (10) nadol
Pozor!
Ak sa páka (10) nedá pri zatváraní bez
odporu stlačiť dole, znova skontrolujte
správne usadenie uzáveru (9).
6. Uťahovaciu ružicu (8) úplne zaskrutkujte a
zaistite kľúčom A (14), aby ste zabránili uvoľ-
neniu páky (10).
7. Pre bezpečné pripevnenie BackCarrier k
ťažnému zariadeniu otočte kľuku (13) až
nadoraz, aby ste pritlačili hliníkový prítlačný
kus proti hrdlu ťažného zariadenia.
Pozor!
Skrutka uťahovacej ružice (8) musí prejsť cez
páku (10), aby sa páka (10) nemohla
svojvoľne otvoriť.
5.
6. - 7.
Montáž na vozidlo / Mounting to the vehicle
páka
lever lock
BackCarrier
BackCarrier
Páka
c lever lock
uťahovacia ružica
fastening hand wheel kľuka
folding crank
12

16 17
1. - 2.
bezpečnostná páčka
securing lever
BackCarrier
zámok
lock
bezpečnostná páčka
securing lever
vodiaca
lišta
guide
BackBox
1
2
Madlo
clip
držiak
holding device
Madlo
clip
3
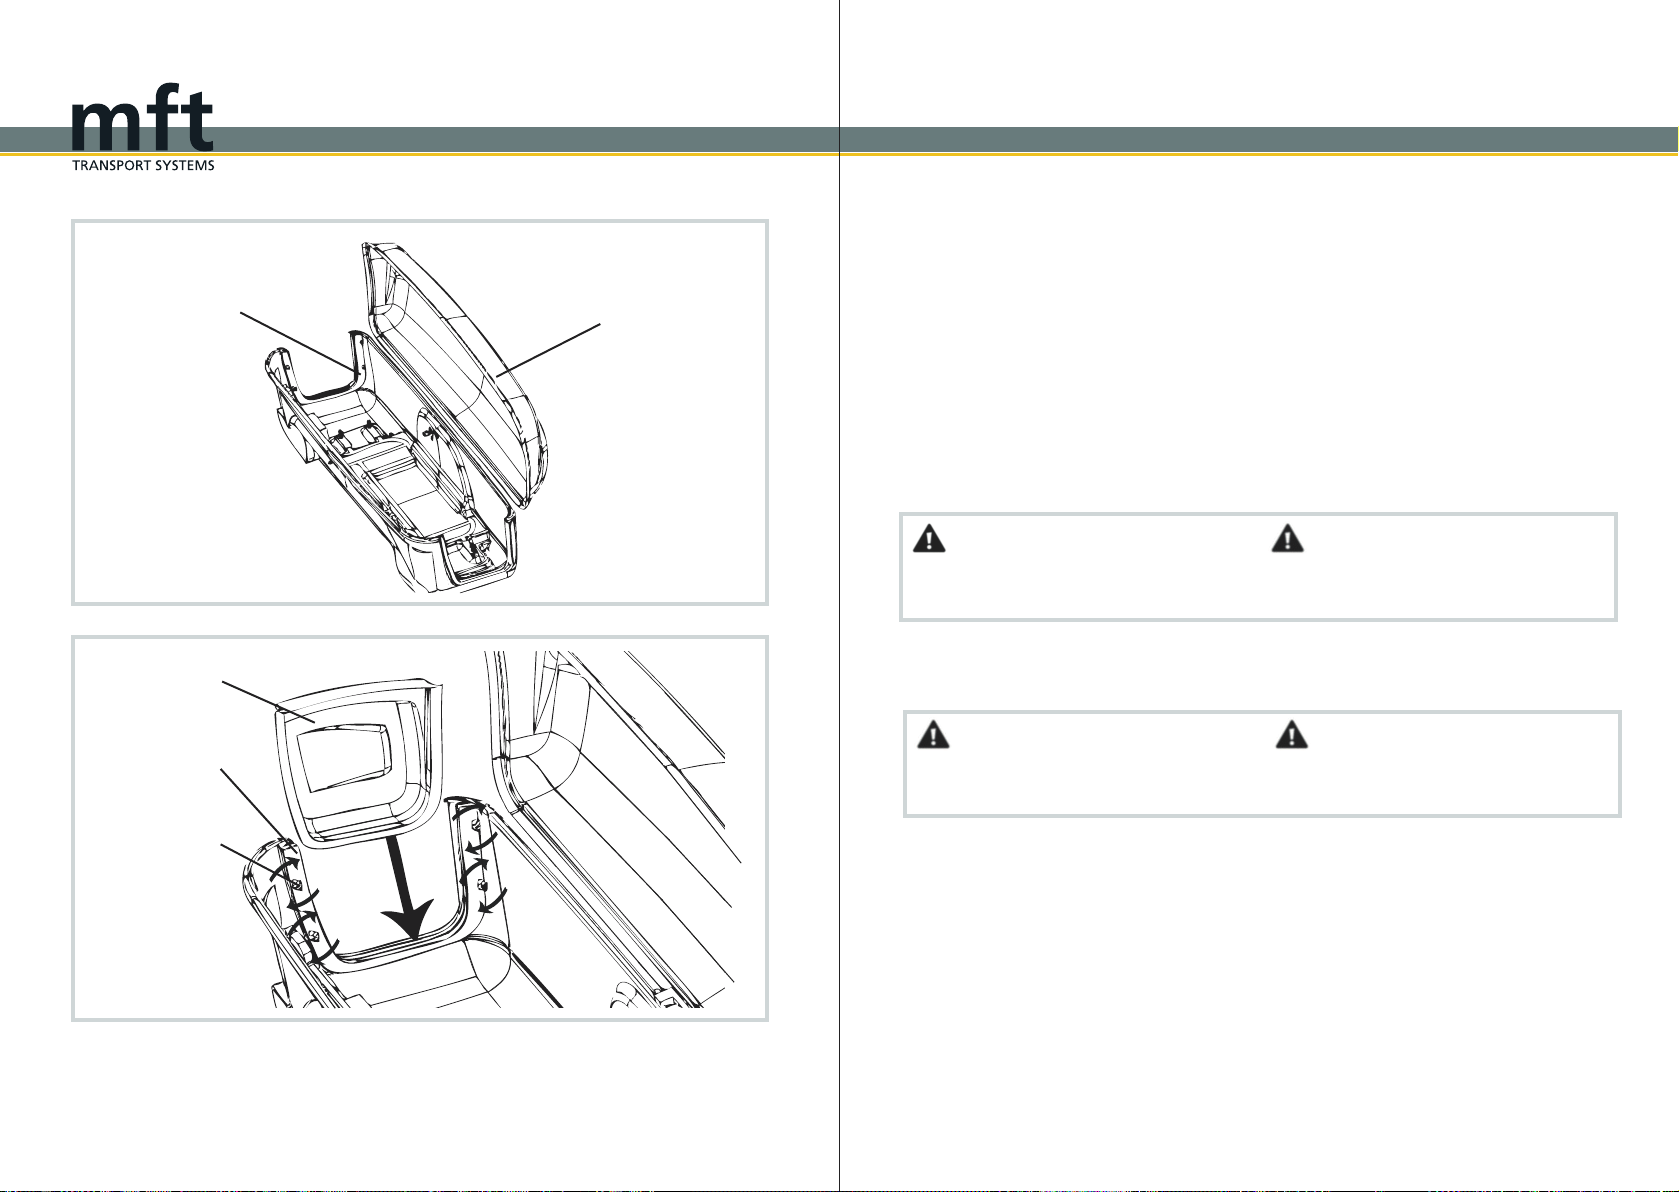
Informácia
Na montáž BackBoxu na BackCarrier je
potrebná pomooc druhej osoby.
Montáž BackBoxu na
základňuBackCarrier
1. Odomknite zámky bezpečnostných páčok
(11) kľúčom A (14) na základni BackCarrier.
2. Stlačte bezpečnostnú páčku (11) a držte ju
stlačenú, otočte smerom dole o 90° podľa oz-
načenia. Potom potiahnite madlo (12) dozadu.
3. Umiestnite BackBox na BackCarrier tak, aby
vodiace lišty boli vložené priamo do úchytov
BackCarrier.
4. Zatlačte BackBox smerom k vozidlu
až kým počuteľne zacvakne na svoje miesto
na základni BackCarrier. Madlo (12) zatlačte
späť dopredu v smere jazdy až nadoraz.
5. Vráťte poistné páčky (11) do pôvodnej
polohy ich súčasným stlačením a
otočením o 90°.
6. Potom zamknite zámky bezpečnostných
páčok (11) otočte kľúčom A (14) a kľúč
uschovajte.
Information
It is necessary to have another person for help
during assembling of the BackBox on the
BackCarrier.
Mounting the BackBox to the
BackCarrier
1. Unlock the lock of the securing lever (11) on
the BackCarrier with the key A (14).
2. Press the securing levers (11) and simultane-
ously turn them 90° upwards in the direction of
the arrows. Finally pull the clip (12) backwards.
3. Place the BackBox on the BackCarrier
in order to insert the guides into the
holding device of the BackCarrier.
4. Press the BackBox towards the vehicle
until it audibly engages in the BackCarrier.
Then push the clip (12) forward in driving
direction until it stops.
5. Bring the securing levers (11) back to the
original position by pressing and simultaneously
turning them by 90°.
6. Then lock the key A (14) of the securing
levers (11) and store your key safely.
Montáž boxu/ Mounting of the box
1
2
Schloss
lock
Sicherungshebel
securing lever
5. - 6.
BackCarrier
3. - 4.

18 19
madlo
1. clip 2.
3. 4.
BackCarrier
BackBox
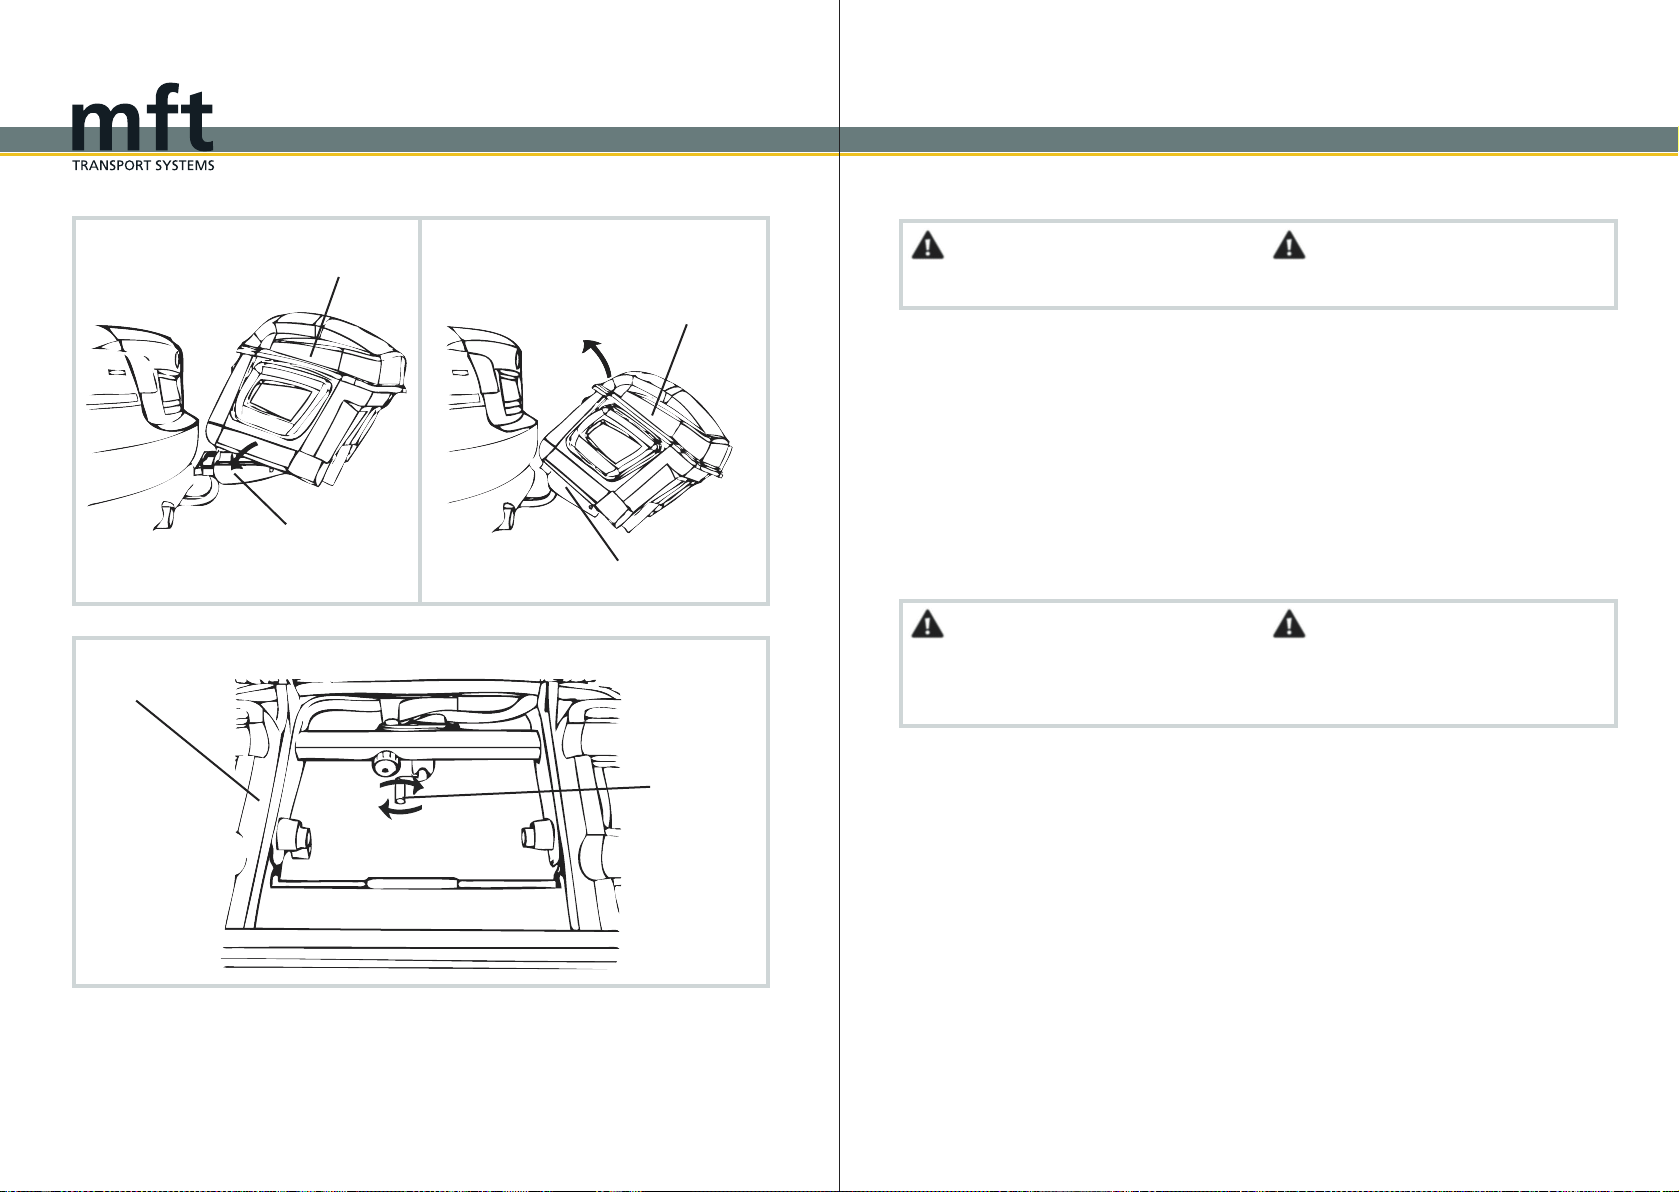
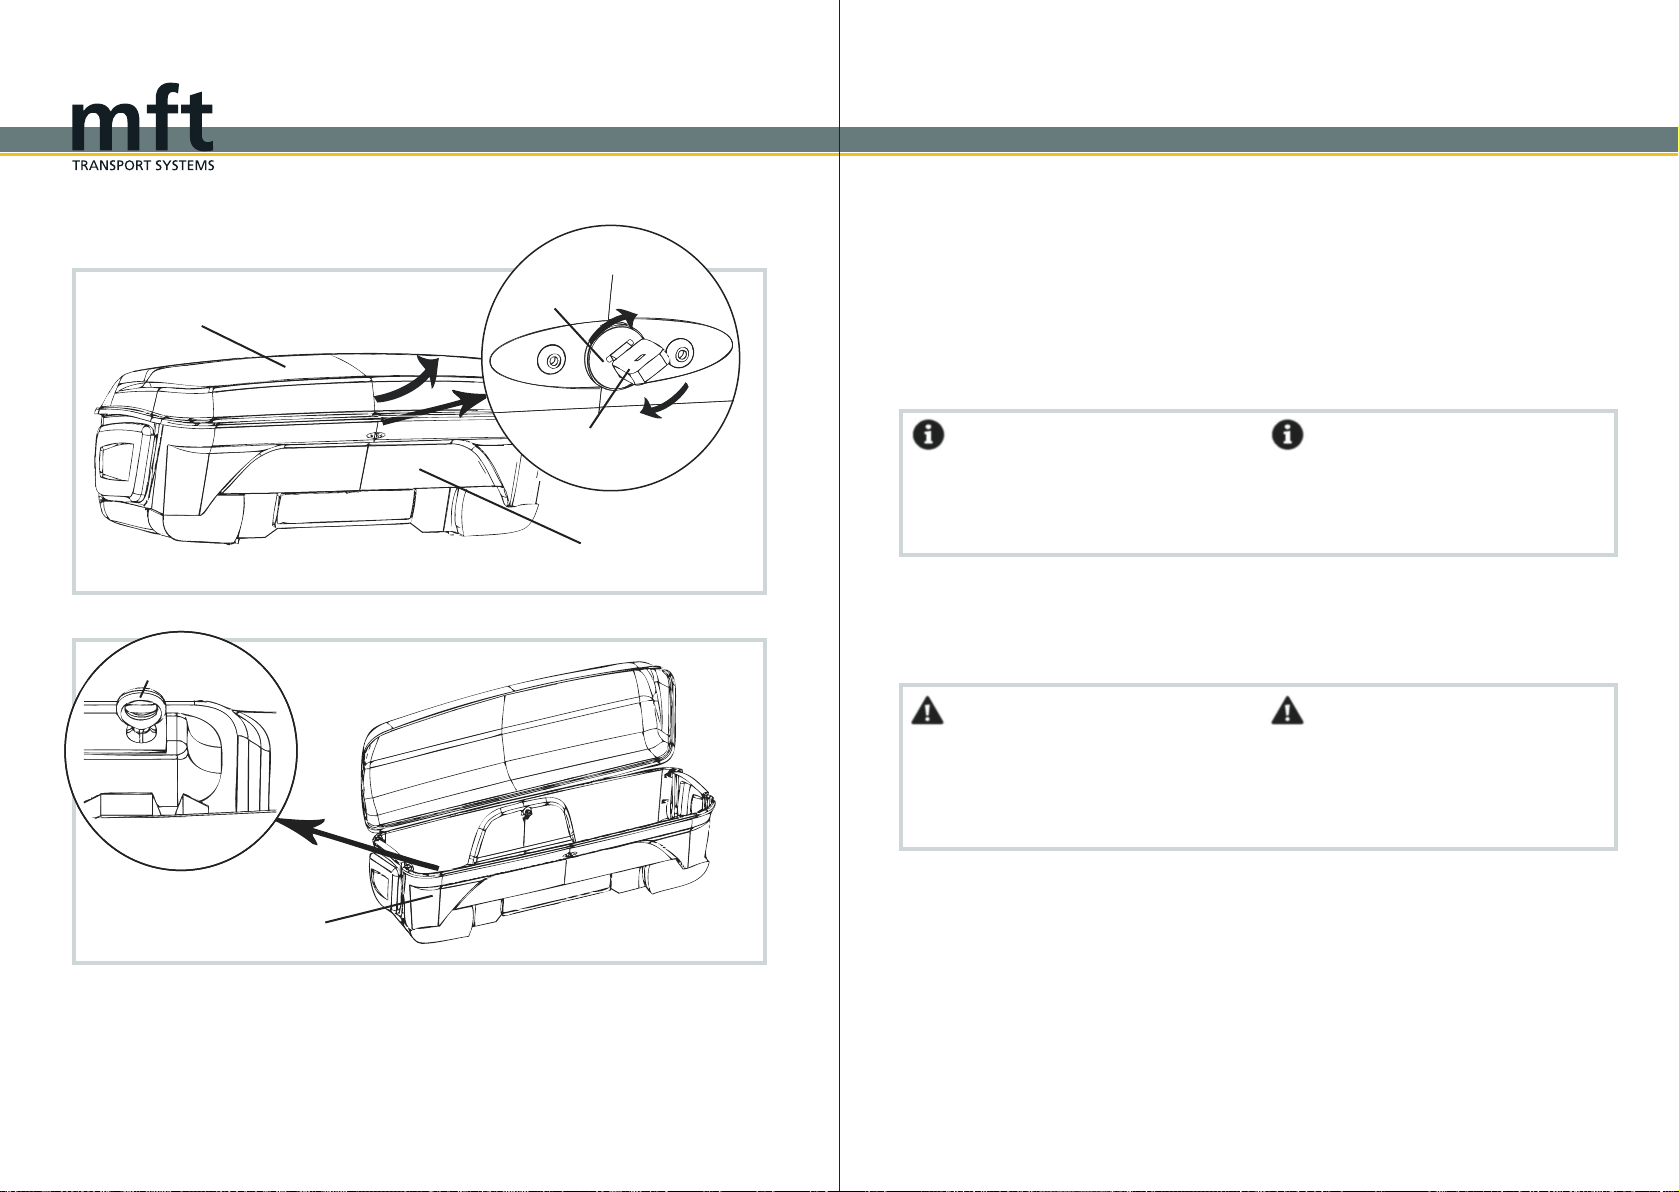
Pozor!
Veko kufra je možné otvárať len vtedy, keď je
BackBox vyklopený. Buďte opatrní s elek-
trickými dverami kufra, prípadne elektrickou
strechou kabrioletu. Ak je to možné, vypnite
funkciu automatického zatvárania. Mohlo by
dôjsť k zraneniu osôb alebo k materiálnym
škodám na vozidle a BackBoxe.
Vyklopenie BackBoxu
1. Potiahnite madlo (12) na BackCarier
smerom k sebe až nadoraz.
2. BackBox je možné opatrne vyklopiť
Podoprite box pri vyklápaní rukami.
Teraz môžete otvoriť kufor.
Pozor!
Nikdy neotvárajte zaisťovaciu páku (10).
Dodatočné skladanie
BackCarrier
Na zväčšenie vzdialenosti medzi
BackBoxom a vekom batožinového
priestoru sa dá sklopiť aj BackCarrier.
3. Uchopte BackBox a odskrutkujte
skladaciu kľuku (13) až nadoraz. Dávajte
pozor, aby ste nestratili hliníkový prít-
lačný kus na konci kľuky.
4. Naďalej držte BackBox a potom ho
pomaly sklopte nadol.
Attention!
Open the boot only when the BackBox is
folded down. Be careful with automatic tailgate
and electric convertible roofs. If possible deacti-
vate the function. People may be injured or the
vehicle and the BackBox could be damaged.
Fold-down the BackBox
1. Pull the clip (12) of the BackCarrier
backwards until it stops.
2. Fold down the BackBox carefully backwards.
Support the folding with your hands.
Now you can open the boot.
Attention!
Never open the lever lock (10).
Additional fold-down of the
BackCarrier
To increase the distance between the BackBox
and the boot lid, you can additionally fold down
BackCarrier.
3. Hold the BackBox and turn back the
folding crank (13) until it stops. Make sure that
the aluminium spring catch at the end of the
crank does not get lost.
4. Continue holding the BackBox and fold
it down slowly.
Montáž Boxu/ Mounting of the box
BackCarrier kufor
boot
BackBox
BackCarrier
sklápacia kľuka
folding crank
BackCarrier

20 21
zástrčka
plug
zásuvka na vozidle
vehicle power socket
1
2
2.
z ástrčka
plug
zásuvka
plug holder BackBox
1.
Elektrické pripojenie
1. Vyberte konektor z držiaka konektora na
zadnej strane BackBoxu.
2. Zasuňte zástrčku do zásuvky vozidla a
zaistite ju o štvrť otáčky doprava. Pripojovací
kábel sa nesmie ťahať po podlahe, v prípade
potreby ho zviažte.
Informácia
BackBox má 13-pinový konektor. Pre 7-
kolíkovú zásuvku na vozidle je potrebná re-
dukcia 7/13. V tomto prípade cúvacie svetlo
nie je funkčné.
Pozor!
Pred každou jazdou skontrolujte osvetlenie a
upevnenie nosiča BackCarrier a BackBoxu.
Pravidelne kontrolujte pohyblivé časti
a dotiahnite podľa potreby. Aj pri jazde bez
nákladu musia byť všetky zámky uzamknuté.
Electrical connection
1. Take the plug out of the holder which is at the
back side of the BackBox.
2. Insert the plug into the vehicle power socket
and lock it with one quarter turn to the right. En-
sure that the connection cable does not touch
the floor, if necessary tie the connection cable
up.
Information
The BackBox has a 13-pin plug. An adaptor
is necessary for a 7-pin vehicle socket. In
this case the reverse light is not operating.
Attention!
You must check the function of the lights, the
fixing of the BackBox and the BackCarrier
before every journey. You should check
regularly all mobile parts and tighten
them if necessary. Even if the BackBox is
empty everything must be locked.
Osadenie Boxu/ Mounting of the box
22 23
1. 2.
3.
BackCarrier
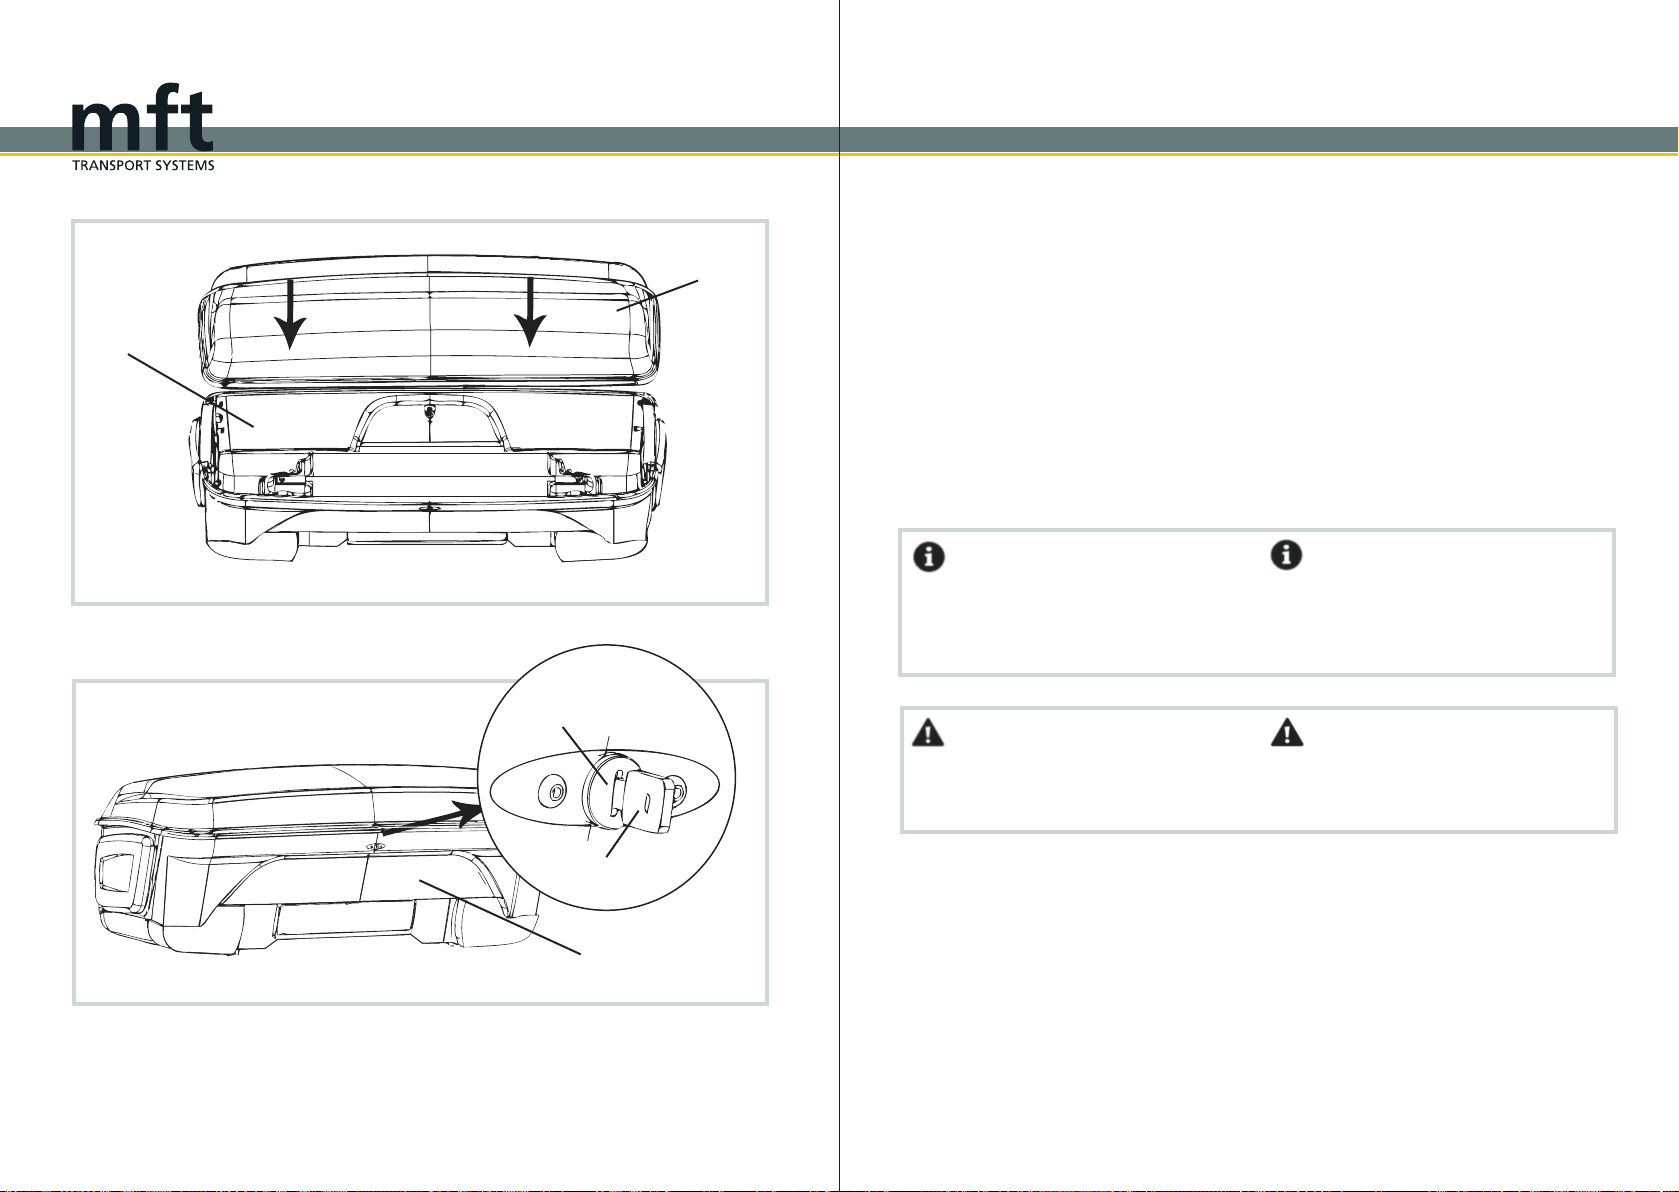
Pozor!
Nikdy neotvárajte zaisťovaciu páku (10).
Vrátenie BackBoxu do vý-
chodiskovej polohy
1. Zatlačte BackBox nahor smerom k vozidlu,
kým BackBox počuteľne nezapadne na miesto
na nosiči.
2. Uveďte zadný nosič do východiskovej polo-
hy.
3. Priťahujte sklápaciu kľuku (13) ku guli, kým
sa nezastaví.
Pozor!
V okolí vyklápania BackBoxu sa nesmú
nachádzať žiadne osoby ani predmety.
Attention!
Never open the lever lock (10).
Returning the BackBox in its
original position
1. Push the BackBox upwards in the direction
of the vehicle until it snaps audibly in the
BackCarrier.
2. Put the BackCarrier in its original position.
3. Turn the folding crank (13) against the narrow
part of the towball until it stops.
Attention!
Please make sure that no person and items
are positioned in the pivoting range of the
BackBox.
Osadenie Boxu/ Mounting of the box
BackBox
BackCarrier
BackBox
sklápacia kľuka
folding crank
BackCarrier
24 25
1.
2. - 3.
BackBox
vodiaca lišta
guide rail
vložka
insert
vodiaca lišta
guide rail
uťahovacia skrutka
fastening screw 2
1
Osadenie Boxu/ Mounting of the box
Mounting of inserts
The inserts (3) must be mounted before loading
the BackBox.
Proceed as following:
1. The guide rails (2) for the inserts (3) are on
the outer sides of the BackBox.
2. Put the inserts (3) into the guide rails (2).
Attention!
Be careful during mounting to avoid damages
to the sealings.
3. Then tighten the fastening screws on the
guide rails (2).
Attention!
Never use the BackBox without the
inserts (3).
Montáž vložiek
Vložky(3) musia byť vložené pred naložením
BackBoxu
Postupujte nasledovne:
1. Na vonkajšej strane BackBoxu sú vodiace
lišty (2) pre vložky (3).
2. Vložte vložky (3) do vodiacich líšt (2).
Pozor!
Pri montáži musíte byť opatrní, aby ste
nepoškodili žiadne tesnenia.
3. Potom utiahnite uťahovacie skrutky na
vodiacich lištách (2).
Pozor!
Nikdy nepoužívajte BackBox bez
vložiek (3).
26 27
1.
BackBox
2.
BackBox
veko
cover
2
skrutka s okom
ring bolt
Správne nakladanie BackBoxu
1. Otvorte BackBox pomocou dodaného kľúča
B (15). BackBox sa automaticky otvorí
miernym nadvihnutím veka (4).
Informácia
Pri nakladaní BackBoxu je potrebné dbať
na to, aby sa ťažké predmety vždy
naložili ako prvé.
2. Naložte a zaistite náklad v BackBoxe
zaisťovacícmi popruhmi o skrutky s okom
okolo naložených predmetov.
Pozor!
Nesmú sa prepravovať zvieratá, ľudia, popol/
piesok, ľahko horľavé alebo výbušné
predmety, ostré predmety, ťažké kovové
predmety alebo žieravé kvapaliny. (Pozri str.
2)
Correct loading of the BackBox
1. Open the BackBox with the corre-
sponding key B (15). By slightly lifting the cover
(4) the BackBox will open automatically.
Information
Always load heavy items at first and light items
at the end.
2. Load the BackBox and secure your
load by putting the securing straps at the ring
bolts around the loaded objects.
Attention!
Do not transport pets or people, easily inflam
Mable, explosive or sharp objects, ashes/sand,
heavy metal objects or corrosive liquids in the
BackBox. (See page 2)
Nakladanie boxu / Loading of the box
kľúč B
key B
zámok
lock
28 29
4.
veko
cover
BackBox
5.
BackBox
kľúč B
key B
zámok
lock
3. Utiahnite zaisťovacie popruhy tak, aby boli
napnuté. To zabraňuje posúvaniu nákladu tam
a späť počas jazdy.
4. Zatvorte BackBox oboma rukami.
Uistite sa, že veko (4) BackBoxu sa dá aj po
naložení ľahko zatvoriť. V prípade potreby
odstráňte predmety.
5. Vráťte kľúč B (15) do zvislej polohy a vy-
berte ho. Toto uzamkne veko.
Informácia
Na prepravu lyží odporúčame použiť pen-
ové vložky (obj. č. 1599).
Pozor!
Zaťaženie nesmie prekročiť nosnosť ťažného
zariadenia ani maximálnu nosnosť 57 kg.
3. Tighten the securing straps, so that they are
tensioned. This will prevent your loading of slip-
ping around during journey.
4. Close the BackBox with both hands.
Ensure that the cover (4) can be closed easily
after loading. If necessary remove items.
5. Bring the key B (15) again in vertical position
and remove it, this will lock the euro-select box.
Information
To transport skis we recommend you to use
foam inserts (Item No. 1599).
Attention!
Make sure that your load does not exceed the
maximum bearing load and the maximum load
of 57 kg.
Nakladanie boxu / Loading of the box

30 31
1
2
zámok
lock
Bezpečnostná páčka
securing lever
m adlo
clip
3. - 4. 5.
BackCarrier
2.
1
2
Pozor!
BackBox vykladajte iba vo vodorovnej
polohe a zaistený na mieste.
Informácia
BackBox sa rozoberá v opačnom poradí ako
pri montáži. Pred demontážou odstráňte celý
náklad z BackBoxu.
Demontáž BackBoxu
1. Vyklopte BackBox. (Pozri str.18/19)
2. Elektrickú zástrčku otočte o štvrť otáčky
doľava a vytiahnite ju zo zásuvky vozidla.
Potom ju vložte do priloženého držiaka.
Vráťte BackBox do vodorovnej polohy.
3. Kľúčom A (14) odomknite zámky
bezpečnostných páčok (11) na BackCarrier
základni (Pozri str. 17)
4. Stlačte páku uzáveru (11) a potom ju
otočte smerom nadol o 90° podľa označe-
nia, pričom ju držte stlačenú.
5. Potiahnite madlo (12) BackCarrier zák-
ladne smerom dozadu až na doraz.
Informácia
BackBox je možné demontovať len vtedy,
keď nie je naložený. Nikdy nepoužívajte
BackCarrier bez BackBoxu.
Attention!
Unload the BackBox only in a horizontal
position and when it is locked in place.
Information
The removal of the BackBox is done in
reverse order of mounting. Remove the com-
plete loading of the BackBox before re-
moving from the vehicle.
Removing the BackBox
1. Fold the BackBox. (See page 18/19)
2. Unlock the electrical plug by turning it one
quarter to the left. Then unplug it from the ve-
hicle socket and put it into the provided hold-
ing device. Bring the BackBox again into
horizontal position.
3. Unlock the locks of the securing levers (11)
on the BackCarrier with the key A (14).
(See page 17)
4. Press the securing levers (11) and simultane-
ously turn them 90° upwards in the direction of
the arrows.
5. Pull the clip (12) of the BackCarrier
backwards until it stops.
Information
Remove the BackBox only when it is
empty. Never use the BackCarrier without
the BackBox .
Demontáž / Removal from the vehicle
zásuvka na vozidle
vehicle power socket
zástrčka
plug
32 33
BackCarrier
BackBox
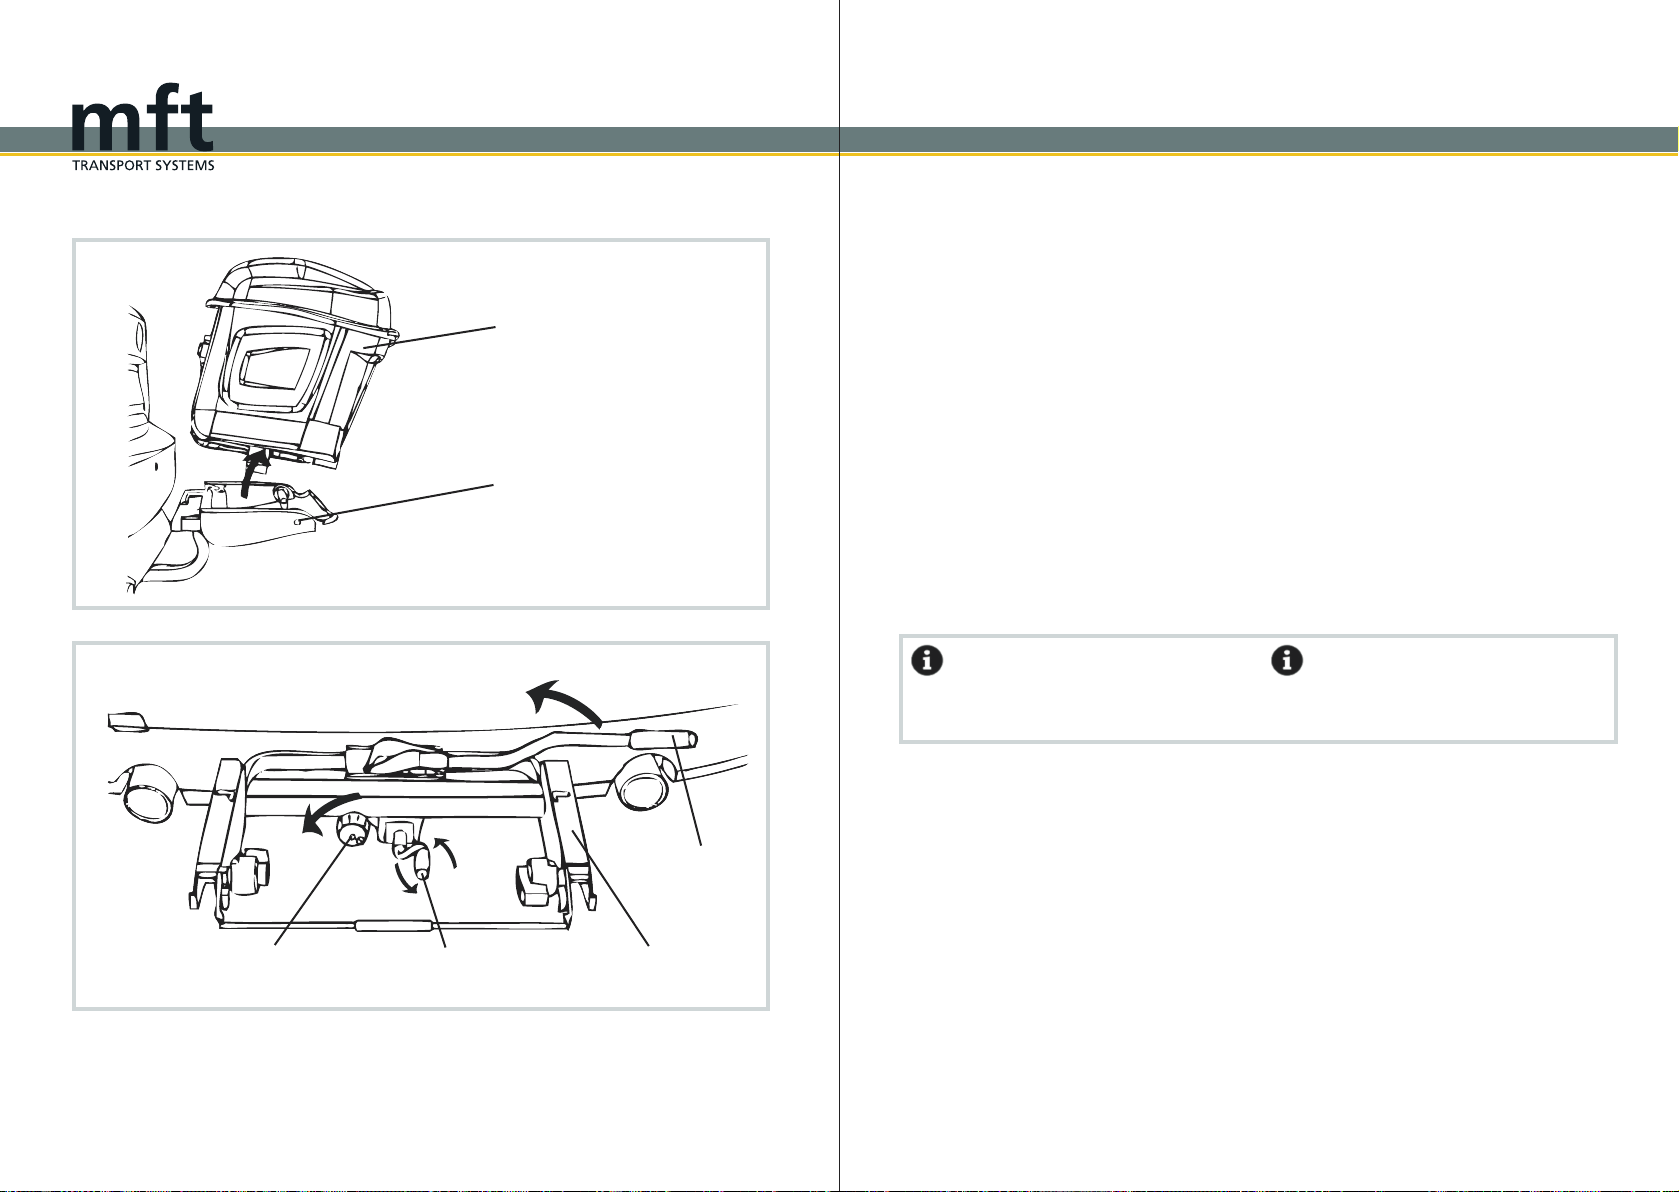
6. Nakloňte BackBox mierne dozadu a
vyberte ho zo zadného nosiča.
Demontáž BackCarrier základne
7. Odskrutkujte kľuku (13) až nadoraz.
8. Kľúčom A (14) odomknite uťahovaciu
ružicu (8) a potom odskrutkujte.
9. Uchopte BackCarrier a otvorte zaisťo-
vaciu páku (10) smerom nahor.
10. BackCarrier je teraz možné ľahko vy-
brať zo závesu.
Informácia
Nikdy nepoužívajte BackCarrier bez namonto-
vaného BackBoxu.
6. Tilt the BackBox slightly backwards
and remove it from the BackCarrier.
Removing the BackCarrier
7. Unscrew the folding crank (13) maximal until
it stops.
8. Unlock the fastening hand wheel (8) with the
key A (14) and unscrew it.
9. Hold the BackCarrier and open the
lever lock (10).
10. Now, the BackCarrier can be re
moved from the coupling without any problems.
Information
Never use the BackCarrier at the vehicle
without the BackBox.
Demontáž/ Removal from the vehicle
6.
7. - 9.
Páka uzáveru
lever lock
3
2
1
uťahovacia ružica
fastening hand wheel
kľuka
folding crank
BackCarrier

34 35
Údržba
BackBox odporúčame pravidelne čistiť a
udržiavať.
Namažte všetky pohyblivé časti a závity,
najmä objímku na vozidle a zadný nosič
bicyklovým olejom alebo sprejom na suchú
reťaz. Namažte ložisko klapky a valček
zatváracej páky.
BackBox nie je vhodný do autoumyvárne!
Opatrenia
Pred každou jazdou musíte skontrolovať
uchytenie, náklad a všetky funkcie
BackBoxu.
Rozšírenia
Rozšírenie malé 1540
mm
Artikel-Nr. 1503
Rozšírenie stredné 1720 mm Artikel-Nr. 1504
Rozšírenie veľké 1900 mm Artikel-Nr. 1505
Príslušenstvo
BackCarrier - základňa Artikel-Nr. 1201
Penové vložky Artikel-Nr. 1599
BackSupport Artikel-Nr. 1508
Podpora náklonu -prídavná páka
Maintenance
It is recommended that the BackBox is
cleaned and maintained regularly.
Lubricate all moving parts and screw threads,
especially the sleeve on the car and the
BackCarrier, with bicycle grease or chain
spray lubricant. Grease the bracket of the
clamp and the pivot of the lever lock.
The BackBox is not suitable for car washing
systems!
Precautions
You have to check the mounting, the loading,
and all functions of the BackBox before
every journey.
Extensions
Small insert 1540 mm item no. 1503
Medium insert 1720 mm item no. 1504
Large insert 1900 mm item no. 1505
Accessories
BackCarrier item no. 1201
Foam inserts item no. 1599
BackSupport item no. 1508
Conversion kit for second folded down-process
mft transport systems na
internete:
www.mft.systems
Na našej webovej stránke nájdete prehľad
našich produktov testovaných TÜV, ktoré
ponúkajú optimálne riešenia prepravy pre
každého.
Štýlové ľahké alebo cenovo výhodné
univerzálne zariadenia: všetky produkty
prepravných systémov mft sú nekompliko-
vané a pohodlne sa skladajú a manipulujú.
Navyše zaručujú vysokú úroveň bezpečnosti
bez ohľadu na to, či sa majú prepravovať
bicykle alebo iné náklady.
Ešte viac zaujímavých faktov o spoločnosti
mft transport systems GmbH a jej produktoch
nájdete na stránke www.mft.systems. Vážime
si váš záujem!
Návod na obsluhu vášho produktu nájdete aj
na našej domovskej stránke.
mft transport systems online:
www.mft.systems
Our web site gives you an overview of our
products, tested by TÜV. Our products offer in-
dividual optimised transport solutions.
Whether it’s a stylish lightweight model or a val-
ue-for-money all-rounder- all mft transport sys-
tems products are simple and convenient to fit
and use. In addition, they also guarantee a high
level of safety, regardless of whether bicycles or
other loads are being transported.
More useful facts about mft transport systems
GmbH and its products can be found on our
website www.mft.systems.
Thank you for being interested!
Y o u can find another copy of the instruction
manual for your product on our web site.

mft transport systems GmbH
Almarstraße 9
74532 Ilshofen
tel. +49 7904 / 9444 78 - 0
fax +49 7904 / 9444 78 - 44
www.mft.systems
Other manuals for BackBox
1
Table of contents
Other mft Automobile Accessories manuals

mft
mft BackCarrier User manual

mft
mft EasyMount 2 User manual

mft
mft multi-cargo 2 family User manual

mft
mft Aluline FA0132 User manual

mft
mft aluline User manual

mft
mft euro-select XT User manual

mft
mft compact 2e+1 FIX4BIKE User manual

mft
mft BackBox User manual

mft
mft Euro-select compact User manual

mft
mft multi-cargo2 series User manual


