MGG DTC 2000 Pro Series User manual
1
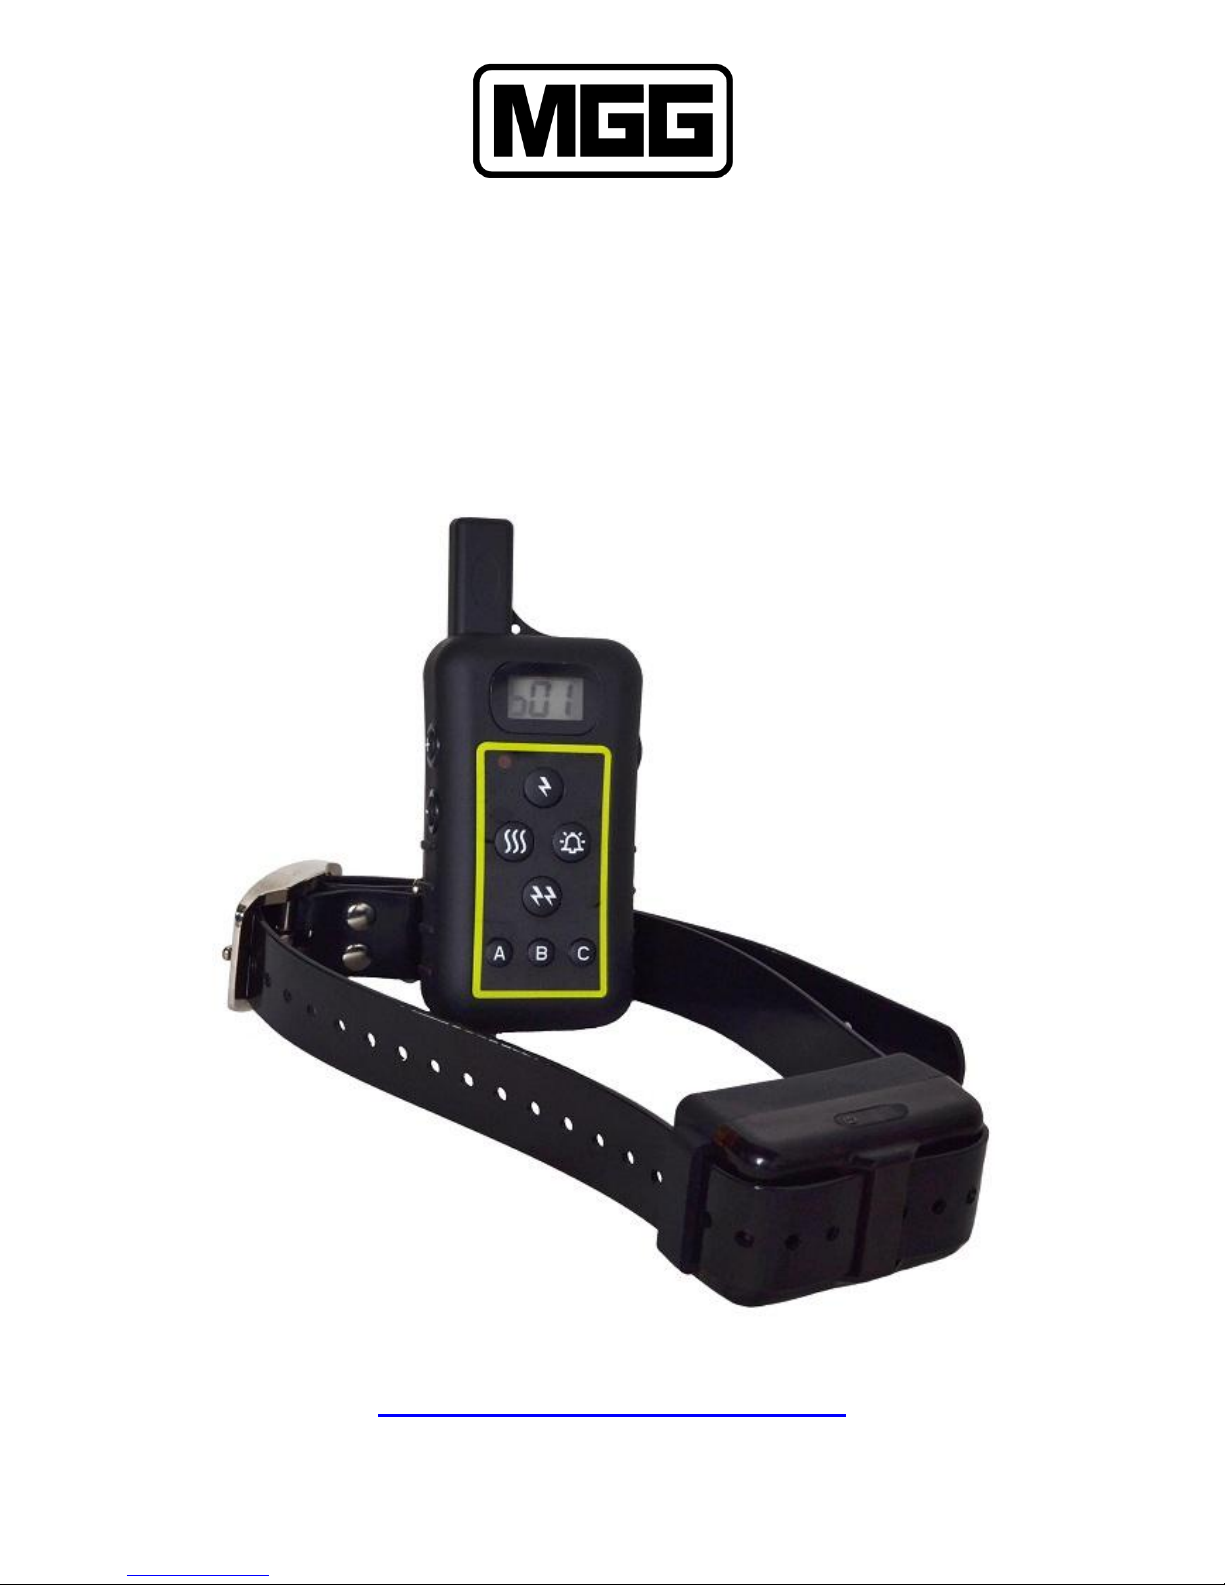
MGG DTC 2000 Pro Series Training Collar System
Operator’s Manual
www.mggproducts.co.nz
2
Thank you for choosing one of the MGG Pro Series high quality electronic training collar systems backed by
MGG Product’s Pro Series 2 year warranty..
We want to ensure your dog’s safety by providing you with the tools and techniques to successfully train
your dog.
Please read this operator’s manual carefully before starting to train your dogs .
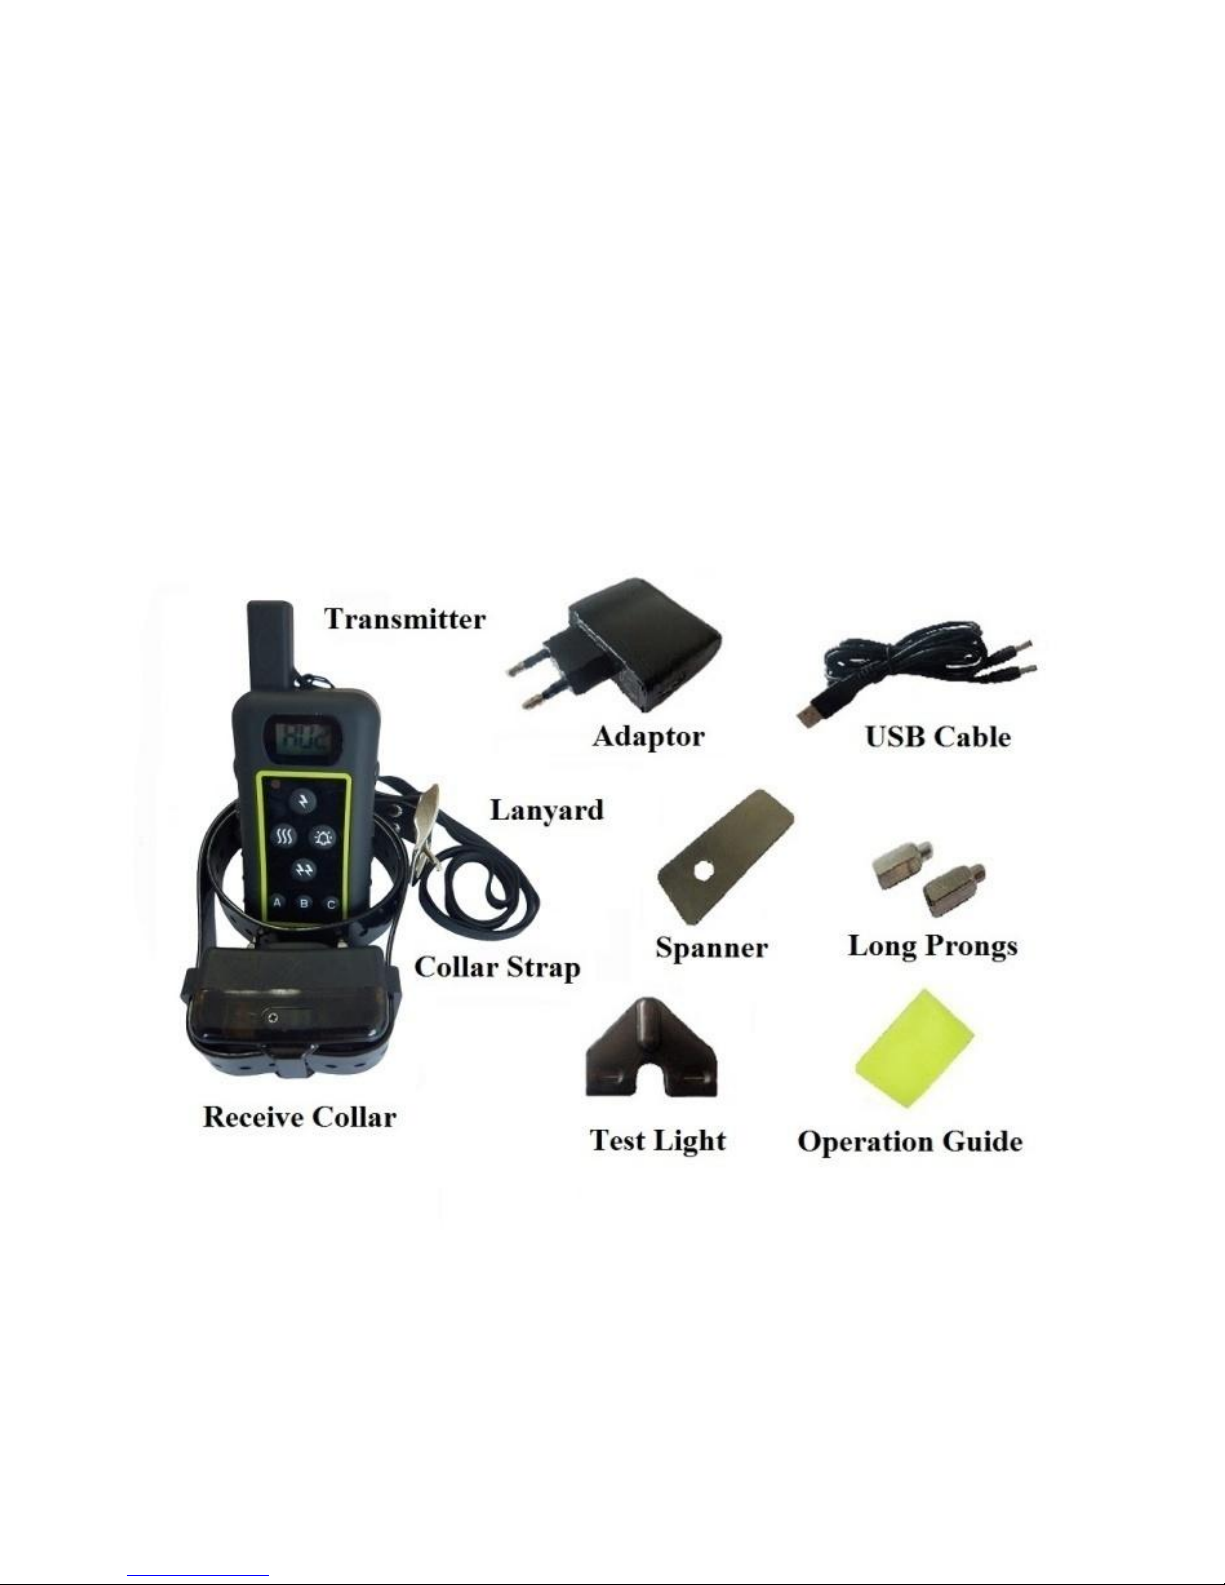
Package Contents
How the System Works
The Remote Dog Trainer has been proven safe, comfortable, and effective for all pets over 4.5Kg. This system assists
you in controlling your pet without a leash at long distance range. At the push of a button the Remote Transmitter
sends a signal activating the Receiver Collar. Using the Remote Trainer consistently and correctly, most bad habits
which your dog exhibits can be corrected and any basic obedience commands can be taught.
3
Important: The Remote Trainer range may vary depending upon the way you hold the Remote Transmitter. Hold
the Remote Transmitter in a horizontal position away from your body to achieve optimum range. Terrain,
weather, vegetation , Vehicles , Buildings, transmission from other radio devices and other factors will affect the
range of your Remote Trainer.
Main Features
1. The range in open field is 2000 meters
2. Train up to 3 dogs from the same transmitter
3. 10 levels each of continuous and momentary static shock
4. 10 levels of vibrate function
5. “Buzz” sound activated with a separate button
6. With the highlight LED function your dog can be found from 200 to 300 meters away in night
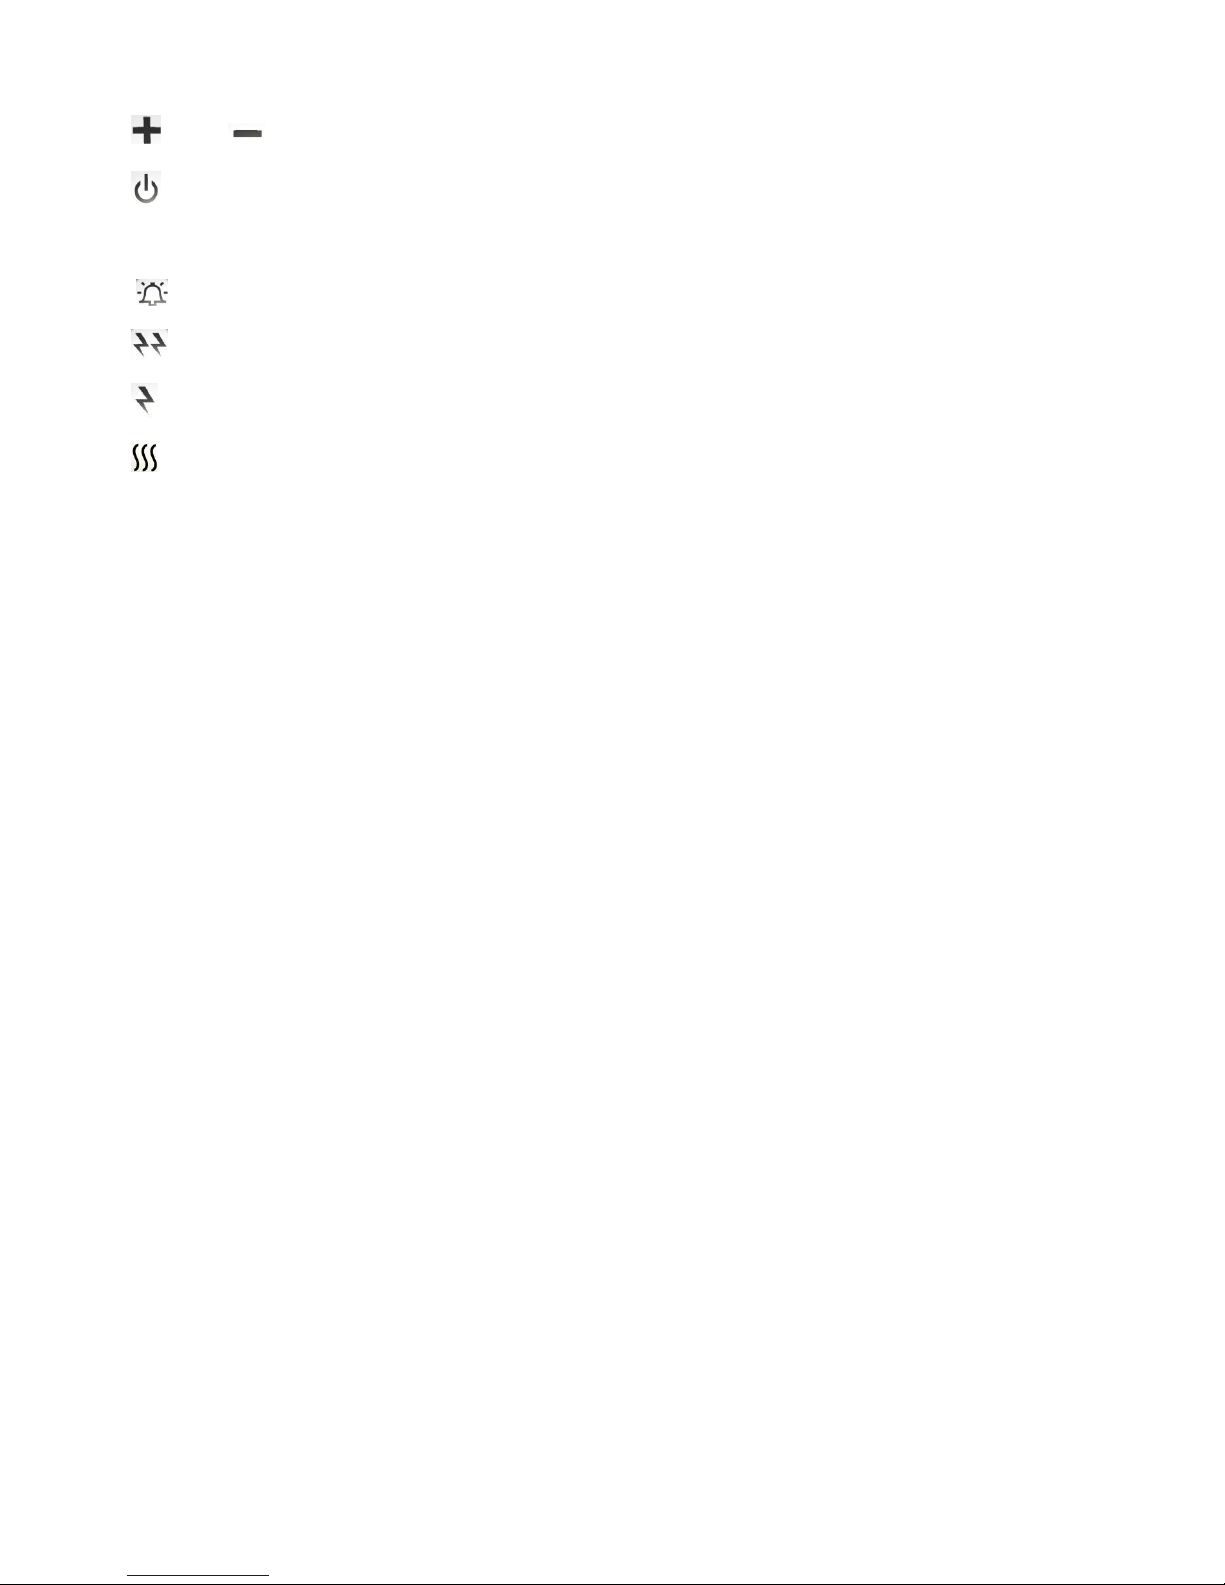
7. Two buttons “+” and “-” allow you to easily set your intensity of static shock and vibration
8. Dog Selection button allows you to select which dog
9. LCD digital display for 10 shock levels,10 vibrate levels and dog ID
10. Transmitter can memorize shock levels and vibration levels for different dogs
11. Easy to operate with rubber buttons
12. Water-proof transmitter and receiver. Your dog can swim freely.
13. Rechargeable 3.7V Li-ion battery for both transmitter and receiver
14. Strong TPU Collar Strap
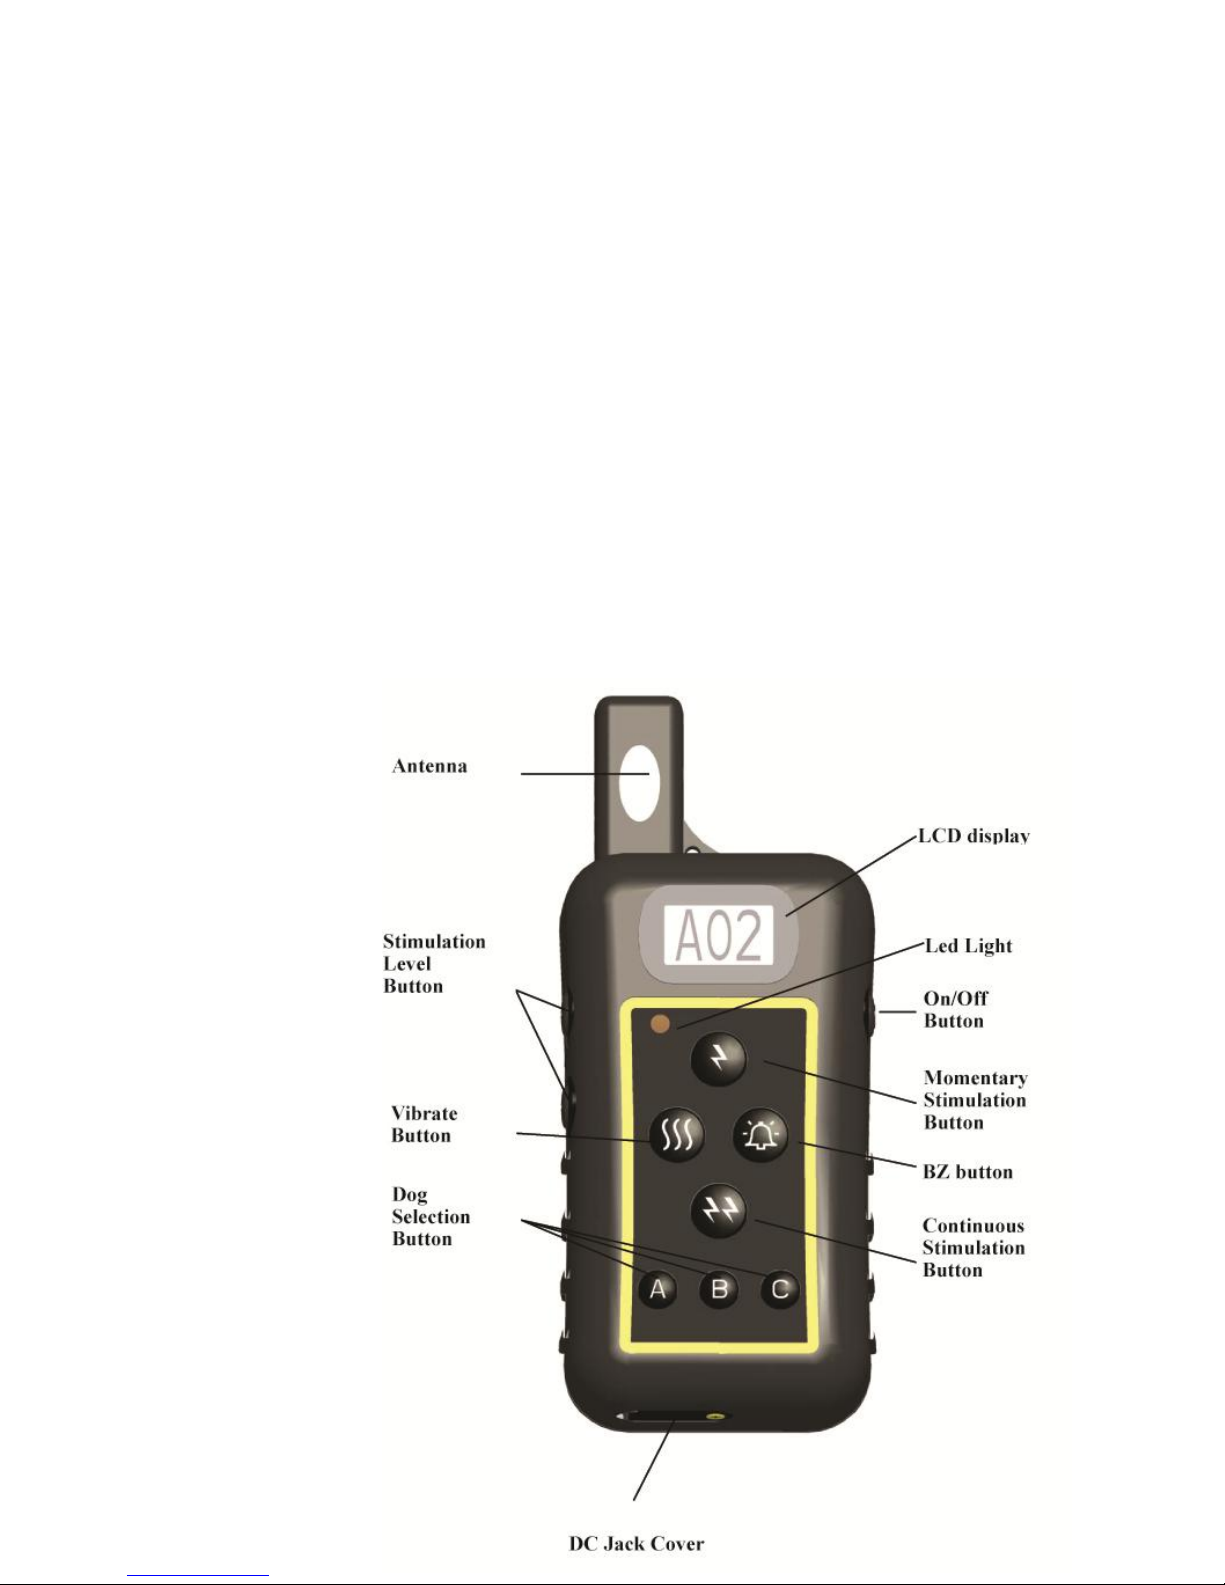
Transmitter
4
“” and “ “ buttons: press these buttons to adjust the shock & vibrate intensities from levels 1 to 10.
“ ” button: it is the power switch. Hold this button for 4 seconds to switch on the power then the LCD will display
the default “A01”. You may change this by pressing the relative buttons. To switch off the power hold this button for
4 seconds.
“ ” button: no-stimulation just a warning buzz
“ ” button: a continuous stimulation whilst held down. Will cut out after 8 seconds for safety.
“ ” button: momentary stimulation
“" button: vibrate button, press one time , vibrate 1 time. Press and hold on gives up to 8 seconds vibration
before cutting out.
“A,B,C ”buttons: Dog selection buttons. The default is “A”. Your transmitter is capable of training up to three dogs
with optional extra receiver collars. When you select A dog the LCD displays dog ID “A XX”. If you want to train B dog,
press “B” button and the LCD will display “BXX”. If you want to train C dog then press the “C” button and the LCD will
display “C XX”. “XX” is for showing the shock level or vibrate level.
High-Light operation: After matching the collar with the transmitter, when you press button A and keep your finger
on the button the collar will flash a white light. Remove finger and press button A again and the light will turn off.
Likewise, collar B will flash a red light and collar C will flash a green light. These lights are visible for 200 to 300
metres in the dark and can be of great assistance in finding out which dog is where.
The memory functions in the transmitter will save the shock & vibrate levels which you set for different dogs.
There are 10 levels of continuous stimulation, 10 levels of momentary stimulation. 10 levels of vibrate, One tone
NOTE: The red LED light will flash when the battery is low. Please then recharge the battery at once.
5
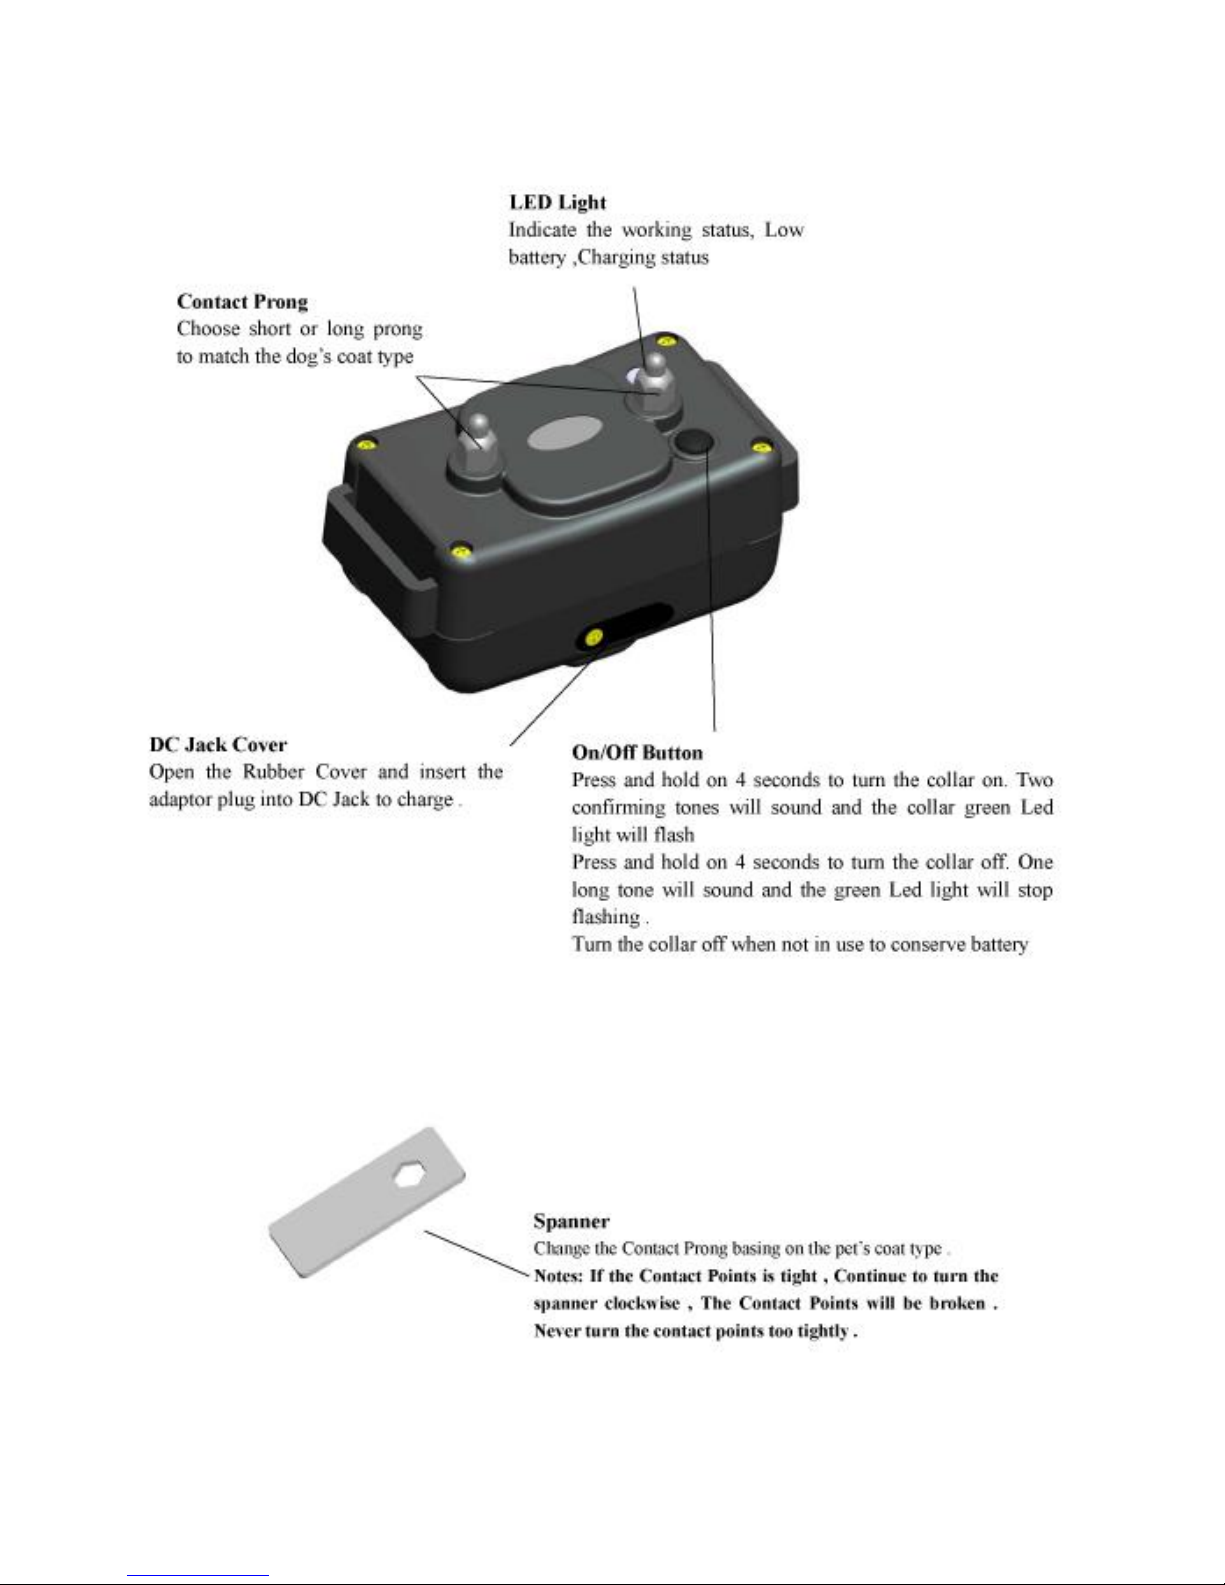
Collar Receiver
6
You can expand your one-dog Remote Trainer into a multi-dog Remote Trainer by yourself. Simply purchase extra
receive collar and add them to your system.
1. Matching a Receiver collar. To add a Receiver collar to your remote dog training system please follow the steps
below.
Step 1 : Take out an unmatched receiver collar. Press and hold the “ON/OFF” button.Release after two “beeps”
sound. The receiver power is now on and the green LED flashes frequently. (Note: never open 2 or more
unmatched receivers at the same time)
Step 2 : Take out the transmitter that you want to match receiver to. Press and hold on “ ” button until the LCD
display comes on then. The transmitter is power is nowon . .
Step 3 : Press and hold the “ ” button and the “ ” button at the same time until the digital number on the LCD
display changes automatically then release. Now it is in the “match receiver”mode. The number changes
like “08,09,10,11……”, increasing automatically .”
Step 4 : Hold the transmitter within 50 to 100mm of the unmatched receiver.
Step 5 : Press and hold the chosen dog selection button. If you match “A” dog, Press “A” button. If you match “B”
Dog , Press “B” button. If you match “C” dog, Press “C” button.After hearing 3 “beep” sounds from receiver
and seeing the green LED flash slow down, then release.
Special note: You must confirm that you heard 3 “beeps” from the unmatched receiver and see green LED flash
slow down first and, then release dog selection button. If your matching fails, you need to cancel the
failed matched receiver first then re-match again as above.
Step 6 : Press and hold “ ” button and “ ” button at the same time again until the digital number on the LCD
displays no change, then release.
Step 7 : Test matched Receiver---Choose the dog first, then press “ ” button and you can hear the “beep” sound
from the matched receiver. Congratulations! You have matched the receiver successfully.
Note: After matching a receive collar, the dog selection button will return to “A’ default. Before testing the
matched collar, Please chose the correct dog first.
2. To Cancel a Matched Receiver. Follow steps below, one by one, to cancel the matched Receiver:
Step 1: Take out a matched receiver. Press and hold the “ON/OFF” button.After two “beep” sounds the receiver is
power on and the green LED flashes once every 5 seconds.
Step 2: Press and hold the “ ” button on the transmitter until LCD display turns on then release. The Transmitter
power is now on.
Step 3: Press and hold the “ ” button and the “ ” button at the same time until the digital number on the LCD
display changes automatically, then release. You have now entered the cancel matched receiver mode. The
number changes like “08,09,10,11……”, increasing automatically.
Step 4: Hold the Receive Collar 50 to 100mm from the transmitter, press any dog selection Button once. You can
hear 2 “beep” sounds from receiver.
Step 5: Press and hold the “ ” button and the “ ” button at the same time again until the digital number on
the LCD display no longer changes then release. This exits the cancel matched receiver mode.
Step 6: The yellow LED of Receiver flashes frequently. Congratulations! You have cancelled the matched Receiver
successfully.

7
Charging
The transmitter and receiver charge rapidly –only 2 hours or so are needed.
The transmitter and receiver collar can be charged at same time
There is a common adapter for transmitter and receiver charging
To re-charge open the rubber cover first and insert the plug into the receiver and transmitter DC Jack sockets. Then
plug the Adaptor into your household AC power outlet.
The Transmitter and Receiver Collar can also be charged by connecting USB Cable to your computer USB socket.
Do not charge batteries in especially hot areas such as inside a vehicle ,far away from a fire.
Important : When not using the products for 4 to 5 weeks, please give a full charge for both Transmitter and
receiver collar.
Receiver Collar Charging
The red Led Light is on when charging.
The green Led Light is on and the red Led Light is off when the receiver collar is fully charged
NOTE: The receiver red led light flashes if the battery is low. Charge it promptly.
Transmitter Charging
The LCD display is “CHA” when charging.
The LCD display is “FUL” when the transmitter is fully charged
Training Guide
1. Fitting Collar on the Dog
Place the collar strap in the middle of the dog’s neck. The receiver should be on the underside of his neck although
on some dog’s necks the receiver will naturally seek a slightly off-centre position. The Rubber Cover should face
backwards (toward the dog’s chest).
Tighten the buckle by holding it with two fingers as you pull the strap snug. Remote training collars must be put on a
dog quite snugly to ensure consistent contact of the probes with the skin of your dog’s neck and therefore reliable
stimulation.
Do not put any fingers under the strap as you tighten it.
2. Static shock stimulation
Your Remote Trainer has 10 levels of intensity so you can find the best level for your dog’s temperament and the
type of training your dog requires. You may also select either continuous or momentary stimulation depending upon
your dog’s temperament and your training purpose.
You may press “+” or “-“ button to select suitable shock level, then press the “ ” button for around 8 seconds
continuous stimulation or press “ ” button for momentary shock.
3. Vibrate
Your Remote Trainer has 10 levels of vibration so you can find the best level for your dog depending upon your dog’s
temperament and your training purpose.

8
You may press the “+” or “-“button to select a suitable shock level then press the “ ” button 1 time for a brief
one time vibrate. Press and hold on the “ ” button for up to 8 seconds continuous vibration stimulation.
4. Highlight LED Flash Continuously
Note: To get a highlight flash continuously on a dark night you must firstly match the receiver collar to the
Transmitter.
Press and hold on “A” button for 3 seconds and “A” dog receiver collar will highlight flash 5 times then flash 1 time
per 3 seconds continuously. Press and hold on “A” button for 3 seconds again and “A” dog receiver collar will flash 2
times then quit the continuous flash.
Set up Dogs B and C in the same manner with buttons B and C
"A" dog receive collar is white highlight LED,
"B" dog receive collar is red highlight LED,
"C" dog receive collar is green highlight LED.
Troubleshooting Guide
Problem#1: No stimulation when a transmitter button is pressed.
The receiver has not been activated. The receiver must be turned on or it won’t work at all. The receiver has not
been set to your transmitter. Follow the instruction to re-match. The batteries in either the receiver or the
transmitter are dead. Recharge or replace, as needed. The level of stimulation has not been set.
Problem#2: The Beeper of Receiver doesn’t make any sound when the Receiver is turned on.
The battery in the Receiver has run down. Recharge as needed.
Loose battery connection.
The Beeper component is loose. Send to MGG for repair.
Problem#3: The stimulation seems to high, not high enough or no feeling at all
The collar strap is not tight enough. Make sure the contacts points connect the dog’s skin properly.
The intensity level is not correct. Change the shock level.
The batteries are dead. Recharge as needed.
Problem#4: The receiver light changes colour to indicate low charge very quickly
The unit has been left turned on between training sessions. Make sure the receiver is turned off after use.
You are training in very cold weather.
Problem#5: The Remote Trainer doesn’t have range or the range is significantly reduced.
Either you or the dog is shielded by a metal structure. Operate it far away from these types of structure.
The receiver is on backwards. For best range, position the receiver so that the light faces toward the dog’s nose.
Radio Interference. Wait a short while then try again, or move to another area.
Problem#6: The receiver seems not to receive any signal or cannot work at all
Check the receiver on/off button and make sure the receiver is turned on.
Check the transmitter battery, Recharge the Transmitter.
Check if you are using the correct transmitter and receivers as they are matched previously in the factory.
Table of contents
Other MGG Pet Care Product manuals


