Microtest MICROSCANNER User manual

MICROSCANNER
ENGLISH - 1
MICROSCANNER
TM
MICROSCANNER
TM
PRO
User Guide
ENGLISH

MICROSCANNER
ENGLISH - 2

MICROSCANNER
ENGLISH - 3
Table of Contents
The Keypad .......................................................... 4
Operating Mode .................................................... 4
Calibration Mode .................................................. 4
Setting the NVP percentage .................................
Changing Display from Meters to Feet ................ 6
Battery .................................................................. 6
High Voltage Protection ........................................ 6
Technical Support ................................................. 7
Product Versions ..................................................7
MICROSCANNER Tests ...................................... 8
Wiremap ........................................................... 8
Patch Cable Wiremap .............................. 10
Length ............................................................ 11
Network Link Indicator
(MICROSCANNER PRO) ......................... 12
Pair Length ............................................... 14
Coaxial Cabling
(MICROSCANNER PRO) ......................... 1
Office Identifier ...............................................16
Office Identifier
(MICROSCANNER PRO) ......................... 17
Toner .................................................................. 18
Technical Specifications ..................................... 19

MICROSCANNER
ENGLISH - 4
The Keypad
When turned on, MICROSCANNER will flash the
LCD power-up test and then resume the test
mode that was last executed. MICROSCANNER
will turn off automatically when no cable is
detected and no key has been used for 10
minutes.
Press ▲ ▼ to quickly change pairs or adjust
values. The ▲ ▼ keys are only active if the
indicators are shown on the display
Operating Mode
Press MODE to select the desired test. The
available modes are: WIREMAP - OFFICE
IDENTIFIER - LENGTH - TONER
Calibration Mode
+
Turn the MICROSCANNER OFF, then hold the
MODE key down while pressing the ON key to
start 'Calibrate' mode. Use MICROSCANNER to
calibrate cable lengths of more than 0 feet (1
meters) and up to 1 00 feet (4 7 meters.)

MICROSCANNER
ENGLISH - 5
Setting t e NVP percentage
Once in Calibrate Mode, the default NVP
(Nominal Velocity of Propagation) will be
displayed followed by the overall cable length. The
cable length is measured with the currently stored
NVP.
NVP is the measure of how fast a signal travels
down a cable compared to the speed of light. The
result will be represented as a percentage of the
speed of light. For an accurate length test, the
NVP must be set correctly.
If you know a cable's NVP, change the displayed
numbers using the ▲▼ keys until the appropriate
NVP is displayed. The cable length will automati-
cally adjust to the new NVP.
If you know a cable's length, change the shown
NVP using the ▲▼ keys until the appropriate
length is displayed. The NVP can be adjusted in
1% increments, and the length changes accord-
ingly.
Cables used for calibration must be at least 0
feet (1 meters) long. Cable lengths of less than
0 feet will display FAULT.

MICROSCANNER
ENGLISH - 6
C anging Display from Meters to Feet
During Calibration you will be able to switch the
displayed length from meters to feet by simply
pressing the MODE key.
Press the ON/OFF key once the desired cable
length or NVP is displayed to terminate 'Calibrate'
mode and store the new calibration factor.
MICROSCANNER will use it for future length
measurements until another calibration is
performed.
Battery
MICROSCANNER requires a 9 Volt Alkaline
battery. The Battery icon is displayed on the
screen when MICROSCANNER detects a low
battery condition.
Using MICROSCANNER with a low battery may
effect the test accuracy.
If MICROSCANNER is stored for more than one
month, the battery should be removed.
Note: MICROSCANNER will not function properly
with a 9 Volt Carbon Battery.
Hig Voltage Protection
MICROSCANNER is designed to withstand input
voltage conditions that arise from normal
telephony applications such as 48 VDC at less
than 80 ma or 24 VAC used to power many
keysets. Tests cannot be performed when hazard
conditions exist on the inputs.

MICROSCANNER
ENGLISH - 7
Tec nical Support
If you have technical questions, you may contact
Microtest Technical Support by phone, fax or e-
mail.
Nort America, Latin America, and Asia
Pacific:
1-800-NET-FIXR (1-800-638-3497) (U.S. and Canada only)
1-800-419-8991 (FA ) (U.S. and Canada only)
1-602-9 2-6483 (Voice)
1-602-9 2-6494 (FAX)
Greater Europe, Middle East, and Africa:
+44 1 293 4 6 02 , +44 1 293 4 6 008 (FAX)
Before calling Technical Support, please have
your Hardware and Software Version numbers
available.
For new product information: World Wide Web
page at ttp://www.microtest.com
Product Versions
+ +
Turn the MICROSCANNER OFF, then hold the ▲
and MODE keys down while pressing the ON key
to display your hardware and software versions.
Hardware Software

MICROSCANNER
ENGLISH - 8
MICROSCANNER
TMTM
TMTM
TM
Tests
Wiremap
The Wiremap function tests twisted-pair cabling
for proper wiring. Your cabling configuration is
checked for shield continuity, opens, shorts,
crossed pairs, split pairs, and reversed pairs. Test
Results are displayed as a numeric representa-
tion, where the upper line of fixed digits shows the
detected wires at the MICROSCANNER jack, and
the lower line of digits indicates the actual wiring.
This function requires the use of the Wiremap
Adapter at the far end.
1. Connect the cable to be te ted to the MAIN
jack (identified on the unit right above the
modular 8 jack).
2. To di play the Wiremap creen, pre the
MODE key until the word WIREMAP
appear on the creen.
Following are examples where MICROSCANNER
did not detect any faults.
ull Wiremap with intact shield shown as a
ZERO '0' on the right (4 pair, 8 wires)

MICROSCANNER
ENGLISH - 9
10BaseT Cable Token Ring
unshielded shielded
(2 pair, 4 wires) (2 pair, 4 wires)
Below are examples of wiring faults. The FAULT
indicator will be displayed and the numerical wire
indicators will blink.
Reversed: Crossed:
Pair 3 - 6 Pairs 4 - 5, 3 - 6
Split Pair
Note: If a cable i wired correctly, pin-to-pin, but
there i a plit pair, Wiremap will di play SPLIT
PAIR. For example a wire from the 1 - 2 pair
could be twi ted with a wire from the 3 - 6 pair.
MICROSCANNER
ENGLISH - 10
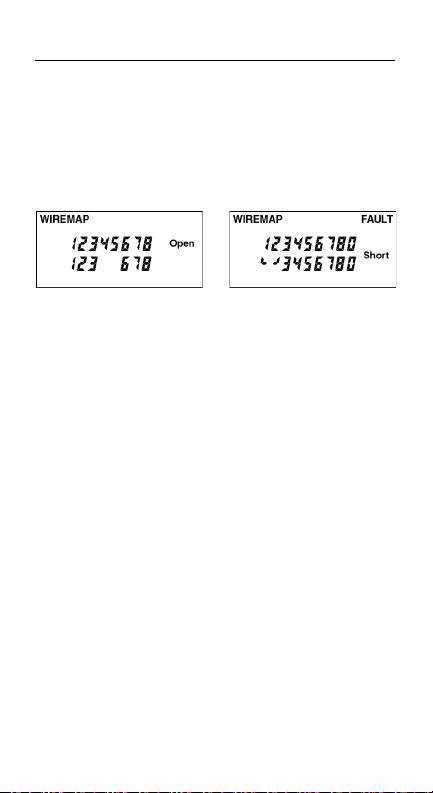
If the wire does not go to the far end, the
numerical indicator for the open will be left blank.
The word Open will be displayed. Shorted pairs
are indicated with a connecting bracket, and the
word S ort will be displayed.
Open: Pair 4 - 5 Short: Pair 1 - 2
When the wiring fault includes shorted or
swapped non-pair pins (e.g. non-pair pins 1 - 3),
the wiremap will display dashes for those
numerical wire indicators.
Patc Cable Wiremap
The Wiremap function can also be used to verify
patch cables.
1. Simply plug the two end of a cable into the
two modular 8 jack (MAIN and LOOP
BACK) on MICROSCANNER.
2. To di play the Wiremap creen, pre the
MODE key until the word WIREMAP
appear on the creen.
If there are any miswires, the number of the faulty
wire will blink.
Other manuals for MICROSCANNER
1
This manual suits for next models
1
Other Microtest Test Equipment manuals

Microtest
Microtest 626 Series User manual

Microtest
Microtest 6235 User manual

Microtest
Microtest 6910 User manual

Microtest
Microtest CT-8700 User manual

Microtest
Microtest OMNIScanner User manual

Microtest
Microtest 7600 User manual

Microtest
Microtest HT-7630 User manual

Microtest
Microtest CT-8750 User manual

Microtest
Microtest MT-6920R User manual

Microtest
Microtest 7700 User manual


