Midea TJE17GS7-S00N0A User manual

Commercial
High Speed Oven
SERVICE MANUAL
TJE17GS7-S00N0A
Oven Capacity: 18 Liter
208/240v~ 60hz, 6000w

CONTENTS
1. GENERAL INFORMATION................................................................................... 1
2
7
16
22
36
41
3. DIAGNOSTICS.........................................................................................................
5. REPLACING COMPONENTS............................................................................
6. CIRCUIT DIAGRAMS AND BOARDS............................................................
7 COMMISSIONING THE APPLIANCE..............................................................
4. SAFE WORKING WHEN TESTING COMPONENTS................................
2. HAZARDS AND SAFETY PRECAUTIONS...................................................
1.1 Purpose of this chapter........................................................................................................................
1.2 Equipment details Generic................................................................................................................
1.3 Important Information.........................................................................................................................
1.4 Structure of technical documentation.........................................................................................
1.5 About this Service Manual.................................................................................................................
2.1 Hazards and safety precautions during installing...................................................................
2.2 Hazards and safety precautions during servicing and repair...........................................
2.3 Hazards and safety precautions when taking the appliance out of service..............
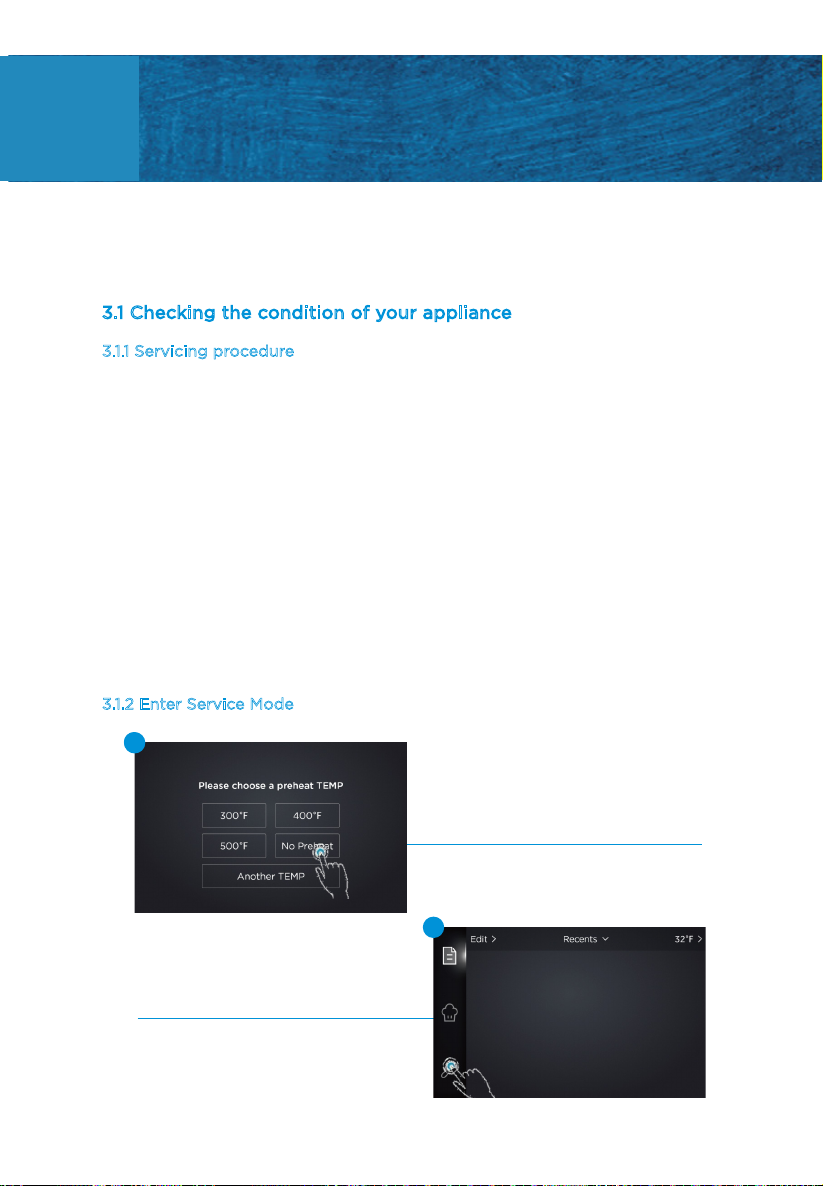
3.1 Checking the condition of your appliance..................................................................................
3.2 Fault finding............................................................................................................................................
4.1 Electrically live components.............................................................................................................
4.2 Moving heavy loads.............................................................................................................................
4.3 Sharp-edged sheet-metal parts.....................................................................................................
4.4 Hot surfaces............................................................................................................................................
4.5 Live components..................................................................................................................................
4.6 Microwave emissions..........................................................................................................................
4.7 Fire / smoke in the appliance..........................................................................................................
4.8 Requirements.........................................................................................................................................
4.9 Testing selected components (casing mounted)...................................................................
4.10 The key components (casing removed)...................................................................................
4.11 Mains voltage components (casing removed)........................................................................
5.1 Safe working when replacing appliance parts..........................................................................
5.2 Parts and their function.....................................................................................................................
5.3 Overview..................................................................................................................................................
5.4 Removing / fitting the casing.........................................................................................................
6.1 SRB / QTS circuit boards...................................................................................................................
6.2 TFT Driver Board..................................................................................................................................
6.3 Circuit diagrams....................................................................................................................................
7.1 Recommission Test: Recommissioning the appliance after service/repair...................
1
1
5
7
16
28
36
40
41
38
25
24
22
20
19
18
18
18
17
17
17
16
16
10
3
2
1
1
1

1.3 Important Information
1.4 Structure of technical documentation
1.5 About this Service Manual
1.2 Equipment details Generic
User Manual
Service Manual (this document)
The technical documentation for the microwave oven includes the following
documents:
This Service Manual is intended for all people who work with the Commercial High
Speed Oven, and provides them with the necessary information for carrying out
servicing and repair work properly and safely.
The trained service technicians should read the service manual before all servicing
and repair work. If you do not follow the information in this document, you risk
potentially fatal injury and property damage.
To guarantee safety, all people who work with the Commercial High Speed Oven
must have read and understood the following parts of this document before starting
any work: The sections that describe the activity to be carried out.
Users are cautioned that repairs should be performed by a TJE17G-S00N0A
authorized service agent using genuine TJE17G-S00N0A replacement parts.
TJE17G-S00N0A will have no obligation with respect to any product that has been
improperly installed, adjusted, operated or not repaired in accordance with national
and local codes or installation instructions provided with the product, or any
product that has its serial number defaced, obliterated or removed, or which has
been modified or repaired using unauthorized parts or by unauthorized service
agents. For a list of authorized service agents please refer to your distributor.
Generic Model Number
Description Commercial High Speed Oven
TJE17G-S00N0A
This chapter shows you how to identify your Commercial High Speed Oven and
provides guidance on using this manual.
1.1 Purpose of this chapter
01
GENERAL INFORMATION
1

2.1 Hazards and safety precautions during installing
2.1.1 Electrical Power
02
HAZARDS AND SAFETY
PRECAUTIONS
2.1.2 Mechanical parts of the appliance
Danger Where or in what situations
does the hazard arise? Preventive action
Trapping fingers
ivor bodyiv
When opening or
closing the door
When opening or
closing the door
Danger Where or in what situations
does the hazard arise? Preventive action
Risk of electric
shock from
live parts
Ensure that all electrical
connections are in perfect
condition and fixed securely
before putting the appliance
into use.
On the appliance and
on adjacent metal parts
Before preparing the
appliance for use, make sure
that the appliance is
connected to an equipotential
bonding system (EU).
Work on the electrical
system must only be
performed by qualified
electricians from an
authorized service
company.
Professional working
Under covers
Under the operating
panel
Along the mains power
lead
2

2.2 Hazards and safety precautions during servicing and repair
2.2.1 Heat
2.2.2 Electrical power
Danger Where or in what situations
does the hazard arise? Preventive action
Risk of electric
shock from
live parts
Before removing the covers:
Before putting the appliance
back into use, make sure that
the appliance, including all
metallic accessories, is
connected to an equipotential
bonding system.
Work on the electrical system
must only be performed by
qualified electricians from an
authorized customer service
company
Make sure that the electrical
connections are intact and
fixed securely before plugging
the appliance back into the
power supply.
Under covers
Under the control panel
On the appliance and on
adjacent metal parts.
On the appliance and on
adjacent metallic
accessories.
Switch o all connections
to the power supply
Take protective measures
at every power switch to
ensure that the power
cannot be switched on
again.
Wait 15 minutes to allow
the DC bus capacitors to
discharge.
Make sure that the
appliance is de-energized.
Danger Where or in what situations
does the hazard arise? Preventive action
A risk of burns
from hot surfaces
Inside the entire cavity,
including all parts that are
or were inside during
cooking, such as
On the inside of the
appliance door
Racks
Containers, baking
sheets, shelf grills etc.
Before starting cleaning
tasks, wait until the
cavity has cooled to
below 50°C/122°F or use
the 'cool down' function
to cool the cavity.
Wear specified
protective clothing, in
particular protective
gloves
3

2.2.3 Mechanical parts of the appliance
2.2.4 Moving heavy weights
2.2.5 Moving appliances supported on a wheeled base
Danger Where or in what situations
does the hazard arise? Preventive action
Risk of injury from
over-stressing
your body
When moving the
appliance
Use a forklift truck or
pallet truck to place the
appliance in the
installation position or to
move it to a new position.
Always use the correct
number of persons and
observe the limits
specified for lifting and
carrying when ad-joust-
ing the appliance
position.
Observe the local
occupational safety
regulations.
Wear personal protective
equipment
Danger Where or in what situations
does the hazard arise? Preventive action
Risk of crushing
of body parts
Risk of electric
shock from live
parts
While appliances are being
moved on a wheeled
platform.
Disconnect the appliance
from the electrical supply
before moving it.
When servicing the
appliances, always
engage the parking brake
on the wheels.
Danger Where or in what situations
does the hazard arise? Preventive action
Risk of body parts
being crushed if
the appliance tips
over or falls o.
Always observe the
requirements for the supporting
surface
When the appliance is being
moved e.g. to gain better
access to the connections
Risk of cuts from
sharp edges
Exercise caution when
performing this action
Wear personal protective
equipment
During servicing work
When handling sheet-
metal parts
Risk of hands and
feet being pinched
4

2.3 Hazards and safety precautions when taking the appliance out
of service
2.2.6 Smoke or fire
2.3.1 Electrical power
2.3.2 Moving heavy weights
Danger Where or in what situations
does the hazard arise? Preventive action
Risk of electric
shock from live
parts
Work on the electrical
system must only be
performed by qualified
electricians from an
authorized customer
service company.
Professional working
Danger Where or in what situations
does the hazard arise? Preventive action
Risk of fire/smoke
from defective
electrical com-
ponents or
wrong electrical
connections.
If one of the electrical
components is defect, for
example due to a short
circuit, or if the internal
wiring is refitted incorrectly
when servicing/repairing
the oven.
Never use electrical spare
components which failed
in a dedicated test or
which bear visible
damages.
Carefully refit electrical
connections using the
wiring diagrams provided
in this manual.
Danger Where or in what situations
does the hazard arise? Preventive action
Risk of injury from
over-stressing
your body
When moving the appliance
onto and o the moving
equipment.
Use a forklift truck or
pallet truck.
Do not exceed safety
limits for lifting and
carrying.
Wear personal protective
equipment.
Under covers
Under the operating
panel
5

2.3.3 Mechanical parts of the appliance
Danger Where or in what situations
does the hazard arise? Preventive action
Risk of slipping on
damp kitchen floor.
Ensure that the floor around
the appliance is dry at
all times.
Always observe the
requirements for the
supporting surface when
taking the appliance out
of service.
In front of the appliance.
Risk of body parts
being crushed if
the appliance tips
over or falls o.
When the appliance is
being moved e.g. to gain
better access to the
connections.
6

03
DIAGNOSTICS
This chapter contains information on checking various functions of your Commercial
High Speed Oven.
3.1 Checking the condition of your appliance
3.1.1 Servicing procedure
3.1.2 Enter Service Mode
1)Disconnect/isolate the appliance from the power supply.
2)Check the appliance is correctly installed.
3)Visually check the cleanliness/condition of the power supply/cable/gland, casing,
cavity and door of the appliance for signs of wear, damage, distortion etc. If
required, refer to the “Replacing components" section of this manual.
4)Complete an "Earth/Insulation test" (see “Tests" section of user manual) on the
appliance before switching on.
5)Check the display for error messages. If an error is shown, refer to the “Diagnos-
tics” section of this manual.
6)If a firmware update is required, follow the instructions under “Firmware Updates”
before continuing with the service procedure.
On start up,Click on the“No Preheat”
button,Enter the next UI interface.
Select the spanner symbol.
1
1
2
7

3.1.3 Functions of the Service Mode
Check the "Error Log" for details of
any logged appliance errors and refer
to the error codes for more details.
Check the "Running Status" to find the
operational performance of the main
components.
Click “Defect Records” button to display “Error Logs”、“Oven Counters”、“Running
Status”、“Reset”.
Check the "Oven Counters" to find the
usage of components.
34
2) Oven Counters
1) Error Logs
3) Running Status
8

When error code E-1, E-5, E-6 occur
and the text description is “Magne-
tron1_*”, the “1L” and ”4L” symbols
get red.
“1L” and”4L” are associated; they turn
green or red at the same time.
Clear the error by restarting the
cooking.
When error code E-1, E-5, E-6 occur
and the text description is “Magne-
tron2_*”, the “1R” and “4R” symbols
get red.
“1R”and”4R” are associated; they turn
green or red at the same time. Clear
the error by restarting the cooking.
3.1) Magnetron/Power Invertor(L)
3.2) Magnetron/Power Invertor(R)
3.1) Magnetron/Power Invertor(L)
9

The oven has 2 main parts being the QTS assembly (Keyboard, Screen, and Logic)
and the SRB (Smart Relay Board to switch and monitor the required operation).
The QTS and SRB have their own Personality Module (PM) fitted with the respective
software to be able to communicate and work with each other.
The QTS is the master of the oven and instructs the SRB what to do, in turn the SRB
communicates information on the operation back to the QTS.
The power provision to the QTS and the communication between QTS and SRB is
enabled via ONE cable with XH-4P connectors fitted.
3.2 Fault finding
3.2.1 Hardware control components
Operations communication:
Starting up sequence
With the oven switch in the OFF position and the mains power ON, the QTS & SRB
boards boot up. When the oven switch is turned ON the splash screen briefly
displays oven information and the cabinet cooling fan is activated.
After completing a successful logic test, the safety relay is energized and the oven
displays a preheat temperature choice.
The oven displays the main menu when preheating is complete or when you choose
‘no preheat’.
When error codes U02, U21, U22, U23,
U25, U26 occur, the Fan symbol get red.
When error code E01, E02, F11 occurs,
the Heater symbol gets red.
3.3) Fan
3.4) Heater 3.4) Heater
3.3) Fan
1
2
3
4
10

3.2.2 Exchanging data via USB interface
3.2.3 Error Code List
Shutting down sequence
When oven switch is turned OFF the screen displays ‘Shutdown & clean’ and the
cooling fan operates until the cabinet temperature has been suciently reduced
(cavity temperature of 60°C / 140°F) or you can choose to long press the switch
button (5S) to choose the forced shutdown. The safety relay is de-energized and the
QTS & SRB boards remain active.
Shutting down sequence
Menu loading from the USB memory stick to the appliance (recipes / download).
Software loading from the USB memory stick to the appliance (firmware /
download).
Menu copying from the appliance to the USB memory stick (upload).
Error
Code
E02
E17
E01
E03
F11 Over Temp
Elec Error
Sensor
Open
Cavity
sensor
broken/
unplugged
The controller
is reading an
open circuit
across the
temperature
sensor
Error
Condition
Cavity
sensor
short
Sensor
Short
Cavity
Sensor
Error
Description Trigger Possible
Causes
System
Response
The sensor is
not
connected, Or
is broken
open circuit.
The controller
is reading a
short circuit
across the
temperature
sensor
Detects if the
power supply
voltage is
outside
specification
Cavity
temperature
is too high
Cavity sensor
measures
more than
300℃
Display error
message until
service call
and the
machine cools
down
Cavity sensor
positioning
next to heater
No heater
current
detected
when
requested
Cavity does
not reach
80℃in 10
minutes
Oven heater
element
failure
Display error
message until
service call
and
magnetron
cools down or
the cavity
thermostat is
reset.
Incorrect
mains voltage.
Faulty SRB.
Display error
message until
system is
power cycled.
The power
supply to the
oven voltage
sensor on the
SRB measures
too high/low
Shorted
temperature
sensor on
SRB
Display error
message until
system is
power cycled.
Display error
message until
system is
power cycled.
11

U02 Motor
Driver NC
No
communica-
tion can be
made
between the
SRB and
Motor driver.
Loss of
communica-
tion between
SRB and
Motor driver
more than 10
second.
Display error
message until
communica-
tion resumes
SRB and
Motor driver
connection
cable
unplugged or
damaged.
Faulty SRB or
Motor driver
E-1 Magnetron
1/2_1
Inverter
leakage
Before
magnetron
start energies,
magnetron
current was
too high.
Display error
message
Faulty
Microwave
inverter
U25 Motor Over
Temperature
Detects if the
driver is
Driver's
temperature
sensor
Display error
message
Ambient
overheat
>85℃
U26 Motor Loss
Phase
The drive lose
motor phase
The drive lose
motor phase
Display error
message
The motor is
unplugged or
damaged
U22 Motor Low
Voltage
Detects if the
power supply
voltage is
outside
specification
The power
supply to the
oven voltage
sensor on the
SRB measures
too low
Display error
message until
system is
power cycled.
Incorrect
mains voltage.
Faulty Motor
Driver.
CB Common
Breakdown
No
communica-
tion can be
made
between the
TFT screen
and SRB
Loss of
communica-
tion between
the TFT
screen and
SRB more
than 10
second.
TFT
screen/SRB
connection
cable
unplugged or
damaged.
Faulty TFT
screen or SRB
Display error
message until
communica-
tion resumes
operating
above
temperature
measured
>120℃
D11 zero Error Detects if SRB
cannot
receive power
supply
frequency
signal more
than 10
second
Loss of power
supply
frequency
Faulty SRB. Display error
message
U23 Motor Over
Voltage
Detects if the
power supply
voltage is
outside
specification
The power
supply to the
oven voltage
sensor on the
SRB measures
too high
Incorrect
mains voltage.
Motor Driver.
Display error
message until
system is
power cycled.
U21 Motor Over
Current
Motor over
current
The motor
current
measured by
Motor Driver
was >12A
Motor
blocked
Display error
message until
system is
power cycled.
E-5 Magnetron
1/2_5
Magnetron
failed to
energies
The current
measured by
the current
sensing
transformer
was none.
Failure of
components
in the
microwave
circuit.
Display error
message
12

3.2.4 Service Guidance
E-6 Magnetron
1/2_6
Magnetron
over current
The current
measured by
the current
sensing
transformer
was outside
of tolerance.
Display error
message
Shorted
magnetron
E-8 Magnetron
1/2_8
Magnetron
current is too
low
The current
measured by
the current
sensing
transformer
was outside
of tolerance
Microwave
Inverter is
operating
above
temperature
Display error
message
13
Check the sensor
terminal CN7 is loose
Replug the
terminal
Change the
sensor
Change the
sensor
Replace the fuse 3
Replace the heater
Replace the
SRB relay
Replace the SSR
Reset the
thermostate
Change the
SRB
Change the
SRB
E17
E01
E02
The SRB
is bad
The SRB
is bad
The sensor
is bad
The sensor
is bad
Sensor Open
Check the thermostat
is reset
Check the SRB relay
RLY11 is normal
Check the SSR
terminal is normal
Check the heater
is normal
Check the fuse 3
is working
Sensor Short
Measure whether t
he sensor resistance
is normal
The temperature
of the cavity
is abnormal
Measure whether
the sensor resistance
is normal
Yes
Yes
Yes
Not
Not
Not
Not
Not
Not
Replace the
TFT or SRB
Replug the
terminal
CB
The TFT or SRB
is bad
The terminal
is loose
Abnormal
communication
Check the signal
wires of the
TFT Screen and
SRB(CN9)
is loose
Yes
Not
Not
Not

14
Replace the Driver
Board or SRB
Replug the
terminal
U02
The Driver Board
or SRB is bad
The terminal
is loose
The signal of
Driver Board
is abnormal
Check the signal
wires of the
Driver Board
and SRB(CN10)
is loose
Yes
Not
Replace
the Motor
Replace the
Driver Board
U21/
U26
The Motor is bad
The Driver
Board is bad
Motor
vercurrent/
Motor phase loss
Check the
resistance
between three
phases of the
motor is normal
Yes
Not
The Inverter
is bad Yes
Check the fault
is eliminated
Replace the
Magnetron
E-1
Replace the
Inverter
The Magnetron
is bad
Inverter
leakage
Check the
Magnetron is
normal Yes
Not
Replace the
SRB relay
(RLY1/RLY5)
Replace the
Interlock
assembly
Replace the
Inverter
Check the
Interlock
assembly
is normal
Check the
SRB relay
(RLY1/RLY5)
is normal
Check
Inverter
is normal
Yes
Yes
Yes Not
Not
Not
Replace the
Magnetron
Replace the
Fuse 2
E-5
Check the
Magnetron
is normal
The Fuse
2 is bad
Inverter No
output
Check the
Fuse 2 is normal
Yes Not
Not
Replace
the Inverter
Replace the
Magnetron
E-6
Check
Inverter
is normal
The Magnetron
is bad
The current Is
too large in the
magnetron
Check the
Magnetron
is normal Yes Not
Not

Fuse 1
Fuse 3
Fuse 2
Interlock Assembly
Magnetron
Cooling Motor/Lamp
Interlock Assembly
Convection Motor
Heater
Magnetron
Right Inverter
Left Inverter
15
TFT screen or
switch button
is not bright
The Interlock
assembly is bad
Check the signal wires
of TFT screen and
SRB(CN9) is loose
Replug
the terminal
Replace SRB
Replace
TFT screen
Replace Noise
Filter/EMI Filter
Check Noise Filter/
EMI Filter is normal
The inverter is bad
The Magnetron is bad
Cooling Motor/
Lamp is bad
Fuse 1
is normal
Replace switch
button
switch button
is bright
switch button is
not bright
Check or switch
button is normal
Fuse 1 is bad
Yes
Yes
Not
Not
Not

4.1 Electrically live components
4.2 Moving heavy loads
4.3 Sharp-edged sheet-metal parts
When the appliance is not connected to an equipotential bonding system, there is a risk
of electric shock from touching live parts.
Working with or behind sharp-edged sheet-metal parts may result in cuts to hands.
When lifting the appliance, the weight of the appliance may lead to injuries, especially in
the area of the torso.
When the appliance is not connected to an equipotential bonding system, there is a
risk of electric shock from touching live parts.
Make sure that the electrical connections are intact and connected securely before
putting the appliance into use.
Before preparing the appliance for use, make sure that the appliance, including all
metallic accessories, is connected to an equipotential bonding system.
Exercise caution.
Wear personal protective equipment.
Use a forklift truck or pallet truck to place the appliance in the installation position
or to move it to a new position.
When shifting the appliance into the correct position, use enough people for the
weight of the appliance when lifting it (value depending on age and gender).
Observe the local occupational safety regulations.
Wear personal protective equipment.
04
SAFE WORKING WHEN
TESTING COMPONENTS
Before starting oven tests, it is essential that you familiarize yourself with the rules
and hazard warnings specified and follow the instructions given there. Only qualified
personnel from an authorized service company are permitted to test components of
the Commercial High Speed Oven.
Risk of electric shock from live parts
DANGER
Risk of injury from lifting incorrectly
DANGER
Risk of cuts from sharp-edged sheet-metal parts
DANGER
16

4.4 Hot surfaces
4.5 Live components
4.6 Microwave emissions
When the covers of the Commercial High Speed Oven are removed, there is a risk of
electric shock from touching live parts.
Make sure that any work on the electrical system is performed solely by a qualified
electrician from an authorized customer service oce.
Before removing the covers:
Switch the appliance o and disconnect the plug from the wall socket.
Turn o the isolator switch to disconnect fixed wired appliances and lock-o.
Take protective measures at every power switch to ensure that the power
cannot be switched on again.
Always discharge the high voltage capacitors before working on the appliance
using a suitably insulated 10MΩresistor.
Make sure that the appliance is de-energized.
Make sure that the electrical connections are intact and connected securely before
you reconnect the appliance to the power supply.
Before putting the appliance back into operation, make sure that the appliance,
including all metallic accessories, is connected to an equipotential bonding system.
You may get burnt if you touch any of the interior parts of the cooking chamber, the
inside of the appliance door or any parts that were inside the oven during cooking.
Before starting servicing and repair work, wait until the cooking chamber has
cooled to below 50°C / 122°F or put a cup of ice cube into the cavity to cool the
cooking chamber.
Wear personal protective equipment.
Do not become exposed to emissions from the microwave generator or parts
conducting microwave energy.
Never operate an appliance that has failed the "Microwave Leakage test".
Risk of burns from microwave emissions
DANGER
Risk of electric shock from live parts
DANGER
Risk of burns from high temperatures inside the cavity and on the inside
of the appliance door
DANGER
17

4.7 Fire / smoke in the appliance
4.8 Requirements
4.9 Testing selected components (casing mounted)
Flames and/or smoke may come out of the oven when switching it on after service/repair.
This can be caused by a defective electrical component or electrical connections (wiring)
that have been refitted incorrectly.
The equipment required for testing the appliance is as follows.
Portable Appliance Tester (P.A.T.)
Digital Multi-Meter (D.M.M.)
Megger / similar 500 V d. c. resistance meter
Microwave detection / leakage meter
Temperature reader
Continuity meter
Door Spacer Kit
Microwave safe 600 ml glass beaker
Microwave safe 2 litre container
Switch o the oven.
Disconnect/isolate the oven from the electrical supply.
Keep the oven door closed to stifle any flames.
While testing with a Portable Appliance Tester (PAT) is not an automatic requirement for
the Commercial High Speed Oven models, the following notice is to advise on this testing
in addition to the following instructions as deemed necessary.
If the customer requires PAT testing of our equipment we suggest this is limited to a)
earth continuity and b) insulation resistance (measured at ~ 500 V DC). All Commercial
High Speed Ovens are classified as CLASS 1 for the purpose of testing.
Should it still be deemed necessary by the customer to perform an Earth Leakage test,
the following advice should be adhered to. Note that not all PATs are capable of just
measuring the leakage or allow you to set a pass limit and therefore may not be
appropriate for this test.
Risk of fire and/or smoke
DANGER
18
Table of contents
Other Midea Oven manuals

Midea
Midea MG25BNM User manual

Midea
Midea MC32AHB User manual

Midea
Midea 65CME19 series User manual

Midea
Midea MO5BL User manual

Midea
Midea BOP90E3BL User manual

Midea
Midea 315545 User manual

Midea
Midea MG25CHB User manual

Midea
Midea 7NM30EO User manual

Midea
Midea MOP9BL User manual

Midea
Midea BOM90D2IX User manual

Midea
Midea 315544 User manual

Midea
Midea MBO-M1865 User manual

Midea
Midea AAE40006 User manual

Midea
Midea MO 659 TD BK User manual

Midea
Midea MO 729 TDE BK User manual

Midea
Midea 310715 User manual

Midea
Midea MO 655 BK User manual

Midea
Midea MAF-CN20A User manual

Midea
Midea B 3.60 IX User manual

Midea
Midea MO9BL User manual