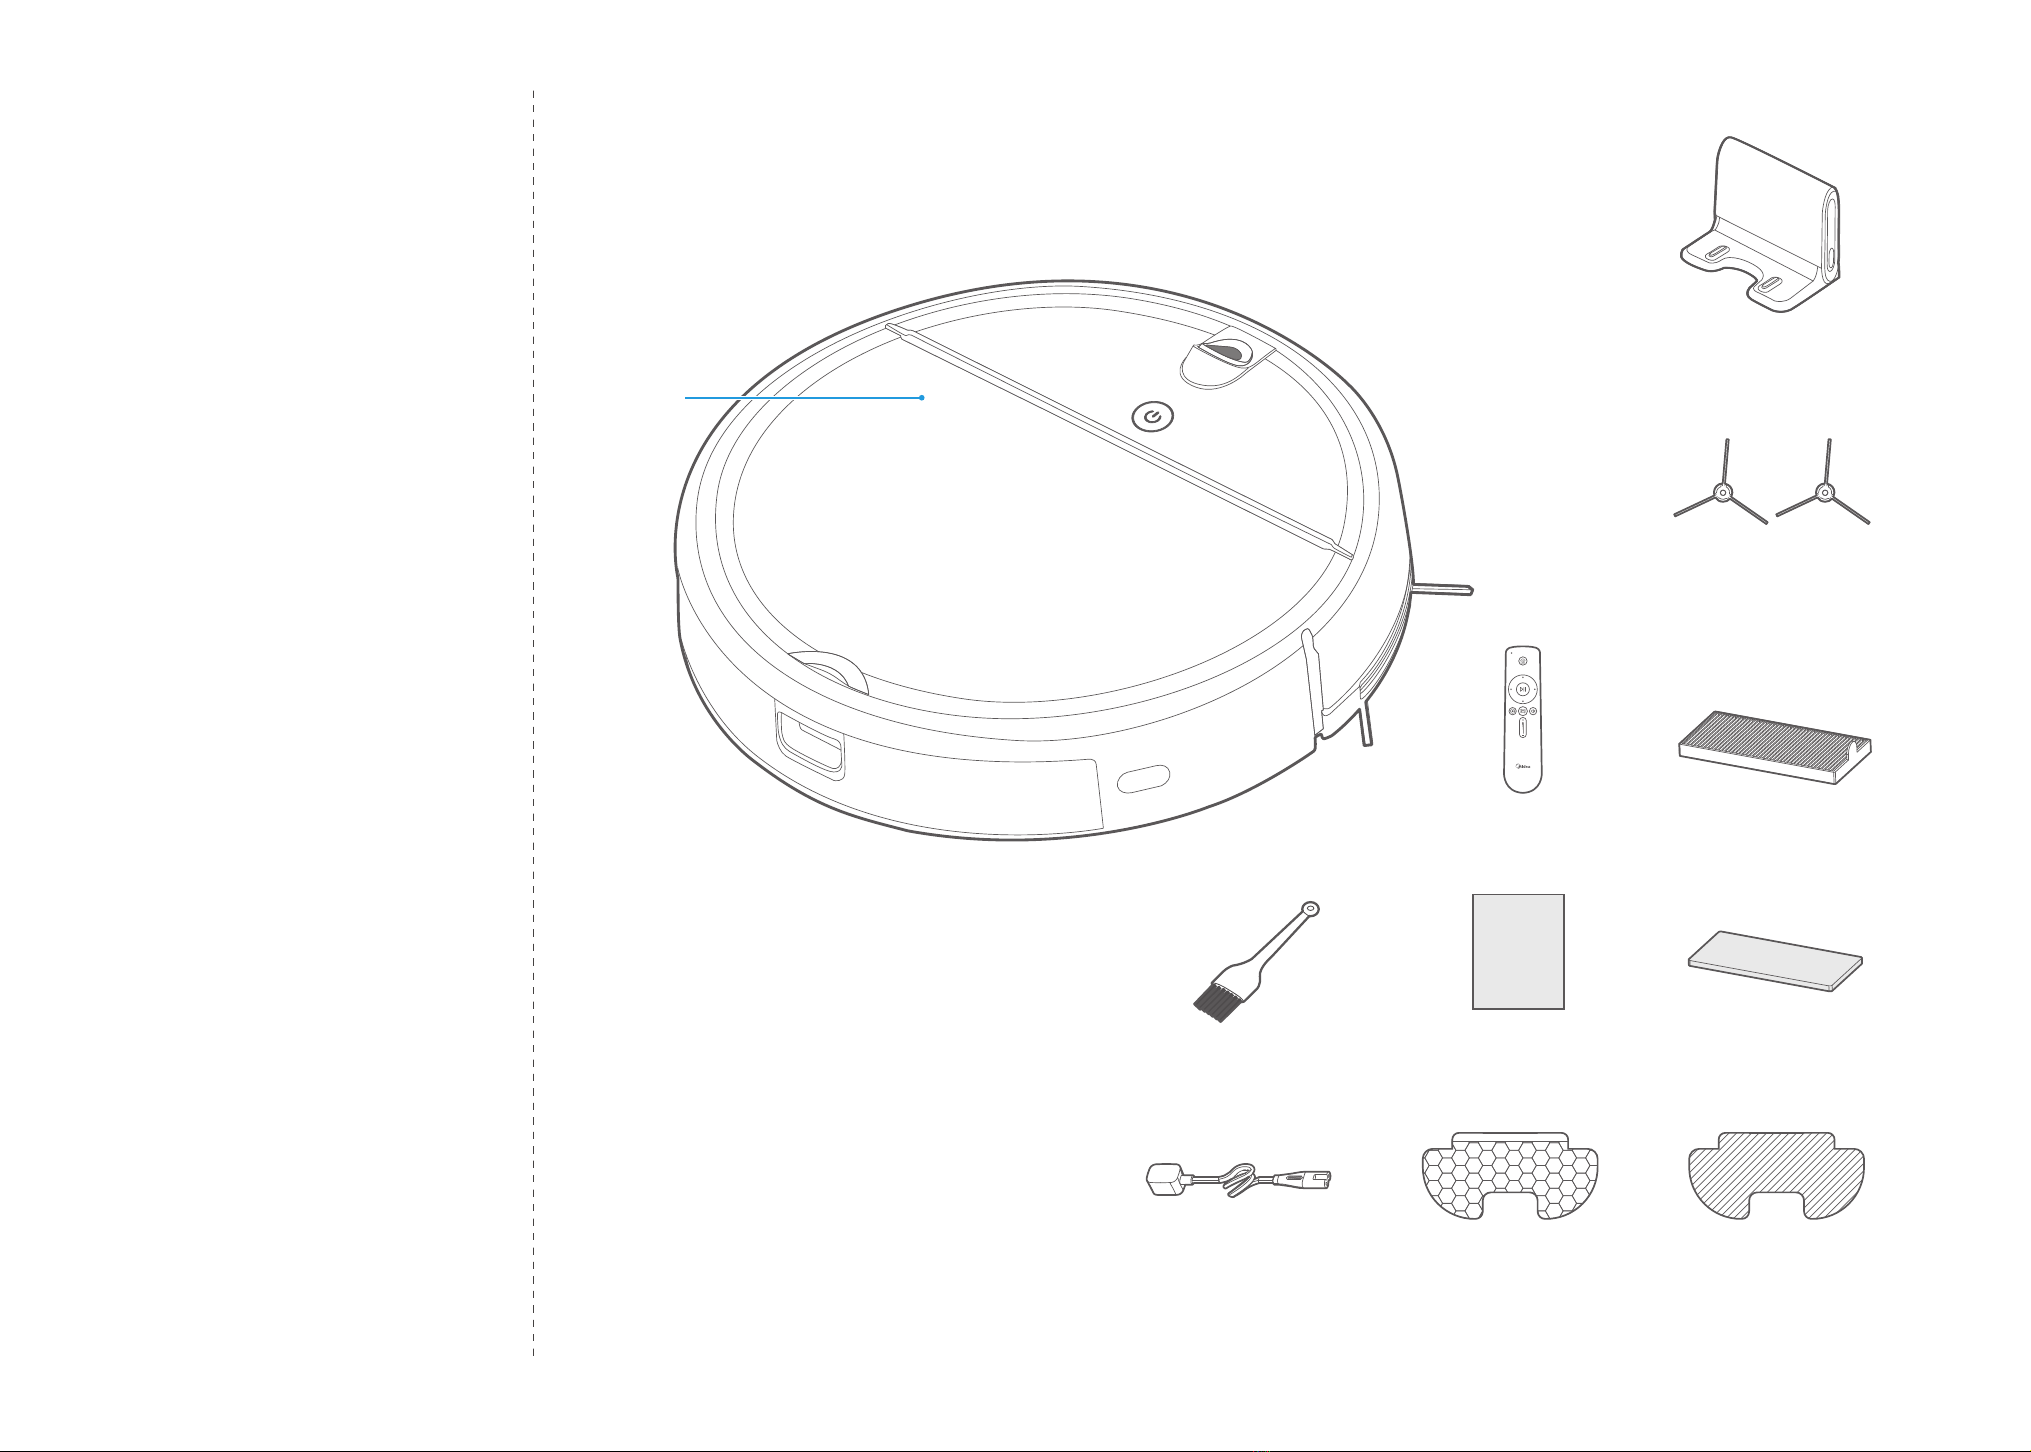
manuals.online logo
Brands
  1. Home
  2. •
  3. Brands
  4. •
  5. Midea
  6. •
  7. Vacuum Cleaner
  8. •
  9. Midea i5 Extra User manual

Midea i5 Extra User manual

Other Midea Vacuum Cleaner manuals

Midea Eureka I5C User manual

Midea

Midea Eureka I5C User manual

Midea Eureka I5C User manual

Midea

Midea Eureka I5C User manual

Midea MVC-S8+ User manual

Midea

Midea MVC-S8+ User manual

Midea C7 User manual

Midea

Midea C7 User manual

Midea C5 PRO Administrator Guide

Midea

Midea C5 PRO Administrator Guide

Midea VC-15C189 User manual

Midea

Midea VC-15C189 User manual

Midea B1 User manual

Midea

Midea B1 User manual

Midea SC861 User manual

Midea

Midea SC861 User manual

Midea VCR09B User manual

Midea

Midea VCR09B User manual

Midea 20Q0BW User manual

Midea

Midea 20Q0BW User manual

Midea VTW21A15T User manual

Midea

Midea VTW21A15T User manual

Midea M7 User manual

Midea

Midea M7 User manual

Midea VHS01A17Z0A User manual

Midea

Midea VHS01A17Z0A User manual

Midea P7 FLEX Wiring diagram

Midea

Midea P7 FLEX Wiring diagram

Midea MVC-16P-BG User manual

Midea

Midea MVC-16P-BG User manual

Midea P3-L Administrator Guide

Midea

Midea P3-L Administrator Guide

Midea C5 Administrator Guide

Midea

Midea C5 Administrator Guide

Midea VCB42A3670G User manual

Midea

Midea VCB42A3670G User manual

Midea M7 User manual

Midea

Midea M7 User manual

Midea VC-02A14S User manual

Midea

Midea VC-02A14S User manual

Midea MVC-SC861R User manual

Midea

Midea MVC-SC861R User manual

Midea Eureka I5C User manual

Midea

Midea Eureka I5C User manual

Midea H3 Series User manual

Midea

Midea H3 Series User manual

Midea MCS2045BS User manual

Midea

Midea MCS2045BS User manual

Popular Vacuum Cleaner manuals by other brands

Shark KD400WM owner's guide

Shark

Shark KD400WM owner's guide

Shark CORDLESS SV780_N 14 user manual

Shark CORDLESS

Shark CORDLESS SV780_N 14 user manual

Philips FC9176/08 manual

Philips

Philips FC9176/08 manual

Kenmore KW3030 user manual

Kenmore

Kenmore KW3030 user manual

AMiO YF-101 user manual

AMiO

AMiO YF-101 user manual

Beko VRT 94929 VI user manual

Beko

Beko VRT 94929 VI user manual

Shark CORDLESS SV780 Series quick start guide

Shark CORDLESS

Shark CORDLESS SV780 Series quick start guide

Lumme LU-3203 instruction manual

Lumme

Lumme LU-3203 instruction manual

Melissa 640-040/051 instruction manual

Melissa

Melissa 640-040/051 instruction manual

Makita DVC152L instruction manual

Makita

Makita DVC152L instruction manual

Bosch BSN1 instruction manual

Bosch

Bosch BSN1 instruction manual

King Canada 8560LST Service manual & parts list

King Canada

King Canada 8560LST Service manual & parts list

EUFY RoboVac 11c+ owner's manual

EUFY

EUFY RoboVac 11c+ owner's manual

Panasonic MC-E4101 Service manual

Panasonic

Panasonic MC-E4101 Service manual

Panasonic MC-V9658 operating instructions

Panasonic

Panasonic MC-V9658 operating instructions

Bosch BGB 2 Series instruction manual

Bosch

Bosch BGB 2 Series instruction manual

Hoover dog & cat TURBO manual

Hoover

Hoover dog & cat TURBO manual

FGE Far Tools NET UP 20 manual

FGE

FGE Far Tools NET UP 20 manual

manuals.online logo
manuals.online logoBrands
  • About & Mission
  • Contact us
  • Privacy Policy
  • Terms and Conditions

Copyright 2025 Manuals.Online. All Rights Reserved.

VACUUM CLEANER
INSTRUCTIONS MANUAL
吸尘器
使用说明书
使用产品前请仔细阅读本说明书,并请妥善保管
微信扫一扫,服务立马到
Please keep this instruction Manual carefully,
and read it before operating
TEL 400-8899-315
江苏美的清洁电器股份有限公司
地址:苏州市相城经济开发区漕湖大道39号
编码:215000
网址:www.midea.com
版本号:i5 Extra10-06-R2.7
执行标准 : GB4706.7-2014 / GB4706.1-2005 / GB4343.1-2009 / GB17625.1-2012
Jiangsu Midea Cleaning Appliances Co.,Ltd
Address : No.39 Caohu Avenue, Xiangcheng Economic Development Zone, Suzhou
Post : 215000
www.midea.com
Version No. : i5 Extra10-06-R2.7
Executive standard :GB4706.7-2014 / GB4706.1-2005 / GB4343.1-2009 / GB17625.1-2012
i5 Extra
PN:16175000002878
目录 Contents 产品介绍 Product Introduction
2 3
主机
Appliance
充电座 X1
Instruction manual X1
说明书 X1
remote control X1
遥控器 X1
Docking station X1
Mop X2
抹布 X2
Sponge X1
海绵 X1
说明书
Manual
Power cord X1
电源线 X1
Cleaning brush X1
清洁刷 X1
Mop holder X1
抹布支架 X1
Filter X2
滤网 X2
Side brush X2 Pairs
边刷 X2 对
产品介绍
使用说明
维护保养
异常处理
安全说明
保修须知
2
6
16
22
30
32
Product Introduction
Product Operation
Product Maintenance
Trouble Shooting
Safety Introduction
Warranty Information
Bumper
碰撞板
Start / Pause
启动/暂停
Cover
面盖
Water tank
水箱
Power switch
电源开关
Dust bin
尘盒
Camera
摄像头
滤网
Filter
海绵
Sponge
滤网架
Filter holder
尘盒按键
Dust bin button
电源插口
Power socket
4 5
滚刷盖
Brushroll cover
边刷
Side brush
滚刷体
Brushroll
驱动轮
Wheel
万向轮
Universal wheel
电池盖板
Battery cover
出水盖板
Cover for
water outlet
抹布支架
Mop holder
储尘盒
Dust bin
充电座
Docking station
Water tank assembly
产品介绍 Product Introduction
主机图解
Illustration of appliance
部件介绍
Introduction of components
水箱组件
抹布
Mop
抹布支架
Mop holder
水箱
Water tank
注水口
Water inlet
释放按钮
Release button
6 7
使用说明 Product Operation
1. 将充电座靠墙边放置,并尽可能放置在空旷位置,充电座周围1.5m范围内无障碍物为佳;
2. 移除地面上的玻璃、陶瓷等易碎品,避免扫地机发生碰撞时损坏物品;
3 .移除地面上的电线等杂物,方便扫地机工作更加顺畅;
4. 移除地面上的插线板,避免扫地机清扫到插线板上时造成触电等安全问题。
5. 整机运行时有气流高速流动声属于正常现象。
1. Put the docking station against the wall, and place it as far as possible in an open position. It is
better that there is no obstacle within 1.5m around the docking station;
2. Remove glass, ceramics and other fragile items on the floor to prevent damage to the items when
the sweeper crashes.
3. Remove the wires and other things on the ground to make the sweeping more smoothly;
4. Remove the patch panel on the ground to avoid the safety problems such as electric shock
caused by the sweeper cleaning to the patch panel.
5. It is normal phenomenon that has the voice of high speed airflow while the product running.
将边刷直接压入底座边刷中心凸轴。
注意 Caution
a. 机器充电时,按键白灯两秒间隔闪烁;
b. 充电完成时,按键白灯常亮,并伴有语
音提示“充电已完成”;
c. 待机模式下电量不足时,机器会播报语音“请充电”,红灯闪烁;
d. 工作模式下电量不足时,机器会自动寻找充电座充电;
e.充电时,请清空水箱并取下抹布支架。
a. When charging, white light of button flashes at intervals of two seconds;
b. When the charging is completed, the white light of button is always on, and the voice
prompt ‘‘Charging completed” ;
c. When the battery is low power in standby mode, "low battery" will be prompted forby voice
and the red light flashes;
d. When the battery is low power in the working mode, the appliance will automatically find the
docking station for charging;
e. When charging, empty the water tank and remove the mop holder.
注意 Caution
安装说明
Installation instructions
边刷安装
Side brush installation
主要操作
Main operation
整机充电
Appliance Charging
Push the side brush directly into the conver shaft of the base of side brush.
Switch the power on after open
the cover;
打开机器面盖内电源滑动开关;
2
Place the appliance on the docking station, as shown in the pic.
将主机放置于充电座上,如图所示。
3
1.5 M
1.5 M
1.5 M
1.5 M
1放置好充电座:把充电座置于靠墙边位置,并
移除充电座周围所有障碍物,如下图所示。
Put the docking station well:Place the
docking station against a wall and remove
all of obstructions around the docking
stand, as shown in the figure below.
8 9
a. 首次使用请让机器充满12个小时;
b. 电量不足时,请尽快进行充电;
c. 如果长时间不使用机器,请将电池充满电,然后取出置于通风且干燥的地方;
d. 如果机器超过3个月不使用,请用充电器对机器进行一次12小时充电。
有效延长电池寿命方法:
To eectively extend battery life, you should:
a. For the first use, please charge for 12 hours;
b. When the battery is low power, please charge it as soon as possible;
c. If you do not use the appliance for an extended period of time, fully charge the battery and
put it in a ventilated and dry place;
d. If the appliance is not used for more than 3 months, charge the appliance for 12 hours.
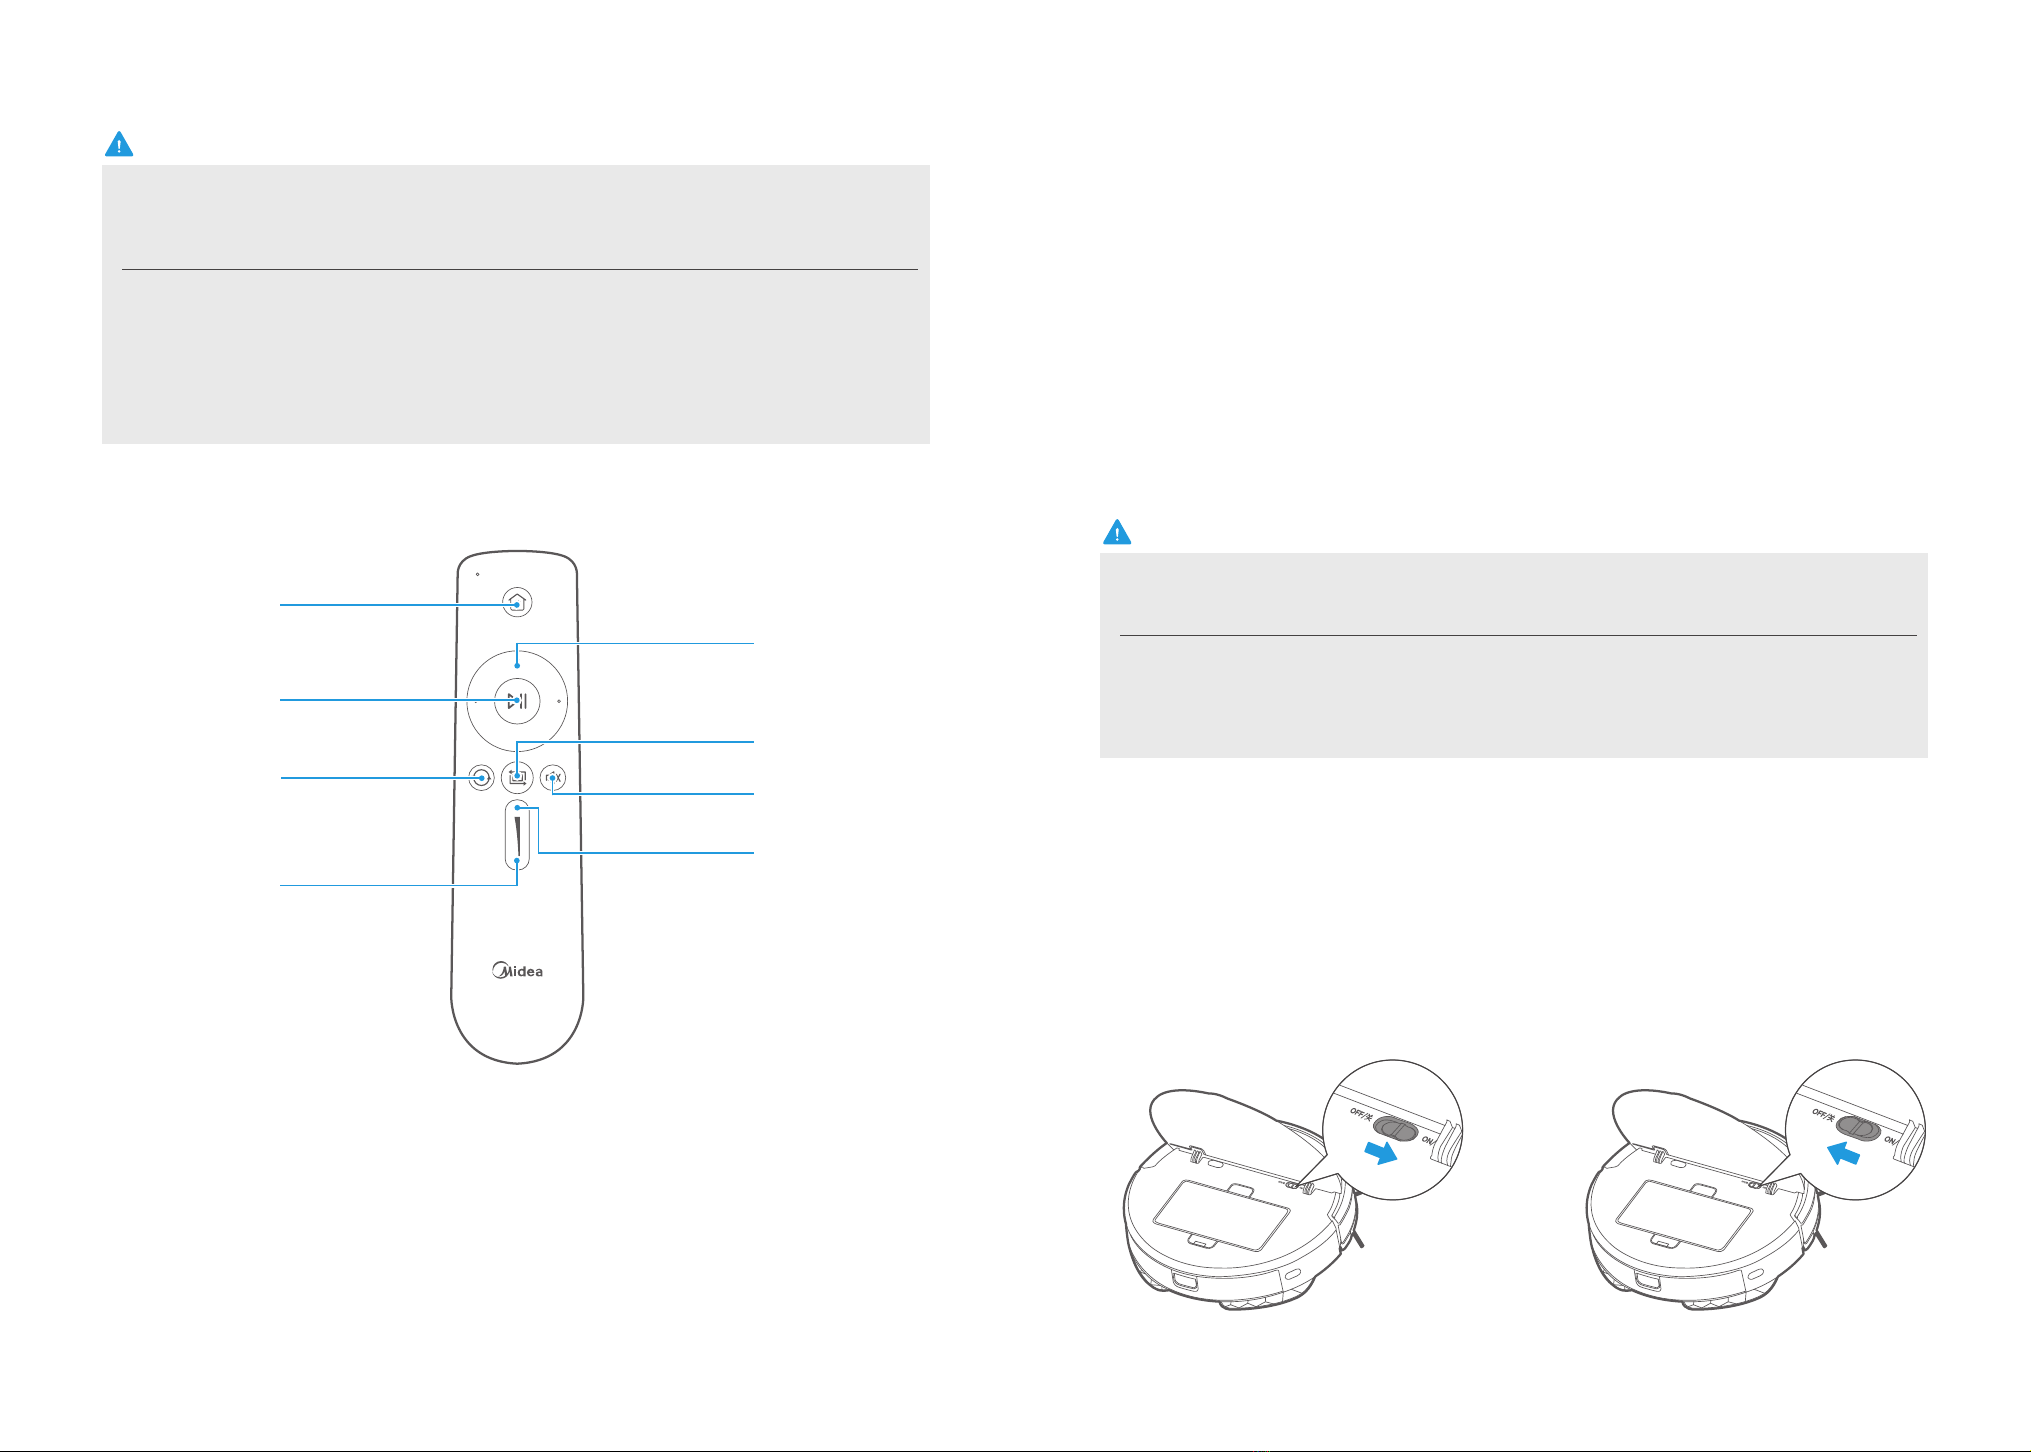
注意 Caution
a.使用前请安装电池,若长时间不使用遥控器请将电池取出;
b.方向键中无后退功能,防止机器后退掉下台阶;
c.关闭语音提示功能后,整机无语音提示功能;
d.本遥控器的有效遥控距离为5m;
a. Place the battery in to controller before using;Take battery o if not used for a whicle.
b. In case of safety,there’s no backward fucntion.
c. When voice is switch o, appliance no voice reminding function.
d. Please operate the controller within 5m to appliance.
注意 Caution
Docking: When in standby or working mode, appliance will return docking station for charging.
回充键:机器处于待机状态或者清扫状态时,返回充电座进行充电;
1
Spot cleaning: start to cleaning by Spiral mode in certain zone.
重点清扫:在选定区域进行螺旋式清扫;
4
Edge cleaning: cleaning by the edge of obstacle.
沿边清扫:沿障碍物边界进行清扫;
5
Silence: Switch voice reminding function on or o.
静音键:关闭或开启语音提示功能;
6
Suction increase: increasing the suction power.
吸力增大:提高清扫强度与吸力;
7
Suction decrease: Decreasing the suction power.
功率减小:减小清扫强度与吸力;
8
Direction: Controlling the moving direction by forward/left/right key.
方向键: 按前左右键,控制机器行走方向;
2
Start/Pause: when in standby mode,appliance start working or pause.
开始/暂停:机器处于待机状态下,机器开始或暂停工作;
3
开机/关机
Power ON/OFF
遥控器控制面板介绍
Instruction for remote control
按键功能简介
Function for keys
1开机:打开面盖,拨动电源开关至“ON/开”,
接通电源,再按启动/暂停,指示灯亮。
Power on:Open the cover, power on by
turning the power switch to "ON/开", and
then press the Start button, the indicator
lights up .
2关机(长时间不使用时):拨动电源开关至
“OFF/关”,断开电源,指示灯灭。
Power o (when not be used for a long
time):Power o the appliance by turning
the power switch to "OFF/关" and the light
goes out .
回充键
Docking
开始/暂停
Start/Pause
重点清扫
Spot cleaning
吸力减小
Suction decrease
方向键
Direction
沿边清扫
Edge cleaning
静音键
Silence
吸力增大
Suction increase
10 11
若机器处于睡眠状态,按主机“ ”键使机器从睡眠状态切换到暂停状态,再按一次开始清扫。
If the appliance is in sleep state, press the “ ” key and switch the appliance from sleep to pause,
and press it again to start cleaning.
注意 Caution
如果家里更换WiFi名称或密码,产品需要重新配网。(吸尘器配网操作:吸尘器开机后,长按启动键3秒,听到
滴声后松手,吸尘器进入配网模式)
The product is required to be configured once again network accessing if your home WiFi name or
password is changed. (Network accessing config operation of the cleaner: Hold the start key 3
seconds after the cleaner is power-on and release after a tick sound is heard, now the cleaner is
configured to access network.)
注意 Caution
确保电源开关处于“ON/开”位置;
清扫
Sweep
暂停
Pause
Make sure the power switch is in
the "ON" position;
1
待机是指机器电源导通,等待用户操作,清扫中按主机“ ”键使机器进入暂停状态;
Standby means that the power supply is on, waiting for the user to operate, and the appliance
enters into the PAUSE by pressing the “ ”;
清扫/暂停
Sweep/Pause
配置入网指引
Guide for network accessing configuration
确保手机连接家庭WiFi
Ensure the mobile phone is connected with home WiFi
注册并登录美居账号
Register for Midea Smart Home account number and log in.
WiFi
第一步:下载美居App
扫描此二维码,或在手机应用市场搜索“美居”后点击下载。
The 1st step: Download Midea Smart Home App;
Scan this two-dimension code or search “Midea Smart Home” in Mobile App market and then
click its icon to download.
第二步:注册登录
打开美居App,按照界面提示,注册并登录个人账号(可以使用手机号注册登录,也可以使用QQ、微
信第三方授权登录)
The 2nd step: Registration and login
Open Midea Smart Home App, register for your personal account and login by account number
as per the prompts on the interface(Either the mobile phone number or third-party authorized
App, such as QQ or WeChat number may be used for registration and login.)
在待机模式下,按主机“ ”键,开始清扫。
2
In standby mode, press the " " key to
start cleaning.
12 13
若WiFi指示灯未慢闪,可长按“ ”3秒,听到“滴~”声后松手,wifi指示灯慢闪,吸尘器即进入配网模式。
If WiFi indicator light doesn’t flicker slowly, long press “ ” 3 seconds and release
after a tick sound is heard; Slow flickering of wifi indicator light indicates that the cleaner gets into
the state of network accessing configuration.
注意 Caution
Open the upper cover of the cleaner and press power switch;
翻开吸尘器上盖,打开电源开关;
1
Short press “ ” on the front side of the cleaner and once the voice prompt
of successful system start-up is heard, the system is now started successfully.
短按吸尘器正面“ ”,听到系统启动成功的提示音,表明系统启动成功。
2
When 1st using,slow flickering of wifi indicator light indicates that the cleaner gets into the
state of network accessing configuration, now click “Next Step” on the mobile phone
to operate.
首次开机,WiFi指示灯慢闪表明吸尘器进入配网状态,点击手机上的“下一步”操作
3
添加智能吸尘器
Add Appliance
第一步:添加设备
The 1st step: Add
配网操作指引
Operating instructions for network accessing configuration
方式一:扫一扫
点击App主界面“+”按钮,在下拉菜单中点击“扫一扫”,扫描吸尘器正面的产品二维码。
Method Ⅰ: Scan
Click “+” key on the main screen of App and select “Scan” from the drop-down menu to scan
the product QR code on the front side of the cleaner.
方式二:按产品品类添加
点击App主界面的“+”按钮,选择“添加设备”,在新界面的产品品类中,选择右下角吸尘器。
Method Ⅱ: Add by product category
Click “+” key on the main screen of App and select “Add Equipment” from the drop-down menu,
then select model from product categories on the new interface.
按App上配网操作指引对吸尘器进行配网操作,操作完成后,点击手机上的下一步。
Conduct network accessing operations in accordance with network accessing instructions on App
and after that, click “Next Step” on the mobile phone.
第二步:吸尘器配网操作
The 2nd step: Network accessing operation of the appliance.
配网成功后,进入吸尘器操作界面,即可操作您的安防智能吸尘器。
Once the network access is configured successfully, you will be the owner of this cleaner and can
operate your security intelligent cleaner by accessing to cleaner operating interface.
第三步:按手机上的App提示,进行配网操作
The 3rd step: Conduct network accessing config operations as per the prompts on
Mobile App.
2
14 15
1. 请勿在地毯上使用抹布组件
2. 抹布支架和抹布必须组合使用
3. 水箱中缺少或清理抹布时,不必抬起机器,直接从后方抽取和安装
4. 拖地完成后,清空水箱
1. Do not use mop tank assembly on the carpet;
2. The mop holder and mop must be used in combination;
3. When the mop is missing or be cleaned in the water tank, it is not necessary to lift the appliance
but extract it directly and install from the rear;
4. After floor is mopped, clear the water tank.
注意 Caution
Attach the mop to the holder.
抹布正贴于抹布支架上。
1
Press the button on tank and remove
the tank.
按压水箱按键,取出水箱。
2
Fill the water.
注水。
3
Mount the water tank onto the mop
holder.
将水箱装到抹布支架上。
4
拖地操作
Mopping operation
Then insert the water tank assembly into
the appliance.
再将水箱组件插入到主机上。
5
Press ‘‘ ’’ and start mopping.
按“ ”键,开始拖地工作。
6
16 17
Clean the side brush with a cleaning tool or a rag;
用清洁工具或抹布清洁边刷;
2
If curl or deformation occurs, remove the side brush and put
it in warm water for about 5 seconds;
若发生卷曲或变形,可将边刷取下置于温水中约5秒;
3
When the side brush is damaged and cannot be used, please make timely replacement.
当边刷受损无法使用时,请及时更换。
4
The steps are as follows
具体步骤如下图所示:
Check whether the side brush is damaged or has wrapped;
检查边刷是否受损或有异物;
1
维护保养 Product Maintenance
用手指勾起面盖上的“ ”标记打开面盖; 取出尘盒;
边刷清洁
Cleaning of side brush
尘盒、海绵及过滤网清洁
Dust bin, sponge and filter cleaning
Open the cover by lifting the mark “ ”
on the cover with fingers;
12
按一键按钮,倒掉尘盒里的垃圾; 取出过滤架;
Press a button to empty trash in the
dust bin;
Take out the filter holder;
34
1. 当过滤网和海绵使用15-30天后,建议水洗一次,过滤网最大使用寿命24个月;
2. 安装前,请确保过滤网和海绵处于干燥状态;
3. 过滤网和海绵都是可以更换的附件;
4. 每次使用后请清空尘盒。
1. When filter and sponges are used for 15-30 days, it is recommended to wash them once.
The maximum service life of filter is 24 months.
2. Before installation, make sure that filter and sponge are in a dry condition;
3. filter and sponges are replaceable accessories;
4. Empty the dust bin after each use.
注意 Caution
取出过滤网; 取出海绵;
Take out the filter; Take out the sponge;
56
清洁尘盒、海绵及过滤网,可水洗; 将海绵、海帕,海帕架重新装回尘盒。
Clean the dust bin, sponge and filter
by water;
Replace the sponge, filter and filter
holder rack back into the dust bin.
78
Remove the dust bin;
18 19
拖地完后,从主机尾部抽出水箱组件,拆下抹布支架和抹布;
After the floor is mopped, pull out the water tank assembly from the rear of the main
unit and remove the mop holder and mop.
1
清洗抹布,放平晾干;
Wash mop, and leave it dry;
2
拖地完后,将水箱内剩余的水倒干净;
After the floor is mopped, pour the remaining water in the tank.
3
水箱清洁
Water tank cleaning
擦干水箱并晾干,请勿暴晒。
Wipe the water tank and leave it dry. No sunlight exposure is allowed.
4
用清洁工具或软布轻轻拭擦传感器及轮子,如下图标记的位置。
Wipe the sensor and the wheel gently with a cleaning tool or a soft cloth, as shown in the
figure below.
1
传感器及轮子清洁
Cleaning of sensor and wheel
用清洁工具或软布清洁充电基座及主机上的充电端子,如下图标记的位置。
Clean the charging base and the charging terminal on the appliance with a cleaning tool
or a soft cloth, as shown in the figure below
1
充电端子清洁
Charge terminal cleaning