Midea S8+ User manual

Please read the manual before use
ROBOTIC VACUUM CLEANER
S8+
English / Français / Deutsche / Italiano / Español


Installation
Installation of dust collector station 8
Use guide for vibration mop assembly 9
Installation of side brushes 10
Robot charging 10
Safety Instructions
Warning for the machine 1
Warning for docking station 3
Warning for battery 4
Technical data 5
Operating Guidelines
Power-on methods 11
Start cleaning 11
Pause cleaning 11
Return to charge 11
Trouble shooting 11
Power off 11
Dust Collection Methods 12
Status indicator of main unit/dust collector station 13
Introduction
Included accessories 6
Overview of Main unit 6
Parts introduction of dust collector station 7
Faults solution for main unit and its App 23
DOC 31
Daily Maintenance and Service
Maintenance of dust box
Maintenance of vibration mopping assembly
Cleaning tool
Maintenance of roller brush
Cleaning of drive wheels
Cleaning of side brushes
Cleaning of Sensors and spring chips
Replacement of dust bag for dust collector station
Maintenance of base for dust collector station
16
17
18
18
19
20
20
21
22
MSmartLife APP Quick Guide 15
MsmartLife APP
Using App 14
Table of Contents
English

Français
Installation
Consignes de sécurité
Guide d’utilisation
Présentation
Maintenance et entretien au quotidien
APP MSmartLife
Table des matières
Avertissements concernant la machine...........................................33
Avertissements concernant la station de charge.............................35
Avertissements concernant la batterie ............................................36
Données techniques........................................................................37
Accessoires inclus........................................................................... 38
Aperçu de l'unité principale .............................................................38
Présentation des pièces de la station du collecteur de poussière...39
Installation de la station de collecte de poussière ...........................40
Guide d'utilisation pour l'assemblage du balai vibrant.....................41
Installation des brosses latérales .................................................. 42
Mise en charge du robot................................................................ 42
Méthodes de mise sous tension.................................................... 43
Commencer le nettoyage .............................................................. 43
Mise en pause du nettoyage ......................................................... 43
Retour pour mise en charge.......................................................... 43
Dépannage.................................................................................... 43
Mise hors tension .......................................................................... 43
Méthodes de Collecte de poussière .............................................. 44
Indicateurs d'état de l'unité principale/station de collecte de
poussière....................................................................................... 45
Utilisation de l'APP ........................................................................ 46
Guide Rapide de l’APP MSmartLife .............................................. 47
Entretien du bac à poussière......................................................... 48
Entretien de l'ensemble du balai vibrant........................................ 49
Outil de nettoyage ......................................................................... 50
Entretien de la brosse à rouleau ................................................... 50
Nettoyage des roues ..................................................................... 51
Nettoyage des brosses latérales ................................................... 52
Nettoyage des capteurs et des puces de charge .......................... 52
Remplacement du sac à poussière pour la station de collecte de
poussière....................................................................................... 53
Entretien de la base de la station de collecte de poussière .......... 54
Solution relative aux pannes de l'unité principale et de son APP.. 55
Déclaration de Conformité (DdC) ................................................. 63

Deutsch
Installation
Sicherheitshinweise
Benutzung des Roboters
Einführung
Wartung und Instandhaltung
MSmartLife APP
Inhaltsverzeichnis
Warnhinweise für das Gerät ...........................................................65
Warnhinweise für die Ladestation ..................................................67
Warnhinweise für die Batterie .........................................................68
Technische Daten ...........................................................................69
Mitgeliefertes Zubehör ....................................................................70
Übersicht der Zentraleinheit ............................................................70
Einführung in die Teile der Staubsaugerstation ..............................71
Installation der Staubfangstation ....................................................72
Gebrauchsanleitung für den Vibrationsmopp .................................73
Installation der Seitenbürsten ....................................................... 74
Aufladen des Roboters ................................................................. 74
Einschalten ................................................................................... 75
Mit dem Reinigen beginnen .......................................................... 75
Unterbrechen der Reinigung ........................................................ 75
Rückkehr zum Laden/ Wiederaufladen ......................................... 75
Fehlerbehebung ........................................................................... 75
Ausschalten .................................................................................. 75
Staubabsaugverfahren ................................................................. 76
Statusanzeige der Haupteinheit / Staubsaugerstation
................... 77
Gebrauch der APP ....................................................................... 78
MSmartLife APP Kurzanleitung .................................................... 79
Wartung der Staubkammer .......................................................... 80
Wartung der Vibrationswischeinheit ............................................. 81
Reinigungswerkzeuge .................................................................. 82
Wartung der Walzenbürste ........................................................... 82
Reinigung der Räder ..................................................................... 83
Reinigung der Seitenbürsten ........................................................ 84
Reinigung von Sensor und Federspänen ..................................... 84
Austausch des Staubsaugerbeutels für die Staubfangsstation .... 85
Wartung des Fußes der Staubsaugerstation................................. 86
Fehlerbehebung für das Hauptgerät (Roboter) und dessen APP. 87
Konformitätserklärung ................................................................... 95

Italiano
Installazione
Istruzioni di sicurezza
Linee guida per l'uso
Introduzione
Manutenzione quotidiana e assistenza
APP MSmartLife
Indice
Avvertenza per la macchina ............................................................97
Avvertenza per la base di ricarica ...................................................99
Avvertenza per la batteria ...............................................................100
Dati tecnici....................................................................................... 101
Accessori inclusi.............................................................................. 102
Panoramica dell’unità principale......................................................102
Introduzione alle parti della stazione di raccolta polveri ..................103
Installazione della stazione di raccolta delle polveri........................ 104
Guida d'uso per il montaggio del panno a vibrazione...................... 105
Installazione delle spazzole laterali ............................................... 106
Ricarica del robot .......................................................................... 106
Metodi di accensione..................................................................... 107
Avvio della pulizia.......................................................................... 107
Interruzione della pulizia................................................................ 107
Ritorno alla carica.......................................................................... 107
Risoluzione dei problemi ............................................................... 107
Spegnimento ................................................................................. 107
Metodi di raccolta della polvere..................................................... 108
Indicatore di stato dell'unità principale/station de collecte de poussière
... 109
Uso dell'APP.................................................................................. 110
Guida rapida dell'APP MSmartLife ................................................ 111
Manutenzione del contenitore della polvere.................................. 112
Manutenzione del panno di pulizia a vibrazione............................ 113
Strumento di pulizia....................................................................... 114
Manutenzione della spazzola a rullo ............................................. 114
Pulizia delle ruote .......................................................................... 115
Pulizia delle spazzole laterali ........................................................ 116
Pulizia del sensore e dei chip della molla...................................... 116
Sostituzione del sacchetto della polvere per la stazione di raccolta
della polvere .................................................................................. 117
Manutenzione della base della stazione di raccolta della polvere
... 118
Soluzione dei guasti per l'unità principale e l’APP......................... 119
Dichiarazione di conformità (DdC) ................................................ 127

Español
Instalación
Instrucciones de seguridad
Instrucciones de funcionamiento
Introducción
Mantenimiento y revisión diarios
MSmartlife APP
Tabla de contenidos
Advertencia para el uso de la máquina ...........................................129
Advertencia para la estación de amarre..........................................131
Advertencia para batería .................................................................132
Datos técnicos................................................................................. 133
Accesorios incluidos........................................................................ 134
Vista general de la unidad principal ................................................134
Introducción de las piezas de la estación colectora de polvo .........135
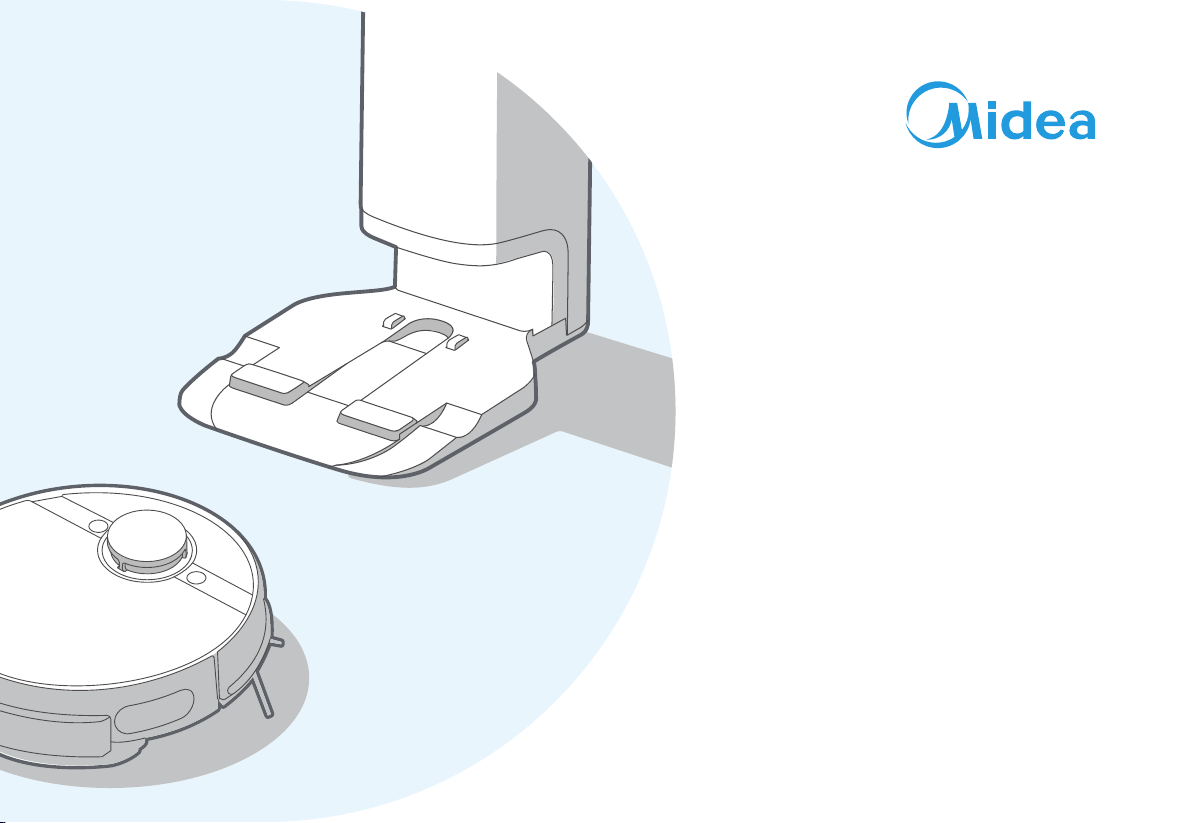
Instalación de la estación colectora de polvo.................................. 136
Guía de uso para el armado de la mopa vibratoria .........................137
Instalación de cepillos laterales..................................................... 138
Carga del robot.............................................................................. 138
Métodos de encendido .................................................................. 139
Comenzar con la limpieza ............................................................. 139
Pausar la limpieza ......................................................................... 139
Regresar a la carga....................................................................... 139
Solución de problemas.................................................................. 139
Apagado ........................................................................................ 139
Métodos de recolección de polvo.................................................. 140
Indicador de estado de la unidad principal/station de collecte de
poussière....................................................................................... 141
Uso de la APP ............................................................................... 142
Guía rápida de la APP MSmartLife ............................................... 143
Mantenimiento de la caja de polvo................................................ 144
Mantenimiento del sistema de mopa vibratoria............................. 145
Herramienta de limpieza ............................................................... 146
Mantenimiento cepillo giratorio...................................................... 146
Limpieza de las ruedas ................................................................. 147
Limpieza de los cepillos laterales.................................................. 148
Limpieza del sensor y de los chips del muelle de carga ............... 148
Sustitución de la bolsa de polvo de la estación de recogida de polvo
... 149
Mantenimiento de la base de la estación de captación de polvo .. 150
Solución de fallos para la unidad principal y su APP .................... 151
Declaración de conformidad.......................................................... 159

Warning for the machine
This appliance can be used by children aged from 8 years
and above and persons with reduced physical, sensory or
mental capabilities or lack of experience and knowledge if
they have been given supervision or instruction concerning
use of the appliance in a safe way and understand the
hazards involved.
Children shall not play with the appliance.
Cleaning and user maintenance shall not be made by
children without supervision.
Plug must be removed from the socket-outlet before
cleaning or maintaining the appliance. Switch off before
cleaning or maintaining the appliance.
If the supply cord is damaged, it must be replaced by the
manufacturer, its service agent or similarly qualified
persons in order to avoid a hazard.
WARNING: For the purposes of recharging the battery,
only use the detachable supply unit provided with this
appliance.
Use only with BS2101 supply unit.
This appliance contains batteries that are only replaceable
by skilled persons.
1.
2.
3.
4.
5.
Do not bring the smart robot close to heat source, radiation
or burning cigarette butts. It is strictly forbidden to vacuum
the following objects:
1) All liquids such as water and solvents;
2) Lime, cement dust and other construction dust and
garbage;
3) Heat generating objects, such as unextinguished carbon
butts, cigarette butts;
4) Sharp fragments, such as glass, etc.;
5) Flammable and explosive items, such as gasoline and
alcohol products.
Before using, please remove all fragile items from the
ground (such as glasses, lamps, etc.), and items that may
be tangled with the side brush, Roller brush and drive
wheels(such as wires, curtains and other easily-entangled
materials).
Please pay attention to your hair and avoid entanglement
on wheels or roller brushes when using, cleaning and
maintaining the robot.
Do not use this product at an altitude of more than 2000m.
6.
7.
8.
9.
Safety Instructions
1
English

Correct Disposal of this product.
This marking indicates that this product should not be
disposed with other household wastes throughout the EU.
To prevent possible harm to the environment or human
health from uncontrolled waste disposal, recycle it
responsibly to promote the sustainable reuse of material
resources. To return your used device, please use the
return and collection systems or contact the retailer where
the product was purchased. They can take this product for
environmental safe recycling.
Warranty Information
The manufacturer provides warranty in accordance with the
legislation of the customer's own country of residence, with
a minimum of 1 year (Germany: 2 years), starting from the
date on which the appliance is sold to the end user.
10.
11.
The warranty only covers defects in material or
workmanship.
The repairs under warranty may only be carried out by
an authorized service center. When making a claim
under the warranty, the original bill of purchase
(with purchase date) must be submitted.The warranty
will not apply in cases of:
-Normal wear and tear
-Incorrect use, e.g. overloading of the appliance, use of
non-approved accessories
-Use of force, damage caused by external influences
-Damage caused by non-observance of the user
manual, e.g. connection to an unsuitable mains supply
or non-compliance with the installation instructions
-Partially or completely dismantled appliances
2

WIFI:2400-2483.5MHz, MAX POWRE:20dBm.
BLUETOOTH MAX POWR:10dBm
To satisfy RF exposure requirements, a separation
distance of 20 cm or more should be maintained between
the antenna of this device and persons during device
operation.To ensure compliance, operations at closer than
this distance is not recommended.
CLASS 1 LASER PRODUCT
INVISIBLE LASER RADIATION
12.
13.
1.
2.
3.
4.
5.
6.
“IMPORTANT SAFETY INSTRUCTIONS – SAVE
THESE INSTRUCTIONS" and "DANGER – TO
REDUCE THE RISK OF FIRE OR ELECTRIC SHOCK,
CAREFULLY FOLLOW THESE INSTRUCTIONS".
This appliance can be used by children aged from 8
years and above and persons with reduced physical,
sensory or mental capabilities or lack of experience and
knowledge if they have been given supervision or
instruction concerning use of the appliance in a safe
way and understand the hazards involved.
Children shall not play with the appliance.
Cleaning and user maintenance shall not be made by
children without supervision.
Plug must be removed from the socket-outlet before
cleaning or maintaining the appliance. Switch off before
cleaning or maintaining the appliance.
If the supply cord is damaged, it must be replaced by
the manufacturer, its service agent or similarly qualified
persons in order to avoid a hazard.
Docking station is only applicable to the product
S8+.
Warning: The battery charger(Docking station) is not
intended to charge non-rechargeable batteries.
Warning for docking station
3

Warning for battery
1.
2.
3.
4.
5.
6.
7.
8.
9.
Do not dismantle, open or shred secondary cells or
batteries.
b) Do not expose cells or batteries to heat or fire. Avoid
storage in direct sunlight.
Do not short-circuit a cell or a battery. Do not store cells
or batteries haphazardly in a box
or drawer where they may short-circuit each other or be
short-circuited by other metal objects.
Do not remove a cell or battery from its original
packaging until required for use.
Do not subject cells or batteries to mechanical shock.
In the event of a cell leaking, do not allow the liquid to
come in contact with the skin or eyes. If contact has
been made, wash the affected area with copious
amounts of water and seek medical advice.
Do not use any charger other than that specifically
provided for use with the equipment.
Observe the plus (+) and minus (–) marks on the cell,
battery and equipment and ensure correct use.
Do not use any cell or battery which is not designed for
use with the equipment.
Do not mix cells of different manufacture, capacity, size
or type within a device.
10.
11.
Keep cells and batteries out of the reach of children.
Seek medical advice immediately if a cell or a battery
has been swallowed.
[symbol IEC 60417-5957
( 2004-12 )]
[symbol ISO 7000-0790
( 2004-01 )]
[symbol IEC 60417-5031
( 2002-10 )]
[symbol IEC 60417-5032
( 2002-10 )]
[symbol IEC 60417-5172
( 2003-02 )]
time-lag miniature fuse-link where X is the symbol for the
time/current characteristic as given in IEC 60127
for indoor use only
read operator's manual
direct current
alternating current
class II equipment
4

12.
13.
14.
15.
16.
17.
18.
19.
20.
21.
22.
Always purchase the correct cell or battery for the
equipment.
Keep cells and batteries clean and dry.
Wipe the cell or battery terminals with a clean dry cloth if
they become dirty.
Secondary cells and batteries need to be charged
before use. Always use the correct charger and refer to
the manufacturer’s instructions or equipment manual for
proper charging instructions.
Do not leave a battery on prolonged charge when not in
use.
After extended periods of storage, it may be necessary
to charge and discharge the cells
or batteries several times to obtain maximum
performance.
Secondary cells and batteries give their best
performance when they are operated at normal room
temperature (20 °C ± 5 °C).
Retain the original product literature for future reference.
Use only the cell or battery in the application for which it
was intended.
When possible, remove the battery from the equipment
when not in use.
Dispose of properly.
Product Model: S8+
Host Charging Voltage: 16.9 V
Host Rated Voltage: 14.4 V
Host Rated Power: 55 W
Docking Station Model: BS2101
Docking Station Input: 220-240V~, 50-60Hz, 765W
Docking Station Output: 16.9V , 2A
Battery Model: BP14452F
Battery Rated Voltage: 14.4V
Battery Capacity: 5200mAh 74.88Wh
Charging Limit Voltage: 16.8V
1.
2.
3.
4.
5.
6.
7.
8.
9.
10.
11.
Midea Robozone Technology Co.,Ltd
Add.: No.39 Caohu Avenue,
Xiangcheng Economic Development Zone,Suzhou, Jiangsu, China
Importer: Midea Electrics Netherlands B.V.
Add.:
Johan Cruijff Boulevard 71, 1101DL Amsterdam
Note: you can also view the instructions on the app.
Technical data
5
Correct Disposal of this product.
This marking indicates that this product should not be
disposed with other household wastes throughout the EU.
To prevent possible harm to the environment or human
health from uncontrolled waste disposal, recycle it
responsibly to promote the sustainable reuse of material
resources. To return your used device, please use the
return and collection systems or contact the retailer where
the product was purchased. They can take this product for
environmental safe recycling.
Warranty Information
The manufacturer provides warranty in accordance with the
legislation of the customer's own country of residence, with
a minimum of 1 year (Germany: 2 years), starting from the
date on which the appliance is sold to the end user.

Introduction
Front view (with the cover not opened)
Overview of main unit
Return-to charge key Bumper plate
Power-on and power-
off/start/pause key
Laser radar
Vibration mopping assembly/
Water tank (including an
electrolytic water module inside)
Cover lifting port
Wi-Fi
Dust-box release
Cleaning brush
Reset
Dust box
Tank release
Anti-drop sensor
Charging chips
Special rag for
vibration mopping
Water outlet
(under the rag)
Universal wheel
Side brush
Drive wheel
Roller brush cover
Front view
(with the cover opened)
Bottom view
Included accessories
6
Upper-level layout
Lower-level Layout
Main Unit
Dust Collector
Station

Parts introduction of dust collector station
Bottom view
Indicator
Return-to-charge
signal emission area
Air outlet
Air inlet
Top cover
Top cover release
button of dust collector station
Air intake duct
Air exhaust
duct
Charging chips
Power cord
storage slot
7

4. Ensure the charging area is dry;
7. Keep the charging chips of the dust collector station dry and neat,
and clean and wipe them regularly.
6. If there are other cleaner charging
stations in your room, please store them
before using the dust collector station;
Installation
Cautions
Installation of dust collector station 1. Avoid direct sunlight;
2. Do not cover the signal emission area of
the dust collector station with stickers or
other objects;
3. Prevent putting the station
on carpets or soft surfaces;
1. Place the dust collector station against the wall on a hard floor;
2. Place the dust collector station in an area with Wi-Fi coverage, ensuring
stable networking of main unit and good functional experience of its App.
5. Store the power cord;
0.5m
0.5m
1.5m
8

Use guide for vibration mop assembly
Water inlet/outlet
2. Remove the rubber plug, and fill the
tank with water to the MAX line;
Cautions
1. Fill the tank with municipal water
instead of purified water;
2. Do not add washing powder, laundry
detergent, cleaning agents, disinfectants,
hand sanitizers, unknown oily liquids,
and alkaline substances;
4. Do not fill the tank with hot water to prevent
its distortion at high temperature;
3. Do not use the mopping function
on floor carpets;
6. The mopping water volume can be
adjusted in the App.
5. Keep the terminal dry and clean
before pushing in the vibration
mopping assembly.
Special rag for vibration mopping
Terminal
Water speed
Adhere the special rag for vibration mopping
to the bottom of the vibration mopping assembly
by aligning it along the middle seam, and you
can clean/replace it by simply peeling it off;
4. Push the vibration
mopping assembly in
the main unit until a
"click" sound is heard;
Mop Cloth Holder
Mop Cloth
Attach mopping holder to the
water tank.
1. Press the button on tank
and pull to remove.
Water Tank
9

Installation of side brushes
Instructions prior to use
Robot charging
2. Use relevant objects to block the robot, or establish a virtual wall in
the App;
Cautions
1. Prior to startup, clear away sundries
on the floor, and remove easily falling,
fragile, valuable, and possibly
hazardous items;
3. If there is an area that does not need cleaning or may trap the robot,
you can add a prohibited area or virtual wall at the appropriate location in
the map of the App, to prevent the robot from entering specific areas.
1. If the robot cannot be charged, check whether the charging chips on the
robot's bottom are blocked by fair bundles of left and right side brushes.
If yes, manually rotate relevant side brush to eliminate such blockage.
By keeping the side brush color
consistent with the side brush slots on
the base of the main unit,push the side
brush into the slot directly until a “click”
sound is heard;
To remove the side brush,turn the
robot’s bottom upwards,and grasp the
side brush by its rubber-coating leg(take
care not to pull on hair bundles of the
side brush with brute force)with your two
hands to pull it off.
Before first use, put robot on the station
closely, and make sure robot is in charging
status for first use, then start robot.
For future use, robot can automatically goes
to the charging base when cleaning is
finished.
1010

Power off
1. Long press " " for 3 seconds, and the power indicator starts to flash;
2. The robot sounds a chord voice, and the power indicator is off, indicating the robot is
powered off successfully;
Operating Guidelines
Power-on methods
Start the cleaning
1. During the standby mode, briefly press " " for 1 second, and the robot starts
to clean the whole room;
2. If you want to mop the floor, it is required to confirm that the vibration mopping
assembly is installed properly.
Pause the cleaning
1. During the cleaning, briefly press " " for 1 second, and the robot pauses the
cleaning and enters its standby status.
Return to charge
Troubleshooting
1. When the robot fails, the power indicator flashes quickly. Briefly press " " for 1
second to eliminate the fault;
Cautions
1. When it is not possible to start the
cleaning due to low battery level, please
charge the robot before starting the cleaning;
5. The robot cannot be powered off when being located in the charging station,
and if you need to power it off, remove it from the station.
or
2. The robot will return to charge
automatically during the cleaning in case
of low battery level, and then return to its
interruption point to proceed after being
fully charged;
3. During the charging, the power indicator
flashes slowly, and becomes continuously
on after completion of the charging;
4. The robot will enter its sleep mode
after being standby for more than 10
minutes, and in this mode, pressing
any key on the robot will awaken it;
1. When putting the robot in the charging station to charge, it will turn on
automatically (recommended practices)
2. Long press " " for 3 seconds, the power indicator flashes, the robot sounds
a chord voice, and the power indicator is continuously on, indicating the robot
is powered on successfully.
1. When the robot returns to charge after completion of the cleaning, the
return-to-charge indicator is continuously red;
When the robot returns to charge due to low battery level, the return-to-charge
indicator flashes.
2. ①During the standby mode, briefly press " " for 1 second, and the robot starts to
return to charge;
② During the cleaning, briefly press " " for 1 second, and the robot pauses the
cleaning; then briefly press " " for 1 second, and the robot starts to return to charge;
3. In case of special conditions (such as depleted battery, stuck robot etc.), the main
unit may not return to charge automatically. Please manually place the main unit
back to its charge station to charge.
1111
Connect Robot to Station
1.Fast Connect:When robot is under powered-off status,long press “ ” for 3 seconds.
The connection will automatically complete after robot turned on.A sound of “Di-du”
means connected successfully.
2.Connect Manually:When robot is under powered-on status,long press “ ” and “ ”
for 3 seconds at the same time.If connected successfully,a “Di-du” sound will be heard
and station indicator light will flicker 3 times.

Manual
dust
collection
Dust collection settings can be changed on the MSmartLife APP,
The dust collection length can be set from 6 to 14 seconds.
The dust collection frequency can be set 1 time, 3 times or 5 times
after cleaning.
The dust collection station will start to work automatically when
the robot returns to the dust collection station as it reaches the
scheduled cleaning times.
When the cleaning is finished, the robot can be returned to the dust
collector station manually. Dust collection will automatically start when
the robot reaches the scheduled cleaning times.
When the robot returns to the charging station,
press “Manual dust collection” to start dust collection.
Dust Collection Methods
12

Status indicators of the dust collector stationStatus indicators of the main unit
Indications SolutionsStatus
/
/
/
/
/
Indications SolutionsStatus
/
/
See Troubleshooting
(Page 6) for fault solutions
/
/
/
/
/
/
/
/
/
/
Standby indicator is
continuously on
Standby indicator is off
Standby indicator flashes
quickly
Standby indicator flashes
slowly
Return-to-charge indicator
is continuously on
Return-to-charge indicator
flashes
Return-to-charge indicator
is off
WiFi indicator is off
WiFi indicator flashes
slowly
Wi-Fiindicator flashes
quickly
WiFi indicator is
continuously on
Electrolytic water indicator
is on
Electrolytic water indicator
is off
Robot is standby, cleaning, and
return-to-charge after completion of
cleaning
Sleep/shutdown
Robot is faulty
Robot is charging
Robot is return-to-charge after completion
of cleaning
Robot is return-to-charge due to low
battery level
Robot is standby/cleaning/charging
Robot is not network paired or
disconnected from the network
Robot is waiting for network pairing
Robot is networking
Robot shows normal connection with the
network
Electrolytic water module is operating
Electrolytic water module does not start
Off
White indicator is
continuously on
Red indicator is
continuously on
Red indicator
flashes
Dust collector station is not powered
Dust collector station is standby
Dust collector station has been powered for a
while
Robot returns to the dust collector station,
starting to collect dust automatically
Dust collector station is collecting dust
Dust bag is full
Dust bag is not installed in place or dust collector
station is not tightly covered with its top cover
Please replace it with a new
dust bag
Install the dust bag and close
the top cover tightly
13
Other manuals for S8+
1
Table of contents
Languages:
Other Midea Vacuum Cleaner manuals

Midea
Midea MCS1825GB Pro User manual

Midea
Midea VCW40 User manual

Midea
Midea MVC-V18P User manual

Midea
Midea VTW21A15T User manual

Midea
Midea MVC-I5C User manual

Midea
Midea C100-B Administrator Guide

Midea
Midea MVC-16T-B User manual

Midea
Midea VCM43B16H User manual

Midea
Midea VC-35A1Q3 User manual

Midea
Midea VC-15C189 User manual

Midea
Midea B5 Administrator Guide

Midea
Midea VCR09B User manual

Midea
Midea VSC02A861 User manual

Midea
Midea MVC-13M-B User manual

Midea
Midea MVC-X10 User manual

Midea
Midea C5 Administrator Guide

Midea
Midea MVC-S8+ User manual

Midea
Midea MVC-SC861R User manual

Midea
Midea VCS861B User manual

Midea
Midea MSB 5.700bs Administrator Guide