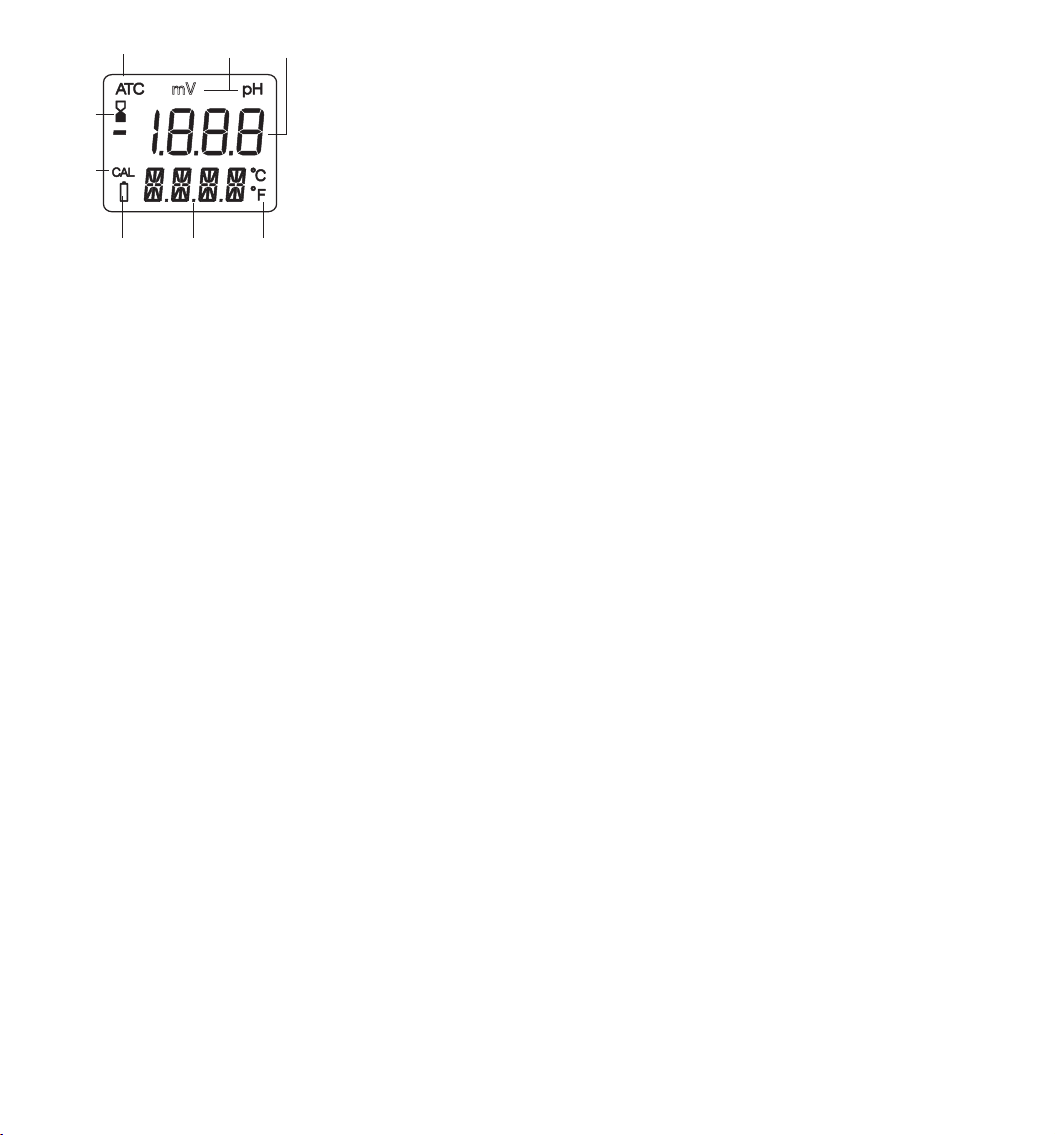
manuals.online logo
Brands
  1. Home
  2. •
  3. Brands
  4. •
  5. Milwaukee
  6. •
  7. Test Equipment
  8. •
  9. Milwaukee pH58 User manual

Milwaukee pH58 User manual

The meter is also provided with BEPS (Battery Error
Prevention System), which avoids any erroneous
readings due to low battery level by automatically
switching the meter o.
It is recommended to replace the batteries
immediately.
To replace the batteries unscrew the battery
compartment cap and replace all four 1.5V batteries
while paying attention to their polarity. Make sure
the gasket is in place before screwing back the cap.
Batteries should only be replaced in a non-
hazardous area using the battery type specified in
this instruction manual.
ACCESSORIES
MI58P Replaceable electrode for pH58
M10004B pH 4.01 buer, 20 ml sachet, 25 pcs.
M10007B pH 7.01 buer, 20 ml sachet, 25 pcs.
M10010B pH 10.01 buer, 20 ml sachet, 25 pcs.
MA9004 pH 4.01 buer, 230 ml bottle
MA9006 pH 6.86 buer, 230 ml bottle
MA9007 pH 7.01 buer, 230 ml bottle
MA9009 pH 9.18 buer, 230 ml bottle
MA9010 pH 10.01 buer, 230 ml bottle
MA9015 Electrode storage solution, 230 ml
MA9016 Electrode cleaning solution, 230 ml
M10000B Electrode rinse solution, 20 ml sachet,
25 pcs.
CERTIFICATION
Milwaukee Instruments conform to the CE European
Directives.
Disposal of Electrical & Electronic Equipment. Do not
treat this product as household waste. Hand it over to the
appropriate collection point for the recycling of electrical
and electronic equipment.
Disposal of waste batteries. This product contains
batteries. Do not dispose of them with other household
waste. Hand them over to the appropriate collection point
for recycling.
Please note: proper product and battery disposal prevents
potential negative consequences for human health
and the environment. For detailed information, contact
your local household waste disposal service or go to
www.milwaukeeinstruments.com (USA & CAN) or
www.milwaukeeinst.com.
SPECIFICATIONS
RANGE -2.00 to 16.00 pH;
±1000 mV (ORP);
-5.0 to 60.0°C / 23.0 to 140.0°F
RESOLUTION 0.01 pH;
1 mV;
0.1°C / 0.1°F
ACCURACY (@25°C) ±0.05 pH;
±2 mV;
±0.5°C / ±1°F
TYPICAL EMC DEVIATION ±0.02 pH;
±2 mV;
±0.3°C / ±0.6°F
TEMPERATURE COMPENSATION Automatic,
from -5 to 60°C
pH CALIBRATION Automatic, 1 or 2 points
with 2 sets of memorized buers
(pH 4.01, 7.01, 10.01 or 4.01, 6.86, 9.18)
ORP CALIBRATION Factory calibrated
PROBE Replaceable MI58P
ENVIRONMENT -5 to 50°C; 100% RH max.
BATTERY TYPE 4 x 1.5V; IEC LR44, A76
BATTERY LIFE approx. 250 hours of use
AUTO-OFF after 8 minutes of non-use
DIMENSIONS 200 x dia 38 mm
WEIGHT 100 g
RECOMMENDATION
Before using this product, make sure it is entirely suitable for
your specific application and for the environment in which it is
used. Any modification introduced by the user to the supplied
equipment may compromise the meter’s performance. For
your and the meter’s safety do not use or store the meter
in hazardous environment. To avoid damage or burn, do not
perform any measurement in microwave ovens.
WARRANTY
This instrument is warranted against defects in materials
and manufacturing for a period of 2years from the date of
purchase. Probe is warranted for 6 months This warranty
is limited to repair or free of charge replacement if the
instrument cannot be repaired. Damage due to accidents,
misuse, tampering or lack of prescribed maintenance is
not covered by warranty. If service is required, contact
your local Milwaukee Instruments Technical Service. If the
repair is not covered by the warranty, you will be notified of
the charges incurred. When shipping any meter, make sure
it is properly packaged for complete protection.
Milwaukee Instruments reserves the right to make
improvements in design, construction and appearance of
its products without advance notice.
ISTPH58 07/20
USER MANUAL
SATISFACTION
GUARANTEED
milwaukeeinstruments.com (USA & CAN)
milwaukeeinst.com
pH58
PRO Waterproof
pH/ORP/Temperature
Tester
ON/OFF
CAL
SET
HOLD
pH58
pH/ORP/Temp
Waterproof
mV
Automatic temperature
compensation indicator
Instability
indicator
Calibration
indicator
Low battery
indicator
Measuring
unit
Main
LCD
Secondary
LCD
Temperature
Unit
OPERATIONAL GUIDE
yRemove the electrode cap and immerse the
meter in MA9015 storage solution for 2hours to
activate the electrode.
yTurn the meter on by pressing the ON/OFF button.
All the used segments on the LCD will be visible
for 1 second or as long as the button is pressed.
yImmerse the electrode in the solution to be
tested. Stir gently and wait for the reading to
stabilize, i.e. the instability indicator (hourglass)
on the LCD turns o.
ySelect the pH or ORP (mV) mode by pressing the
SET/HOLD button.
yThe displayed pH value is automatically
compensated for temperature. The ORP (mV)
value will be displayed on the main LCD, while
the temperature will always be displayed on the
secondary LCD.
yTo freeze the display, while in measurement
mode, press and hold the SET/HOLD button.
The “HOLD” message appears on the secondary
display and the reading will be frozen on the
LCD. Press any button to return to the normal
measurement mode.
yTo turn the meter o, press the ON/OFF
button. The “OFF” message will appear on the
secondary display. Release the button.
Note:
yBefore taking any measurement, make sure the
meter is calibrated (the CAL tag is on).
yAfter use always turn the meter OFF, rinse the
electrode with water to minimize contamination
and store it with a few drops of storage (MA9015)
or pH7 (M10007) solution in the protective cap.
NEVER USE DISTILLED OR DEIONIZED WATER FOR
STORAGE PURPOSE.
CALIBRATION PROCEDURE
The ORP (mV) range is factory calibrated. Contact
the nearest Service Center for recalibration, if
necessary.
For better accuracy, frequent calibration of the tester
is recommended. Calibration is also necessary after
electrode replacement, after testing aggressive
chemicals and where extreme accuracy is required.
yTurn the meter on and select the pH mode with
the SET/HOLD button.
yPress and hold the ON/OFF/CAL button until
the “OFF” message on the secondary LCD is
substituted by “CAL”. Release the button.
yThe instrument enters the calibration mode by
displaying “pH 7.01 USE” (or “pH 6.86 USE” if the
NIST buer set was selected).
yFor a single-point calibration, immerse the
electrode in any buer, i.e. pH 4.01, 7.01 (or 6.86),
10.01 (or 9.18).
yThe meter activates the automatic buer
recognition. If no valid buer is detected, the
meter keeps the USE indication active for 12
seconds, and then replaces it with WRNG,
indicating that the sample being measured is
not a valid buer. Otherwise, if a valid buer is
detected, then its value is shown on the primary
display, and REC appears on the secondary LCD.
yIf the pH 7.01 (or pH 6.86) was used, press the
SET button to exit the Calibration mode and the
“OK 1” message will appear on the display. The
first calibration point is stored and the meter
returns to normal measurement mode.
For better accuracy, it is always recommended to
perform a 2-point calibration.
yFor a two-point calibration, immerse the
electrode in pH 7.01 (or pH 6.86) buer solution.
yAfter the first point has been accepted, the
meter will then ask for the second buer and
the message “pH 4.01 USE” will appear.
yRinse the electrode and immerse it in the
second solution (pH 4.01, 10.01 or 9.18).
yIf a valid buer value is detected, the REC
message is displayed and the meter completes
the calibration procedure. The LCD shows the
accepted value with the “OK 2” message and the
instrument returns to the normal measurement
mode. Otherwise, if no valid buer is detected,
the meter displays the WRNG message.
Note: When the calibration procedure is completed,
the CAL tag is turned on.
yTo quit the procedure and return to the last
calibration data, after entering the calibration
mode press the ON/OFF button. The secondary
LCD displays “ESC” for 1 second and then the
meter returns to the normal measurement
mode.
yTo reset to the default values and clear a
previous calibration, press the SET/HOLD button
after entering the calibration mode and before
the first point is accepted. The secondary LCD
displays “CLR” for 1 second, the meter resets to
the default calibration and the CAL tag on the
LCD turns o.
SETUP
Setup mode allows the selection of temperature (°C
or °F) and pH buer set for calibration. To enter the
Setup mode, press the ON/OFF button until “CAL” on
the secondary LCD is replaced by “TEMP” and the
current temperature unit (e.g. TEMP °C). Then:
yfor °C/°F selection: use the SET/HOLD button;
then press the ON/OFF button once to enter
the buer set selection or twice to return to the
normal measurement mode.
yto change the calibration buer set: after
setting the temperature unit, press ON/OFF
once and select the buer set (“pH 7.01 BUFF” or
“pH 6.86 BUFF” for NIST) by using the SET/HOLD
button. Press ON/OFF to return to the normal
measurement mode.
ELECTRODE REPLACEMENT
yRemove the protective cap and unscrew the
plastic ring on the top of the electrode.
yPull out the MI58P electrode and replace it with
a new one.
yMake sure the gaskets are in place before
screwing back the ring.
BATTERY REPLACEMENT
When the batteries become weak, the battery
symbol on the LCD will light up to advise that only a
few hours of working time is remaining.

Other Milwaukee Test Equipment manuals

Milwaukee MW14 User manual

Milwaukee

Milwaukee MW14 User manual

Milwaukee pH51 User manual

Milwaukee

Milwaukee pH51 User manual

Milwaukee HEAVY DUTY 2216-40 User manual

Milwaukee

Milwaukee HEAVY DUTY 2216-40 User manual

Milwaukee pH54 User manual

Milwaukee

Milwaukee pH54 User manual

Milwaukee MW804 User manual

Milwaukee

Milwaukee MW804 User manual

Milwaukee EC59 User manual

Milwaukee

Milwaukee EC59 User manual

Milwaukee CD97 User manual

Milwaukee

Milwaukee CD97 User manual

Milwaukee 2237-40 User manual

Milwaukee

Milwaukee 2237-40 User manual

Milwaukee MW12 User manual

Milwaukee

Milwaukee MW12 User manual

Milwaukee pH55 PRO User manual

Milwaukee

Milwaukee pH55 PRO User manual

Milwaukee MW11 User manual

Milwaukee

Milwaukee MW11 User manual

Milwaukee MW14 User manual

Milwaukee

Milwaukee MW14 User manual

Milwaukee pH600 User manual

Milwaukee

Milwaukee pH600 User manual

Milwaukee MW803 User manual

Milwaukee

Milwaukee MW803 User manual

Milwaukee ORP57 User manual

Milwaukee

Milwaukee ORP57 User manual

Milwaukee ORP57 User manual

Milwaukee

Milwaukee ORP57 User manual

Milwaukee MW10 User manual

Milwaukee

Milwaukee MW10 User manual

Milwaukee 2210-20 User manual

Milwaukee

Milwaukee 2210-20 User manual

Popular Test Equipment manuals by other brands

Big Joe E30 Series manual

Big Joe

Big Joe E30 Series manual

VALD FDMax instruction manual

VALD

VALD FDMax instruction manual

Tektronix DPO4034 user manual

Tektronix

Tektronix DPO4034 user manual

Vident iLink300 PRO user manual

Vident

Vident iLink300 PRO user manual

Druck DPI 620 Genii user manual

Druck

Druck DPI 620 Genii user manual

Cosmo LS-1866 Operation manual

Cosmo

Cosmo LS-1866 Operation manual

Gemini Tinytag TGE-0003 Technical manual

Gemini

Gemini Tinytag TGE-0003 Technical manual

Tektronix 7B87 instruction manual

Tektronix

Tektronix 7B87 instruction manual

Overmax AD-06 user manual

Overmax

Overmax AD-06 user manual

RHEINTACHO RT STROBE pocketLED  LASER operating instructions

RHEINTACHO

RHEINTACHO RT STROBE pocketLED LASER operating instructions

VeEX VePAL TX300 Quick reference guide

VeEX

VeEX VePAL TX300 Quick reference guide

REV Ritter GK26A operating instructions

REV Ritter

REV Ritter GK26A operating instructions

SKF TKRS 21 Instructions for use

SKF

SKF TKRS 21 Instructions for use

Astronics Trig-Tek 346B user manual

Astronics

Astronics Trig-Tek 346B user manual

Tektronix TPS2000 Series Service manual

Tektronix

Tektronix TPS2000 Series Service manual

Aeroflex 3500 Operation manual

Aeroflex

Aeroflex 3500 Operation manual

Acterna HST-3000 Getting started

Acterna

Acterna HST-3000 Getting started

pico Technology PicoScope 3000 Series user guide

pico Technology

pico Technology PicoScope 3000 Series user guide

manuals.online logo
manuals.online logoBrands
  • About & Mission
  • Contact us
  • Privacy Policy
  • Terms and Conditions

Copyright 2025 Manuals.Online. All Rights Reserved.