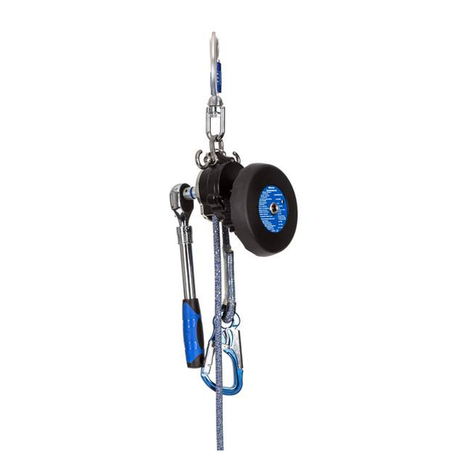
Mittelmann LiftEvac Product guide

Technik, die das Leben sichert
Gebrauchsanleitung / Prüfbuch
Technische Daten:
Hersteller
Abseilgerät Typ
Geräteklasse/EN-Norm
Geräteklasse/EN Norm
Fabrik-Nr./Baujahr
zul. Abseilhöhe
max. Abseilhöhe
max. Abseillast
max. Hublast
max. Hubhöhe
Mittelmann Sicherheitstechnik
LiftEvac LiftEvac 2K
A / EN 341 - 1993
B / EN 1496 - 2006
.........................../........................
160 m
siehe Kennzeichnung am Gerät
200 kg
200 kg
30 m
Ident-Nr. 174671
Mittelmann Sicherheitstechnik
GmbH & Co. KG
42551 Velbert, Bessemerstraße 25
Telefon 02051/91219-00
Fax 02051/91219-19

*HEUDXFKVDQOHLWXQJ
1. Anwendung
Die Rettungshub- und Abseilgeräte LiftEvac und LiftEvac 2K (im folgenden nur LiftEvac genannt)
sind Rettungsgeräte, mit denen sich eine bzw. auch zwei Personen gleichzeitig oder mehrere
Personen einzeln nacheinander
von einem höheren zu einem tiefer gelegenen Ort mit einer
begrenzten Geschwindigkeit abseilen können. Zusätzlich kann eine Person von einem Helfer von
einem tiefer- zu einem höher-gelegenen Ort heraufgezogen werden oder ein Helfer kann an eine
zu rettende Person heranfahren diese aufnehmen und gemeinsam mit dieser abfahren.
Die Ausrüstung darf nur innerhalb der festgelegten Einsatzbedingungen und für den
vorgesehenen Verwendungszweck benutzt werden. Die Rettungshub- und Abseilgeräte LiftEvac
dürfen nur als Rettungssystem nicht als Auffangsystem verwendet werden.
2. Kontrolle
Vor Benutzung Rettungshub- und Abseilgerät einer Sicht- und Funktionsprüfung unterziehen.
Funktionsprüfung wie folgt: Jeweils einmal ziehen am linken Abfahrseil und einmal am rechten
Abfahrseil. Das Seil muß sich relativ schwer aber gleichmäßig ziehen lassen. Die Umschalthebel
der Halte- und Hubknarren müssen hierfür alle einmal auf gelb und einmal auf rot gestellt werden.
Die Überprüfung vor der Benutzung kann bei bestimmten, für den Notfall vorgesehenen
Ausrüstungsteilen dann entfallen, wenn diese durch eine sachkundige Person verpackt oder
versiegelt wurde.
Sollten Zweifel hinsichtlich des sicheren Zustandes des Systems oder den Bestandteilen
auftreten, sind diese sofort der Benutzung zu entziehen.
Beschädigte Geräte, Auffanggurte und Seile dürfen nicht verwendet werden.
Durch Absturz beanspruchte Systeme sind ebenfalls dem Gebrauch zu entziehen und dem
Hersteller zur Wartung und erneuten Prüfung zurückzusenden.
Die Sicherheit des Benutzers ist von der Wirksamkeit und der Haltbarkeit der Ausrüstung
abhängig. Hierfür ist die regelmäßige Überprüfung eine zwingende Notwendigkeit. Die
regelmäßigen Überprüfungen dürfen nur durch den Hersteller oder eine durch den Hersteller
autorisierte Person unter genauer Beachtung der Anleitung des Herstellers für regelmäßige
Überprüfung durchgeführt werden. Die Produktkennzeichnung muß immer lesbar sein.
Nach einem Rettungseinsatz Prüfung durch den Hersteller oder eine durch den Hersteller
autorisierte Person vornehmen lassen.
Nach Erreichen der Abseilarbeit Prüfung durch den Hersteller oder eine oder eine durch
den Hersteller autorisierte Person vornehmen lassen. Für das Erreichen der Abseilarbeit
gelten folgende Werte:
Personengewicht 150 kg – 5000 Abfahrmeter
Personengewicht 100 kg – 7500 Abfahrmeter
Personengewicht 75 kg – 10000 Abfahrmeter
Bei Abfahrt von 2 Personen gleichzeitig sind max. 600 Abfahrmeter zulässig.
Mindestens einmal im Jahr Prüfung durch den Hersteller oder eine durch den Hersteller
autorisierte Person vornehmen lassen, auch wenn kein Einsatz des Abseilgerätes erfolgte.
Achtung:Keine Veränderungen am Produkt vornehmen!
Das Austauschen von Bestandteilen des Systems ist nicht erlaubt.
3. Benutzung
3.1 Abseilen der zu rettenden Person
Das Rettungshub- und Abseilgerät LiftEvac darf nur von Personen benutzt werde, die in der
sicheren Benutzung unterwiesen sind und die entsprechenden Kenntnisse haben.
Achtung: Seile beim Abfahren nicht über scharfe Kanten laufen lassen.
Seile vor scharfkantigen Gegenständen, Schweißfunken oder anderen
zerstörenden oder beschädigenden Gefahren schützen.

Abseilgerät mit Abfahrseil so weit aus dem Kunststoffbeutel herausziehen, dass der
Karabinerhaken der sich am Abseilgerät befindet, an einem Anschlagpunkt nach EN 795
eingehakt werden kann. (siehe Bild 1) Der Anschlagpunkt muß oberhalb des Benutzers
liegen und eine Mindestbelastbarkeit von 10 kN nach EN 795 gewährleisten. Es ist darauf zu
achten, dass keine Hindernisse den Abseilvorgang beeinträchtigen.
Den Karabinerhaken vom oben befindlichen Abfahrseilende in den Befestigungspunkt des
Rettungsgurtes EN 1497 oder Auffanggurtes EN 361 einhaken und sichern. (siehe Bild 2)
Die bildliche Darstellung zeigt die Anwendung mit dem Mittelmann-Rettungsgurt SG16.
Bei Verwendung eines anderen Rettungs-oder Auffanggurtes die jeweilige Gebrauchsanleitung
des Gurtes beachten.
Kunststoffbeutel mit dem restlichen Abfahrseil nach unten werfen. Seil muß schlingenfrei
hängen und bis zum tiefer gelegenen Abseilort reichen. (siehe Bild 3)
Achtung: Bereits bei den Vorbereitungen zum Abseilen auf eine entsprechende
Sicherung gegen Absturz achten!
Am Abfahrseil befinden sich an beiden Seilenden je ein Karabinerhaken. Das Abfahrseil läuft über
eine Seilscheibe. Wenn sich das eine Seilende mit Karabinerhaken am oberen Abseilort befindet,
muß sich das andere Seilende mit Karabinerhaken am unteren Abseilort befinden.
Achtung: Die Hubknarren vom Gerät abnehmen. Sie werden für den reinen
Abseilvorgang nicht benötigt.
Die erste Person den am Abfahrseil befindlichen Rettungsgurt anlegen.(siehe Bild 4 und 5)
Gebrauchsanleitung Rettungs- bzw. Auffanggurt beachten.
Jetzt am langen nach unten hängenden Abfahrseil so lange ziehen, bis eine straffe
Verbindung zwischen Abseilgerät und Rettungsgurt hergestellt ist. (siehe Bild 6)
Hierfür den Umschalthebel der Halteknarre in Richtung kurzes Abfahrseil schalten.
Achtung: Niemals in ein durchhängendes Seil fallen lassen.
R u h e b e w a h r e n !
Jetzt den Richtungsschalter der Halteknarre in Richtung langes Abfahrseil umschalten.
Mit dem Gesicht zur Wand aussteigen und abfahren. (siehe Bild 7 und 8)
Die Abfahrgeschwindigkeit wird automatisch geregelt. Auf Hindernisse achten!
Unten angekommen Rettungsgurt ablegen und am Seil belassen. (siehe Bild 9)
Beim Abseilen von mehreren Personen müssen mindestens 2 Rettungsgurte vorhanden sein.
Die zweite Person Karabinerhaken vom jetzt oben befindlichen Abfahrseilende in den
Befestigungspunkt des 2. Rettungsgurtes einhaken und sichern.
Jetzt den am Abfahrseil befindlichen Rettungsgurt anlegen.(siehe Bild 4 und 5)
Achtung: Gebrauchsanleitung Rettungs- bzw. Auffanggurt beachten.
Am langen nach unten hängenden Abfahrseil so lange ziehen, bis eine straffe
Verbindung zwischen Abseilgerät und Rettungsgurt hergestellt ist. (siehe Bild 6)
Jetzt den Umschalthebel der Halteknarre in Richtung langes Abfahrseil umschalten.
Mit dem Gesicht zur Wand aussteigen und abfahren. (siehe Bild 7 und 8)
Unten angekommen Rettungsgurt ablegen und am Seil belassen. (siehe Bild 9)
Das andere Abfahrseilende mit Rettungsgurt befindet sich jetzt wieder am oberen
Abseilpunkt und die 3. Person kann sich den Gurt heranziehen, am Karabinerhaken des
Abfahrseils belassen und anlegen. (siehe Bild 4 und 5)
Jetzt am langen nach unten hängenden Abfahrseil so lange ziehen, bis eine straffe
Verbindung zwischen Abseilgerät und Rettungsgurt hergestellt ist. (siehe Bild 6)
Jetzt den Umschalthebel der Halteknarre in Richtung langes Abfahrseil umschalten.
Mit dem Gesicht zur Wand aussteigen und abfahren. (siehe Bild 7 und 8)
Unten angekommen Rettungsgurt ablegen und am Seil belassen. (siehe Bild 9)
Alle weiteren Personen können sich in gleicher Weise wie Person 3 nacheinander abseilen.
3.2 Gleichzeitiges Abfahren der zu rettenden Person und der rettenden Person
Die rettende Person kann sich gleichzeitig mit der zu rettenden Person abseilen. Dazu müssen
beide den Karabinerhaken vom oben befindlichen Abfahrseilende in den jeweiligen
Befestigungspunkt des Rettungsgurtes einhaken und sichern.
Bei dieser Anwendung darf das Seil nicht durch die offene Augenschraube geführt werden.
Achtung: Bis zum Abseilvorgang (einzeln oder zu zweit) stets auf ausreichende
Sicherung gegen Absturz achten. Nicht über Flüssigkeiten und losen
Schüttgütern abseilen.

3.3 Hubfunktion
Für das Heraufziehen einer Person von einem tiefer- zu einem höhergelegenen Ort, muß das
Rettungshub- und Abseilgerät mit dem am Gerät befindlichen Karabinerhaken an einem
Anschlagpunkt nach EN 795 sicher befestigt werden. Hubknarre abnehmen. Den am kurzen
Abfahrseilende befindlichen Rettungsgurt mit dem Abfahrseil nach unten ablassen. Hierfür muß
das Seil durch das Gerät durchgezogen werden. Der Umschalthebel der Halteknarre muß dabei
in Richtung langes einlaufendes Seil zeigen. Die hochzuziehende Person legt den am Abfahrseil
befindlichen Rettungsgurt an. Für den Hubvorgang den Umschalthebel der Halteknarre in
Richtung lasttragendes Seilende umschalten. Hubknarren aufstecken. Der Umschalthebel der
Hubknarren muß in Richtung loses Seilende zeigen. Hubvorgang beginnen.
Zur Vereinfachung der Schaltstellungen der Umschalthebel an der Halte- und den Hubknarren
sind diese mit rot und gelb gekennzeichnet. Je nach Hub- bzw. Abseilrichtung immer alle Schalter
entweder auf gelb oder alle Schalter auf rot stellen. Die Hubknarren und die Adapter für die
Hubknarren sind blau und rot markiert. Rote Hubknarre immer in roten Adapter und blaue
Hubknarre immer in blauen Adapter.
3.4 Rettung einer hilflos im Verbindungsmittel hängenden Person
Achtung: Arbeitshandschuhe erforderlich !
Das Rettungshub- und Abseilgerät mit dem am Gerät befindlichen Karabinerhaken an einem
geeigneten Anschlagpunkt nach EN 795 sicher befestigen.
Den Karabinerhaken des kurzen Seilendes in die Rückenöse des Auffanggurtes der zu rettenden
Person einhaken und sichern. Der Umschalthebel der Halteknarre muß in Richtung des kurzen in
die Rückenöse eingehakten Seilendes zeigen. Die Umschalthebel der Hubknarren müssen in
Richtung loses Seilende geschalten werden. Mit den Hubknarren die zu rettende Person soweit
anheben, daß diese aus dem Verbindungsmittel gelöst werden kann.
Das Abseilen der Person erfordert das Umschalten aller Knarren. Auch hier gilt wieder, je nach
Hub- bzw. Abseilrichtung alle Schalter entweder auf gelb oder alle Schalter auf rot stellen.
Achtung: Unter Last können und dürfen die Knarren nicht umgeschaltet werden.
Zum Umschalten muß als erstes die Halteknarre und anschließend die Hubknarren entlastet
werden. Hierzu ist wie folgt vorzugehen: Mit einer Hubknarre die Last anheben und mit dieser
auch die Last halten. Dadurch wird die Halteknarre entlastet und kann umgeschaltet werden.
Achtung: Die Last weiter mit der Hubknarre halten.
Beim LiftEvac 2K die zweite Hubknarre ebenfalls umschalten. Bei Bedarf kann diese durch
betätigen des Auswurfknopfes vom Gerät abgenommen werden. Jetzt das unbelastete Seil in den
offenen Haken einlegen, fest nach unten ziehen und straff halten. Die Hubknarre mit der die Last
gehalten wird, kann jetzt langsam entlastet und ebenfalls umgeschaltet werden, oder durch
Betätigung des Auswurfknopfes vom Gerät abgenommen werden. Dabei muß die Last mit dem
Seil gehalten werden. Es erfolgt also eine Lastübergabe von der Hubknarre auf das straff nach
unten zu haltende Seil. Um den Abseilvorgang zu beginnen das Seil langsam durch die Hand
gleiten lassen und los lassen. Die Abseilgeschwindigkeit wird durch eine Fliehkraftbremse
automatisch geregelt. Bei der Rettung eines Verunfallten aus einer Steigleiter ist es oft
erforderlich, den Vorgang des Abseilens, zusätzlich von Hand mit zu steuern. Dazu läßt der Retter
das nach oben laufende Seil durch seine Hand gleiten und kann damit die Abseilgeschwindigkeit
exakt steuern und den Verunfallten so an möglichen Hindernissen langsam vorbeiführen.
3.5 Rettung durch Heranfahren des Retters an eine zu rettende Person
Mit dem Abseil- und Rettungshubgerät LiftEvac ist es auch möglich, daß der Retter direkt mit dem
Gerät an die zu rettende Person heranfährt, diese anhängt, gegebenenfalls sich selbst und die zu
rettende Person anhebt um z.B. das Verbindungsmittel der zu rettenden Person zu lösen und
dann gemeinsam mit dieser nach unten abfährt.
Diese Rettung darf nur von Personen durchgeführt werden, die in die sicheren Benutzung speziell
dieser Anwendung unterwiesen sind und die entsprechenden Kenntnisse haben.
4. Wartung, Lagerung, Transport und Instandsetzung
Nach dem Einsatz Abseilgerät und Abfahrseil gegebenenfalls reinigen. Reinigung mit
Feinwaschmittel und reichlich Wasser (40°C).
Wenn es beim Einsatz oder beim Reinigen naß geworden ist trocknen.

Trocknen ausschließlich auf natürliche Weise, d.h. nicht in der Nähe von Feuer oder
anderen Hitzequellen. Abseilgerät und Abfahrseil in luftigen und schattigen Räumen trocken
lagern. Um Beschädigungen während der Lagerung oder des Transports zu verhindern sollte die
Ausrüstung in einem Gerätebeutel oder einer Transportkiste aufbewahrt werden.
Berühren mit Säuren, ätzenden Flüssigkeiten und Ölen vermeiden. Wenn unvermeidbar,
unbedingt an den Hersteller wenden.
Sollte eine Desinfektion der Ausrüstung erforderlich sein, bitte ebenfalls an den Hersteller
wenden.
Instandsetzungen dürfen nur durch den Hersteller oder eine durch den Hersteller autorisierte
Person unter genauer Beachtung der Instandsetzungsanleitung durchgeführt werden.
5. Benutzungsdauer
Die Benutzungsdauer ist von den jeweiligen Einsatzbedingungen abhängig. Nach den
bisherigen Erfahrungen kann unter normalen Einsatzbedingungen bei Seilen von einer
Benutzungsdauer von 4 bis 6 Jahren ausgegangen werden.
Nach Erreichen der Abseilarbeit muß eine Prüfung durch den Hersteller oder einen
Sachkundigen vorgenommen werden. Für das Erreichen der Abseilarbeit gelten folgende
Werte:
Personengewicht 150 kg – 5000 Abfahrmeter
Personengewicht 100 kg – 7500 Abfahrmeter
Personengewicht 75 kg – 10000 Abfahrmeter
Bei Abfahrt von 2 Personen gleichzeitig sind max. 600 Abfahrmeter zulässig.
6. Hinweis
Für jedes System bzw. Bestandteil wird eine Gebrauchsanleitung/Prüfbuch mitgeliefert.
Diese muß bei der Ausrüstung gehalten werden. Wenn die Ausrüstung in ein anderes Land
weiterverkauft wird, muß der Wiederverkäufer eine Anleitung für den Gebrauch, die
Instandhaltung, die regelmäßige Überprüfung und die Instandsetzung in der Sprache des
anderen Landes zur Verfügung stellen. Beachten Sie auch die Gebrauchsanleitungen der
Produkte, die im Zusammenhang mit dem Abseilgerät LiftEvac benutzt werden, sowie die
jeweils gültigen Unfallverhütungsvorschriften.
7. Erläuterung der Kennzeichnung
LiftEvac LiftEvac 2K Typbezeichnung des Gerätes
Mittelmann Sicherheitstechnik GmbH & Co. KG Hersteller des Gerätes
A / EN341 B / EN1496 Geräteklasse / Norm der Ausrüstung
Abseilgeschw. ca, 0,8 m/s Angabe zur Abseilgeschindigkeit des Gerätes
A-***** / ** Fabrikationsnummer / Baujahr des Gerätes
max. Abseillast 200 kg Angabe der max. Abseillast des Gerätes
max. Hublast 200 kg Angabe der max. Hublast (Nennlast) des Gerätes
Abseilhöhe max. *** m Angabe der max. Abseilhöhe des Gerätes
EN 341 / 1993 Nummer und Jahr des Dokuments der die Ausrüstung entspricht:
EN 1496 / 2006 Nummer und Jahr des Dokuments der die Ausrüstung entspricht:
Symbol zum Hinweis, daß die Gebrauchsanleitung beachtet werden muß:
0158
CE-Zeichen und Kenn-Nr. der bei der Kontrolle der PSA eingeschalteten
notifizierten Stelle: DEKRA EXAM GmbH 44809 Bochum Dinnendahlstraße 9
8. Prüfstelle
DEKRA EXAM GmbH 44809 Bochum Dinnendahlstraße 9
Stand: 08.11.2012

Bild 1 Bild 2 Bild 3
Bild 4
Bild 7
Bild 5
Bild 8
Bild 6
Bild 9

offener Haken
Hubknarre
Halteknarre
Umschalthebel
Hubknarre
Auswurfknopf
Umschalthebel
Halteknarre
offener Haken
LiftEvac
Adapter

offener Haken
Hubknarre rot
Hubknarre blau
Halteknarre
Adapter blau
Umschalthebel
Hubknarre
Umschalthebel
Hubknarre
Umschalthebel
Halteknarre
offener Haken
LiftEvac 2K
Auswurfknopf
Adapter rot
Auswurfknopf

Produkt: Geräteklasse - Norm: A - EN 341/1993 und B - EN 1496/2006
Typ: LiftEvac LiftEvac 2K Fabr.-Nr.:
Hersteller: Mittelmann Sicherheitstechnik Bessemerstraße 25 Tel. 02051/91219-00
GmbH & Co. KG 42551 Velbert Fax. 02051/91219-19
Kaufdatum:
Baujahr: Ablaufdatum: Datum der ersten Benutzung:
Datum Datum der nächsten
regelmäßigen Überprüfungdurchgeführte Instandsetzungen
und weitere wesentliche Angaben
Name und Unterschrift
der sachkundigen Person
Dokumentation der Ausrüstung
Ablauf der regelmäßigen Überprüfung und Instandsetzung
Rettungshub- und Abseilgerät
Grund der Bearbeitung
(regelmäßige Überprüfung
oder Instandsetzung)
Festgestellte Schäden

Technology that secures life
Instructions for use / test book
Technical data:
Manufacturer
Type of descender device
Device class / EN standard
Serial number /
year of manufacture
Permitted descent height
Maximum descent height
Maximum descent load
Maximum lifting capacity
Maximum lifting height
Mittelmann Sicherheitstechnik
LiftEvac LiftEvac 2K
A / EN 341 - 1993
B / EN 1496 - 2006
........................... /
........................
160 m
see marking on the device
200 kg
200 kg
30 m
Identification number: 175214
Mittelmann Sicherheitstechnik
GmbH & Co. KG
42551 Velbert, Bessemerstraße 25
Telefone +49(0)2051/91219-00
Fax +49(0)2051/91219-19

,QVWUXFWLRQVIRUXVH
1. Application
The Liftevac and the Liftevac 2 K (in the following text only called Liftevac) rescue lifting and
descender device are rescue devices by means of which one person or two persons simultaneously
or several persons one after the other are able to descend from a higher to a lower place at limited
velocity. In addition, a person can be lifted from a lower to a higher place by a rescuer or a rescuer
can approach a casualty, collect that person and descend with the casualty.
The equipment may only be used within the limits of the defined conditions of use and for its
intended use. The Liftevac rescue lifting and descender device may only be used as rescue system
and not as fall arrest system.
2. Inspection
Perform a visual inspection and a functional test of the rescue lifting and descending device before
using it. The functional test is performed as follows: Pull each the left and the right descent rope
once. The rope should be relatively hard to pull but it should move regularly.
The switch levers of the holding and the lifting ratchets have to be swiched on “red” for one
direction and then on “yellow” for the other direction.
The inspection prior to use may be omitted for certain equipment parts intended for emergency use
if they were packaged and sealed by a competent person. If any doubts concerning the safety of
the system or parts thereof exist, the system or its parts have to be immediately withdrawn from
service.
It is not permitted to use damaged devices, full body harnesses or ropes.
Devices that were subjected to a fall from a height must also be withdrawn from service and sent
back to the manufacturer for maintenance and re-inspection.
The safety of the user depends on the effectiveness and durability of the equipment. Therefore,
periodical inspections are absolutely necessary. Periodic inspections may only be performed by the
manufacturer or a person who was authorized by the manufacturer and closely follows the
manufacturer’s instructions regarding periodic inspections. The product marking must be readable
at all times.
Have the equipment inspected by the manufacturer or a person authorized by the
manufacturer after each rescue operation.
Have the equipment inspected by the manufacturer or a person authorized by the
manufacturer as soon as the descent energy is reached. The descent energy is reached
when the equipment was subjected to the following loads:
User weight 150 kg – 5 000 descent metres
User weight 100 kg – 7 500 descent metres
User weight 75 kg – 10 000 descent metres
If 2 persons descend simultaneously, a maximum of 600 descent metres is admissible.
Have the equipment inspected by the manufacturer or a person authorized by the
manufacturer at least once a year, even if the descender device was not used.
C a u t i o n: Do not modify or change the product!
It is not permitted to replace components of the system.
3. Use
3.1 Lowering the casualty
The Liftevac rescue lifting and descender device may only be used by persons who were instructed
in the safe use of the equipment and who have the necessary knowledge.
Caution: Make sure that the ropes are not running over sharp edges when descending.
Protect ropes from sharp-edged objects, welding sparks or other hazards that
might destroy or damage them.
Pull descender device with descent rope out of the plastic bag until the karabiner hook that is
attached to the descender device can be fixed to an anchor point according to EN 795 (see picture

1). The anchor point has to be above the user and ensure a minimum load carrying capacity of 10
kN according to EN 795. Make sure that the descent is not hindered by any obstacles. Attach the
karabiner of the upper end of the descent rope to the anchor point of the rescue harness EN 1497
or fall arrest harness EN 361 and secure it (see picture 2).
The pictures show the use in connection with the Mittelmann rescue harness SG16. If you use
another rescue harness or fall arrest harness, please follow the instructions for use of this harness.
Throw down the plastic bag containing the rest of the descent rope. The rope has to hang down
without forming loops and it must reach to the next lower descent point (see picture 3).
Caution: Make sure appropriate precautions against falling down from a height during the
preparations for the descent are in place!
One karabiner hook is attached to both ends of the descent rope. The descent rope runs through a
rope pulley. If one rope end with karabiner hook is at the upper descent point the other rope end
with karabiner hook must be at the lower descent point.
Caution: Remove the lifting ratchets from the device. It is not needed for a descent alone.
The first person has to put on the rescue harness that is attached to the descent rope (see pictures
4 and 5).
Please follow the instructions of use for the rescue harness or the fall arrest harness.
Now pull at the long descent rope hanging down until a taut connection between the descender
device and the rescue harness has been established (see picture 6).
For this purpose you have to shift the switch lever of the holding ratchet towards the short descent
rope.
Caution: Never let yourself fall when the rope is slack.
K e e p y c a l m!
Now shift the direction switch of the holding ratchet towards the long descent rope. Turn your face
to the wall and start the descent (see pictures 7 and 8). The descent velocity is automatically
controlled. Look out for obstacles! When you reach the ground, put off the rescue harness but leave
it on the rope (see picture 9). If several persons need to descend, at least 2 rescue harnesses are
required. Now the second person has to fix the karabiner hook that is attached to the rope end that
is now located at the higher point of descent to the attachment point of the second rescue harness
and secure it. Now put on the rescue harness of the descent rope (see picture 4 and 5).
Caution: Please follow the instructions of use of the rescue harness or the fall arrest
harness.
Pull at the long descent rope hanging down until a taut connection between the descender device
and the rescue harness has been established (see picture 6). Now shift the switch lever of the
holding ratchet towards the long descent rope. Turn your face to the wall and start the descent (see
pictures 7 and 8). When you reach the ground, put off the rescue harness but leave it on the rope
(see picture 9). The other end of the descent rope with the rescue harness attached is now again at
the upper descent point and the third person can pull the harness towards himself. This person has
to leave it attached to the karabiner hook of the descent rope and put it on. (see pictures 4 and 5).
Now pull at the long descent rope until a taut connection between the descender device and the
rescue harness is established (see picture 6). Now shift the switch lever of the holding ratchet
towards the long descent rope. Turn your face to the wall and start the descent (see pictures 7 and
8). When you reach the ground, put off the rescue harness but leave it on the rope (see picture 9).
Any other persons can descend in the same way as person 3 one after another.
3.2 Simultaneous descent of casualty and rescuer
The rescuing person can descend at the same time as the person that is rescued. For this
operation both persons have to attach the karabiner hooks of the upper descent rope end to the
respective attachment points of the rescue harness and secure them.
For this use the rope should not be pulled through the open eye bolt.
Caution: Make sure you are appropriately secured against falling from a height until the
beginning of the descent (on person after another or two persons
simultaneously). Do not descend above liquids or loose bulk goods.
3.3 Lifting function
To lift a person from a lower to a higher place the rescue lifting and descender device needs to be
securely fixed to an anchor point according to EN 795 using the karabiner hook that is attached to
the device. Remove lifting ratchet. Lower the rescue harness located at the shorter descent rope

end using the descent rope. For this purpose the rope has to be pulled through the device. The
switch lever of the holding ratchet needs to point towards the direction of the long incoming rope.
The person that needs to be lifted has to put on the rescue harness that is attached to the descent
rope. For the lifting, turn the switch lever of the holding ratchet to point towards the direction of the
load-bearing rope. Attach lifting ratchets. The switch lever of the lifting ratchets also needs to point
towards the direction of the loose (unloaded) rope end. Start lifting.
All positions of the switch levers are maked “red” or “yellow” . All levers have to point on one colour,
depending on the direction of use.
The adaptors for the lifting ratchets (only Liftevac 2K) are marked “blue” or “red” as well as the
lifting rachets. Put the lifting ratchets only into the adaptor with the same colour.
“Red” ratchet into the “red” adaptor and “blue” ratchet into the “blue adaptor.
3.4 Rescue of a helpless person that is hanging by its lanyard
Caution: Wear work gloves!
Securely fix the rescue lifting and descender device to a suitable anchor point according to EN 795
using the karabiner that is attached to the device.
Fix the karabiner hook of the short rope end to the rear eye of the full body harness of the casualty
and secure it. The switch lever of the holding ratchet must point towards the direction of the short
rope end that is fixed to the rear eye. The switch levers of the lifting ratchets have to be switched
into direction of the loose (long) rope end.
Using the lifting ratchets, lift the casualty until the person can be disengaged from the lanyard.
To lower the person, all ratchet levers must be switched. Again all switch levers have to be
switched onto one colour; all on “red” or on “yellow”.
Caution: The ratchets cannot and must not be switched over when under load.
In order to shift the switch, first the holding ratchet and then the lifting ratchet must be unloaded by
executing the following steps:
Using the lifting ratchet, lift the load and hold it. This unloads the holding ratchet and its switch lever
can be turned.
Caution: Continue to hold the load with the lifting ratchet.
Using the Liftevac 2K the second lifting ratchet has to be switched too. Otherwise the second lifting
has to be taken off by pressing the eject button on the backside head of the ratchet.
Now put the unloaded rope in the open hook, firmly pull downwards and hold tight. You can now
slowly unload the lifting ratchet and operate switch lever.
Otherwise the lifting ratchet has to be removed from the device by actuating the eject button.
During this process the load has to be held with the rope. That means that the load is transferred
from the lifting ratchet to the rope that needs to be tautly held down. To start the descent, let the
rope slowly glide through your fingers and then let go. The descent velocity will be automatically
controlled by a centrifugal brake. When rescuing a casualty from a ladder the descending process
often needs to be manually controlled as well. That means that the rescuer has to let the rope that
is running upwards glide through his fingers in order to exactly control descent velocity and slowly
guide the casualty over possible obstacles.
3.5 Rescuer accesses the casualty in order to recover her or him
The Liftevac descender and rescue lifting device also enables the rescuer to access the casualty
directly with the device. After reaching the casualty, the rescuer then hooks the casualty in and, if
necessary, lifts him- or herself and the casualty in order to release the casualty’s lanyard and they
then descend together.
This rescue operation may only be executed by persons who are specifically trained in the safe use
of this application and have the necessary knowledge.
4. Maintenance, storage, transport and repair
If necessary, clean descender device and descent rope after use. Clean with fine-fabric detergent
and plenty of water (40°C).
Dry the device if it has become wet during use or during cleaning.

Air-dry only, i.e. do not dry close to fire or other heat sources. Store descender device and descent
rope in dry, ventilated rooms, protected from sunlight. To avoid damages during storage or
transport the equipment should be stored in an equipment bag or transport box. Avoid exposure to
acids, corrosive fluids and oils. If unavoidable, please contact the manufacturer.
If the equipment needs to be disinfected, please also contact the manufacturer.
Repairs may only be executed by the manufacturer or a person authorized by the manufacturer
strictly following the instructions for repair.
5. Utilization period
The utilization period depends on the respective conditions of use. Based on our experiences so
far, you can expect the ropes to have a utilization period of 4 to 6 years under normal conditions of
use.
After having reached the descent energy the manufacturer or a competent persons have to
test the equipment. The descent energy is reached when the equipment was subjected to
the following loads:
User weight 150 kg – 5000 descent metres
User weight 100 kg – 7500 descent metres
User weight 75 kg – 10000 descent metres
If 2 persons descend simultaneously, a maximum of 600 descent metres is admissible.
6. Note
Instructions for use / test books are provided for each system or component. They have to
be kept close to the equipment. If the equipment is sold to another country, the re-seller has
to provide instructions for use, maintenance, periodic inspection and repair in the language
of the other country.
Please also follow the instructions for use of the products that are used in connection with
the Liftevac descender device and the accident prevention rules applicable in each case.
7. Explanation of the marking
LiftEvac LiftEvac 2K Identification mark
Mittelmann Sicherheitstechnik GmbH & Co. KG Manufacturer
A / EN341 B / EN1496 Device class / standard
App. 0,8 m/s Indication of the Descent velocity
A-***** / ** Serial number / Year of Manufacture
Maximum descent load 200 kg Indication of the maximum descent load
Maximum lifting capacity 200 kg Indication of the maximum lifting capacity
Descent height max.*** m Indication of the maximum descent height
EN341/ 1993 Number and year of the document whose regulations are fulfilled by the equipment
EN1496/2006 Number and year of the document whose regulations are fulfilled by the equipment
Symbol indicating that the instructions for use have to be observed:
0158
CE marking and code number of the notified body intervening for the test of the PPE:
DEKRA EXAM GmbH
Stand: 08.11.2012

picture 1 picture 2 picture 3
picture 4
picture 7
picture 5
picture 8
picture 6
picture 9

open hook
lifting ratchet
holding ratchet
switch lever
lifting ratchet
switch lever
holding ratchet
open hook
LiftEvac
eject button
adaptor

open hook
lifting ratchet red
lifting ratchet blue
holding ratchet
switch level
lifting ratchet
switch level
lifting ratchet
switch lever
holding ratchet
open hook
LiftEvac 2K
adaptor blue
eject button
adaptor red
eject button

Product: Device class - standard: A - EN 341/1993 and B - EN 1496/2006
Type: LiftEvac LiftEvac 2K Serial number:
Manufacturer: Mittelmann Sicherheitstechnik Bessemerstraße 25 Tel. +49(0)2051/91219-00
GmbH & Co. KG 42551 Velbert Fax. +49(0)2051/91219-19
Purchase Date:
Year of manufacture Expiry date: Date of first use:
date date of the next
periodic inspectionexecuted repairs
and other important information
name and signature
of the competent person
Documentation of equipment
Periodic inspection and repair procedure
rescue lifting and descender device
reason for revision
(periodic inspection
or repair)
detected damages

La technique au service de la vie
Notice d’utilisation / Notice de test
Caractéristiques techniques:
Fabricant
Type d’équipement
Catégorie/Norme EN
N° de fabrication/année
Hauteur de descente admissible
Hauteur de descente maxi
Charge de descente maxi
Charge de levage maxi
Hauteur de levage maxi
Catégorie/Norme EN
Mittelmann Sicherheitstechnik
LiftEvac LiftEvac 2K
A / EN 341 - 1993
B / EN 1496 - 2006
.........................../........................
160 m
voir marquage sur l’appareil
200 kg
200 kg
30 m
Reférence 175794
Mittelmann Sicherheitstechnik
GmbH & Co. KG
42551 Velbert, Bessemerstraße 25
Telefon +49(0)2051/91219-00
Fax +49(0)2051/91219-19

Notice d'utilisation
1. Emploi
L'équipement de sauvetage Liftevac permet d'évacuer à vitesse limitée une ou deux personnes en même
temps et plusieurs personnes l'une après l'autre d'un point haut à un point bas. Il permet également,
avec l'intervention d'un tiers, de remonter une personne d'un point bas vers un point haut, ou de
descendre chercher un blessé et de remonter les deux personnes ensemble.
L'équipement ne doit être utilisé que dans les conditions indiquées et pour l'emploi prévu. Le Liftevac est
un dispositif de sauvetage uniquement et ne doit pas être utilisé comme engin de levage.
2. Contrôle
Avant d'utiliser l'équipement, effectuer un contrôle visuel et un test de fonctionnement. Pour le test de
fonctionnement, procéder comme suit : tirer une fois sur le câble gauche et une fois sur le câble droite. Le
câble doit résister légèrement, mais se dérouler régulièrement. Il est possible de renoncer au contrôle
avant utilisation pour certains éléments de secours si ceux-ci ont été emballés ou scellés par une
personne compétente. En cas de doute sur l'état de l'équipement ou de ses composants, en interdire
immédiatement l'emploi.
Ne jamais utiliser d'équipements, de sangles ou de câbles endommagés. Les équipements ayant été
sollicités par une chute doivent immédiatement être mis hors service et retournés au fabricant pour
vérification et maintenance.
La sécurité de l'utilisateur dépend de l'efficacité et de la solidité de l'équipement. Des vérifications
régulières sont donc absolument indispensables. Ces contrôles doivent être effectués exclusivement par
le fabricant ou par des personnes agréées par lui, en respectant strictement les consignes de contrôle.
Le marquage du produit doit toujours être lisible. Après un sauvetage, faire effectuer un contrôle de
l'équipement par le fabricant ou par des personnes agréées par lui.
Après une descente en rappel, faire effectuer un contrôle de l'équipement par le fabricant ou par
des personnes agréées par lui. Les données à respecter pour la descente en rappel sont les
suivantes :
Poids de corps 150 kg - 5000 mètres de descente²
Poids de corps 100 kg - 7500 mètres de descente
Poids de corps 75 kg - 10000 mètres de descente
Si 2 personnes descendent en même temps, la longueur est de 320 mètres au maximum. Faire
effectuer au moins une fois par an un contrôle de l'équipement par le fabricant ou par des
personnes agréées par lui, même si l'équipement de descente en rappel n'a pas été utilisé.
A t t e n t i o n : Ne pas modifier l'équipement !
Ne pas remplacer les pièces de l'équipement.
3. Utilisation
3.1 Descente de la personne à secourir
L'équipement Liftevac ne doit être utilisé que par des personnes formées à son utilisation et possédant les
connaissances nécessaires.
Attention : Ne pas faire passer le câble sur des arêtes vives.
Eviter les objets coupants, étincelles de soudage et autres risques
d'endommagement ou de rupture des câbles.
Other manuals for LiftEvac
1
This manual suits for next models
1
Table of contents
Languages:
Other Mittelmann Safety Equipment manuals