MOB MO6277 User manual

USER MANUAL
(2014/53/EU art. 10-8)
(a) Frequency Range;110~205 kHz
(b) Wireless Power; 10 W Max.
(2014/53/EU art. 10-9 Simplified Declaration of Conformity)
Hereby, MOB, declares that item MO6277 complies with the essential requirements and
other relevant conditions of directive 2014/53/EU. The full text of the EU declaration of
conformity is available at the following internet address: www.momanual.com
MOB, PO BOX 644, 6710 BP (NL).
PO: 4100104848
Made in China

MO6277
EN
Wireless charger.
Specification:
Coils: 2pieces
Frequency range: 110~205kHz
Wireless output power: 10W Max
Input: DC5V⎓2A / DC9V⎓1.5A
Output: DC5V⎓1A / DC9V⎓1.1A
Materiel: bamboo
Product overview:
1. Wireless charging area
2. LED Indicator light
3. Micro USB input port
Using wireless charger:
•First plug the wireless charger using the included Micro USB
cable into the USB port of your wall adapter, The LED indicator
lights up in Green & Blue for two seconds
•Make sure your phone is compatible for wireless charging.
•Put your wireless charging enabled device on the wireless
charging area
•Blue led will light up when device is charging successfully.
Note:
•Some phone cases may block the wireless charging.
•Do not place other materials, like metal objects, magnets, and
magnetic stripe cards, between the mobile device and the

wireless charger pad.
•Check your mobile device’s battery percentage using the
charging icon displayed on the screen of your phone.
•When the mobile device is not placed on the charging area
accurately, your mobile device may not charge properly.
•Please do not expose this device to moisture or heat sources.
•This is not a toy, not suitable for children under the age of 7.
DE
Wireless Ladegerät
Technische Daten:
Spulen: 2 Stück
Frequenzbereich: 110~205kHz
Wireless Ausgangs-leistung: 10W max
Eingang: DC5V⎓2A / DC9V⎓1.5A
Ausgang: DC5V⎓1A / DC9V⎓1.1A
Material: Bambus
Produktübersicht:
1.Wireless Ladefläche
2.LED Anzeige
3.Mikro USB Eingang
Wireless Ladegerät verwenden:
•Verbinden Sie das kabellose Ladegerät zunächst mit dem
mitgelieferten Mikro-USB-Kabel mit dem USB-Anschluss Ihres
Netzteils, die LED-Anzeige leuchtet zwei Sekunden lang grün
und blau.
•Vergewissern Sie sich, dass Ihr Smartphone für das kabellose
Laden kompatibel ist.

•Legen Sie Ihr kompatibles Gerät auf die kabellose Ladefläche
•Die blaue LED leuchtet auf, wenn das Gerät erfolgreich geladen
wird.
Hinweis:
•Einige Schutzhüllen können das kabellose Laden blockieren.
•Legen Sie keine anderen Materialien, wie z. B.
Metallgegenstände, Magnete und Magnetstreifenkarten,
zwischen das mobile Gerät und die kabellose Ladefläche.
•Überprüfen Sie den Akkustand Ihres Mobiltelefons anhand des
Ladesymbols, das auf dem Bildschirm Ihres Telefons angezeigt
wird.
•Wenn das Mobiltelefon nicht genau auf der Ladefläche platziert
wird, kann es sein, dass Ihr mobiles Gerät nicht richtig geladen
wird.
•Bitte setzen Sie dieses Gerät keiner Feuchtigkeit oder
Wärmequellen aus.
•Dies ist kein Spielzeug, nicht geeignet für Kinder unter 7 Jahren.
FR
Chargeur sans fil.
Spécifications:
Bobines: 2 pièces
Gamme de fréquence : 110 ~ 205kHz
Puissance de sortie sans fil: 10W Max
Entrée : DC5V⎓2A/DC9V⎓1.5A
Sortie : DC5V⎓1A/DC9V⎓1.1A
Matériel : bambou
Présentation du produit:
1. Zone de recharge sans fil
2. Voyant LED
3. Port d'entrée micro-USB

Utilisation du chargeur sans fil:
•Branchez d'abord le chargeur sans fil à l'aide du câble micro
USB inclus dans le port USB de votre adaptateur mural, le
voyant LED s'allume en vert et bleu pendant deux secondes
•Assurez-vous que votre téléphone est compatible avec le
chargement sans fil.
•Placez votre appareil compatible sur la zone de chargement
sans fil
•La LED bleue s'allumera lors de la charge.
Note:
•Certains étuis ou coques de téléphone peuvent bloquer le
chargement sans fil.
•Ne placez pas d'autres matériaux, comme des objets
métalliques, des aimants et des cartes à bande magnétique,
entre l'appareil mobile et le chargeur sans fil.
•Vérifiez le pourcentage de batterie de votre appareil mobile à
l'aide de l'icône de charge affichée sur l'écran de votre
téléphone.
•Lorsque l'appareil mobile n'est pas placé avec précision sur la
zone de charge, votre appareil mobile peut ne pas se charger
correctement.
•Veuillez ne pas exposer cet appareil à l'humidité ou à des
sources de chaleur.
•Ce n'est pas un jouet, ne convient pas aux enfants de moins de
7 ans.
ES
Cargador inhalambrico

Especificaciones:
Bobinas: 2 piezas
Rango frecuencia: 110~205kHz
Potencia salida inhalambrico: 10W Max
Input: DC5V⎓2A / DC9V⎓1.5A
Output: DC5V⎓1A / DC9V⎓1.1A
Material: bamboo
Vista de product:
1. Superficie carga inhalambrica
2. Indicador luz LED
3. Puerto salida Micro USB
Usando cargador inalámbrico:
•Primero conecte el cargador inalámbrico usando el cable Micro
USB incluido en el puerto USB de su adaptador de pared. El
indicador LED se ilumina en verde y azul durante dos
segundos.
•Asegúrese de que su teléfono sea compatible con la carga
inalámbrica.
•Coloque su dispositivo habilitado para carga inalámbrica en el
área de carga inalámbrica
•El LED azul se iluminará cuando el dispositivo se esté cargando
correctamente.
Nota:
•Algunas carcasas de teléfonos pueden bloquear la carga
inalámbrica.
•No coloque otros materiales, como objetos metálicos, imanes y

tarjetas con banda magnética, entre el dispositivo móvil y la
base del cargador inalámbrico.
•Verifique el porcentaje de batería de su dispositivo móvil
usando el ícono de carga que se muestra en la pantalla de su
teléfono.
•Cuando el dispositivo móvil no se coloca en el área de carga
con precisión, es posible que su dispositivo móvil no se cargue
correctamente.
•No exponga este dispositivo a fuentes de calor o humedad.
•Esto no es un juguete, no apto para niños menores de 7 años.
IT
Cargador inhalambrico
Especificaciones:
Bobinas: 2 piezas
Rango frecuencia: 110~205kHz
Potencia salida inhalambrico: 10W Max
Input: DC5V⎓2A / DC9V⎓1.5A
Output: DC5V⎓1A / DC9V⎓1.1A
Material: bamboo
Vista de product:
1. Superficie carga inhalambrica
2. Indicador luz LED
3. Puerto salida Micro USB
Usando cargador inalámbrico:
•Primero conecte el cargador inalámbrico usando el cable Micro
USB incluido en el puerto USB de su adaptador de pared. El
indicador LED se ilumina en verde y azul durante dos

segundos.
•Asegúrese de que su teléfono sea compatible con la carga
inalámbrica.
•Coloque su dispositivo habilitado para carga inalámbrica en el
área de carga inalámbrica
•El LED azul se iluminará cuando el dispositivo se esté cargando
correctamente.
Nota:
•Algunas carcasas de teléfonos pueden bloquear la carga
inalámbrica.
•No coloque otros materiales, como objetos metálicos, imanes y
tarjetas con banda magnética, entre el dispositivo móvil y la
base del cargador inalámbrico.
•Verifique el porcentaje de batería de su dispositivo móvil
usando el ícono de carga que se muestra en la pantalla de su
teléfono.
•Cuando el dispositivo móvil no se coloca en el área de carga
con precisión, es posible que su dispositivo móvil no se cargue
correctamente.
•No exponga este dispositivo a fuentes de calor o humedad.
•Esto no es un juguete, no apto para niños menores de 7 años.
NL
Draadloze lader.
Specificatie:
Spoelen: 2 stuks
Frequentiebereik: 110~205kHz
Draadloze uitgangsvermogen: 10W Max
Ingang: DC5V⎓2A / DC9V⎓1.5A
Uitgang: DC5V⎓1A / DC9V⎓1.1A
Materiaal: bamboe
Productoverzicht:
1. Draadloos oplaadgebied
2. LED-indicatielampje
3. Micro USB-ingangspoort

Draadloze oplader gebruiken:
•Sluit eerst de draadloze oplader aan op de USB-poort van je
wandadapter met de meegeleverde Micro USB-kabel. De LED-
indicator licht twee seconden op in Groen & Blauw
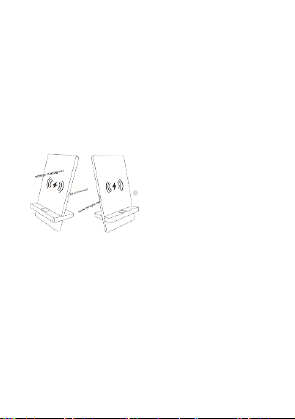
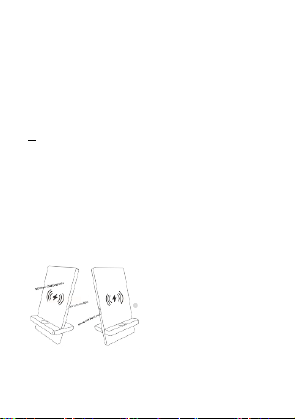
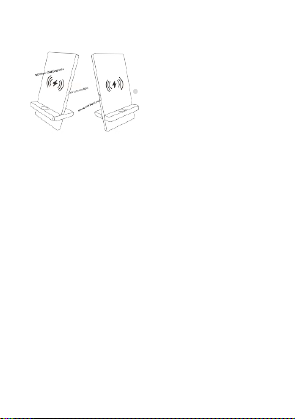
•Zorg ervoor dat je telefoon geschikt is voor draadloos opladen.
•Plaats je toestel geschikt voor draadloos opladen op de
draadloze oplader
•De blauwe led zal oplichten wanneer het apparaat succesvol is
opgeladen.
Opmerking:
•Sommige telefoonhoesjes kunnen het draadloos opladen
blokkeren.
•Plaats geen andere materialen, zoals metalen voorwerpen,
magneten en magneetkaarten, tussen het mobiele apparaat en
de draadloze oplader.
•Controleer het batterijpercentage van uw mobiele apparaat met
behulp van het oplaadpictogram dat op het scherm van uw
telefoon wordt weergegeven.
•Als het mobiele apparaat niet nauwkeurig op het oplaadgebied
wordt geplaatst, kan het zijn dat uw mobiele apparaat niet goed
wordt opgeladen.
•Stel dit apparaat niet bloot aan vocht of warmtebronnen.
•Dit is geen speelgoed, niet geschikt voor kinderen onder de 7
jaar.
PL
Bezprzewodowa ładowarka.
Specyfikacja:
Cewki: 2 sztuki
Zakres częstotliwości: 110 ~ 205kHz
Bezprzewodowa moc wyjściowa: maks. 10 W;
Wejście: DC5V⎓2A/DC9V⎓1,5A
Wyjście: DC5V (1A / DC9V (1,1 A)
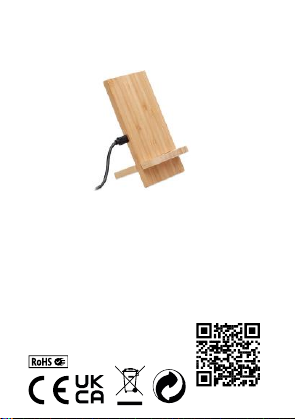
Materiał: bambus
Przegląd produktów:
1. Obszar ładowania bezprzewodowego

2. Kontrolka LED
3. Port wejściowy Micro USB
•Korzystanie z ładowarki bezprzewodowej:
•Najpierw podłącz bezprzewodową ładowarkę za pomocą
dołączonego kabla Micro USB do portu USB adaptera
ściennego. Wskaźnik LED zaświeci się na zielono i niebiesko
przez dwie sekundy
•Upewnij się, że Twój telefon jest kompatybilny z ładowaniem
bezprzewodowym.
•Umieść urządzenie obsługujące ładowanie bezprzewodowe w
obszarze ładowania bezprzewodowego
•Niebieska dioda zaświeci się, gdy urządzenie ładuje się
pomyślnie.
Uwaga:
•Niektóre etui na telefony mogą blokować ładowanie
bezprzewodowe.
•Nie umieszczaj innych materiałów, takich jak metalowe
przedmioty, magnesy i karty z paskiem magnetycznym, między
urządzeniem mobilnym a bezprzewodową ładowarką.
•Sprawdź procent baterii swojego urządzenia mobilnego za
pomocą ikony ładowania wyświetlanej na ekranie telefonu.
•Jeśli urządzenie mobilne nie zostanie umieszczone dokładnie w
obszarze ładowania, urządzenie mobilne może nie ładować się
prawidłowo.
•Nie wystawiaj urządzenia na działanie wilgoci lub źródeł ciepła.
•To nie jest zabawka, nie nadaje się dla dzieci poniżej 7 roku
życia.
Other MOB Batteries Charger manuals
Popular Batteries Charger manuals by other brands

Altronix
Altronix AL300ULXD user manual

NewMar
NewMar PT-14W Installation and operation manual

ANSMANN
ANSMANN ENERGY8 plus operating instructions

ISDT
ISDT K4 user guide

True blue power
True blue power TA360 Series Installation manual and operating instructions

Sierra wave
Sierra wave Power Station 9652 operating instructions