Monacor CD-112/BT User manual

THE AUDIO COMPANY THE AUDIO COMPANY THE AUDIO COMPANY THE AUDIO COMPANY THE AUDIO COMPANY THE AUDIO COMPANY
BEDIENUNGSANLEITUNG
INSTRUCTION MANUAL
MODE D’EMPLOI
ISTRUZIONI PER L’USO
GEBRUIKSAANWIJZING
MANUAL DE INSTRUCCIONES
INSTRUKCJA OBSŁUGI
SIKKERHEDSOPLYSNINGER
SÄKERHETSFÖRESKRIFTER
TURVALLISUUDESTA
CD/MP3-Spieler
mit Bluetooth-Empfänger
CD/MP3 Player
with Bluetooth Receiver
CD-112/BT
Bestell-Nr. • Order No. 0212940

2
Deutsch ...........Seite 4
English ............Page 8
Français ...........Page 12
Italiano............Pagina 16
Nederlands ........Pagina 20
Español ...........Página 24
Polski .............Strona 28
Dansk .............Sida 32
Svenska ...........Sidan 32
Suomi.............Sivulta 33
THE AUDIO COMPANY THE AUDIO COMPANY THE AUDIO COMPANY THE AUDIO COMPANY THE AUDIO COMPANY THE AUDIO COMPANY

3
AUTO PLAY
MANUAL PLAY
USE ONLY WITH A 250V FUSE
CD
TR 14 01:53 CDA
POWER
2
IR
6
1
78
3
9
5
0
4
SD/MMC
CARD SKIP
REV
CUE
PROG
STOP PLAY/PAUSE EJECT
FOLDER REPEAT FUNC DOWN UP
C D -112/ BT
PAIR
PAIR BT POWER
IR
SKIP
REV
CUE
PROG
STOP PLAY/PAUSE EJECT
FOLDER REPEAT FUNC DOWN UP
PAIR
PAIR BT POWER
R L R L
PRIORITY OUT BLUETOOTH OUT CD PLAYER OUT
R L
FUSE
230V~/
50Hz
1 2 3 4 5 6
7 158 10
9
11
12
13
14
16 2018 1917
21 2524
22 23
➀
➁
➂
2 31
5 64
8 97
0
STOP
PROG
ID3
PLAY
PAUSE
REV – SKIP – CUE
FUNC
FINDREPEAT
MUTEEJECT
FOLDER
DISPLAY
3
16
17
11
26
10
9
18
27
8
19
28
29
➃ ➄

4
Deutsch
English
English Page
Français
Français Page
Italiano
Italiano Pagina
Español
Español Página
Nederlands
Nederlands Pagina
Polski
Polski Strona
CD/MP3-Spieler
Diese Bedienungsanleitung richtet sich an
Benutzer ohne besondere Fachkenntnisse.
Bitte lesen Sie die Anleitung vor dem Betrieb
gründlich durch und heben Sie sie für ein spä-
teres Nachlesen auf.
Auf der ausklappbaren Seite 3 finden
Sie alle beschriebenen Bedienelemente und
Anschlüsse.
1 Übersicht
1.1 Frontseite
1 Ein-/Ausschalter POWER
2
Schlitz zum Einstecken einer SD/MMC-
Speicherkarte
3 Zifferntasten zur Direktwahl eines Titels
Beispiele:
Titel-Nr. Tasten
4 4, PLAY/PAUSE
27 2, 7, PLAY/PAUSE
135 1, 3, 5, PLAY/PAUSE
4 CD-Einzugschlitz
Die CD soweit in den Schlitz schieben, bis
sie automatisch eingezogen wird.
5 Display
6
USB-Schnittstelle zum Einstecken eines
USB-Sticks oder zum Anschluss einer
Festplatte
7
Infrarotsensor für die Fernbedienungs-
signale
8 SKIP-Tasten (CUE und REV) für die Titel-
anwahl sowie den schnellen Vor- und
Rücklauf
Titelanwahl
Mit jedem Drücken der Taste CUE wird
einen Titel vorgesprungen; durch Drü
-
cken der Taste REV wird an den Titel-
anfang gesprungen und mit jedem
weiteren Drücken einen Titel zurück.
schneller Vor-/Rücklauf
Für den Vorlauf die Taste CUE gedrückt
halten, für den Rücklauf die Taste REV.
9 Taste STOP zum Beenden des Abspielens
10 Taste PLAY/PAUSE zum Umschalten zwi-
schen Wiedergabe und Pause
11 Taste EJECT zum Auswerfen der CD
12 Anzeige PAIR:
Blinkt bei eingeschaltetem Bluetooth-
Empfänger.
Leuchtet konstant bei erfolgter Kopplung
mit einer Bluetooth-Signalquelle.
13 Taste PAIR zum Koppeln mit einer Blue-
tooth-Signalquelle (☞Kapitel 6.8)
14 Antenne des Bluetooth-Empfängers
15 Taste BT POWER/ Izum Ein- und Aus-
schalten des Bluetooth-Empfängers (Taste
länger gedrückt halten) und um die Wie-
dergabe bei Bluetooth-Betrieb zu unter-
brechen oder fortzufahren (Taste kurz
drücken)
16 Tasten FOLDER bei MP3-Dateien zur Ord-
neranwahl:
Zum Anwählen des nächsten Ordners die
Taste drücken. Zum Zurückspringen
auf den vorherigen Ordner die Taste
betätigen. Dabei wird immer auf den
ersten Titel des angewählten Ordners
gesprungen.
17
Taste REPEAT zum Anwählen der Wieder-
holfunktionen und der Zufallswiedergabe
Grundeinstellung
PLAY ALL: Alle Titel des Tonträgers
oder einer programmierten Titelfolge
werden einmal abgespielt.
erster Tastendruck
PLAY ALL RANDOM: einmalige Wie-
dergabe der Titel in zufälliger Reihen-
folge
nächster Tastendruck
REPEAT TRACK: ständige Wiederho-
lung des angewählten Titels
nächster Tastendruck
REPEAT FOLDER: ständige Wiederho-
lung aller Titel im angewählten Ordner
(Funktion nur bei MP3-Dateien vorhan-
den)
nächster Tastendruck
REPEAT ALL: ständige Wiederholung
aller Titel
nächster Tastendruck
RANDOM REPEAT: ständiges Abspielen
der Titel in zufälliger Reihenfolge
nächster Tastendruck
PLAY ALL: Zurückschalten auf die
Grundeinstellung
18
Taste PROG, um zum Zusammenstellen
einer eigenen Titelfolge in den Program-
miermodus zu schalten (☞Kapitel 6.7)
19
Taste FUNC zum Wählen des Tonträgers
(CD, USB-Speicher, SD/MMC-Speicher-
karte)
20 Für den Bluetooth-Betrieb:
Tasten DOWN/ und UP/ für die
Titelanwahl sowie den schnellen Vor- und
Rücklauf
1.2 Rückseite
21 Cinch-Buchsen PRIORITY OUT
Hier liegt entweder das Signal des Blue-
tooth-Empfängers an oder, wenn kein
Signal empfangen wird oder die Wieder-
gabe auf Pause geschaltet ist, das Signal
des CD/MP3-Spielers.
22
Cinch-Buchsen BLUETOOTH OUT für den
Audioausgang des Bluetooth-Empfängers
23 Cinch-Buchsen CD PLAYER OUT für den
Audioausgang des CD/MP3-Spielers
24
Netzbuchse zum Anschluss an eine Steck-
dose (230V/50 Hz) über das beiliegende
Netzkabel
25 Halterung für die Netzsicherung
Eine geschmolzene Sicherung nur durch
eine gleichen Typs ersetzen.
1.3 Fernbedienung
3, 8 – 11 und 16 – 19
Diese Tasten haben die gleichen Funktionen
wie die Tasten am Gerät.
26 Taste MUTE zum Stummschalten
27
Taste DISPLAY zum Umschalten der Infor-
mationen in der unteren Displayzeile wäh-
rend der Wiedergabe von MP3-Dateien
Grundeinstellung
In der unteren Zeile wird die Titelnum-
mer (TR) und die gespielte Zeit des Ti-
tels angezeigt.
1. Tastendruck
Der Ordnername wird angezeigt.
2. Tastendruck
Die Anzahl der Ordner und der Titel
werden angezeigt.
3. Tastendruck
Zurückschalten auf die Grundeinstel-
lung
28 Taste ID3 zum Aus- und Wiedereinblen-
den der durchlaufenden Informationen in
der oberen Displayzeile bei MP3-Dateien
(Name der Datei, des Titels, des Künstlers
und des Albums)
29 Taste FIND zur Suche von MP3-Titeln und
Ordnern (☞Kapitel 6.3.3 und 6.3.4)
2 Sicherheitshinweise
Das Gerät entspricht allen relevanten Richt-
linien der EU und trägt deshalb das -Zei-
chen.
WARNUNG
Das Gerät wird mit lebens-
gefährlicher Netzspannung
versorgt. Nehmen Sie deshalb
niemals selbst Eingriffe daran
vor. Es besteht die Gefahr
eines elektrischen Schlages.
•
Das Gerät ist nur zur Verwendung im In-
nenbereich geeignet. Schützen Sie es vor
Tropf- und Spritzwasser sowie vor hoher
Luftfeuchtigkeit. Der zulässige Einsatztem-
peraturbereich beträgt 0–40 °C.
•
Stellen Sie keine mit Flüssigkeit gefüllten
Gefäße, z.B. Trinkgläser, auf das Gerät.
•
Nehmen Sie das Gerät nicht in Betrieb und
ziehen Sie sofort den Netzstecker aus der
Steckdose,
1. wenn sichtbare Schäden am Gerät oder
am Netzkabel vorhanden sind,
2. wenn nach einem Sturz oder Ähnlichem
der Verdacht auf einen Defekt besteht,
3. wenn Funktionsstörungen auftreten.
Geben Sie das Gerät in jedem Fall zur Re-
paratur in eine Fachwerkstatt.
•
Ziehen Sie den Netzstecker nie am Kabel
aus der Steckdose, fassen Sie immer am
Stecker an.
•
Wird das Gerät zweckentfremdet, nicht
richtig angeschlossen, falsch bedient oder
nicht fachgerecht repariert, kann keine Haf-
tung für daraus resultierende Sach- oder
Personenschäden und keine Garantie für
das Gerät übernommen werden.
Soll das Gerät endgültig aus dem
Betrieb genommen werden, ent-
sorgen Sie es gemäß den örtlichen
Vorschriften.
Deutsch
Deutsch Seite

5
Deutsch
3 Einsatzmöglichkeiten
Der CD/MP3-Spieler CD-112/BT mit Blue-
tooth-Empfänger ist für vielfältige Beschal-
lungsaufgaben geeignet (z.B. im Theater, in
Gaststätten, in Warteräumen) und bietet dazu
spezielle Funktionen wie z.B. Endloswieder-
gabe, Zufallswiedergabe, MP3-Wiedergabe
von USB-Speichermedien und SD/MMC-Spei-
cherkarten (max. 32GB).
Mit dem Gerät können Audio-CDs, selbst
gebrannte Audio-CDs (Audio CD-R) sowie
CDs mit Titeln im MP3-Format abgespielt wer-
den. Bei wiederbeschreibbaren CDs (CD-RW)
kann es jedoch je nach CD-Typ, verwendetem
CD-Brenner und Brennprogramm beim Ab-
spielen zu Problemen kommen.
Hinweis: Aufgrund der Vielfalt von Speicherher-
stellern und Gerätetreibern kann nicht garantiert
werden, dass alle Speichermedien mit dem CD-
112/BT kompatibel sind.
3.1 Konformität und Zulassung
Hiermit erklärt Monacor International GmbH &
Co. KG, dass der Funkanlagentyp CD-112/BT
der Richtlinie 2014/53/EU entspricht. Der voll-
ständige Text der EU-Konformitätserklärung
ist unter der folgenden Internetadresse ver-
fügbar:
www.monacor-international.de
4 Auto-Start-Funktion
ausschalten
Der CD/MP3-Spieler ist mit einer Auto-Start-
Funktion ausgestattet: Nach dem Einschalten
des Geräts und dem Einlesen eines Tonträgers
(CD, USB-Speicher oder Speicherkarte) star-
tet automatisch die Wiedergabe des ersten
Titels. Wenn das automatische Starten nicht
gewünscht wird [Start der Wiedergabe erst
durch Drücken der Taste PLAY/PAUSE(10)],
lässt sich die Auto-Start-Funktion ausschalten.
WARNUNG Weil das Gerät für die Ände-
rung geöffnet werden muss,
darf dies nur durch eine aus-
gebildete Fachkraft erfolgen.
Durch unsachgemäßes Vorge-
hen besteht die Gefahr eines
elektrischen Schlages!
Vor dem Öffnen des Geräts unbedingt den
Netzstecker aus der Steckdose ziehen!
Auf der Leiterplatte mit dem Netzteil und den
Audio-Ausgangsbuchsen befindet sich eine
Steckbrücke (siehe Pfeil in der Abb. 5). Die
Auto-Start-Funktion ist eingeschaltet, wenn
sich die Brücke in der Position AUTO PLAY
befindet. Zum Ausschalten der Funktion die
Brücke in die Position MANUAL PLAY stecken.
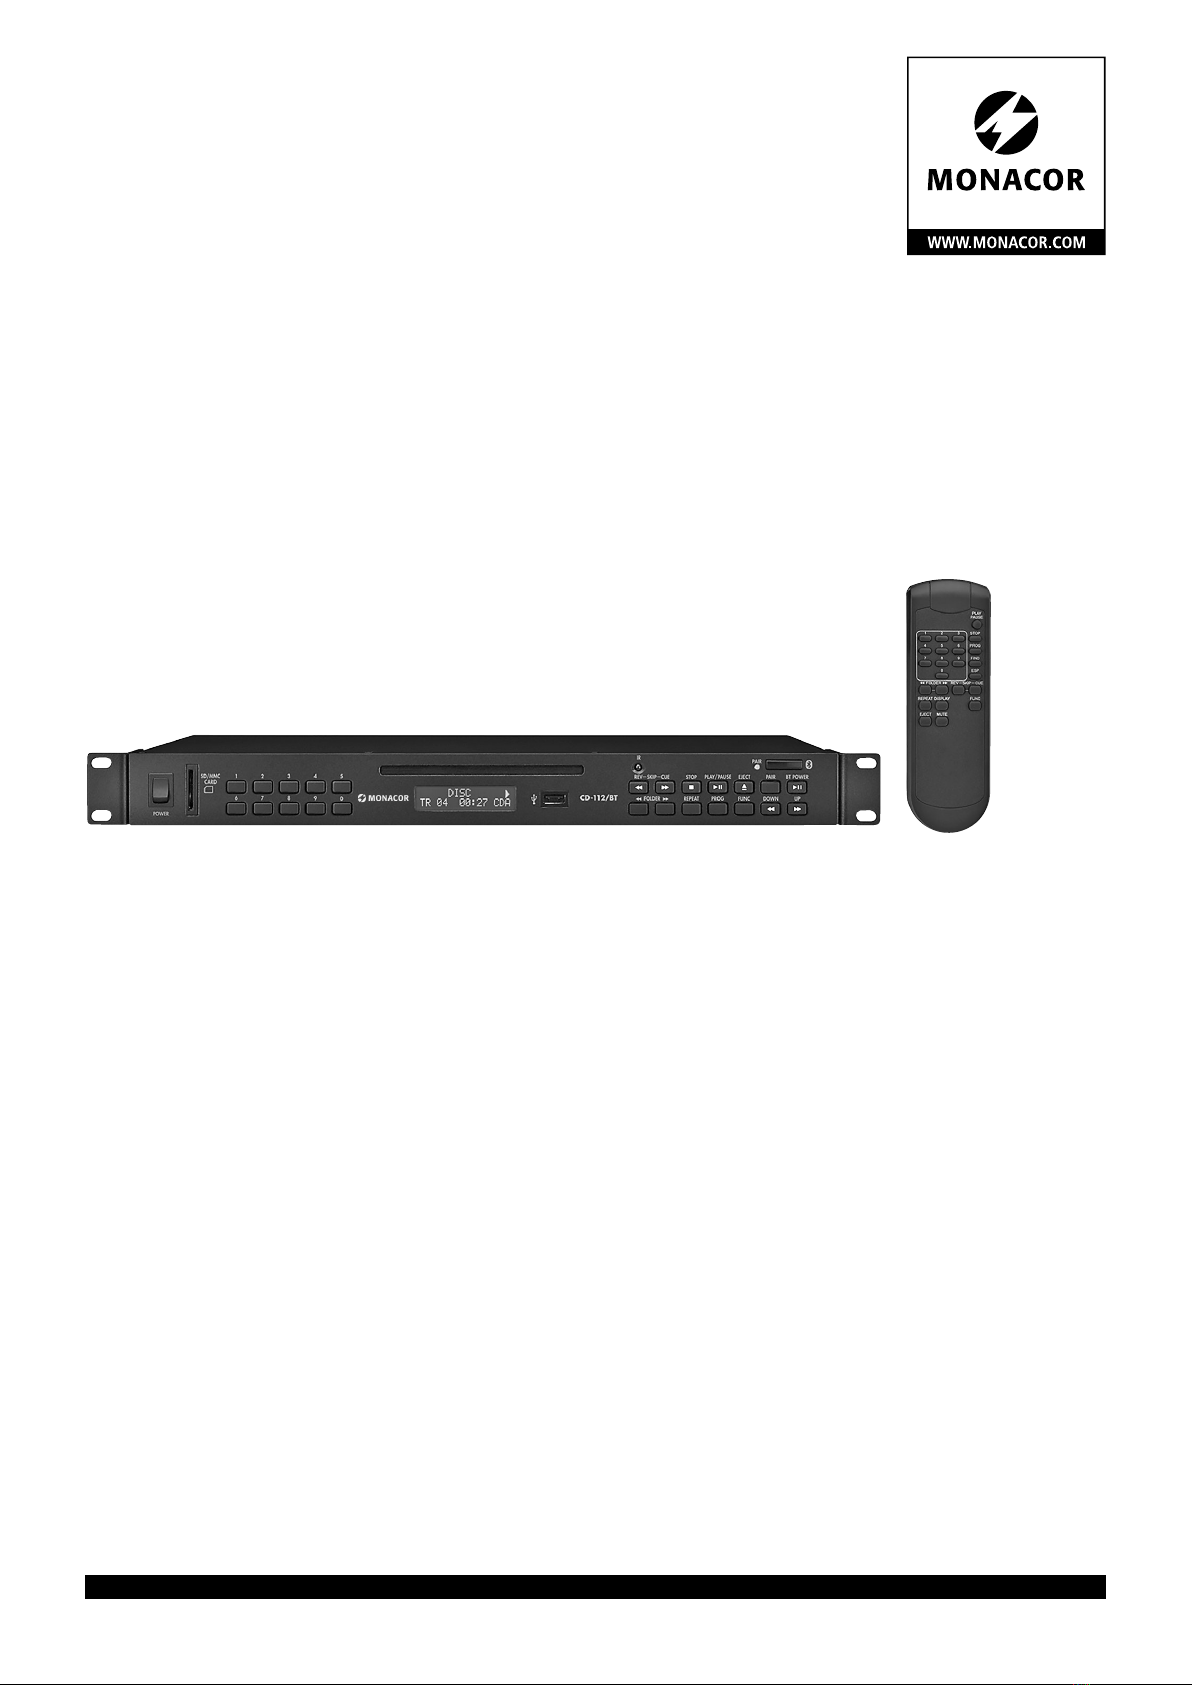
5 Gerät aufstellen
undanschließen
Das Gerät ist für die Montage in ein Rack
(482mm /19”) vorgesehen, kann aber auch
als frei stehendes Tischgerät verwendet wer-
den. Für den Einbau in ein Rack wird 1HE
benötigt (HE = Höheneinheit = 44,45mm).
Vor dem Anschluss bzw. vor dem Verändern
von Anschlüssen den CD-112/BT und die an-
zuschließenden Geräte ausschalten.
1)
Um die Audiosignale an das nachfolgende
Gerät (z.B. Mischpult oder Verstärker) wei-
terzuleiten, sind drei Line-Pegel-Ausgänge
vorhanden:
PRIORITY OUT (21)
Hier liegt entweder das Signal des Blue-
tooth-Empfängers an oder, wenn kein
Signal empfangen wird oder die Wie-
dergabe auf Pause geschaltet ist, das
Signal des CD/MP3-Spielers.
BLUETOOTH OUT (22)
für das Signal des Bluetooth-Empfängers
CD PLAYER OUT (23)
für das Signal des CD/MP3-Spielers
2)
Das beiliegende Netzkabel zuerst in die
Netzbuchse (24) und dann in eine Steck-
dose (230V/50 Hz) stecken.
6 Bedienung
Das Gerät mit dem Netzschalter POWER (1)
einschalten. Auf dem Display (5) erscheint die
Anzeige
Welcome.
Zuerst liest das Gerät die CD ein. Ist keine
CD eingeschoben, wird der USB-Speicher ein-
gelesen. Ist kein USB-Speicher angeschlossen,
wird die SD/MMC-Speicherkarte eingelesen.
Ist auch keine Speicherkarte eingesteckt, zeigt
das Display
NO DISC an.
6.1 Fernbedienung
1)
Zum Einsetzen der Batterien (2 × 1,5V,
Größe AAA = Micro) auf der Rückseite der
Fernbedienung den Batteriefachdeckel ab-
nehmen. Die Batterien, wie im Batteriefach
angegeben, einsetzen. Das Fach mit dem
Deckel wieder schließen.
Bei längerem Nichtgebrauch die Batte-
rien herausnehmen, damit die Fernbedie-
nung bei einem eventuellen Auslaufen der
Batterien nicht beschädigt wird.
2)
Die Fernbedienung beim Drücken einer
Taste immer in Richtung des Sensors IR(7)
halten. Dabei muss Sichtverbindung zwi-
schen der Fernbedienung und dem Sensor
bestehen.
3)
Lässt die Reichweite der Fernbedienung
nach, sind die Batterien verbraucht und
müssen ausgewechselt werden.
Batterien dürfen nicht im Hausmüll
entsorgt werden. Geben Sie sie
gemäß den örtlichen Vorschriften
in den Sondermüll.
6.2 Musiktitel abspielen
1) Eine CD, mit der Beschriftung nach oben
zeigend, in den Einzugschlitz (4) schieben,
bis sie automatisch eingezogen wird
und/oder
einen USB-Stick in den USB-Anschluss (6)
stecken oder eine Festplatte (ggf. mit ei-
gener Stromversorgung) mit dem USB-
Anschluss verbinden
und/oder
eine SD/MMC-Speicherkarte in den Schlitz
SD/MMC CARD (2) stecken. Dabei muss
die abgeschrägte Ecke der Karte nach oben
zeigen. Soll die Karte wieder entnommen
werden, sie etwas hineindrücken, sodass
sie ausrastet.
2)
Den Tonträger (CD, USB-Speicher, Spei-
cherkarte) ggf. mit der Taste FUNC (19)
anwählen.
3)
Nach dem Einlesevorgang startet auto-
matisch die Wiedergabe des ersten Titels.
Wurde jedoch die Auto-Start-Funktion
ausgeschaltet (Kapitel 4), mit der Taste
PLAY/PAUSE (10) die Wiedergabe des ers-
ten Titels starten. Zum Anwählen anderer
Titel siehe Kapitel 6.3.
4) Während des Abspielens ist in der oberen
Displayzeile rechts das Wiedergabesym-
bol eingeblendet. Die untere Zeile zeigt
die Nummer (TR …) des laufenden Titels
und die bereits verstrichene Abspielzeit
(Min. : Sek.) des Titels an. Ganz rechts wird
MP3 bei Titeln im MP3-Format angezeigt
oder
CDA bei Standard-Audio-CDs.
5)
Bei MP3-Dateien erscheint zusätzlich durch-
laufend in der oberen Zeile:
File –… = Dateiname
Title –… = Titelname
Artist –… = Name des Künstlers
Album –…= Name des Albums
Hinweis: Fehlt eine Angabe, zeigt das Display
anstelle des Names
Unknown an.
Mit der Taste ID3 (28) können diese durch-
laufenden Informationen aus- und wieder
eingeblendet werden.
6) Durch Drücken der Taste DISPLAY (27) auf
der Fernbedienung können bei MP3-Da-
teien in der unteren Displayzeile verschie-
dene Informationen angezeigt werden:
Grundeinstellung
In der unteren Zeile wird die Titelnummer
und die gespielte Zeit des Titels angezeigt.
1. Tastendruck
Der Ordnername wird angezeigt.
2. Tastendruck
Die Anzahl der Ordner und der Titel
werden angezeigt.
3. Tastendruck
Zurückschalten auf die Grundeinstel-
lung
7) Mit der Taste PLAY/PAUSE kann zwischen
Wiedergabe und Pause gewechselt wer-
den. Im Pausenmodus ist das Pausensym-
boleingeblendet und die Zeitangabe
blinkt.
8)
Wenn die Wiedergabe beendet werden
soll, die Taste STOP (9) drücken. Das Dis-
play zeigt dann in der zweiten Zeile:
bei Standard-Audio-CDs
– die Anzahl der Titel (TR …)
– die Gesamtspielzeit (Min. : Sek.)
bei Tonträgern mit MP3-Dateien
– die Anzahl der Ordner
– die Anzahl der Titel
9)
Zum Auswerfen der CD die Taste EJECT(11)
drücken. Das Display zeigt
EJECT, die CD
wird herausgefahren und kann entnom-
men werden. Wird die CD nicht aus dem
Einzugschlitz genommen, zieht das Gerät
sie nach ca. 10s wieder automatisch ein.

6
Deutsch
6.3 Titelanwahl
6.3.1 Direktwahl der Titelnummer
Mit den Zifferntasten (3) lässt sich ein Titel
durch Eingabe seiner Nummer direkt anwäh-
len. Zum Starten des Titels anschließend die
Taste PLAY/PAUSE (10) drücken. Beispiele:
Titel-Nr. Tasten
4 4, PLAY/PAUSE
27 2, 7, PLAY/PAUSE
135 1, 3, 5, PLAY/PAUSE
Hinweis: MP3-Titel werden vom Gerät wie folgt
durchnummeriert:
1. alle Titel ohne Ordner im Hauptverzeichnis ROOT
2. alle Titel in Ordnern im Hauptverzeichnis
3. alle Titel in Unterordnern usw.
Die Nummerierung der Titel und Ordner erfolgt
nicht in alphabetischer Reihenfolge, lässt sich je-
doch mit der Suchfunktion leicht feststellen (
☞
Ka-
pitel 6.3.3 und 6.3.4).
6.3.2 Titel vor- oder zurückspringen
Um einen oder mehrere Titel vor- oder zu-
rückzuspringen, die Taste CUE bzw. REV (8)
kurz (mehrfach) drücken.
Taste CUE: Zum nächsten Titel springen
Taste REV: An den Anfang des gerade laufen-
den Titels springen. Durch weiteres Drücken
der Taste REV wird immer einen Titel weiter
zurückgesprungen.
Hinweis: Die Tasten CUE und REV nur kurz drü-
cken, sonst erfolgt ein schneller Rück- bzw. Vorlauf.
6.3.3 Alphabetische Suche von MP3-Titeln
1)
Auf der Fernbedienung die Taste FIND(29)
drücken. Ein Lupensymbol erscheint blin-
kend unten links im Display. Rechts dane-
ben wird der Buchstabe
Aangezeigt und
in der oberen Displayzeile der Name der
ersten Datei, die mit dem BuchstabenA
beginnt.
2) Mit der Taste CUE [vorwärts laufend] oder
REV [rückwärts laufend] (8) den Buchsta-
ben wählen, mit dem der gesuchte Datei-
name beginnt. Hierbei können auch die
Ziffern 0–9 gewählt werden. Bei Buchsta-
ben und Ziffern, mit denen kein Dateiname
beginnt, wird
None angezeigt.
3) Wenn mehrere Dateinamen mit dem glei-
chen Anfangsbuchstaben vorkommen,
nach dem Wählen des Suchbuchstabens
die Taste CUE oder REV gedrückt halten,
bis der Buchstabe neben dem Lupensym-
bol blinkt. Alle Dateinamen mit dem ange-
zeigten Anfangsbuchstaben können nun
mit der Taste CUE oder REV nacheinander
angewählt werden.
4)
Bei der Suche zeigt das Display stets
die Nummer des Ordners und des Titels
unten rechts an. Ist der gewünschte Titel
gefunden, die Wiedergabe mit der Taste
PLAY/PAUSE (10) starten.
6.3.4 Ordneranwahl und Ordnersuche
Bei MP3-Dateien in mehreren Ordnern (Datei-
verzeichnissen) kann während der Wieder-
gabe mit den Tasten FOLDER (16) auf den
ersten Titel des nächsten Ordners (Taste )
und auf den ersten Titel des vorherigen Ord-
ners (Taste ) gesprungen werden.
Wird zuerst die Wiedergabe mit der Taste
STOP(9) beendet und dann die Taste FOLDER
oder gedrückt, zeigt die obere Dis-
playzeile den Ordnernamen an und die un-
tere Zeile hinter dem Symbol die Ordner-
nummer.
Mit der Suchfunktion lässt sich ein Ordner mit
einem bestimmten Namen auch während der
Wiedergabe eines Titels finden:
1) Die Taste FIND (29) zweimal drücken, so-
dass im Display das Lupensymbol blinkend
erscheint und rechts daneben Dir für
Directory (Ordner) angezeigt wird.
2)
Mit der Taste CUE oder REV (8) den ge-
wünschten Ordner suchen. Die obere Dis-
playzeile zeigt dabei den Ordnernamen an
und die untere Zeile die Ordnernummer.
3) Ist der Ordner gefunden, zum Starten des
ersten Titels aus dem Ordner die Taste
PLAY/PAUSE (10) drücken oder zum Star-
ten eines anderen Titels aus dem Ordner
zuerst die Taste CUE oder REV gedrückt
halten, bis neben dem Lupensymbol
File (Datei) angezeigt wird. Mit der Taste
CUE oder REV lassen sich jetzt die Titel
aus dem Ordner nacheinander anwählen.
Zum Starten des gewählten Titels die Taste
PLAY/PAUSE drücken.
6.4 Schneller Vor-/Rücklauf
Die Taste CUE bzw. REV (8) gedrückt halten
(CUE:schneller Vorlauf, REV: schneller Rück-
lauf). Bei MP3-Dateien kann ein Vor- oder
Rücklauf nur innerhalb eines Titels erfolgen
und nicht akustisch, sondern nur anhand der
Zeitanzeige des Displays verfolgt werden.
6.5 Wiederholfunktionen und
Zufallswiedergabe
Mit der Taste REPEAT (17) lässt sich eine der
Wiederholfunktionen und die Wiedergabe
der Titel in zufälliger Reihenfolge einschalten:
Grundeinstellung
PLAY ALL: Alle Titel des Tonträgers oder
einer programmierten Titelfolge werden
einmal abgespielt, dann endet die Wie-
dergabe.
erster Tastendruck
PLAY ALL RANDOM: einmalige Wieder-
gabe der Titel in zufälliger Reihenfolge
nächster Tastendruck
REPEAT TRACK: ständige Wiederholung
des angewählten Titels
nächster Tastendruck
REPEAT FOLDER: ständige Wiederholung
aller Titel im angewählten Ordner
(Funktion nur bei MP3-Dateien vorhan-
den)
nächster Tastendruck
REPEAT ALL: ständige Wiederholung aller
Titel
nächster Tastendruck
RANDOM REPEAT: ständiges Abspielen
der Titel in zufälliger Reihenfolge
nächster Tastendruck
PLAY ALL: Zurückschalten auf die Grund-
einstellung
6.6 Ton stumm schalten
Um während der Wiedergabe eines Titels den
Ton stummzuschalten, die Taste MUTE(26)
auf der Fernbedienung drücken. Zum Wieder-
einschalten des Tons die Taste MUTE erneut
drücken.
6.7 Eigene Titelfolge
zusammenstellen
Soll eine Auswahl von Titeln in einer be-
stimmten Reihenfolge abgespielt werden,
lässt sich eine Folge von bis zu 64 Titeln pro-
grammieren. Dazu sollte bei MP3-Dateien
die Nummerierung der Ordner bekannt sein
(☞Kapitel6.3.4), denn für jeden zu pro-
grammierenden Titel muss die zugehörige
Nummer des Ordners eingegeben werden.
1)
Das Gerät muss auf Stopp geschaltet sein;
ggf. die Taste STOP (9) drücken.
2)
Mit der Taste PROG (18) den Programmier-
modus einschalten. Alle weiteren Tasten
jeweils innerhalb von 15 Sekunden drü-
cken, sonst wird der Programmiermodus
verlassen. In diesem Fall die Taste PROG
erneut betätigen. Das Display zeigt:
– bei einer CD ohne MP3-Dateien
PROGRAM
CD Pƅ01 00
– bei MP3-Dateien
PROGRAM
Pƅ01 000 0000
3)
Bei CDs ohne MP3-Dateien diesen Bedien-
schritt überspringen und direkt mit dem
Schritt 4 fortfahren.
Bei MP3-Dateien muss zuerst die Num-
mer des Ordners gewählt werden, in dem
sich der erste gewünschte Titel der Titel-
folge befindet. Dieses ist auch erforderlich,
wenn sich alle Titel im Hauptverzeichnis
ROOT ohne Ordner befinden. In diesem
Fall die 1 als Ordnernummer eingeben.
Die Ordnernummer mit den SKIP-Tasten(8)
wählen oder mit den Zifferntasten (3)
eingeben. Zum Speichern dann die Taste
PROG drücken. Die vier Nullen blinken als
Aufforderung, die Titelnummer einzuge-
ben.
4)
Die Nummer des ersten Titels für die Titel-
folge mit den SKIP-Tasten (8) wählen oder
mit den Zifferntasten (3) eingeben. Bei
MP3-Dateien in Ordnern beachten, dass
jetzt nicht alle Dateien durchnummeriert
sind, sondern dass jeweils die erste Datei
in einem Ordner mit der Nummer 1 be-
zeichnet wird.
5) Zum Speichern die Taste PROG drücken.
Das Display zeigt die nächste Speicher-
platznummer, z. B.
P-02.
6)
Die Bedienschritte (3), 4 und 5 für alle wei-
teren gewünschten Titel wiederholen, bis
die gesamte Titelfolge programmiert ist.
7) Zum Starten der Titelfolge die Taste PLAY/
PAUSE (10) drücken. Die obere Displayzeile
zeigt links
MEM für Memory an und die
Titelfolge wird abgespielt.
8)
Mit den SKIP-Tasten kann jeder Titel der
Titelfolge angewählt oder durch Gedrückt-
halten der jeweiligen Taste der schnelle

7
Deutsch
Vor-/Rücklauf innerhalb eines Titels akti-
viert werden.
9)
Nach dem Abspielen der Titelfolge oder
beim Drücken der Taste STOP wird die Wie-
dergabe beendet. Soll die Titelfolge erneut
gestartet werden, zuerst die Taste PROG
und dann die Taste PLAY/PAUSE drücken.
Hinweis: Eine programmierte Titelfolge wird beim
Wechseln des Tonträgers, beim Drücken der Taste
FUNC (19), beim Drücken der Taste STOP im Pro-
grammiermodus und beim Ausschalten des Geräts
gelöscht.
6.8 Bedienung des
Bluetooth-Empfängers
Mit dem Bluetooth-Empfänger kann eine
Funkverbindung zu einer Bluetooth-Signal-
quelle (z.B. Notebook, Smartphone, Tablet-
PC) hergestellt werden, um die dort gespei-
cherten Audio-Dateien über den CD-112/BT
abzuspielen.
Hinweis: Die Bluetooth-Signalquelle muss nach
dem A2DP-Protokoll arbeiten (Advanced Audio
Distribution Profile). Anderenfalls ist keine Funk
-
verbindung möglich.
1)
Die Bluetooth-Funktion am Notebook,
Smartphone oder Tablet-PC einschalten
(siehe ggf. Anleitung des Geräts).
2)
Um den Bluetooth-Empfänger des CD-
112/BT einzuschalten, die Taste BT POWER
(15) kurz gedrückt halten, bis die Anzeige
PAIR (12) blinkt.
3)
Um den CD-112/BT mit der Bluetooth-
Signalquelle zu koppeln, die Taste PAIR (13)
kurz gedrückt halten, bis die Anzeige PAIR
langsamer blinkt. Sobald die Funkverbin-
dung hergestellt ist, leuchtet die Anzeige
PAIR konstant.
Hinweis: Der CD-112/BT wird auf dem Display
der Bluetooth-Signalquelle mit „Audio Blue-
tooth“ angezeigt.
4) Die Wiedergabe eines Titels an der Blue-
tooth-Signalquelle starten.
5)
Mit der Taste I(15) lässt sich die Wieder-
gabe unterbrechen und wieder fortfahren.
Hinweis: Solange die Wiedergabe unterbro-
chen ist, liegt am Ausgang PRIORITY (21) das
Signal des CD/MP3-Spielers an.
6)
Mit den Tasten DOWN/ und UP/ (20)
kann auf den vorherigen oder den nächs-
ten Titel gesprungen werden (Taste kurz
drücken) sowie ein schneller Rück- oder
Vorlauf erfolgen (Taste gedrückt halten).
7)
Soll der Bluetooth-Empfänger ausgeschal-
tet werden, die Taste BT POWER so lange
gedrückt halten, bis die Anzeige PAIR er-
lischt.
7 Pflege
Das Gerät vor Staub, Vibrationen, Feuchtig-
keit und Hitze schützen. Für die Reinigung nur
ein weiches, trockenes Tuch verwenden, auf
keinen Fall Wasser oder Chemikalien.
Hinweis zu Tonaussetzern und Lese-
fehlern:
Zigarettenrauch und Staub dringen leicht
durch alle Öffnungen des Geräts und setzen
sich auch auf der Optik des Laser-Abtastsys-
tems ab. Sollte dieser Belag zu Lesefehlern
und Tonaussetzern führen, muss das Gerät in
einer Fachwerkstatt gereinigt werden. Diese
Reinigung ist kostenpflichtig, auch während
der Garantiezeit!
8 Technische Daten
Frequenzgang: . . . . . . . . . . . 20–20 000Hz
Klirrfaktor: . . . . . . . . . . . . . . < 0,1%
Kanaltrennung:. . . . . . . . . . . > 60dB
Dynamikumfang: . . . . . . . . . > 96dB
Störabstand: . . . . . . . . . . . . . > 70dB
Audioausgang: . . . . . . . . . . . 1,2V
Bluetooth-Übertragung
Frequenzband:. . . . . . . . . . 2,4GHz
max. Sendeleistung: . . . . . 10dBm
Stromversorgung: . . . . . . . . . ~ 230V/ 50Hz
Leistungsaufnahme: . . . . . . . max. 50VA
Einsatztemperatur: . . . . . . . . 0–40 °C
Abmessungen
Breite: . . . . . . . . . . . . . . . . 482mm
Höhe: . . . . . . . . . . . . . . . . 44mm
Tiefe:. . . . . . . . . . . . . . . . . 265mm
Höheneinheiten im Rack: . . . 1HE
Gewicht:. . . . . . . . . . . . . . . . 4kg
Änderungen vorbehalten.
Diese Bedienungsanleitung ist urheberrechtlich für MONACOR
®
INTERNATIONAL GmbH & Co. KG
geschützt. Eine Reproduktion für eigene kommerzielle Zwecke – auch auszugsweise – ist untersagt.

8
English
Deutsch
Deutsch Seite
Français
Français Page
Italiano
Italiano Pagina
Español
Español Página
Nederlands
Nederlands Pagina
Polski
Polski Strona
English
English Page
CD/MP3 Player
These instructions are intended for users
without any specific technical knowledge.
Please read these instructions carefully
prior to operation and keep them for later
reference.
All operating elements and connections
described can be found on the fold-out
page3.
1 Overview
1.1 Front panel
1 POWER switch
2 Slot to insert an SD/MMC memory card
3
Numerical keys for direct selection of a
title
Examples:
Title number Keys
4 4, PLAY/PAUSE
27 2, 7, PLAY/PAUSE
135 1, 3, 5, PLAY/PAUSE
4 CD slot
Insert the CD into the slot until it is pulled
in automatically.
5 Display
6
USB interface to connect a USB flash drive
or a hard disk
7 IR sensor for the remote control signals
8
SKIP Buttons (CUE and REV) for title selec-
tion and for fast forward/reverse
Title selection
Each time you press the button CUE,
the player will go to the next title;
when you press the button REV, the
player will return to the beginning of
the current title and each time you
press it again, it will go back one title
at a time.
Fast forward/reverse
For fast forward, keep the button CUE
pressed; for fast reverse, keep the but-
ton REV pressed.
9 Button STOP to stop the replay
10
Button PLAY/PAUSE to switch between
replay and pause
11 Button EJECT to eject the CD
12 LED PAIR
Keeps flashing when the Bluetooth re-
ceiver has been switched on.
Lights permanently after the device has
been linked to a Bluetooth signal source.
13 Button PAIR to link the device to a Blue-
tooth signal source (☞chapter 6.8)
14 Antenna of the Bluetooth receiver
15
Button BT POWER/ Ito switch on/off
the Bluetooth receiver (keep the but-
ton pressed for a longer period) and to
pause/continue the replay in Bluetooth
mode (press the button briefly)
16
Buttons FOLDER for folder selection of
MP3 files:
To select the next folder, press the button
. To return to the previous folder, press
the button . The player always goes to
the first title of the folder selected.
17 Button REPEAT to select the repeat func-
tions and random replay
basic setting
PLAY ALL: all titles of the sound carrier
or of a programmed title sequence will
be replayed once.
first actuation of button
PLAY ALL RANDOM: the titles will be
replayed once in random order.
next actuation of button
REPEAT TRACK: the title selected will
be repeated continuously.
next actuation of button
REPEAT FOLDER: all titles in the folder
selected will be repeated continuously
(function available for MP3 files only).
next actuation of button
REPEAT ALL: all titles will be repeated
continuously.
next actuation of button
RANDOM REPEAT: all titles will be re-
played continuously in random order.
next actuation of button
PLAY ALL: return to basic setting
18 Button PROG to switch to the program-
ming mode to compile an individual title
sequence (☞chapter 6.7)
19 Button FUNC to select the sound carrier
(CD, USB flash drive, SD/MMC memory
card)
20 In Bluetooth mode:
Button DOWN/ and UP/ for title
selection and for fast forward/reverse
1.2 Rear panel
21 RCA jacks PRIORITY OUT
At this output, either the signal of the
Bluetooth receiver or, if no signal is re-
ceived or if the replay has been set to
pause, the signal of the CD/MP3 player
is present.
22
RCA jacks BLUETOOTH OUT for the audio
output of the Bluetooth receiver
23 RCA jacks CD PLAYER OUT for the audio
output of the CD/MP3 player
24
Mains jack for connection to a socket
(230V/ 50Hz) via the mains cable pro-
vided
25 Support for the mains fuse
Always replace a blown fuse by one of
the same type.
1.3 Remote control
3, 8 – 11 and 16 – 19
These buttons have the same functions as the
buttons on the player.
26 Button MUTE to mute the sound
27 Button DISPLAY to change the informa-
tion in the lower line of the display during
replay of MP3 files
basic setting
The lower line will show the title num-
ber (TR) and the time already played
of the title.
first actuation of button
The folder name will be displayed.
second actuation of button
The number of folders and the number
of titles will be displayed.
third actuation of button
return to basic setting
28
Button ID3 to activate/deactivate infor-
mation on MP3 files scrolling through the
upper line of the display (file name, title
name, name of artist and album)
29 Button FIND to search for MP3 titles and
folders (☞chapters 6.3.3 and 6.3.4)
2 Safety Notes
The device corresponds to all relevant di-
rectives of the EU and is therefore marked
with .
The device corresponds to the relevant UK
legislation and is therefore marked with
UKCA.
WARNING
The device uses dangerous mains
voltage. Leave servicing to skilled
personnel only. Inexpert han-
dling may result in electric shock.
•
The device is suitable for indoor use only.
Protect it against dripping water, splash
water and high air humidity. The admissi-
ble ambient temperature range is 0–40°C.
•
Do not place any vessel filled with liquid on
the device, e.g. a drinking glass.
•
Do not operate the device and immediately
disconnect the mains plug from the socket
1. if the device or the mains cable is visibly
damaged,
2. if a defect might have occurred after the
device was dropped or suffered a similar
accident,
3. if malfunctions occur.
In any case the device must be repaired by
skilled personnel.
•
Never pull the mains cable to disconnect
the mains plug from the socket, always
seize the plug.
•
No guarantee claims for the device and no
liability for any resulting personal damage
or material damage will be accepted if the
device is used for other purposes than orig-
inally intended, if it is not correctly con-
nected or operated, or if it is not repaired
in an expert way.
If the device is to be put out of
operation definitively, dispose of
the device in accordance with local
regulations.

9
English
3 Applications
The CD/MP3 player CD-112/BT with Blue-
tooth receiver is suitable for versatile PA ap-
plications (e.g. in theatres, pubs or waiting
rooms) and offers special features, e.g. con-
tinuous repeat, random replay, MP3 replay
of USB storage media and SD/MMC memory
cards (32GB max.).
It is able to play audio CDs, audio CDs
you have burnt yourself (audio CD-R) and CDs
with titles in MP3 format. However, problems
may occur when replaying rewriteable CDs
(CD-RW) depending on the type of CD, the
CD burner and the burning program used.
Note: Due to the large number of storage device
manufacturers and device drivers, it cannot be
guaranteed that all storage media are compatible
with the CD-112/BT.
3.1 Conformity and approval
Hereby, Monacor International GmbH &
Co. KG declares that the radio equipment
type CD-112/BT is in compliance with Direc-
tive 2014/53/EU. The full text of the EU dec-
laration of conformity is available at the fol-
lowing internet address:
www.monacor-international.com
4 Deactivating the
AutomaticStart Function
The CD/MP3 player is provided with an auto-
matic start function: After switching on the
device and reading in a sound carrier (CD,
USB flash drive or memory card) the replay
of the first title will start automatically. If you
do not wish the device to start automati-
cally [replay will not start before the button
PLAY/PAUSE (10) is pressed], deactivate the
automatic start function.
WARNING
To make this modification, the
device must be opened by skilled
personnel only. Inexpert han-
dling may result in electric shock!
Always disconnect the mains plug from
the socket before opening the device!
On the PCB with the power supply unit and
the audio output jacks there is a jumper (see
arrow in fig. 5). The automatic start function
is activated when the jumper is in the position
AUTO PLAY. To deactivate the function, re-
arrange the jumper to the position MANUAL
PLAY.
5 Setting Up and Connecting
the Player
The player is designed for installation into a
rack (482mm /19”); however, it can also be
placed as desired as a desktop device. For
rack installation, 1rack unit (= 44.45 mm)
is required.
Prior to making or changing any connections,
switch off the CD-112/BT and the devices to
be connected.
1)
Three line level outputs are available to
route the audio signals to the subsequent
device (e.g. mixer or amplifier):
PRIORITY OUT (21)
At this output, either the signal of the
Bluetooth receiver or, if no signal is re-
ceived or if the replay has been set to
pause, the signal of the CD/MP3 player
is present.
BLUETOOTH OUT (22)
for the signal of the Bluetooth receiver
CD PLAYER OUT (23)
for the signal of the CD/MP3 player
2) Connect the mains cable provided to the
mains jack (24) first and then to a mains
socket (230V/50 Hz).
6 Operation
Switch on the CD/MP3 player with the
POWER switch (1). The display (5) will show
Welcome.
First the player will read the CD. If no CD
has been inserted, the player will read the
USB flash drive. If no USB flash drive has been
connected, the player will read the SD/MMC
memory card. If no memory card has been
inserted, the display will show
NO DISC.
6.1 Remote control
1)
To insert the batteries (2 × 1,5 V, size AAA),
remove the battery compartment cover on
the rear side of the remote control. Insert
the batteries as indicated in the battery
compartment. Close the compartment
with the cover.
If the remote control is not in use for a
longer period of time, remove the batter-
ies to prevent any damage due to battery
leakage.
2) When you press a button on the remote
control, always direct the remote control
towards the sensor IR (7). There must be
no obstacles between the remote control
and the sensor.
3)
If the range of the remote control de-
creases, the batteries are discharged and
must be replaced.
Never put batteries in the house-
hold waste. Always dispose of the
batteries in accordance with local
regulations.
6.2 Replaying music titles
1)
Insert a CD with the lettering facing up
into the slot (4) until it is pulled in auto-
matically
and/or
connect a USB flash drive to the USB
port (6) or connect a hard disk (with
individual power supply, if required) to the
USB port
and/or
insert an SD/MMC memory card into the
slot SD/MMC CARD (2), the notched cor-
ner of the card facing up. To remove the
card, slightly push it in to eject the card
from the slot.
2)
Select the sound carrier (CD, USB flash
drive, memory card) with the button
FUNC(19), if necessary.
3)
After reading in the sound carrier, the first
title will start automatically. However, if
the automatic start function has been
deactivated (chapter 4), press the button
PLAY/PAUSE (10) to start the first title. To
select other titles see chapter 6.3.
4)
While replaying, the upper line of the
display will show the replay symbol on
the right. The lower line will show the
number (TR …) of the current title and the
time already played of the title (min. : sec.).
At the far right, MP3 is shown for titles
in
MP3 format or
CDA for standard audio
CDs.
5) For MP3 files, the following additional in-
formation will scroll in the upper line:
File – …
Title – …
Artist – …
Album – …
Note: If information is not available, the display
will show
Unknown instead of a name.
To activate/deactivate this information
scrolling through the line, press the but-
ton ID3 (28).
6) When you press the button DISPLAY (26)
on the remote control, various information
for MP3 files will be displayed in the lower
line of the display:
basic setting
The lower line will show the title num-
ber and the time already played of the
title.
first actuation of button
The folder name will be displayed.
second actuation of button
The number of folders and the number
of titles will be displayed.
third actuation of button
return to basic setting
7)
Press the button PLAY/PAUSE to switch
between replay and pause. In the pause
mode, the pause symbolwill be inserted
and the time indication will flash.
8)
To stop the replay, press the button
STOP(9). The second line of the display
will show:
for standard audio CDs
– the number of titles (TR …)
– the total playing time (min.: sec.)
for audio carriers with MP3 files:
– the number of folders
– the number of titles
9)
To eject the CD, press the button EJECT
(11). The display will show
EJECT
, the
CD will be ejected and can be removed. If
the CD is not removed from the slot, the
CD player will pull it in again automatically
after approx. 10seconds.

10
English
6.3 Title selection
6.3.1 Direct selection of the title number
For direct selection of a title, enter its number
with the numerical keys (3). To start the title,
press the button PLAY/PAUSE (10).
Examples:
Title number Keys
4 4, PLAY/PAUSE
27 2, 7, PLAY/PAUSE
135 1, 3, 5, PLAY/PAUSE
Note: The player will arrange MP3 titles as follows:
1. all titles without folder in the ROOT directory
2. all titles in folders in the ROOT directory
3. all titles in subfolders, etc.
The titles and folders will not be arranged in alpha-
betic order but can be easily found with the search
function (☞chapters 6.3.3 and 6.3.4).
6.3.2 Skipping titles in forward/reverse
direction
To skip one title or several titles in forward or
reverse direction, briefly press the button CUE
or REV (8) [repeatedly].
Button CUE: to skip to the next title
Button REV: to return to the beginning of the
title currently playing. Each time the button
REV is pressed again, the device will go back
one title at a time.
Note: Only press the buttons CUE and REV briefly,
longer actuation will result in fast forward or reverse.
6.3.3 Alphabetic search for MP3 titles
1) Press the button FIND (29) on the remote
control. A magnifying glass symbol will
flash on the left at the bottom of the dis-
play. On the right of it, the letter
A
will
appear and in the upper line of the display
the name of the first file beginning with
the letter A.
2) Press the button CUE [forward direction]
or REV [reverse direction] (8) to select the
first letter of the desired file name. The
digits 0–9 are also available. If there are no
file names beginning with certain letters
or numbers, these letters or numbers are
marked
None.
3)
If there are several file names beginning
with the same letter, select the desired
letter and keep the button CUE or REV
pressed until the letter starts flashing next
to the magnifying glass symbol. All file
names beginning with the letter will now
be available to be selected one after the
other with the button CUE or REV .
4)
When searching, the display will always
show the number of the folder and of the
title on the right at the bottom. When you
have found the desired title, start the re-
play with the button PLAY/PAUSE (10).
6.3.4 Selection of folders and
searchforfolders
With MP3 files in several folders (file directo-
ries), press the buttons FOLDER (16) during
the replay to go to the first title of the next
folder (button ) or to the first tile of the
previous folder (button ).
If you stop the replay with the button
STOP (9) first and then press the button
FOLDER or , the upper line of the dis-
play will show the folder name and the lower
line will show the folder number behind the
symbol .
The search function even allows you to find a
folder with a certain name during the replay
of a title:
1) Press the button FIND (29) twice so that
the magnifying glass symbol will flash on
the display and
Dir
(directory) will ap-
pear on the right of it.
2)
Search for the desired folder with the but-
ton CUE or REV (8). The upper line of the
display will show the folder name and the
lower line will show the folder number.
3)
When you have found the folder, press
the button PLAY/PAUSE (10) to start the
first title or keep the button CUE or REV
pressed to start another title from the
folder until File appears next to the
magnifying glass symbol. Press the button
CUE or REV to select the titles from the
folder one after another. To start the title
selected, press the button PLAY/PAUSE.
6.4 Fast forward/reverse
Keep the button CUE or REV (8) pressed:
button CUE: fast forward
button REV: fast reverse
With MP3 files, fast forward/reverse will only
be possible within a title. You will not be able
to trace it acoustically, only by means of the
time indication on the display.
6.5 Repeat functions and
randomreplay
Press the button REPEAT (17) to activate one
of the repeat functions and the replay of the
titles in random order:
basic setting
PLAY ALL: all titles of the sound carrier or
of a programmed title sequence will be
replayed once, then the replay will stop.
first actuation of button
PLAY ALL RANDOM: the titles will be re-
played once in random order.
next actuation of button
REPEAT TRACK: the title selected will be
repeated continuously.
next actuation of button
REPEAT FOLDER: all titles in the folder
selected will be repeated continuously
(function available for MP3 files only).
next actuation of button
REPEAT ALL: all titles will be repeated
continuously.
next actuation of button
RANDOM REPEAT: all titles will be re-
played continuously in random order.
next actuation of button
PLAY ALL: return to basic setting
6.6 Muting the sound
To mute the sound of a title during replay,
press the button MUTE (26) on the remote
control. To reactivate the sound, press the
button MUTE once again.
6.7 Compiling an individual
titlesequence
For replaying a selection of titles in a certain
order, a sequence of up to 64 titles can be
programmed. For this purpose, in case of MP3
files, the arrangement of the folders should
be known to you (☞chapter 6.3.4) as it
will be necessary to enter the correspond-
ing number of the folder for each title to be
programmed.
1) Set the CD player to the stop mode; press
the button STOP (9), if required.
2) Activate the programming mode with the
button PROG (18). Press all other buttons
within 15 seconds, otherwise you will exit
the programming mode. In this case, press
the button PROG once again. The display
will show:
– for a CD without MP3 files
PROGRAM
CD Pƅ01 00
– with MP3 files
PROGRAM
Pƅ01 000 0000
3) For CDs without MP3 files, skip this step
and directly proceed with step 4.
For MP3 files, first select the number of
the folder containing the first title desired
for the title sequence. This is also neces-
sary when all the files are in the ROOT
directory without folder. In this case, enter
1 as the folder number. Select the folder
number with the SKIP buttons (8) or with
the numerical keys (3). To save it, press the
button PROG. The four zeroes will flash as
a prompt to enter the title number.
4) Select the number of the first title of the
title sequence with the SKIP buttons (8)
or enter it with the numerical keys (3). For
MP3 files in folders, please note that these
files are not arranged consecutively but
that the first file in each folder is always
number 1.
5)
To save it, press the button PROG. The dis-
play will show the next memory location
number, e. g.
P-02.
6)
Repeat steps (3), 4 and 5 for all further
titles desired until the entire title sequence
has been programmed.
7)
To start the title sequence, press the button
PLAY/PAUSE (10). The upper line of the
display will show
MEM (memory) and the
title sequence will be replayed.
8)
Use the SKIP buttons to select any title
of the title sequence or keep the corre-
sponding button pressed to activate the
fast forward/reverse function within a title.
9)
The replay will stop after the title sequence
has been replayed or when you press the

11
English
button STOP. To restart the title sequence,
first press the button PROG, then the but-
ton PLAY/PAUSE.
Note: A programmed title sequence will be de-
leted when you change the sound carrier, when you
press the button FUNC (19), when you press the
button STOP in the programming mode or when
you switch off the player.
6.8 Operation of the
Bluetoothreceiver
The Bluetooth receiver is used for wireless
connection to a Bluetooth signal source (e.g.
notebook, smartphone, tablet PC). Thus, the
CD-112/BT will be able to replay the audio
files that have been stored on this source.
Note: The Bluetooth signal source must be com-
patible with the A2DP protocol (Advanced Audio
Distribution Profile); otherwise wireless connection
will not be possible.
1)
Enable the Bluetooth function on the
notebook, smartphone or tablet PC (see
manual of the device, if necessary).
2) To switch on the Bluetooth receiver of the
CD-112/BT, keep the button BT POWER (15)
pressed briefly until the LED PAIR (12) starts
flashing.
3)
To link the CD-112/BT to the Bluetooth
signal source, keep the button PAIR (13)
pressed briefly until the LED PAIR starts
flashing more slowly. As soon as the wire-
less connection has been established, the
LED PAIR will light permanently.
Note: On the display of the Bluetooth signal
source, the CD-112/BT is indicated as “Audio
Bluetooth”.
4)
Start a title at the Bluetooth signal source.
5)
To pause or continue the title, press the
button I(15).
Note: As long as the replay is interrupted, the
signal of the CD/MP3 player will be present at
the output PRIORITY (21).
6)
Use the buttons DOWN/ and UP/
(20) to go to the previous or next title
(press the button briefly) or for fast for
-
ward/reverse (keep the button pressed).
7) To switch off the Bluetooth receiver, keep
the button BT POWER pressed until the
LED PAIR is extinguished.
7 Maintenance
Protect the player from dust, vibrations, hu-
midity and heat. For cleaning only use a dry,
soft cloth; never use water or chemicals.
Note concerning sound interruptions and
reading errors
Cigarette smoke and dust will easily penetrate
through all openings of the device and will
also settle on the optics of the laser sampling
system. If this deposit should cause reading
errors and sound interruptions, the device
must be cleaned by skilled personnel. Please
note that there will be a charge on cleaning,
even during the warranty period!
8 Specifications
Frequency range: . . . . . . . . . 20–20 000Hz
THD:. . . . . . . . . . . . . . . . . . . < 0.1%
Channel separation: . . . . . . . > 60dB
Dynamic range:. . . . . . . . . . . > 96dB
S/N ratio: . . . . . . . . . . . . . . . > 70dB
Audio output:. . . . . . . . . . . . 1.2V
Bluetooth transmission
Frequency band: . . . . . . . . 2.4GHz
max. transmission power: . 10dBm
Power supply: . . . . . . . . . . . . ~ 230V/ 50Hz
Power consumption:. . . . . . . 50VA max.
Ambient temperature: . . . . . 0–40°C
Dimensions
Width:. . . . . . . . . . . . . . . . 482mm
Height: . . . . . . . . . . . . . . . 44mm
Depth:. . . . . . . . . . . . . . . . 265mm
Rack units: . . . . . . . . . . . . . . 1U
Weight: . . . . . . . . . . . . . . . . 4kg
Subject to technical modification.
All rights reserved by MONACOR
®INTERNATIONAL GmbH & Co. KG. No part of this instruction manual
may be reproduced in any form or by any means for any commercial use.

12
Français
Deutsch
Deutsch Seite
English
English Page
Italiano
Italiano Pagina
Español
Español Página
Nederlands
Nederlands Pagina
Polski
Polski Strona
Français
Français Page
Lecteur CD/MP3
Cette notice s‘adresse aux utilisateurs sans
connaissances techniques particulières. Veuil-
lez lire la présente notice avant le fonction-
nement et conservez-la pour pouvoir vous y
reporter ultérieurement. Ouvrez le présent
livret page 3, dépliable, de manière à visualiser
les éléments et branchements.
1 Eléments et branchements
1.1 Face avant
1 Interrupteur Marche/Arrêt POWER
2
Fente pour insérer une carte mémoire
SD/MMC
3
Touches numériques pour sélectionner
directement un titre
Exemples :
numéro titre touches
4 4, PLAY/PAUSE
27 2, 7, PLAY/PAUSE
135 1, 3, 5, PLAY/PAUSE
4 Fente d’insertion du CD
Poussez le CD dans la fente jusqu’à ce
qu’il entre automatiquement.
5 Affichage
6
Interface USB pour mettre une clé USB ou
brancher un disque dur
7
Capteur infrarouge pour les signaux de la
télécommande
8 Touches SKIP (CUE et REV) pour la sélec-
tion de titres et l’avance et retour rapides
sélection de titres :
A chaque pression sur la touche CUE,
on avance d’un titre ; en appuyant sur
la touche REV, on saute au début du
titre et à chaque autre pression, on
recule d’un titre.
avance et retour rapides :
Pour l’avance rapide, maintenez la
touche CUE enfoncée, pour le retour
rapide, maintenez la touche REV en-
foncée.
9 Touche STOP pour arrêter la lecture
10
Touche PLAY/PAUSE pour commuter entre
lecture et pause
11 Touche EJECT pour éjecter le CD
12 LED PAIR :
Clignote lorsque le récepteur Bluetooth
est allumé
Brille en continu lorsque l’appareil a été
couplé à une source de signal Bluetooth
13
Touche PAIR pour coupler l’appareil à
une source de signal Bluetooth (☞cha-
pitre6.8)
14 Antenne du récepteur Bluetooth
15 Touche BT POWER/ Ipour éteindre et
allumer le récepteur Bluetooth (maintenez
la touche enfoncée) et pour interrompre
ou poursuivre la lecture en mode Blue-
tooth (enfoncez brièvement la touche)
16
Touches FOLDER pour sélectionner les
dossiers de fichiers MP3 :
Pour sélectionner le dossier suivant, ap-
puyez sur la touche . Pour revenir au
dossier précédent, activez la touche .
Vous revenez toujours au premier titre du
dossier sélectionné.
17
Touche REPEAT pour sélectionner les fonc-
tions répétition et la lecture aléatoire
réglage de base (PLAY ALL)
Tous les titres du support audio ou
d’une suite programmée sont lus une
fois.
première pression (PLAY ALL RANDOM)
une seule lecture de tous les titres dans
un ordre aléatoire
pression suivante (REPEAT TRACK)
répétition continue du titre sélectionné
pression suivante (REPEAT FOLDER)
répétition continue de tous les titres
dans le dossier sélectionné (fonction
uniquement pour des fichiers MP3)
pression suivante (REPEAT ALL)
répétition continue de tous les titres
pression suivante (RANDOM REPEAT)
lecture continue des titres dans un
ordre aléatoire
pression suivante (PLAY ALL)
retour au réglage de base
18 Touche PROG pour commuter en mode
programmation pour créer votre propre
suite de titres (☞chapitre 6.7)
19
Touche FUNC pour sélectionner le support
audio (CD, support USB, carte mémoire
SD/MMC)
20 En mode Bluetooth :
Touches DOWN/ et UP/ pour la
sélection de titres et l’avance et retour
rapide
1.2 Face arrière
21 Prises RCA PRIORITY OUT
A cette sortie, soit le signal du récepteur
Bluetooth soit, si aucun signal n’est reçu
ou si la lecture est sur Pause, le signal du
lecteur CD/MP3 est présent.
22
Prises RCA BLUETOOTH OUT pour la sortie
audio du récepteur Bluetooth
23
Prises RCA CD PLAYER OUT pour la sortie
audio du lecteur CD/MP3
24
Prise secteur à relier à une prise 230V/
50Hz via le cordon secteur livré
25
Porte fusible : tout fusible fondu doit être
remplacé par un fusible de même type.
1.3 Télécommande
3, 8 – 11 et 16 – 19
Ces touches ont les mêmes fonctions que
celles de l’appareil.
26 Touche MUTE pour couper le son
27
Touche DISPLAY pour commuter les infor-
mations dans la ligne inférieure de l’affi-
chage pendant la lecture de fichiers MP3
réglage de base
Dans la ligne inférieure, le numéro du
titre (TR) et la durée déjà lue du titre
s’affichent.
1re pression
Le nom du dossier s’affiche.
2ème pression
Le nombre de dossiers et de titres
s’affichent.
3ème pression
retour au réglage de base
28
Touche ID3 pour activer/désactiver les
informations pour des fichiers MP3 défi-
lant dans la ligne supérieure de l’affichage
(nom du fichier, du titre, de l’artiste, de
l’album)
29
Touche FIND pour une recherche de titres
MP3 et dossiers (☞chapitres 6.3.3 et
6.3.4)
2 Conseils desécurité
Cet appareil répond à toutes les directives
nécessaires de l’Union européenne et porte
donc le symbole .
AVERTISSEMENT
Cet appareil est ali-
menté par une tension
dangereuse. Ne tou-
chez jamais l’intérieur
de l’appareil car, en cas
de mauvaise manipu-
lation, vous pourriez
subir une décharge
électrique.
•
L‘appareil n‘est conçu que pour une utilisa-
tion en intérieur. Protégez-le des éclabous-
sures, de tout type de projections d‘eau et
d’une humidité d‘air élevée. La plage de
température ambiante admissible est de
0– 40°C.
•
En aucun cas, vous ne devez poser d’ob-
jet contenant du liquide ou un verre sur
l’appareil.
•
Ne le faites jamais fonctionner et débran-
chez-le immédiatement lorsque :
1. des dommages visibles apparaissent sur
l’appareil ou sur le cordon secteur.
2. après une chute ou accident similaire...,
vous avez un doute au sujet de l’état de
l’appareil.
3. des dysfonctionnements apparaissent.
Dans tous les cas, les dommages doivent
être réparés par un technicien spécialisé.
•
Ne débranchez jamais l’appareil en tirant
sur le cordon secteur, tenez-le toujours par
la fiche.
•
Nous déclinons toute responsabilité en
cas de dommages matériels ou corporels
résultants si l’appareil est utilisé dans un
but autre que celui pour lequel il a été
conçu, s’il n’est pas correctement branché
ou utilisé ou s’il n’est pas réparé par une
personne habilitée, en outre, la garantie
deviendrait caduque.
Lorsque l’appareil est définitive-
ment retiré du service, éliminez-le
conformément aux directives lo-
cales.
CARTONS ET EMBALLAGE
PAPIER À TRIER

13
Français
3 Possibilités d’utilisation
Le lecteur CD/MP3 CD-112/BT avec récep-
teur Bluetooth est adapté pour de multiples
applications de sonorisation (par exemple,
théâtres, restaurants, salles d’attente) et
propose de nombreuses fonctions telles que
répétition continue, lecture aléatoire, lecture
MP3 de supports de stockage USB et cartes
SD/MMC (32 GO max.).
On peut lire des CDs audio, des CD-R
(CDs audio gravés) et des CDs avec titres au
format MP3. Pour des CD-RW (CDs réinscrip-
tibles), on peut rencontrer des problèmes lors
de la lecture selon le type de CD, le graveur
et le programme de gravure utilisés.
Conseil : En raison de la multitude de fabricants
de supports de mémoire et de drivers d’appareils, il
n’est pas possible de garantir que tous les supports
de mémoire soient compatibles avec le CD-112/BT.
3.1 Conformité et autorisation
Le soussigné, Monacor International GmbH &
Co. KG, déclare que l'équipement radioélec-
trique du type CD-112/BT est conforme à la
directive 2014/53/UE. Le texte complet de la
déclaration UE de conformité est disponible
à l'adresse internet suivante :
www.monacor-international.com
4 Désactiver la fonction
AutoStart
Le lecteur CD/MP3 est doté d’une fonction
démarrage automatique : une fois l’appareil
allumé et le support (CD, support USB, carte
de mémoire) reconnu, la lecture du premier
titre démarre automatiquement. Si vous ne
voulez pas la fonction de démarrage auto-
matique [démarrage de la lecture uniquement
en appuyant sur la touche PLAY/PAUSE (10)],
vous pouvez désactiver la fonction démarrage
automatique.
AVERTISSEMENT
Comme l’appareil doit
être ouvert pour effec-
tuer des modifications,
seul un personnel qua-
lifié peut le faire. En cas
de mauvaise manipula-
tion, il y a risque de dé-
charge électrique.
Avant d’ouvrir l’appareil, débranchez im-
pérativement la fiche du secteur.
Il y a un cavalier sur la platine avec le bloc
secteur et les prises de sortie audio (voir la
flèche sur le schéma 5). La fonction démar-
rage automatique est activée lorsque le ca-
valier est sur la position AUTO PLAY. Pour
désactiver la fonction, mettez le cavalier sur
la position MANUAL PLAY.
5
Positionnement de l’appareil
et branchements
L’appareil est prévu pour une installation en
rack 19” (= 482mm). Il peut également être
directement posé sur une table. Pour une ins-
tallation en rack, une unité (1U = 44,45 mm)
est nécessaire.
Avant d’effectuer ou de modifier les branche
-
ments, assurez-vous que le lecteur CD-112/BT
et les appareils à relier sont éteints.
1) Pour diriger les signaux audio vers l’appa-
reil suivant (par exemple table de mixage
ou amplificateur), trois sorties niveau ligne
sont prévues :
PRIORITY OUT (21)
A cette sortie, soit le signal du récep-
teur Bluetooth soit, si aucun signal n’est
reçu ou si la lecture est sur Pause, le
signal du lecteur CD/MP3 est présent.
BLUETOOTH OUT (22)
pour le signal du récepteur Bluetooth
CD PLAYER OUT (23)
pour le signal du lecteur CD/MP3
2)
Reliez le cordon secteur livré à la prise
secteur (24) puis à une prise 230V/50 Hz.
6 Utilisation
Allumez le lecteur CD/MP3 avec l’interrupteur
POWER (1), sur l’affichage (5), le message
Welcome s’affiche.
Tout d’abord le CD est lu. Si aucun CD
n’est inséré, le support USB est lu. Si aucun
support USB n’est relié, la carte mémoire
SD/MMC est lue. Si aucune carte mémoire
n’est placée, l’affichage indique
NO DISC.
6.1 Télécommande
1) Pour insérer les batteries (2 × 1,5V, type
R03), retirez le couvercle du compartiment
batterie sur la face arrière de la télécom-
mande. Insérez les batteries comme in-
diqué dans le compartiment, refermez le
compartiment avec le couvercle.
En cas de non utilisation prolongée
de la télécommande, retirez les batteries,
elles pourraient couler et endommager la
télécommande.
2)
Maintenez toujours la télécommande dans
la direction du capteur IR (7) lorsque vous
activez une touche. Il ne faut aucun obs-
tacle entre la télécommande et le capteur.
3) Si la portée de la télécommande diminue,
les batteries sont épuisées et doivent être
remplacés.
Ne jetez pas les batteries usagées
dans la poubelle domestique. Dé-
posez-les dans les containers dé-
diés conformément aux directives
locales.
6.2 Lecture de titres de musique
1)
Insérez un CD, inscription vers le haut,
dans la fente (4) jusqu’à ce qu’il soit au-
tomatiquement inséré
et/ou
mettez une clé USB dans le port USB (6)
ou branchez un disque dur (le cas échéant
avec alimentation propre) au port USB
et/ou
mettez une carte SD/MMC dans la fente
SD/MMC CARD (2). Le coin oblique de la
carte doit être dirigé vers le haut. Pour re-
tirer la carte, enfoncez-la légèrement pour
qu’elle se désenclenche.
2)
Sélectionnez le support audio (CD, support
USB, carte mémoire) le cas échéant avec
la touche FUNC (19).
3) La lecture du premier titre démarre auto-
matiquement une fois le processus de
reconnaissance du support terminé. Si
la fonction démarrage automatique a
été désactivée (chapitre 4), démarrez la
lecture du premier titre avec la touche
PLAY/PAUSE (10). Voir chapitre 6.3 pour
sélectionner d’autres titres.
4)
Pendant la lecture, le symbole de lecture
est affiché dans la ligne supérieure à droite
de l’affichage. La ligne inférieure indique le
numéro (TR …) du titre en cours et la durée
déjà écoulée (min, sec) du titre. Pour des
titres au format MP3, MP3 s’affiche tout
à droite, pour des CDs audio standards,
CDA s’affiche.
5)
Pour des fichiers MP3, s’affiche en plus
dans la ligne supérieure :
File – … = nom du fichier
Title – … = nom du titre
Artist – … = nom de l’artiste
Album – … = nom de l’album
Remarque : S’il manque une donnée, l’affi-
chage indique à la place Unknown.
Avec la touche ID3 (28), vous pouvez acti-
ver/désactiver l’affichage des informations
défilantes.
6)
En appuyant sur la touche DISPLAY (27)
sur la télécommande, des informations
diverses peuvent s’afficher dans la ligne
inférieure pour des fichiers MP3 :
réglage de base : Dans la ligne inférieure,
le numéro du titre et la
durée déjà lue du titre
s’affichent.
1
re
pression : Le nom du dossier s’affiche.
2
ème
pression : Le nombre de dossiers et
de titres s’affichent.
3ème pression : retour au réglage de base
7)
Avec la touche PLAY/PAUSE, on peut com-
muter entre lecture et pause. En mode
pause, le symbole pauses’affiche, l’in-
dication de temps clignote.
8)
Pour arrêter la lecture, appuyez sur la
touche STOP (9). L’affichage indique dans
la deuxième ligne :
pour des CDs audio standard :
– le nombre de titres (TR …)
– la durée totale (min, sec)
pour des supports audio avec fichiers MP3 :
– nombre de dossiers
– nombre de titres
9) Pour éjecter le CD, appuyez sur la touche
EJECT (11). L’affichage indique
EJECT
, le
CD est éjecté et peut être retiré. Si le CD
n’est pas retiré de la fente, l’appareil le
fait rentrer automatiquement après 10se-
condes environ.

14
Français
6.3 Sélection de titres
6.3.1 Sélection directe du numéro de titre
Sélectionnez directement le titre voulu avec
les touches numériques (3) en tapant son nu-
méro. Pour démarrer le titre, appuyez ensuite
sur la touche PLAY/PAUSE (10). Exemples :
numéro titre touches
4 4, PLAY/PAUSE
27 2, 7, PLAY/PAUSE
135 1, 3, 5, PLAY/PAUSE
Remarque : Les titres MP3 sont numérotés par
l’appareil comme suit :
1. tous les titres sans dossier dans le répertoire
principal ROOT
2. tous les titres dans des dossiers dans le répertoire
principal
3. tous les titres dans les sous-dossiers etc.
La numérotation des titres et dossiers ne s’effectue
pas par ordre alphabétique, mais on peut les trou-
ver facilement avec la fonction recherche (☞cha-
pitre6.3.3/6.3.4).
6.3.2 Avance et retour de titres
Pour avancer ou reculer d’un ou plusieurs
titres, appuyez brièvement (plusieurs fois)
sur la touche CUE ou REV (8).
touche CUE : saut au titre suivant
touche REV : saut au début du titre en cours.
Par une autre pression sur la touche REV, on
recule toujours d’un titre.
Conseil : N’appuyez que brièvement sur les touches
CUE et REV sinon on a une avance/un retour rapide.
6.3.3 Recherche alphabétique des
titresMP3
1)
Appuyez sur la touche FIND (29) sur la
télécommande. Un symbole de loupe
s’affiche en clignotant à bas à gauche sur
l’affichage. A sa droite s’affiche la lettre
Aet dans la ligne supérieure le nom du
premier fichier commençant par la lettre A.
2) Avec la touche CUE [avance] ou REV [re-
tour] (8), sélectionnez la première lettre
du nom du fichier voulu. Les chiffres 0 à 9
peuvent également être sélectionnés. Les
lettres et chiffres qui ne débutent aucun
titre sur le CD sont toujours repérés par
None.
3) Si plusieurs noms de fichiers ont la même
lettre initiale, sélectionnez la lettre clé puis
maintenez la touche CUE ou REV enfoncée
jusqu’à ce que la lettre à côté du symbole
loupe clignote. Tous les noms de fichiers
commençant par la lettre clé peuvent être
sélectionnés avec la touche CUE ou REV
les uns après les autres.
4)
Lors de la recherche, l’affichage indique
toujours le numéro du dossier et du titre
en bas à droite. Lorsque le titre voulu est
trouvé, démarrez la lecture avec la touche
PLAY/PAUSE (10).
6.3.4 Sélection et recherche de dossiers
Pour des fichiers MP3 dans plusieurs dos-
siers (répertoires de fichiers), on peut sauter
pendant la lecture au premier titre du dos-
sier suivant (touche ) et au premier titre
du dossier précédent (touche ) avec les
touches FOLDER(16).
Si la lecture est arrêtée avec la touche STOP(9)
et la touche FOLDER ou est enfoncée,
la ligne supérieure de l’affichage indique le
nom du dossier et la ligne inférieure le nu-
méro du dossier derrière le symbole .
Avec la fonction recherche, on peut trouver
un dossier avec un nom donné, même pen-
dant la lecture d’un titre :
1) Appuyez deux fois sur la touche FIND (29)
pour que le symbole loupe clignote sur
l’affichage et que
Dir pour Directory
(dossier) soit affiché à côté à droite.
2)
Avec la touche CUE ou REV (8), recherchez
le dossier souhaité. La ligne supérieure de
l’affichage indique le nom du dossier et
la ligne inférieure le numéro du dossier.
3)
Lorsque vous avez trouvé le dossier, ap-
puyez sur la touche PLAY/PAUSE (10) pour
démarrer le premier titre du dossier ou
pour démarrer un autre titre du dossier,
maintenez tout d’abord la touche CUE ou
REV enfoncée jusqu’à ce que
File
(fi-
chier) soit affiché à côté du symbole loupe.
Avec la touche CUE ou REV, vous pouvez
sélectionner les titres dans le dossier les
uns après les autres. Pour démarrer la lec-
ture du titre sélectionné, appuyez sur la
touche PLAY/PAUSE.
6.4 Avance et retour rapides
Maintenez la touche CUEou REV (8) enfoncée :
touche CUE : avance rapide
touche REV : retour rapide
Pour des fichiers MP3, une avance ou un re-
tour rapide ne peut se faire qu’au sein d’un
titre ; elle ne peut être suivie acoustiquement
mais uniquement selon les indications de
durée sur l’affichage.
6.5 Fonctions répétition
etlecturealéatoire
Avec la touche REPEAT (17), on peut activer
une des fonctions répétition et la lecture de
tous les titres en ordre aléatoire :
réglage de base
PLAY ALL : Tous les titres du support audio
ou d’une suite programmée sont lus une
fois puis la lecture s’arrête.
première pression
PLAY ALL RANDOM : une seule lecture
de tous les titres dans un ordre aléatoire
pression suivante
REPEAT TRACK : répétition continue du
titre sélectionné
pression suivante
REPEAT FOLDER : répétition continue de
tous les titres dans le dossier sélectionné
(fonction uniquement pour des fichiers
MP3)
pression suivante
REPEAT ALL : répétition continue de tous
les titres
pression suivante
RANDOM REPEAT : lecture continue des
titres dans un ordre aléatoire
pression suivante
PLAY ALL : retour au réglage de base
6.6 Coupure du son
Pour couper le son pendant la lecture d’un
titre, appuyez sur la touche MUTE (26) sur la
télécommande. Pour rallumer le son, appuyez
une nouvelle fois sur la touche MUTE.
6.7 Composition personnelle
d’unesuitedetitres
Si une sélection de titres doit être lue dans un
ordre donné, on peut programmer une suite
de 64 titres au plus. Pour des fichiers MP3, il
faut connaître la numérotation des dossiers
(☞chapitre 6.3.4) ; de même, il faut entrer
le numéro correspondant du dossier pour
chaque titre à programmer.
1) Le lecteur CD doit être en mode Stop ; si
besoin, appuyez sur la touche STOP (9).
2)
Avec la touche PROG (18), activez le mode
de programmation ; toutes les autres
touches doivent être enfoncées en l’espace
de 15secondes sinon on quitte le mode
de programmation. Dans ce cas, appuyez
une nouvelle fois sur la touche PROG. L’af-
fichage indique :
– pour un CD sans fichiers MP3
PROGRAM
CD Pƅ01 00
– pour fichiers MP3
PROGRAM
Pƅ01 000 0000
3)
Pour des CDs sans fichiers MP3, sautez
cet étape et allez directement au point 4.
Pour des fichiers MP3, il faut tout
d’abord sélectionner le numéro du dos-
sier dans lequel se trouve le premier titre
souhaité pour la suite. C’est également né-
cessaire lorsque tous les fichiers sont dans
le répertoire principal ROOT sans dossier.
Dans ce cas, saisissez 1 comme numéro de
dossier. Sélectionnez le numéro de dossier
avec les touches SKIP (8) ou tapez-le avec
les touches numériques (3). Pour mémori-
ser, appuyez ensuite sur la touche PROG.
Les 4zéros clignotent incitant à taper le
numéro du titre.
4)
Sélectionnez le numéro du premier titre
pour la suite avec les touches SKIP (8) ou
tapez-le avec les touches numériques (3).
Pour des fichiers MP3 dans des dossiers,
n’oubliez pas que les fichiers ne sont pas
numérotés les uns à la suite des autres
mais que le premier fichier dans chaque
dossier est repéré par numéro 1.
5)
Appuyez sur la touche PROG pour mé-
moriser. L’affichage indique le prochain
numéro de l’emplacement de mémoire,
par exemple
Pƅ02.
6)
Répétez les étapes (3), 4 et 5 pour les
autres titres souhaités jusqu’à complète
programmation de la suite de titres.
7)
Pour démarrer la lecture de la suite, ap-
puyez sur la touche PLAY/PAUSE (10). La
ligne supérieure de l’affichage indique
MEM pour Memory (mémoire) et la suite
de titres est lue.
8)
Avec les touches SKIP, on peut sélectionner
chaque titre de la suite ou activer la fonc-
tion avance/retour rapides au sein d’un

15
Français
titre en maintenant la touche correspon-
dante enfoncée.
9)
Une fois la suite lue ou si vous appuyez sur
la touche STOP, la lecture s’arrête. Pour re-
démarrer la suite, enfoncez tout d’abord la
touche PROG puis la touche PLAY/PAUSE.
Conseil : Une suite programmée de titres est ef-
facée lorsqu’on change de supports de données,
lorsqu’on appuie sur la touche FUNC (19) ou appuie
sur la touche STOP en mode programmation, ou si
on arrête l’appareil.
6.8 Utilisation du récepteur
Bluetooth
Avec le récepteur Bluetooth, on peut établir
une liaison radio vers une source de signal
Bluetooth (par exemple ordinateur portable,
Smartphone, tablette PC) pour lire, via le
CD-112/BT, les données audio qui y sont
mémorisées.
Conseil : La source de signal Bluetooth doit fonc-
tionner selon le protocole A2DP (Advanced Audio
Distribution Profile). Sinon aucune liaison radio
n’est possible.
1)
Allumez la fonction Bluetooth sur l’ordi-
nateur portable, Smartphone ou tablette
PC (voir si besoin la notice de cet appareil).
2)
Pour allumez le récepteur Bluetooth
du CD-112/BT maintenez la touche BT
POWER (15) brièvement enfoncée jusqu’à
ce que la LED PAIR (12) clignote.
3)
Pour coupler le CD-112/BT à la source
de signal Bluetooth, maintenez la touche
PAIR(13) brièvement enfoncée jusqu’à ce
que la LED PAIR clignote plus lentement.
Dès que la liaison radio est établie, la LED
PAIR brille en continu.
Remarque : Le CD-112/BT est indiqué sur l’af-
fichage de la source de signal Bluetooth par
«Audio Bluetooth».
4)
Démarrez la lecture d’un titre sur la source
de signal Bluetooth.
5) Avec la touche I(15), vous pouvez in-
terrompre puis reprendre la lecture.
Remarque : Tant que la lecture est interrompue,
le signal du lecteur CD/MP3 est présent à la
sortie PRIORITY (21).
6)
Avec les touches DOWN/ et UP/ (20),
vous pouvez aller au titre précédent ou au
titre suivant (enfoncez la touche briève-
ment) ou faire un retour/avance rapide
(maintenez la touche enfoncée).
7)
Pour éteindre le récepteur Bluetooth,
maintenez la touche BT POWER enfoncée
jusqu’à ce que la LED PAIR s’éteigne.
7 Entretien
Protégez l’appareil de la poussière, des vibra
-
tions, de l’humidité et de la chaleur. Pour le
nettoyer, utilisez uniquement un chiffon sec
et doux, en aucun cas, de produits chimiques
ou d’eau.
Remarque sur les coupures du son et les
erreurs de lecture
La fumée de cigarettes s’introduit facilement
dans les ouvertures du lecteur et se dépose
sur l’optique du système laser. Cela peut gé-
nérer des erreurs de lecture et des coupures
de son. Dans ce cas, confiez impérativement
le nettoyage du lecteur à un technicien spé-
cialisé. Cette opération est à la charge de
l’utilisateur, même lorsque l’appareil est sous
garantie!
8 Caractéristiques techniques
Bande passante :. . . . . . . . . . 20–20000Hz
Taux de distorsion : . . . . . . . . < 0,1%
Séparation de canaux : . . . . . > 60dB
Plage dynamique : . . . . . . . . > 96dB
Rapport signal
sur bruit : . . . . . . . . . . . . . . . > 70dB
Sortie audio : . . . . . . . . . . . . 1,2V
Transmission Bluetooth
Plage de fréquence : . . . . . 2,4GHz
Puissance d'émission max. : 10dBm
Alimentation :. . . . . . . . . . . . ~ 230V/ 50Hz
Consommation :. . . . . . . . . . 50VA max.
Température fonc. :. . . . . . . . 0–40°C
Dimensions
Largeur : . . . . . . . . . . . . . . 482mm
Hauteur :. . . . . . . . . . . . . . 44mm
Profondeur : . . . . . . . . . . . 265mm
Unités de rack: . . . . . . . . . . . 1U
Poids :. . . . . . . . . . . . . . . . . . 4kg
Tout droit de modification réservé.
Notice d’utilisation protégée par le copyright de MONACOR
®INTERNATIONAL GmbH & Co. KG
Toute reproduction même partielle à des fins commerciales est interdite.

16
Italiano
Deutsch
Deutsch Seite
English
English Page
Français
Français Page
Español
Español Página
Nederlands
Nederlands Pagina
Polski
Polski Strona
Italiano
Italiano Pagina
Lettore CD/MP3
Queste istruzioni sono rivolte all‘utente senza
conoscenze tecniche specifiche. Vi preghiamo
di leggerle attentamente prima della messa in
funzione e di conservarle per un uso futuro.
A pagina 3, se aperta completamente,
vedrete sempre gli elementi di comando e i
collegamenti descritti.
1 Panoramica
1.1 Pannello frontale
1 Interruttore on/off POWER
2
Fessura per inserire una scheda di memo-
ria SD/MMC
3 Tasti numerici per la scelta diretta di un
titolo
Esempi:
N. titolo Tasti
4 4, PLAY/PAUSE
27 2, 7, PLAY/PAUSE
135 1, 3, 5, PLAY/PAUSE
4 Fessura per l’inserimento di un CD
Spingere il CD finché non viene ritirato
automaticamente.
5 Display
6 Porta USB per inserire una chiavetta USB
o per il collegamento di un disco rigido
7 Sensore a infrarossi per i segnali del te-
lecomando
8 Tasti SKIP (CUE e REV) per la scelta di un
titolo e per l’avanzamento e ritorno veloce
Scelta di un titolo
Con ogni pressione del tasto CUE si
salta avanti di un titolo; premendo il
tasto REV, si salta all’inizio del titolo
e con ogni ulteriore pressione si salta
indietro di un titolo.
Avanzamento/ritorno veloce
Per l’avanzamento tener premuto il
tasto CUE, per il ritorno il tasto REV.
9 Tasto STOP per terminare la riproduzione
10
Tasto PLAY/PAUSE per cambiare fra ripro
-
duzione e pausa
11 Tasto EJECT per espellere il CD
12 Spia PAIR:
Lampeggia con il ricevitore bluetooth
acceso.
Rimane acceso con il collegamento
avvenuto con una fonte bluetooth.
13
Tasto PAIR per il collegamento con una
fonte di segnali bluetooth (☞Cap. 6.8)
14 Antenna del ricevitore bluetooth
15
Tasto BT POWER/ Iper accendere e spe-
gnere il ricevitore bluetooth (tener pre-
muto il tasto) e per interrompere o conti-
nuare la riproduzione con funzionamento
bluetooth (premere il tasto brevemente)
16
Tasti FOLDER per la scelta della cartella
con i file MP3: Per scegliere la cartella suc-
cessiva, premere il tasto . Per ritornare
alla cartella precedente azionare il tasto
. In ogni caso si salta sul primo titolo
della cartella scelta.
17
Tasto REPEAT per attivare le funzioni di
ripetizione e di riproduzione casuale
impostazione base
PLAY ALL: tutti i titoli della sorgente o
di una sequenza programmata sono
riprodotti una volta.
prima pressione del tasto
PLAY ALL RANDOM:
riproduzione
unica dei titoli in ordine casuale
ulteriore pressione del tasto
REPEAT TRACK: ripetizione continua
del titolo scelto
ulteriore pressione del tasto
REPEAT FOLDER: ripetizione continua
di tutti i titoli della cartella scelta
(la funzione è presente solo per i file
MP3)
ulteriore pressione del tasto
REPEAT ALL: ripetizione continua di
tutti i titoli
ulteriore pressione del tasto
RANDOM REPEAT: riproduzione conti-
nua dei titoli in ordine casuale
ulteriore pressione del tasto
PLAY ALL: ritorna all’impostazione base
18
Tasto PROG, per la compilation di una
sequenza individuale di titoli, attivare il
modo di programmazione (☞Cap. 6.7)
19 Tasto FUNC per scegliere la sorgente
(CD, memoria USB, scheda SD/MMC)
20 Con funzionamento bluetooth:
Tasti DOWN/ e UP/ per la selezione
dei titoli e per l’avanzamento e il ritorno
veloce
1.2 Pannello posteriore
21 Prese RCA PRIORITY OUT
Qui è presente il segnale del ricevitore
bluetooth oppure, se non si riceve nessun
segnale o se la riproduzione è in pausa, il
segnale del lettore CD/MP3.
22 Prese RCA BLUETOOTH OUT per l’uscita
audio del ricevitore bluetooth
23
Prese RCA CD PLAYER OUT per l’uscita
audio del lettore CD/MP3
24 Presa per il collegamento con una presa
di rete (230V/ 50Hz) tramite il cavo in
dotazione
25 Portafusibile
Sostituire un fusibile difettoso solo con
uno dello stesso tipo.
1.3 Telecomando
3, 8 – 11 e 16 – 19
Questi tasti hanno le stesse funzioni dei tasti
sull’apparecchio.
26 Tasto MUTE per la funzione di muto
27
Tasto DISPLAY per cambiare, durante la
riproduzione di file MP3, le informazioni
nella riga inferiore del display
impostazione base
Nella riga inferiore è indicato il numero
del titolo (TR) e il tempo trascorso del
titolo.
1. pressione del tasto
È indicato il nome della cartella.
2. pressione del tasto
È indicato il numero delle cartelle e
dei titoli.
3. pressione del tasto
ritorno all’impostazione base
28
Tasto ID3 per la dissolvenza IN e OUT delle
informazioni che scorrono per i file MP3
nella riga superiore del display (nome del
file, del titolo, dell’artista e dell’albo)
29 Tasto FIND per la ricerca di titoli e cartelle
MP3 (☞Capp. 6.3.3 e 6.3.4)
2 Avvertenze di sicurezza
Quest’apparecchio è conforme a tutte le di-
rettive rilevanti dell’UE e pertanto porta la
sigla .
AVVERTIMENTO
L’apparecchio funziona
con pericolosa tensione
di rete. Non intervenire
mai personalmente al
suo interno. La mani-
polazione scorretta può
provocare delle scariche
elettriche pericolose.
•
Usare l’apparecchio solo all’interno di lo-
cali. Proteggetelo dall’acqua gocciolante e
dagli spruzzi d’acqua nonché da alta umi-
dità dell’aria. La temperatura d’esercizio
ammessa è 0– 40°C.
•
Non depositare sull’apparecchio dei con-
tenitori riempiti di liquidi, p.es. bicchieri.
•
Non mettere in funzione l’apparecchio e
staccare subito la spina rete se:
1.
l’apparecchio o il cavo rete presentano
dei danni visibili;
2.
dopo una caduta o dopo eventi simili
sussiste il sospetto di un difetto;
3.
l’apparecchio non funziona corretta-
mente.
Per la riparazione rivolgersi sempre ad
un’officina competente.
•
Staccare il cavo rete afferrando la spina,
senza tirare il cavo.
•
Nel caso d’uso improprio, di collegamenti
sbagliati, d’impiego scorretto o di ripara-
zione non a regola d’arte dell’apparecchio,
non si assume nessuna responsabilità per
eventuali danni consequenziali a persone
o a cose e non si assume nessuna garanzia
per l’apparecchio.
Se l’apparecchio deve essere messo
definitivamente fuori servizio, smal-
tire l’apparecchio in conformità con
le normative locali.

17
Italiano
3 Possibilità d’impiego
Il lettore CD/MP3 CD-112/BT con ricevitore
bluetooth è adatto per molteplici compiti di
sonorizzazione (p.es. in teatri, ristoranti, sale
d’attesa) e a tale scopo offre funzioni speciali
come p.es. la riproduzione senza fine o in
ordine casuale, la riproduzione di mezzi di me-
moria USB e di schede di memoria SD/MMC
(max. 32GB).
Con questo apparecchio si possono ri-
produrre CD audio, CD audio masterizzati in
proprio (CD-R) nonché CD con titoli nel for-
mato MP3. Nel caso di CD riscrivibili (CD-RW)
è possibile che vi siano dei problemi durante
la riproduzione a seconda del tipo di CD, del
masterizzatore e del programma usato.
Nota: Dato il grande numero di produttori di me-
morie e di driver per apparecchi, non si può garan-
tire che tutti i mezzi di memoria siano compatibili
con il CD-112/BT.
3.1 Conformità e omologazione
Il fabbricante, Monacor International GmbH
& Co. KG, dichiara che il tipo di apparec-
chiatura radio CD-112/BT è conforme alla
direttiva 2014/53/UE. Il testo completo della
dichiarazione di conformità UE è disponibile
al seguente indirizzo Internet:
www.monacor-international.com
4 Disattivare la funzione
autostart
Il lettore CD/MP3 è equipaggiato con una fun-
zione auto start: Dopo l’accensione dell’ap-
parecchio e il caricamento dei dati di un di-
spositivo audio (CD, memoria USB o scheda
memoria), s’avvia automaticamente la ripro-
duzione del primo titolo. Se l’avvio automa-
tico non è richiesto [avvio della riproduzione
solo premendo il tasto PLAY/PAUSE(10)], si
può disattivare la funzione auto start.
AVVERTIMENTO Dato che occorre aprire
l’apparecchio per que-
sta modifica, tale mo-
difica deve essere fatta
solo da parte di una per-
sona esperta. La mani-
polazione scorretta può
provocare una scossa
elettrica!
Prima di aprire l’apparecchio staccare as-
solutamente la spina del cavo dalla presa
di rete!
Sulla scheda con l’alimentatore e le prese
audio OUT si trova un jumper (vedi la freccia
in fig. 5). La funzione auto start è attivata se
il jumper si trova in posizione AUTO PLAY. Per
disattivare la funzione, spostare il jumper in
posizione MANUAL PLAY.
5 Collocare e collegare
l’apparecchio
L’apparecchio è previsto per il montaggio in
un rack (482mm /19”), ma può essere col-
locato anche liberamente su un tavolo. Per
il montaggio in un rack e richiesta un’unità
d’altezza (=44,45mm).
Prima di effettuare o modificare i collega-
menti, spegnere il CD-112/BT e gli apparecchi
da collegare.
1)
Per inoltrare i segnali audio all’apparecchio
a valle (p. es. mixer o amplificatore), sono
presenti tre uscite con livello Line:
PRIORITY OUT (21)
Qui è presente il segnale del ricevitore
bluetooth oppure, se non si riceve nes-
sun segnale o se la riproduzione è in
pausa, il segnale del lettore CD/MP3.
BLUETOOTH OUT (22)
per il segnale del ricevitore bluetooth
CD PLAYER OUT (23)
per il segnale del lettore CD/MP3
2)
Inserire il cavo rete in dotazione prima nella
presa (24) e quindi in una presa di rete
(230V/50 Hz).
6 Funzionamento
Accendere l’apparecchio con l’interruttore
POWER (1). Sul display (5) si legge
Welcome
.
Per prima cosa, l’apparecchio carica i dati
del CD. Se non è inserito nessun CD, sono
caricati i dati della memoria USB. Se non è
collegato nessuna memoria USB, si caricano
i dati della scheda SD/MMC. Se è assente
anche questa, il display indica
NO DISC.
6.1 Telecomando
1)
Per inserire le batterie (2 × 1,5V, tipo AAA
= ministilo), togliere il coperchio del vano
batterie sul retro del telecomando. Inserire
le batterie come indicato nel vano stesso e
richiudere il vano con il coperchio.
In caso di mancato uso prolungato
conviene togliere le batterie per non dan-
neggiare il telecomando se le batterie do-
vessero perdere.
2)
Premendo un tasto del telecomando,
tenerlo sempre in direzione del sensore
IR(7). Non ci devono essere ostacoli fra il
telecomando e il sensore.
3)
Se la portata del telecomando diminuisce,
significa che le batterie sono scariche e che
devono essere sostituite.
Non gettare le batterie scariche
nelle immondizie di casa bensì negli
appositi contenitori (p.es. presso il
vostro rivenditore).
6.2 Riprodurre titoli musicali
1)
Inserire un CD, con la scritta rivolta in alto,
nella fessura (4) finché non viene ritirata
automaticamente
e/o
inserire una chiavetta USB nella porta
USB (6) o collegare un disco rigido (even-
tualmente con alimentazione individuale)
con la porta USB
e/o
inserire una scheda di memoria SD/MMC
nella fessura SD/MMC CARD (2), con l’an-
golo smussato rivolto in alto. Per togliere
nuovamente la scheda, spingerla un po’
indentro per sbloccarla.
2) Scegliere la sorgente audio (CD, memoria
USB, scheda di memoria) eventualmente
con il tasto FUNC (19).
3) Dopo il caricamento dei dati si avvia auto-
maticamente la riproduzione del primo ti-
tolo. Se è stata disattivata la funzione auto
start (Cap. 4), avviare la riproduzione del
primo titolo con il tasto PLAY/PAUSE (10).
Per scegliere altri titoli, vedi capitolo 6.3.
4) Durante la riproduzione, nella riga supe-
riore del display si vede a destra il simbolo
di riproduzione . La riga inferiore indica il
numero (TR …) del titolo attuale e il tempo
già trascorso (min. : sec.). Tutto a destra,
con i titoli nel formato MP3 si vede
MP3,
oppure
CDA
nel caso di CD audio stan
-
dard.
5)
Con i file MP3 si vede in più, scorrendo
nella riga superiore:
File – … = nome del file
Title – … = nome del titolo
Artist – … = nome dell’artista
Album – … = nome dell’albo
Nota: Se è assente un dato, al posto del nome,
il display segnala Unknown.
Con il tasto ID3 (28) si può attivare la dis-
solvenza IN e OUT di queste informazioni
che scorrono nella riga superiore.
6) Premendo il tasto DISPLAY (27) sul teleco-
mando, con i file MP3 si possono visualiz-
zare varie informazioni nella riga inferiore
del display:
impostazione base:
Nella riga inferiore è indicato il numero del
titolo e il tempo trascorso del titolo.
1. pressione del tasto:
È indicato il nome della cartella.
2 pressione del tasto:
È indicato il numero delle cartelle e dei titoli.
3. pressione del tasto:
ritorno all’impostazione base
7) Con il tasto PLAY/PAUSE si può cambiare
fra riproduzione e pausa. Nel modo di
pausa, è visualizzato il simbolo di pausa
e
l’indicazione del tempo lampeggia.
8) Per terminare la riproduzione, premere il
tasto STOP (9). Allora, il display indica nella
seconda riga:
con CD audio standard
– il numero dei titoli (TR …)
– la durata complessiva (min. : sec.)
con sorgenti con file MP3
– il numero delle cartelle
– il numero dei titoli
9) Per espellere il CD, premere il tasto EJECT
(11). Il display indica
EJECT, il CD esce e
può essere prelevato. Se entro 10 secondi
circa non si toglie il CD dalla sua sede,
l’apparecchio lo ritira di nuovo automa-
ticamente.

18
Italiano
6.3 Scelta di un titolo
6.3.1 Scelta diretta del numero del titolo
Con i tasti numerici (3), un titolo può essere
selezionato direttamente digitando il suo
numero. Per avviare il titolo premere succes-
sivamente il tasto PLAY/PAUSE (10). Esempi:
N. titolo Tasti
4 4, PLAY/PAUSE
27 2, 7, PLAY/PAUSE
135 1, 3, 5, PLAY/PAUSE
Nota: I titoli MP3 sono numerati dall’apparecchio
come segue:
1. tutti i titoli senza cartella nella directory princi-
pale ROOT
2. tutti i titoli in cartelle nella directory principale
3. tutti i titoli nelle sottocartelle ecc.
La numerazione dei titoli e delle cartelle non avviene
in ordine alfabetico, ma con l’aiuto della funzione di
ricerca si vede facilmente (☞Cap. 6.3.3 e 6.3.4).
6.3.2 Saltare avanti o indietro di un titolo
Per saltare avanti o indietro di uno o più titoli,
premere brevemente (più volte) il tasto CUE
o REV (8).
Tasto CUE: saltare al titolo successivo
Tasto REV: saltare all’inizio del titolo attuale.
Con ogni ulteriore pressione del tasto REV si
salta indietro di un altro titolo.
Nota: Premere i tasti CUE e REV solo brevemente;
altrimenti si attiva l’avanzamento o ritorno veloce.
6.3.3 Ricerca alfabetica di titoli MP3
1)
Premere il tasto FIND (29) del teleco-
mando. In basso a sinistra del display ap-
pare, lampeggiante, il simbolo di una lente
d’ingrandimento. A destra della stessa è
visualizzata la lettera
A, e nella riga supe-
riore del display si vede il nome del primo
file che inizia con la lettera A.
2)
Con il tasto CUE [scorrendo in avanti] o
REV [scorrendo indietro] (8) scegliere la
lettera con la quale inizia il nome del file
desiderato. Si possono digitare anche le
cifre 0– 9. Per le lettere e le cifre con le
quali non inizia nessun nome di un file,
sarà indicato None.
3)
Se sono presenti più nomi che iniziano con
la stessa lettera, dopo la scelta della lettera
tener premuto il tasto CUE o REV finché la
lettera vicino al simbolo della lente comin-
cia a lampeggiare. Ora, con il tasto CUE o
REV si possono scegliere, uno dopo l’altro,
tutti i nomi di file con l’iniziale indicata.
4)
Durante la ricerca, il display indica sempre,
in basso a destra, il numero della cartella e
del titolo. Se il titolo cercato è stato trovato,
avviare la riproduzione con il tasto PLAY/
PAUSE (10).
6.3.4 Scelta e ricerca della cartella
Con i file MP3 disposti in più cartelle (direc-
tories), durante la riproduzione con i tasti
FOLDER (16) è possibile saltare sul primo titolo
della cartella successiva (tasto ) e sul primo
titolo della cartella precedente (tasto ).
Se prima si termina la riproduzione con il
tasto STOP (9) e se quindi si preme il tasto
FOLDER o , la riga superiore del display
indica il nome della cartella e la riga inferiore
visualizza dietro il simbolo il numero della
cartella.
Con la funzione di ricerca si può trovare una
cartella con un determinato nome anche du-
rante la riproduzione di un titolo:
1)
Premere due volte il tasto FIND (29) in
modo che sul display lampeggi il simbolo
della lente e che alla sua destra si veda
Dir per Directory (cartella).
2) Con il tasto CUE o REV (8) cercare la car-
tella desiderata. La riga superiore del di-
splay indica il nome della cartella e la riga
inferiore il relativo numero.
3) Se la cartella è stata trovata, per avviare il
primo titolo della cartella premere il tasto
PLAY/PAUSE (10) oppure, per avviare un
altro titolo della cartella, tener premuto
dapprima il tasto CUE o REV finché vicino
al simbolo delle lente si vede
File. Con il
tasto CUE o REV è possibile scegliere i titoli
della cartella uno dopo l’altro. Per avviare il
titolo scelto premere il tasto PLAY/PAUSE.
6.4 Avanzamento/ritorno veloce
Tener premuto il tasto CUE o REV (8):
tasto CUE: avanzamento veloce
tasto REV: ritorno veloce
Nei file MP3, l’avanzamento o ritorno veloce è
possibile solo all’interno di un titolo e non può
essere seguito acusticamente ma solo sulla
base dell’indicazione del tempo sul display.
6.5 Funzioni di ripetizione e
riproduzionein ordine casuale
Con il tasto REPEAT (17) si può attivare una
delle funzioni di ripetizioni e la riproduzione
dei titoli in ordine casuale:
impostazione base
PLAY ALL: tutti i titoli della sorgente o di
una sequenza programmata sono ripro-
dotti una volta, quindi la riproduzione
termina.
prima pressione del tasto
PLAY ALL RANDOM: riproduzione unica
dei titoli in ordine casuale
ulteriore pressione del tasto
REPEAT TRACK: ripetizione continua del
titolo scelto
ulteriore pressione del tasto
REPEAT FOLDER: ripetizione continua di
tutti i titoli della cartella scelta
(la funzione è presente solo per i file MP3)
ulteriore pressione del tasto
REPEAT ALL: ripetizione continua di tutti
i titoli
ulteriore pressione del tasto
RANDOM REPEAT: riproduzione continua
dei titoli in ordine casuale
ulteriore pressione del tasto
PLAY ALL: ritorna all’impostazione base
6.6 Attivare la funzione di muto
Per rendere muto l’audio durante la riprodu-
zione di un titolo, premere il tasto MUTE(26)
del telecomando. Per riattivare l’audio, pre-
mere nuovamente il tasto MUTE.
6.7 Compilare una sequenza
individuale di titoli
Se si desidera riprodurre una selezione di
titoli in un determinato ordine, si può pro-
grammare una sequenza con un massimo
di 64 titoli. In questo caso, per i file MP3,
si dovrebbe conoscere la numerazione delle
cartelle (☞Capitolo6.3.4), perché per ogni
titolo da programmare si deve immettere il
relativo numero della cartella.
1) L’apparecchio deve trovarsi in Stop; even-
tualmente premere il tasto STOP (9).
2)
Con il tasto PROG (18) attivare il modo
di programmazione. Premere tutti gli altri
tasti entro 15 secondi, altrimenti si esce
dal modo di programmazione In questo
caso azionare nuovamente il tasto PROG.
Il display indica:
– con un CD senza file MP3
PROGRAM
CD Pƅ01 00
– con file MP3
PROGRAM
Pƅ01 000 0000
3)
Nel caso di CD senza file MP3 saltare il
presente punto e continuare direttamente
con il punto 4.
Per i file MP3 occorre dapprima sce-
gliere il numero della cartella nella quale
si trova il primo titolo desiderato per la
compilation. Questo è necessario anche se
tutti i titoli si trovano senza cartella nella
directory principale ROOT. In questo caso
digitare 1 come numero della cartella. Se-
lezionare il numero della cartella con i tasti
SKIP (8) oppure digitarlo direttamente con
i tasti numerici (3). Per memorizzare, pre-
mere il tasto PROG. I quattro zeri lampeg-
giano e invitano ad immettere il numero
del titolo.
4) Con i tasti SKIP (8) selezionare il numero
del primo titolo della compilation oppure
digitarlo con i tasti numerici (3). Per i file
MP3 che si trovano nelle cartelle tener pre-
sente che ora non tutti i file sono numerati,
ma che sempre il primo file della cartella è
indicato con il numero 1.
5)
Per memorizzare premere il tasto PROG.
Il display indica la locazione successiva di
memoria, p.es.
P-02.
6)
Ripetere i punti (3), 4 e 5 per gli altri ti-
toli fino ad aver programmato tutta la
sequenza di titoli.
7)
Per avviare la compilation, premere il
tasto PLAY/PAUSE (10). La riga superiore
del display visualizza a sinistra MEM per
Memory, e la sequenza viene riprodotta.
8) Con i tasti SKIP si può scegliere ogni titolo
della sequenza, oppure, tenendo premuto

19
Italiano
il relativo tasto, si può attivare l‘avanza-
mento/ritorno veloce all’interno di un ti-
tolo.
9)
Dopo la riproduzione della compilation
o premendo il tasto STOP, si termina la
riproduzione. Per riavviare la sequenza,
premere prima il tasto PROG e quindi il
tasto PLAY/PAUSE.
Nota: Una sequenza programmata di titoli viene
cancellata cambiando la sorgente audio, premendo
il tasto FUNC (19), premendo il tasto STOP nel modo
di programmazione e spegnendo l’apparecchio.
6.8 Funzionamento del
ricevitorebluetooth
Con il ricevitore bluetooth è possibile creare
un collegamento radio con una fonte di se-
gnali bluetooth (p.es. notebook, smartphone,
tablet-PC) per riprodurre tramite il CD-112/BT
i file audio memorizzati su detta fonte.
N.B.: La fonte di segnali bluetooth deve usare il pro-
tocollo A2DP (Advanced Audio Distribution Profile).
Altrimenti non è possibile il collegamento via radio.
1)
Attivare la funzione bluetooth sul note-
book, smartphone o tablet-PC (vedere
eventualmente le relative istruzioni).
2)
Per accendere il ricevitore bluetooth del
CD-112/BT, tener premuto brevemente il
tasto BT POWER (15) finché lampeggia la
spia PAIR (12).
3)
Per collegare il CD-112/BT con la fonte
di segnali bluetooth, tener premuto bre-
vemente il tasto PAIR (13) finché la spia
PAIR lampeggia più lentamente. Quando il
collegamento via radio esiste, la spia PAIR
rimane accesa costantemente.
N.B.: Sul display della fonte di segnali bluetooth,
il CD-112/BT è indicato con “Audio Bluetooth”.
4) Avviare sulla fonte di segnali bluetooth la
riproduzione di un titolo.
5) Con il tasto I(15) si può interrompere
e riprendere la riproduzione.
N.B.: Mentre la riproduzione è interrotta, all’u-
scita PRIORITY (21) è presente il segnale del
lettore CD/MP3.
6)
Con i tasti DOWN/ e UP/ (20) si può
saltare sul titolo precedente o successivo
(premere brevemente il tasto) oppure si
può attivare il ritorno o l’avanzamento
veloce (tener premuto il tasto).
7) Per spegnere il ricevitore bluetooth, tener
premuto il tasto BT POWER finché si spe-
gne la spia PAIR.
7 Cura dell’apparecchio
Proteggere l’apparecchio da polvere, vibra-
zioni, umidità e calore. Per la pulizia usare
solo un panne morbido, asciutto, in nessun
caso acqua o prodotti chimici.
Note su possibili buchi nella riproduzione
e su errori di lettura
Il fumo di sigarette e polvere penetrano facil-
mente fra tutte le aperture dell’apparecchio
e si depositano sul sistema ottico della scan-
sione ai raggi laser. Se ciò dovesse provocare
errori di lettura e buchi nella riproduzione,
l’apparecchio deve essere pulito in un labora-
torio specializzato. Una tale pulizia è a paga-
mento, anche durante il periodo di garanzia!
8 Dati tecnici
Risposta in frequenza:. . . . . . 20– 20000 Hz
Fattore di distorsione: . . . . . . < 0,1%
Separazione canali: . . . . . . . . > 60dB
Range dinamico:. . . . . . . . . . > 96dB
Rapporto S/R: . . . . . . . . . . . . > 70dB
Uscita audio:. . . . . . . . . . . . . 1,2V
Trasmissione Bluetooth
Banda di frequenza:. . . . . . 2,4GHz
Potenza di trasmissione: . . 10dBm max.
Alimentazione: . . . . . . . . . . . ~ 230V/50 Hz
Potenza assorbita:. . . . . . . . . max. 50VA
Temperatura d’esercizio: . . . . 0–40°C
Dimensioni
Larghezza:. . . . . . . . . . . . . 482mm
Altezza:. . . . . . . . . . . . . . . 44mm
Profondità: . . . . . . . . . . . . 265mm
Unità d'altezza:. . . . . . . . . . . 1U
Peso:. . . . . . . . . . . . . . . . . . . 4kg
Con riserva di modifiche tecniche.
La MONACOR ®INTERNATIONAL GmbH & Co. KG si riserva ogni diritto di elaborazione in qualsiasi forma
delle presenti istruzioni per l’uso. La riproduzione – anche parziale – per propri scopi commerciali è vietata.

20
Nederlands
Deutsch
Deutsch Seite
English
English Page
Français
Français Page
Italiano
Italiano Pagina
Español
Español Página
Polski
Polski Strona
CD/MP3-speler
Deze handleiding is bedoeld voor gebruikers
zonder bijzondere vakkennis. Lees de hand-
leiding grondig door, alvorens het apparaat in
gebruik te nemen, en bewaar ze voor latere
raadpleging.
Op de uitklapbare pagina 3 vindt u een
overzicht van alle bedieningselementen en
de aansluitingen.
1 Overzicht
1.1 Frontpaneel
1 POWER-schakelaar
2
Sleuf voor het insteken van een SD/MMC-
geheugenkaart
3
Cijfertoetsen om een track rechtstreeks
te selecteren
Voorbeelden:
Tracknr. Toetsen
4 4, PLAY/PAUSE
27 2, 7, PLAY/PAUSE
135 1, 3, 5, PLAY/PAUSE
4 CD-intreksleuf
Schuif de cd in de sleuf tot ze er automa-
tisch wordt ingetrokken.
5 Display
6 USB-slot om een USB-stick in te pluggen
of een harde schijf aan te sluiten
7
Infraroodsensor voor de afstandsbedie-
ningssignalen
8 SKIP-toetsen (CUE en REV) om een track
te selecteren en snel vooruit en achteruit
te zoeken
een track selecteren
Telkens u op de toets CUE drukt, gaat
u naar de volgende track; door op de
toets REV te drukken, keert u terug
naar het begin van de track; telkens u
daarna op de toets drukt, keert u een
track terug.
snel vooruit/achteruit zoeken
Om snel vooruit te zoeken, houdt u de
toets CUE ingedrukt, om snel achteruit
te zoeken de toets REV.
9
Toets STOP om het afspelen te beëindigen
10
Toets PLAY/PAUSE om tussen afspelen en
pauze om te schakelen
11 Toets EJECT om de cd uit te werpen
12 Led PAIR:
Knippert bij ingeschakelde Bluetooth-ont-
vanger.
Licht continu op bij geslaagde koppeling
met een Bluetooth-signaalbron.
13 Toets PAIR voor koppeling met een Blue-
tooth-signaalbron (☞hoofdstuk 6.8)
14 Antenne van de Bluetooth-ontvanger
15
Toets BT POWER/Ivoor het in- en
uitschakelen van de Bluetooth-ontvan-
ger (toets langer ingedrukt houden) en
om het afspelen in Bluetooth-bedrijf te
onderbreken of voort te zetten (kort op
toets drukken)
16 Toetsen FOLDER bij mp3-bestanden voor
het selecteren van mappen:
Om de volgende map te selecteren, drukt
u op de toets . Om naar de vorige map
terug te keren, drukt u op de toets .
Daarbij wordt steeds naar de eerste track
van de geselecteerde map gesprongen.
17
Toets REPEAT om de herhalingsfuncties
en de willekeurige weergave te selecteren
basisinstelling
PLAY ALL: alle tracks van de geluids-
drager of van een geprogrammeerde
reeks tracks worden één keer afge-
speeld.
eerste keer drukken op de toets
PLAY ALL RANDOM: eenmalige weer-
gave van de tracks in willekeurige
volgorde
volgende keer drukken op de toets
REPEAT TRACK: continue herhaling
van de geselecteerde track
volgende keer drukken op de toets
REPEAT FOLDER: continue herhaling
van alle tracks in de geselecteerde map
(functie alleen bij mp3-bestanden be-
schikbaar)
volgende keer drukken op de toets
REPEAT ALL: continue herhaling van
alle tracks
volgende keer drukken op de toets
RANDOM REPEAT: continu afspelen
van de tracks in willekeurige volgorde
volgende keer drukken op de toets
PLAY ALL: terugschakelen naar de ba-
sisinstelling
18
Toets PROG om voor het samenstellen
van een eigen reeks tracks naar de pro-
grammeermodus te schakelen (
☞
hoofd-
stuk6.7)
19
Toets FUNC om de geluidsdrager (cd,
USB-stick, SD/MMC-geheugenkaart) te
selecteren
20 Bij Bluetooth-bedrijf:
Toetsen DOWN/ en UP/ om een
track te selecteren en om snel vooruit en
achteruit te spoelen
1.2 Achterzijde
21 Cinch-jacks PRIORITY OUT
Hier is het signaal van de Bluetooth-ont-
vanger beschikbaar ofwel – als er geen
signaal ontvangen wordt of het afspelen
in pauze geschakeld is – het signaal van
de cd/mp3-speler.
22
Cinch-jacks BLEUTOOTH OUT voor de
audio-uitgang van de Bluetooth-ontvan-
ger
23
Cinch-jacks CD PLAYER OUT voor de
audio-uitgang van de cd/mp3-speler
24
POWER-jack voor aansluiting op een stop-
contact (230V/ 50Hz) met behulp van het
bijgeleverde netsnoer
25 Houder voor de netzekering
Vervang een gesmolten zekering uitslui-
tend door een zekering van hetzelfde
type.
1.3 Afstandsbediening
3, 8 – 11 en 16 – 19
Deze toetsen hebben dezelfde functies als de
toetsen op het apparaat.
26 Toets MUTE voor het dempen
27
Toets DISPLAY om de gegevens in de
onderste regel op het display om te wis-
selen tijdens het afspelen van mp3-be-
standen
basisinstelling
In de onderste regel wordt het track-
nummer (TR) en de reeds verstreken
speeltijd van de track weergegeven.
1ste keer drukken op de toets
De naam van de map wordt weerge-
geven.
2de keer drukken op de toets
Het aantal mappen en tracks wordt
weergegeven.
3de keer drukken op de toets
terugschakelen naar de basisinstelling
28 Toets ID3 om de doorlopende informatie
in de bovenste displayregel bij mp3-be-
standen (naam van het bestand, de track,
de kunstenaar en het album) weer te
geven of uit te schakelen
29
Toets FIND voor het zoeken van mp3-
tracks en mappen (☞hoofdstuk 6.3.3
en 6.3.4)
2 Veiligheidsvoorschriften
Het apparaat is in overeenstemming met alle
relevante EU-Richtlijnen en is daarom geken-
merkt met .
WAARSCHUWING De netspanning van het
apparaat is levensgevaar-
lijk. Open het apparaat
niet, want door onzorg-
vuldige ingrepen loopt u
het risico van elektrische
schokken.
•
Het apparaat is enkel geschikt voor gebruik
binnenshuis; vermijd druip- en spatwater
en plaatsen met uitzonderlijk hoge voch-
tigheid. Het toegestane omgevingstempe-
ratuurbereik is 0–40 °C.
•
Plaats geen bekers met vloeistof zoals
drinkglazen etc. op het apparaat.
•
Schakel het apparaat niet in en trek on-
middellijk de stekker uit het stopcontact,
1.
wanneer het apparaat of het netsnoer
zichtbaar beschadigd is,
2. wanneer er een defect zou kunnen op-
treden nadat het apparaat bijvoorbeeld
is gevallen,
3.
wanneer het apparaat slecht functio-
neert.
Het apparaat moet in elk geval worden
hersteld door een gekwalificeerd vakman.
•
Trek de stekker nooit met het snoer uit het
stopcontact, maar met de stekker zelf.
•
In geval van ongeoorloofd of verkeerd
gebruik, verkeerde aansluiting, foutieve
bediening of van herstelling door een
niet-gekwalificeerd persoon vervalt de
garantie en de verantwoordelijkheid voor
Nederlands
Nederlands Pagina
This manual suits for next models
1
Table of contents
Languages:
Other Monacor MP3 Player manuals

Monacor
Monacor IMG Stageline DMP-100 User manual

Monacor
Monacor CD-113 User manual

Monacor
Monacor PA-1140RCD User manual

Monacor
Monacor CD-114/BT User manual

Monacor
Monacor PA-1140RCD User manual

Monacor
Monacor CD-112 User manual

Monacor
Monacor PA-24RCD User manual

Monacor
Monacor CD-156 User manual

Monacor
Monacor CD-112RDS/BT User manual

Monacor
Monacor TXA-1020DMP User manual