Monacor CD-156 User manual

ELECTRONICS FOR SPECIALISTS ELECTRONICS FOR SPECIALISTS ELECTRONICS FOR SPECIALISTS ELECTRONICS FOR SPECIALISTS
BEDIENUNGSANLEITUNG
INSTRUCTION MANUAL
MODE D’EMPLOI
ISTRUZIONI PER L’USO
MANUAL DE INSTRUCCIONES
INSTRUKCJA OBSŁUGI
VEILIGHEIDSVOORSCHRIFTEN
SIKKERHEDSOPLYSNINGER
SÄKERHETSFÖRESKRIFTER
TURVALLISUUDESTA
CD / MP3 Player
CD-156
Bestell-Nr. • Order No. 21.2410

2
Deutsch ...........Seite 4
English ............Page 6
Français ...........Page 8
Italiano............Pagina 10
Español ...........Página 12
Polski .............Strona 14
Nederlands ........Pagina 16
Dansk .............Sida 16
Svenska ...........Sidan 17
Suomi.............Sivulta 17
ELECTRONICS FOR SPECIALISTS ELECTRONICS FOR SPECIALISTS ELECTRONICS FOR SPECIALISTS ELECTRONICS FOR SPECIALISTS

3
9
15
16
14
6
10 11
13
17
MIN. SEC.TRACK
REMOTE
SENSOR
MODE RANDOM
PHONES LEVEL
MAXMIN
PHONES
OPEN/CLOSE
CD/USB
CD-156
MODE RANDOM
PHONES LEVEL
MAXMIN
PHONES
OPEN/CLOSE
4 5 6 8
910 11 12 14
13
7
2
1
MIN. SEC.TRACK
CD
CD
USBUSB
3
REMOTE
SENSOR
CD/USB
USBUSB
➀
MODE RANDOM
PHONES LEVEL
MAXMIN
PHONES
OPEN/CLOSE
CD-156
MIN. SEC.TRACK
REMOTE
SENSOR
CD/USB
USBUSB
230V~
50Hz
LINE OUT
L
R
1918
➁
➂

4
English
English Page
Français
Français Page
Italiano
Italiano Pagina
Español
Español Página
Nederlands
Nederlands Pagina
Polski
Polski Strona
Deutsch
Deutsch
Deutsch Seite
CD/MP3-Player
Diese Bedienungsanleitung richtet sich an Be-
nutzer ohne besondere Fachkenntnisse. Bitte
lesen Sie die Anleitung vor dem Betrieb gründ-
lich durch und heben Sie sie für ein späteres
Nachlesen auf.
Auf der ausklappbaren Seite 3 finden Sie
alle beschriebenen Bedienelemente und An-
schlüsse.
1 Übersicht der Anschlüsse
und Bedienelemente
1.1 Front des Players und
Fernbedienung (Abb. 1)
1 Ein-/Ausschalter
2 CD-Schublade
3 Display
4 Infrarotsensor für die Fernbedienung
5 Anschluss zum Einstecken eines USB-Sticks
6 Umschalttaste CD/USB-Stick
7
6,3-mm-Klinkenbuchse zum Anschluss eines
Stereo-Kopfhörers (Impedanz min. 32Ω)
8
Lautstärkeregler für den Kopfhörerausgang
PHONES (7)
9
Taste zum Öffnen/Schließen der CD-Schub-
lade
10 Umschalttaste Wiedergabe/Pause
11 Stopptaste zum Beenden des Abspielens
12
Tasten zur Titelanwahl und für den schnellen
Vor-/Rücklauf
Titelanwahl
Taste kurz drücken
Mit der Taste wird ein Titel vor-
gesprungen, mit der Taste erst an
den Titelanfang und mit jedem weiteren
Drücken ein Titel zurück.
schneller Vor-/Rücklauf
Taste gedrückt halten*
Taste für den Vorlauf
Taste für den Rücklauf
13 Taste für die Wiederholfunktion
1. Tastendruck (Anzeige „REPEAT 1“)
Wiederholung des laufenden Titels
2. Tastendruck (Anzeige „REPEAT ALL“)
Wiederholung aller Titel
3. Tastendruck
Abschalten der Wiederholfunktion
14
Taste zum Ein- und Ausschalten der Titelwie-
dergabe in zufälliger Reihenfolge
15 Tasten zur Titelanwahl
Durch Drücken der Taste SKIP+ wird ein Titel
vorgesprungen, durch Drücken der Taste
SKIP− erst an den Titelanfang und mit jedem
weiteren Drücken ein Titel zurück.
Zum Überspringen mehrerer Titel die jewei-
lige Taste gedrückt halten.*
16
Tasten, um den schnellen Vorlauf (SEARCH+)
bzw. schnellen Rücklauf (SEARCH−) zu star
-
ten
17 Zifferntasten zur Direktwahl eines Titels
*
Wird die Taste (SKIP+ auf der Fernbedienung)
bzw. die Taste (SKIP− auf der Fernbedienung)
im Stopp-Modus gedrückt gehalten, springt der
Player immer 10 Titel vor bzw. zurück.
1.2 Rückseite des Players (Abb. 2)
18
Cinch-Ausgangsbuchsen (L = links, R =
rechts) zum Anschluss an einen Verstärker
oder an ein Mischpult
19
Netzkabel zum Anschluss an eine Steckdose
(230V/50 Hz)
2 Hinweise für den sicheren
Gebrauch
Das Gerät entspricht allen relevanten Richtlinien
der EU und trägt deshalb das -Zeichen.
WARNUNG
Das Gerät wird mit lebensgefähr-
licher Netzspannung versorgt.
Nehmen Sie deshalb niemals
selbst Eingriffe am Gerät vor. Es
besteht die Gefahr eines elektri-
schen Schlages.
•
Vorsicht! Blicken Sie bei geöffneter CD-
Schublade nicht in den CD-Schacht. Eventuell
austretende Laserstrahlen können zu Augen-
schäden führen.
•
Das Gerät ist nur zur Verwendung im
Innenbereich geeignet. Schützen Sie es vor
Tropf- und Spritzwasser sowie vor hoher
Luftfeuchtigkeit. Der zulässige Einsatztem-
peraturbereich beträgt 0– 40 °C.
•
Stellen Sie keine mit Flüssigkeit gefüllten
Gefäße z.B. Trinkgläser, auf das Gerät.
•
Ziehen Sie sofort den Netzstecker aus der
Steckdose,
1.
wenn sichtbare Schäden am Gerät oder am
Netzkabel vorhanden sind,
2.
wenn nach einem Sturz oder Ähnlichem
der Verdacht auf einen Defekt besteht,
3. wenn Funktionsstörungen auftreten.
Geben Sie das Gerät in jedem Fall zur Repa-
ratur in eine Fachwerkstatt.
•
Ein beschädigtes Netzkabel darf nur durch
eine Fachwerkstatt ersetzt werden.
•
Ziehen Sie den Netzstecker nie am Kabel aus
der Steckdose, fassen Sie immer am Stecker an.
•
Wird das Gerät zweckentfremdet, nicht rich-
tig angeschlossen, falsch bedient oder nicht
fachgerecht repariert, kann keine Haftung für
daraus resultierende Sach- oder Personen-
schäden und keine Garantie für das Gerät
übernommen werden.
Soll das Gerät endgültig aus dem Be-
trieb genommen werden, übergeben
Sie es zur umweltgerechten Entsorgung
einem örtlichen Recyclingbetrieb.
3 Einsatzmöglichkeiten
Der CD/MP3-Player CD-156 ist universell einsetz-
bar (z.B. für den Heimgebrauch, in Restaurants
oder Warteräumen). Es lassen sich Standard-Au-
dio-CDs, auch selbst gebrannte, abspielen sowie
CDs und USB-Sticks mit MP3-Dateien. Bei wie-
derbeschreibbaren CDs (CD-RW) kann es jedoch
je nach CD-Typ, verwendetem CD-Brenner und
Brennprogramm zu Problemen kommen.
Der Player ist mit einem Anti-Shock-Spei-
cher ausgestattet, der beim Abspielen kurzzei-
tige Störungen durch Stöße oder Vibrationen
ausgleichen kann (bis 45 Sekunden bei Daten-
trägern mit MP3-Dateien, bis 30 Sekunden bei
Standard-Audio-CDs). Das Anti-Shock-System
kann jedoch keine lang anhaltenden Störungen
ausgleichen.
Hinweise:
1. Anstelle eines USB-Sticks kann auch eine USB-Fest-
platte (FAT16/32) mit eigener Stromversorgung
angeschlossen werden.
2. Auch das Abspielen von Dateien im WMA-Format
ist möglIch.
3. Aufgrund der Vielfalt von Speicher-Herstellern und
Gerätetreibern kann nicht garantiert werden, dass
alle USB-Speichermedien mit dem CD-156 kom-
patibel sind.
4 Gerät aufstellen und
anschließen
Der Player kann als frei stehendes Tischgerät
auf einer ebenen, waagerechten Fläche aufge-
stellt oder in ein Rack (482mm /19“) eingesetzt
werden. Für den Einbau in ein Rack die zwei
beiliegenden Montagewinkel nach Abb. 3 an-
schrauben. Es werden 2HE (1 HE = Höhenein-
heit = 44,45mm) benötigt.
Vor dem Anschluss bzw. vor dem Verändern von
Anschlüssen den Player und die anzuschließen-
den Geräte ausschalten.
1)
Den Ausgang LINE OUT (18) – linker Ka-
nal L weiße Buchse, rechter Kanal R rote
Buchse– über ein Stereo-Audiokabel mit
Cinch-Steckern an den CD-Player-Eingang am
Mischpult oder am Verstärker anschließen.
2)
An die 6,3-mm-Klinkenbuchse PHONES (7)
lässt sich ein Stereo-Kopfhörer (Impedanz
min. 32Ω) anschließen.
3)
Zuletzt den Stecker des Netzkabels (19) in
eine Steckdose (230V/50 Hz) stecken.
5 Bedienung
Die Bedienung kann über die Tasten an der Ge-
rätevorderseite oder über die Fernbedienung
erfolgen.
Beim Betätigen der Fernbedienung diese immer
auf den Infrarotsensor (4) des Geräts richten.
Sollte die Fernbedienung nicht funktionieren
oder die Reichweite nachlassen, muss die Bat-
terie ersetzt werden ☞Kapitel 6.
Bei längerem Nichtgebrauch die Batterie
sicherheitshalber herausnehmen, damit die Fern-
bedienung bei einem eventuellen Auslaufen der
Batterie nicht beschädigt wird.
5.1 Musikdatenträger abspielen
1)
Zum Einschalten des Geräts den Schalter
POWER (1) drücken. Nach dem Einschalten
ist das CD-Laufwerk angewählt. Das Display
(3) zeigt erst , dann , wenn
keine CD eingelegt ist.
2) Den/die Datenträger einsetzen:
– Um eine CD einzulegen, die CD-Schublade
mit der Taste OPEN/CLOSE (9) öffnen, im
Display erscheint . Eine CD mit der
Beschriftung nach oben einlegen und zum
Einfahren der Schublade die Taste erneut
drücken; im Display erscheint .
– Einen USB-Stick in den USB-Anschluss (5)
stecken.
3)
Zum Umschalten zwischen den Datenträgern
die Taste CD/USB (6) drücken. Der gewählte
Datenträger wird durch die entsprechende
Einblendung im Display – „CD“ oder „USB“–
angezeigt.
Hinweis zum schnellen Hin- und Herschalten
zwischen den Datenträgern: Wird noch wäh
-
rend des Einlesens eines Datenträgers versucht,

5
Deutsch
auf den vorherigen Datenträger zurückzuschalten,
reagiert der Player nicht auf die Umschaltung und
das Display zeigt kurz .
4)
Nach dem Einlesen des Datenträgers befindet
sich der Player im Stopp-Modus. Das Display
zeigt im Stopp-Modus:
– bei Standard-Audio-CDs:
die Titelanzahl und die Gesamtspieldauer,
z.B. bei einer CD mit 20 Titeln
undeiner Gesamtspielzeit von 69 Minuten
und 37 Sekunden.
– bei CDs oder USB-Sticks mit MP3-Dateien:
die Anzahl der MP3-Dateien, z.B.
bei einem Datenträger mit 105 MP3-Da-
teien.
Soll die Wiedergabe mit dem ersten Titel
gestartet werden, die Taste (10) am
Gerät bzw. die Taste PLAY/PAUSE (10) auf
der Fernbedienung drücken. Soll mit einem
anderen Titel gestartet werden, diesen an-
wählen (☞Kapitel 5.2) und anschließend
die Taste bzw. PLAY/PAUSE drücken.
5)
Ist ein Kopfhörer angeschlossen, dessen
Lautstärke mit dem Regler PHONES LEVEL
(8) einstellen.
VORSICHT
Stellen Sie die Kopfhörer-
lautstärke nie sehr hoch ein.
Hohe Lautstärken können auf
Dauer das Gehör schädigen!
Das Ohr gewöhnt sich an
hohe Lautstärken und empfindet sie nach
einiger Zeit als nicht mehr so hoch. Darum
erhöhen Sie eine hohe Lautstärke nach der
Gewöhnung nicht weiter.
6) Mit der Taste bzw. PLAY/PAUSE kann
zwischen Wiedergabe (Anzeige
▶
) und Pause
(Anzeige
❙❙
) gewechselt werden. Während
der Wiedergabe und im Pausenmodus zeigt
das Display die Nummer und die bereits ge-
spielte Zeit des aktuellen Titels an. Bei MP3-
Titeln wird zusätzlich „MP3“ eingeblendet.
7) Nach dem Abspielen aller Titel schaltet der
Player in den Stopp-Modus. Zum vorzeiti-
gen Beenden der Wiedergabe den Player mit
der Taste (11) am Gerät bzw. der Taste
STOP (11) auf der Fernbedienung in den
Stopp-Modus schalten.
8)
Zum Wechsel der CD muss das CD-Laufwerk
angewählt sein (ggf. die Taste CD/USB drü-
cken), sonst lässt sich die CD-Schublade nicht
herausfahren.
9) Vor dem Ausschalten immer die CD-Schub-
lade einfahren, um das Laser-Abtastsystem
vor Verschmutzung zu schützen. Dann das
Gerät durch Ausrasten des Schalters POWER
ausschalten.
5.2 Titelwahl
5.2.1 Direktwahl über die Titelnummer
Mit den Zifferntasten (17) der Fernbedienung
lässt sich ein Titel durch Eingabe seiner Num-
mer direkt anwählen. Bei mehrstelligen Titel-
nummern die jeweiligen Ziffern hintereinander
drücken, z.B. bei Titelnummer 10 die Tasten
„1“ und „0“.
Hinweis: Bei Datenträgern mit MP3-Dateien und
mehreren Ordnern werden die Titel in folgender Rei-
henfolge abgespielt und durchnummeriert:
1. alle Titel ohne Ordner auf dem Hauptverzeichnis
2. alle Titel in Ordnern auf dem Hauptverzeichnis
3. alle Titel in Unterordnern usw.
5.2.2 Titel vor- oder zurückspringen
Mit den Tasten / (12) am Gerät
bzw. SKIP+/SKIP− (15) auf der Fernbedienung
kann auf Titel vor- oder zurückgesprungen wer-
den.
Titel vorspringen
Bei jedem Drücken der Taste oder
SKIP+ wird ein Titel weitergesprungen.
Titel zurückspringen
Mit der Taste oder SKIP− wird erst an
den Titelanfang gesprungen und mit jedem
weiteren Drücken ein Titel zurück
Zum Überspringen mehrerer Titel die jeweilige
SKIP-Taste gedrückt halten.
Hinweise zur Titelanwahl im Stopp-Modus:
1. Wird im Stopp-Modus auf einen Titel vor- oder zu-
rückgesprungen, wechselt das Display ca. 3 Sekun-
den nach dem Anzeigen der Titelnummer zurück auf
die Anzeige der Titelanzahl/Gesamtspieldauer bzw.
der Anzahl der MP3-Dateien (☞Kap.5.1, Punkt 4).
2. Wird im Stopp-Modus die Taste /SKIP+ bzw.
/SKIP− gedrückt gehalten, springt der Player
immer 10 Titel weiter bzw. zurück.
5.3 Schneller Vor- und Rücklauf
Mit den Tasten / (12) am Gerät
und mit den Tasten SEARCH+/SEARCH− (16)
auf der Fernbedienung kann während der Wie-
dergabe ein schneller Vor- bzw. Rücklauf durch-
geführt werden:
– Entweder die Taste für den Vorlauf
bzw. für den Rücklauf so lange ge-
drückt halten, bis die gewünschte Stelle er-
reicht ist.
– Oder die Taste SEARCH+ bzw. SEARCH−
drücken, um den Vorlauf bzw. Rücklauf zu
starten. Wenn die gewünschte Stelle erreicht
ist, die Taste (10) am Gerät bzw. die
Taste PLAY/PAUSE (10) auf der Fernbedienung
drücken.
Der Vor-/Rücklauf fährt auch über mehrere Titel,
wird jedoch am Anfang des ersten Titels bzw.
am Ende des letzten Titels beendet (Ausnahme:
bei MP3-Titeln endet der Rücklauf, wenn der
Titelanfang erreicht ist).
5.4 Zufällige Titelfolge
Zum Abspielen der Titel in zufälliger Reihen-
folge die Taste RANDOM (14) drücken, das
Display zeigt „RANDOM“. In diesem Abspiel-
modus kann mit der Vorwärtstaste (12)
bzw. SKIP+ (15) der nächste Titel der zufälligen
Titelfolge angewählt werden, der Rücksprung
auf den zurückliegenden Titel mit der Taste
bzw. SKIP− oder die Titeldirektwahl mit
den Zifferntasten (17) ist nicht möglich. Wenn
jeder Titel des Datenträgers einmal gespielt
wurde, schaltet der Player in den Stopp-Modus
und die RANDOM-Funktion ist ausgeschaltet.
Um die Funktion vorzeitig auszuschalten,
die Taste RANDOM erneut drücken, im Display
erlischt „RANDOM“ und nach dem Ende des
laufenden Titels wird in aufsteigender Reihen-
folge weitergespielt. Die Funktion wird auch
ausgeschaltet, wenn die Taste (11) am Gerät
bzw. die Taste STOP (11) auf der Fernbedienung
gedrückt wird.
5.5 Wiederholfunktion
Zum endlosen Wiederholen des laufenden Titels
die Taste MODE (13) einmal drücken, das Display
zeigt „REPEAT1“. Zum endlosen Wiederholen
aller Titel des Datenträgers die Taste MODE ein
zweites Mal drücken, das Display zeigt „REPEAT
ALL“.
Zum Ausschalten der Wiederholfunktion die
Taste MODE ein drittes Mal drücken. Die Funk-
tion wird auch ausgeschaltet, wenn die Taste
(11) am Gerät bzw. die Taste STOP (11) auf der
Fernbedienung gedrückt wird.
6 Batterie der Fernbedienung
wechseln
Die Verriegelung des Batteriehalters nach links
drücken (1. Pfeil in Abb. 4) und gleichzeitig den
Halter nach unten herausziehen (2. Pfeil). Die
alte Batterie herausnehmen und die neue Bat-
terie (3-V-Knopfzelle, Typ CR2025) einsetzen.
Dabei darauf achten, dass der Pluspol der Batte-
rie im Halter nach oben zeigt. Den Halter zurück
in die Fernbedienung schieben.
1.2.
Abb. 4 Batteriewechsel
Batterien dürfen nicht in den Hausmüll
geworfen werden. Geben Sie sie zur
umweltgerechten Entsorgung nur in
den Sondermüll (z.B. Sammelbehälter
im Einzelhandel).
7 Pflege des Geräts
Das Gerät vor Staub, Vibrationen, Feuchtigkeit
und Hitze schützen. Für die Reinigung nur ein
weiches, trockenes Tuch verwenden, auf keinen
Fall Wasser oder Chemikalien.
Hinweis zu Tonaussetzern und Lesefehlern:
Zigarettenrauch und Staub dringen leicht durch alle
Öffnungen des Geräts und setzen sich auch auf der
Optik des Laser-Abtastsystems ab. Sollte dieser Belag
zu Lesefehlern und Tonaussetzern führen, muss das
Gerät in einer Fachwerkstatt gereinigt werden. Diese
Reinigung ist kostenpflichtig, auch während der Ga-
rantiezeit!
8 Technische Daten
Frequenzbereich: . . . . . . 20– 20 000 Hz
Klirrfaktor: . . . . . . . . . . . < 0,1%
Kanaltrennung:. . . . . . . . > 80 dB
Dynamikumfang: . . . . . . > 90dB
Störabstand: . . . . . . . . . . > 80dB
Gleichlaufschwankungen: nicht messbar,
quarzgenau
Ausgang LINE OUT:. . . . . 2 V
Kopfhörerimpedanz:. . . . min. 32 Ω
USB-Schnittstelle: . . . . . . USB2.0
Stromversorgung: . . . . . . 230V/50 Hz
Leistungsaufnahme: . . . . 25VA
Einsatztemperatur: . . . . . 0–40°C
Abmessungen: . . . . . . . . 420 × 90 × 285mm
(ohne Montage-
winkel), 2HE
Gewicht:. . . . . . . . . . . . . 3,7 kg
Änderungen vorbehalten.
Diese Bedienungsanleitung ist urheberrechtlich für
MONACOR
®INTERNATIONAL GmbH & Co. KG ge-
schützt. Eine Reproduktion für eigene kommerzielle
Zwecke – auch auszugsweise – ist untersagt.

6
Deutsch
Deutsch Seite
Français
Français Page
Italiano
Italiano Pagina
Español
Español Página
Nederlands
Nederlands Pagina
Polski
Polski Strona
English
English
English Page
CD/MP3 Player
These instructions are intended for users without
any specific technical knowledge. Please read
these instructions carefully prior to operating the
unit and keep them for later reference.
All operating elements and connections de-
scribed can be found on the fold-out page3.
1 Operating Elements and
Connections
1.1 Front side of the player and
remote control (fig. 1)
1 POWER switch
2 CD tray
3 Display
4 Infrared sensor for the remote control
5 Port for inserting a USB flash drive
6 Selector button CD/USB flash drive
7 6.3mm jack for connection of stereo head-
phones (minimum impedance 32Ω)
8 Volume control for the headphone output
PHONES (7)
9 Button to open/close the CD tray
10 Selector button Replay/Pause
11 Stop button to stop the replay
12 Buttons for title selection and for fast for-
ward/reverse
Title selection
press button shortly
Press button to go to the next
title. Press button to go to the title
beginning. With each further press of the
button, the player will go back one title.
Fast forward/reverse
keep button pressed*
Button fast forward
Button fast reverse
13 Button for the repeat function
1st press of button (display “REPEAT 1”)
repeat of the current title
2nd press of button (display “REPEAT ALL”)
repeat of all titles
3rd press of button
the repeat function is switched off
14
Button for switching on and off the title
replay in a random order
15 Buttons for title selection
Press the button SKIP+ to go to the next
title, press the button SKIP− to go to the
title beginning. With each further press of
the button, the player will go back one title.
To skip several titles, keep the respective
button pressed.*
16 Buttons to start fast forward (SEARCH+) or
fast reverse (SEARCH−)
17 Numerical keys for direct selection of a title
* When the button (SKIP+ on the remote
control) or the button (SKIP− on the remote
control) is kept pressed in the stop mode, the player
will go forward or backward 10 titles.
1.2 Rear side of the player (fig. 2)
18
RCA output jacks (L = left, R = right) for
connection to an amplifier or a mixer
19
Mains cable for connection to a socket
(230V/50Hz)
2 Safety Notes
This unit corresponds to all relevant directives of
the EU and is therefore marked with .
WARNING
The unit is supplied with haz-
ardous mains voltage. Leave ser-
vicing to skilled personnel only!
Inexpert handling may result in
an electric shock.
•
Caution! Never look into the CD compart-
ment when the CD tray is open; laser beams
may be emitted causing eye damage.
•
The unit is suitable for indoor use only. Protect
it against dripping water, splash water and
high air humidity. The admissible ambient
temperature range is 0– 40 °C.
•
Do not place any vessel filled with liquid on
the unit, e.g. a drinking glass.
•
Immediately disconnect the mains plug from
the socket
1. if there is visible damage to the unit or to
the mains cable,
2. if a defect might have occurred after the
unit was dropped or suffered a similar ac-
cident,
3. if malfunctions occur.
In any case the unit must be repaired by skilled
personnel.
•
A damaged mains cable must be replaced by
skilled personnel only.
•
Never pull the mains cable to disconnect the
mains plug from the socket; always seize the
plug.
•
No guarantee claims for the unit and no liabil-
ity for any resulting personal damage or mate-
rial damage will be accepted if the unit is used
for other purposes than originally intended,
ifit is not correctly connected or operated, or
if it is not repaired in an expert way.
•
Important for U. K. Customers!
The wires in this mains lead are coloured in
accordance with the following code:
blue = neutral
brown = live
As the colours of the wires in the mains lead
of this appliance may not correspond with the
coloured markings identifying the terminals in
your plug, proceed as follows:
1. The wire which is coloured blue must be
connected to the terminal which is marked
with the letter N or coloured black.
2. The wire which is coloured brown must be
connected to the terminal which is marked
with the letter L or coloured red.
If the unit is to be put out of operation
definitively, take it to a local recycling
plant for a disposal which is not harm-
ful to the environment.
3 Applications
The CD/MP3 player CD-156 is suitable for uni-
versal applications (e.g. for home applications,
in restaurants, or waiting rooms). It is possible to
replay standard audio CDs, even CDs you have
burnt yourself, and CDs and USB flash drives
with MP3 files. However, problems may occur
when replaying rewritable CDs (CD-RW), de-
pending on the type of CD, the CD burner and
the burning software used.
The player is provided with an anti-shock
memory which will be able to compensate
temporary interruptions caused by shocks or
vibrations during replay (45 seconds max. for
data carriers with MP3 files, 30 seconds max.
for standard audio CDs); however, it will not be
able to compensate permanent interruptions.
Notes:
1. Instead of a USB flash drive, a USB hard disk
(FAT16/32) with an individual power supply can
also be connected.
2. It is also possible to replay files in the WMA format.
3. Due to the large number of storage device manu-
facturers and device drivers, it cannot be guaranteed
that all USB storage media are compatible with the
CD-156.
4 Setting-up and
Connectingthe Unit
The player can be placed as a free-standing
table top unit on an even, horizontal surface or
be inserted into a rack (482mm /19“). For rack
installation, fasten the two supplied mounting
brackets according to fig. 3. Two RS (1 RS = rack
space = 44.45mm) are required.
Prior to making or changing any connections,
switch off the player and the units to be con-
nected.
1)
Connect the output LINE OUT (18) –left
channel L white jack, right channel R red
jack– via a stereo audio cable with RCA
plugs to the CD player input on the mixer
or amplifier.
2) It is possible to connect stereo headphones
(minimum impedance 32Ω) to the 6.3mm
jack PHONES (7).
3) Finally connect the plug of the mains cable
(19) to a mains socket (230V/50Hz).
5 Operation
The player can be operated via the buttons on
the front side of the unit or via the remote con-
trol.
When using the remote control, always point it
to the infrared sensor (4) of the unit. If the re-
mote control should fail to function or the range
should decrease, the battery must be replaced
☞chapter 6.
If the remote control is not used for a longer
period of time, remove the battery as a pre-
caution so that the remote control will not be
damaged if the battery should leak.
5.1 Playing a music data carrier
1)
To switch on the unit, press the switch
POWER (1). After switching-on, the CD player
mechanism is selected. The display (3) shows
first, then , if no CD has been
inserted.
2) Insert the data carrier/s:
– To insert a CD, open the CD tray with the
button OPEN/CLOSE (9), the display shows
. Insert a CD with the lettering facing
upwards. To close the tray, press the button
again; the display shows .
– Connect a USB flash drive to the USB
port(5).

7
English
3)
To switch between the data carriers, press the
button CD/USB (6). The selected data carrier
is shown on the display by the corresponding
insertion – “CD” or “USB”.
Note concerning the fast switching-over
between the data carriers: When a data car-
rier is being read and you try to switch back to
the previous data carrier, the player does not re-
spond to the switching-over and the display shortly
shows .
4) After reading the data carrier, the player is
in the stop mode. The display shows in the
stop mode:
– for standard audio CDs:
the number of titles and the total playing
time, e.g. for a CD with 20 titles
and a total playing time of 69 minutes and
37 seconds.
– for CDs or USB flash drives with MP3 files:
the number of MP3 files, e.g. in
case of a data carrier with 105 MP3 files.
To start the replay with the first title, press
the button (10) on the unit or the but-
ton PLAY/PAUSE (10) on the remote control.
To start with another title, select this title
(☞chapter 5.2) and then press the button
or PLAY/PAUSE.
5)
If headphones are connected, adjust the
headphone volume with the control PHONES
LEVEL (8).
CAUTION
Never adjust the headphones
to a very high volume. Per-
manent high volumes may
damage your hearing! The
human ear will get accus-
tomed to high volumes which do not seem
to be that high any more after some time.
Therefore, do not further increase a high
volume after getting used to it
6)
Use the button or PLAY/PAUSE to
change between replay (indication
▶
) and
pause (indication
❙❙
). During replay and in the
pause mode, the display shows the number
and the time already played of the current
title. With MP3 titles, “MP3” is additionally
inserted.
7)
After replaying all titles, the player is switched
to the stop mode. To stop the replay before
the end, use the button (11) on the unit or
the button STOP (11) on the remote control
to set the player to the stop mode.
8)
To change the CD, the CD player mechanism
must be selected (if required, press the but-
ton CD/USB), otherwise the CD tray cannot
be opened.
9) Prior to switching-off, always close the CD
tray to protect the laser sampling system
against impurities. Then switch off the unit
by disengaging the POWER switch.
5.2 Title selection
5.2.1 Direct selection via the title number
Use the numerical keys (17) of the remote con-
trol to directly select a title by entering its num-
ber. In case of multi-digit title numbers, press
the respective numbers successively, e.g. for
title number 10, press buttons “1” and “0”.
Note: For data carriers with MP3 files and several fold-
ers, the titles are replayed and consecutively numbered
in the following order:
1. all titles without folder in the root directory
2. all titles in folders in the root directory
3. all titles in subfolders, etc.
5.2.2 Going to the next/previous title
Use the buttons / (12) on the unit
or SKIP+/SKIP− (15) on the remote control to go
to the next/previous title.
Going to the next title
With each press of the button or
SKIP+, the player will go to the next title.
Going to the previous title
Press the button or SKIP− to go to
the title beginning. With each further press
of the button, the player will go to the pre-
vious title.
Notes about title selection in the stop mode:
1. When going to the next/previous title in the stop
mode, the display will indicate the title number for
approx. 3 seconds and will then indicate the number
of titles/total playing time or the number of MP3
files (☞chapter 5.1, item 4).
2. When the button /SKIP+ or /SKIP− is
kept pressed in the stop mode, the player will go
forward or backward 10 titles.
5.3 Fast forward/reverse
During replay, use the buttons /
(12) on the unit and the buttons SEARCH+/
SEARCH− (16) on the remote control for fast
forward /reverse.
– Either keep the button (fast forward)
or (fast reverse) pressed until the de-
sired spot is reached.
– Or press the button SEARCH+ or SEARCH–
tostart fast forward or fast reverse. When the
desired spot is reached, press the button
(10) on the unit or the button PLAY/PAUSE (10)
on the remote control.
Fast forward/reverse will apply to multiple titles;
however, it will stop at the beginning of the first
title or at the end of the last title (exception: for
MP3 titles, the reverse function will stop when
the beginning of the title has been reached).
5.4 Random title sequence
To replay the titles in a random order, press the
button RANDOM; “RANDOM” will appear on
the display. In this replay mode, it is possible to
select the next title of the random title sequence
with the button (12) or SKIP+ (15); how-
ever, it is not possible to go to the previous title
with the button or SKIP− or to directly
select a title with the numerical keys (17). When
each title of the data carrier has been replayed
once, the player will be set to the stop mode
and the RANDOM function will be switched off.
To switch off the function before all titles
have been replayed, press the button RANDOM
again. “RANDOM” will disappear from the dis-
play and, after the end of the current title, the
titles will be replayed in ascending order. The
function will also be switched off when the but-
ton (11) on the unit or the button STOP (11)
on the remote control is pressed.
5.5 Repeat function
For continuous repeat of the current title, press
the button MODE (13) once; “REPEAT 1” will
appear on the display. For continuous repeat
of all titles of the data carrier, press the button
MODE a second time; “REPEAT ALL” will appear
on the display.
To switch off the repeat function, press the
button MODE a third time. The function will also
be switched off, when the button (11) on
the unit or the button STOP (11) on the remote
control is pressed.
6 Replacing the Battery of the
Remote Control
Push the lock of the battery support to the left
(1
st
arrow in fig. 4) and at the same time remove
the support downward (2
nd
arrow). Remove the
old battery and insert the new one (3V button
cell, type CR2025). Make sure that the positive
pole of the battery in the support points up-
wards. Slide the support back into the remote
control.
1.2.
Fig. 4 Replacing the battery
Used batteries must not be placed
in the household waste; always take
them to a special waste disposal, e.g.
collection container at your retailer.
7 Maintenance
Protect the unit from dust, vibrations, humidity
and heat. For cleaning only use a dry, soft cloth,
never use water or chemicals.
Note concerning sound interruptions and reading
errors: Cigarette smoke and dust will easily penetrate
through all openings of the unit and will also settle on
the optics of the laser sampling system. If this deposit
should cause reading errors and sound interruptions,
the unit must be cleaned by skilled personnel. Please
note that there will be a charge on cleaning, even
during the warranty period!
8 Specifications
Frequency range: . . . . . . 20– 20000Hz
THD:. . . . . . . . . . . . . . . . < 0.1 %
Channel separation: . . . . > 80dB
Dynamic range:. . . . . . . . > 90dB
S/N ratio: . . . . . . . . . . . . > 80 dB
Wow and flutter: . . . . . . not measurable,
quartz precision
Output LINE OUT: . . . . . . 2V
Headphone impedance: . min. 32Ω
USB interface:. . . . . . . . . USB 2.0
Power supply: . . . . . . . . . 230V/50 Hz
Power consumption:. . . . 25 VA
Ambient temperature: . . 0– 40 °C
Dimensions: . . . . . . . . . . 420 × 90 × 285 mm
(w/o mounting
brackets), 2RS
Weight: . . . . . . . . . . . . . 3.7kg
Subject to technical modification.
All rights reserved by MONACOR
®
INTERNATIONAL
GmbH & Co. KG. No part of this instruction manual
may be reproduced in any form or by any means for
any commercial use.

8
Deutsch
Deutsch Seite
English
English Page
Italiano
Italiano Pagina
Español
Español Página
Nederlands
Nederlands Pagina
Polski
Polski Strona
Français
Français
Français Page
Lecteur CD/MP3
Cette notice s‘adresse aux utilisateurs sans
connaissances techniques particulières. Veuillez
lire la présente notice avant le fonctionnement
et conservez-la pour pouvoir vous y reporter
ultérieurement.
Vous trouverez sur la page 3, dépliable, les
éléments et branchements décrits.
1 Eléments et branchements
1.1 Façade du lecteur et
télécommande (schéma 1)
1 Interrupteur Marche/Arrêt
2 Tiroir CD
3 Affichage
4 Capteur infrarouge pour la télécommande
5 Port pour clé USB
6 Touche de commutation CD/clé USB
7
Prise jack 6,35 pour brancher un casque
stéréo (impédance minimale 32Ω)
8
Réglage de volume pour la sortie casque
PHONES (7)
9 Touche pour ouvrir/fermer le tiroir CD
10 Touche de commutation Lecture/Pause
11 Touche Stop pour arrêter la lecture
12
Touches pour la sélection de titre et
l’avance/retour rapides
sélection de titre
appuyez brièvement sur la touche
Avec la touche , vous avancez d’un
titre. Avec la touche , vous revenez
au début du titre puis à chaque autre
pression, vous reculez d’un titre.
avance et retour rapides
touche maintenue enfoncée*
touche pour l’avance
touche pour le retour
13 Touche pour la fonction répétition
1ère pression (affichage «REPEAT 1»)
répétition du titre en cours
2ème pression (affichage «REPEAT ALL»)
répétition de tous les titres
3èmepression
désactivation de la fonction répétition
14
Touche pour activer/désactiver la lecture
aléatoire de titres
15 Touches pour la sélection de titres
En appuyant sur la touche SKIP+, vous avan-
cez d’un titre. En appuyant sur la touche
SKIP−, vous revenez au début du titre et à
chaque autre pression sur la touche, vous
reculez d’un titre.
Pour sauter plusieurs titres, maintenez la
touche correspondante enfoncée.*
16 Touches pour démarrer une avance rapide
(SEARCH+) ou un retour rapide (SEARCH−)
17
Touches numériques pour la sélection directe
d’un titre
* Si la touche (SKIP+ sur la télécommande) ou
la touche (SKIP− sur la télécommande) est
maintenue enfoncée en mode Stop, le lecteur saute
toujours 10 titres vers l’avant ou l’arrière.
1.2 Face arrière du lecteur (schéma 2)
18 Prises de sorties RCA (L = gauche, R = droit)
pour brancher à un amplificateur ou une
table de mixage
19 Cordon secteur à relier à une prise secteur
230V/50Hz
2 Conseils d’utilisation
et de sécurité
Cet appareil répond à toutes les directives né-
cessaires de l’Union européenne et porte donc
le symbole .
AVERTISSEMENT Cet appareil est alimenté par
une tension dangereuse. Ne
touchez jamais l’intérieur de
l’appareil, vous pourriez subir
une décharge électrique.
•
Attention! Ne regardez pas le compartiment
CD lorsque le tiroir CD est ouvert. Des rayon-
nements laser éventuellement émis pourraient
causer des troubles de la vision.
•
L‘appareil n‘est conçu que pour une utilisation
en intérieur. Protégez-le des éclaboussures, de
tout type de projections d‘eau et d’une hu-
midité d‘air élevée. La plage de température
ambiante admissible est de 0– 40 °C.
•
En aucun cas, vous ne devez poser d’objet
contenant du liquide, p.ex. un verre, sur l’ap-
pareil.
•
Débranchez immédiatement la fiche du sec-
teur lorsque :
1.
des dommages visibles apparaissent sur
l’appareil ou sur le cordon secteur,
2.
après une chute ou accident similaire...,
vous avez un doute au sujet de l’état de
l’appareil.
3. des dysfonctionnements apparaissent.
Dans tous les cas, les dommages doivent être
réparés par un technicien spécialisé.
•
Tout cordon secteur endommagé doit être
remplacé impérativement par un technicien
spécialisé.
•
Ne débranchez jamais l’appareil en tirant
sur le cordon secteur, tenez-le toujours par
la fiche.
•
Nous déclinons toute responsabilité en cas de
dommages matériels ou corporels résultants
si l’appareil est utilisé dans un but autre que
celui pour lequel il a été conçu, s’il n’est pas
correctement branché ou utilisé ou s’il n’est
pas réparé par une personne habilitée, en
outre, la garantie deviendrait caduque.
Lorsque l’appareil est définitivement re-
tiré du service, vous devez le déposer
dans une usine de recyclage adaptée
pour contribuer à son élimination non
polluante.
CARTONS ET EMBALLAGE
PAPIER À TRIER
3 Possibilités d’utilisation
Le lecteur CD/MP3, CD-156 est prévu pour
une utilisation universelle (par exemple pour un
usage domestique, dans des restaurants, salles
d’attente). Il peut lire des CDs audio standards,
des CDs gravés, des CDs et clés USB avec fichiers
MP3. Les CD-RW (CDs réinscriptibles), peuvent
rencontrer des problèmes lors de la lecture selon
le type de CD, le graveur CD et le programme
de gravure utilisés.
Le lecteur CD est doté d’une mémoire an-
ti-chocs qui peut compenser les dysfonctionne-
ments causés par des chocs ou vibrations lors de
la lecture du CD (jusqu’à 45 secondes pour des
supports de données avec fichiers MP3, jusqu’à
30 secondes pour des CDs audio standards).
Cependant, le système anti-chocs ne permet
pas de compenser des interruptions continues.
Remarques :
1. On peut également brancher, à la place d’une
cléUSB, un disque dur USB (FAT 16/32) avec une
alimentation propre.
2. La lecture de données au format WMA est égale-
ment possible.
3. En raison de la multitude de fabricants de supports
de mémoire et de drivers d’appareils, il n’est pas
possible de garantir que tous les supports de mé-
moireUSB soient compatibles avec le CD-156.
4 Positionnement de
l’appareil et branchements
Le lecteur CD-156 est prévu pour être directe-
ment posé sur une table et doit être placé sur
une surface plane et horizontale ou dans un
rack (482mm /19“). Pour un montage en rack,
vissez les deux étriers de montage livrés, selon
le schéma 3. Deux unités (1 unité = 44,45mm)
sont nécessaires.
Avant d’effectuer ou de modifier les branche-
ments, assurez-vous que le lecteur CD/MP3 et
les appareils à relier sont éteints.
1)
Reliez la sortie LINE OUT (18) – canal
gaucheL, prise blanche ; canal droit R, prise
rouge– via un cordon audio stéréo avec
fiches RCA à l’entrée lecteur CD de la table
de mixage ou de l’amplificateur.
2) On peut brancher un casque stéréo (impé-
dance minimale 32Ω) à la prise jack 6,35
PHONES (7).
3) Reliez ensuite le cordon secteur (19) à une
prise secteur 230V/50Hz.
5 Utilisation
L’utilisation du lecteur peut se faire via les
touches sur la face avant de l’appareil ou via la
télécommande.
Lorsque vous utilisez la télécommande, dirigez
toujours la télécommande vers le capteur infra-
rouge (4) de l’appareil. Si la télécommande ne
fonctionnait pas ou si la portée venait à faiblir,
ilfaut remplacer la batterie, ☞chapitre 6.
En cas de non utilisation prolongée, retirez
la batterie par précaution, elle pourrait couler et
endommager la télécommande.
5.1 Lecture de support de données
de musique
1)
Pour allumer l’appareil, appuyez sur l’in-
terrupteur POWER (1). Une fois allumé, le
mécanisme du lecteur CD est sélectionné.
L’affichage (3) indique tout d’abord ,
puis si aucun CD n’est inséré.
2) Insérez le/les support(s) de données :
– Pour insérer un CD, ouvrez le tiroir CD avec
la touche OPEN/CLOSE (9), est visible
sur l’affichage. Insérez un CD, inscription
vers le haut ; appuyez une nouvelle fois sur
la touche pour refermer le tiroir ; est
visible sur l’affichage.
– Insérez une clé USB dans le port USB (5).

9
Français
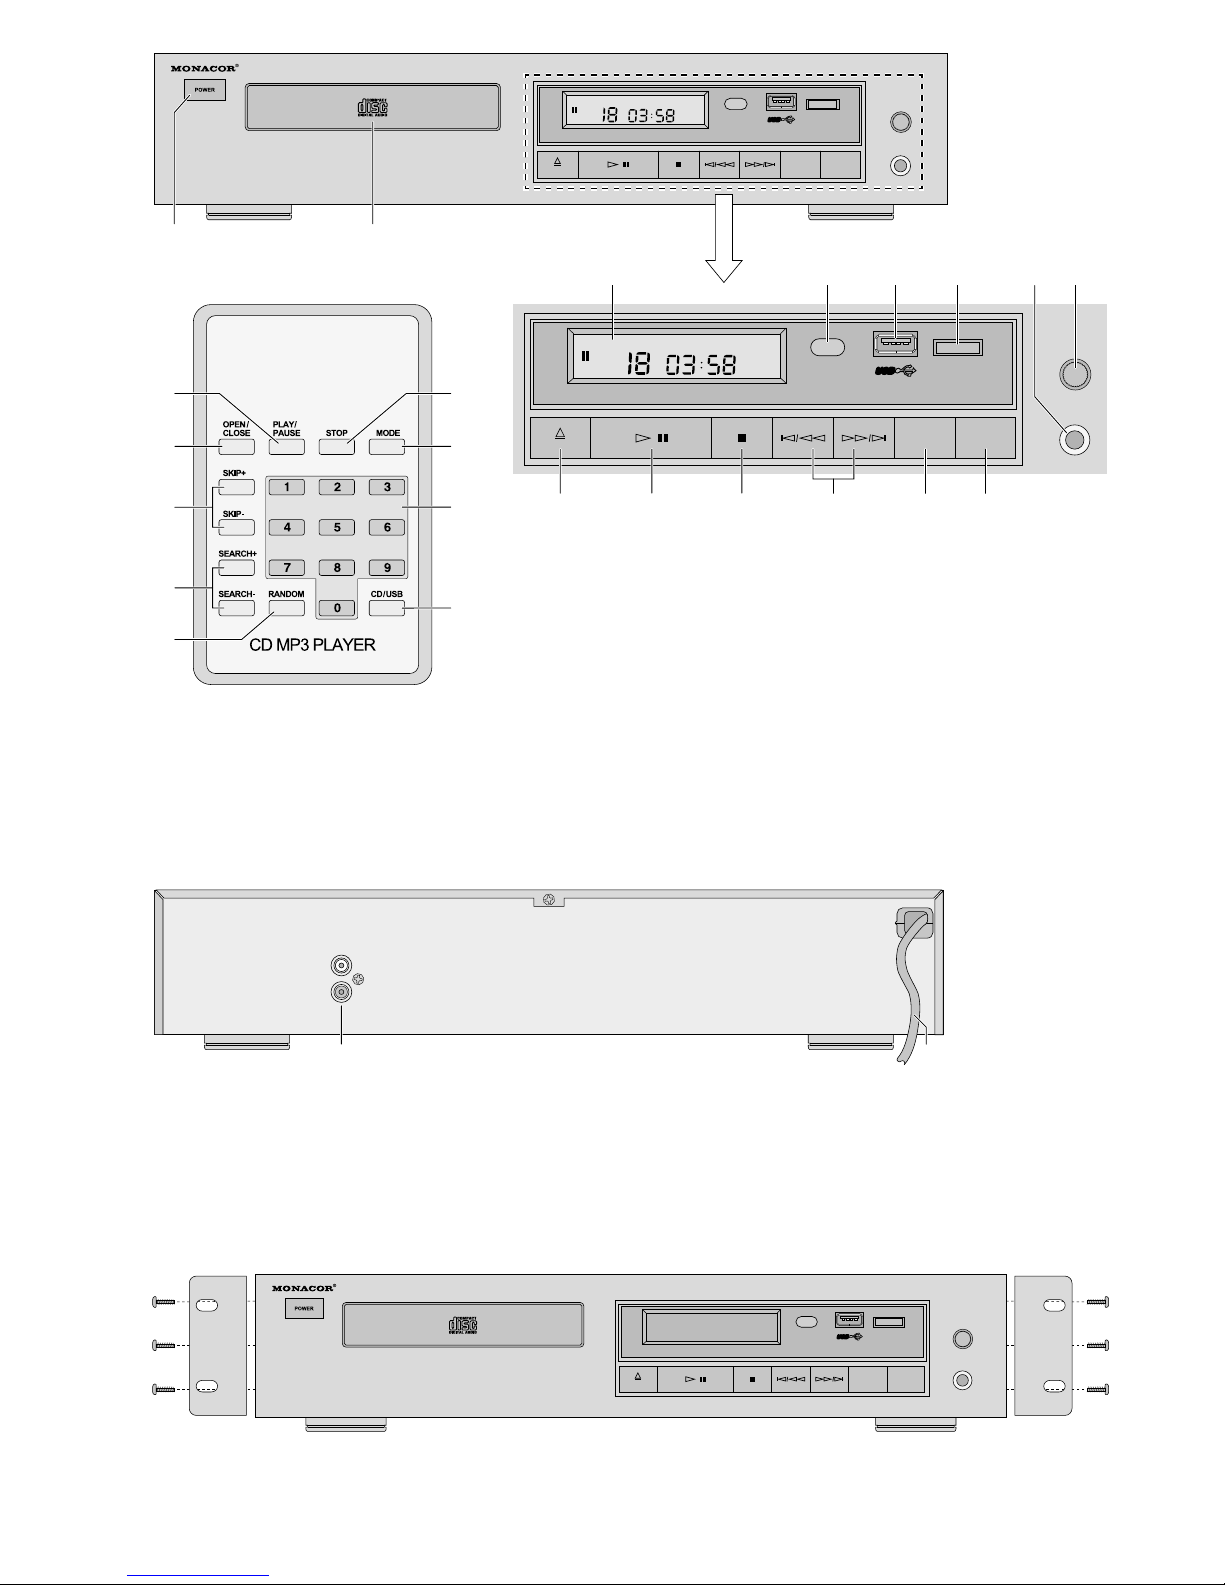
3) Pour commuter entre les supports de don-
nées, appuyez sur la touche CD/USB (6). Le
support de données sélectionné est indiqué
sur l’affichage par le message correspondant
– «CD» ou «USB».
Conseil pour commuter entre les supports
de données : si pendant la reconnaissance d’un
support de données, vous essayez de revenir au
support de données précédent, le lecteur ne ré-
agit pas à la commutation et l’affichage indique
brièvement .
4) Une fois le support de données reconnu, le
lecteur est en mode Stop. L’affichage indique
en mode Stop :
– pour des CDs audio standards :
le nombre de titres et la durée totale de lec-
ture, par exemple pour un CD avec
20 titres et une durée totale de 69minutes
et 37 secondes.
– pour des CDs ou clés USB avec fichiers MP3:
le nombre de fichiers MP3, par exemple
pour un support de données avec
105 fichiers MP3.
Si la lecture doit commencer avec le premier
titre, appuyez sur la touche (10) sur
l’appareil ou sur la touche PLAY/PAUSE (10)
sur la télécommande. Si vous souhaitez dé-
marrer avec un autre titre, sélectionnez-le
(☞chapitre 5.2) puis appuyez sur la touche
ou PLAY/PAUSE.
5)
Si un casque est relié, réglez le volume du
casque avec le réglage PHONES LEVEL (8).
ATTENTION
Ne réglez pas le volume du
casque trop fort. Des volumes
élevés peuvent à la longue
générer des troubles de l’au-
dition. L’oreille s’habitue à
des volumes forts et ne les perçoit plus, au
bout d’un certain temps, aussi forts. C’est
pourquoi n’augmentez pas un volume élevé
une fois habitué.
6) Avec la touche ou PLAY/PAUSE, vous
pouvez commuter entre Lecture (affichage
▶
)
et Pause (affichage
❙❙
). Pendant la lecture et
en mode Pause, l’affichage indique le numéro
et la durée déjà lue du titre en cours. Pour des
titres MP3, «MP3» s’affiche en plus.
7) Après la lecture de tous les titres, le lecteur
passe en mode Stop. Pour terminer la lecture
avant la fin, mettez le lecteur sur le mode
Stop avec la touche (11) sur l’appareil ou
la touche STOP (11) sur la télécommande.
8) Pour changer de CD, il faut sélectionner le
lecteur CD (le cas échéant, appuyez sur la
touche CD/USB) sinon le tiroir CD ne peut
être ouvert.
9) Avant d’éteindre l’appareil, fermez toujours
le tiroir CD pour éviter que le système de
lecteur laser ne soit sali par des poussières.
Eteignez ensuite l’appareil en désenclenchant
l’interrupteur POWER.
5.2 Sélection de titre
5.2.1 Sélection directe via le numéro du titre
Avec les touches numériques (17) de la télé-
commande, vous pouvez sélectionner directe-
ment un titre en tapant son numéro. Pour des
numéros de titres à plusieurs chiffres, tapez les
chiffres les uns après les autres par exemple pour
le numéro 10, tapez «1» et «0».
Remarque : pour des supports de données avec fi-
chiers MP3 et plusieurs dossiers, les titres sont lus et
numérotés dans l’ordre suivant :
1. tous les titres sans dossier dans le répertoire principal
2. tous les titres dans les dossiers dans le répertoire
principal
3. tous les titres dans les sous-dossiers, etc.
5.2.2 Saut d’un titre en avant ou en arrière
Avec les touches / (12) sur l’appa-
reil ou SKIP+/SKIP− (15) sur la télécommande,
vous pouvez sauter des titres vers l’avant ou
l’arrière.
Saut de titre vers l’avant :
A chaque pression sur la touche ou
SKIP+, vous sautez un titre.
Saut de titre vers l’arrière
Avec une pression sur la touche ou
SKIP−, vous revenez tout d’abord au début
du titre puis à chaque autre pression, vous
reculez d’un titre.
Pour sauter plusieurs titres, maintenez la touche
SKIP correspondante enfoncée.
Conseils sur la sélection de titre en mode Stop
1. Si en mode Stop, vous avancez ou reculez d’un titre,
l’affichage revient 3 secondes environ après l’indica-
tion du numéro du titre sur l’indication du nombre
de titres/durée totale ou le nombre de fichiers MP3
(☞chapitre 5.1, point 4).
2. Si en mode Stop, la touche /SKIP+ ou
/SKIP− est maintenue enfoncée, le lecteur
saute toujours 10 titres vers l’avant ou l’arrière.
5.3 Avance et retour rapides
Avec les touches / (12) sur l’ap-
pareil et les touches SEARCH+/SEARCH− (16)
sur la télécommande, vous pouvez, pendant la
lecture, faire une avance/retour rapide :
– Maintenez la touche pour l’avance
ou pour le retour enfoncée jusqu’à
atteindre l’endroit voulu.
– Ou appuyez sur la touche SEARCH+ ou
SEARCH− pour démarrer l’avance ou le retour.
Lorsque l’endroit voulu est atteint, appuyez sur
la touche (10) sur l’appareil ou la touche
PLAY/PAUSE (10) sur la télécommande.
L’avance/retour s’effectue sur plusieurs titres,
elle s’arrête au début du premier titre ou à la
fin du dernier titre (exception : pour des titres
MP3, le retour s’arrête lorsque le début du titre
est atteint).
5.4 Lecture aléatoire
Pour lire les titres de manière aléatoire, appuyez
sur la touche RANDOM (14), l’affichage indique
«RANDOM». Avec ce mode de lecture, vous
pouvez sélectionner le titre suivant de la suite
aléatoire avec la touche d’avance (12)
ou SKIP+ (15), le retour au titre précédent avec
la touche ou SKIP− ou la sélection di-
recte de titres avec les touches numériques (17)
n’est pas possible. Si chaque titre du support de
données est lu une fois, le lecteur commute en
mode Stop, la fonction RANDOM est désactivée.
Pour arrêter la fonction avant terme, ap-
puyez une nouvelle fois sur la touche RANDOM,
«RANDOM» s’éteint sur l’affichage, à la fin du
titre en cours, la lecture se poursuit en ordre
croissant. La fonction est également désacti-
vée lorsque la touche (11) sur l’appareil ou
la touche STOP (11) sur la télécommande est
enfoncée.
5.5 Fonction répétition
Pour une répétition continue du titre en cours,
appuyez une fois sur la touche MODE (13), l’af-
fichage indique «REPEAT1». Pour une répétition
continue de tous les titres du support de don-
nées, appuyez une deuxième fois sur la touche
MODE, l’affichage indique «REPEAT ALL».
Pour désactiver la fonction, appuyez une
troisième fois sur la touche MODE. La fonction
est également désactivée lorsque vous appuyez
sur la touche (11) sur l’appareil ou sur la
touche STOP (11) sur la télécommande.
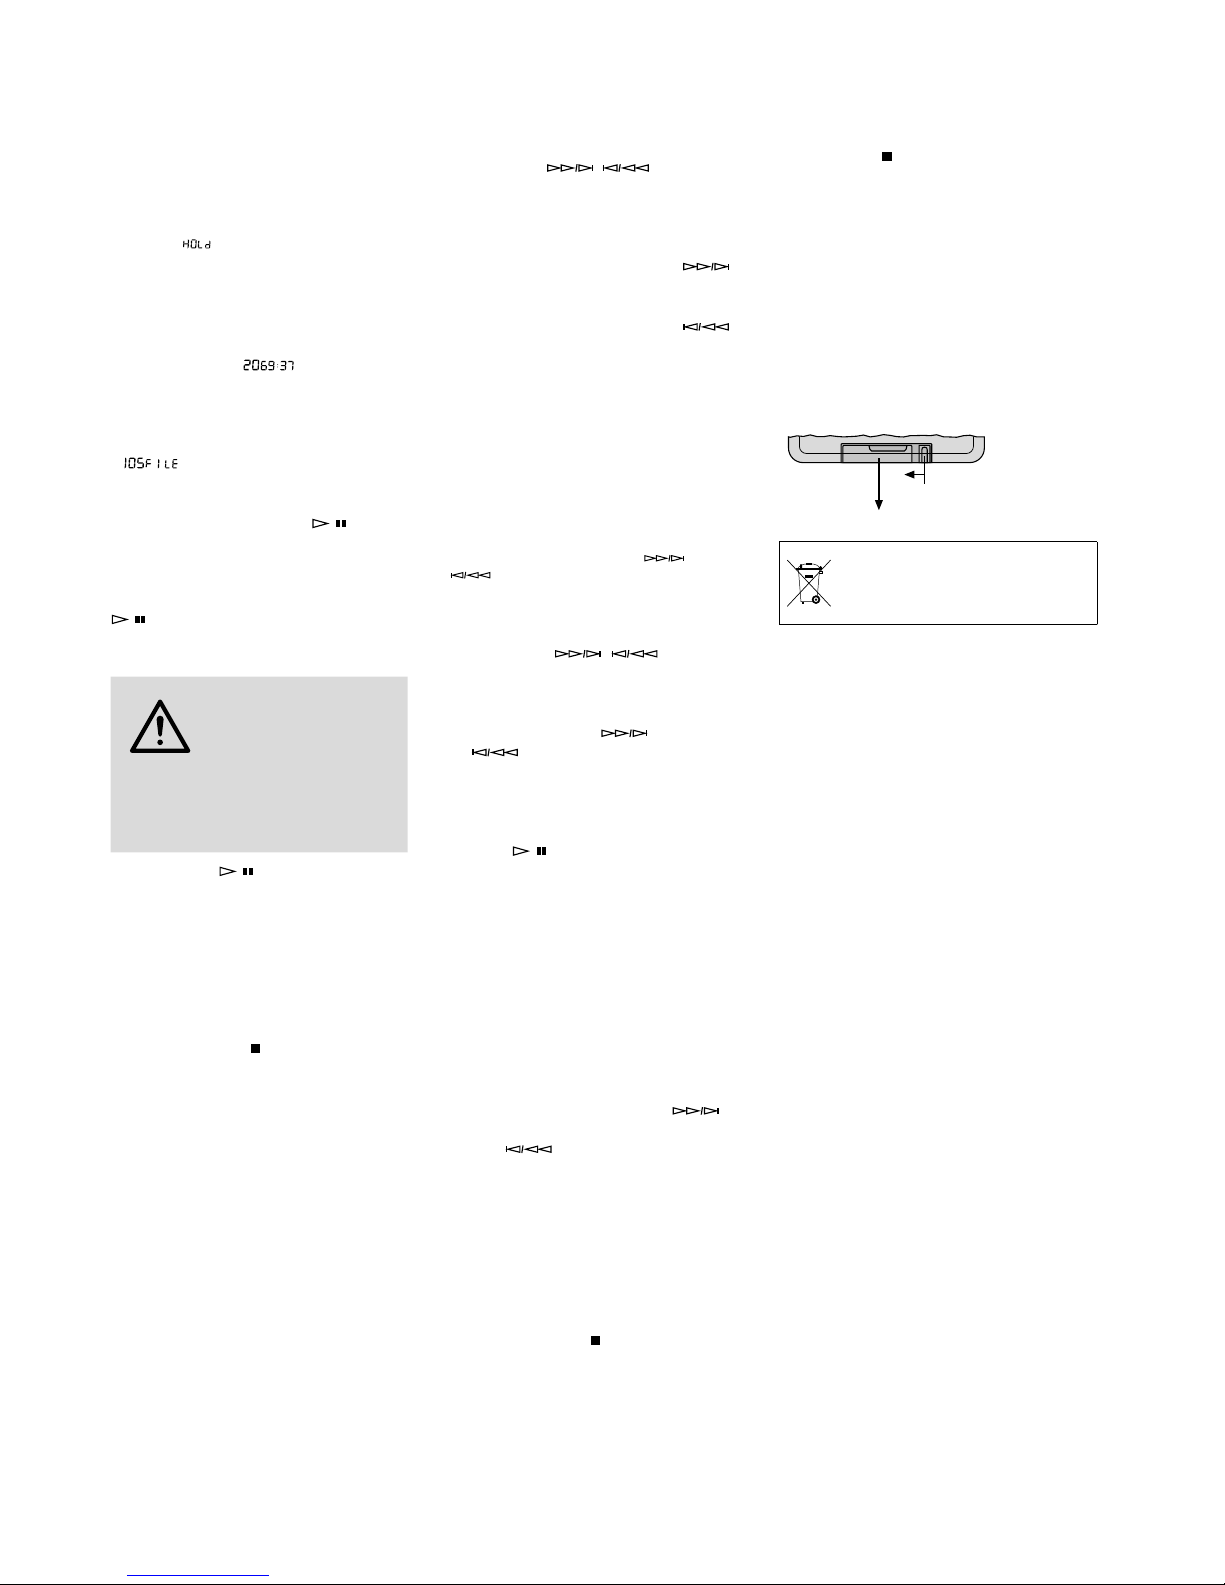
6 Remplacement de la batterie
de la télécommande
Poussez vers la gauche le verrouillage du com-
partiment batterie (flèche 1 sur le schéma 4)
et simultanément, tirezle support vers le bas
(flèche 2). Retirez l’ancienne batterie, insérez
une neuve (pile bouton 3V, type CR 2025). Veil-
lez à ce que le pôle plus de la batterie soit dirigé
vers le haut dans le support. Remettez le support
dans la télécommande.
1.2.
Schéma 4 remplacement de la batterie
Ne jetez pas les batteries usagées dans
la poubelle domestique, déposez-les
dans un container spécifique ou rame-
nez-les chez votre revendeur.
7 Entretien de l’appareil
Protégez l’appareil de la poussière, des vibra-
tions, de l’humidité et de la chaleur. Pour le net-
toyer, utilisez uniquement un chiffon sec et doux,
en aucun cas, de produits chimiques ou d’eau.
Remarques sur les coupures du son et les erreurs
de lecture : La fumée de cigarettes et la poussière
s’introduisent facilement dans les ouvertures du lecteur
et se déposent sur l’optique du système laser. Cela peut
générer des erreurs de lecture et des coupures de son,
donc, le nettoyage du lecteur doit être confié à un
technicien spécialisé. Cette opération est à la charge de
l’utilisateur, même lorsque l’appareil est sous garantie !
8 Caractéristiques techniques
Bande passante :. . . . . . . 20– 20 000 Hz
Taux de distorsion : . . . . . < 0,1%
Séparation des canaux : . > 80dB
Plage dynamique : . . . . . > 90dB
Rapport signal/bruit : . . . > 80 dB
Pleurage et scintillement : non mesurable,
précision quartz
Sortie LINE OUT : . . . . . . 2V
Impédance casque : . . . . 32Ω minimum
Interface USB : . . . . . . . . USB2.0
Alimentation :. . . . . . . . . 230 V/50 Hz
Consommation :. . . . . . . 25 VA
Température fonc. :. . . . . 0– 40 °C
Dimensions :. . . . . . . . . . 420 × 90 × 285 mm
(sans étriers de
montage), 2U
Poids :. . . . . . . . . . . . . . . 3,7kg
Tout droit de modification réservé.
Notice d’utilisation protégée par le copyright de
MONACOR ®INTERNATIONAL GmbH & Co. KG. Toute
reproduction même partielle à des fins commerciales
est interdite.

10
Deutsch
Deutsch Seite
English
English Page
Français
Français Page
Español
Español Página
Nederlands
Nederlands Pagina
Polski
Polski Strona
Italiano
Italiano
Italiano Pagina
Lettore CD/MP3
Queste istruzioni sono rivolte all‘utente senza
conoscenze tecniche specifiche. Vi preghiamo
di leggerle attentamente prima della messa in
funzione e di conservarle per un uso futuro.
A pagina 3, se aperta completamente, ve-
drete sempre gli elementi di comando e i colle-
gamenti descritti.
1 Elementi di comando e
collegamenti
1.1 Frontale del lettore e
telecomando (fig. 1)
1 Interruttore on/off
2 Cassetto CD
3 Display
4 Sensore a infrarossi del telecomando
5 Contatto per una chiavetta USB
6 Tasto commutazione CD/chiavetta USB
7
Presa jack 6,3mm per il collegamento di una
cuffia stereo (impedenza min. 32Ω)
8
Regolatore del volume per l’uscita cuffia
PHONES (7)
9 Tasto per aprire/chiudere il cassetto CD
10
Tasto di commutazione Riproduzione/Pausa
11 Tasto Stop per terminare la riproduzione
12 Tasti per scegliere un titolo e per l’avanza-
mento/ritorno veloce
Scelta di un titolo
premere il tasto brevemente
Con il tasto si salta avanti di un
titolo. Con il tasto si ritorna prima
all’inizio del titolo e quindi con ogni altra
pressione si salta indietro di un titolo.
Avanzamento/ritorno veloce
tener premuto il tasto*
Tasto per l’avanzamento
Tasto per il ritorno
13 Tasto per la funzione di ripetizione
1. pressione del tasto
(indicazione “REPEAT 1”)
ripetizione del titolo attuale
2. pressione del tasto
(indicazione “REPEAT ALL”)
ripetizione di tutti i titoli
3. pressione del tasto
disattivazione della funzione di ripetizione
14
Tasto per attivare e disattivare la riprodu-
zione dei titoli in ordine casuale
15 Tasti per la scelta dei titoli
Premendo il tasto SKIP+, si salta avanti di
un titolo. Premendo il tasto SKIP− si ritorna
prima all’inizio del titolo e quindi con ogni
altra pressione si salta indietro di un titolo.
Per saltare più titoli, tener premuto il relativo
tasto.*
16
Tasti per avviare l’avanzamento veloce
(SEARCH+) o ritorno veloce (SEARCH−)
17
Tasti numerici per la scelta diretta di un titolo
1.2 Retro del lettore (fig. 2)
18 Prese RCA d’uscita (L = sinistra, R= destra)
per il collegamento con un amplificatore o
un mixer
19 Cavo per il collegamento con una presa di
rete (230V/50 Hz)
2 Avvertenze di sicurezza
L’apparecchio è conforme a tutte le direttive
rilevanti dell’UE e pertanto porta la sigla .
AVVERTIMENTO
L’apparecchio funziona con
pericolosa tensione di rete.
Non intervenire mai perso-
nalmente al suo interno.
Esiste il pericolo di una sca-
rica elettrica.
•
Attenzione! Con il cassetto CD aperto, non
guardare mai nella fessura per il CD. I raggi
laser eventualmente uscenti possono provo-
care dei danni agli occhi.
•
Usare l’apparecchio solo all’interno di locali.
Proteggetelo dall’acqua gocciolante e dagli
spruzzi d’acqua nonché da alta umidità dell’a-
ria. La temperatura d’esercizio ammessa è
0– 40 °C.
•
Non depositare sull’apparecchio dei conteni-
tori riempiti di liquidi, p.es. bicchieri.
•
Staccare subito la spina dalla presa di rete se:
1. l’apparecchio o il cavo rete presentano dei
danni visibili;
2. dopo una caduta o dopo eventi simili sus-
siste il sospetto di un difetto;
3.
l’apparecchio non funziona correttamente.
Per la riparazione rivolgersi sempre ad un’of-
ficina competente.
•
Il cavo rete, se danneggiato, deve essere so-
stituito solo da un laboratorio specializzato.
•
Staccare il cavo rete afferrando la spina, senza
tirare il cavo.
•
Nel caso d’uso improprio, di collegamenti
sbagliati, d’impiego scorretto o di riparazione
non a regola d’arte dell’apparecchio, non si
assume nessuna responsabilità per eventuali
danni consequenziali a persone o a cose e non
si assume nessuna garanzia per l’apparecchio.
Se si desidera eliminare l’apparecchio
definitivamente, consegnarlo per lo
smaltimento ad un’istituazione locale
per il riciclaggio.
3 Possibilità d’impiego
Il lettore CD/MP3 CD-156 è previsto per impie-
ghi universali (p.es. per usi privati, in ristoranti
o in sale d’attesa). Si possono riprodurre dei
CD standard, anche se masterizzati in proprio,
nonché i CD e le chiavette USB con file MP3.
Nel caso di CD riscrivibili (CD-RW) è possibile
che ci siano dei problemi, a seconda del tipo
di CD, del masterizzatore e del programma di
masterizzazione.
Il lettore è equipaggiato con un sistema
anti-shock, che è in grado di compensare du-
rante la riproduzione breve colpi o vibrazioni
(fino a 45 secondi con file MP3, fino a 30 secondi
con CD audio standard). Tuttavia non è in grado
di compensare delle interruzioni prolungate.
Nota:
1. Al posto di una chiavetta USB si può collegare anche
un disco rigido USB (FAT16/32) con alimentazione
propria.
2. È possibile anche la riproduzione di file nel formato
WMA.
3. Dato il grande numero di produttori di memorie e
di driver per apparecchi, non si può garantire che
tutti i mezzi di memoria USB siano compatibili con
il CD-156.
4 Collocare e collegare
l’apparecchio
Il lettore può essere collocato liberamente su una
superficie piana, orizzontale oppure può essere
montato in un rack (482mm/19“). Per il montag-
gio in un rack avvitare i due angoli di montaggio
in dotazione come illustrato in fig. 3. Occorrono
2RS (1 RS = unità d’altezza = 44,45 mm).
Prima di eseguire o modificare dei collegamenti,
spegnere il lettore e gli apparecchi da collegare.
1) Collegare l’uscita LINE OUT (18) – canale si-
nistro L presa bianca, canale destro R presa
rossa – con l’ingresso CD sul mixer o am-
plificatore servendosi di un cavo stereo con
connettori RCA.
2)
Alla presa jack 6,3mm PHONES (7) si può
collegare una cuffia stereo (impedenza min.
32Ω).
3) Alla fine inserire la spina del cavo (19) in una
presa di rete (230V/50Hz).
5 Funzionamento
Il funzionamento è possibile tramite i tasti sul
pannello frontale o tramite il telecomando.
Azionando il telecomando, orientarlo sempre
sul sensore ad infrarossi (4) dell’apparecchio.
Se il telecomando non dovesse funzionare o se
dovesse ridursi la portata, occorre sostituire la
batteria ☞Capitolo 6.
In caso di non uso prolungato, conviene
togliere la batteria per non danneggiare il tele-
comando se la batteria dovesse perdere.
5.1 Riprodurre un
supporto di dati di musica
1)
Per accendere l’apparecchio premere l’in-
terruttore POWER (1). Dopo l’accensione è
scelto il drive CD. Il display (3) indica dap-
prima , quindi , se non è inse-
rito nessun CD.
2) Inserire il supporto/i supporti dati:
– Per inserire un CD, aprire il cassetto con il
tasto OPEN/CLOSE (9), sul display si vede
. Inserire un CD con la scritta rivolta
verso l’alto e per far entrare il cassetto
premere nuovamente il tasto; sul display
si vede .
– Inserire una chiavetta USB nella porta
USB(5).
3)
Per cambiare fra i supporti dati, premere il
tasto CD/USB (6). Il supporto selezionato
viene indicato sul display con “CD” o “USB”.
Nota per il veloce cambio fra i supporti di dati:
Se durante la scansione di un supporto di dati si
cerca di ritornare sul supporto precedente, il let-
tore non reagisce al cambio e il display visualizza
brevemente .
* Se il tasto (SKIP+ sul telecomando) oppure il
tasto (SKIP− sul telecomando) viene tenuto
premuto nel modo si Stop, il lettore salta risp. avanti
e indietro di 10 titoli.

11
Italiano
4) Dopo la scansione del supporto dati, il let-
tore si trova in Stop. Il display visualizza nel
modo Stop:
– con CD audio standard:
il numero totale dei titoli e la durata totale,
p.es. nel caso di un CD con 20 titoli
e una durata complessiva di 69 minuti e
37 secondi.
– con CD o chiavetta USB con file MP3:
il numero totale dei file MP3, p.es.
nel caso di un supporto dati con 105 file
MP3.
Se la riproduzione deve avviarsi con il primo
titolo, premere il tasto (10) sull’appa-
recchio oppure il tasto PLAY/PAUSE (10) sul
telecomando. Se si desidera iniziare con un
altro titolo, sceglierlo (☞Capitolo 5.2) e
quindi premere risp. e PLAY/PAUSE.
5)
Se è collegata una cuffia, regolare il vo-
lume nella cuffia con il regolatore PHONES
LEVEL(8).
ATTENZIONE Mai tenere molto alto il vo-
lume nelle cuffie. A lungo
andare, il volume eccessivo
può procurare danni all’u-
dito! L’orecchio si abitua
agli alti volumi e dopo un
certo tempo non se ne
rende più conto. Perciò non
aumentare il volume succes-
sivamente.
6) Con il tasto o PLAY/PAUSE si può cam-
biare fra riproduzione (indicazione
▶
) e pausa
(indicazione
❙❙
). Durante la riproduzione e nel
modo di pausa, il display indica il numero e
il tempo già trascorso del titolo attuale. Nei
titoli MP3 viene visualizzato anche “MP3”.
7) Dopo la riproduzione di tutti i titoli, il lettore
va in Stop. Per terminare la riproduzione an-
zitempo, mettere il lettore nel modo di Stop
per mezzo del tasto (11) sull’apparecchio
oppure STOP (11) sul telecomando.
8)
Per cambiare il CD, deve esser scelto il
drive CD (eventualmente premere il tasto
CD/USB), altrimenti non è possibile aprire
il cassettoCD.
9)
Prima di spegnere, chiudere sempre il cassetto
CD per proteggere il sistema di scansione
laser dallo sporco. Quindi spegnere l’apparec-
chio sbloccando l’interruttore POWER.
5.2 Scelta dei titoli
5.2.1 Scelta diretta con il numero del titolo
Con i tasti numerici (17) del telecomando è pos-
sibile scegliere direttamente un titolo digitando
il relativo numero. Nel caso di numeri a più cifre,
premere una cifra dopo l’altra, p.es. per il nu-
mero 10 premere i tasti “1” e “0”.
Nota: Nel caso di supporti dati con file MP3 e varie
cartelle, i titoli saranno riprodotti e numerati nel se-
guente ordine:
1. tutti i titoli nell’elenco principale
2. tutti i titoli nelle cartelle del’elenco principale
3. tutti i titoli nelle sottocartelle ecc.
5.2.2 Saltare avanti o indietro dei titoli
Con i tasti / (12) sull’apparecchio
e SKIP+/SKIP− (15) sul telecomando si possono
saltare in avanti o indietro dei titoli.
Saltare avanti di un titolo
Con ogni pressione del tasto o SKIP+
si salta avanti di un titolo.
Saltare indietro di un titolo
Con il tasto o SKIP− si ritorna dap-
prima all’inizio del titolo e con ogni ulteriore
pressione si salta indietro di un titolo.
Per saltare sopra più titoli tenere premuto il
relativo tasto SKIP.
Nota per la scelta dei titoli nel modo di Stop:
1. Se nel modo di Stop si salta avanti o indietro di un
titolo, passati 3 secondi circa dopo l’indicazione del
numero del titolo, il display ritorna all’indicazione
risp. del numero totale/della durata totale e del
numero totale dei file MP3 (☞Cap. 5.1, punto 4).
2. Se nel modo di Stop si tiene premuto il tasto
/SKIP+ o /SKIP−, il lettore salta avanti
o indietro sempre di 10 titoli.
5.3 Avanzamento/ritorno veloce
Con i tasti / (12) sull’apparecchio
e SEARCH+/SEARCH− (16) sul telecomando,
durante la riproduzione è possibile eseguire un
avanzamento/ritorno veloce:
– Tener premuto il tasto per l’avanza-
mento o per il ritorno fino al raggiun-
gimento del punto desiderato.
– Oppure premere il tasto SEARCH+ o SEARCH−,
per avviare l’avanzamento o il ritorno. Al rag-
giungimento del punto desiderato, premere
il tasto (10) sull’apparecchio oppure il
tasto PLAY/PAUSE (10) sul telecomando.
L’avanzamento/ritorno passa sopra diversi titoli,
ma si ferma all’inizio del primo titolo o alla fine
dell’ultimo titolo (eccezione: nel caso di titoli
MP3, il ritorno termina quando è raggiunto
l’inizio del titolo).
5.4 Ordine casuale dei titoli
Per riprodurre i titoli in ordine casuale, premere
il tasto RANDOM (14); il display indica “RAN-
DOM”. In questo modo di riproduzione, con il
tasto “avanti” (12) o SKIP+ (15) si può
scegliere il titolo successivo dell’ordine casuale
dei titoli. Invece non è possibile il ritorno al titolo
precedente tramite il tasto o SKIP− o la
scelta diretta dei titoli per mezzo dei tasti nume-
rici (17). Quando ogni titolo del supporto dati è
stato riprodotto una volta, il lettore si mette in
Stop e la funzione RANDOM si disattiva.
Per disattivare la funzione anzitempo, pre-
mere nuovamente il tasto RANDOM; sul display
si spegne la scritta “RANDOM” e alla fine del
titolo attuale, la riproduzione riprende in ordine
crescente. La funzione viene disattivata anche se
si preme il tasto (11) sull’apparecchio o STOP
(11) sul telecomando.
5.5 Funzione di ripetizione
Per una ripetizione senza fine del titolo attuale
premere una volta il tasto MODE (13), il display
indica “REPEAT1”. Per la ripetizione senza fine
di tutti i titoli del supporto dati premere il tasto
MODE una seconda volta; il display indica ora
“REPEAT ALL”.
Per disattivare la ripetizione, premere il tasto
MODE una terza volta. La funzione si disattiva
anche se si preme il tasto (11) sull’apparecchio
o STOP (11) sul telecomando.
6 Sostituire la batteria del
telecomando
Spingere verso sinistra il blocco del porta batteria
(1. freccia in fig. 4) e contemporaneamente sfi-
lare il supporto verso il basso (2. freccia). Togliere
la vecchia batteria e inserire la nuova batteria
(batteria bottone a 3V, tipo CR 2025). Fare at-
tenzione che il polo positivo della batteria nel
porta batteria sia rivolto verso l’alto. Rimettere
il porta batteria nel telecomando.
1.2.
Fig. 4 Sostituzione della batteria
Non gettare le batterie scariche nelle
immondizie di casa bensì negli appo-
siti contenitori (p.es. presso il vostro
rivenditore).
7 Manutenzione
dell’apparecchio
Proteggere l’apparecchio dalla polvere, da vibra-
zioni, umidità e calore. Per la pulizia usare solo
un panno morbida, asciutto; non impiegare in
nessun acqua o caso prodotti chimici.
Note su possibili errori di lettura:
Il fumo di sigarette e la polvere penetrano facilmente
fra tutte le aperture dell’apparecchio e si depositano
sul sistema ottico della scansione ai raggi laser. Se
questo deposito dovesse provocare errori di lettura
e buchi nella riproduzione, l’apparecchio deve essere
pulito in un laboratorio specializzato. Una tale pulizia
è a pagamento, anche durante il periodo di garanzia!
8 Dati tecnici
Gamma di frequenze: . . . 20– 20 000 Hz
Fattore di distorsione: . . . < 0,1%
Separazione canali: . . . . . > 80dB
Range dinamico:. . . . . . . > 90 dB
Rapporto S/R: . . . . . . . . . > 80dB
Wow and flutter: . . . . . . non misurabile, pre-
cisione del quarzo
Uscita LINE OUT: . . . . . . . 2V
Impedenza cuffia: . . . . . . min. 32 Ω
Interfaccia USB:. . . . . . . . USB2.0
Alimentazione: . . . . . . . . 230 V/50Hz
Potenza assorbita:. . . . . . 25 VA
Temperatura d’esercizio: 0– 40 °C
Dimensioni:. . . . . . . . . . . 420 × 90 × 285 mm
(senza angoli di
montaggio), 2RS
Peso:. . . . . . . . . . . . . . . . 3,7 kg
Con riserva di modifiche tecniche.
La MONACOR
®INTERNATIONAL GmbH & Co. KG si
riserva ogni diritto di elaborazione in qualsiasi forma
delle presenti istruzioni per l’uso. La riproduzione
– anche parziale – per propri scopi commerciali è
vietata.

12
Deutsch
Deutsch Seite
English
English Page
Français
Français Page
Italiano
Italiano Pagina
Nederlands
Nederlands Pagina
Polski
Polski Strona
Español
Español
Español Página
Lector CD/MP3
Estas instrucciones van dirigidas a usuarios sin
ningún conocimiento técnico específico. Lea
atentamente estas instrucciones antes de utili-
zar el aparato y guárdelas para usos posteriores.
Todos los elementos de funcionamiento y
las conexiones que se describen pueden encon-
trarse en la página 3 desplegable.
1 Conexiones y Elementos de
Funcionamiento
1.1 Panel frontal del lector y
controlremoto (fig. 1)
1 Interruptor POWER
2 Bandeja de CD
3 Visualizador
4 Sensor de infrarrojos para el control remoto
5 Puerto para insertar una unidad flash USB
6 Botón selector CD/unidad flash USB
7
Jack 6,3mm para la conexión de auriculares
estéreo (impedancia mínima 32Ω)
8 Control de volumen para la salida de auri-
culares PHONES (7)
9 Botón para abrir/cerrar la bandeja de CD
10 Botón selector Reproducción/Pausa
11 Botón Stop para terminar la reproducción
12 Botones para la selección de pista y para el
avance/retroceso rápido
Selección de pista
pulse el botón brevemente
Pulse el botón para avanzar una
pista. Pulse el botón para volver
primero al principio de la pista. Cada vez
que se vuelva a pulsar, se retrocede una
pista.
Avance/retroceso rápido
mantener el botón pulsado*
Botón para avanzar
Botón para retroceder
13 Botón para la función de repetición
1avez que se pulsa el botón
(indicación “REPEAT 1”)
Repetición de la pista actual
2avez que se pulsa el botón
(indicación “REPEAT ALL”)
Repetición de todas las pistas
3avez que se pulsa el botón
Se desactiva la función de repetición
14 Botón para activar y desactivar la reproduc-
ción de las pistas en orden aleatorio
15 Botones para la selección de pista
Pulse el botón SKIP+ para avanzar una pista,
pulse el botón SKIP− para volver al inicio de
la pista. Cada vez que se vuelva a pulsar, se
retrocede una pista.
Para saltar varias pistas, mantenga pulsado
el respectivo botón.*
16
Botones para iniciar el avance rápido
(SEARCH+) o el retroceso rápido (SEARCH−)
17
Botones numéricos para la selección directa
de una pista
* Si el botón (SKIP+ en el control remoto) o el
botón (SKIP− en el control remoto) se mantie-
nen pulsados durante el modo stop, el lector avanza
o retrocede siempre 10 pistas.
1.2 Parte posterior del lector (fig. 2)
18 Tomas de salida RCA (L = izquierda, R = de-
recha) para conectar a un amplificador o a
un mezclador
19
Cable de corriente para la conexión a un
enchufe (230V/50Hz)
2 Notas de Seguridad
Este aparato cumple con todas las directivas
relevantes de la UE y por lo tanto está marcado
con el símbolo .
ADVERTENCIA
El aparato está alimentado
con un voltaje peligroso. Deje
el mantenimiento en manos
del personal cualificado. El
manejo inexperto puede pro-
vocar una descarga.
•
¡PRECAUCIÓN! Nunca mire directamente
al mecanismo del CD cuando la bandeja del
CDestá abierta, el haz del láser podría emi-
tirse provocando daños oculares.
•
El aparato está adecuado sólo para utilizarlo
en interiores. Protéjalo contra goteos, salpi-
caduras y humedad elevada. Rango de tem-
peratura ambiente admisible: 0– 40 ºC.
•
No coloque ningún recipiente con líquido
encima del aparato, p. ej. un vaso.
•
Desconecte inmediatamente el enchufe de la
toma de corriente si:
1. Existe algún daño visible en el aparato o
en el cable de corriente.
2.
El aparato ha sufrido daños después de una
caída o accidente similar.
3. No funciona correctamente.
Sólo el personal cualificado puede reparar el
aparato bajo cualquier circunstancia.
•
Un cable de corriente dañado sólo puede
repararse por el personal cualificado.
•
No tire nunca del cable de corriente para
desconectarlo de la toma, tire siempre del
enchufe.
•
No podrá reclamarse garantía o responsa-
bilidad alguna por cualquier daño personal
o material resultante si el aparato se utiliza
para otros fines diferentes a los originalmente
concebidos, si no se conecta o se utiliza
adecuadamente o no se repara por expertos.
Si va a poner el aparato fuera de servi-
cio definitivamente, llévelo a la planta
de reciclaje de la zona para que su
eliminación no sea perjudicial para el
medio ambiente.
3 Aplicaciones
El lector CD/MP3 CD-156 está adecuado para
aplicaciones universales (p.ej. en casa, en res-
taurantes, o en salas de espera). Pueden re-
producirse CDs de audio estándar, incluso CDs
que ha grabado usted mismo, y CDs o unida-
des flashUSB con archivos en formato MP3. Sin
embargo, pueden aparecer problemas durante
la reproducción de CDs regrabables (CD-RW),
según el tipo de CD, de copiador y de programa
de creación que se utilicen.
El lector está provisto con una memoria
anti-choque que puede compensar las interrup-
ciones breves provocadas por golpes o vibracio-
nes durante la reproducción (máx. 45segundos
para porta-datos con archivos MP3, 30 segundos
para CDs de audio estandar); sin embargo, no
puede compensar las interrupciones perma-
nentes.
Notas:
1. En vez de una unidad flash USB, puede conectarse
también un disco duro USB (FAT 16/32) con alimen-
tación individual.
2. Pueden reproducirse archivos en formato WMA.
2. Debido a la gran cantidad de fabricantes de medios
de almacenamiento y de drivers, no podemos ga-
rantizar que todos los medios de almacenamiento
USB sean compatibles con el CD-156.
4 Colocación y
ConexióndelLector
El lector puede colocarse como aparato in-
dependiente de sobremesa en una superficie
plana horizontal o se puede insertar en un rack
(482mm /19“). Para la instalación en rack, fije
los dos soportes de montaje de acuerdo con
la fig. 3. Se necesitan 2U de rack (U = Espacio
rack = 44,45mm).
Antes de hacer o cambiar cualquier conexión,
apague el lector y los aparatos que van a co
-
nectar.
1) Conecte la salida LINE OUT (18) – canal iz-
quierdo L toma blanca, canal derecho R toma
roja – mediante un cable de audio estéreo
con conectores RCA a la entrada para el
lector de CD del mezclador o amplificador.
2)
Pueden conectarse auriculares estéreo (im-
pedancia mínima de 32Ω) al jack 6,3 mm
PHONES (7).
3)
Para acabar, conecte el enchufe del cable
de corriente (19) a una toma de corriente
(230V/50Hz).
5 Funcionamiento
El lector se puede operar vía los botones de la
parte frontal del aparato o mediante el control
remoto.
Cuando utilice el control remoto, diríjalo siem-
pre al sensor de infrarrojos (4) del aparato. Si el
control remoto no funciona correctamente o
disminuye su rango de acción, hay que cambiar
la batería ☞apartado 6.
Si el control remoto no se va a utilizar du-
rante un largo periodo de tiempo, quite la bate-
ría como precaución para que el control remoto
no se dañe si se derrama la batería.
5.1 Reproducción de
un porta-datos de música
1)
Conecte el aparato, pulse el interruptor
POWER (1). Después de la conexión, siempre
se selecciona el lector CD. En el visualizador
(3) primero aparece y luego
si no se ha insertado ningún CD.
2) Inserte el/los porta-datos:
– Para insertar un CD, abra la bandeja del
CD con el botón OPEN/CLOSE (9), en el
visualizador aparece . Inserte un
CD con la cara con inscripciones hacia
arriba. Para cerrar la bandeja, pulse de
nuevo el botón; en el visualizador aparece
.
– Conecte una unidad flash USB en el
puertoUSB (5).
3)
Para cambiar entre los porta-datos, pulse
el botón CD/USB (6). El porta-datos se-
leccionado se muestra en el visualizador

13
Español
mediante la indicación correspondiente
– “CD” o “USB”.
Nota respecto al cambio rápido entre porta-
datos: Cuando un porta-datos se está leyendo y
usted intenta cambiar al porta-datos anterior, el
lector no responde al cambio y en el visualizador
se muestra brevemente .
4) Después de leer el porta-datos, el lector se
pone en modo stop. En el modo stop el vi-
sualizador muestra:
– Para CDs de audio estándar:
El número total de pistas y el tiempo total
de reproducción, p.ej. para un CD
con 20 pistas y un tiempo de reproducción
total de 69 minutos y 37 segundos.
– Para CDs o unidades flash USB con archi-
vosMP3:
El número total de archivos MP3, p. ej.
en un porta-datos con 105 archi-
vos MP3.
Para empezar la reproducción con la primera
pista, pulse el botón (10) del aparato o
el botón PLAY/PAUSE (10) del control remoto.
Para empezar con otra pista, seleccione la
pista (
☞
apartado 5.2) y luego pulse el botón
o PLAY/PAUSE.
5)
Si los auriculares están conectados, ajuste
el volumen de los auriculares con el control
PHONES LEVEL (8).
PRECAUCIÓN No ajuste nunca los auricu-
lares en un volumen muy
elevado. Los volúmenes
permanentes muy elevados
pueden dañar su oído. El
oído humano se acostumbra a los volúme-
nes altos que no lo parecen tanto después
de un rato. Por lo tanto, no aumente un
volumen alto que ya se había ajustado antes
de acostumbrarse a él.
6)
Utilice el botón o PLAY/PAUSE para
cambiar entre reproducción (indicación
▶
)
y pausa (indicación
❙❙
). Durante la repro-
ducción y en el modo pausa, el visualizador
muestra el número y el tiempo reproducido
de la pista actual. Con pistas MP3, aparece
además la indicación “MP3”.
7)
Después de reproducir todas las pistas, el
lector cambia a modo stop. Para terminar
la reproducción antes del final, utilice el bo-
tón (11) del aparato o el botón STOP (11)
del control remoto para poner el lector en
modostop.
8) Para cambiar el CD, el lector CD tiene que
estar seleccionado (si es necesario, pulse el
botón CD/USB), de lo contrario no se abrirá
la bandeja del CD.
9)
Antes de desconectar el aparato, cierre siem-
pre la bandeja de CD para proteger el lector
láser de impurezas. A continuación desco-
necte el aparato con el interruptor POWER.
5.2 Selección de pista
5.2.1 Selección directa del número de pista
Utilice los botones numéricos (17) del control
remoto para seleccionar directamente una pista
introduciendo su número. En caso de números
de pista con más de un dígito, pulse los números
sucesivamente, p.ej. para la pista número 10
pulse los botónes “1” y “0”.
Nota: Para porta-datos con archivos MP3 y varias
carpetas, las pistas se reproducen y se numeran en
el siguiente orden:
1. Todas las pistas sin carpeta en el directorio raíz
2. Todas las pistas en las carpetas del directorio raíz.
3. Todas las pistas en subcarpetas, etc.
5.2.2 Avanzar o retroceder pistas
Utilice los botones / (12) del apa-
rato o SKP+/SKIP− (15) en el control remoto para
avanzar o retroceder pistas.
Avanzar pistas
Cada vez que se pulsa el botón o
SKIP+, se avanza una pista.
Retroceder pistas
Utilice el botón o SKIP− para ir pri-
mero al inicio de la pista. Cada vez que se
vuelva a pulsar, se retrocede una pista.
Para saltar varias pistas, mantenga pulsado el
respectivo botón SKIP.
Notas sobre la selección de pista en el modo stop
1. Si se avanza o se retrocede una pista en el modo
stop, el visualizador vuelve, aprox. 3 segundos
después de indicar el número de pista, a la indi-
cación del número total de pistas/tiempo total de
reproducción o del número total de archivos MP3
(☞apartado 5.1, punto 4).
2. Si el botón /SKIP+ o /SKIP− se man-
tiene pulsado durante el modo stop, el lector avanza
o retrocede siempre 10 pistas.
5.3 Avance/Retroceso rápido
Utilice los botones / (12) del apa-
rato y los botones SEARCH+/SEARCH− (16) del
control remoto para avanzar/retroceder durante
la reproducción:
– Mantenga pulsado el botón para el
avance o para el retroceso hasta que
se alcance el punto deseado.
– O pulse el botón SEARCH+ o SEARCH− para
empezar el avance o el retroceso. Si se alcanza
el punto deseado, pulse el botón (10)
del aparato o el botón PLAY/PAUSE (10) del
control remoto.
El avance/retroceso también puede traspasar
varias pistas, sin embargo, se para al inicio de
la primera pista o al final de la última pista
(excepción: para pistas MP3, el retroceso se para
cuando llega al inicio de la pista).
5.4 Secuencia aleatoria de pistas
Para reproducir las pistas en una secuencia alea-
toria, pulse el botón RANDOM (14), en el visua-
lizador se indica “RANDOM”. En este modo de
reproducción puede seleccionarse la siguiente
pista de la secuencia aleatoria con el botón de
avance (12) o SKIP+ (15), lo que no es
posible es el retroceso a la pista previa con el
botón o SKIP− o bien la selección de
pista directa con los botones numéricos (17).
Cuando se ha reproducido una vez cada pista
del porta-datos, el lector se pone en modo stop
y se desactiva la función RANDOM.
Para desactivar la función antes de que se
hayan reproducido todas las pistas hasta el final,
pulse el botón RANDOM de nuevo, desaparece
“RANDOM” del visualizador y después de fina-
lizar la pista en reproducción, ésta continúa en
orden ascendente. La función también se desco-
necta cuando se pulsa el botón (11) en el apa-
rato o el botón STOP (11) en el control remoto.
5.5 Función de repetición
Para la repetición continua de la pista en repro-
ducción, pulse una vez el botón MODE (13),
en el visualizador se muestra “REPEAT1”. Para
la repetición continua de todas las pistas del
porta-datos, pulse de nuevo el botón MODE, en
el visualizador se muestra “REPEAT ALL”.
Para desactivar la repetición, pulse el botón
MODE una tercera vez. La función también se
desconecta cuando se pulsa el botón (11) en
el aparato o el botón STOP (11) en el control
remoto.
6 Cambio de la Batería del
Control Remoto
Apriete el seguro del soporte de la batería hacia
la izquierda (1aflecha en la fig. 4) y al mismo
tiempo tire del soporte hacia abajo (2aflecha).
Extraiga la batería gastada e introduzca la nueva
(pila botón 3V, tipo CR 2025). Asegúrese de que
el polo positivo de la batería dentro del soporte
apunta hacia arriba. Introduzca el soporte de
nuevo en el control remoto.
1.2.
Fig. 4 Cambio de la batería
Las baterías gastadas no deben depo-
sitarse en el contenedor normal; lléve-
las a un contenedor especial, p.ej. al
contenedor de su vendedor.
7 Mantenimiento del Aparato
Proteja el aparato del polvo, de las vibraciones,
de la humedad y del calor. Utilice sólo un paño
suave y seco para la limpieza; no utilice nunca
ni productos químicos ni agua.
Nota respecto a las interrupciones de sonido y
errores de lectura:
El humo del tabaco o el polvo pueden penetrar fá-
cilmente a través de todas las ranuras del aparato y
posarse en las ópticas del sistema de muestreo láser.
Si estos restos provocan errores de lectura e interrup-
ciones de sonido, el personal cualificado tendrá que
limpiar el aparato. Tenga en cuanta que habrá un cargo
en la limpieza, incluso durante el periodo de garantía.
8 Especificaciones
Banda pasante:. . . . . . . . 20 – 20 000 Hz
THD:. . . . . . . . . . . . . . . . < 0,1 %
Separación de canal:. . . . > 80 dB
Rango dinámico:. . . . . . . > 90 dB
Relación sonido/ruido: . . > 80 dB
Wow y flutter: . . . . . . . . No medibles,
precisión de cuarzo
Salida LINE OUT: . . . . . . . 2 V
Impedancia
de los auriculares: . . . . . . mín. 32 Ω
Interfaz USB:. . . . . . . . . . USB 2.0
Alimentación: . . . . . . . . . 230V/50 Hz
Consumo:. . . . . . . . . . . . 25 VA
Temperatura ambiente:. . 0 – 40 °C
Dimensiones: . . . . . . . . . 420 × 90 × 285mm
(sin soportes de
montaje), 2U
Peso:. . . . . . . . . . . . . . . . 3,7 kg
Sujeto a modificaciones técnicas.
Manual de instrucciones protegido por el copyright de
MONACOR
®INTERNATIONAL GmbH & Co. KG. Toda
reproducción mismo parcial para fines comerciales
está prohibida.

14
Deutsch
Deutsch Seite
English
English Page
Français
Français Page
Italiano
Italiano Pagina
Español
Español Página
Nederlands
Nederlands Pagina
Polski
Polski
Polski Strona
Odtwarzacz CD/MP3
Niniejsza instrukcja przeznaczona jest dla użyt-
kowników, którzy nie posiadają wiedzy i do-
świadczenia technicznego. Przed rozpoczęciem
użytkowania proszę zapoznać się z instrukcją, a
następnie zachować ją do wglądu.
Proszę otworzyć instrukcję na stronie 3.
Pokazano tam rozkład elementów operacyjnych
i złączy.
1 Elementy operacyjne i złącza
1.1 Panel przedni odtwarzacza oraz
pilot zdalnego sterowania (rys. 1)
1 Włącznik POWER
2 Szuflada na płytę CD
3 Wyświetlacz
4 Czujnik podczerwieni do odbioru sygnału z
pilota zdalnego sterowania
5
Gniazdo do podłączania pamięci przenośnej
USB
6 Przycisk wyboru CD/USB
7
Gniazdo 6,3mm do podłączania słuchawek
stereo (minimalna impedancja 32Ω)
8 Regulator głośności dla wyjścia słuchawko-
wego PHONES (7)
9 Przycisk do otwierania/zamykania szuflady
na płytę CD
10 Przycisk Replay/Pause do przełączania mię-
dzy trybem odtwarzania a trybem pauzy
11
Przycisk Stop do zatrzymywania odtwarzania
12
Przyciski do wyboru utworów oraz szybkiego
przewijania
Do wyboru utworów
wcisnąć przycisk na krótko
Wcisnąć przycisk aby przejść
do kolejnego utworu. Wcisnąć przycisk
aby powrócić do początku bieżą-
cego utworu. Kolejne wciśnięcie przyci-
sku powoduje przejście do poprzedniego
utworu.
W celu szybkiego przewijania
przytrzymać wciśnięty przycisk*
Przycisk do przewijania do przodu
Przycisk do przewijania do tyłu
13 Przycisk dla funkcji powtarzania
Pierwsze wciśnięcie przycisku
(wskazanie “REPEAT 1”)
bieżący utwór będzie ciągle powtarzany
Drugie wciśnięcie przycisku
(wskazanie “REPEAT ALL”)
wszystkie utwory z danego nośnika będą
ciągle powtarzane
Trzecie wciśnięcie przycisku
funkcja powtarzania jest wyłączona
14
Przycisk do włączania odtwarzania losowego
15 Przyciski do wyboru utworów:
Wcisnąć przycisk SKIP+ aby przejść do kole-
jnego utworu. Wcisnąć przycisk SKIP− aby
powrócić do początku bieżącego utworu.
Kolejne wciśnięcie przycisku powoduje pr-
zejście do poprzedniego utworu.
Aby przejść o kilka utworów przytrzymać
wciśnięty przycisk.*
16
Przyciski do szybkiego przewijania do przodu
(SEARCH+) lub od tyłu (SEARCH−)
17
Przyciski numeryczne do bezpośredniego
wyboru utworów
1.2 Panel tylny odtwarzacza (rys. 2)
18
Gniazda wyjściowe RCA (L = lewy, R = prawy)
do podłączania wzmacniacza lub miksera
19
Kabel zasilający do łączenia z gniazdkiem
sieciowym (230V/50Hz)
2 Środki bezpieczeństwa
Urządzenie spełnia wszystkie wymagania norm
UE dlatego zostało oznaczone symbolem .
UWAGA
Urządzenie zasilane jest niebez-
piecznym napięciem. Wszelkie
naprawy należy zlecić osobie prze-
szkolonej; nieprawidłowa obsługa
może spowodować porażenie prą-
dem elektrycznym.
•
Uwaga! Nie wolno zaglądać do środka me-
chanizmu odtwarzacza CD przy otwartej
szufladzie na płytę CD; wiązka lasera może
uszkodzić wzrok.
•
Urządzenie przeznaczone jest wyłącznie do
użytku wewnątrz pomieszczeń. Należy chro-
nić je przez wodą, dużą wilgotnością oraz
wysoką temperaturą. Dopuszczalny zakres
wynosi 0– 40 °C.
•
Na urządzeniu nie należy stawiać żadnych
pojemników z cieczą np. szklanek.
•
Nie wolno używać urządzenia lub natychmiast
odłączyć wtyczkę zasilającą z gniazdka
1.
jeżeli stwierdzono istnienie widocznego
uszkodzenia odtwarzacza lub kabla zasi-
lającego,
2.
jeżeli uszkodzenie urządzenia mogło nastą-
pić w wyniku upadku lub innego podob-
nego zdarzenia,
3. jeżeli urządzenie działa nieprawidłowo.
W każdym przypadku, naprawę należy zlecić
specjaliście.
•
Wymianę kabla zasilającego należy zlecić
specjaliście.
•
Nie wolno odłączać urządzenia z gniazdka
sieciowego ciągnąc za kabel zasilania, należy
zawsze chwytać za wtyczkę.
•
Producent ani dostawca nie ponoszą odpo-
wiedzialności za wynikłe szkody lub utratę
zdrowia użytkownika, jeśli urządzenie było
używane niezgodnie z przeznaczeniem, zo-
stało podłączone niewłaściwie lub poddane
nieautoryzowanej naprawie.
Po całkowitym zakończeniu eksplo-
atacji, urządzenie należy oddać do
punktu recyklingu, aby nie zaśmiecać
środowiska.
3 Zastosowanie
Odtwarzacz CD/MP3 CD-156 przeznaczony jest
do uniwersalnych zastosowań (np. systemów
audio w domu, restauracjach lub poczekalniach).
Pozwala na odtwarzanie standardowych płyt
audio CD, audio CD wypalonych we własnym
zakresie oraz płyt i nośników USB z plikami MP3.
Urządzenie może mieć jednak problem z od-
twarzaniem płyt wielokrotnego zapisu (CD-RW).
Odtwarzacz został dodatkowo wyposażony
pamięć antywstrząsową, kompensującą zakłóce-
nia powodowane wstrząsami lub wibracjami
(do 45sekund dla nośników z plikami MP3 lub
do 30sekund dla standardowych płyt audioCD).
Pamięć ta nie kompensuje jednak ciągłych ws-
trząsów.
Uwagi:
1. Zamiast pamięci przenośnej USB, można podłączyć
także twardy dysk USB (FAT 16/32) z własnym za-
silaniem.
2. Możliwe jest również odtwarzanie plików WMA.
3. Ze względu na dużą ilość producentów nośników,
producent nie gwarantuje kompatybilności odtwa-
rzacza CD-156 ze wszystkimi dostępnymi na rynku
nośnikami USB.
4 Przygotowanie do pracy i
podłączanie urządzenia
Urządzenie przystosowane jest do montażu w
racku (482mm/19“), ale może pracować także
jako wolnostojące. Instalacja w racku odbywa
się za pomocą dołączonych uchwytów, zgodnie
z rys. 3. Wymagana jest przestrzeń montażowa
2U (1 U = 44,5 mm).
Przed przystąpieniem do podłączania lub zmiany
połączeń, należy bezwzględnie wyłączyć odtwa-
rzacz oraz podłączane urządzenia.
1)
Połączyć wyjście LINE OUT (18) – lewy kanałL
poprzez białe gniazdo, prawy kanał R po-
przez czerwone gniazdo – z wejściem mik-
sera lub wzmacniacza, za pomocą kabla ze
złączami RCA.
2) Możliwe jest podłączanie słuchawek stereo
(o minimalnej impedancji 32Ω) do gniazda
6,3mm PHONES (7).
3) Na końcu podłączyć kabel zasilający (19) do
gniazdka sieciowego (230V/50Hz).
5 Obsługa
Do sterowania urządzeniem można wykorzystać
przyciski na przednim panelu lub na pilocie zdal-
nego sterowania.
W przypadku zdalnego sterowania należy kiero-
wać pilot w stronę czujnika podczerwieni (4) na
urządzeniu. Jeżeli zasięg działanie pilota znacznie
się zmniejszy, oznacza to że baterie są wyczer-
pane i należy wymienić je na nowe ☞rozdz. 6.
Jeżeli pilot nie będzie przez dłuższy czas uży-
wany, należy wyjąć z niego baterię, aby zapobiec
jego uszkodzeniu na skutek wylania baterii.
5.1 Odtwarzanie muzyki
1)
Włączyć urządzenie włącznikiem POWER
(1). Po włączeniu, urządzenie ustawia się
automatycznie na odtwarzanie płyty CD. Na
wyświetlaczu (3) pojawia się najpierw ,
a następnie , jeżeli w napędzie nie
ma płyty CD.
2) Wkładanie nośników:
– Aby włożyć płytę CD, wysunąć szufladę
CD przyciskiem OPEN/CLOSE (9), na wy
-
świetlaczu pojawi się . Włożyć płytę
CD nadrukiem do góry. Następnie zasunąć
szufladę wciskając przycisk; na wyświetla-
czu pojawi się .
– Podłączyć nośnik USB do gniazda USB (5).
3)
Do przełączania pomiędzy nośnikami służy
przycisk CD/USB (6). Wybór nośnika sygna-
lizowany jest na wyświetlaczu – “CD” lub
“USB”.
Uwaga dotycząca szybkiego przełączania
między nośnikami: Po wybraniu nośnika, dane
* Jeżeli przycisk (SKIP+ na pilocie) lub przycisk
(SKIP− na pilocie) zostanie wciśnięty na dłu-
żej w trybie zatrzymania, odtwarzacz przeskoczy o
10utworów w przód lub w tył.

15
Polski
z niego muszą zostać wczytane, w tym czasie nie
jest możliwe przełączenie na poprzedni nośnik,
urządzenie nie będzie reagować na przycisk, a na
wyświetlaczu pojawi się .
4)
Po wczytaniu danych odtwarzacz ustawia się
w tryb zatrzymania. Na wyświetlaczu sygna-
lizowany jest tryb stop:
– dla standardowych płyt audio CD:
liczba utworów oraz całkowity czas odtwa-
rzania, np. dla płyty CD z 20utwo-
rami i całkowitym czasem odtwarzana
69minut i 37 sekund.
– dla płyt CD lub nośników USB z plikami MP3:
liczba plików MP3, np. dla nośnika
z 105 plikami MP3.
Aby rozpocząć odtwarzanie od pierwszego
utworu, wcisnąć przycisk (10) na urzą-
dzeniu lub przycisk PLAY/PAUSE (10) na pi-
locie zdalnego sterowania. Aby rozpocząć
od innego utworu, wybrać najpierw żądany
utwór (☞rozdz. 5.2), a następnie wcisnąć
przycisk lub PLAY/PAUSE.
5) W przypadku korzystania ze słuchawek, re-
gulacja głośności sygnału na słuchawkach
odbywa się za pomocą regulatora PHONES
LEVEL (8).
UWAGA
Nigdy nie ustawiać poziomu
głośności dźwięku na bardzo
dużą wartość. Zbyt duże natę-
żenie dźwięku może uszkodzić
słuch! Ucho ludzkie dostoso-
wuje się do hałasu, który po pewnym czasie
nie wydaje się uciążliwy. Nie wolno zwięk-
szać głośności po przyzwyczajeniu się do
poprzedniego ustawienia.
6)
Przycisk lub PLAY/PAUSE pozwala na
przełączanie między trybem odtwarzania
(wskazanie
▶
), a pauzy (wskazanie
❙❙
). W
trybie odtwarzania oraz pauzy, wyświetlacz
pokazuje numer oraz miniony czas odtwa
-
rzania bieżącego utworu. W przypadku pli-
ków MP3, pojawia się dodatkowo wskazanie
“MP3”.
7) Po zakończeniu odtwarzania utworów, od-
twarzacz ustawia się w tryb zatrzymania. Aby
zatrzymać odtwarzanie wcześniej, wcisnąć
przycisk (11) na urządzeniu lub przycisk
STOP (11) na pilocie.
8) Aby zmienić płytę CD, należy najpierw prze-
łączyć się na odtwarzacz CD (jeżeli trzeba,
wcisnąć przycisk CD/USB), w przeciwnym
razie szuflada na płytę CD nie da się wysunąć.
9)
Przed wyłączeniem urządzenia należy zawsze
zasunąć szufladę na płytę CD, aby chronić
układ laserowy przed zabrudzeniem. Na-
stępnie wyłączyć urządzenie przełącznikiem
POWER.
5.2 Wybór utworów
5.2.1 Bezpośrednie wybieranie
numeru utworu
Możliwe jest bezpośrednie wywoływanie utworu
za pomocą klawiszy numerycznych (17) pilota.
W przypadku numerów wielocyfrowych, wci-
snąć kolejno odpowiednie przyciski numeryczne
np. w przypadku utworu numer 10 wcisnąć
przyciski “1” oraz “0”.
Uwaga: W przypadku nośników z plikami MP3 w
kilku folderach, utwory są odtwarzane i numerowane
w następującej kolejności:
1. wszystkie utwory spoza folderów, jako ścieżka root
2. wszystkie utwory w folderach
3. wszystkie utwory w podfolderach, itd.
5.2.2 Przechodzenie pomiędzy utworami
Do przechodzenia do kolejnego lub poprzed-
niego utworu służą przyciski / (12)
na urządzeniu lub SKIP+/SKIP− (15) na pilocie
zdalnego sterowania.
Przechodzenie do kolejnego utworu
Każde wciśnięcie przycisku lub SKIP+
powoduje przejście do kolejnego utworu.
Przechodzenie do poprzedniego utworu
Każde wciśnięcie przycisku lub SKIP−
powoduje powrót do początku bieżącego
utworu. Kolejne wciśnięcie przycisku powo-
duje przejście do poprzedniego utworu.
Aby przejść o kilka utworów, przytrzymać wci-
śnięty odpowiedni przycisk SKIP.
Przechodzenie pomiędzy utworami w trybie za-
trzymania:
1. Jeżeli przechodzenie pomiędzy utworami odbywa
się w trybie zatrzymania, wyświetlacz powraca po
około 3 sekundach ze wskazania numeru utworu
na liczbę utworów/czas całkowity odtwarzania lub
liczbę plików MP3 (☞rozdz. 5.1, punkt 4).
2. Jeżeli przycisk /SKIP+ lub /SKIP−
zostanie wciśnięty na dłużej w trybie zatrzymania,
odtwarzacz przeskoczy o 10 utworów.
5.3 Szybkie przewijanie
Za pomocą przycisków / (12) na
urządzeniu lub przycisków SEARCH+/SEARCH−
(16) na pilocie, możliwe jest szybkie przewijanie
podczas odtwarzania:
– Wciśnięcie na dłużej przycisku powo-
duje przewinięcie do przodu, wciśnięcie na
dłużej przycisku – przewinięcie do tyłu
do żądanego punktu.
– Ten sam cel można osiągną za pomocą przyci-
sków SEARCH+ oraz SEARCH− . Po osiągnię-
ciu żądanego punktu, wcisnąć przycisk
(10) na urządzeniu lub przycisk PLAY/PAUSE
(10) na pilocie.
Szybkie przewijanie możliwe jest również pomię-
dzy poszczególnymi utworami, jednakże zatrzy-
muje się na początku pierwszego oraz na końcu
ostatniego utworu (wyjątek: dla plikówMP3,
przewijanie do tyłu zatrzymuje się zawsze po
osiągnięciu początku utworu).
5.4 Odtwarzanie losowe
Aby włączyć odtwarzanie losowe, wcisnąć przy-
cisk RANDOM (14), na wyświetlaczu pojawi się
“RANDOM”. W trybie odtwarzania losowego
możliwe jest przechodzenie do następnego, lo-
sowo wybranego utworu, za pomocą przycisku
(12) lub SKIP+ (15). Przechodzenie do
poprzedniego utworu przyciskiem lub
SKIP−, a także bezpośrednie wybieranie przy-
ciskami numerycznymi (17) nie jest możliwe.
Po odtworzeniu wszystkich utworów z nośnika,
odtwarzanie zostaje zatrzymane a funkcja od-
twarzania losowego RANDOM wyłączona.
Aby wyłączyć odtwarzanie losowe, wcisnąć
przycisk RANDOM ponownie, wskazanie “RAN-
DOM” zniknie z wyświetlacza po zakończeniu
odtwarzania bieżącego utworu. Funkcja ta zo-
staje również wyłączona po wciśnięciu przycisku
(11) na urządzeniu lub przycisku STOP (11)
na pilocie.
5.5 Funkcja powtarzania
W celu włączenia funkcji powtarzania bieżącego
utworu wcisnąć przycisk MODE (13) jeden raz,
na wyświetlaczu pojawi się “REPEAT1”. Aby włą-
czyć ciągłe odtwarzania wszystkich utworów z
nośnika, wcisnąć przycisk MODE po raz drugi, na
wyświetlaczu pojawi się “REPEAT ALL”.
Aby wyłączyć funkcję powtarzania, wcisnąć
ponownie przycisk MODE. Funkcja ta zostanie
również wyłączona po wciśnięciu przycisku
(11) na urządzeniu lub przycisku STOP (11) na
pilocie.
6 Wymiana baterii
pilota zdalnego sterowania
Przesunąć blokadę pokrywy komory bateryjnej
w lewo (strzałka 1 na rys. 4), a następnie zsu-
nąć pokrywę w dół (strzałka 2). Zastąpić stare
baterie i nowymi (3V pastylkowe, typ CR2025).
Zwrócić uwagę na właściwą polaryzację (dodatni
biegun w górę). Ponownie założyć pokrywę ko-
mory bateryjnej.
1.2.
Rys. 4 Wymiana baterii
Zużyte baterie należy wyrzucać do spe-
cjalnych pojemników, nie do zwykłych
koszy na śmieci.
7 Konserwacja urządzenia
Urządzenie należy chronić przed kurzem, wstrzą-
sami, dużą wilgotnością oraz wysoką tempe-
raturą. Do czyszczenia używać suchej miękkiej
ściereczki; nie stosować wody ani środków
chemicznych.
Uwagi dotyczące zakłóceń dźwięku i błędów
odczytu: Wpływ dymu papierosowego oraz kurzu
może spowodować błędy przy odczycie płyt CD. Nie-
stety uniknięcie szkodliwych warunków nie zawsze
jest możliwe (np. w dyskotekach). W takim przypadku
należy zlecić okresowe czyszczenie urządzenia przez
autoryzowany serwis.
8 Specyfikacja
Pasmo przenoszenia:. . . . 20– 20 000 Hz
THD:. . . . . . . . . . . . . . . . < 0,1 %
Separacja kanałów:. . . . . > 80 dB
Zakres dynamiki:. . . . . . . > 90 dB
Stosunek S/N:. . . . . . . . . > 80 dB
Drżenie i trzepotanie: . . . niemierzalne,
kwarcowa precyzja
Wyjście LINE OUT: . . . . . . 2 V
Impedancja słuchawek:. . min. 32 Ω
Interfejs USB: . . . . . . . . . USB2.0
Zasilanie:. . . . . . . . . . . . . 230 V/50Hz
Pobór mocy: . . . . . . . . . . 25VA
Zakres temperatur: . . . . . 0–40°C
Wymiary: . . . . . . . . . . . . 420 × 90 × 285mm
(bez uchwytów
montażowych), 2U
Waga:. . . . . . . . . . . . . . . 3,7kg
Z zastrzeżeniem możliwości zmian.
Instrukcje obsługi są chronione prawem copyright
for MONACOR
®INTERNATIONAL GmbH & Co. KG.
Przetwarzanie całości lub części instrukcji dla osobi-
stych korzyści finansowych jest zabronione.

16
NederlandsDansk
Svenska
Svenska Sidan
Suomi
Suomi Sivulta
Læs nedenstående sikkerhedsoplysninger op-
mærksomt igennem før ibrugtagning af enhe-
den. Bortset fra sikkerhedsoplysningerne henvi-
ses til den engelske tekst.
Sikkerhedsoplysninger
Denne enhed overholder alle relevante EU-
direktiver og er som følge deraf mærket .
ADVARSEL
Enheden benytter livsfarlig net-
spænding. For at undgå fare
for elektrisk stød må kabinettet
ikke åbnes. Overlad servicering
til autoriseret personel.
•
Advarsel! Undlad at kigge ind i CD-mekanis-
men, når CD-skuffen er åben. Der kan udsen-
des laserstråler, som kan forårsage øjenskader.
•
Enheden er kun beregnet til indendørs brug.
Beskyt den mod vanddråber og -stænk, høj
luftfugtighed og varme (tilladt omgivelsestem-
peratur 0– 40 °C).
•
Undgå at placere væskefyldte genstande, som
f.eks. glas, ovenpå enheden.
•
Tag straks netstikket ud af stikkontakten i
følgende tilfælde:
1. hvis der er synlig skade på enheden eller
netkablet,
2. hvis der kan være opstået skade, efter at
enheden er tabt eller lignende,
3. hvis der forekommer fejlfunktion.
Enheden skal altid repareres af autoriseret
personel.
•
Et beskadiget netkabel må kun repareres af
autoriseret personel.
•
Tag aldrig netstikket ud af stikkontakten ved
at trække i kablet, tag fat i selve stikket.
•
Hvis enheden benyttes til andre formål, end
den oprindeligt er beregnet til, hvis den ikke
er korrekt tilsluttet, hvis den betjenes forkert,
eller hvis den ikke repareres af autoriseret
personel, omfattes eventuelle skader ikke af
garantien.
ADVARSEL
Indstil ikke hovedtelefonernes
lydniveau for højt. Vedvarende
højt lydtryk kan være skadeligt
for den lyttende person! Det
menneskelige øre vænner sig til
højt lydtryk, således at dette efter
en tids forløb ikke føles så højt.
Skru derfor ikke yderligere op for
lyden, når De efter nogen tid har
vænnet Dem til det høje lydtryk.
Hvis enheden skal tages ud af drift
for bestandigt, skal de afleveres på en
genbrugsstation, for at undgå skader
på miljøet.
Vedligeholdelse af enheden
Beskyt enheden mod støv, vibrationer og fugt.
Til rengøring må kun benyttes en blød, tør klud;
der må under ingen omstændigheder benyttes
vand eller kemikalier.
Note vedrørende læse fejl og afbrydelse af afspil-
ning:
Cigaretrøg og støv kan nemt trænge ind gennem alle
åbninger på CD-afspilleren, og kan sætte sig på lase-
ren. Hvis dette skulle medfører læse fejl, skal denne
renses af en uddannet reparatør. Rensning af laseren
er ikke omfattet af garantien på CD-afspilleren.
Fjernbetjening
Hvis fjernbetjeningen ikke skal benyttes i læn-
gere tid, skal batteriet fjernes, for at undgå ska-
der ved eventuelle lækager fra disse.
Brugte batterier må aldrig smides ud
sammen med den øvrige hushold-
ningsaffald. Aflever dem altid i gen-
brugsstationens battericontainere.
Alle rettigheder til denne brugsvejledning tilhører
MONACOR
®
INTERNATIONAL GmbH & Co. KG. Ingen
dele af denne vejledning må reproduceres under ingen
omstændigheder til kommerciel anvendelse.
Lees aandachtig de onderstaande veiligheids-
voorschriften, alvorens het apparaat in gebruik
te nemen. Voor meer informatie over de bedie-
ning van het apparaat raadpleegt u de anders-
talige handleidingen.
Veiligheidsvoorschriften
Het apparaat is in overeenstemming met alle
relevante EU-Richtlijnen en draagt daarom de
-markering.
WAAR-
SCHUWING
De netspanning van het appa-
raat is levensgevaarlijk. Open
het apparaat niet, want door on-
zorgvuldige ingrepen loopt u het
risico van elektrische schokken.
•
Opgelet! Kijk bij geopende cd-lade niet in
het binnenwerk van de cd-speler, want even-
tueel actieve laserstralen kunnen oogletsels
veroorzaken.
•
Het apparaat is enkel geschikt voor gebruik
binnenshuis; vermijd druip- en spatwater en
plaatsen met uitzonderlijk hoge vochtigheid.
Het toegestane omgevingstemperatuurbereik
is 0– 40 °C.
•
Plaats geen bekers met vloeistof zoals drink-
glazen etc. op het apparaat.
•
Trek onmiddellijk de netstekker uit het stop-
contact,
1.
wanneer het apparaat of het netsnoer
zichtbaar beschadigd is,
2.
wanneer er een defect zou kunnen op-
treden nadat het apparaat bijvoorbeeld is
gevallen,
3. wanneer het apparaat slecht functioneert.
Het apparaat moet in elk geval worden her-
steld door een gekwalificeerd vakman.
•
Een beschadigd netsnoer mag alleen in een
erkende werkplaats worden vervangen.
•
Trek de stekker nooit met het snoer uit het
stopcontact, maar met de stekker zelf.
•
In geval van ongeoorloofd of verkeerd ge-
bruik, verkeerde aansluiting, foutieve bedie-
ning of van herstelling door een niet-gekwa-
lificeerd persoon vervalt de garantie en de
verantwoordelijkheid voor hieruit resulterende
materiële of lichamelijke schade.
OPGELET
Stel het volume van de hoofdtele-
foon nooit zeer hoog in. Langdu-
rige blootstelling aan hoge volu-
mes kan het gehoor beschadigen!
Het gehoor raakt aangepast aan
hoge volumes die na een tijdje niet meer zo
hoog lijken. Verhoog daarom het volume niet
nog meer, nadat u er gewoon aan bent geraakt.
Wanneer het apparaat definitief uit be-
drijf wordt genomen, bezorg het dan
voor milieuvriendelijke verwerking aan
een plaatselijk recyclagebedrijf.
Onderhoud van het apparaat
Bescherm het apparaat tegen stof, trillingen,
vocht en warmte. Verwijder het stof met een
zachte, droge doek. Gebruik zeker geen water
of chemicaliën.
Opmerking in verband met klankstoringen en
leesfouten: Sigarettenrook en stof dringen makkelijk
in alle openingen van de cd-speler en zet zich ook af
op de optische onderdelen van de laseraftastsystemen.
Mocht deze afzetting tot leesfouten en klankstoringen
leiden, dan moet het apparaat door een gekwalificeerd
vakman worden gereinigd. De kosten voor deze reini-
ging draagt de koper, ook tijdens de garantietermijn!
Afstandsbediening
Als de afstandsbediening langere tijd niet wordt
gebruikt, neemt u de batterij er veiligheidshalve
uit, zodat de afstandsbediening niet wordt be-
schadigd bij eventueel uitlopen van de batterij.
Lege batterijen horen niet in het huis-
vuil. Verwijder ze voor een milieuvrien-
delijke verwerking uitsluitend als KGA
(bv. de inzamelbox in de detailhandel).
Deze gebruiksaanwijzing is door de auteurswet be-
schermd eigendom van MONACOR® INTERNATIONAL
GmbH&Co. KG. Een reproductie – ook gedeeltelijk –
voor eigen commerciële doeleinden is verboden.
Dansk
Dansk Sida
Nederlands
Nederlands Pagina

17
Ole hyvä ja huomioi joka tapauksessa seuraa-
vat turvallisuuteen liittyvät seikat ennen laitteen
käyttöä. Laitteen toiminnasta saa lisätietoa tar-
vittaessa tämän laitteen muunkielisistä käyttö-
ohjeista.
Turvallisuudesta
Tämä laite täyttää kaikki siihen kohdistuvat
EU-direktiivit ja sille on myönnetty hyväk-
syntä.
VAROITUS
Laite toimii hengenvaarallisella
jännitteellä. Välttääksesi sähköis-
kun, älä avaa laitteen koteloa.
Jätä huoltotoimet valtuutetulle,
ammattitaitoiselle huoltoliik-
keelle.
•
Huomio! Älä katso CD mekanismiin, kun CD
kelkka on ulkona. Lasersäteiden säteily voi
vahingoittaa silmiä.
•
Tämä laite soveltuu vain sisätilakäyttöön. Suo-
jele laitetta kosteudelta, vedeltä ja kuumuu-
delta (sallittu ympäröivä lämpötila 0– 40 °C).
•
Älä sijoita laitteen päälle mitään nestettä si-
sältävää, kuten vesilasia tms.
•
Irrota virtajohto pistorasiasta jos:
1.
laitteessa tai virtajohdossa on havaittava
vaurio
2. putoaminen tai muu vastaava vahinko on
saattanut aiheuttaa vaurion
3. laitteessa esiintyy toimintahäiriöitä
Kaikissa näissä tapauksissa laite tulee toimit-
taa valtuutettuun huoltoliikkeeseen.
•
Virtajohdon saa vaihtaa vain valtuutettu huol-
tohenkilö.
•
Älä koskaan irrota virtajohtoa pistorasiasta
johdosta vetämällä.
•
Laitteen takuu raukeaa, eikä valmistaja,
maahantuoja tai myyjä ota vastuuta mahdol-
lisista välittömistä tai välillisistä vahingoista,
jos laitetta on käytetty muuhun kuin alku-
peräiseen käyttötarkoitukseen, laitetta on
taitamattomasti käytetty tai kytketty tai jos
laitetta on huollettu muussa kuin valtuute-
tussa huollossa.
HUOMIO
Älä säädä kuulokkeiden äänenvoi-
makkuutta liian kovalle, koska jat-
kuva voimakas ääni voi vahingoit-
taa kuuloa. Ota huomioon, että
korva tottuu kovaan ääneen, joka
tuntuu sen jälkeen todellista hiljai-
semmalta, Jos kuuntelet kovaa, älä
enää nosta äänenvoimakkuutta
kun olet tottunut siihen.
Kun laite poistetaan lopullisesti käy-
töstä, vie se paikalliseen kierrätyskes-
kukseen jälkikäsittelyä varten.
Laitteen huolto ja ylläpito
Suojele laitetta pölyltä, värähtelyiltä ja kosteu-
delta. Käytä puhdistamiseen vain kuivaa, peh-
meää kangasta. Älä käytä vettä tai kemikaaleja.
Tiedote koskien levyn lukuhäiriöitä sekä katkok-
sia äänessä:
Laitteeseen kertyvä pöly, tupakansavu yms aiheuttaa
laitteeseen lukuvirheitä. Laitteen saa avata ja huoltaa
vain av-huoltoliike tai sähköalan ammattilainen. Huo-
mioi että kyseessä on normaalisti veloitettava huoltotyö
myös takuuaikana.
Kauko-ohjain
Jos kauko-ohjainta ei käytetä pidempään aikaan,
irrota patteri varmuuden vuoksi, jotta kauko-oh-
jain ei vaurioituisi mikäli patteri sattuisi vuota-
maan.
Käytöstä poistettavat patterit on vie-
tävä niille tarkoitettuihin keräyspis-
teisiin, eikä niitä saa hävittää muun
sekäjätteen mukana.
Kaikki oikeudet pidätetään MONACOR
®
INTERNATIO-
NAL GmbH & Co. KG. Mitään tämän käyttöohjeen osaa
ei saa jäljentää miltään osin käytettäväksi mihinkään
kaupallisiin tarkoituksiin.
Ge akt på säkerhetsinformationen innan enheten
tas i bruk. Skulle ytterliggare information behövas
kan den återfinnas i Manualen för andra språk.
Säkerhetsföreskrifter
Denna enhet uppfyller alla relevanta direktiv
inom EU och har därför fått märkning.
VARNING
Enheten använder farlig nät-
spänning. For att undvika en
elektrisk stöt, öppna aldrig
chassit på egen hand utan över-
låt all service till auktoriserad
verkstad.
•
OBS! Titta aldrig in i spelmekanismen då
luckan är öppen. Laserstrålen kan skada
ögonen.
•
Enheten är endast avsedd för inomhusbruk.
Skydda enheten mot vätskor, hög luftfuktig-
het och hög värme (tillåten omgivningstem-
peratur 0– 40 °C).
•
Placera inte föremål innehållande vätskor,
t.ex. dricksglas, på enheten.
•
Ta omedelbart kontakten ur eluttaget om
något av följande fel uppstår:
1. Enheten eller elsladden har synliga skador.
2. Enheten är skadad av fall e.d.
3. Enheten har andra felfunktioner.
Enheten skall alltid lagas på verkstad av ut-
bildad personal.
•
En skadad elsladd skall endast bytas på verk-
stad.
•
Drag aldrig ut kontakten genom att dra i el-
sladden utan ta tag i kontaktkroppen.
•
Om enheten används för andra ändamål än
avsett, om den kopplas in felaktigt, om den
används på fel sätt eller inte repareras av auk-
toriserad personal upphör alla garantier att
gälla och inget ansvar tas heller för uppkom-
men skada på person eller materiel.
OBS!
Justera aldrig hörlurarna till en
väldigt hög ljudnivå. Permanent
höga volymer kan ge upphov till
hörselskador! Örat vänjer sig vid
höga volymer vilken efter ett tag
inte längre verkar så hög. Därför
bör man ej ytterligare höja voly-
men efter att man vant sig.
Om enheten ska tas ur drift slutgiltigt,
ta den till en lokal återvinningsanlägg-
ning för en avyttring som inte är skad-
ligt för miljön.
Skötsel av enheten
Skydda enheten mot damm, vibrationer och fukt.
Rengör endast med en mjuk och torr trasa, an-
vänd aldrig kemikalier eller vatten vid rengöring.
Notering ang ljud avbrott och läs problem:
Cigarett rök och damm kommer lätt in genom enhe-
tens intag och kan då givetvis sätta sig på det optiska
läshuvudet. Om detta sker och förorsakar ljudstör-
ningar och avbrott så måste enheten rengöras av
kvalificerad personal. Var vänlig att notera att detta
kommer att fakturears även om artikeln befinner sig
inom garantiperioden.
Fjärrkontroll
Om fjärrkontrollen inte ska användas under en
längre tid, ta ur batteriet som en försiktighets-
åtgärd, så att fjärrkontrollen ej att skadas i hän-
delse av att batteriet läcker.
Förbrukade batterier får inte slängas
bland hushållssopor. Lämna alltid in
dem hos uppsamlingsställen (som
t.ex. batteriholkar eller hos er åter-
försäljare).
Alla rättigheter är reserverade av MONACOR
®INTER-
NATIONAL GmbH & Co. KG. Ingen del av denna
instruktionsmanual får eftertryckas i någon form eller
på något sätt användas i kommersiellt syfte.
Suomi
Suomi
Suomi Sivulta
Svenska
Svenska
Svenska Sidan

MONACOR INTERNATIONAL GmbH & Co. KG • Zum Falsch 36 • 28307 Bremen • Germany
Copyright©by MONACOR INTERNATIONAL. All rights reserved.
A-0942.99.03.08.2016
Table of contents
Languages:
Other Monacor MP3 Player manuals

Monacor
Monacor PA-1140RCD User manual

Monacor
Monacor CD-114/BT User manual

Monacor
Monacor PA-1140RCD User manual

Monacor
Monacor CD-112RDS/BT User manual

Monacor
Monacor CD-113 User manual

Monacor
Monacor CD-112/BT User manual

Monacor
Monacor TXA-1020DMP User manual

Monacor
Monacor IMG STAGELINE CD-110T User manual

Monacor
Monacor IMG Stageline DMP-100 User manual

Monacor
Monacor M-32CD User manual