Monacor PA-1140RCD User manual

ELECTRONICS FOR SPECIALISTS ELECTRONICS FOR SPECIALISTS ELECTRONICS FOR SPECIALISTS ELECTRONICS FOR SPECIALISTS
BEDIENUNGSANLEITUNG
INSTRUCTION MANUAL
MODE D’EMPLOI
ISTRUZIONI PER L’USO
MANUAL DE INSTRUCCIONES
INSTRUKCJA OBSŁUGI
VEILIGHEIDSVOORSCHRIFTEN
SIKKERHEDSOPLYSNINGER
SÄKERHETSFÖRESKRIFTER
TURVALLISUUDESTA
CD-/MP3-Spieler-Einschub
mit RDS-Tuner
CD/MP3 Player Insertion
with RDS Tuner
PA-1140RCD
Bestell-Nr. • Order No. 17.3530

ELECTRONICS FOR SPECIALISTS ELECTRONICS FOR SPECIALISTS ELECTRONICS FOR SPECIALISTS ELECTRONICS FOR SPECIALISTS
2
Deutsch ..........Seite 4
English ...........Page 9
Français ..........Page 14
Italiano...........Pagina 19
Español ..........Página 24
Polski ............Strona 29
Nederlands .......Pagina 34
Dansk ............Sida 34
Svenska ..........Sidan 35
Suomi............Sivulta 35

3
LEVEL
EJECT POWER MODE BAND
DISP
INT RPT AF/REG
RDM FPTY
F
TUNE
TRACK
USB
12 3
456
010
PA -1140RCD
IN
ch
1
10 11 12 13 14 15 16 17
2 3 4 5 6 7 8 9
➀
ON OFF
a
d
e
c
b
➁
➂ ➃ ➄
ANT. Terminal
(option)
AM GND 300 Ω
FM 75 Ω
AM GND 300 Ω
FM 75 Ω
ANT

4
Deutsch
English
English Page
Français
Français Page
Italiano
Italiano Pagina
Español
Español Página
Nederlands
Nederlands Pagina
Polski
Polski Strona
Deutsch
Deutsch Seite CD-/MP3-Spieler-Einschub
mit RDS-Tuner
Diese Anleitung richtet sich an Techniker, die das
Modul einbauen, und an Benutzer ohne besondere
Fachkenntnisse. Bitte lesen Sie die Anleitung vor
dem Betrieb gründlich durch und heben Sie sie für
ein späteres Nachlesen auf.
Auf der ausklappbaren Seite 3 finden Sie alle
beschriebenen Bedienelemente und Anschlüsse.
1 Übersicht der Bedienelemente
1 Taste EJECT zum Auswerfen der CD
2
Taste POWER zum Ein- und Ausschalten des
Gerätes
3
Taste MODE zum Umschalten zwischen CD-Wie-
dergabe, MP3-Wiedergabe über den USB-An-
schluss (10) und Radioempfang
4 Taste BAND zum Umschalten der Empfangsbe-
reiche bei Radiobetrieb
5 CD-Einsteckschlitz
6 Stationstaste 1 oder
bei CD/MP3-Betrieb Pause/Start
7 Stationstaste 2 oder
bei CD/MP3-Betrieb Anspielen aller Titel
8 Stationstaste 3 oder
bei CD/MP3-Betrieb Wiederholung des laufen-
den Titels
9
Taste AF/REG für die Funktion Alternativfrequenz
bei RDS-Empfang
10
USB-Anschluss zum Einstecken eines USB-Sticks
11 Tasten TRACK/TUNE
CD/MP3: Zum Weiterspringen auf den nächs-
ten Titel bzw. zum Zurückspringen
auf den vorherigen Titel; bei gedrückt
gehaltener Taste schneller Vor- bzw.
Rücklauf
Radio: Zum Einstellen eines Senders
Um den Sendersuchlauf zu starten,
die entsprechende Taste kurz drücken.
Zur manuellen Sendereinstellung die
Taste oder gedrückt halten, bis
das Display kurz MANUAL signalisiert.
Dann den Sender mit der Taste oder
einstellen.
12
Taste DISP zum Umschalten des Displays auf
verschiedene Informationen (z.B. Uhrzeit, Pro-
grammtyp, ID3-Tags)
13 Display
14
Stationstaste 4 oder bei CD/MP3-Betrieb Zu
-
fallswiedergabe
15
Stationstasten 5 und 6 oder bei CD/MP3-Betrieb
Ordneranwahl
16
Taste PTY zur Auswahl des Programmtyps bei
RDS-Empfang
17 Lautstärkeregler LEVEL
2 Sicherheitshinweise
Das Einschubmodul entspricht allen relevanten Richt-
linien der EU und trägt deshalb das -Zeichen.
•
Verwenden Sie den Einschub nur im Innenbe-
reich. Schützen Sie ihn vor Tropf- und Spritzwas-
ser, hoher Luftfeuchtigkeit und Hitze (zulässiger
Einsatztemperaturbereich 0–40 °C).
•
Nehmen Sie das Gerät mit dem eingebauten Ein-
schub nicht in Betrieb und ziehen Sie den Netz-
stecker sofort aus der Steckdose, wenn:
1.
sichtbare Schäden am Einschub, am Gerät oder
an der Netzanschlussleitung vorhanden sind,
2.
nach einem Sturz oder Ähnlichem der Verdacht
auf einen Defekt besteht,
3. Funktionsstörungen auftreten.
Geben Sie den Einschub oder das komplette Gerät
in jedem Fall zur Reparatur in eine Fachwerkstatt.
•
Verwenden Sie für die Reinigung nur ein weiches,
trockenes Tuch, auf keinen Fall Chemikalien oder
Wasser.
•
Wird der Einschub zweckentfremdet, nicht fach-
gerecht eingebaut, falsch bedient oder nicht
fachgerecht repariert, kann keine Garantie für
das Gerät und keine Haftung für daraus resultie-
rende Sach- oder Personenschäden übernommen
werden.
Soll das Modul endgültig aus dem Betrieb
genommen werden, übergeben Sie es zur
umweltgerechten Entsorgung einem ört-
lichen Recyclingbetrieb.
3 Einsatzmöglichkeiten
Das Einschubmodul ist zum Einbau in MONACOR-
ELA-Verstärker mit einem Einschubschacht und
in MONACOR-Erweiterungsgeräte geeignet, zum
Beispiel:
PA-1120
PA-1240 ELA-Verstärker für 5 Zonen
PA-1200 ELA-Verstärker für 4 Zonen
PA-1200EX Erweiterungsgerät für 2 Module
PA-5240
PA-5480 ELA-Verstärker für 5 Zonen
PA-6240
PA-6480
PA-6600
ELA-Verstärker für 6 Zonen

5
Deutsch
4 Einbau des Einschubmoduls
WARNUNG
Der Einschub darf nur von einer qua
-
lifizierten Fachkraft eingebaut wer-
den. Vor dem Einbau des Einschubs
den Netzstecker des Verstärkers oder
des PA-1200EX aus der Steckdose
ziehen. Anderenfalls besteht die Ge-
fahr eines elektrischen Schlages.
1)
Den Gehäusedeckel des Verstärkers bzw. des
PA-1200EX abnehmen.
2)
Auf der Frontseite des Verstärkers bzw. des
PA-1200EX die Abdeckblende für den Einschub-
schacht abschrauben. Den Einschub einsetzen
und festschrauben.
3)
Die freiliegende dreipolige Leitung des Verstär-
kers bzw. des PA-1200EX in das Stiftgehäuse der
Position cstecken (siehe Abb. 2). Hierüber wird
der Einschub mit 17V (⎓) versorgt und das Audio-
signal zum Verstärker geleitet.
4) Bei Bedarf stehen zwei weitere Audioausgänge
zur Verfügung:
symmetrischer Monoausgang am Anschluss d
asymmetrischem Stereoausgang am Anschluss e
5) Zur Montage der beiliegenden Antennenbuchse
(Abb. 3) auf der Rückseite des Verstärkers bzw.
des PA-1200EX die Abdeckblende (Abb. 4) ab-
schrauben oder das Abdeckblech (Abb. 5) her-
austrennen. Die Antennenbuchse in die Öffnung
einsetzen und festschrauben.
6)
Die Leitung der eingesetzten Antennenbuchse
in das fünfpolige Stiftgehäuse der Position aste-
cken.
7) Der Einschub PA-1140RCD besitzt eine Speicher-
batterie, damit die Sender auch bei ausgeschal-
tetem Gerät gespeichert bleiben. Die Speicher-
batterie ist im Auslieferungszustand deaktiviert,
um eine allmähliche Entladung bis zum Einbau
zu verhindern. Zum Aktivieren der Batterie die
Brücke bin die Position ON setzen.
Soll die Batterie wieder deaktiviert werden
(z.B. bei einer längeren Lagerung), die Brücke b
in die Position OFF setzen.
8)
Den Verstärker bzw. den PA-1200EX mit dem
Gehäusedeckel wieder verschließen. An die An-
tennenbuchse (Abb. 3) die Empfangsantenne
anschließen. Sollen sowohl eine UKW- als auch
eine Mittelwellenantenne angeschlossen werden,
müssen diese über eine Antennenweiche an die
Buchse ANT angeschlossen werden.
5 Bedienung
1)
Den Verstärker bzw. den PA-1200EX mit dem
Netzschalter einschalten und das Einschubmodul
mit der Taste POWER (2).
2)
Mit dem Lautstärkeregler LEVEL (17) die ge-
wünschte Lautstärke einstellen.
3)
Zum Ausschalten die Taste POWER erneut be-
tätigen.
5.1 Bedienung des CD/MP3-Spielers
Mit dem Gerät können Audio-CDs, selbst gebrannte
Audio-CDs (CD-R) sowie CDs mit Titeln im MP3-For-
mat abgespielt werden. Bei wiederbeschreibbaren
CDs (CD-RW) kann es jedoch je nach CD-Typ, ver-
wendetem CD-Brenner und Brennprogramm beim
Abspielen zu Problemen kommen.
Über den USB-Anschluss lassen sich auch
MP3-Dateien von einem USB-Stick abspielen.
Hinweis: Aufgrund der Vielfalt von Speicher-Herstellern
und Gerätetreibern kann nicht garantiert werden, dass alle
Speichermedien mit dem MP3-Spieler kompatibel sind.
5.1.1 Musiktitel abspielen
1) Eine CD mit der Beschriftung nach oben so weit
in den Einsteckschlitz (5) schieben, bis sie automa-
tisch eingezogen wird. Falls sich bereits eine CD im
Gerät befindet, zeigt das Display das Symbol
IN
.
Zum Wechseln einer CD die Taste EJECT (1)
drücken. Die CD fährt heraus. Wird die CD nicht
entnommen, zieht das Gerät die CD nach einigen
Sekunden wieder hinein.
2) Alternativ oder zusätzlich kann ein USB-Stick in
den Anschluss USB (10) gesteckt werden.
3)
Nach dem Ladevorgang startet der erste Titel. Bei
Standard-Audio-CDs zeigt das Display die Titel-
nummer und die bereits gespielte Zeit (Min.:Sek.)
an.
IN
Bei Titeln im MP3-Format wird der Dateiname
durchlaufend angezeigt und nach einem Durch-
lauf hinter dem Buchstaben „T“ die Titelnummer.
Durch mehrfaches Drücken der Taste DISP (12)
können Informationen über den Titel des Musik-
stücks, des Albums, über den Interpreten etc. (ID3-
Tags) im Display angezeigt werden. Sind keine ID3-
Tags vorhanden, signalisiert das Display NO ID3.
Hinweis: Bei der Wiedergabe von einer CD oder einem
USB-Stick werden durch Drücken der Taste DISP auch
Informationen zum eingestellten Sender angezeigt,
siehe Kapitel 5.2.3, Absatz Informationen. Darum die
Taste DISP so oft betätigen, bis die gewünschte Infor-
mation im Display erscheint.
4)
Nach dem Abspielen des letzten Titels startet das
Gerät wieder den ersten Titel (Endloswiedergabe).

6
Deutsch
5)
Zum Unterbrechen der Wiedergabe die Taste
II (6) drücken. Das Display signalisiert S-PAUSE.
Durch erneutes Drücken der Taste
II wird die
Wiedergabe fortgesetzt.
6) Zum Umschalten zwischen der Wiedergabe von
der CD, vom USB-Stick und dem Radioempfang
die Taste MODE (3) drücken.
5.1.2 Titel und Ordner anwählen
1)
Mit den Tasten TRACK (11) den gewünschten
Titel anwählen.
Taste
I: bei jedem Antippen springt das Gerät
einen Titel weiter.
Taste I: kurz gedrückt – das Gerät springt auf
den Titelanfang;
mit jedem weiteren Antippen der Taste wird
immer ein Titel weiter zurückgesprungen.
2)
Sind die Titel in verschiedene Ordner (Dateien-
verzeichnisse) einsortiert, lassen sich die Ordner
mit den Tasten Fund F
(15) anwählen. Der
Name des angewählten Ordners erscheint einmal
durchlaufend im Display.
Nach der Anwahl des Ordners startet immer
der erste Titel des Ordners. Zum Anwählen eines
anderen Titels die Tasten TRACK (11) verwenden.
Mit der Taste
Ikann auch vom letzten Titel eines
Ordners auf den ersten Titel des nächsten Ordners
gesprungen werden und mit der Taste Ivom
ersten Titel eines Ordners auf den letzten Titel
des vorherigen Ordners.
Hinweis: Die Titel werden in folgender Reihenfolge
abgespielt, wenn sie in verschiedene Ordner einsortiert
sind:
1. alle Titel ohne Ordner
2. alle Titel in Ordnern auf der Hauptebene
3. alle Titel in Unterordnern usw.
Das Anwählen von Ordnern und die Nummerierung
der Titel erfolgt ebenfalls in dieser Reihenfolge.
5.1.3 Schneller Vor- und Rücklauf
Bei gedrückt gehaltener Taste
I(11) läuft der
CD-Spieler vor und bei gedrückt gehaltener Taste
Izurück.
Bei Titeln im MP3-Format kann mit dem Vor- und
Rücklauf nicht über mehrere Titel gefahren werden.
Am Ende oder Anfang eines Titels schaltet das Gerät
trotz gedrückt gehaltener Taste (11) auf normale
Wiedergabe zurück.
5.1.4 Kurzes Anspielen der Titel
Alle Titel können für jeweils 10 Sekunden angespielt
werden.
1)
Die Taste INT (7) drücken. Im Display erschei-
nen S-INT und die Titelnummer. Bei Titeln im
MP3-Format wird dazu im Wechsel der Dateiname
durchlaufend angezeigt. Wenn der momentane
Titel schon länger als 10 Sekunden läuft, springt
das Gerät auf den nächsten Titel.
2) Sollen nur die Titel im angewählten Ordner an-
gespielt werden, beim Einschalten der Anspiel-
funktion die Taste INT länger als 3 Sek. drücken,
sodass im Display kurz D-INT (directory intro)
angezeigt wird.
3)
Zum Ausschalten der Funktion die Taste INT
erneut drücken. Die Anzeige S-INT bzw. D-INT
erlischt und der gerade angespielte Titel wird
weiter abgespielt. Die Funktion wird auch durch
Betätigen der Taste RPT (8) oder RDM (14) aus-
geschaltet.
5.1.5 Wiederholtes Abspielen von Titeln
1)
Den zu wiederholenden Titel mit der Taste I
oder
I(11) anwählen und anschließend die
Taste RPT (8) drücken. Im Display erscheinen die
Anzeige S-RPT und die Titelnummer. Bei Titeln
im MP3-Format wird dazu im Wechsel der Datei-
name durchlaufend angezeigt. Der Titel wird end-
los wiederholt.
2) Sollen alle Titel im angewählten Ordner wieder-
holt werden, beim Einschalten der Wiederhol-
funktion die Taste RPT länger als 3 Sek. drücken,
sodass im Display kurz D-RPT (directory repeat)
angezeigt wird.
3) Zum Ausschalten der Funktion die Taste RPT er-
neut drücken. Die Anzeige S-RPT bzw. D-RPT
erlischt. Die Funktion wird auch durch Betätigen
der Taste INT (7) oder RDM (14) ausgeschaltet.
5.1.6 Zufallswiedergabe
Bei der Zufallswiedergabe werden die Titel nicht in
aufsteigender Titelfolge abgespielt, sondern in einer
durch das Gerät zufällig ausgewählten Reihenfolge.
1)
Die Taste RDM (14) drücken. Das Gerät wählt
zufallsbedingt den nächsten Titel aus. Im Display
erscheinen die Anzeige S-RDM und die Titel-
nummer. Bei Titeln im MP3-Format wird dazu im
Wechsel der Dateiname durchlaufend angezeigt.
2)
Sollen nur die Titel im angewählten Ordner in
zufälliger Reihenfolge gespielt werden, beim Ein-
schalten der Zufallswiedergabe die Taste RDM
länger als 3 Sek. drücken, sodass im Display kurz
D-RDM (directory random) angezeigt wird.
3)
Zum Ausschalten der Zufallswiedergabe die Taste
RDM erneut drücken. Die Anzeige S-RDM bzw.
D-RDM erlischt. Die Funktion wird auch durch
Betätigen der Taste INT (7) oder RPT (8) ausge-
schaltet.

7
Deutsch
5.1.7 Hinweis zu Tonaussetzern und Lesefehlern
Zigarettenrauch und Staub dringen leicht durch alle
Öffnungen des Gerätes und setzen sich auch auf der
Optik des Laser-Abtastsystems ab. Sollte dieser Belag
zu Lesefehlern und Tonaussetzern führen, muss das
Gerät in einer Fachwerkstatt gereinigt werden. Diese
Reinigung ist kostenpflichtig, auch während der
Garantiezeit!
5.2 Bedienung des Tuners
Sobald eine CD eingeschoben oder ein USB-Stick
eingesteckt wird, schaltet das Gerät automatisch auf
die Wiedergabe von der CD bzw. von dem USB-Stick
um. Mit der Taste MODE (3) lässt sich dann zwischen
Radioempfang und Wiedergabe von der CD bzw.
von dem USB-Stick umschalten.
5.2.1 Sender einstellen und speichern
Mit dem Tuner können UKW- und Mittelwellensen-
der empfangen werden. Damit sich mit den sechs
Stationstasten (6, 7, 8, 14, 15) mehr als sechs Sender
speichern lassen, ist der UKW-Bereich in drei identi-
sche Unterbereiche aufgeteilt. In den drei Unterberei-
chen (F1, F2, F3) und im Mittelwellenbereich (MW)
können jeweils sechs Sender gespeichert werden,
somit insgesamt 18 UKW- und 6 Mittelwellensender.
1)
Mit der Taste BAND (4) auf den gewünschten
Bereich schalten. Am übersichtlichsten ist es,
zuerst im Bereich F1 sechs Sender zu speichern
und dann auf den Bereich F2 umzuschalten und
danach auf F3.
2)
Ein Sender lässt sich mit dem Sendersuchlauf fin-
den oder manuell einstellen:
Zum Starten des Sendersuchlaufs die Taste (11)
(vorwärts) oder (rückwärts) kurz drücken. Der
Sendersuchlauf läuft bis zum nächsten Sender.
Während des Suchlaufs zeigt das Display SEARCH
an. Den Suchlauf so oft erneut starten, bis der
gewünschte Sender empfangen wird.
Zur manuellen Sendereinstellung die Taste
oder
gedrückt halten, bis im Display kurz MANUAL
angezeigt wird. Danach lässt sich die Empfangs-
frequenz mit jedem Tastendruck schrittweise erhö-
hen oder verringern (im UKW-Bereich um 50kHz,
im Mittelwellenbereich um 9kHz). Um manuell
schnell einen großen Bereich zu durchlaufen, die
Taste oder gedrückt halten. Nach dem ma-
nuellen Einstellen schaltet das Gerät nach einigen
Sekunden wieder auf automatischen Suchlauf
um, wenn nicht zuvor die Taste oder erneut
gedrückt wird. Das Display signalisiert kurz AUTO.
3)
Ist der Sender eingestellt, die gewünschte Ziffern-
taste (6, 7, 8, 14, 15) so lange gedrückt halten,
bis rechts im Display die Stationsnummer und die
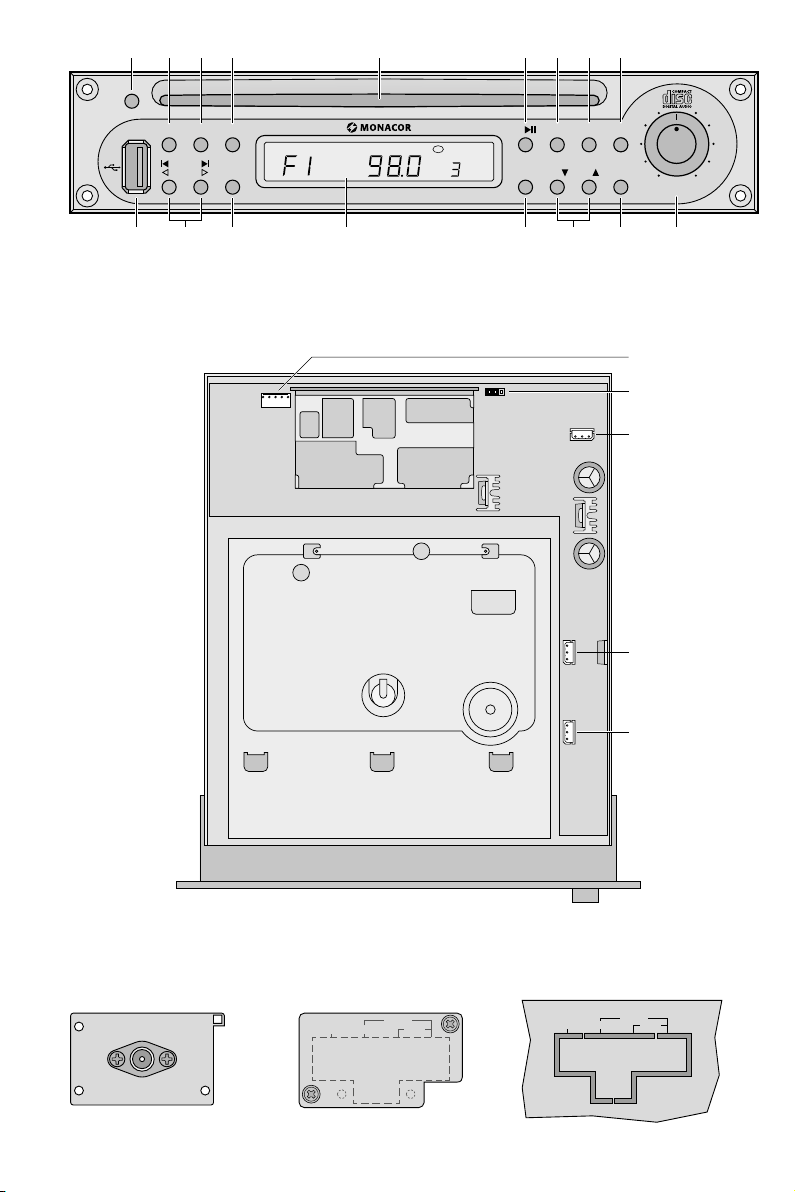
Anzeige „ch“ erscheinen (siehe Abb. 1). Der Sen-
der ist dann unter dieser Nummer im jeweiligen
Unterbereich abgespeichert.
5.2.2 Gespeicherte Sender aufrufen
1)
Mit der Taste BAND (4) den Bereich wählen, in
dem der gewünschte Sender gespeichert wurde.
2)
Die Stationsnummer des Senders mit der entspre-
chenden Zifferntaste (6, 7, 8, 14, 15) wählen.
3)
Mit dem Lautstärkeregler LEVEL (17) die ge-
wünschte Lautstärke einstellen.
4) Bei einer Stereosendung erscheint oben links im
Display ST.
5.2.3 RDS-Funktionen
Strahlt der gewählte Sender RDS-Informationen
(radio data system) aus, wird im Display der Sen-
dername anstelle der Frequenz angezeigt. Einige
Sender geben im Wechsel mit dem Sendernamen zu-
sätzliche Informationen an, z.B. Musiktitel, Interpret.
Bietet ein Sender Verkehrsfunk an, erscheint im
Display die Anzeige TP (traffic program). Wird EON
(enhanced other networks) angezeigt und ein Pro-
gramm empfangen, das zurzeit keinen Verkehrsfunk
bietet, schaltet der Tuner automatisch auf ein ande-
res Programm der gleichen Sendeanstalt um, wenn
dort Verkehrsmeldungen durchgegeben werden.
Nach der Verkehrsdurchsage schaltet das Gerät wie-
der auf das vorherige Programm zurück.
Informationen
Mit der Taste DISP (12) lassen sich folgende Infor-
mationen anzeigen:
1. Tastendruck Anzeige der Uhrzeit
Wird keine Uhrzeit gesendet, zeigt das Display
NO CLOCK. Weil die Uhrzeit nicht kontinuierlich
gesendet wird, kann es nach dem Einschalten
des Radios einige Minuten dauern, bis die Uhrzeit
verfügbar ist.
2. Tastendruck Anzeige des Bereichs (F1, F2, F3,
MW) und der Senderfrequenz
3. Tastendruck Anzeige des Programmtyps
Wird vom Sender kein Programmtyp angegeben,
zeigt das Display PTY NONE.
4. Tastendruck Sendername (Grundeinstellung)
Das Display schaltet auch 5 Sek. nach dem letzten
Tastendruck auf die Grundeinstellung zurück.
Diese Informationen lassen sich auch während der
Wiedergabe von einer CD bzw. von einem USB-Stick
mit der Taste DISP anzeigen.
Alternativfrequenzen
Erscheint im Display kontinuierlich AF (nicht blin-
kend), wird das Programm auch auf Alternativfre-
quenzen umliegender Sender ausgestrahlt. Das

8
Deutsch
Gerät wechselt dann automatisch auf den am besten
empfangbaren Sender. Mit der Taste AF/REG (9) lässt
sich diese Funktion ausschalten (AF erlischt) und
wieder einschalten.
Einige Sender strahlen regional zeitweise ein
unterschiedliches Programm aus, z.B. Regional-
nachrichten. Damit beim automatischen Wechsel
auf einen besser empfangbaren Sender auch auf
das gleiche Regionalprogramm umgeschaltet wird,
lässt sich der Regionalprogrammmodus einschalten:
Die Taste AF/REG 3 Sek. gedrückt halten, bis das
Display kurz REG ON signalisiert. Bei eingeschaltem
Modus erscheint die Anzeige REG im Display. Zum
Ausschalten des Modus die Taste AF/REG erneut
3Sek. gedrückt halten, bis das Display kurz REG
OFF signalisiert.
Programmtyp
Mit der Taste PTY (16) lässt sich von den gespei-
cherten Sendern einer auswählen, der gerade Musik
oder Informationen einer bestimmten Rubrik sendet.
Folgende Rubriken können gewählt werden:
Gruppe Musik Gruppe Wort
mit der Stationstaste 1(6) selektierbar
POP M Pop-Musik
ROCK M Rock-Musik
NEWS Nachrichten
AFFAIRS aktuelle Infos
INFO Service-Programm
mit der Stationstaste 2(7) selektierbar
EASY M Unterhaltungs-
musik
LIGHT M leichte Klassik
SPORT Sport
EDUCATE Bildung
DRAMA Hörspiel, Literatur
mit der Stationstaste 3(8) selektierbar
CLASSICS ernste Klassik
OTHER M spezielle Musik
CULTURE Kultur, Gesellschaft
SCIENCE Wissenschaft
VARIED Unterhaltung
mit der Stationstaste 4(14) selektierbar
JAZZ Jazz
COUNTRY Country-Musik
WEATHER Wetter
FINANCE Wirtschaft
CHILDREN Kinderprogramm
mit der Stationstaste 5(15) selektierbar
NATION M Landesmusik
OLDIES Oldies
SOCIAL Soziales
RELIGION Religion
PHONE IN Anrufsendung
mit der Stationstaste 6(15) selektierbar
FOLK M Folklore
TRAVEL Reiseinformationen
LEISURE Freizeit
DOCUMENT Dokumentation
1) Mit der Taste PTY (16) die Funktion Programm-
typ einschalten. Damit ist eine genauere Auswahl
aus der Gruppe Musik möglich. Im Display wird
eine Rubrik aus dieser Gruppe angezeigt. Zum
Umschalten auf die Gruppe Wort die Taste PTY
erneut drücken. Das Display zeigt eine Rubrik aus
dieser Gruppe an. (Beim dritten Tastendruck ist
die Funktion Programmtyp wieder ausgeschaltet.)
2)
Durch (mehrfaches) Drücken der zugehörigen Zif-
ferntaste die gewünschte Rubrik aus der zuvor
gewählten Gruppe selektieren. Das Gerät sucht
unter den gespeicherten Sendern den heraus, der
zurzeit ein Programm in der gewählten Rubrik
ausstrahlt. Während des Suchvorgangs ist der
Ton ausgeschaltet.
Kann das Gerät keinen Sender mit der ge-
wünschten Rubrik finden, blinkt nach einiger
Zeit im Display die Meldung PTY NONE und das
Gerät springt auf den zuletzt eingestellten Sender
zurück.
3)
Um die Funktion Programmtyp auszuschalten und
die gespeicherten Sender wieder mit den zuge-
hörigen Stationstasten aufrufen zu können, die
Taste PTY ein- oder zweimal drücken, sodass im
Display die Senderfrequenz oder der Sendername
angezeigt wird.
6 Technische Daten
Blockschaltbild siehe Seite 37
CD/MP3-Spieler
Klirrfaktor: . . . . . . . . . . . < 0,03%
Störabstand: . . . . . . . . . . > 85 dB
Frequenzgang: . . . . . . . . 10 – 20000 Hz, ±1 dB
Gleichlaufschwankungen: nicht messbar
(quarzgenau)
Tuner
Empfangsfrequenz
FM: . . . . . . . . . . . . . . . 87,5– 108MHz
MW: . . . . . . . . . . . . . . 522 – 1620kHz
HF-Empfindlichkeit
FM: . . . . . . . . . . . . . . . 6dBµV
MW: . . . . . . . . . . . . . . 25 dBµV
Störabstand
FM: . . . . . . . . . . . . . . . > 60dB
MW: . . . . . . . . . . . . . . > 50 dB
Klirrfaktor: . . . . . . . . . . . < 0,5%
Allgemeine Daten
Stromversorgung: . . . . . . 17 V (⎓) über den
ELA-Verstärker oder
über den PA-1200EX
Abmessungen
(B × H × T):. . . . . . . . . . . 195 × 40 × 215 mm
Gewicht:. . . . . . . . . . . . . 1,1kg
Änderungen vorbehalten.
Diese Bedienungsanleitung ist urheberrechtlich für MONACOR ®INTERNATIONAL GmbH & Co. KG geschützt. Eine
Reproduktion für eigene kommerzielle Zwecke – auch auszugsweise – ist untersagt.

9
English
Italiano
Italiano Pagina
Español
Español Página
Nederlands
Nederlands Pagina
Polski
Polski Strona
CD/MP3 Player Insertion
with RDS Tuner
These instructions are intended for technicians in-
stalling the module and for users without any specific
technical knowledge. Please read the instructions
carefully prior to operation and keep them for later
reference.
All operating elements and connections de-
scribed can be found on the fold-out page 3.
1 Operating Elements
1 Button EJECT to eject the CD
2 Button POWER to switch the unit on and off
3
Button MODE to switch between CD replay,
MP3 replay via the USB port (10) and radio re-
ception
4 Button BAND to select the reception bands for
the radio
5 CD slot
6 Station button 1 or
for CD/MP3 operation: Pause/Start
7 Station button 2 or
intro replay of all titles for CD/MP3 operation
8 Station button 3 or
repeat of the current title for CD/MP3 operation
9 Button AF/REG for the function: alternative fre-
quency for RDS reception
10 USB port to insert a USB flash drive
11 Buttons TRACK/ TUNE
CD/MP3: To go to the next title or to go back to
the previous title; fast forward/reverse
with the button kept pressed
Radio: station tuning
To start the automatic station scan,
briefly press the corresponding button.
For manual station scan, keep the
button or pressed until MANUAL
is briefly displayed. Then adjust the
station with the button or .
12 Button DISP to switch the display to various in-
formation (e.g. time, programme type, ID3 tags)
13 Display
14 Station button 4 or random replay for CD/MP3
operation
15 Station buttons 5 and 6 or folder selection for
CD/MP3 operation
16
Button PTY to select the programme type for
RDS reception
17 Volume control LEVEL
2 Safety Notes
The insertion module corresponds to all relevant
directives of the EU and is therefore marked with .
•
The insertion is suitable for indoor use only. Pro-
tect it against dripping water and splash water,
high air humidity and heat (admissible ambient
temperature range 0–40 °C).
•
Do not set the unit with the installed insertion into
operation, and immediately disconnect the mains
plug from the mains socket if
1.
there is visible damage to the insertion, the unit
or to the mains cable,
2. a defect might have occurred after a drop or
similar accident,
3. malfunctions occur.
The insertion or the complete unit must in any
case be repaired by skilled personnel.
•
For cleaning only use a dry, soft cloth; never use
chemicals or water.
•
No guarantee claims for the unit and no liability
for any resulting personal damage or material
damage will be accepted if the insertion is used
for other purposes than originally intended, if it
is not correctly installed or operated or if it is not
repaired in an expert way.
If the insertion is to be put out of opera-
tion definitively, take it to a local recycling
plant for a disposal which is not harmful
to the environment.
3 Applications
The insertion module is suitable for installation into
PA amplifiers from MONACOR with an insertion
compartment and into MONACOR extensions, for
example:
PA-1120
PA-1240 PA amplifier for 5 zones
PA-1200 PA amplifier for 4 zones
PA-1200EX Extension for 2 modules
PA-5240
PA-5480 PA amplifier for 5 zones
PA-6240
PA-6480
PA-6600
PA amplifier for 6 zones
English
English Page

10
English
4 Installation of the
InsertionModule
WARNING The installation of the insertion must
be made by skilled personnel only!
Prior to the installation of the inser-
tion, disconnect the mains plug of the
amplifier or of the PA-1200EX from
the mains socket. Otherwise there is
an electric shock hazard.
1) Remove the housing cover of the amplifier or of
the PA-1200EX.
2)
Screw off the cover for the insertion compart-
ment on the front side of the amplifier or of the
PA-1200EX. Install the insertion and tighten it
with screws.
3) Connect the bare three-pole cable of the ampli-
fier or of the PA-1200EX to the pin housing of
position c(see fig. 2). This allows to supply the
insertion with 17V (⎓) and to feed the audio
signal to the amplifier.
4)
If required, two further audio outputs are available:
balanced mono output at the connection d
unbalanced stereo output at the connection e
5)
To install the supplied antenna jack (fig. 3) on the
rear side of the amplifier or of the PA-1200EX,
unscrew the cover panel (fig. 4) or remove the
cover plate (fig.5). Insert the antenna jack into
the opening and tighten it with screws.
6)
Connect the cable of the inserted antenna jack to
the five-pole pin housing of position a.
7) The insertion PA-1140RCD has a storage battery
so that the stations also remain stored with the
unit switched off. The storage battery has been
deactivated in the factory to prevent discharge
before installation. To activate the battery, set
the jumper bto position ON.
To deactivate the battery again (e.g. if stored
for a longer time), set the jumper bto position
OFF again.
8)
Close the amplifier or the PA-1200EX with the
housing cover. Connect the reception antenna to
the antenna jack (fig. 3). To connect both an FM
antenna and a medium wave antenna, connect
them to the jack ANT via an antenna combiner.
5 Operation
1) Switch on the amplifier or the PA-1200EX with
the mains switch and the insertion module with
the POWER button (2).
2) Adjust the desired volume with the volume con-
trol LEVEL (17).
3) To switch off, press the POWER button again.
5.1 Operation of the CD/MP3 player
It is possible to replay audio CDs including those
you have burnt yourself (CD-R) and CDs with titles
in the MP3 format. In case of rewritable CDs (CD-
RW), however, problems may occur during replay
depending on the CD type, the CD burner and the
burning programme used.
Via the USB port, also MP3 files can be replayed
from a USB flash drive.
Note: Due to the large number of storage device manu-
facturers and device drivers, it cannot be guaranteed that
all storage media are compatible with the MP3 player.
5.1.1 Replaying music titles
1)
Insert a CD with the lettering facing upwards into
the slot (5) until it is automatically retracted. If
there is already a CD in the unit, the display shows
the symbol
IN
.
To change a CD, press the button EJECT (1).
The CD is ejected. If the CD is not removed, the
unit retracts the CD after a few seconds.
2)
Alternatively or additionally, a USB flash drive can
be inserted into the USB port (10).
3)
After loading, the first title starts. For standard
audio CDs, the display shows the title number
and the time already played (min. : sec.).
IN
For titles in the MP3 format, the file name passes
through the display, then the title number is
shown behind the letter “T”. When the button
DISP (12) is pressed repeatedly, information about
the title of the music piece, the album, the artist
etc. (ID3 tags) can be displayed. If no ID3 tags are
available, the display shows NO ID3.
Note: When the button DISP is pressed during the
replay from a CD or USB flash drive, also information
about the station adjusted are displayed, see chap-
ter5.2.3, paragraph “Information”. Press the button
DISP repeatedly until the desired information is dis-
played.
4) When the last title has been played, the unit re-
starts with the first title (continuous replay).
5) To interrupt the replay, press the button
II (6).
The display indicates S-PAUSE. When the button
II is pressed again, the replay will be continued.

11
English
6) To switch between the replay from the CD, the
USB flash drive and the radio reception, press the
button MODE (3).
5.1.2 Selecting title and folder
1)
Select the desired title with the buttons
TRACK(11).
Button
I: each time the button is briefly pressed,
the unit advances one title.
Button I: briefly pressed – the unit goes to the
title beginning;
each time the button is briefly pressed, the unit
goes back one title.
2) If the titles are stored in different folders (file di-
rectories), the folders can be selected with the
buttons Fand F
(15). The name of the selected
folder passes through the display once.
After the selection of the folder, always the
first title of the folder starts. To select another title,
use the buttons TRACK (11). With the button
I,
it is also possible to go from the last title of a
folder to the first title of the next folder, and with
the button I
, from the first title of a folder to the
last title of the previous folder.
Note: When the titles have been stored in different
folders, they are replayed in the following order:
1. All titles without folder
2. All titles in folders in the root directory
3. All titles in subfolders etc.
The folders are selected and the titles are numbered
according to this order as well.
5.1.3 Fast forward and reverse
With the button
I(11) pressed, the CD player ad-
vances and with the button Ipressed, it goes back.
For titles in the MP3 format, it is not possible
to go beyond multiple titles with fast forward and
reverse. At the end or beginning of a title, the unit
switches back to normal replay even if the button
(11) is kept pressed.
5.1.4 Replaying title intros
The first 10 seconds of all titles can be replayed.
1) Press the button INT (7). S-INT and the title num-
ber are displayed. For titles in the MP3 format,
also the file name passes through the display
alternately. When the current title has already
been replayed for more than 10 seconds, the unit
will go to the next title.
2)
To replay the intros only of the titles in the selected
folder, keep the button INT pressed for more than
3seconds while switching on the intro replay
function so that D-INT (directory intro) is briefly
displayed.
3) To switch off the function, press the button INT
again. S-INT or D-INT will not be displayed any
more and the title whose intro is being replayed
will be continued. The function can also be deacti-
vated by means of the button RPT (8) or RDM (14).
5.1.5 Repeated title replay
1)
Select the title to be repeated with the button
I
or
I (11) and then press the button RPT (8).
S-RPT and the title number are displayed. For ti-
tles in the MP3 format, also the file name passes
through the display alternately. The title is con-
tinuously repeated.
2)
To repeat all titles of the selected folder, keep the
button RPT pressed for more than 3 seconds while
switching on the repeat function so that D-RPT
(directory repeat) is briefly displayed.
3) To switch off the function, press the button RPT
again. S-RPT or D-RPT will not be displayed any
more. The function can also be deactivated by
means of the button IN (7) or RDM (14).
5.1.6 Random replay
With random replay, the titles are not replayed in
ascending but in random order.
1) Press the button RDM (14). The unit selects the
next title at random. S-RDM and the title number
are displayed. For titles in the MP3 format, also the
file name passes through the display alternately.
2) To replay only the titles of the selected folder at
random, keep the button RDM pressed for more
than 3 seconds while switching on the random-
replay function so that D-RDM (directory random)
is briefly displayed.
3) To switch off the random-replay function, press
the button RDM again. S-RDM or D-RDM is not
displayed any more. The function can also be de-
activated by means of the button IN (7) or RPT (8).
5.1.7 Note concerning sound interruptions
andreading errors
Cigarette smoke and dust will easily penetrate
through all openings of the unit and also settle on
the optics of the laser sampling system. If this deposit
causes reading errors and sound interruptions, the
unit must be cleaned by skilled personnel. Please
note that there will be a charge on cleaning, even
during the warranty period!

12
English
5.2 Operation of the tuner
Once a CD or a USB flash drive has been inserted,
the unit will automatically be switched to replay from
the CD or USB flash drive. Press the button MODE (3)
to switch between radio reception and replay from
the CD or USB flash drive.
5.2.1 Station tuning and storing
The tuner is able to receive FM and medium wave
stations. To allow storing of more than six stations
with the six station buttons (6, 7, 8, 14, 15), the FM
band has been divided into three identical subbands.
In each of the three subbands (F1, F 2, F3) and in the
medium wave band (MW), six stations can be stored
i.e. a total of 18 FM and 6 medium wave stations.
1)
Select the desired band with the button BAND(4).
It is recommended to store six stations in the band
F1 first and then to switch over to the band F 2
and then to F3.
2)
For station tuning, use either the automatic or
manual station scan:
To start the automatic station scan, briefly press
the button (11) (forward) or (backward). The
automatic station scan stops at the next station.
During the station scan, SEARCH is displayed. Re-
start the station scan repeatedly until the desired
station is received.
For manual station scan, keep the button
or pressed until MANUAL is briefly displayed.
Then the received frequency can be increased
or reduced step by step with each press of the
button (in the FM band by 50kHz, in the medium
wave band by 9kHz). To run quickly through a
great range for manual station scan, keep the but-
ton or pressed. After manual station scan, the
unit switches to automatic station scan again after
a few seconds unless the button
or
has been
pressed again before. AUTO is briefly displayed.
3) When the station has been tuned, keep the de-
sired numerical key (6, 7, 8, 14, 15) pressed until
the station number and “ch” appear on the right
in the display (see fig. 1). Then the station is stored
under this number in the respective subband.
5.2.2 Calling up stored stations
1)
Use the button BAND (4) to select the band in
which the desired station has been stored.
2) Select the number of the station with the corre-
sponding numerical key (6, 7, 8, 14, 15).
3) Adjust the desired volume with the volume con-
trol LEVEL (17).
4)
With a stereo programme, ST appears on the top
left of the display.
5.2.3 RDS functions
If the selected station transmits RDS information
(radio data system), the name of the station is dis-
played instead of the frequency. Some stations show
additional information alternately with the station
name, e.g. music title, artist.
If a station offers traffic programme, TP is dis-
played. If EON (enhanced other networks) is shown
and a programme is received which currently does
not offer a traffic programme, the tuner automat-
ically switches to another programme of the same
broadcasting station when traffic messages are
transmitted there. After the traffic announcement,
the unit switches back to the previous programme.
Information
With the button DISP (12), the following information
can be displayed:
1st press of button time indication
If no time is transmitted, NO CLOCK is displayed.
The time is not transmitted continuously; there-
fore, it may take a few minutes until the time is
available after the radio has been switched on.
2nd press of button indication of the band (F1, F2,
F3, MW) and of the station frequency
3rd press of button indication of the programme
type
If no programme type is indicated by the station,
PTY NONE is displayed.
4th press of button station name (basic setting)
The display switches to the basic setting after
5seconds if no button is pressed.
This information can also be displayed with the
button DISP during the replay from a CD or USB
flash drive.
Alternative frequencies
If AF is continuously displayed (not flashing), the pro-
gramme is also broadcast on alternative frequencies
of neighbouring stations. Then the unit automatically
changes to the station which can be received best.
With the button AF/REG (9), this function can be
switched off (AF will be not be displayed any more)
and switched on again.
Some stations temporarily broadcast a different
programme depending on the region, e. g. regional
news. To make sure that the same regional pro-
gramme will be selected when the unit switches to
a station with better reception, the regional pro-
gramme mode can be switched on. Keep the but-
ton AF/REG pressed for 3 seconds until REG ON is
briefly displayed. With the mode switched on, REG is
displayed. To switch off the mode, keep the button
AF/REG pressed again for 3 seconds until REG OFF
is briefly displayed.

13
English
Programme type
With the button PTY (16) one of the stored stations
can be selected which currently broadcasts music
or information of a special category. The following
categories can be selected:
Music Group Word Group
to be selected with station button 1(6)
POP M Pop music
ROCK M Rock music
NEWS News
AFFAIRS Current affairs
INFO Information
to be selected with station button 2(7)
EASY M Easy listening music
LIGHT M Light classical
music
SPORT Sports
EDUCATE Education
DRAMA Drama
to be selected with station button 3(8)
CLASSICS Serious classical
music
OTHER M Other music
CULTURE Culture
SCIENCE Science
VARIED Varied
to be selected with station button 4(14)
JAZZ Jazz
COUNTRY Country music
WEATHER Weather
FINANCE Finance
CHILDREN Children’s pro-
grams
to be selected with station button 5(15)
NATION M National music
OLDIES Oldies
SOCIAL Social affairs
RELIGION Religion
PHONE IN Phone in
to be selected with station button 6(15)
FOLK M Folk music
TRAVEL Travel
LEISURE Leisure
DOCUMENT Documentary
1)
Switch on the function programme type with the
button PTY (16). Thus, a more detailed selection
of the music group is possible. One category of
this group is displayed. To switch to the word
group, press the button PTY again. The display
shows a category of this group. (With the third
press of the button, the function programme type
is switched off again.)
2) (Repeatedly) press the corresponding numerical
key to select the desired category of the group
chosen before. Among the stored stations, the
unit searches for the station which currently
broadcasts a programme in the selected cate-
gory. During the search, the sound is switched off.
If the unit cannot find a station with the de-
sired category, the message PTY NONE flashes in
the display after some time, and the unit goes to
the station last tuned.
3) To switch off the function programme type and
to be able to call up the stored stations again
with the corresponding station buttons, press
the button PTY once or twice so that the station
frequency or the station name is displayed.
6 Specifications
Block diagram see page 37
CD/MP3 player
THD:. . . . . . . . . . . . . . . . < 0.03%
S/N ratio: . . . . . . . . . . . . > 85dB
Frequency response: . . . . 10–20 000 Hz, ±1dB
Wow and flutter: . . . . . . not measurable
(quartz precision)
Tuner
Received frequency
FM: . . . . . . . . . . . . . . . 87.5– 108MHz
MW: . . . . . . . . . . . . . . 522 – 1620kHz
RF sensitivity
FM: . . . . . . . . . . . . . . . 6dBµV
MW: . . . . . . . . . . . . . . 25 dBµV
S/N ratio
FM: . . . . . . . . . . . . . . . > 60dB
MW: . . . . . . . . . . . . . . > 50 dB
THD:. . . . . . . . . . . . . . . . < 0.5%
General information
Power supply: . . . . . . . . . 17 V (⎓) via the PA
amplifier or via the
PA-1200EX
Dimensions (W × H × D): 195 × 40 × 215mm
Weight: . . . . . . . . . . . . . 1.1kg
Subject to technical modification.
All rights reserved by MONACOR
®INTERNATIONAL GmbH & Co. KG. No part of this instruction manual may be
reproduced in any form or by any means for any commercial use.

14
Français
Deutsch
Deutsch Seite
English
English Page
Italiano
Italiano Pagina
Español
Español Página
Nederlands
Nederlands Pagina
Polski
Polski Strona
Module insert lecteur CD/MP3
avec tuner RDS
Cette notice s’adresse aux techniciens installant
le module et aux utilisateurs sans connaissances
techniques particulières. Veuillez lire la notice avant
l’utilisation et conservez-la pour pouvoir vous y re-
porter ultérieurement. Vous trouverez sur la page
3, dépliable, les éléments et branchements décrits.
1 Eléments
1 Touche EJECT : éjection du CD
2
Touche POWER pour allumer et éteindre l’appareil
3 Touche MODE pour commuter entre lecture de
CD, lecture MP3 via le port USB (10) et récep-
tion radio
4 Touche BAND pour commuter les plages de ré-
ception en mode radio
5 Fente d’insertion du CD
6 Touche de station 1 ou
touche pause/start en mode CD/MP3
7 Touche station 2 ou
lecture des débuts des titres en mode CD/MP3
8 Touche station 3 ou
répétition du titre en cours en mode CD/MP3
9 Touche AF/REG pour la fonction de fréquence
alternative en réception RDS
10 Port USB pour insérer une clé USB
11 Touches TRACK/ TUNE
CD/MP3 :pour aller au titre suivant ou pour reve-
nir au titre précédent ; si la touche est
maintenue enfoncée, avance et retour
rapides
Radio: réglage d’une station
Pour démarrer la recherche de sta-
tions, appuyez brièvement sur la
touche correspondante.
Pour un réglage manuel de stations,
maintenez la touche ou enfoncée
jusqu’à ce que l’affichage indique briè-
vement MANUAL. Réglez ensuite la
station avec la touche ou .
12 Touche DISP pour commuter l’affichage sur des
informations distinctes (par exemple heure, type
de programmation, ID3 Tags)
13 Affichage
14 Touche station 4 ou lecture aléatoire en mode
CD/MP3
15 Touches station 5 et 6 ou sélection de dossiers
en mode CD/MP3
16
Touche PTY pour sélectionner le type de pro-
gramme en réception RDS
17 Réglage de volume
2 Conseils de securité
Le module insert répond à toutes les directives né-
cessaires de l’Union Européenne et porte donc le
symbole .
•
Le module n’est conçu que pour une utilisation en
intérieur. Protégez-le de tout type de projections
d’eau, des éclaboussures, d’une humidité de l’air
élevée et de la chaleur (plage de température de
fonctionnement autorisée : 0– 40 °C).
•
Ne faites pas fonctionner l’appareil avec le module
installé et débranchez immédiatement la fiche
secteur dans les cas suivants :
1. le module, l’appareil ou le cordon secteur pré-
sente des dommages.
2.
après une chute, l’appareil présente un défaut.
3. des dysfonctionnements apparaissent.
Dans tous les cas, les dommages sur le module
ou l’appareil complet doivent être réparés par un
technicien spécialisé.
•
Pour nettoyer, utilisez un chiffon sec, en aucun
cas de produits chimiques ou d’eau.
•
Nous déclinons toute responsabilité en cas de
dommages matériels ou corporels consécutifs si
le module est utilisé dans un but autre que celui
pour lequel il a été conçu, s’il n’est pas correc-
tement installé ou utilisé ou s’il n’est pas réparé
par une personne habilitée ; de même, la garantie
deviendrait caduque.
Lorsque le module est définitivement re-
tiré du service, vous devez le déposer dans
une usine de recyclage de proximité pour
contribuer à son élimination non polluante.
CARTONS ET EMBALLAGE
PAPIER À TRIER
3 Possibilités d’utilisation
Le module insert peut être inséré dans des amplifica-
teurs Public Adress MONACOR avec compartiment
pour module et dans des appareils complémentaires
MONACOR, par exemple :
PA-1120
PA-1240
Amplificateur Public Adress pour
5zones
PA-1200 Amplificateur Public Adress pour
4zones
PA-1200EX Appareil complémentaire pour
2modules
PA-5240
PA-5480
Amplificateur Public Adress pour
5zones
PA-6240
PA-6480
PA-6600
Amplificateur Public Adress pour
6zones
Français
Français Page

15
Français
4 Montage du module
AVERTIS-
SEMENT
Seul un personnel habilité peut
effectuer l’installation du module.
Avant de monter le module, veiller
à retirer le cordon d’alimentation de
la prise secteur de l’amplificateur ou
du PA-1200EX. Sinon il y a risque de
dé charge électrique.
1) Retirez le couvercle du boîtier de l’amplificateur/
du PA-1200EX.
2)
Sur la face avant de l’amplificateur/du PA-1200EX,
dévissez le cache du compartiment du module.
Placez ce dernier et vissez-le.
3) Mettez le câble lâche 3 pôles de l’amplificateur/
du PA-1200EX dans le boîtier de connexion de la
position c(schéma 2). Le module est ici alimenté
avec une tension 17V (⎓) et le signal audio est
dirigé vers l’amplificateur.
4) Si besoin, deux autres sorties audio sont dispo-
nibles :
sortie mono symétrique à la connexion d
sortie stéréo asymétrique à la connexion e
5)
Pour monter la prise d’antenne livrée (schéma3) sur
la face arrière de l’amplificateur/du PA-1200EX,
dévissez la plaque de protection (schéma4) ou
retirez la plaque métallique(schéma 5). Insérez
la prise d’antenne dans l’ouverture et vissez-la.
6)
Mettez le câble de la prise d’antenne installée
dans le boîtier de connexion 5 pôles de la po-
sition a.
7)
Le module PA-1140RCD possède une batterie
de mémoire pour que les positions des stations
restent enregistrées même si l’appareil est dé
-
branché. Cette batterie est désactivée à la sortie
d’usine pour éviter qu’elle ne se décharge lente-
ment jusqu’à ce qu’elle soit placée. Pour activer
la batterie, mettez le cavalier bsur ON.
Si la batterie doit être désactivée à nouveau
(par exemple en cas de stockage prolongé), met-
tez le cavalier bsur la position OFF.
8) Refermez le couvercle de l’amplificateur/du PA-
1200EX avec le couvercle. Reliez l’antenne de
réception à la prise d’antenne (schéma 3). Pour
relier à la fois une antenne FM et une antenne
ondes moyennes, reliez-les à la prise ANT via un
combinateur d’antenne.
5 Utilisation
1)
Allumez l’amplificateur/ le PA-1200EX avec l’in-
terrupteur secteur puis le module avec la touche
POWER (2).
2) Réglez le volume souhaité avec le potentiomètre
LEVEL (17).
3) Pour éteindre, appuyez une nouvelle fois sur la
touche POWER.
5.1 Utilisation du lecteur CD/MP3
Avec cet appareil, on peut lire des CDs audio, des
CDs audio gravés (CD-R) et des CDs avec des titres
au format MP3. Lors de la lecture de CD réinscrip-
tibles (CD-RW), selon le type de CD, de graveur de
CD utilisé et de programme de gravure, on peut
rencontrer des problèmes lors de la lecture.
Via le port USB, on peut également lire des
fichiers MP3 depuis une clé USB.
Note : En raison de la multitude de fabricants de cartes
mémoires et de drivers d’appareils, il n’est pas possible de
garantir que tous les supports de mémoire soient compa
-
tibles avec le lecteur MP3.
5.1.1 Lecture de titres de musique
1)
Insérez un CD, inscription vers le haut dans la
fente (5) jusqu’à ce qu’il soit automatiquement
entré. S’il y a déjà un CD dans l’appareil, l’affi-
chage indique le symbole
IN
.
Pour changer un CD, appuyez sur la touche
EJECT (1). Le CD est éjecté. Si vous ne le retirez
pas, l’appareil le fait rentrer automatiquement
après quelques secondes.
2) A la place ou en plus, on peut brancher une clé
USB dans le port USB (10).
3) Une fois le processus de chargement terminé, le
premier titre démarre. Pour des CDs audio stan-
dards, l’affichage indique le numéro du titre et la
durée déjà lue (minutes, secondes).
IN
Pour des titres au format MP3, le nom du fichier
défile sur l’affichage, puis derrière la lettre «T»,
le numéro du titre. En appuyant plusieurs fois sur
la touche DISP (12), on peut afficher des infor-
mations sur le titre du morceau de musique, de
l’album, l’interprète ... (ID-3Tags). S’il n’y a pas de
ID3-Tags, l’affichage indique NO ID3.
Note : Lors de la lecture d’un CD ou d’une clé USB,
des informations sur la station réglée sont également
affichées en appuyant sur la touche DISP, voir chapitre
5.2.3, point Informations. Appuyez sur la touche DISP
jusqu’à ce que l’information souhaitée soit visible sur
l’affichage.

16
Français
4)
Une fois le dernier titre lu, l’appareil redémarre le
premier (lecture continue).
5)
Pour interrompre la lecture, appuyez sur la touche
II (6). L’affichage indique S-PAUSE. Par une
nouvelle pression sur la touche
II, la lecture est
poursuivie.
6)
Pour commuter entre lecture du CD, de la clé
USB et la réception radio, appuyez sur la touche
MODE (3).
5.1.2 Sélection des titres et dossiers
1)
Avec les touches TRACK (11), sélectionnez le titre
souhaité :
touche
I: à chaque pression, l’appareil saute
au titre suivant
touche I: brièvement enfoncée : l’appareil re-
vient au début du titre ; à chaque nouvelle pres-
sion, le lecteur recule toujours d’un titre.
2) Si les titres sont classés dans différents dossiers
(répertoires de données), on peut sélectionner
les dossiers avec les touches F
et F
(15). Le
nom du dossier sélectionné défile une fois sur
l’affichage.
Une fois le dossier sélectionné, le premier titre
du dossier démarre toujours. Pour sélectionner
un autre titre, utilisez les touches TRACK (11).
Avec la touche
I, on peut sauter du dernier titre
d’un dossier au premier titre du dossier suivant et
avec la touche I, du premier titre d’un dossier
au dernier titre du dossier précédent.
Note : Les titres sont lus dans l’ordre suivant lorsqu’ils
sont listés dans différents dossiers :
1. tous les titres sans dossier
2. tous les titres dans les dossiers du répertoire principal
3. tous les titres dans les sous-répertoires etc.
Les répertoires sélectionnés et les titres sont également
numérotés selon cet ordre.
5.1.3 Avance et retour rapides
Si vous maintenez la touche
I(11) enfoncée, le
lecteur CD avance, si vous maintenez la touche I
enfoncée, il recule.
Pour des titres au format MP3, on ne peut pas
aller sur plusieurs titres avec l’avance et retour rapide.
A la fin ou au début du titre, l’appareil revient à la
lecture normale même si la touche (11) est mainte-
nue enfoncée.
5.1.4 Lecture des intros des titres
Il est possible d’écouter les intros de tous les titre
pendant 10 secondes respectivement.
1)
Enfoncez la touche INT (7), l’affichage indique
S-INT et le numéro du titre. Pour des titres au for-
mat MP3, le nom du fichier défile sur l’affichage
à la place. Si le titre actuellement en cours a été
lu plus de 10 secondes, l’appareil passe au titre
suivant.
2) Si seuls les débuts des titres dans le dossier sé-
lectionné doivent être lus, appuyez sur la touche
INT plus de trois secondes lorsque vous activez la
fonction de la lecture des intros des titres, de telle
sorte que sur l’affichage D-INT (directory intro)
s’affiche brièvement.
3)
Pour déconnecter la fonction, enfoncez une nou-
velle fois la touche INT ; S-INT ou D-INT n’est plus
visible, la lecture du titre en cours se poursuit. La
fonction est déconnectée lorsque les touches RPT
(8) ou RDM (14) sont activées.
5.1.5 Répétition d’un titre
1)
Sélectionnez le titre à répéter avec la touche
Iou
I(11) et appuyez sur la touche RPT (8).
Sur l’affichage, S-RPT et le numéro du titre sont
visibles. Pour des titres au format MP3, le nom du
fichier est affiché en continu à la place. Le titre
est répété en boucle.
2)
Si tous les titres dans le dossier sélectionné doivent
être répétés, appuyez sur la touche RPT plus de
trois secondes lorsque vous activez la fonction de
répétition, de telle sorte que sur l’affichage D-RPT
(directory repeat) s’affiche brièvement.
3) Pour déconnecter cette fonction, enfoncez une
nouvelle fois la touche RPT; S-RPT ou D-RPT n’est
plus visible sur l’affichage. La fonction est égale-
ment déconnectée lorsque les touches INT(7) ou
RDM (14) sont activées.
5.1.6 Lecture aléatoire
Lors de la lecture aléatoire, les titres ne sont pas lus
dans l’ordre d’enregistrement mais dans un ordre
arbitraire sélectionné par l’appareil.
1)
Enfoncez la touche RDM (14). L’appareil sélec-
tionne de manière arbitraire le titre suivant. Sur
l’affichage, S-RDM et le numéro du titre sont vi-
sibles. Pour des titres au format MP3, le nom du
fichier défile sur l’affichage à la place.
2)
Si seuls les titres dans le dossier sélectionné
doivent être lus dans un ordre aléatoire, appuyez
sur la touche RDM plus de trois secondes lorsque
vous activez la fonction de reproduction aléatoire,
de telle sorte que sur l’affichage D-RDM (directory
random) s’affiche brièvement.
3) Pour déconnecter cette fonction, enfoncez une
nouvelle fois la touche RDM; S-RDM ou D-RDM
n’est plus visible sur l’affichage. La fonction est
également déconnectée lorsque les touches INT
(7) ou RPT (8) sont activées.

17
Français
5.1.7 Remarques sur les coupures du son et
leserreurs de lecture
La fumée de cigarettes et la poussière s’introduisent
facilement dans les ouvertures du lecteur et se dé-
posent sur l’optique du système laser. Cela peut
générer des erreurs de lecture et des coupures de
son, donc, le nettoyage du lecteur doit être confié
à un technicien spécialisé. Cette opération est à la
charge de l’utilisateur, même lorsque l’appareil est
sous garantie !
5.2 Utilisation du tuner
Dès qu’un CD est inséré ou une clé USB placée, l’ap-
pareil commute automatiquement sur la lecture du
CD ou de la clé USB. Avec la touche MODE (3), vous
pouvez commuter entre réception radio et lecture
de CD ou de la clé USB.
5.2.1 Réglage et mémorisation de la station
Avec le tuner, vous pouvez recevoir des stations FM
et AM. Pour pouvoir mémoriser plus de six stations
avec les 6 touches (6, 7, 8, 14, 15), la plage FM est
divisée en trois sous-plages identiques. Dans les trois
sous-plages (F 1, F 2, F 3), et la plage AM (MW), six
stations peuvent respectivement être mémorisées,
soit un total de 18 stations FM et 6 stations AM.
1)
Avec la touche BAND (4), sélectionnez la plage
souhaitée ; il est recommander de mémoriser les
6 stations dans la plage FM 1, puis passez dans
la plage FM 2 puis FM 3.
2) Vous avez le choix entre une recherche automa-
tique ou manuelle des stations pour trouver une
station:
Démarrez la recherche de stations par une brève
pression sur la touche (11)
(avant) ou
(arrière).
La recherche automatique s’arrête dès que la sta-
tion suivante est trouvée. Pendant la recherche,
l’affichage indique SEARCH. Refaites la recherche
jusqu’à ce que la station souhaitée soit reçue.
Pour une recherche manuelle des stations, main-
tenez la touche ou enfoncée jusqu’à ce que
MANUAL soit visible brièvement sur l’affichage.
La fréquence de réception peut être augmentée
ou diminuée par palier à chaque pression sur la
touche (dans la plage FM de 50kHz, dans la plage
AM de 9kHz). Pour faire défiler rapidement ma-
nuellement une plage plus grande, maintenez
la touche ou enfoncée. Après le réglage
manuel, l’appareil commute après quelques
secondes, à nouveau sur la recherche automa-
tique si la touche ou n’a auparavant pas été
enfoncée. L’affichage indique brièvement AUTO.
3)
Lorsque la station est trouvée, maintenez la
touche numérique souhaitée (6, 7, 8, 14, 15)
enfoncée jusqu’à ce que sur l’affichage à droite,
le numéro de la station et «ch» soient visibles
(schéma 1). La station est alors mémorisée sous
ce numéro dans la sous-plage correspondante.
5.2.2 Appel des stations mémorisées
1)
Avec la touche BAND (4), sélectionnez la plage
dans laquelle se trouve la station souhaitée.
2)
Sélectionnez le numéro de la station avec la touche
numérique correspondante (6, 7, 8, 14,15).
3) Réglez ensuite le volume avec le réglage LEVEL
(17).
4) Pour une émission stéréo, ST s’affiche en haut à
gauche sur l’affichage.
5.2.3 Fonctions RDS
Si la station sélectionnée émet des informations RDS
(radio data system), sur l’affichage le nom de la sta-
tion s’affiche à la place de la fréquence. Certaines
stations donnent des informations supplémentaires,
par exemple titre, interprète, en alternance avec le
nom de la station.
Si une station propose des informations trafic,
TP (trafic program) s’affiche. Si EON (enhanced other
networks) s’affiche et si un programme qui ne pro-
pose pas d’information trafic à cet instant, est reçu,
le tuner commute automatiquement sur un autre
programme de la même station où des informations
trafic sont données. Après l’annonce de trafic, l’ap-
pareil revient au programme précédent.
Informations
Avec la touche DISP (12), on peut afficher les infor-
mations suivantes :
1. pression affichage de l’heure
si aucune heure n’est émise, l’affichage indique
NO CLOCK. Parce que l’heure n’est pas émise
en continu, cela peut prendre plusieurs minutes
après l’allumage de la radio jusqu’à ce que l’heure
soit disponible.
2. pression affichage de la plage (F 1, F2, F 3, MW)
et la fréquence d’émission
3. pression affichage du type de programme
Si aucun type de programme n’est donné par la
station, l’affichage indique PTY NONE.
4. pression nom de la station (réglage de base)
L’affichage revient également sur le réglage de
base 5 secondes après la dernière pression sur
la touche.
Ces informations peuvent également être affichés
pendant la lecture d’un CD ou d’une clé USB avec
la touche DISP.

18
Français
Fréquences alternatives
Si sur l’affichage, AF est visible en continu (non
clignotant), le programme est diffusé sur des fré-
quences alternatives de stations voisines. L’appareil
change automatiquement sur la station à la meilleure
réception. Avec la touche AF/REG (9), cette fonction
peut être déconnectée (AF s’éteint) et rallumée.
Certaines stations émettent, selon les régions,
des programmes différents, par exemple des infor-
mations régionales. Pour une commutation automa-
tique sur une station avec une meilleure réception
et à la fois pour commuter sur le même programme
régional, le mode Programme régional peut être
activé : maintenez la touche AF/REG enfoncée 3se-
condes jusqu’à ce que REG ON soit visible briève-
ment sur l’affichage. Lorsque le mode est activé, REG
est visible sur l’affichage. Pour désactiver le mode,
maintenez à nouveau la touche AF/REG enfoncée
pendant 3 secondes jusqu’à ce que l’affichage in-
dique brièvement REG OFF.
Type de programme
Avec la touche PTY (16), on peut sélectionner une
des stations mémorisées qui envoie de la musique
ou des informations sur une rubrique donnée. On
peut sélectionner les rubriques suivantes :
Groupe Musique Groupe Mots
sélectionnable avec la touche station 1(6)
POP M Pop
ROCK M Rock
NEWS Informations
AFFAIRS Infos actuelles
INFO Programme service
sélectionnable avec la touche station 2(7)
EASY M Musique divertisse-
ment
LIGHT M Musique classique
légère
SPORT Sport
EDUCATE Formation
DRAMA Littérature
sélectionnable avec la touche station 3(8)
CLASSICS Musique classique
OTHER M Musique spécifique
CULTURE Culture, société
SCIENCE Science
VARIED Divertissement
sélectionnable avec la touche station 4(14)
JAZZ Jazz
COUNTRY Country
WEATHER Météo
FINANCE Economie
CHILDREN Programme enfants
sélectionnable avec la touche station 5 (15)
NATION M Musique nationale
OLDIES Rétro
SOCIAL Sujets sociaux
RELIGION Religion
PHONE IN Emissions avec
appel public
sélectionnable avec la touche station 6 (15)
FOLK M Folklore
TRAVEL Informations
voyage
LEISURE Temps libre
DOCUMENT Documentation
1) Avec la touche PTY (16), allumez la fonction de
type de programme. Une sélection plus précise
du groupe musique est ainsi possible. Sur l’affi-
chage, une rubrique de ce groupe est affichée.
Pour commuter sur le groupe mots, enfoncez une
nouvelle fois la touche PTY. L’affichage indique
une rubrique de ce groupe. (Par une troisième
pression, la fonction est désactivée).
2)
Par une pression (plusieurs pressions) sur la touche
numérique correspondante, sélectionnez la ru-
brique du groupe précédemment sélectionné.
L’appareil recherche parmi les stations mémo-
risées celle qui diffuse un programme dans la
catégorie choisie. Pendant la recherche, le son
est coupé.
Si l’appareil ne peut trouver aucune station
avec la rubrique souhaitée, le message PTY NONE
clignote sur l’affichage après quelque temps et
l’appareil revient à la dernière station réglée.
3)
Pour désactiver la fonction de type de programme,
et pouvoir appeler les stations mémorisées avec
les touches de stations correspondantes, appuyez
une ou deux fois sur la touche PTY de telle sorte
que sur l’affichage, la fréquence de la station ou
le nom de la station soit affiché.
6 Caractéristiques techniques
schéma technique voir page 37
Lecteur CD/MP3
Taux de distorsion : . . . . . < 0,03%
Rapport signal/bruit : . . . > 85dB
Bande passante :. . . . . . . 10–20 000 Hz, ±1dB
Pleurage et scintillement : non mesurable
(précision quartz)
Tuner
Fréquence de réception
FM : . . . . . . . . . . . . . . 87,5–108MHz
MW : . . . . . . . . . . . . . 522– 1620kHz
Sensibilité HF
FM : . . . . . . . . . . . . . . 6dBµV
MW : . . . . . . . . . . . . . 25dBµV
Rapport signal/bruit
FM : . . . . . . . . . . . . . . > 60dB
MW : . . . . . . . . . . . . . > 50dB
Taux de distorsion : . . . . . < 0,5%
Généralités
Alimentation :. . . . . . . . . 17V (⎓) via l’amplifica-
teur Public Adress ou le
PA-1200EX
Dimensions (l × h × p) :. . 195 × 40 × 215mm
Poids: . . . . . . . . . . . . . . . 1,1kg
Tout droit de modification réservé.
Notice d’utilisation protégée par le copyright de MONA-
COR
®
INTERNATIONAL GmbH & Co. KG. Toute reproduc-
tion même partielle à des fins commerciales est interdite.

19
Italiano
Español
Español Página
Nederlands
Nederlands Pagina
Polski
Polski Strona
Modulo lettore CD/MP3
con tuner RDS
Queste istruzioni sono rivolte ai tecnici che montano
il modulo e agli utenti senza particolari conoscenze
in materia. Vi preghiamo di leggere attentamente le
presenti istruzioni prima della messa in funzione e di
conservarle per un uso futuro.
A pagina 3, se aperta completamente, vedrete
sempre gli elementi di comando e i collegamenti
descritti.
1 Elementi di comando
1 Tasto EJECT per espellere il CD
2
Tasto POWER per accendere e spegnere l’ap-
parecchio
3 Tasto MODE per cambiare fra riproduzione CD,
riproduzione MP3 tramite la porta USB (10) e
ricezione radio
4 Tasto BAND per cambiare il campo di ricezione
con funzionamento radio
5 Fessura per l’introduzione del CD
6 Tasto stazione 1 oppure
con funzionamento CD/MP3 Pausa/Start
7 Tasto stazione 2 oppure
con funzionamento CD/MP3 riproduzione dell’i-
nizio di tutti i titoli
8 Tasto stazione 3 oppure
con funzionamento CD/MP3 riproduzione del
titolo attuale
9
Tasto AF/REG per la funzione frequenza alterna-
tiva in caso di ricezione RDS
10 Porta USB per inserire una chiavetta USB
11 Tasti TRACK/TUNE
CD/MP3: Per saltare al titolo successivo oppure
per ritornare al titolo precedente;
con il tasto premuto, avanzamento o
ritorno veloce
Radio: Per impostare una stazione radio
Per avviare la ricerca automatica, pre-
mere brevemente il relativo tasto.
Per l’impostazione manuale delle sta-
zioni radio, tener premuto il tasto
o finché il display non segnali bre-
vemente MANUAL. Quindi impostare
la stazione radio con il tasto o .
12
Tasto DISP per visualizzare sul display varie infor
-
mazioni (p.es. ora, tipo di programma, tag ID3)
13 Display
14
Tasto stazione 4 oppure, con funzionamento
CD/MP3 riproduzione in ordine casuale
15 Tasti stazione 5 e 6 oppure, con funzionamento
CD/MP3 scelta di una cartella
16 Tasto PTY per scegliere il tipo di programma in
caso di ricezione RDS
17 Regolatore volume LEVEL
2 Avvertenze di sicurezza
Il modulo inserto è conforme a tutte le direttive rile-
vanti dell’UE e pertanto porta la sigla .
•
Usare l’inserto solo all’interno di locali. Proteggerlo
dall’acqua gocciolante e dagli spruzzi d’acqua, da
alta umidità dell’aria e dal calore (temperatura
d’impiego ammessa fra 0 e 40°C).
•
Non mettere in funzione l’apparecchio con l’in-
serto montato e staccare subito la spina rete se:
1.
l’apparecchio, l’inserto o il cavo rete presentano
dei danni visibili;
2. dopo una caduta o dopo eventi simili sussiste
il sospetto di un difetto;
3. l’apparecchio non funziona correttamente.
Per la riparazione consegnare l’inserto o l’intero
apparecchio in ogni caso ad una officina com-
petente.
•
Per la pulizia usare solo un panno morbido,
asciutto; non impiegare in nessun caso prodotti
chimici o acqua.
•
Nel caso d’uso improprio, di montaggio sbagliato,
d’impiego scorretto o di riparazione non a regola
d’arte dell’inserto, non si assum e nessuna respon-
sabilità per eventuali danni consequenziali a per-
sone o a cose e non si assume nessuna garanzia
per l’apparecchio.
Se si desidera eliminare l’inserto definiti-
vamente, consegnarlo per lo smaltimento
ad un’istituzione locale per il riciclaggio.
3 Possibilità d’impiego
L’inserto è adatto per il montaggio in amplificatori
PA della MONACOR con relativo vano e in dispositivi
d’estensione di MONACOR, per esempio:
PA-1120
PA-1240 Amplificatore PA per 5 zone
PA-1200 Amplificatore PA per 4 zone
PA-1200EX Dispositivo d’estensione per 2 moduli
PA-5240
PA-5480 Amplificatore PA per 5 zone
PA-6240
PA-6480
PA-6600
Amplificatore PA per 6 zone
Italiano
Italiano Pagina

20
Italiano
4 Montaggio del modulo inserto
AVVERTIMENTO L’inserto dev’essere montato solo
da una persona qualificata. Prima
del montaggio dell’inserto stac-
care la spina rete dell’amplifica-
tore o del PA-1200EX. Altrimenti
sussiste il pericolo di una scarica
elettrica.
1)
Togliere il coperchio dell’amplificatore o del
PA-1200EX.
2)
Dal lato frontale dell’amplificatore o del PA-1200EX
svitare la mascherina che copre il vano per l’in-
serto. Inserire l’inserto e avvitarlo.
3)
Inserire il cavetto libero a 3 poli dell’amplificatore
o del PA-1200EX nel connettore di posizionec
(vedi fig. 2). Così, l’inserto viene alimentato con
17V (⎓) , e il segnale audio viene inoltrato all’am-
plificatore.
4)
Se necessario, sono disponibili altre due uscite
audio:
uscita mono simmetrica al contatto d
uscita stereo asimmetrica al contatto e
5)
Per il montaggio della presa d’antenna (fig.3)
in dotazione, sul retro dell’amplificatore o del
PA-1200EX svitare la mascherina (fig. 4) o togliere
la parte staccabile (fig. 5). Inserire la presa d’an-
tenna nell’apertura e avvitarla.
6) Inserire il cavetto della presa d’antenna nel con-
nettore a 5 poli di posizione a.
7)
L’inserto PA-1140RCD è equipaggiato con una
batteria di memoria per poter tener in memoria
le stazioni radio anche con l’apparecchio spento.
Tale batteria è disattivata alla consegna dell’ap-
parecchio per evitare che lentamente si scarichi
prima del montaggio. Per attivare la batteria,
mettere il ponticello bin posizione ON.
Per disattivare nuovamente la batteria (p.es.
in caso di un magazzinaggio prolungato), mettere
il ponticello bin posizione OFF.
8)
Richiudere l’amplificatore o il PA-1200EX con il
coperchio. Collegare l’antenna di ricezione con la
presa d’antenna (fig. 3). Se si devono collegare sia
un’antenna FM che una OM, occorre collegarle
con la presa ANT per mezzo di un combinatore
d’antenna.
5 Funzionamento
1)
Accendere l’amplificatore o il PA-1200EX con l’in-
terruttore di rete e il modulo inserto con il tasto
POWER (2).
2) Con il regolatore volume LEVEL (17) impostare il
volume desiderato.
3)
Per spegnere azionare nuovamente il tasto
POWER.
5.1 Funzionamento del lettore CD/MP3
Con questo apparecchio si possono riprodurre dei
CD audio, dei CD audio masterizzati in proprio
(CD-R) nonché CD con titoli nel formato MP3. Nel
caso di CD riscrivibili (CD-RW) si possono manife-
stare dei problemi nella riproduzione a seconda del
tipo di CD utilizzato, del masterizzatore usato e del
programma di masterizzazione.
Tramite la porta USB si possono riprodurre anche
i file MP3 di una chiavetta USB.
Nota: Data la varietà di produttori di memorie e di driver,
non si può garantire che tutti i mezzi di memoria siano
compatibili con il lettore MP3.
5.1.1 Riprodurre titoli di musica
1) Inserire un CD con la scritta rivolta in alto nella
relativa fessura (5) finché non viene ritirato auto-
maticamente. Se nell’apparecchio si trova già un
CD, il display visualizza il simbolo
IN
.
Per cambiare un CD, premere il tasto EJECT(1).
Il CD esce. Se non viene prelevato, dopo alcuni
secondi l’apparecchio lo ritira nuovamente.
2) In alternativa o in aggiunta, nella porta USB (10)
si può inserire una chiavetta USB.
3) Dopo la carica, si avvia il primo titolo. Con i CD
audio standard, il display visualizza il numero del
titolo e il tempo già trascorso (min. : sec.).
IN
Nei titoli nel formato MP3, il nome del file scorre
attraverso il display, seguito dalla lettera “T” e
il numero del titolo. Premendo più volte il tasto
DISP (12), sul display si possono visualizzare delle
informazioni sul titolo del brano, dell’albo, sull’in-
terprete ecc. (tag ID3). Se non sono presenti dei
tag ID3, il display segnala NO ID3.
Nota: Durante la riproduzione di un CD o di una chia-
vetta USB, premendo il tasto DISP saranno visualizzate
anche delle informazioni sulla stazione impostata, vedi
5.2.3, paragrafo Informazioni. Azionare il tasto DISP
tante volte finché sul display non appare l’informazione
desiderata.
4)
Dopo la riproduzione dell’ultimo titolo, l’appa-
recchio riparte con il primo titolo (riproduzione
senza fine).
Other manuals for PA-1140RCD
1
Table of contents
Languages:
Other Monacor MP3 Player manuals

Monacor
Monacor IMG STAGELINE CD-110T User manual

Monacor
Monacor CD-156 User manual

Monacor
Monacor IMG Stageline DMP-100 User manual

Monacor
Monacor TXA-1020DMP User manual

Monacor
Monacor CD-112RDS/BT User manual

Monacor
Monacor DMP-100 User manual

Monacor
Monacor CD-114/BT User manual

Monacor
Monacor PA-24RCD User manual

Monacor
Monacor CD-112 User manual

Monacor
Monacor PA-1140RCD User manual