3. das Aufnahmesymbol ●
4. bei eingeschalteter Überschreibfunktion:
„OW“ (= „overwrite“);
bei ausgeschalteter Überschreibfunktion:
die verbleibende Speicherkapazität der Festplat-
te, z.B. „032GB“ bei 32 Gigabyte Restspeicher-
kapazität; bei zwei eingesetzten Festplatten wird
die verbleibende Kapazität für die Master-Fest-
platte unter dem Datum angezeigt und die für die
Slave-Festplatte unter der Uhrzeit.
(Zum Ein-/Ausschalten der Überschreibfunktion
siehe Menü „RECORD“, Kap. 9.4.)
7.1 Manuelle Aufnahme
Zum Starten der Aufnahme die Taste „REC“ (2) drü-
cken. Zum Beenden der Aufnahme die Stopptaste
(20) drücken.
Für die manuelleAufnahme gelten die Einstellun-
gen der Menüzeilen „REC IPS“ und „REC QUA-
LITY“ des Menüs „RECORD“ (siehe Kap. 9.4).
7.2 Timergesteuerte Aufnahme
Ist die Timer-Funktion aktiviert [siehe Kap. 9.3; bei
eingeschalteter Funktion leuchtet in der LED-Reihe
(18) die Anzeige „TIMER“], startet und stoppt der
Recorder automatisch zu den im Menü „TIMER“
festgelegten Zeiten. Durch Drücken der Stopptaste
(20) kann eine Aufnahme auch vorzeitig beendet
werden.
Die Aufnahmequalität und Aufnahmegeschwin-
digkeit lässt sich im Menü „TIMER“ für jede Auf-
nahme separat einstellen.
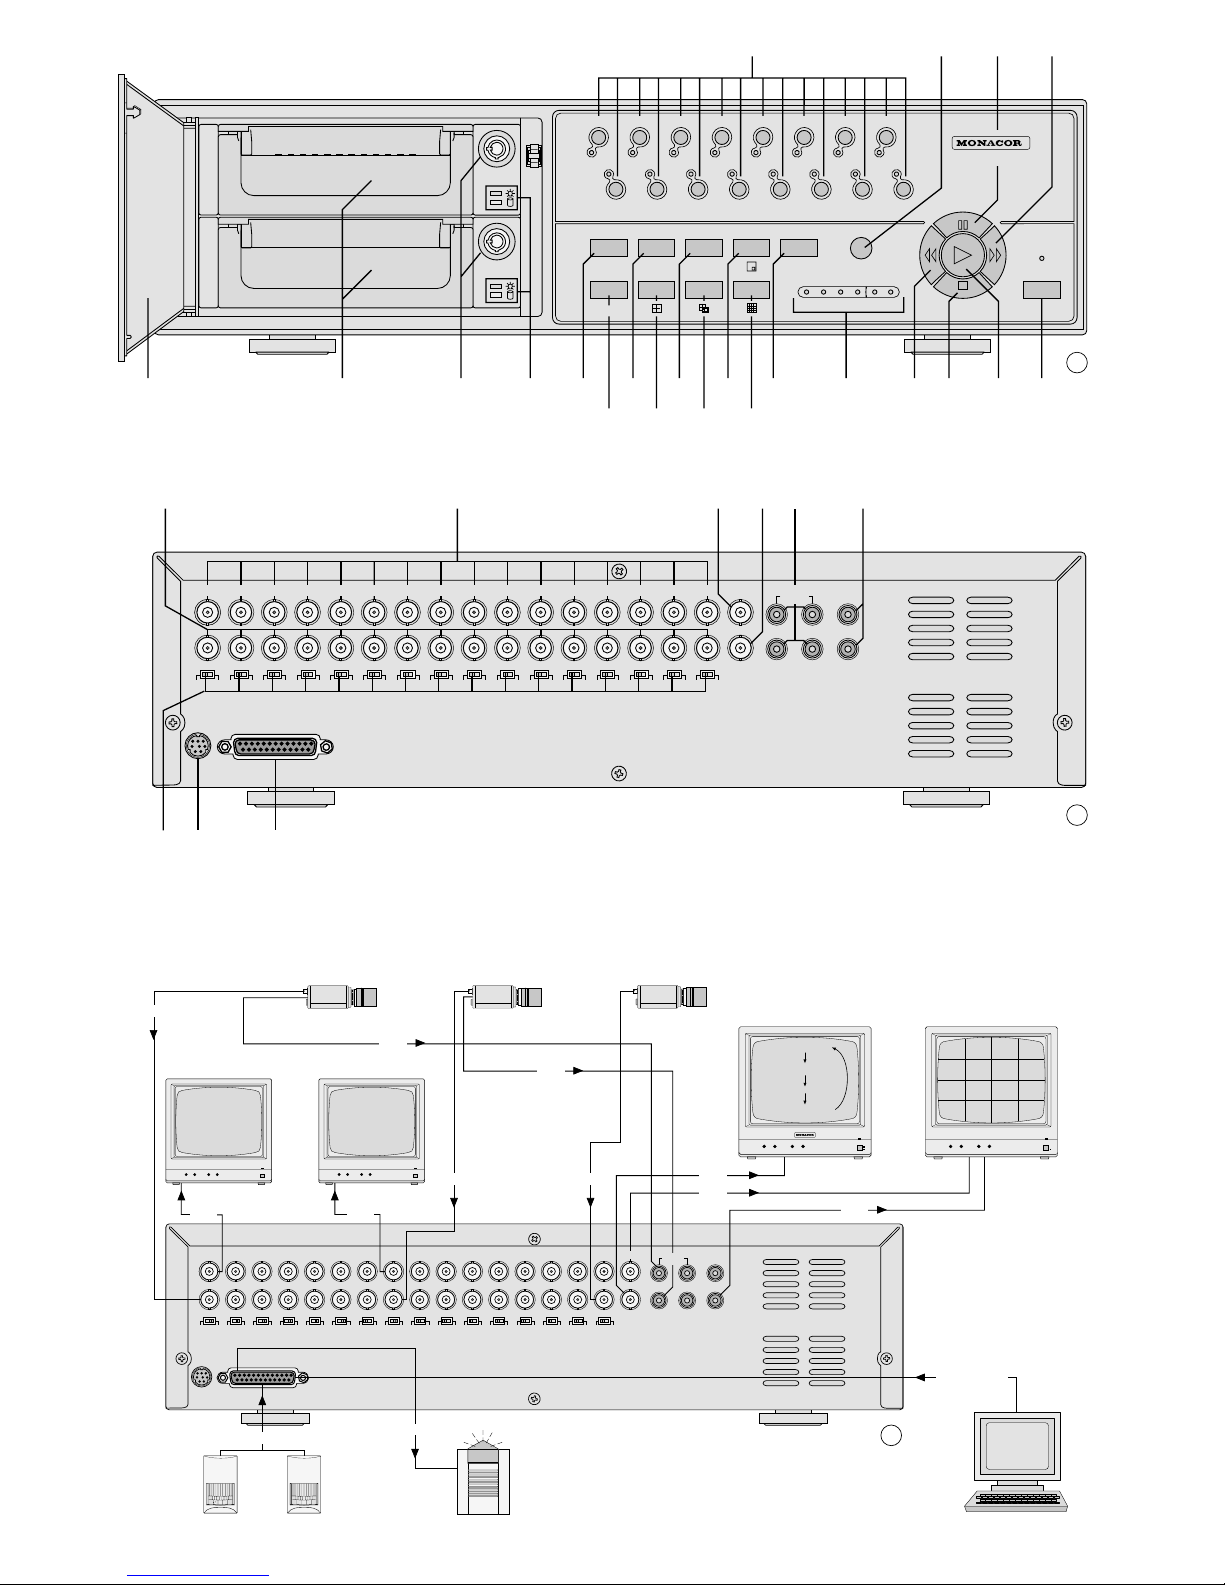
7.3 Aufnahmestart bei externem Alarm
Empfängt der Recorder einAlarmsignal an einem der
Alarmeingänge [Pins 2–9 und 15–22 der Sub-D-
Buchse „EXTERNAL I/O“ (31)] und ist die Funktion
„externer Alarm“ für den entsprechenden Kameraka-
nal aktiviert (siehe Kap. 9.5, Menüpunkt ALARM),
schaltet das Gerät auf Alarmaufnahme.
1. Falls zum Zeitpunkt des Alarms keine Aufnahme
läuft, schaltet der Recorder automatisch auf Auf-
nahme. Für die Aufnahmegeschwindigkeit und
Aufnahmequalität gelten die Einstellungen der
Menüzeilen „ALARM REC IPS“ und „ALARM REC
QUALITY“ des Menüs „RECORD“ (Kapitel 9.4).
Nach dem Ablauf der Alarmdauer (Voreinstel-
lung = 10Sek, veränderbar in der Zeile „ALARM
DURATION“ im Menü „SYSTEM“, siehe Kapitel
9.6) stoppt dieAufnahme und der Recorder kehrt
in seinen vorherigen Betriebsmodus zurück.
2. Tritt einAlarm während einer manuell gestarteten
oder timergesteuerten Aufnahme auf, so hat die
Alarmaufnahme Priorität, d.h. die Aufnahme-
geschwindigkeit und -qualität ändern sich ent-
sprechend den Einstellungen der Menüzeilen
„ALARM REC IPS“ und „ALARM REC QUALITY“.
Nach Ablauf der Alarmdauer schaltet der Re-
corder in den vorherigenAufnahmemodus zurück.
3. Wird zum Zeitpunkt eines Alarms gerade eine
Aufzeichnung abgespielt, erfolgt keineAufnahme.
Durch Drücken der Stopptaste (20) kann die
Alarmaufnahme auch vorzeitig beendet werden.
Weitere Informationen zu den Vorgängen bei exter-
nem Alarm sind im Kapitel 10.1 angegeben.
7.4 Aufnahmestart durch den internen
Video-Bewegungsdetektor
Ist der Bewegungsdetektor aktiviert (siehe Kapitel
9.5.1) und im Menü „RECORD“ die Funktion „MO-
TION TRIGGER RECORD“ auf „ON“ gestellt (siehe
Kapitel 9.4), schaltet das Gerät bei einer erkannten
Bewegung auf Alarmaufnahme.
1. Falls zum Zeitpunkt des Alarms keine Aufnahme
läuft, schaltet der Recorder automatisch auf Auf-
nahme. Für die Aufnahmegeschwindigkeit und
Aufnahmequalität gelten die Einstellungen der
Menüzeilen „ALARM REC IPS“ und „ALARM REC
QUALITY“ des Menüs „RECORD“ (Kapitel 9.4).
Nach dem Ablauf der Alarmdauer (Voreinstel-
lung = 10Sek, veränderbar in der Zeile „ALARM
DURATION“ im Menü „SYSTEM“, siehe Kapitel
9.6) stoppt dieAufnahme und der Recorder kehrt
in seinen vorherigen Betriebsmodus zurück.
2. Tritt einAlarm während einer manuell gestarteten
oder timergesteuerten Aufnahme auf, so hat die
Alarmaufnahme Priorität, d.h. die Aufnahme-
geschwindigkeit und -qualität ändern sich ent-
sprechend den Einstellungen der Menüzeilen
„ALARM REC IPS“ und „ALARM REC QUALITY“.
Nach Ablauf der Alarmdauer schaltet der Re-
corder in den vorherigenAufnahmemodus zurück.
3. Wird zum Zeitpunkt der erkannten Bewegung ge-
rade eine Aufzeichnung abgespielt, erfolgt keine
Aufnahme.
Durch Drücken der Stopptaste (20) kann die Auf-
nahme auch vorzeitig beendet werden. Weitere In-
formationen zu den Vorgängen bei Alarmauslösung
durch den Bewegungsdetektor sind im Kapitel 10.3
angegeben.
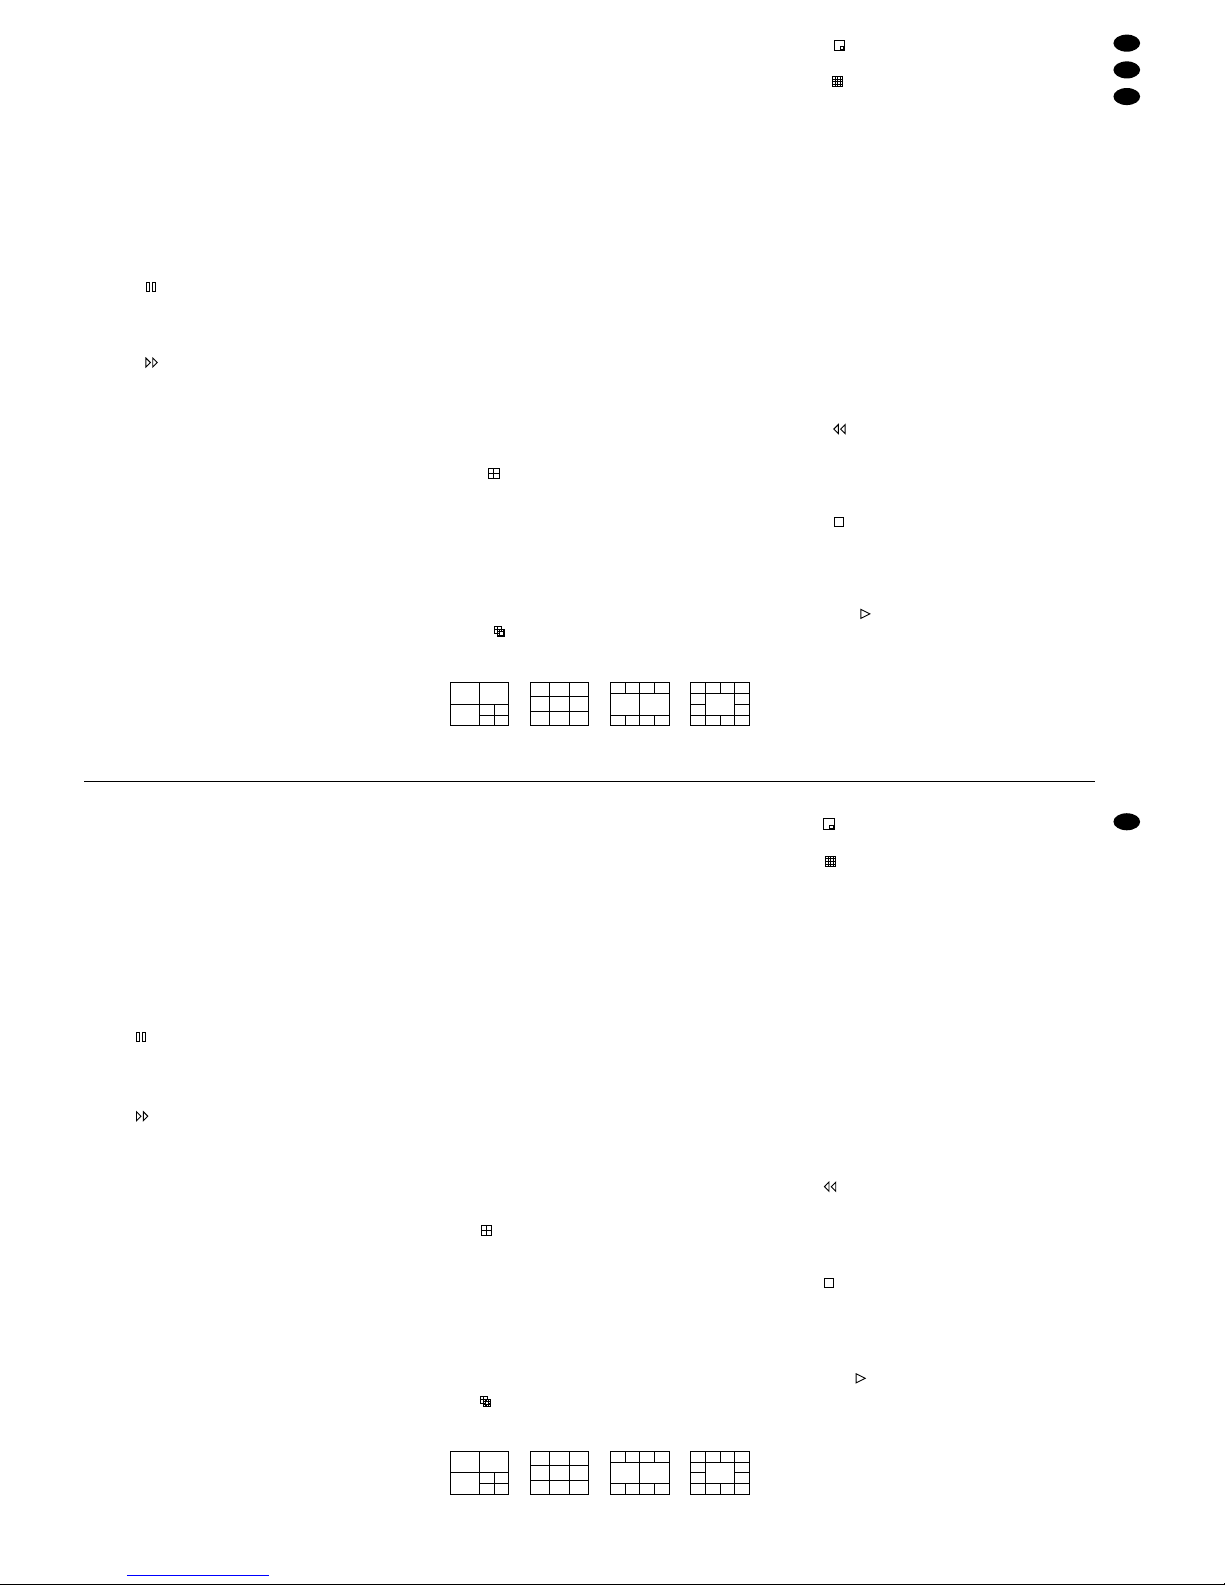
8 Wiedergabe
1) Zur Wiedergabe der letzten Aufzeichnung die
Starttaste (21) drücken. (Zur Wiedergabe einer
anderen Aufzeichnung siehe Kapitel 9.2.) Die
Wiedergabe beginnt ab dem Startpunkt der Auf-
zeichnung. Auf dem Bildschirm erscheint das
Symbol . Ist das Ende der Aufzeichnung er-
reicht, wird „END“ eingeblendet. Soll die Wieder-
gabe rückwärts ablaufen, zuerst die Starttaste ,
dann die Taste (19) drücken. Auf dem Bild-
schirm erscheint dann das Symbol .
Während der Wiedergabe leuchtet die Wie-
dergabeanzeige „PLAY“ in der LED-Reihe (18).
2) Um auf Standbild zu schalten, die Pausentaste
(3) drücken. Auf dem Bildschirm wird das
Symbol eingeblendet. Zum Weiterlaufen der
Wiedergabe entweder die Starttaste oder die
Pausentaste drücken.
3) Zum Stoppen der Wiedergabe die Stopptaste
(20) drücken.
“T” for timer-controlled recording
“A” for recording triggered by an external alarm
signal
“D” for recording started by the video motion
detector
3. the recording symbol ●
4. with activated overwrite function:
“OW” (= “overwrite”);
with deactivated overwrite function:
the remaining storage capacity of the hard disk,
e.g. “032GB” with a remaining storage capacity
of 32 gigabytes; with two inserted hard disks the
remaining capacity for the master hard disk is
displayed under the date and that for the slave
hard disk under the time.
(For activating/deactivating the overwrite func-
tion see menu “RECORD”, chapter 9.4.)
7.1 Manual recording
To start the recording, press the key “REC” (2). To
stop the recording, press the stop key (20).
The settings of the menu lines “REC IPS” and
“REC QUALITY” of the menu “RECORD” apply to
the manual recording (see chapter 9.4).
7.2 Timer-controlled recording
If the timer is activated [see chapter 9.3; with acti-
vated function, the indication “TIMER” lights up in
the LED row (18)], the recorder will automatically
start and stop at the times defined in the menu
“TIMER”. Press the stop key (20) to stop a re-
cording before the end.
The recording quality and the recording speed
can be set in the menu “TIMER” separately for each
recording.
7.3 Recording start in case of external alarm
If the recorder receives an alarm signal at one
of the alarm inputs [pins 2 to 9 and 15 to 22 of the
Sub D jack “EXTERNALI/O” (31)] and if the function
„external alarm“ is activated for the corresponding
camera channel (see chapter 9.5, menu item
“ALARM”), the unit will switch to alarm recording.
1. If no recording is made at the time of alarm, the
recorder will automatically switch to recording.
For the recording speed and recording quality the
settings of the menu lines „ALARM REC IPS“ and
„ALARM REC QUALITY“ of the menu „RECORD“
apply (chapter 9.4).
After the alarm duration has elapsed (preset-
ting = 10 seconds, it can be changed in the line
„ALARM DURATION“ in the menu „SYSTEM“,
see chapter 9.6), the recording will stop and the
recorder will return to its previous operating mode.
2. If an alarm occurs during a manual or timer-con-
trolled recording, the alarm recording takes prior-
ity, i.e. the recording speed and the recording
quality change according to the settings in the
menu lines „ALARM REC IPS“ and „ALARM REC
QUALITY“. After the alarm duration has elapsed,
the recorder switches back to its previous record-
ing mode.
3. If a recording is being replayed at the time of an
alarm, no recording will be made.
It is also possible to stop an alarm recording at any
time by pressing the stop key (20). Further infor-
mation on the proceedings in case of external alarm
can be found in chapter 10.1.
7.4 Recording start by the internal video
motion detector
If the motion detector is activated (see chapter
9.5.1) and the function „MOTION TRIGGER REC-
ORD“ is set to „ON“ in the menu „RECORD“ (see
chapter 9.4), the unit will switch to alarm recording in
case of a recognized movement.
1. If no recording is made at the time of the alarm,
the recorder will automatically switch to record-
ing. For the recording speed and the recording
quality the settings of the menu lines „ALARM
REC IPS and „ALARM REC QUALITY“ of the
menu „RECORD“ apply (chapter 9.4).
After the alarm duration has elapsed (preset-
ting = 10 seconds, it can be changed in the line
„ALARM DURATION“ in the menu „SYSTEM“,
see chapter 9.6), the recording will stop and the
recorder will return to its previous operating
mode.
2. If an alarm occurs during a manual or timer-con-
trolled recording, the alarm recording takes prior-
ity, i.e. the recording speed and recording quality
change according to the settings of the menu
lines „ALARM REC IPS“ and „ALARM REC
QUALITY“. After the alarm duration has elapsed,
the recorder switches back to its previous record-
ing mode.
3. If a recording is being replayed at the time of the
recognized movement, no recording will be made.
It is also possible to stop the recording at any time
by pressing the stop key (20). Further information
on the proceedings in case of alarm triggered by the
motion detector can be found in chapter 10.3.
8 Replay
1) To replay the last recording, press the start key
(21). (To replay another recording, see chap-
ter 9.2.) The replay starts from the starting point
of the recording. The symbol is displayed on
the screen. If the end of the recording is reached,
“END” is inserted. For backward replay, first
press the start key , then the key (19). The
symbol is displayed on the screen.
During the replay the replay indication “PLAY”
lights up in the LED row (18).
2) To switch to still picture, press the pause key
(3). The symbol is displayed on the screen. To
continue the replay, either press the start key
or the pause key.
3) To stop the replay, press the stop key (20).
10
GB
D
A
CH