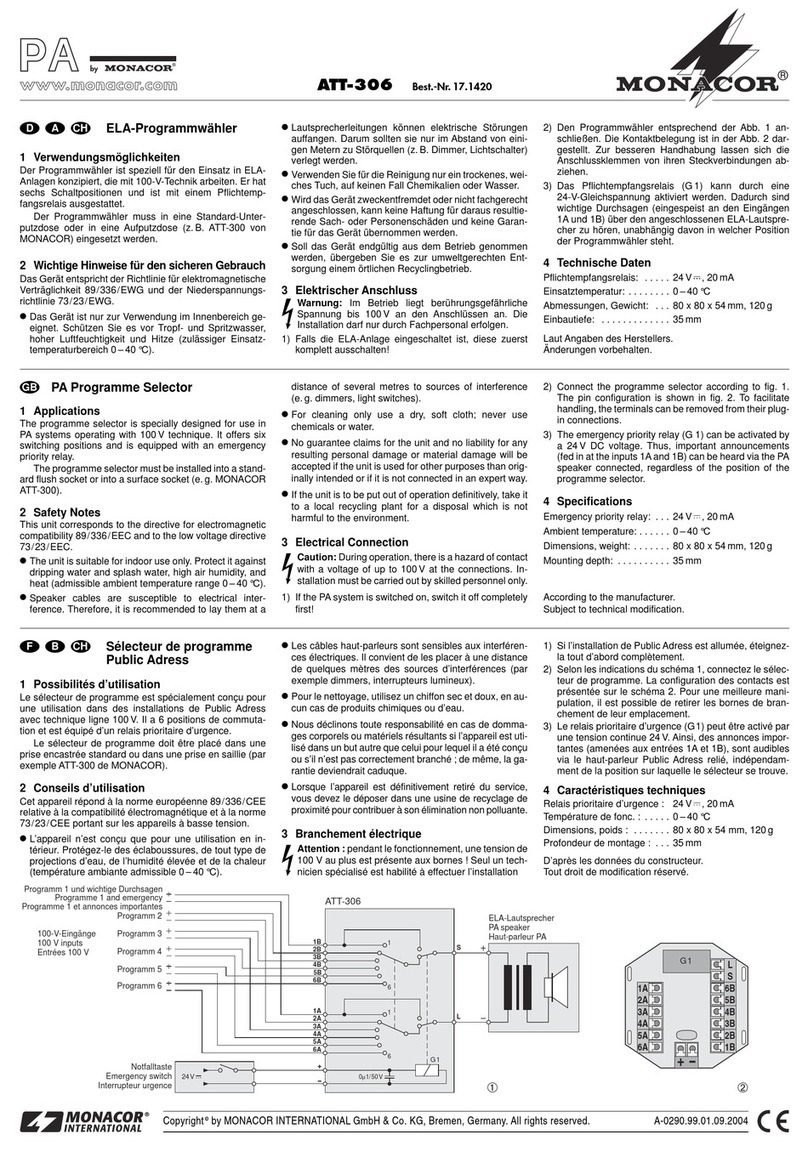
Monacor CD-113DPR User manual

ELECTRONICS FOR SPECIALISTS ELECTRONICS FOR SPECIALISTS ELECTRONICS FOR SPECIALISTS ELECTRONICS FOR SPECIALISTS
BEDIENUNGSANLEITUNG
INSTRUCTION MANUAL
MODE D’EMPLOI
ISTRUZIONI PER L’USO
MANUAL DE INSTRUCCIONES
INSTRUKCJA OBSŁUGI
VEILIGHEIDSVOORSCHRIFTEN
SIKKERHEDSOPLYSNINGER
SÄKERHETSFÖRESKRIFTER
TURVALLISUUDESTA
MP3-Rekorder mit CD-Spieler
MP3 Recorder with CD Player
CD-113DPR
Bestell-Nr. • Order No. 21.3080


ELECTRONICS FOR SPECIALISTS ELECTRONICS FOR SPECIALISTS ELECTRONICS FOR SPECIALISTS ELECTRONICS FOR SPECIALISTS
3
Deutsch ...........Seite 4
English ............Page 7
Français ...........Page 10
Italiano............Pagina 13
Español ...........Página 16
Polski .............Strona 19
Nederlands ........Pagina 22
Dansk .............Sida 22
Svenska ...........Sidan 23
Suomi.............Sivulta 23

4
Deutsch
English
English Page
Contents
Français
Français Page
Table des matières
Italiano
Italiano Pagina
Indice
Español
Español Página
Contenidos
Nederlands
Nederlands Pagina
Inhoud
Polski
Polski Strona
Spis treści
USE ONLY WITH A 250V FUSE
POWER
SD/MMC
CARD
IR
230V~/
50Hz
FUSE
PLAY MODE
AUTO PLAY RANDOM/
AUTO PLAY
NORMAL
2
135
4
6789 0
C D - 113 D P R
STOP PLAY/PAUSE
PROG SKIP
REV
CUE
FOLDER
FIND REPEAT REC/DEL
EJECT REC
LEVEL
FUNC
RL
LINE OUTPUT AUX INPUT
RL
CD-113DPR
Diese Bedienungsanleitung richtet sich an
Benutzer ohne besondere Fachkenntnisse.
Bitte lesen Sie die Anleitung vor dem Betrieb
gründlich durch und heben Sie sie für ein spä-
teres Nachlesen auf.
1 Einsatzmöglichkeiten
Der CD-113DPR ist für vielfältige Beschal-
lungsaufgaben geeignet. Er kann Standard-
Audio-CDs abspielen sowie MP3- und
WMA-Dateien von CDs, USB-Sticks* und
Speicherkarten* (max. 32GB).
Für Aufnahmen im MP3-Format auf eine
Speicherkarte oder auf einen USB-Stick kann
ein Audiogerät angeschlossen werden, z.B.
Radio, Tape-Deck, Mischpult. Außerdem las-
sen sich Titel wie folgt kopieren:
CD USB-Stick
CD Speicherkarte
USB-Stick Speicherkarte
Speicherkarte USB-Stick
*Hinweis: Aufgrund der Vielfalt von Speicher-Her-
stellern und Gerätetreibern kann nicht garan-
tiert werden, dass alle Speichermedien mit dem
CD-113DPR kompatibel sind.
2 Hinweise für den
sicherenGebrauch
Das Gerät entspricht allen relevanten Richtli-
nien der EU und trägt deshalb das -Zeichen.
WARNUNG
Das Gerät wird mit lebens-
gefährlicher Netzspannung
versorgt. Nehmen Sie deshalb
niemals selbst Eingriffe daran
vor. Es besteht die Gefahr eines
elektrischen Schlages.
•
Das Gerät ist nur zur Verwendung im In-
nenbereich geeignet. Schützen Sie es vor
Tropf- und Spritzwasser sowie vor hoher
Luftfeuchtigkeit. Der zulässige Einsatztem-
peraturbereich beträgt 0– 40 °C.
•
Stellen Sie keine mit Flüssigkeit gefüllten
Gefäße, z.B. Trinkgläser, auf das Gerät.
•
Nehmen Sie das Gerät nicht in Betrieb und
ziehen Sie sofort den Netzstecker aus der
Steckdose,
1. wenn sichtbare Schäden am Gerät oder
am Netzkabel vorhanden sind,
2. wenn nach einem Sturz oder Ähnlichem
der Verdacht auf einen Defekt besteht,
3. wenn Funktionsstörungen auftreten.
Geben Sie das Gerät in jedem Fall zur Re-
paratur in eine Fachwerkstatt.
•
Ziehen Sie den Netzstecker nie am Kabel
aus der Steckdose, fassen Sie immer am
Stecker an.
•
Verwenden Sie für die Reinigung nur ein
trockenes, weiches Tuch, niemals Wasser
oder Chemikalien.
•
Wird das Gerät zweckentfremdet, nicht
richtig angeschlossen, falsch bedient oder
nicht fachgerecht repariert, kann keine Haf-
tung für daraus resultierende Sach- oder
Personenschäden und keine Garantie für
das Gerät übernommen werden.
Soll das Gerät endgültig aus dem
Betrieb genommen werden, überge-
ben Sie es zur umweltgerechten Ent-
sorgung einem örtlichen Recycling-
betrieb.
3 Gerät aufstellen
undanschließen
Das Gerät ist für die Montage in ein Rack
(482mm/19”) vorgesehen, kann aber auch
als frei stehendes Tischgerät verwendet wer-
den. Für den Einbau in ein Rack wird 1HE
benötigt (HE = Höheneinheit = 44,45mm).
Vor dem Anschluss bzw. vor dem Verändern
von Anschlüssen den CD-113DPR und die
anzuschließenden Geräte ausschalten.
1)
Die Ausgänge LINE OUTPUT – L = linker
Kanal, R = rechter Kanal – über Cinch-
Kabel mit den CD-Spieler-Eingängen z. B.
an einem Mischpult oder an einem Ver-
stärker verbinden.
2)
Das beiliegende Netzkabel zuerst in die
Netzbuchse und dann in eine Steckdose
(230V/50Hz) stecken.
4 Bedienung
Das Gerät mit dem Netzschalter POWER
einschalten. Auf dem Display erscheint die
Anzeige Welcome.
Zuerst liest das Gerät die CD ein. Ist keine
CD eingeschoben, wird der USB-Speicher ein-
gelesen. Ist kein USB-Speicher angeschlossen,
wird die Speicherkarte eingelesen. Ist auch
keine Speicherkarte eingesteckt, zeigt das
Display NO DISC an.
4.1 Fernbedienung
1)
Zum Einsetzen der Batterien (2 × 1,5V,
Größe AAA = Micro) auf der Rückseite der
Fernbedienung den Batteriefachdeckel ab-
nehmen. Die Batterien, wie im Batteriefach
angegeben, einsetzen. Das Fach mit dem
Deckel wieder schließen.
Bei längerem Nichtgebrauch die Batte-
rien herausnehmen, damit die Fernbedie-
nung bei einem eventuellen Auslaufen der
Batterien nicht beschädigt wird.
2)
Die Fernbedienung beim Drücken einer
Taste immer in Richtung des Sensors „IR“
halten. Dabei muss Sichtverbindung zwi-
schen der Fernbedienung und dem Sensor
bestehen.
3)
Lässt die Reichweite der Fernbedienung
nach, sind die Batterien verbraucht und
müssen ausgewechselt werden.
Batterien dürfen nicht in den Haus-
müll geworfen werden. Geben Sie
sie zur umweltgerechten Entsor-
gung nur in den Sondermüll (z.B.
Sammelbehälter im Einzelhandel).
4.2 Musiktitel abspielen
1) Eine CD, mit der Beschriftung nach oben
zeigend, in den Einzugschlitz schieben, bis
sie automatisch eingezogen wird
und/oder
einen USB-Stick in den USB-Anschluss
stecken oder eine Festplatte (ggf. mit ei-
gener Stromversorgung) mit dem USB-An-
schluss verbinden
und/oder
eine Speicherkarte in den Schlitz SD/MMC
CARD stecken. Dabei muss die abge-
schrägte Ecke der Karte nach oben zei-
gen. Soll die Karte wieder entnommen
werden, sie etwas hineindrücken, sodass
sie ausrastet.
2)
Zum Starten des Abspielens die Taste PLAY/
PAUSE II drücken.
3)
Alle weiteren Bedienmöglichkeiten sind in
der Tabelle auf der Seite 6aufgeführt.
Nach dem Betrieb das Gerät mit dem Netz-
schalter POWER ausschalten.
Deutsch
Deutsch Seite
Inhalt

5
Deutsch
2 31
5 64
8 97
0
STOP
PROG
DISPLAY
ID3
PLAY
PAUSE
REV – SKIP– CUE
FUNC
A-B
REPEAT
MUTEEJECT
FOLDER
FIND
PLAY 1
REMAIN
REC DEL
4.3 Audio-Aufnahmen
Von einer CD oder von einem an den Buch-
sen AUX INPUT angeschlossenen Gerät (z.B.
Mischpult, Tape-Deck) lassen sich MP3-Auf-
nahmen erstellen und auf einer Speicherkarte
oder auf einem USB-Stick speichern.
1)
Der Schreibschutz an der Speicherkarte
bzw. am USB-Stick darf nicht aktiviert sein;
ggf. den Schutz deaktivieren. Entweder
eine Speicherkarte oder einen USB-Stick
in das Gerät stecken.
2)
Die Taste FUNC so oft drücken, bis das
Display (kurz) die gewünschte Aufnahme-
quelle anzeigt (AUX oder DISC).
3)
Bei Aufnahmen von einer CD im Lauf-
werk des CD-113DPR diesen Bedienschritt
überspringen und direkt mit dem Schritt
4 fortfahren.
Bei Aufnahmen über die Buchsen AUX
INPUT zeigt die Aussteuerungsanzeige REC
LEVEL den Signalpegel an, sobald ein Sig-
nal an den Buchsen anliegt. Mit dem Reg-
ler REC LEVEL den Aufnahmepegel so ein-
stellen, dass bei der höchsten Lautstärke
die gelbe LED aufleuchtet. Leuchtet auch
die rote LED, können Signalverzerrungen
auftreten.
4) Zum Starten der Aufnahme die Taste REC
drücken. Das Gerät bereitet die Aufnahme
vor: Anzeige
RECORD WAITING....
Sobald RECORD Ɗ [CARD] oder [USB]
angezeigt wird, erfolgt die Aufnahme.
5)
Zum Beenden der Aufnahme die Taste
REC
drücken.
Hinweis: Für die Aufnahmen legt das Gerät einen
Ordner auf dem Speichermedium an. Der Ordner-
name und die Namen der Aufnahmen sind in der
folgenden Tabelle angegeben.
Quelle Ordnername Dateinamen
Standard-CD TMC_CDDA
CDDA.mp3
CDDA-001.mp3
CDDA-002.mp3
CDDA-003.mp3
…
MP3-CD TMC_CDROM
der Name der Quelldatei
wird bis zu einer Länge
von 32 Zeichen kopiert
AUX INPUT TMC_AUX
REC_AUX.mp3
REC_AUX-001.mp3
REC_AUX-002.mp3
REC_AUX-003.mp3
…
Speicherkarte
USB-Stick TMC_M2M
der Name der Quelldatei
wird bis zu einer Länge
von 32 Zeichen kopiert
4.4 Titel oder komplette Ordner
kopieren
Mit der Kopierfunktion lassen sich einzelne
Titel oder alle Titel eines Ordners von einer
Speicherkarte auf einen USB-Stick kopieren
und umgekehrt.
1) Mit der Taste FUNC das Speichermedium
anwählen, auf dem sich die zu kopieren-
den Titel befinden (Anzeige
CARD
oder
USB).
2) Die Taste REC drücken. Das Display zeigt
kurz RECORD an. Dann blinkt unten links
das Lupensymbol und daneben wird
Dir
angezeigt. Die Ordnersuchfunktion ist
aktiviert.
3)
Mit den Tasten REV – SKIP – CUE den Ord-
ner wählen, der kopiert werden soll oder in
dem sich der zu kopierende Titel befindet.
4) Soll der gewählte Ordner kopiert werden,
jetzt die Taste REC erneut drücken oder,
wenn nur ein Titel aus dem gewählten
Ordner kopiert werden soll, die Taste REV
oder CUE gedrückt halten, bis neben dem
Lupensymbol File angezeigt wird. Dann
durch Antippen der Taste REV oder CUE
den zu kopierenden Titel wählen. Das
Kopieren mit der Taste REC starten.
Hinweis: Der Kopiervorgang kann jederzeit mit der
Taste STOP abgebrochen werden.
4.5 Einzelne Titel löschen
1) Mit der Taste FUNC den Speicher anwäh-
len, auf dem sich der zu löschende Titel
befindet (Anzeige CARD oder USB).
2)
Das Gerät mit der Taste STOP auf Stopp
schalten.
3)
Auf der Fernbedienung die Taste
DEL
kurz
drücken oder am Gerät die Taste REC/DEL
so lange gedrückt halten, bis das Display
kurz DELETE anzeigt. Dann blinkt unten
links das Symbol und daneben wird
Dir
angezeigt. Die Ordnersuchfunktion
ist aktiviert.
4)
Mit den Tasten REV – SKIP – CUE den Ord-
ner wählen, in dem sich der zu löschende
Titel befindet.
5)
Ist der Ordner gefunden, die Taste REV
oder CUE gedrückt halten, bis File
neben dem Symbol angezeigt wird.
Dann durch Antippen der Taste REV oder
CUE den zu löschenden Titel wählen.
6) Zum Löschen die Taste DEL oder REC/DEL
drücken. Das Display zeigt kurz DELETE
an.
7) Zum Löschen weiterer Titel die Schritte 3)
bis 6) wiederholen.
Hinweis: Der Löschvorgang kann jederzeit mit der
Taste STOP abgebrochen werden.
5 Pflege
Das Gerät vor Staub, Vibrationen, Feuchtigkeit
und Hitze schützen (zulässiger Einsatztempe-
raturbereich 0– 40 °C). Für die Reinigung nur
ein weiches, trockenes Tuch verwenden, auf
keinen Fall Wasser oder Chemikalien.
Hinweis zu Tonaussetzern
und Lesefehlern
Zigarettenrauch und Staub dringen leicht
durch alle Öffnungen des Gerätes und setzen
sich auch auf der Optik der Laser-Abtastsys-
teme ab. Sollte dieser Belag zu Lesefehlern
und Tonaussetzern führen, muss das Gerät in
einer Fachwerkstatt gereinigt werden. Diese
Reinigung ist kostenpflichtig, auch während
der Garantiezeit!
6 Technische Daten
Frequenzgang:� � � � � � � � � � 20 – 20 000 Hz
Klirrfaktor:� � � � � � � � � � � � � < 0,1 %
Kanaltrennung: � � � � � � � � � > 60 dB
Dynamikumfang: � � � � � � � � > 96 dB
Störabstand: � � � � � � � � � � � > 70 dB
Audioausgang: � � � � � � � � � 1,2 V
Audioeingangs-
empfindlichkeit:� � � � � � � � � 300 mV für
0-dB-Aussteuerung
Datenrate für Aufnahmen: � 128 kBits/s
geeignete Speicherkarten
SD: � � � � � � � � � � � � � � � � 64 MB – 2 GB
SDHC: � � � � � � � � � � � � � � 4 GB – 32 GB
Stromversorgung: � � � � � � � 230 V/50 Hz
Leistungsaufnahme:� � � � � � max� 50 VA
Einsatztemperatur:� � � � � � � 0 – 40 °C
Abmessungen (B × H × T):� 482 × 44 × 265mm,
1 HE (Höheneinheit)
Gewicht: � � � � � � � � � � � � � � 3,9 kg

6
Deutsch
Taste
Funktion
auf der Fernbedienung
am Gerät
PLAY MODE ×
Schiebeschalter auf der Rückseite:
AUTO PLAY = Nach dem Einschalten des Gerätes
startet automatisch die Wiedergabe
NORMAL = Nach dem Einschalten steht der
Audiospieler auf Pause
RANDOM/AUTO PLAY = Nach dem Einschalten
startet automatisch die Wiedergabe in zufälliger
Reihenfolge der Titel
FUNC × × Umschalten zwischen CD, USB-Anschluss und
Speicherkarte
II
PLAY/PAUSE
×
×
Wiedergabe starten und
Umschalten zwischen Wiedergabe und Pause
1… 9, 0 × ×
Direktwahl eines Titels, Beispiele:
Titel 8 = Tasten 8 und II
Titel 30 = Tasten 3, 0 und II
Titel 125 = Tasten 1, 2, 5 und II
REV− SKIP− CUE
×
×
Titelanfang, vorheriger/nächster Titel:
Taste kurz drücken
schneller Vor-/Rücklauf: Taste gedrückt halten
(Ton dabei stumm)
FOLDER × × auf den ersten Titel des vorherigen/nächsten
Ordners springen
MUTE × Ton aus- und einschalten
PLAY 1 ×
Einzeltitelwiedergabe (Anzeige 1Ɗ):
Am Ende eines Titels schaltet das Gerät auf Pause.
Zum Starten des nächsten Titels die Taste II
drücken.
REMAIN ×
Umschalten zwischen der Anzeige der bereits
gespielten Zeit eines Titels und der Restzeit eines
Titels (nur bei Standard-Audio-CDs möglich)
DISPLAY ×
Umschalten der Informationen in der unteren
Displayzeile während der Wiedergabe von
MP3-Dateien
ID3 ×
Aus- und Wiedereinblenden der durchlaufenden
Informationen in der oberen Displayzeile bei
MP3-Dateien (Name der Datei, des Titels, des
Künstlers und des Albums)
A-B ×
Titelabschnitt wiederholen (Endlosschleife):
Jeweils am Anfang und am Ende des Abschnitts
die Taste drücken.
Zum Verlassen der Schleife die Taste erneut
drücken.
REPEAT × ×
Wiederholfunktionen, Zufallswiedergabe und
Anspielfunktion
Grundeinstellung PLAY ALL
alle Titel werden einmal abgespielt
erster Tastendruck REPEAT TRACK
ständige Wiederholung des angewähltenTitels
nächster Tastendruck REPEAT FOLDER
ständige Wiederholung aller Titel im ange-
wählten Ordner (Funktion nur bei MP3-Dateien
vorhanden)
nächster Tastendruck REPEAT ALL
ständige Wiederholung aller Titel
nächster Tastendruck RANDOM REPEAT
ständiges Abspielen der Titel in zufälliger
Reihenfolge
nächster Tastendruck RANDOM PLAY
einmalige Wiedergabe der Titel in zufälliger
Reihenfolge
nächster Tastendruck INT PLAY
Anspielfunktion: Jeder Titel wird für 10s ange-
spielt
nächster Tastendruck PLAY ALL
Zurückschalten auf die Grundeinstellung
Taste
Funktion
auf der Fernbedienung
am Gerät
FIND × ×
Alphabetische Suche von MP3-Titeln
1. Die Taste FIND drücken. Ein Lupensymbol er-
scheint blinkend unten links im Display. Rechts
daneben wird der Buchstabe Aangezeigt und
in der oberen Displayzeile der Name der ersten
Datei, die mit dem Buchstaben A beginnt.
2. Mit der Taste CUE [vorwärts laufend] oder REV
[rückwärts laufend] den Buchstaben wählen,
mit dem der gesuchte Dateiname beginnt.
Hierbei können auch die Ziffern 0 –9 gewählt
werden. Bei Buchstaben und Ziffern, mit denen
kein Dateiname beginnt, wird None angezeigt.
3. Wenn mehrere Dateinamen mit dem gleichen
Anfangsbuchstaben vorkommen, nach dem
Wählen des Suchbuchstabens die Taste REV
oder CUE gedrückt halten, bis der Buchstabe
neben dem Lupensymbol blinkt. Alle Datei-
namen mit dem angezeigten Anfangsbuchsta-
ben können nun mit der Taste REV oder CUE
nacheinander angewählt werden.
4. Bei der Suche zeigt das Display stets die Num-
mer des Ordners und des Titels unten rechts an.
Ist der gewünschte Titel gefunden, die Wieder-
gabe mit der TasteII starten.
PROG × ×
Eigene Titelfolge programmieren:
1. Taste PROG drücken
2. Nur bei MP3-Dateien: Ordner-Nr. eingeben und
Taste PROG drücken
3. Titel-Nr. eingeben und Taste PROG drücken
4. Alle weiteren Titel genauso programmieren
(max. 64)
5. Abspielen mit Taste PROG starten
Programmierung löschen oder abbrechen:
Taste STOP drücken
STOP × × Wiedergabe beenden
EJECT × × CD auswerfen
Änderungen vorbehalten.
Diese Bedienungsanleitung ist urheberrechtlich für MONACOR
®
INTERNATIONAL
GmbH & Co. KG geschützt. Eine Reproduktion für eigene kommerzielle Zwecke
– auch auszugsweise – ist untersagt.

7
English
Italiano
Italiano Pagina
Indice
Polski
Polski Strona
Spis treści
Español
Español Página
Contenidos
USE ONLY WITH A 250V FUSE
POWER
SD/MMC
CARD
IR
230V~/
50Hz
FUSE
PLAY MODE
AUTO PLAY RANDOM/
AUTO PLAY
NORMAL
2
135
4
6789 0
C D - 113 D P R
STOP PLAY/PAUSE
PROG SKIP
REV
CUE
FOLDER
FIND REPEAT REC/DEL
EJECT REC
LEVEL
FUNC
RL
LINE OUTPUT AUX INPUT
RL
CD-113DPR
These instructions are intended for users
without any specific technical knowledge.
Please read these instructions carefully prior
to operating the unit and keep them for later
reference.
1 Applications
The CD-113DPR is suitable for versatile PA
applications. It is able to replay standard
audio CDs and MP3 and WMA files from
CDs, USB flash drives* and memory cards*
(32GB max.).
An audio unit (e.g. radio, tape deck,
mixer) can be connected for recordings in
MP3 format on a memory card or on a USB
flash drive. In addition, titles can be copied
as follows:
CD USB flash drive
CD memory card
USB flash drive memory card
Memory card USB flash drive
*Note: Due to the large number of storage device
manufacturers and device drivers, it cannot be guar-
anteed that all storage media are compatible with
the CD-113DPR.
2 Safety Notes
This unit corresponds to all relevant directives
of the EU and is therefore marked with .
WARNING
The unit uses dangerous mains
voltage. Leave servicing to
skilled personnel only. Inex-
pert handling or modification
of the unit may result in electric
shock.
•
The unit is suitable for indoor use only. Pro
-
tect it against dripping water, splash water
and high air humidity. The admissible ambi-
ent temperature range is 0– 40 °C.
•
Do not place any vessel filled with liquid on
the unit, e.g. a drinking glass.
•
Do not operate the unit and immediately
disconnect the mains plug from the socket
1.
if the unit or the mains cable is visibly
damaged,
2. if a defect might have occurred after the
unit was dropped or suffered a similar
accident,
3. if malfunctions occur.
In any case the unit must be repaired by
skilled personnel.
•
Never pull the mains cable to disconnect
the mains plug from the socket, always
seize the plug.
•
For cleaning only use a dry, soft cloth; never
use water or chemicals.
•
No guarantee claims for the unit and no li-
ability for any resulting personal damage or
material damage will be accepted if the unit
is used for other purposes than originally
intended, if it is not correctly connected
or operated, or if it is not repaired in an
expert way.
If the unit is to be put out of oper-
ation definitively, take it to a local
recycling plant for a disposal which
is not harmful to the environment.
3 Setting Up and Connecting
the Player
The player is designed for installation into a
rack (482mm/19”); however, it can also be
placed as desired as a desktop unit. For rack
installation, 1rack space (RS = 44.45mm) is
required.
Prior to making or changing any connections,
switch off the CD-113DPR and the units to
be connected.
1) Connect the outputs LINE OUTPUT – L =
left channel, R = right channel – via cables
with RCA connectors to the CD player in-
puts, e.g. on a mixer or amplifier.
2) Connect the mains cable provided to the
mains jack first and then to a mains socket
(230V/50Hz).
4 Operation
Switch on the player with the POWER switch.
The display will show Welcome.
First the player will read the CD. If no CD
has been inserted, the player will read the
USB flash drive. If no USB flash drive has been
connected, the player will read the memory
card. If no memory card has been inserted,
the display will show NO DISC.
4.1 Remote control
1)
To insert the batteries (2 × 1,5 V, size AAA),
remove the battery compartment cover on
the rear side of the remote control. Insert
the batteries as indicated in the battery
compartment. Close the compartment
with the cover.
If the remote control is not in use for a
longer period of time, remove the batter-
ies to prevent any damage due to battery
leakage.
2) When you press a button on the remote
control, always direct the remote control
towards the sensor “IR”. There must be
no obstacles between the remote control
and the sensor.
3)
If the range of the remote control de-
creases, the batteries are discharged and
must be replaced.
Discharged batteries must not be
placed in the household waste; al-
ways take them to a special waste
disposal, e.g. collection container at
your retailer.
4.2 Replaying music titles
1)
Insert a CD with the lettering facing up
into the slot until it is pulled in automat-
ically
and/or
connect a USB flash drive to the USB
port or connect a hard disk (with indi-
vidual power supply, if required) to the
USB port
and/or
insert a memory card into the slot SD/MMC
CARD, the notched corner of the card
facing up. To remove the card, slightly
push it in to eject the card from the slot.
2) To start the replay, press the button PLAY/
PAUSE II.
3)
All other operating options are listed in
the table on page 9. After operation,
switch off the unit with the POWER switch.
English
English Page
Contents

8
English
2 31
5 64
8 97
0
STOP
PROG
DISPLAY
ID3
PLAY
PAUSE
REV – SKIP– CUE
FUNC
A-B
REPEAT
MUTEEJECT
FOLDER
FIND
PLAY 1
REMAIN
REC DEL
4.3 Audio recordings
It is possible to make MP3 recordings from a
CD or a unit (e.g. mixer, tape deck) connected
to the jacks AUX INPUT and to store them on
a memory card or a USB flash drive.
1) The write protection on the memory card
or USB flash drive must not be activated; if
required, deactivate the protection. Insert
either a memory card or a USB flash drive
into the unit.
2)
Press the button FUNC repeatedly until
the display (shortly) shows the desired re-
cording source (AUX or DISC).
3)
For recordings from a CD in the player
mechanism of the CD-113DPR, skip this
step and directly continue with step 4.
For recordings via the jacks AUX INPUT
the level indication REC LEVEL shows the
signal level as soon as a signal is present at
the jacks. Adjust the recording level with
the control REC LEVEL so that the yellow
LED lights up at the highest volume. If also
the red LED lights up, signal distortions
may occur.
4)
To start the recording, press the button
REC . The unit prepares for recording (in-
dication RECORD WAITING....). As
soon as
RECORD Ɗ [CARD]
or
[USB]
is shown, the recording is made.
5)
To stop the recording, press the button
REC .
Note: The unit creates a folder for the recordings on
the storage medium. The folder name and the names
of the recordings are indicated in the following table.
Source Folder name File name
Standard CD TMC_CDDA
CDDA.mp3
CDDA-001.mp3
CDDA-002.mp3
CDDA-003.mp3
…
MP3 CD TMC_CDROM
the name of the source
file is copied up to a
length of 32 characters
AUX INPUT TMC_AUX
REC_AUX.mp3
REC_AUX-001.mp3
REC_AUX-002.mp3
REC_AUX-003.mp3
…
Memory card
USB flash drive TMC_M2M
the name of the source
file is copied up to a
length of 32 characters
4.4 Copying titles or complete folders
With the copying function, individual titles
or all titles of a folder can be copied from
a memory card onto a USB flash drive and
vice versa.
1)
Select the storage medium containing
the titles to be copied (indication
CARD
or USB) with the button FUNC.
2) Press the button REC . The display briefly
shows
RECORD
. Then the magnifying glass
symbol flashes on the left at the bottom
and
Dir
is shown next to it. The folder
search function is activated.
3)
Use the buttons REV – SKIP – CUE to select
the folder to be copied or the folder con-
taining the title to be copied.
4)
To copy the folder selected, now press the
button REC again or
to copy one title only from the selected
folder, keep the button REV or CUE
pressed until File is shown next to the
magnifying glass symbol. Briefly press the
button REV or CUE to select the title to be
copied. Start copying with the button
REC
.
Note: The copying process can be stopped at any
time with the button STOP .
4.5 Deleting individual titles
1)
Select the storage medium containing the
title to be deleted with the button FUNC
(indication CARD or USB).
2)
Set the unit to stop with the button
STOP.
3)
Briefly press the button
DEL
on the remote
control or keep the button REC/DEL on
the unit pressed until the display briefly
shows DELETE. Then the symbol
flashes on the left at the bottom and
Dir
is shown next to it. The folder search func-
tion is activated.
4) Use the buttons REV – SKIP – CUE to se-
lect the folder containing the title to be
deleted.
5)
When the folder has been found, keep the
button REV or CUE pressed until File is
shown next to the symbol . Then briefly
press the button REV or CUE to select the
title to be deleted.
6)
To delete, press the button
DEL
or REC/
DEL. The display briefly shows DELETE.
7)
To delete further titles, repeat the steps
3) to 6).
Note: The deleting process can be stopped at any
time with the button STOP .
5 Maintenance
Protect the player from dust, vibrations,
humidity and heat (admissible ambient tem-
perature range 0– 40 °C). For cleaning only
use a dry, soft cloth; never use water or
chemicals.
Note concerning sound interruptions and
reading errors
Cigarette smoke and dust will easily pene-
trate through all openings of the unit and will
also settle on the optics of the laser sampling
systems. If this deposit should cause reading
errors and sound interruptions, the unit must
be cleaned by skilled personnel. Please note
that there will be a charge on cleaning, even
during the warranty period!
6 Specifications
Frequency range: � � � � � � � � 20 – 20 000 Hz
THD: � � � � � � � � � � � � � � � � � < 0�1 %
Channel separation:� � � � � � > 60 dB
Dynamic range: � � � � � � � � � > 96 dB
S/N ratio: � � � � � � � � � � � � � > 70 dB
Audio output: � � � � � � � � � � 1�2 V
Audio input sensitivity:� � � � 300 mV for
0 dB level control
Data rate for recordings: � � 128 kbits/s
Suitable memory cards
SD: � � � � � � � � � � � � � � � � 64 MB – 2 GB
SDHC: � � � � � � � � � � � � � � 4 GB – 32 GB
Power supply: � � � � � � � � � � 230 V/50 Hz
Power consumption: � � � � � 50 VA max�
Ambient temperature: � � � � 0 – 40 °C
Dimensions (W × H × D):� � 482 × 44 × 265 mm,
1 rack space
Weight:� � � � � � � � � � � � � � � 3�9 kg

9
English
All rights reserved by MONACOR
®INTERNATIONAL GmbH & Co. KG. No part
of this instruction manual may be reproduced in any form or by any means for
any commercial use.
Button
Function
on the remote controle
on the unit
PLAY MODE ×
sliding switch on the rear:
AUTO PLAY = The replay will start automatically
after the unit has been switched on
NORMAL = The unit will be set to pause after the
unit has been switched on
RANDOM/AUTO PLAY = Replay in random order
will start automatically after the unit has been
switched on
FUNC × × to switch between CD, USB port and memory card
II
PLAY/PAUSE
×
×
to start the replay and
to switch between replay and pause
1… 9, 0 × ×
direct title selection, examples:
title 8 = buttons 8 and II
title 30 = buttons 3, 0 and II
title 125 = buttons 1, 2, 5 and II
REV− SKIP− CUE
×
×
beginning of title, previous/next title:
Press button briefly.
fast forward/reverse: Keep button pressed
(sound muted in the process).
FOLDER × × to go to the first title of the previous/next folder
MUTE × to mute and unmute the sound
PLAY 1 ×
single title replay (indication 1Ɗ):
At the end of a title, the player is set to pause.
To start the next title,
press the buttonII.
REMAIN ×
to switch between
the indication of the time already played of a title
and the remaining time of a title
(function available for standard audio CDs only)
DISPLAY × to change the information in the lower line of the
display during replay of MP3 files
ID3 ×
to activate/deactivate information
on MP3 files scrolling through the upper line of
the display (file name, title name, name of artist
and album)
A-B ×
repeat of title section (continuous loop)
Press button at the beginning and at the end of
the section.
Press button once again to exit the loop.
REPEAT × ×
repeat functions, random replay and intro function
basic setting PLAY ALL
all titles will be replayed once
first actuation of button REPEAT TRACK
the title selected will be repeated continuously
next actuation of button REPEAT FOLDER
all titles in the folder selected will be repeated
continuously (function available for MP3 files
only)
next actuation of button REPEAT ALL
all titles will be repeated continuously
next actuation of button RANDOM REPEAT
all titles will be replayed continuously in
random order
next actuation of button RANDOM PLAY
the titles will be replayed once in random order
next actuation of button INT PLAY
intro function: the first 10 seconds of each title
are replayed
next actuation of button PLAY ALL
return to basic setting
Button
Function
on the remote controle
on the unit
FIND × ×
Alphabetic search for MP3 titles
1. Press the button FIND. A magnifying glass
symbol will flash on the left at the bottom of
the display. On the right of it, the letter Awill
appear and in the upper line of the display the
name of the first file beginning with the letter A.
2. Press the button CUE [forward direction] or REV
[reverse direction] to select the first letter of the
desired file name. The numerals 0–9 are also
available. If there are no file names beginning
with certain letters or numbers, these letters or
numbers are marked None.
3. If there are several file names beginning with
the same letter, select the desired letter and
keep the button REV or CUE pressed until the
letter starts flashing next to the magnifying
glass symbol. All file names beginning with the
letter will now be available to be selected one
after the other with the button REV or CUE.
4. When searching, the display will always show
the number of the folder and of the title on the
right at the bottom. When you have found the
desired title, start the replay with the buttonII.
PROG × ×
to program an individual title sequence:
1. Press the button PROG.
2. for MP3 files only: Enter the folder number and
press the button PROG.
3. Enter the title number and press the button
PROG.
4. Repeat these steps to program all further titles
(64 max.).
5. Press the button PROG to start the replay.
To delete or cancel the sequence,
press the button STOP .
STOP × × to stop the replay
EJECT × × to eject the CD
Subject to technical modification.

10
Français
Deutsch
Deutsch Seite
Inhalt
English
English Page
Contents
Italiano
Italiano Pagina
Indice
Español
Español Página
Contenidos
Nederlands
Nederlands Pagina
Inhoud
Polski
Polski Strona
Spis treści
USE ONLY WITH A 250V FUSE
POWER
SD/MMC
CARD
IR
230V~/
50Hz
FUSE
PLAY MODE
AUTO PLAY RANDOM/
AUTO PLAY
NORMAL
2
135
4
6789 0
C D - 113 D P R
STOP PLAY/PAUSE
PROG SKIP
REV
CUE
FOLDER
FIND REPEAT REC/DEL
EJECT REC
LEVEL
FUNC
RL
LINE OUTPUT AUX INPUT
RL
CD-113DPR
Cette notice s‘adresse aux utilisateurs sans
connaissances techniques particulières. Veuil-
lez lire la présente notice avant le fonction-
nement et conservez-la pour pouvoir vous y
reporter ultérieurement.
1 Possibilités d’utilisation
Le CD-113DPR est adapté pour des applica-
tions multiples de sonorisation. Il peut lire
des CDs audio standards, des fichiers MP3 et
WMA de CDs, clés USB* et cartes mémoire*
(32Go max.).
Pour des enregistrements au format MP3
sur une carte mémoire ou sur une clé USB,
on peut relier un appareil audio, par exemple
radio, tape deck, table de mixage. De plus, on
peut copier des titres comme suit :
CD clé USB
CD carte mémoire
Clé USB carte mémoire
Carte mémoire clé USB
*Conseil : En raison de la multitude de fabricants
de supports de mémoire et de drivers d’appareils, il
n’est pas possible de garantir que tous les supports
de mémoire soient compatibles avec le CD-113DPR.
2 Conseils d’utilisation
etdesécurité
Cet appareil répond à toutes les directives
nécessaires de l’Union européenne et porte
donc le symbole .
AVERTISSEMENT
Cet appareil est alimenté
par une tension dange-
reuse. Ne touchez jamais
l’intérieur de l’appareil car,
en cas de mauvaise manipu-
lation, vous pourriez subir
une décharge électrique.
•
L‘appareil n‘est conçu que pour une utilisa-
tion en intérieur. Protégez-le des éclabous-
sures, de tout type de projections d‘eau et
d’une humidité d‘air élevée. La plage de
température ambiante admissible est de
0–40°C.
•
En aucun cas, vous ne devez poser d’ob-
jet contenant du liquide ou un verre sur
l’appareil.
•
Ne le faites jamais fonctionner et débran-
chez-le immédiatement lorsque :
1. des dommages visibles apparaissent sur
l’appareil et sur le cordon secteur
2. après une chute ou accident similaire...,
vous avez un doute au sujet de l’état de
l’appareil.
3. des dysfonctionnements apparaissent.
Dans tous les cas, les dommages doivent
être réparés par un technicien spécialisé.
•
Ne débranchez jamais l’appareil en tirant
sur le cordon secteur, tenez-le toujours par
la fiche.
•
Pour le nettoyage utilisez uniquement un
chiffon doux et sec, en aucun cas de pro-
duits chimiques ou d’eau.
•
Nous déclinons toute responsabilité en
cas de dommages matériels ou corporels
résultants si l’appareil est utilisé dans un
but autre que celui pour lequel il a été
conçu, s’il n’est pas correctement branché
ou utilisé ou s’il n’est pas réparé par une
personne habilitée; en outre, la garantie
deviendrait caduque.
Lorsque l’appareil est définitivement
retiré du service, vous devez le dé-
poser dans une usine de recyclage
adaptée pour contribuer à son éli-
mination non polluante.
CARTONS ET EMBALLAGE
PAPIER À TRIER
3 Positionnement de l’appareil
et branchements
L’appareil est prévu pour une installation en
rack 19” (= 482mm). Il peut également être
directement posé sur une table. Pour une ins-
tallation en rack, une unité (1U = 44,45mm)
est nécessaire.
Avant d’effectuer ou de modifier les bran-
chements, assurez-vous que le lecteur CD-
113DPR et les appareils à relier sont éteints.
1) Reliez les sorties LINE OUTPUT
–
L = canal
gauche, R = canal droit
–
via des cordons
RCA aux entrées lecteur CD, par exemple
sur une table de mixage ou un amplificateur.
2)
Reliez le cordon secteur livré à la prise sec-
teur puis à une prise 230V/50Hz.
4 Utilisation
Allumez le lecteur avec l’interrupteur POWER,
sur l’affichage, le message
Welcome
s’af-
fiche.
Tout d’abord le CD est lu. Si aucun CD
n’est inséré, le support USB est lu. Si aucun
support USB n’est relié, la carte mémoire est
lue. Si aucune carte mémoire n’est placée,
l’affichage indique NO DISC.
4.1 Télécommande
1) Pour insérer les batteries (2 × 1,5V, type
R03), retirez le couvercle du comparti-
ment batterie sur la face arrière de la télé-
commande. Insérez les batteries comme
indiqué dans le compartiment, refermez
le compartiment avec le couvercle.
En cas de non utilisation prolongée
de la télécommande, retirez les batteries,
elles pourraient couler et endommager la
télécommande.
2)
Maintenez toujours la télécommande dans
la direction du capteur «IR» lorsque vous
activez une touche. Il ne faut aucun obs-
tacle entre la télécommande et le capteur.
3) Si la portée de la télécommande diminue,
les batteries sont épuisées et doivent être
remplacés.
Ne jetez pas les batteries usagées
dans la poubelle domestique, dépo-
sez-les dans un container spécifique
ou ramenez-les chez votre revendeur.
4.2 Lecture de titres de musique
1)
Insérez un CD, inscription vers le haut,
dans la fente jusqu’à ce qu’il soit auto-
matiquement inséré
et/ou
mettez une clé USB dans le port USB ou
branchez un disque dur (le cas échéant
avec alimentation propre) au port USB
et/ou
mettez une carte mémoire dans la fente
SD/MMC CARD. Le coin oblique de la
carte doit être dirigé vers le haut. Pour re-
tirer la carte, enfoncez-la légèrement pour
qu’elle se désenclenche.
2)
Pour démarrer la lecture, appuyez sur la
touche PLAY/PAUSE II.
3)
Toutes les autres possibilités d’utilisation
sont décrites dans le tableau page 12.
Après le fonctionnement, éteignez l’appa-
reil avec l’interrupteur POWER.
Français
Français Page
Table des matières

11
Français
2 31
5 64
8 97
0
STOP
PROG
DISPLAY
ID3
PLAY
PAUSE
REV – SKIP– CUE
FUNC
A-B
REPEAT
MUTEEJECT
FOLDER
FIND
PLAY 1
REMAIN
REC DEL
4.3 Enregistrements audio
On peut créer des enregistrements MP3
depuis un CD ou un appareil relié aux prises
AUX INPUT [par exemple table de mixage,
tape deck] et les mémoriser sur une carte
mémoire ou une clé USB.
1)
La protection en écriture sur la carte
mémoire ou sur la clé USB ne doit pas être
activée ; si besoin, désactivez-la. Placez
soit une carte mémoire soit une clé USB
dans l’appareil.
2) Appuyez sur la touche FUNC de manière
répétée jusqu’à ce que l’affichage indique
(brièvement) la source d’enregistrement
voulue (AUX ou DISC).
3) Pour des enregistrement d’un CD dans le
lecteur du CD-113DPR, sautez ce point et
allez directement au point 4.
Pour des enregistrements via les prises
AUX INPUT, le témoin REC LEVEL indique
le niveau de signal dès qu’un signal est
présent aux prises. Avec le réglage REC
LEVEL, réglez le niveau d’enregistrement
de telle sorte que la LED jaune brille pour le
volume le plus élevé. Si la LED rouge brille
également, il peut y avoir des distorsions
de signal.
4) Pour démarrer l’enregistrement, appuyez
sur la touche REC . L’appareil prépare l’en-
registrement (l’affichage
RECORD WAIT-
ING....
). Dès que
RECORD Ɗ [CARD]
ou [USB] est affiché, l’enregistrement
s’effectue.
5)
Pour arrêter l’enregistrement, appuyez sur
la touche REC .
Conseil : L’appareil crée un répertoire sur le sup-
port de mémoire pour les enregistrements. Le nom
du répertoire et les noms des enregistrements sont
indiqués dans le tableau suivant.
Source Nom du
répertoire Nom du fichier
CD standard TMC_CDDA
CDDA.mp3
CDDA-001.mp3
CDDA-002.mp3
CDDA-003.mp3
…
CD MP3 TMC_CDROM
le nom du fichier source
est copié pour une
longueur maximale de
32signes
AUX INPUT TMC_AUX
REC_AUX.mp3
REC_AUX-001.mp3
REC_AUX-002.mp3
REC_AUX-003.mp3
…
carte mémoire
clé USB TMC_M2M
le nom du fichier source
est copié pour une
longueur maximale de
32signes
4.4 Copier des titres ou
desrépertoirescomplets
Avec la fonction copie, on peut copier des
titres séparément ou tous les titres d’un ré-
pertoire d’une carte mémoire sur une clé USB
et inversement.
1)
Avec la touche FUNC, sélectionnez le sup-
port de mémoire sur lequel les titres à co-
pier se trouvent (affichage CARD ou USB).
2)
Appuyez sur la touche
REC
. L’affichage
indique brièvement RECORD. Le symbole
loupe en bas à gauche clignote et
Dir
s’affiche à côté. La fonction de recherche
de répertoire est activée.
3) Avec les touches REV – SKIP – CUE, sélec-
tionnez le répertoire devant être copié ou
dans lequel se trouve le titre à copier.
4)
Si le répertoire sélectionné doit être copié,
appuyez sur la touche REC à nouveau ou,
si seul un titre du répertoire sélectionné
doit être copié, maintenez la touche REV
ou CUE enfoncée jusqu’à ce que
File
soit
affiché à côté du symbole loupe. Ensuite,
en appuyant brièvement sur la touche REV
ou CUE, sélectionnez le titre à copier. Dé-
marrez la copie avec la touche REC .
Remarque : Il est possible d’arrêter la copie à n’im-
porte quel endroit de la procédure de copie avec la
touche STOP .
4.5 Effacer des titres séparément
1)
Avec la touche FUNC, sélectionnez le sup-
port de mémoire où se trouve le titre à
effacer (indication CARD ou USB).
2)
Commutez l’appareil sur Stop avec la
touche STOP .
3)
Appuyez brièvement sur la touche
DEL
sur
la télécommande ou maintenez la touche
REC/DEL sur l’appareil enfoncée jusqu’à ce
que l’affichage indique brièvement
DE-
LETE. Le symbole en bas à gauche cli-
gnote, Dir s’affiche à côté. La fonction de
recherche de dossier est activée.
4) Avec les touches REV – SKIP – CUE, sélec-
tionnez le répertoire dans lequel se trouve
le titre à effacer.
5)
Lorsque le répertoire est trouvé, maintenez
la touche REV ou CUE enfoncée jusqu’à ce
que File soit affiché à côté du symbole
. En appuyant brièvement sur la touche
REV ou CUE, sélectionnez le titre à effacer.
6)
Pour effacer, appuyez sur la touche
DEL
ou
REC/DEL. L’affichage indique brièvement
DELETE.
7)
Pour effacer d’autres titres, répétez les
points 3) à 6).
Remarque : Il est possible d’arrêter le processus d’ef
-
facement à n’importe quel endroit de la procédure
d’effacement avec la touche STOP .
5 Entretien
Protégez l’appareil de la poussière, des vibra
-
tions, de l’humidité et de la chaleur (tempéra-
ture de fonctionnement admissible 0–40°C).
Pour le nettoyer, utilisez uniquement un chif-
fon sec et doux, en aucun cas, de produits
chimiques ou d’eau.
Remarque sur les coupures du son et les
erreurs de lecture
La fumée de cigarettes et la poussière s’in-
troduisent facilement dans les ouvertures du
lecteur et se dépose sur l’optique du système
laser. Cela peut générer des erreurs de lecture
et des coupures de son. Dans ce cas, confiez
impérativement le nettoyage du lecteur à un
technicien spécialisé. Cette opération est à la
charge de l’utilisateur, même lorsque l’appa-
reil est sous garantie !
6 Caractéristiques techniques
Bande passante :� � � � � � � � 20 – 20 000 Hz
Taux de distorsion : � � � � � � < 0,1 %
Séparation de canaux :� � � � > 60 dB
Plage dynamique : � � � � � � � > 96 dB
Rapport signal
sur bruit : � � � � � � � � � � � � � > 70 dB
Sortie audio :� � � � � � � � � � � 1,2 V
Sensibilité d’entrée audio :� 300 mV pour
gestion 0 dB
Taux de données pour
enregistrements: � � � � � � � � 128 kBits/s
Cartes mémoire appropriées
SD: � � � � � � � � � � � � � � � � 64 MB – 2 Go
SDHC : � � � � � � � � � � � � � 4 Go – 32 Go
Alimentation : � � � � � � � � � � 230 V/50 Hz
Consommation : � � � � � � � � 50 VA max�
Température fonc� : � � � � � � 0 – 40 °C
Dimensions (L × H × P) : � � 482 × 44 × 265 mm,
1unité
Poids :� � � � � � � � � � � � � � � � 3,9 kg

12
Français
Notice d’utilisation protégée par le copyright de MONACOR
®INTERNATIONAL
GmbH & Co. KG. Toute reproduction même partielle à des fins commerciales
est interdite.
Touche
Fonctionsur la télécommande
sur l’appareil
PLAY MODE ×
Sélecteur sur la face arrière :
AUTO PLAY = la lecture démarre automatique-
ment après l’allumage de l’appareil
NORMAL = après l’allumage, l’appareil est sur
Pause
RANDOM/AUTO PLAY = après l’allumage,
la lecture en ordre aléatoire des titres démarre
automatiquement
FUNC × × Commutation entre CD, port USB et
carte mémoire
II
PLAY/PAUSE
×
×
Démarrer la lecture et
commuter entre lecture et pause
1… 9, 0 × ×
Sélection directe d’un titre, exemples :
titre 8 = touches 8 et II
titre 30 = touches 3, 0 et II
titre 125 = touches 1, 2, 5 et II
REV− SKIP− CUE
×
×
Début de titre, titre précédent/suivant :
Appuyez brièvement sur la touche
Avance/retour rapide :
Maintenez la touche enfoncée (son coupé)
FOLDER × × Aller au premier titre du dossier précédent/suivant
MUTE × Son activé ou désactivé
PLAY 1 ×
Lecture titre par titre (affichage 1Ɗ) :
A la fin d’un titre, l’appareil commute sur Pause.
Pour démarrer le titre suivant, appuyez sur la
toucheII.
REMAIN ×
Commuter entre l’affichage de la durée déjà lue
d’un titre et de la durée restante d’un titre (fonc-
tion uniquement pour des CDs audio standards)
DISPLAY × Commuter les informations dans la ligne inférieure
de l’affichage pendant la lecture de fichiers MP3
ID3 ×
Activer/désactiver les informations pour des fichiers
MP3 défilant dans la ligne supérieure de l’affichage
(nom du fichier, du titre, de l’artiste, de l’album)
A-B ×
Répétition segment d’un titre (boucle continue) :
Appuyez sur la touche au début et à la fin du
segment.
Pour quitter la boucle, appuyez une nouvelle fois
sur la touche.
REPEAT × ×
Fonctions répétition, lecture aléatoire et
lectureintroduction
réglage de base PLAY ALL
tous les titres sont lus une fois.
première pression REPEAT TRACK
répétition continue du titre sélectionné
pression suivante REPEAT FOLDER
répétition continue de tous les titres dans le
dossier sélectionné (fonction uniquement pour
des fichiers MP3)
pression suivante REPEAT ALL
répétition continue de tous les titres
pression suivante RANDOM REPEAT
lecture continue des titres
dans un ordre aléatoire
pression suivante RANDOM PLAY
une seule lecture de tous les titres
dans un ordre aléatoire
pression suivante INT PLAY
lecture introduction : chaque titre est lu pendant
10 secondes
pression suivante PLAY ALL
retour au réglage de base
Touche
Fonctionsur la télécommande
sur l’appareil
FIND × ×
Recherche alphabétique des titres MP3
1. Appuyez sur la touche FIND. Un symbole de
loupe s’affiche en clignotant en bas à gauche
sur l’affichage. A sa droite s’affiche la lettre A
et dans la ligne supérieure le nom du premier
fichier commençant par la lettre A.
2. Avec la touche CUE [avance] ou REV [retour],
sélectionnez la première lettre du nom du
fichier voulu. Les chiffres 0 à 9 peuvent égale-
ment être sélectionnés. Les lettres et chiffres qui
ne débutent aucun titre sur le CD sont toujours
repérés par None.
3. Si plusieurs noms de fichiers ont la même lettre
initiale, sélectionnez la lettre clé puis maintenez
la touche REV ou CUE enfoncée jusqu’à ce que
la lettre à côté du symbole loupe clignote. Tous
les noms de fichiers commençant par la lettre
clé peuvent être sélectionnés avec la touche
REV ou CUE les uns après les autres.
4. Lors de la recherche, l’affichage indique
toujours le numéro du dossier et du titre en
bas à droite. Lorsque le titre voulu est trouvé,
démarrez la lecture avec la toucheII.
PROG × ×
Programmation d’une suite de titres :
1. Appuyez sur la touche PROG.
2. Uniquement pour des fichiers MP3 : Saisissez
le numéro du dossier et appuyez sur la touche
PROG.
3. Saisissez le numéro du titre et appuyez sur la
touche PROG.
4. Programmez tous les titres de la même manière
(64 max.).
5. Démarrez la lecture avec la touche PROG.
Effacer ou interrompre la programmation :
Appuyez sur la touche STOP .
STOP × × Arrêter la lecture
EJECT × × Éjecter le CD
Tout droit de modification réservé.

13
Italiano
Polski
Polski Strona
Spis treści
Español
Español Página
Contenidos
USE ONLY WITH A 250V FUSE
POWER
SD/MMC
CARD
IR
230V~/
50Hz
FUSE
PLAY MODE
AUTO PLAY RANDOM/
AUTO PLAY
NORMAL
2
135
4
6789 0
C D - 113 D P R
STOP PLAY/PAUSE
PROG SKIP
REV
CUE
FOLDER
FIND REPEAT REC/DEL
EJECT REC
LEVEL
FUNC
RL
LINE OUTPUT AUX INPUT
RL
CD-113DPR
Queste istruzioni sono rivolte all‘utente senza
conoscenze tecniche specifiche. Vi preghiamo
di leggerle attentamente prima della messa in
funzione e di conservarle per un uso futuro.
1 Possibilità d’impiego
Il CD-113DPR è adatto per molti impieghi
di sonorizzazione. È in grado di riprodurre
CDaudio standard nonché file MP3 e WMA
di CD, chiavette USB* e schede di memoria*
(max. 32GB).
Per le registrazioni nel formato MP3 su
una scheda di memoria o su una chiavetta
USB è possibile collegare un apparecchio
audio, p.es. radio, tape-deck, mixer. Inoltre
si possono copiare dei titoli nei modi seguenti:
CD chiavetta USB
CD scheda di memoria
chiavetta USB scheda di memoria
scheda di memoria chiavetta USB
*Nota: Dato il grande numero di produttori di
memorie e di driver per apparecchi, non si può
garantire che tutti i mezzi di memoria siano com-
patibili con il CD-113DPR.
2 Avvertenze di sicurezza
Quest’apparecchio è conforme a tutte le di-
rettive rilevanti dell’UE e pertanto porta la
sigla .
AVVERTIMENTO
L’apparecchio funziona con
pericolosa tensione di rete.
Non intervenire mai perso-
nalmente al suo interno.
La manipolazione scorretta
può provocare delle scari-
che elettriche pericolose.
•
Usare l’apparecchio solo all’interno di locali.
Proteggetelo dall’acqua gocciolante e dagli
spruzzi d’acqua nonché da alta umidità del-
l’aria. La temperatura d’esercizio ammessa
è 0–40°C.
•
Non depositare sull’apparecchio dei con-
tenitori riempiti di liquidi, p.es. bicchieri.
•
Non mettere in funzione l’apparecchio e
staccare subito la spina rete se:
1.
l’apparecchio o il cavo rete presentano
dei danni visibili;
2.
dopo una caduta o dopo eventi simili
sussiste il sospetto di un difetto;
3.
l’apparecchio non funziona corretta-
mente.
Per la riparazione rivolgersi sempre ad
un’officina competente.
•
Staccare il cavo rete afferrando la spina,
senza tirare il cavo.
•
Per la pulizia usare solo un panno morbido,
asciutto; non impiegare in nessun caso pro-
dotti chimici o acqua.
•
Nel caso d’uso improprio, di collegamenti
sbagliati, d’impiego scorretto o di ripara-
zione non a regola d’arte dell’apparecchio,
non si assume nessuna responsabilità per
eventuali danni consequenziali a persone
o a cose e non si assume nessuna garanzia
per l’apparecchio.
Se si desidera eliminare l’apparec-
chio definitivamente, consegnarlo
per lo smaltimento ad un’istituzione
locale per il riciclaggio.
3 Collocare e
collegarel’apparecchio
L’apparecchio è previsto per il montaggio in
un rack (482mm/19”), ma può essere col-
locato anche liberamente su un tavolo. Per
il montaggio in un rack e richiesta un’unità
d’altezza (=44,45mm).
Prima di effettuare o modificare i collega-
menti, spegnere il CD-113DPR e gli apparec-
chi da collegare.
1) Collegare le uscite LINE OUTPUT – L = ca-
nale di sinistra, R = canale di destra – con gli
ingressi per lettori CD, p.es. di un mixer o
di un amplificatore, servendosi di cavi RCA.
2)
Inserire il cavo rete in dotazione prima
nella presa e quindi in una presa di rete
(230V/50Hz).
4 Funzionamento
Accendere l’apparecchio con l’interruttore
POWER. Sul display si legge Welcome.
Per prima cosa, l’apparecchio carica i dati
del CD. Se non è inserito nessun CD, sono
caricati i dati della memoria USB. Se non è
collegato nessuna memoria USB, si caricano
i dati della scheda di memoria. Se è assente
anche questa, il display indica NO DISC.
4.1 Telecomando
1) Per inserire le batterie (2 × 1,5V, tipo AAA
= ministilo), togliere il coperchio del vano
batterie sul retro del telecomando. Inserire
le batterie come indicato nel vano stesso e
richiudere il vano con il coperchio.
In caso di mancato uso prolungato,
conviene togliere le batterie per non dan-
neggiare il telecomando se le batterie
dovessero perdere.
2)
Premendo un tasto del telecomando,
tenerlo sempre in direzione del sensore
“IR”. Non ci devono essere ostacoli fra il
telecomando e il sensore.
3)
Se la portata del telecomando diminuisce,
significa che le batterie sono scariche e che
devono essere sostituite.
Non gettare le batterie scariche nelle
immondizie di casa bensì negli appo-
siti contenitori (p.es. presso il vostro
rivenditore).
4.2 Riprodurre titoli musicali
1)
Inserire un CD, con la scritta rivolta in
alto, nella fessura finché non viene ritirata
automaticamente
e/o
inserire una chiavetta USB nella porta
USB o collegare un disco rigido (even-
tualmente con alimentazione individuale)
con la porta USB
e/o
inserire una scheda di memoria nella fessura
SD/MMC CARD, con l’angolo smussato
rivolto in alto. Per togliere nuovamente
la scheda, spingerla un po’ indentro per
sbloccarla.
2)
Per avviare la riproduzione, premere il tasto
PLAY/PAUSE II.
3)
Tutte le ulteriori possibilità di funzio-
namento sono segnalate nella tabella a
pagina 15. Dopo l’uso, spegnere l’ap-
parecchio con l’interruttore di rete POWER.
Italiano
Italiano Pagina
Indice

14
Italiano
2 31
5 64
8 97
0
STOP
PROG
DISPLAY
ID3
PLAY
PAUSE
REV – SKIP– CUE
FUNC
A-B
REPEAT
MUTEEJECT
FOLDER
FIND
PLAY 1
REMAIN
REC DEL
4.3 Registrazioni audio
Da un CD o da un apparecchio collegato con
le prese AUX INPUT [p.es. mixer, tape-deck]
si possono realizzare delle registrazioni MP3
da memorizzare su una scheda di memoria
o su una chiavetta USB.
1)
La protezione da sovrascrittura della
scheda di memoria o della chiavetta USB
non deve essere attivata; se necessario,
disattivarla. Inserire nell’apparecchio una
scheda di memoria oppure una chiavetta
USB.
2) Premere tante volte il tasto FUNC finché
il display visualizza (brevemente) la sor-
gente desiderata per la registrazione (
AUX
o DISC).
3)
Nel caso di un CD inserito nel CD-113DPR,
saltare questo punto e continuare diretta-
mente con il punto 4.
Nel caso di registrazioni tramite le prese
AUX INPUT, le spie di pilotaggio REC LEVEL
indicano il livello del segnale presente alle
prese. Con il regolatore REC LEVEL impo-
stare il livello di registrazione in modo tale
che con il volume più alto si accende il LED
giallo. Se si accende anche il LED rosso
sono possibili delle distorsioni del segnale.
4)
Per avviare la registrazione, premere il tasto
REC
. L’apparecchio prepara la registrazione
(indicazione RECORD WAITING....).
Quando viene visualizzato RECORD Ɗ
[CARD]
o
[USB]
, la registrazione è in
atto.
5) Per terminare la registrazione, premere il
tasto REC .
Nota: Per le registrazioni, l’apparecchio prepara una
cartella sul mezzo di memoria. Il nome della cartella
e i nomi delle registrazioni sono indicati nella tabella
seguente.
Sorgente Nome
cartella Nome file
CD standard TMC_CDDA
CDDA.mp3
CDDA-001.mp3
CDDA-002.mp3
CDDA-003.mp3
…
CD MP3 TMC_CDROM
il nome del file sorgente
viene copiato fino ad una
lunghezza di 32caratteri
AUX INPUT TMC_AUX
REC_AUX.mp3
REC_AUX-001.mp3
REC_AUX-002.mp3
REC_AUX-003.mp3
…
scheda di
memoria
chiavetta USB
TMC_M2M
il nome del file sorgente
viene copiato fino ad una
lunghezza di 32caratteri
4.4 Copiare dei titoli o
dellecartellecomplete
Con la funzione copia si possono copiare titoli
singoli o tutti i titoli di una cartella da una
scheda di memoria su una chiavetta USB e
viceversa.
1)
Con il tasto FUNC scegliere il mezzo di me-
moria sul quale si trovano i titoli da copiare
(indicazione CARD o USB).
2)
Premere il tasto
REC
. Il display visualizza
brevemente
RECORD
. Successivamente, in
basso a sinistra, lampeggia il simbolo della
lente, e di fianco allo stesso si vede Dir.
La funzione di ricerca cartella è attivata.
3) Con i tasti REV – SKIP – CUE scegliere la
cartella che deve essere copiata o nella
quale si trova il titolo di copiare.
4) Se si deve copiare la cartella selezionata,
premere ora nuovamente il tasto REC op-
pure,
se si deve copiare un solo titolo della car-
tella selezionata, tener premuto il tasto
REV o CUE, finché di fianco al simbolo
della lente si vede File. Quindi, toc-
cando leggermente il tasto REV o CUE,
scegliere il titolo da copiare. Avviare la
copiatura con il tasto REC .
Nota: La copiatura può essere interrotta in ogni
momento con il tasto STOP .
4.5 Cancellare singoli titoli
1)
Con il tasto FUNC scegliere la memoria
sulla quale si trova il titolo da cancellare
(indicazione CARD o USB).
2)
Con il tasto STOP mettere l’apparecchio
in stop.
3)
Sul telecomando premere brevemente il
tasto
DEL
o tener premuto il tasto REC/
DEL sull’apparecchio finché il display indica
brevemente DELETE. Quindi, in basso a
sinistra, lampeggia il simbolo e di fianco
si vede Dir. La funzione ricerca cartella
è attivata.
4) Con i tasti REV – SKIP – CUE scegliere la
cartella nella quale si trova il titolo da can-
cellare.
5)
Se la cartella è stata trovata, tener premuto
il tasto REV o CUE, finché di fianco al sim-
bolo si vede File. Quindi, premendo
leggermente il tasto REV o CUE scegliere
il titolo da cancellare.
6)
Per cancellare, premere il tasto
DEL
o
REC/DEL. Il display indica brevemente
DELETE.
7)
Per cancellare altri titoli, ripetere i punti
da 3) a 6).
Nota: La cancellazione può essere interrotta in ogni
momento con il tasto STOP .
5 Cura dell’apparecchio
Proteggere l’apparecchio da polvere, vibra-
zioni, umidità e calore (temperatura d’eser-
cizio ammessa 0–40°C). Per la pulizia usare
solo un panne morbido, asciutto, in nessun
caso acqua o prodotti chimici.
Note su possibili buchi nella riproduzione
e su errori di lettura
Il fumo di sigarette e polvere penetrano facil-
mente fra tutte le aperture dell’apparecchio
e si depositano sul sistema ottico della scan-
sione ai raggi laser. Se ciò dovesse provocare
errori di lettura e buchi nella riproduzione,
l’apparecchio deve essere pulito in un labora-
torio specializzato. Una tale pulizia è a paga-
mento, anche durante il periodo di garanzia!
6 Dati tecnici
Risposta in frequenza: � � � � 20 – 20 000 Hz
Fattore di distorsione: � � � � < 0,1 %
Separazione canali: � � � � � � > 60 dB
Range dinamico: � � � � � � � � > 96 dB
Rapporto S/R: � � � � � � � � � � > 70 dB
Uscita audio: � � � � � � � � � � � 1,2 V
Sensibilità
dell’ingresso audio: � � � � � � 300 mV per
regolazione 0 dB
Data rate per registrazioni:� 128 kBits/s
Schede di memoria adatte
SD: � � � � � � � � � � � � � � � � 64 MB – 2 GB
SDHC: � � � � � � � � � � � � � � 4 GB – 32 GB
Alimentazione: � � � � � � � � � 230 V/50 Hz
Potenza assorbita: � � � � � � � max� 50 VA
Temperatura d’esercizio:� � � 0 – 40 °C
Dimensioni (l × h × p):� � � � 482 × 44 × 265 mm,
1 U (unità d’altezza)
Peso:� � � � � � � � � � � � � � � � � 3,9 kg

15
Italiano
La MONACOR
®INTERNATIONAL GmbH & Co. KG si riserva ogni diritto di ela-
borazione in qualsiasi forma delle presenti istruzioni per l’uso. La riproduzione
– anche parziale – per propri scopi commerciali è vietata.
Tasto
Funzionesul telecomando
sull‘apparecchio
PLAY MODE ×
Interruttore a cursore sul retro:
AUTO PLAY = Dopo l‘accensione dell‘apparecchio
si avvia automaticamente la riproduzione
NORMAL = Dopo l‘accensione, il lettore audio è
in pausa
RANDOM/AUTO PLAY = Dopo l‘accensione si
avvia automaticamente la riproduzione con ordine
casuale dei titoli
FUNC × × Cambio fra CD, porta USB e scheda di memoria
II
PLAY/PAUSE
×
×
Avviare la riproduzione e
cambio fra riproduzione e pausa
1… 9, 0 × ×
Selezione diretta di un titolo, esempi:
Titolo 8 = tasti 8 e II
Titolo 30 = tasti 3, 0 e II
Titolo 125 = tasti 1, 2, 5 e II
REV− SKIP− CUE
×
×
Inizio del titolo, titolo precedente/successivo:
Premere il tasto brevemente
Avanzamento/ritorno veloce:
tenere premuto il tasto (audio disattivato)
FOLDER × × Saltare sul primo titolo della cartella precedente/
successiva
MUTE × Disattivare e attivare l‘audio
PLAY 1 ×
Riproduzione di titoli singoli (indicazione 1Ɗ):
Alla fine di un titolo, l‘apparecchio va in pausa. Per
avviare il titolo successivo premere il tastoII.
REMAIN ×
Cambiare fra la visualizzazione del tempo già
riprodotto di un titolo e il tempo residuo del titolo
(la funzione è presente solo per i
CD audio standard)
DISPLAY × Cambiare, durante la riproduzione di file MP3, le
informazioni nella riga inferiore del display.
ID3 ×
Dissolvenza IN e OUT delle informazioni che scor-
rono per i file MP3 nella riga superiore del display
(nome del file, del titolo, dell‘artista e dell‘albo)
A-B ×
Ripetere una parte del titolo (loop senza fine)
All‘inizio e alla fine della parte premere il tasto.
Per uscire dal loop, premere nuovamente il tasto.
REPEAT × ×
Funzioni di ripetizione, di riproduzione casuale e
diriproduzione degli inizi
Impostazione base PLAY ALL
tutti i titoli sono riprodotti una volta
prima pressione del tasto REPEAT TRACK
ripetizione continua del titolo scelto
ulteriore pressione del tasto REPEAT FOLDER
ripetizione continua di tutti i titoli della cartella
scelta (la funzione è presente solo per i file MP3)
ulteriore pressione del tasto REPEAT ALL
ripetizione continua di tutti i titoli
ulteriore pressione del tasto RANDOM REPEAT
riproduzione continua dei titoli in ordine casuale
ulteriore pressione del tasto RANDOM PLAY
riproduzione unica dei titoli in ordine casuale
ulteriore pressione del tasto INT PLAY
funzione di riproduzione degli inizi: ogni titoli è
riprodotto per 10 sec.
ulteriore pressione del tasto PLAY ALL
ritorna all’impostazione base
Tasto
Funzionesul telecomando
sull‘apparecchio
FIND × ×
Ricerca alfabetica di titoli MP3
1. Premere il tasto FIND. In basso a sinistra del
display appare, lampeggiante, il simbolo di una
lente d’ingrandimento. A destra della stessa è
visualizzata la lettera A, e nella riga superiore
del display si vede il nome del primo file che
inizia con la lettera A.
2. Con il tasto CUE [scorrendo in avanti] o REV
[scorrendo indietro] scegliere la lettera con la
quale inizia il nome del file desiderato. Si pos-
sono digitare anche le cifre 0–9. Per le lettere
e le cifre con le quali non inizia nessun nome
di un file, sarà indicato None.
3. Se sono presenti più nomi che iniziano con la
stessa lettera, dopo la scelta della lettera tener
premuto il tasto REV o CUE finché la lettera
vicino al simbolo della lente comincia a lampeg-
giare. Ora, con il tasto REV o CUE si possono
scegliere, uno dopo l’altro, tutti i nomi di file
con l’iniziale indicata.
4. Durante la ricerca, il display indica sempre, in
basso a destra, il numero della cartella e del
titolo. Se il titolo cercato è stato trovato, avviare
la riproduzione con il tastoII.
PROG × ×
Programmare una sequenza individuale dei titolo:
1. Premere il tasto PROG.
2. Solo per i file MP3: Digitare il numero della
cartella e premere il tasto PROG.
3. Digitare il numero del titolo e premere il tasto
PROG.
4. Programmare in questo modo tutti gli altri titoli
(max. 64).
5. Avviare la riproduzione con il tasto PROG.
Cancellare o interrompere la programmazione:
premere il tasto STOP .
STOP × × Terminare la riproduzione
EJECT × × Espellere il CD
Con riserva di modifiche tecniche.

16
Español
Deutsch
Deutsch Seite
Inhalt
English
English Page
Contents
Français
Français Page
Table des matières
Italiano
Italiano Pagina
Indice
Español
Español Página
Contenidos
Nederlands
Nederlands Pagina
Inhoud
Polski
Polski Strona
Spis treści
USE ONLY WITH A 250V FUSE
POWER
SD/MMC
CARD
IR
230V~/
50Hz
FUSE
PLAY MODE
AUTO PLAY RANDOM/
AUTO PLAY
NORMAL
2
135
4
6789 0
C D - 113 D P R
STOP PLAY/PAUSE
PROG SKIP
REV
CUE
FOLDER
FIND REPEAT REC/DEL
EJECT REC
LEVEL
FUNC
RL
LINE OUTPUT AUX INPUT
RL
CD-113DPR
Estas instrucciones van dirigidas a usuarios
sin ningún conocimiento técnico específico.
Lea atentamente estas instrucciones antes
de utilizar el aparato y guárdelas para usos
posteriores.
1 Aplicaciones
El CD-113DPR está adecuado para todo tipo
de megafonía. Puede reproducir CDs de audio
estándar y archivos MP3 y WMA de CDs,
unidades flash USB* y tarjetas de memoria*
(32GB máx.).
Se puede conectar un aparato de audio
para grabaciones en formato MP3 en una tar-
jeta de memoria o en una unidad flash USB,
p.ej. radio, pletina, mezclador. Además, se
pueden copiar las pistas del siguiente modo:
CD unidad flash USB
CD tarjeta de memoria
Unidad flash USB tarjeta de memoria
Tarjeta de memoria unidad flash USB
*Nota: Debido a la gran cantidad de fabricantes de
medios de almacenamiento y de drivers, no podemos
garantizar que todos los medios de almacenamiento
sean compatibles con el CD-113DPR.
2 Notas de Seguridad
Este aparato cumple con todas las directivas
relevantes de la UE y por lo tanto está mar-
cado con el símbolo .
ADVERTENCIA
El aparato utiliza un voltaje
peligroso. Deje el manteni-
miento en manos del per-
sonal cualificado. El manejo
inexperto o la modificación
del aparato pueden provocar
una descarga.
•
El aparato está adecuado sólo para utili-
zarlo en interiores. Protéjalo contra goteos,
salpicaduras y humedad elevada. Rango de
temperatura ambiente admisible: 0–40ºC.
•
No coloque ningún recipiente con líquido
encima del aparato, p.ej. un vaso.
•
No utilice el aparato y desconecte inmedia-
tamente la toma de corriente del enchufe si:
1. El aparato o el cable de corriente están
visiblemente dañados.
2. El aparato ha sufrido daños después de
una caída o accidente similar.
3. No funciona correctamente.
Sólo el personal cualificado puede reparar el
aparato bajo cualquier circunstancia.
•
No tire nunca del cable de corriente para
desconectarlo de la toma, tire siempre del
enchufe.
•
Utilice sólo un paño suave y seco para la
limpieza; no utilice nunca ni productos quí-
micos ni agua.
•
No podrá reclamarse garantía o responsa-
bilidad alguna por cualquier daño personal
o material resultante si el aparato se utiliza
para otros fines diferentes a los original-
mente concebidos, si no se conecta o se
utiliza adecuadamente o no se repara por
expertos.
Si va a poner el aparato fuera de
servicio definitivamente, llévelo a la
planta de reciclaje de la zona para
que su eliminación no sea perjudicial
para el medio ambiente.
3 Colocación y
ConexióndelLector
El lector está diseñado para su instalación en
un rack (482mm/19”); sin embargo, también
puede colocarse como quiera como aparato
de sobremesa. Para su instalación en rack, se
necesita 1 unidad de rack (1U = 44,45mm).
Antes de hacer o modificar cualquier cone-
xión, desconecte el CD-113DPR y todos los
aparatos que hay que conectar.
1)
Conecte las salidas LINE OUTPUT – L =canal
izquierdo, R = canal derecho – mediante los
cables con conectores RCA a las entradas
de lector CD, p.ej. de un mezclador o un
amplificador.
2) Conecte el cable de corriente entregado
a la toma de corriente y luego al enchufe
(230V/50Hz).
4 Funcionamiento
Conecte el lector con el interruptor POWER.
En el visualizador aparecerá Welcome.
Primero el lector leerá el CD. Si no hay
ningún CD insertado, el lector leerá la unidad
flash USB. Si no hay ninguna unidad flash
USB, el lector leerá la tarjeta de memoria. Si
no hay ninguna tarjeta de memoria insertada,
en el visualizador aparecerá NO DISC.
4.1 Control remoto
1)
Para insertar las baterías (2 × 1,5V, tipo
AAA), extraiga la tapa del compartimento
de la batería de la parte posterior del con-
trol remoto. Inserte las baterías como se
indica en el compartimento de la batería.
Cierre el compartimento con la tapa.
Si el control remoto no se va a utilizar
durante un largo periodo de tiempo, quite
las baterías para prevenir cualquier daño
provocado por el derrame de una batería.
2)
Cuando pulse un botón del control re-
moto, dirija siempre el control remoto
hacia el sensor “IR”. No puede haber obs-
táculos entre el control remoto y el sensor.
3) Si el rango del control remoto disminuye
significa que las baterías se están agotando
y hay que cambiarlas.
Las baterías gastadas no deben de-
positarse en el contenedor normal;
llévelas a un contenedor especial,
p.ej. al contenedor de su vendedor.
4.2 Reproducción de pistas musicales
1)
Inserte un CD con la inscripción hacia
arriba en la ranura hasta que se introduzca
automáticamente
y/o
conecteunaunidadflashUSBalpuertoUSB
o conecte un disco duro (con alimentación
individual si es necesario) al puerto USB
y/o
inserte una tarjeta de memoria en la ranura
SD/MMC CARD, con la esquina biselada
de la tarjeta mirando hacia arriba. Para
extraer la tarjeta, empújela levemente para
expulsarla de la ranura.
2)
Para empezar la reproducción, pulse el
botón PLAY/PAUSEII.
3)
Los otros modos de funcionamiento están
listados en la tabla en la página 18. Des-
pués del funcionamiento, desconecte el
aparato con el interruptor POWER.
Español
Español Página
Contenidos

17
Español
2 31
5 64
8 97
0
STOP
PROG
DISPLAY
ID3
PLAY
PAUSE
REV – SKIP– CUE
FUNC
A-B
REPEAT
MUTEEJECT
FOLDER
FIND
PLAY 1
REMAIN
REC DEL
4.3 Grabaciones de audio
Se pueden hacer grabaciones MP3 desde un
CD o un aparato (p.ej. mezclador, pletina)
conectado a las tomas AUX INPUT y guar-
darlas en una tarjeta de memoria o en una
unidad flash USB.
1)
La protección contra escritura de la tarjeta
de memoria o de la unidad flash USB no
debe desactivarse; si es necesario, desac-
tive la protección. Inserte una tarjeta de
memoria o una unidad flash USB en el
aparato.
2) Pulse el botón FUNC repetidamente hasta
que en el visualizador aparezca (breve-
mente) la fuente de señal deseada (AUX
o DISC).
3) Para grabaciones desde un CD en el me-
canismo de lectura del CD-113DPR salte
este paso y vaya directamente al paso 4.
Para grabaciones mediante las tomas
AUX INPUT, la indicación de nivel REC
LEVEL muestra el nivel de señal en cuanto
hay una señal presente en las tomas.
Ajuste el nivel de grabación con el control
REC LEVEL de modo que el LED amari-
llo se ilumine con el volumen más alto.
Si también se ilumina el LED rojo, puede
distorsionarse la señal.
4)
Para empezar la grabación, pulse el botón
REC . El aparato prepara la grabación (in-
dicación
RECORD WAITING....
). En
cuanto aparece RECORD Ɗ [CARD] o
[USB] iluminado en el margen, se hace
la grabación.
5)
Para parar la grabación, pulse el botón
REC .
Nota: El aparato crea una carpeta para las grabacio-
nes en el medio de almacenamiento. El nombre de
carpeta y los nombres de las grabaciones se indican
en la siguiente tabla.
Fuente Nombre de
carpeta Nombre de archivo
CD estándar TMC_CDDA
CDDA.mp3
CDDA-001.mp3
CDDA-002.mp3
CDDA-003.mp3
…
CD de MP3 TMC_CDROM
se copia el nombre del
archivo de origen hasta un
máximo de 32caracteres
AUX INPUT TMC_AUX
REC_AUX.mp3
REC_AUX-001.mp3
REC_AUX-002.mp3
REC_AUX-003.mp3
…
tarjeta de
memoria
unidad
flashUSB
TMC_M2M
se copia el nombre del
archivo de origen hasta un
máximo de 32caracteres
4.4 Copiar pistas o carpetas enteras
Con la función de copia, se pueden copiar
pistas individuales o todas las pistas de una
carpeta desde una tarjeta de memoria a una
unidad flash USB y viceversa.
1) Utilice el botón FUNC para seleccionar el
medio de almacenamiento que contiene
las pistas que hay que copiar (indicación
CARD o USB).
2)
Pulse el botón
REC
. En el visualizador
aparece brevemente
RECORD
. Luego el
símbolo de lupa parpadea en la parte infe-
rior izquierda y a su lado aparece Dir. Se
activa la función de buscar carpeta.
3) Utilice los botones REV – SKIP – CUE para
seleccionar la carpeta que hay que copiar
o la carpeta que contiene la pista que hay
que copiar.
4) Para copiar la carpeta seleccionada, pulse
ahora el botón REC de nuevo o
para copiar sólo una pista de la carpeta
seleccionada, mantenga pulsado el botón
REV o CUE hasta que aparezca File
junto al símbolo de lupa. Pulse brevemente
el botón REV o CUE para seleccionar la
pista que hay que copiar. Empiece la copia
con el botón REC .
Nota: El proceso de copia puede pararse en cualquier
momento con el botón STOP .
4.5 Borrar pistas individuales
1) Utilice el botón FUNC para seleccionar el
medio de almacenamiento que contiene la
pista que hay que borrar (indicación
CARD
o USB).
2) Ponga el aparato en pausa con el botón
STOP .
3) Pulse brevemente el botón DEL del con-
trol remoto o mantenga pulsado el botón
REC/DEL del aparato hasta que en visua-
lizador aparezca brevemente DELETE.
Luego el símbolo parpadea en la parte
inferior izquierda y a su lado aparece
Dir
.
Se activa la función de buscar carpeta.
4) Utilice los botones REV – SKIP – CUE para
seleccionar la carpeta que contiene la pista
que hay que borrar.
5)
Cuando haya encontrado la carpeta,
mantenga pulsado el botón REV o CUE
hasta que aparezca File junto al símbolo
. Luego pulse brevemente el botón REV
o CUE para seleccionar la pista que hay
que borrar.
6)
Para borrar, pulse el botón
DEL
o REC/DEL.
En el visualizador aparece brevemente
DELETE.
7)
Para borrar más pistas, repita los pasos
3) a 6).
Nota: El proceso de borrado puede pararse en cual-
quier momento con el botón STOP .
5 Mantenimiento
Proteja el lector del polvo, de las vibraciones,
de la humedad y del calor (temperatura am-
biente admisible: 0–40 ºC). Utilice sólo un
paño suave y seco para la limpieza; no utilice
nunca ni productos químicos ni agua.
Nota referente a las interrupciones de
sonido y los errores de lectura
El humo del tabaco y el polvo pueden pene-
trar fácilmente a través de todas las aperturas
del aparato y depositarse en las ópticas de
los sistemas de muestreo láser. Si estos restos
causan errores de lectura o interrupciones del
sonido, el personal cualificado deberá lim-
piar el aparato. Tenga en cuenta que habrá
un cargo por la limpieza, ¡incluso durante el
periodo de garantía!
6 Especificaciones
Rango de frecuencias: � � � � 20 – 20 000 Hz
THD: � � � � � � � � � � � � � � � � � < 0,1 %
Separación de canal: � � � � � > 60 dB
Dinámica: � � � � � � � � � � � � � > 96 dB
Relación sonido/ruido:� � � � > 70 dB
Salida de audio:� � � � � � � � � 1,2 V
Sensibilidad de entrada
de audio:� � � � � � � � � � � � � � 300 mV para control
de nivel 0 dB
Velocidad de datos
para grabaciones: � � � � � � � 128 kbits/s
Tarjetas
de memoria adecuada
SD: � � � � � � � � � � � � � � � � 64 MB – 2 GB
SDHC: � � � � � � � � � � � � � � 4 GB – 32 GB
Alimentación: � � � � � � � � � � 230 V/50 Hz
Consumo: � � � � � � � � � � � � � 50 VA máx�
Temperatura ambiente: � � � 0 – 40 °C
Dimensiones (B × H × P): � 482 × 44 × 265 mm,
1 U
Peso:� � � � � � � � � � � � � � � � � 3,9 kg

18
Español
Botón
FunciónEn el control remoto
En el aparato
PLAY MODE ×
Interruptor deslizante de la parte posterior:
AUTO PLAY = La reproducción empezará auto-
máticamente después de que el aparato se haya
conectado
NORMAL = El aparato se pondrá en pausa después
de que el aparato se haya conectado
RANDOM/AUTO PLAY = La reproducción en orden
aleatorio empezará automáticamente después de
que el aparato se haya conectado
FUNC × × Para conmutar entre CD, puerto USB y
tarjeta de memoria
II
PLAY/PAUSE
×
×
Para iniciar la reproducción y para conmutar entre
reproducción y pausa
1… 9, 0 × ×
Selección directa de pista, ejemplos:
Pista 8 = botones 8 y II
Pista 30 = botones 3, 0 y II
Pista 125 = botones 1, 2, 5 y II
REV− SKIP− CUE
×
×
Inicio de la pista, pista anterior/siguiente:
Pulse el botón brevemente
Avance/retroceso rápido:
Mantenga el botón pulsado
(sonido silenciado en el proceso).
FOLDER × × Para ir a la primera pista de la anterior/
siguiente carpeta
MUTE × Para silenciar y devolver el sonido
PLAY 1 ×
Reproducción de una pista individual
(indicación 1Ɗ):
Al final de una pista, el lector se pone en pausa.
Para iniciar la siguiente pista, pulse el botónII.
REMAIN ×
Para conmutar entre la indicación del tiempo trans-
currido de una pista y el tiempo restante de una pista
(función disponible sólo para CDs de audio estándar)
DISPLAY × Para cambiar la información en la línea inferior del
visualizador durante la reproducción de archivos MP3
ID3 ×
Para activar/desactivar información sobre archivos
MP3 que se desplaza por la línea superior del visuali-
zador (nombre de archivo, nombre de pista, nombre
de artista y álbum)
A-B ×
Repetición de la sección de pista (bucle continuo):
Pulse el botón al iniciar y acabar la sección.
Pulse el botón de nuevo para salir del bucle.
REPEAT × ×
Para seleccionar las funciones de repetición,
de reproducción aleatoria y de función intro
Ajuste básico PLAY ALL
Todas las pistas se reproducirán una vez
Primera actuación del botón REPEAT TRACK
La pista seleccionada se repetirá continuamente
Siguiente actuación del botón REPEAT FOLDER
Todas las pistas de la carpeta seleccionada se
repetirán continuamente
(función disponible sólo para archivos MP3)
Siguiente actuación del botón REPEAT ALL
Todas las pistas se repetirán continuamente
Siguiente actuación del botón RANDOM REPEAT
Se reproducirán todas las pistas continuamente
en orden aleatorio
Siguiente acción del botón RANDOM PLAY
Las pistas se reproducirán una vez
en orden aleatorio
Siguiente acción del botón INT PLAY
Función intro: Se reproducen los 10 primeros
segundos de cada pista
Siguiente actuación del botón PLAY ALL
Vuelve al ajuste básico
Botón
FunciónEn el control remoto
En el aparato
FIND × ×
Búsqueda alfabética de pistas MP3
1. Pulse el botón FIND. Parpadeará un símbolo de
lupa en la parte inferior izquierda del visualizador.
A su derecha aparecerá la letra Ay en la línea
superior del visualizador el nombre del primer
archivo que empiece con la A.
2. Pulse el botón CUE [hacia delante] o REV [hacia
atrás] para seleccionar la primera letra del nombre
del archivo que quiera. También están disponibles
los numerales 0– 9. Si no hay nombres de archivo
que empiecen con ciertas letras o números, se
marcan como None.
3. Si hay varios nombres de archivo que empiezan
con la misma letra, seleccione la letra y mantenga
pulsado el botón REV o CUE hasta que la letra
empiece a parpadear junto al símbolo de la lupa.
Todos los nombres de archivo que empiecen con
la letra estarán disponibles para seleccionarse uno
tras otros con el botón REV o CUE.
4. Durante la búsqueda, el visualizador siempre mos-
trará el número de la carpeta y de la pista en la
parte inferior derecha. Cuando haya encontrado
la pista que quería, inicie la reproducción con el
botónII.
PROG × ×
Para programar una secuencia de pistas individual:
1. Pulse el botón PROG.
2. Sólo para archivos MP3: Entre el número de
carpeta y pulse el botón PROG.
3. Entre el número de pista y pulse el botón PROG.
4. Repita estos pasos para programar el resto de
pistas (64 máx.).
5. Pulse el botón PROG para iniciar la reproducción.
Para borrar o cancelar la secuencia,
pulse el botón STOP .
STOP × × Para parar la reproducción
EJECT × × Para expulsar el CD
Sujeto a modificaciones técnicas.
Manual de instrucciones protegido por el copyright de MONACOR
®INTER-
NATIONAL GmbH & Co. KG. Toda reproducción mismo parcial para fines
comerciales está prohibida.

19
Polski
Italiano
Italiano Pagina
Indice
Español
Español Página
Contenidos
USE ONLY WITH A 250V FUSE
POWER
SD/MMC
CARD
IR
230V~/
50Hz
FUSE
PLAY MODE
AUTO PLAY RANDOM/
AUTO PLAY
NORMAL
2
135
4
6789 0
C D - 113 D P R
STOP PLAY/PAUSE
PROG SKIP
REV
CUE
FOLDER
FIND REPEAT REC/DEL
EJECT REC
LEVEL
FUNC
RL
LINE OUTPUT AUX INPUT
RL
CD-113DPR
Niniejsza instrukcja przeznaczona jest dla
użytkowników, którzy nie posiadają wiedzy i
doświadczenia technicznego. Przed rozpoczę-
ciem użytkowania proszę zapoznać się z in-
strukcją, a następnie zachować ją do wglądu.
1 Zastosowanie
Odtwarzacz CD-113DPR jest odpowiedni do
zastosowań w wielu systemach PA. Pozwala
na odtwarzanie standardowych płyt audio
CD, płyt CD z plikami MP3 i WMA, a także
plików z pamięci przenośnych USB* oraz kart
SD/MMC* (max 32 GB).
Urządzenie umożliwia także nagrywanie
dźwięku do pliku MP3 na karcie pamięci lub
nośniku USB np. z tunera, magnetofonu, mik-
sera. Dodatkowo, pozwala na kopiowanie
plików pomiędzy nośnikami:
CD pamięć przenośna USB
CD karta pamięci
pamięć przenośna USB karta pamięci
karta pamięci pamięć przenośna USB
*Uwaga: Ze względu na dużą ilość producentów
nośników, producent nie gwarantuje kompaty-
bilności odtwarzacza CD-113DPR ze wszystkimi
dostępnymi na rynku nośnikami.
2 Środki bezpieczeństwa
Urządzenie spełnia wszystkie wymagania
norm UE, dzięki czemu zostało oznaczone
symbole .
UWAGA Urządzenie jest zasilane niebez-
piecznym dla życia napięciem
zmiennym. Naprawą urządzenia
może zajmować się tylko prze-
szkolony personel. Samodzielne
otwarcie obudowy urządzenia
może spowodować porażenie
prądem elektrycznym.
•
Urządzenie przeznaczone jest wyłącznie
do użytku wewnątrz pomieszczeń. Należy
chronić je przez wodą, dużą wilgotnością
oraz wysoką temperaturą (dopuszczalny
zakres wynosi 0– 40 °C).
•
Nie wolno stawiać na urządzeniu żadnych
pojemników z cieczą np. szklanek.
•
Nie wolno używać urządzenia lub na-
tychmiast odłączyć wtyczkę zasilającą z
gniazdka
1. jeżeli stwierdzono istnienie widocznego
uszkodzenia urządzenia lub kabla zasi-
lającego,
2.
jeżeli uszkodzenie urządzenia mogło
nastąpić w wyniku upadku lub innego
podobnego zdarzenia,
3. jeżeli urządzenie działa nieprawidłowo.
Naprawą urządzenia może zajmować się
wyłącznie przeszkolony personel.
•
Nie wolno odłączać urządzenia z gniazdka
sieciowego ciągnąc za kabel zasilania, na-
leży zawsze chwytać za wtyczkę.
•
Do czyszczenia urządzenia należy używać
suchej, miękkiej tkaniny. Nie stosować
wody ani środków chemicznych.
•
Producent ani dostawca nie ponoszą od-
powiedzialności za wynikłe szkody (uszko-
dzenie sprzętu lub obrażenia użytkownika),
jeśli urządzenie było używane niezgodnie
z ich przeznaczeniem, nieprawidłowo za-
montowane, podłączone lub obsługiwane
bądź poddane nieautoryzowanej naprawie.
Po całkowitym zakończeniu eksplo-
atacji urządzenia, należy oddać je do
punktu recyklingu, aby nie zaśmie-
cać środowiska.
3 Przygotowanie do pracy
ipodłączanie
Urządzenie przystosowane jest do montażu
w racku (482mm/19”), ale może również
pracować jako wolnostojące. Przy montażu
w racku zajmuje przestrzeń 1U (44,45mm).
Przed przystąpieniem do podłączania lub
zmiany połączeń należy bezwzględnie wyłą-
czyć odtwarzacz CD-113DPR oraz podłączane
urządzenia.
1) Połączyć wyjścia LINE OUTPUT – L = lewy
kanał, R = prawy kanał – za pomocą kabli
wyposażonych w złącza RCA, z wejściami
liniowymi miksera lub wzmacniacza.
2)
Podłączyć kabel zasilający do gniazda zasi-
lającego, a następnie do gniazdka siecio-
wego (230V/50Hz).
4 Obsługa
Włączyć urządzenie przyciskiem POWER.
Na wyświetlaczu pojawi się komunikat
Welcome.
Odtwarzacz wczytuje płytę CD. Jeżeli
mechanizmie nie ma płyty CD, urządzenie
wczyta zawartość nośnika USB. Jeżeli nie
podłączono nośnika USB – zawartość karty
SD/MMC. Jeżeli nie ma karty pojawi się ko-
munikat NO DISC.
4.1 Zdalne sterowanie
1)
Aby włożyć baterie (2 × 1,5V bateria AAA)
do pilota, należy zdjąć pokrywę komory
bateryjnej na tylnej stronie. Po włożeniu
baterii, zgodnie z oznaczeniem wewnątrz,
zamknąć pokrywę.
Jeżeli pilot nie będzie przez dłuższy czas
wykorzystywany, należy wyjąć z niego ba-
terie.
2)
Podczas korzystania z pilota, należy kie-
rować go w stronę urządzenia, na czujnik
“IR”. Między czujnikiem a pilotem nie po-
winny się znajdować żadne przeszkody.
3)
Jeżeli zmniejszy się dystans działania pilota,
należy wymienić baterie na nowe.
Zużyte baterie należy wyrzucać do
specjalnych pojemników, nie do
zwykłych koszy na śmieci.
4.2 Odtwarzanie
1)
Wsunąć płytę CD, stroną zadrukowaną do
góry, w szczelinę aż zostanie automatycz-
nie wciągnięta
i/lub
podłączyć nośnik USB lub twardy dysk USB
(z osobnym zasilaniem) do złącza USB na
urządzeniu
i/lub
włożyć kartę pamięci do czytnika SD/MMC
CARD, ściętym rogiem do przodu. Aby
wyjąć kartę, należy najpierw lekko ją
wcisnąć.
2)
Rozpocząć odtwarzanie przyciskiem PLAY/
PAUSE II.
3)
Funkcje poszczególnych przycisków oraz
opcje sterowania zawarto w tabeli na
stronie 21. Po zakończeniu pracy, wy-
łączyć odtwarzacz CD/MP3 przełącznikiem
POWER.
Polski
Polski Strona
Spis treści

20
Polski
2 31
5 64
8 97
0
STOP
PROG
DISPLAY
ID3
PLAY
PAUSE
REV – SKIP– CUE
FUNC
A-B
REPEAT
MUTEEJECT
FOLDER
FIND
PLAY 1
REMAIN
REC DEL
4.3 Nagrywanie audio
Urządzenie umożliwia także nagrywanie
dźwięku do pliku MP3 na karcie SD/MMC
lub nośniku USB z płyty CD lub urządzenia
(tunera, magnetofonu, miksera) podłączo-
nego do wejścia AUX INPUT.
1)
Zabezpieczenie przed zapisem na karcie
pamięci lub nośniku USB musi być wyłą-
czone. Włożyć kartę do czytnika lub pod-
łączyć pamięć USB do urządzenia.
2)
Wcisnąć kilka razy przycisk FUNC aż na
wyświetlaczu pojawi się (na krótko) źródło
dźwięku (AUX lub DISC).
3)
W przypadku nagrywania z płyty CD z me-
chanizmu CD-113DPR przejść do kroku 4.
W przypadku nagrywania z zewnętrz-
nego urządzenia poprzez wejście AUX
INPUT, zwrócić uwagę na wskaźnik REC
LEVEL pokazujący poziom sygnału na
wejściu. Do regulacji służy pokrętło REC
LEVEL. Należy ustawić taką wartość, aby
żółta dioda zapalała się tylko przy warto-
ściach szczytowych sygnału.
4)
Aby rozpocząć nagrywanie wcisnąć
przycisk
REC
. Po chwili przygotowania
(wskazanie RECORD WAITING....)
rozpoczyna się rejestracja: wskazanie
RE-
CORD Ɗ [CARD] lub [USB].
5)
Aby zakończyć nagrywanie, wcisnąć przy
-
cisk REC .
Uwaga: Nagrywane pliki umieszczane są w nowym
folderze na nośniku. Nazwy folderu oraz plików
pokazano w poniższej tabeli.
Źródło Nazwa
folderu
Nazwa
pliku
Standardowa
płyta CD TMC_CDDA
CDDA.mp3
CDDA-001.mp3
CDDA-002.mp3
CDDA-003.mp3
…
MP3 CD TMC_CDROM
skopiowana nazwa
pliku źródłowego do
32znaków
AUX INPUT TMC_AUX
REC_AUX.mp3
REC_AUX-001.mp3
REC_AUX-002.mp3
REC_AUX-003.mp3
…
karta pamięci
lub nośnik USB TMC_M2M
skopiowana nazwa
pliku źródłowego do
32znaków
4.4 Kopiowanie utworów oraz
całychfolderów
Za pomocą funkcji kopiowania, możliwe
jest kopiowanie pojedynczych utworów
oraz wszystkich utworów z folderu z karty
SD/MMC na nośnik USB i vice versa.
1)
Wybrać nośnik (wskazanie
CARD
lub
USB
)
zawierający utwory do skopiowania przy-
ciskiem FUNC.
2)
Wcisnąć przycisk
REC
. Na wyświetlaczu
pojawi się wskazanie RECORD. Następnie
pojawi się migający symbol lupy oraz
Dir
po jego prawej stronie. Funkcja wyszuki-
wania folderów jest włączona.
3)
Wybrać folder do kopiowania lub folder
zawierający odpowiednie pliki przyciskami
REV – SKIP – CUE.
4) W celu skopiowania całego folderu, wci-
snąć ponownie przycisk REC lub
aby skopiować pojedynczy utwór z wy-
branego folderu, przytrzymać wciśnięty
przycisk REV lub CUE aż obok symbolu
lupy pojawi się wskazanie File. Wcisnąć
na krótko przycisk REV lub CUE aby wybrać
odpowiedni plik. Rozpocząć kopiowanie
przyciskiem REC .
Uwaga: Kopiowanie może zostać przerwane w każ-
dej chwili, za pomocą przycisku STOP .
4.5 Kasowanie pojedynczych utworów
1)
Wybrać nośnik (wskazanie
CARD
lub
USB
)
zawierający utwory do skasowania przyci-
skiem FUNC.
2)
Zatrzymać odtwarzanie przyciskiem
STOP .
3)
Wcisnąć na krótko przycisk
DEL
na pi-
locie lub przytrzymać wciśnięty przycisk
REC/DEL na urządzeniu, aż na wyświetla-
czu pojawi się na krótko wskazanie DE-
LETE. Następnie, w lewym dolnym rogu
wyświetlacza zacznie migać symbol oraz
pojawi się obok wskazanie Dir. Funkcja
wyszukiwania folderów jest aktywna.
4)
Wybrać folder zawierający odpowiedni plik
przyciskami REV – SKIP – CUE.
5)
Po znalezieniu folderu, przytrzymać wci-
śnięty przycisk REV lub CUE aż obok sym-
bolu pojawi się wskazanie File. Wci-
snąć na krótko przycisk REV lub CUE aby
wybrać odpowiedni plik.
6)
Rozpocząć kasowanie przyciskiem
DEL
lub
REC/DEL. Wyświetlacz pokaże na krótko
DELETE.
7) Aby skasować kolejne utwory, powtórzyć
kroki 3) do 6).
Uwaga: Kasowanie może zostać przerwane w każ-
dej chwili, za pomocą przycisku STOP .
5 Konserwacja urządzenia
Urządzenie należy chronić przed kurzem,
wstrząsami, silnym światłem słonecznym
dużą wilgotnością oraz wysoką temperaturą
(dopuszczalny zakres wynosi 0– 40 ºC). Do
czyszczenia urządzenia należy używać suchej,
miękkiej tkaniny. Nie należy stosować wody
ani chemicznych środków czyszczących.
Uwagi dotyczące zakłóceń dźwięku
i błędówodczytu
Wpływ dymu papierosowego oraz kurzu może
spowodować błędy przy odczycie płyt CD.
Niestety uniknięcie szkodliwych warunków nie
zawsze jest możliwe (np. w dyskotekach).
W takim przypadku należy zlecić okresowe
czyszczenie urządzenia przez autoryzowany
serwis.
6 Specyfikacja
Pasmo przenoszenia: � � � � � 20 – 20 000 Hz
THD: � � � � � � � � � � � � � � � � � < 0,1 %
Separacja kanałów: � � � � � � > 60 dB
Zakres dynamiki: � � � � � � � � > 96 dB
Stosunek S/N: � � � � � � � � � � > 70 dB
Wyjście audio: � � � � � � � � � � 1,2V
Czułość wejścia audio:� � � � 300 mV przy
regulatorze ustawio-
nym na 0 dB
Współczynnik nagrywania: � 128 kbits/sek�
Odpowiednie karty SD
SD: � � � � � � � � � � � � � � � � 64 MB – 2 GB
SDHC: � � � � � � � � � � � � � � 4 GB – 32 GB
Zasilanie:� � � � � � � � � � � � � � 230 V/50 Hz
Pobór mocy: � � � � � � � � � � � 50 VA max
Zakres temperatur:� � � � � � � 0 – 40 °C
Wymiary (S × W × G): � � � � 482 × 44 × 265 mm,
1 U
Waga:� � � � � � � � � � � � � � � � 3,9 kg
Table of contents
Languages:
Other Monacor Recording Equipment manuals

Monacor
Monacor IMG STAGELINE MX-1IO User manual

Monacor
Monacor ATT-306 User manual

Monacor
Monacor AR-30 User manual

Monacor
Monacor PA ATT-306 User manual

Monacor
Monacor DMR-1608A User manual

Monacor
Monacor ATT-306PEU User manual

Monacor
Monacor EVAB-22 User manual

Monacor
Monacor PA-100ANC User manual

Monacor
Monacor PA-24FR User manual

Monacor
Monacor DMR-408A User manual