manuals.online logo
Brands
  1. Home
  2. •
  3. Brands
  4. •
  5. Monark
  6. •
  7. Exercise Bike
  8. •
  9. Monark Ergomedi 894 E User manual

Monark Ergomedi 894 E User manual

Other manuals for Ergomedi 894 E

3

Other Monark Exercise Bike manuals

Monark 808 User manual

Monark

Monark 808 User manual

Monark LC4 User manual

Monark

Monark LC4 User manual

Monark 939 novo User manual

Monark

Monark 939 novo User manual

Monark Sprint Bike Ergomedic 884E User manual

Monark

Monark Sprint Bike Ergomedic 884E User manual

Monark Ergomedi 894 E User manual

Monark

Monark Ergomedi 894 E User manual

Monark 827E User manual

Monark

Monark 827E User manual

Monark 927 E Cardio Care User manual

Monark

Monark 927 E Cardio Care User manual

Monark 839 E User manual

Monark

Monark 839 E User manual

Monark 928 G2 User manual

Monark

Monark 928 G2 User manual

Monark 839 User manual

Monark

Monark 839 User manual

Monark RT2 User manual

Monark

Monark RT2 User manual

Monark 808 User manual

Monark

Monark 808 User manual

Monark Cardio Care 927 E User manual

Monark

Monark Cardio Care 927 E User manual

Monark Ergomedic 874 E User manual

Monark

Monark Ergomedic 874 E User manual

Monark 915E User manual

Monark

Monark 915E User manual

Monark 927 E Cardio Care User manual

Monark

Monark 927 E Cardio Care User manual

Monark 915E User manual

Monark

Monark 915E User manual

Monark Ergomedi 894 E User manual

Monark

Monark Ergomedi 894 E User manual

Monark LT2 User manual

Monark

Monark LT2 User manual

Monark 928 E User manual

Monark

Monark 928 E User manual

Monark Ergomedic 874 E User manual

Monark

Monark Ergomedic 874 E User manual

Monark homeline C100 User manual

Monark

Monark homeline C100 User manual

Monark 828E User manual

Monark

Monark 828E User manual

Monark LC6 novo User manual

Monark

Monark LC6 novo User manual

Popular Exercise Bike manuals by other brands

BH BLADEZ 200U owner's manual

BH

BH BLADEZ 200U owner's manual

Eco-De ECO-800 Instruction guide

Eco-De

Eco-De ECO-800 Instruction guide

Nautilus Be Strong Commercial Series U916 owner's manual

Nautilus

Nautilus Be Strong Commercial Series U916 owner's manual

NordicTrack Gx 3.1 Bike Manual Del Usuario

NordicTrack

NordicTrack Gx 3.1 Bike Manual Del Usuario

NordicTrack Gx 3.1 Bike Instrukcja obsŁugi

NordicTrack

NordicTrack Gx 3.1 Bike Instrukcja obsŁugi

Tomahawk IC3 manual

Tomahawk

Tomahawk IC3 manual

GPI Sports & Fitness BODYWORX ABX250M manual

GPI Sports & Fitness

GPI Sports & Fitness BODYWORX ABX250M manual

Trixter X-Bike user manual

Trixter

Trixter X-Bike user manual

TOORX BRX85 Instruction

TOORX

TOORX BRX85 Instruction

Matrix KranKcycle user manual

Matrix

Matrix KranKcycle user manual

Weslo Vector 302 Bedienungsanleitung

Weslo

Weslo Vector 302 Bedienungsanleitung

Matrix IC3 manual

Matrix

Matrix IC3 manual

Sunny Health & Fitness SF-B121021 user manual

Sunny Health & Fitness

Sunny Health & Fitness SF-B121021 user manual

Stamina 1310 owner's manual

Stamina

Stamina 1310 owner's manual

American Fitness SPR-BK1072A owner's manual

American Fitness

American Fitness SPR-BK1072A owner's manual

Cateye CS-1000 (CYCLO SIMULATOR) Service manual

Cateye

Cateye CS-1000 (CYCLO SIMULATOR) Service manual

BH FITNESS H9158H Instructions for assembly and use

BH FITNESS

BH FITNESS H9158H Instructions for assembly and use

Body Sculpture BC-7220G manual

Body Sculpture

Body Sculpture BC-7220G manual

manuals.online logo
manuals.online logoBrands
  • About & Mission
  • Contact us
  • Privacy Policy
  • Terms and Conditions

Copyright 2025 Manuals.Online. All Rights Reserved.

MANUAL
Monark Ergometer 894E
CONTENTS
Page
Assembly instructions 5-7
Brake belt/cord replacement 12
Brake belt/cord adjusting 12
Brake surface - flywheel 13
Chain 14
Crank bearing 16
Fitness computer 9
Flywheel bearing 16
General 4
General about exercise 16-17
Operation instruction 8-9
Replacement of batteries 11
Replacement of freewheel sprocket 15
Service checklist 16
Warrenty 4
3
4
CONGRATULATIONS ON YOUR NEW EXERCISE BIKE
designed by Monark Exercise AB, Sweden. Monark has been the world’s leading manufacturer of
high quality ergometers and exercise cycles for more than 40 years.
GENERAL
It is important that you keep your ergometer clean and properly lubricated. Most important is to
protect the chromed and zinced parts but also painted parts benefit from the same protection.
When cleaning and lubricating be sure to check that all screws and nuts are properly tightened.
Be sure that all moving parts as crank and flywheel is working normal and that no unnormal play
or sound excists. i. e. play in bearings causes fast waring and with that follows a highly reduced
lifetime.
NOTE: The serial number of your test cycle is placed according to fig 1 page 6.
WARRANTY
As on any quality product there may be an exceptional fault due to material or manufacture. If
such a fault should arise on your exercise cycle, please return to the place of purchase for
necessary repair.
Monark products and parts are guaranteed against defects in materials and workmanship for a pe-
riod of one year from the initial date of purchase of the unit.
Parts found to need replacement due to normal wear and tear, such as brake belts, are not covered.
This guarantee covers parts only, not labor costs associated with the repair.
This guarantee does not apply to cases of abuse or vandalism, nor does it extend to any injury or
loss to person or property caused directly or indirectly by any Monark products.
In the event of a defect in material or workmanship during the warranty period, Monark Exercise
will repair or replace (at its option) the product. Monark Exercise will do so at its expense for the
cost of materials but not for labour or shipping
PARTS BELOW ARE NOT ASSEMBLED.
ASSEMBLY INSTRUCTION:
See pages 5-7.
HANDLEBAR/HANDLEBAR STEM
PEDAL, LEFT
PEDAL, RIGHT
SUPPORTING TUBE, FRONT
SUPPORTING TUBE, REAR
WEIGHT HOLDER
5
6
Fig 4
Fig. 1
Fig. 2
8 cm
Tip the cycle forward. Assemble the rear sup-
porting tube with two bolts and two nuts.
NOTE: Use the accompanying spanner.
See fig 1.
Tip the cycle backwards. Assemble the front
supporting tube with two nuts onto the two
fixed bolts.
NOTE: Use the accompanying spanner.
See fig 2.
Before the handlebar stem is assembled be
sure the expanding wedge is loose. Insert the
handlebar stem into the frame tube and tighten
the expanding bolt firmly by means of the le-
ver.
NOTE: The handlebar stem should be
inserted into the frame tube at least 3
inches (about 8 cm). See fig. 4.
Usually this measure is marked out on the
stem.
To change the height of the handlebar, loosen
the expanding bolt about 5 mm. Give the bolt
a light punch to release the expanding wedge.
Adjust the handlebar to the desired position
and tighten the expanding bolt again by means
of the lever.
In order to change the position of the
handlebar, loosen the expanding bolt one turn.
Adjust to desired angle of handlebar and
tighten the expanding bolt/lever firmly again.
Serial number
Fig. 5
7
Unscrew the two lower nuts holding the tension
device frame.
Put on the weight holder as in fig. 6.
Screw on and tighten firmly the two nuts again.
Fig. 6
Pedal marked R (Right) is to be assembled on
the right hand side of the cycle (the chain
wheel side). The pedal axle has a right hand
thread and must be threaded onto the crank
clockwise. Tighten firmly. See fig 5.
Pedal marked L (Left) is to be assembled on
the left hand side of the cycle. The pedal axle
has a left hand thread and must be threaded
onto the crank counter clockwise. Tighten
firmly. See fig 5.
NOTE! Check now and then that both
pedals are still firmly tightened. If not the
threading in the pedal arms will be
damaged.
Also check that the pedal arms are firmly
tightened on the crank axle. If nessecary
tighten the axle bolt. See fig. 5.
Fig. 3
Post bracket
Saddle post
locking bolt
Check that the inclination of the saddle is
comfortable and that the sadle post bracket
is firmly tightened. In order to change the
inclination of the saddle, loosen the saddle
bracket and tighten firmly again.
Adjust to desired height position of
saddle/saddle post by loosening the saddle
post locking bolt.
NOTE: Tighten firmly. See fig 3.
”L” left
”R” right
Axle bolt
8
Fig. 7
OPERATION INSTRUCTION
NOTE! The use of Ergometer 894E can be fysically very strenuous why it is highly
recommended to consult a doctor before use for persons not used to hard exercise and
if you not feel perfectly healthy.
Monark Ergometer model 894E is a test cycle, which have a braking system, of which workload
can be set by weights in a weight basket. Weights are in sizes 1 kg, 0,5 kg and 0,1 kg. This makes
it possible to vary the workload from 1 kg up to maximum 12 kg in steps of 0,1 kg. NOTE: 1 kg
is the lowest work load that can be set as this is the weight of the basket itself. A weight basket
that only weighs 0,5 kg is available as an option.
The weight basket can also be set in its upper free/resting position and does then not give any
work load at all. The weight basket is released by pushing the lock lever, on the left side of the
bike, backwards.
When pedalling the subject stores energy in the flywheel. The flywheel is then braked by means
of a brake belt/cord which runs around the flywheel. The workload is changed either by using
other pedalling speed or by increasing or decreasing the tension of the brake belt/cord against the
flywheel by means of the load tension device.
The height of the saddle should be adjusted so that, when sitting comfortably the middle of the
foot should be above the pedal axle and with the pedal in its lowest position. The knee should
only be slightly bent.
The adjustment of the handlebar should give a comfortable ride. When cycling for a long time, it
may be suitable some time during the exercise to change the position of the handlebar.
Test Computer LED
The ergometer is equipped with a Fitness computer showing pedal revolutions per
minute (RPM), heart rate in bpm (HR), exercise time in minutes and seconds (TIME), cycling
speed in km per hour or miles per hour (SPEED), covered distance in km or mile (DISTANCE).
Furthermore the workload (kp = weight basket + weights in kg) can be set which gives a reading
of burned calories (CAL) as well as power (WATT) on the computer display. The energy is
usually expressed in kJ (kilo Joule) or cal (kilocalorier, kcal). One kcal is aprox.4,2 kJ. The power
is depending on the pedalling speed which makes it possible to adjust the workload/power by
increasing or decreasing the pedalling speed.
Model 894E has also a computer for anaerobic testing and makes the bike possible to connect to
an axternal PC. The PC cable ia included in the bike. A Windows application, included in the
bike, makes it possible to easy make a lot of different type of anaerobic tests for ex. Wingate tests
and so forth. The anaerobic tests can easily be set from 5 up to 300 seconds duartion.
For a closer explanation of the application look in the program manual,
”Monark Anaerobic Test Software User Manual”.
NOTE! To perform anaerobic tests the the computer on the cycle must be connecteed to a mins
supply via a low voltage AC/DC converter. which is included.
Connect the enclosed converter in a suitable mains supply socket.
The circular connector on the secondary cable from the converter is connecteed to the
corresponding socket on the cycle under the instrument cover on the right side. PC cable is
connected into the serial port underneath and to a serial port on an external PC.
Se fig. 11 page 13.
The LED on the front of the instrument panel, se fig. 7 page 8, indicates both that there is power
to the unit and that the weight basket is in its upper locked position. If the weight basket produces
resistance it must be moved upp in its upper locked position where it does not give any workload.
Then the LED is lit - with a delay of about 5 seconds - indicating that the computer and cycle is
in a ready position for a test.
NOTE! At transport the brake cord should be somewhat tightened to prevent it from
falling off the flywheel.
9
10
Fig. 8.
Setting KM or MILE
Km and km/h is the dafault setting from the factory.
If you want to make a setting in mile take the meter out of the panel.
Turn off the meter by taking out one battery.
On the back side is a switch with two settings - 1 and ON. See fig. 9.
1 is equal to km and km/h and is the default setting.
ON is equal to mile and mph. Choose position and install the battery again.
Put the meter back again into the panel.
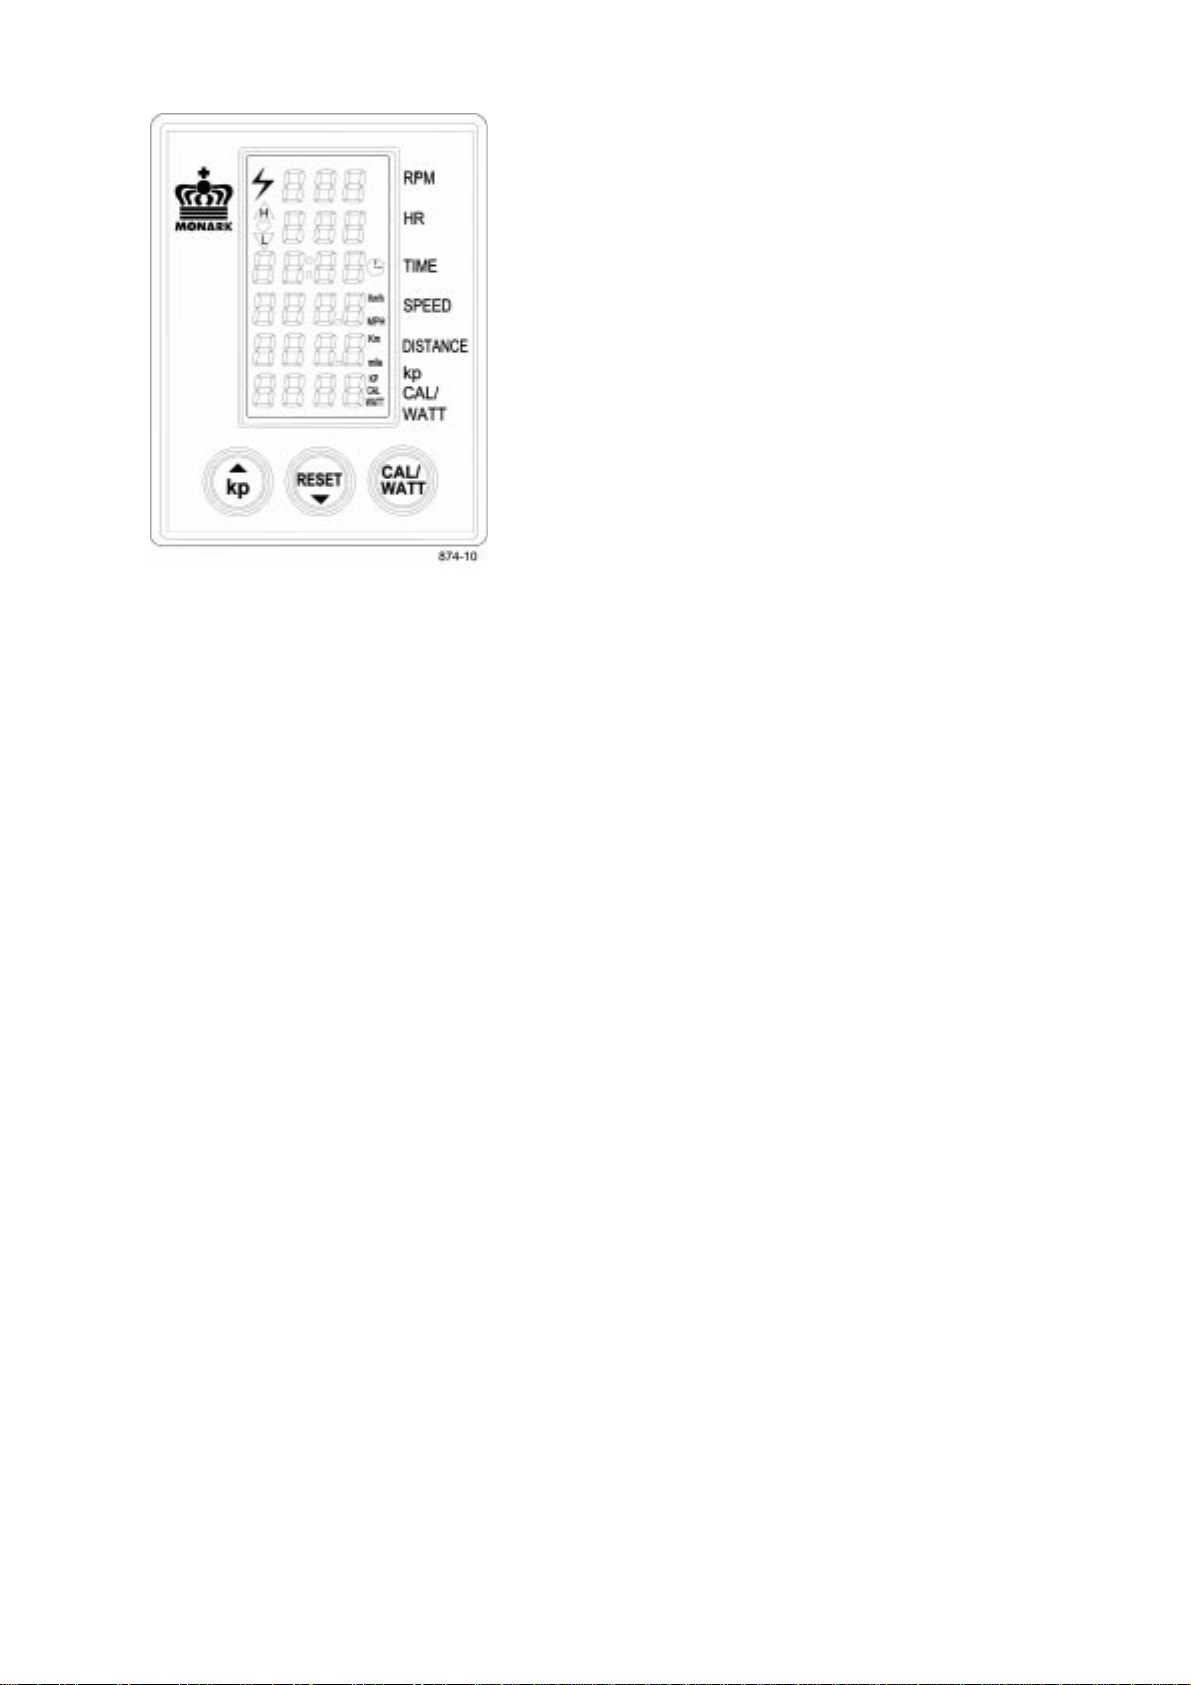
FUNCTION
Press any button or move the pedal to turn on the meter.
At the display for heart rate (HR) a ♥is lit which means that the meter is trying to find a pulse
signal from an external source (chestbelt with electrodes, our part.no 9339-91).
If the meter can not find such a signal this HR function is automatically turned of after 30
seconds. When the function is turned off the ♥ symbol is not lit any more.
The heart rate function can be turned on again by preessing a button.
Timer starts automatically when pedals are moved. Meter values for Time, Distance and Calories
can be set to zero by pressing the RESET button for more than 2 seconds.
To get correct raedings for calories and watts the kp value on the electronic meter has to be set to
the same value as the workload that is the weight of the basket including the weights in it.
Example: The workload is 3 kg (weight basket 1 kg + 2 x 1kg weight). Press the kp button to the
left on the meter. The lower display window is now flashing and showing figures in kp. Increase
or decrease in steps of 0.1 kp by pressing the kp button(!) or the RESET button(") until the
reading is corresponding with the actual or desired kp values (workload) from the weight basket.
After that press the CAL/WATT button to either show the CAL or WATT figures.
The watt reading in the display is depending on the pedalling speed. The watts can accordingly be
adjusted by increasing or decreasing the pedalling speed.
Calories are calculated all the time.
Do not expose the fitness computer to direct sunlight or extremely high temperature. Do not use
any dissolvents when cleaning. Use only dry cloth.
FITNESS COMPUTER
SPECIFICATIONS:
RPM: 0 - 199 pedalrev./min
HR: 50 - 240 bpm
TIME: 0:00 - 99.59 min:sek
SPEED: 0 - 99 km/h or mph
DISTANCE: 0.0 - 99.9 km or mile
FORCE 0.0 - 7.0 kp
CALORIES 0 - 999 kcal
WATT 0 - 7 x rpm watt
Power supply: 1.5 V x 2 AA(R6)
Storing temp.: -10ºC - +60ºC
Operating temp.: 0ºC - 50ºC