Moza Air 2S User manual

Air 2S
User Manual • Uživatelský manuál •
Užívateľský manuál • Használati utasítás •
Benutzerhandbuch

2
English
3 –32
Čeština
33 –67
Slovenčina
68 –103
Magyar
104 –141
Deutsch
142 –179

3
The product user guide contains product features, how to use, and the operating
procedure. Read the user manual carefully to get the best experience and avoid
unnecessary damage. Keep this manual for future reference. If you have any questions
or comments about the device, please contact the customer line.
✉www.alza.co.uk/kontakt
✆+44 (0)203 514 4411
Importer
Alza.cz a.s., Jankovcova 1522/53, Holešovice, 170 00 Praha 7, www.alza.cz

4
Battery and Charging
The MOZA Mini-S has a built-in lithium battery. Fully charge the battery before the first
use of Mini-S. The power indicator LED blinks when the battery level is less than 20%.
Charge it in time. With universal Type-C port, Mini-S can be charged by phone charger
and mobile power supplier. The charging stops automatically when the battery gets full.
Notes:
1. Please use the original charging cable provided in the package.
2. Please do not overcharge or over-discharge the battery. Otherwise, the battery will
be damaged.
3. Recharge and discharge the battery every 3 months to keep it activated if it is left
unused for a long time.
Disclaimer and Warning
•This document is related to the safety use and legal rights of your equipment. Please
read it carefully before the first use.
•By using this product, you are deemed to have read, understood, endorsed and
accepted all the terms and content of this statement. You are solely responsible for
the use of this product and the consequences thereof. You undertake to use this
product for legitimate purposes and agree to the terms and any relevant regulations,
policies and guidelines formulated by Shenzhen Alza Technology Co., Ltd.
(hereinafter referred to as Alza). Alza is not responsible for damage, injury or any
legal problems caused by the direct or indirect use of this product. Users should
follow all safety guidelines including but not limited to this document.
•Mini-MX is professional videography equipment. Users need to have professional
videography and safety knowledge and need to be careful. Please read the user
manual carefully before the first use.
•This product is not a toy and not suitable for use by minors. Do not allow children to
operate this product.
•Do not use with products or accessories that are not provided or recommended by
Alza, and please strictly follow the safety guidelines in the product manual.
•The final interpretation of this document belongs to Shenzhen Alza Technology Co.,
Ltd. Updates are subject to change without notice. Please visit the official website
www.gudsen.com for the latest product
5
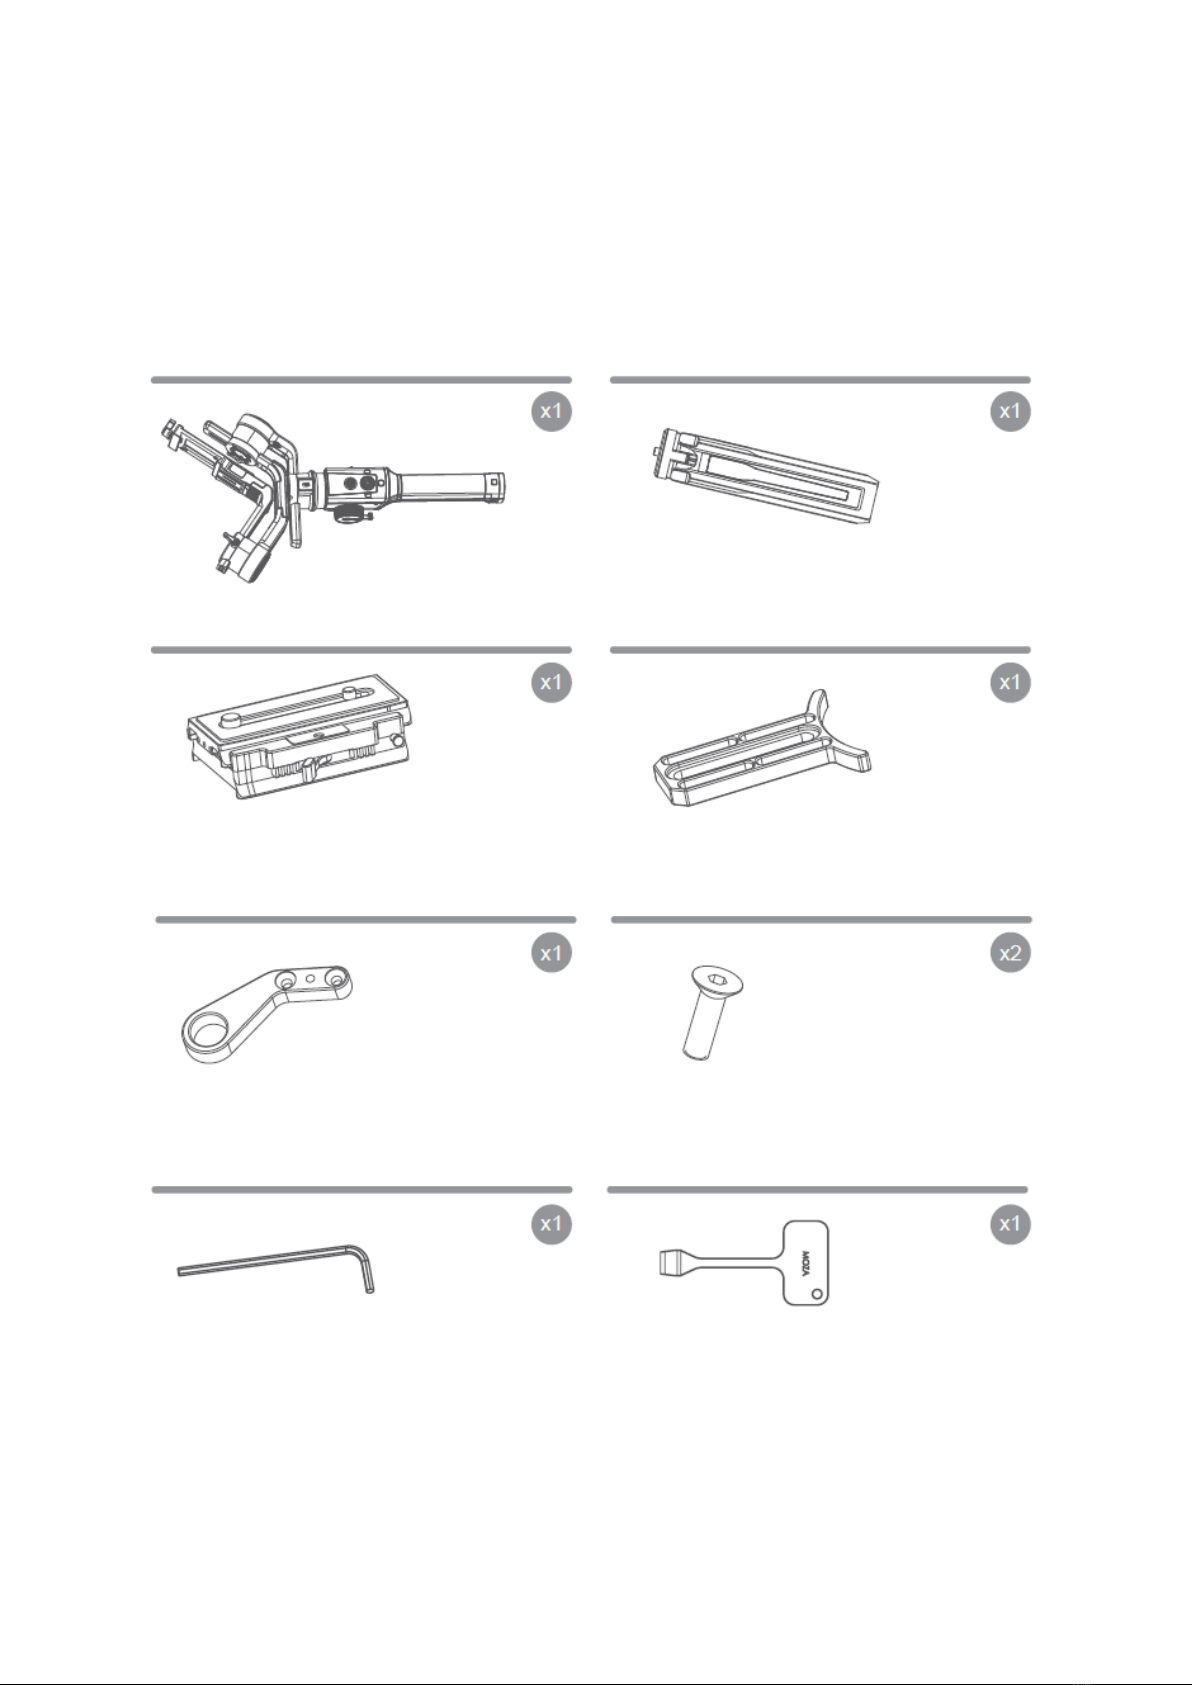
Packing List
Check that all of the following items are in your package. If any item is missing, please
contact MOZA or your local dealer.
Gimbal
Tripod
Quick Release System
Lens Support
Support Rod Adapter
M3 Screw
H2 L-Allen Wrench
Disassembly spanner
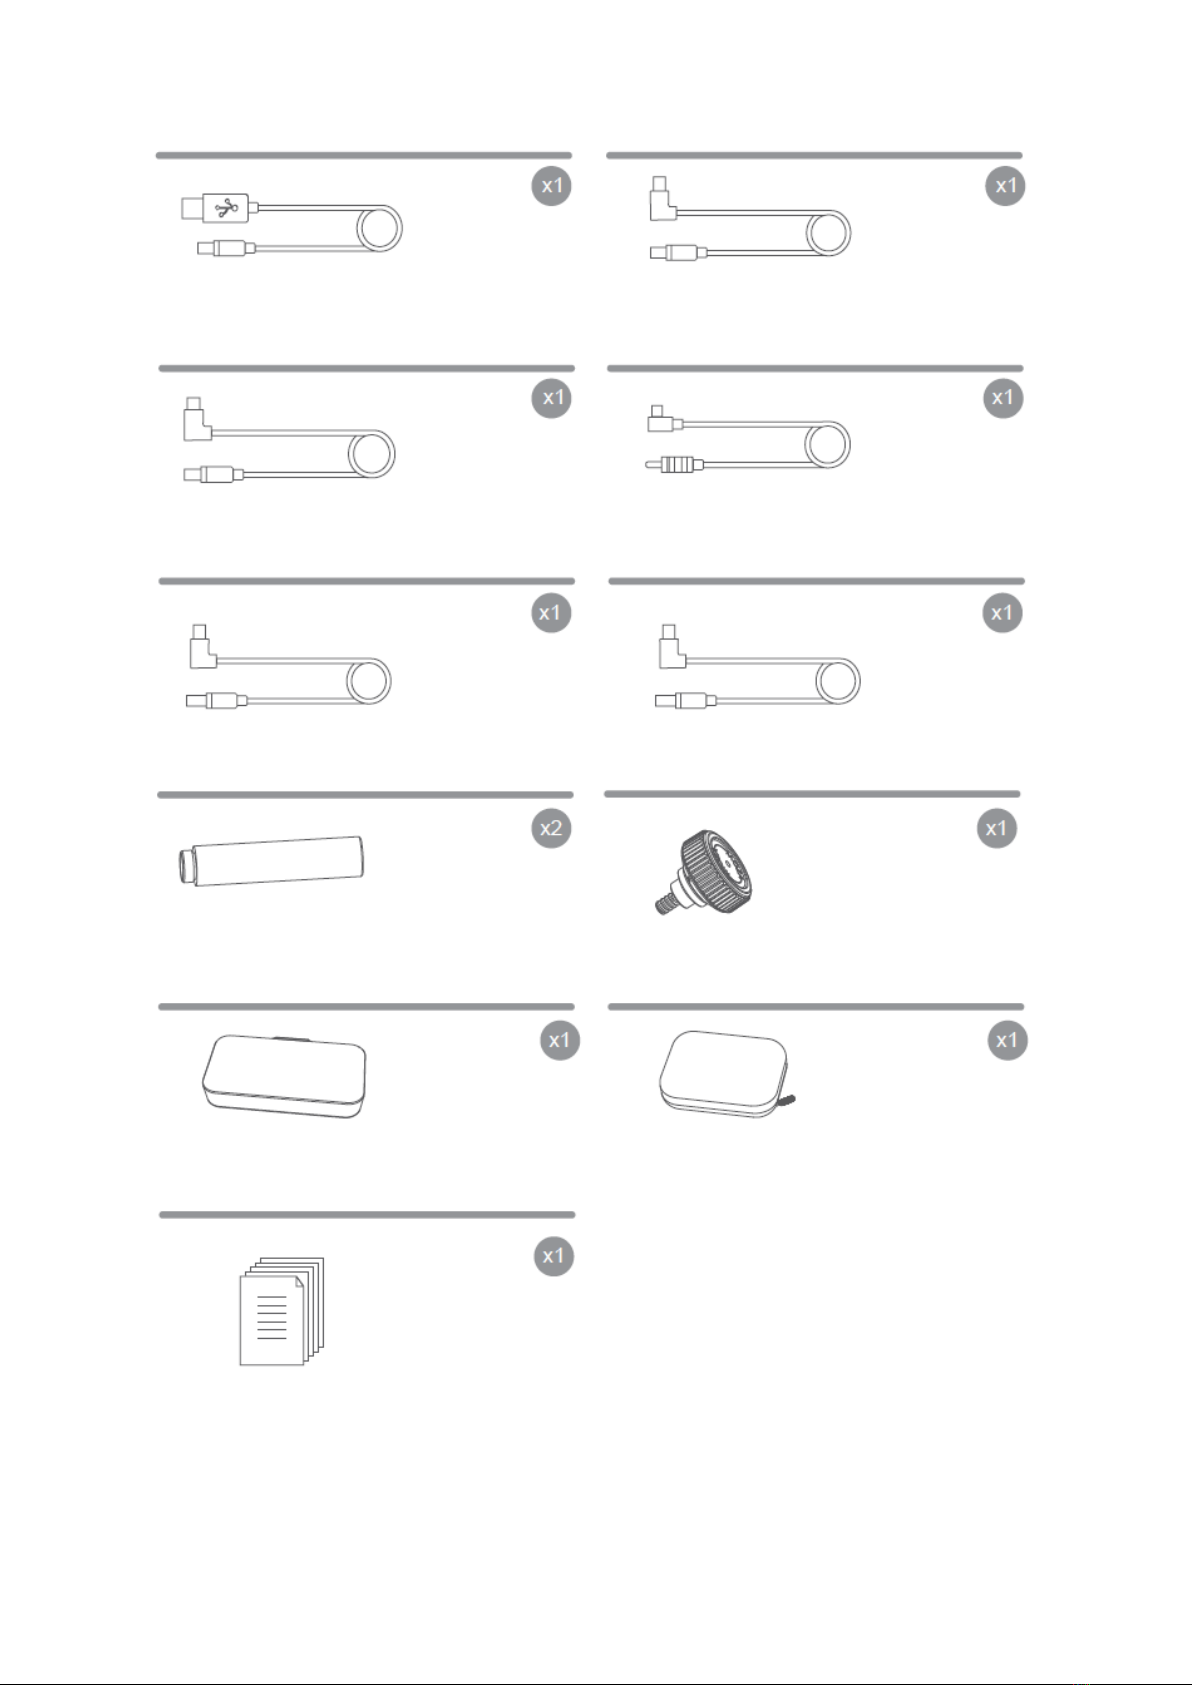
6
M3C-Mini
MCSC-Multi/C
MCSC-Multi
Follow Focus Support Rod
Tool Box
Storage Case
User Manual
Lens Support Screw
MCSC-Remote
M3C-Micro
USB-C Cable

7
MOZA Air 2S Overview
1. Tilt Motor
7. Tilt Arm
13. Dial
19. Battery
Indicator Light
2. Mechanical Memory
Quick Release System
8. Tilt Motor Lock
14. Power Button
20. Roll Motor
Lock
3. Pan Motor
9. Roll Arm
15. Battery on/off
Button
21. Pan Arm
4. Wheel
10. Roll Motor
16. Pan Motor Lock
22. 1/4”Extension
Port
5. M Button
11. Joystick
17. Extension Port
23. Smart Trigger
6. Type-C Port
12. S Button
18. Adjust parameters
and firmware
upgrade interface
8
Air 2S Installation
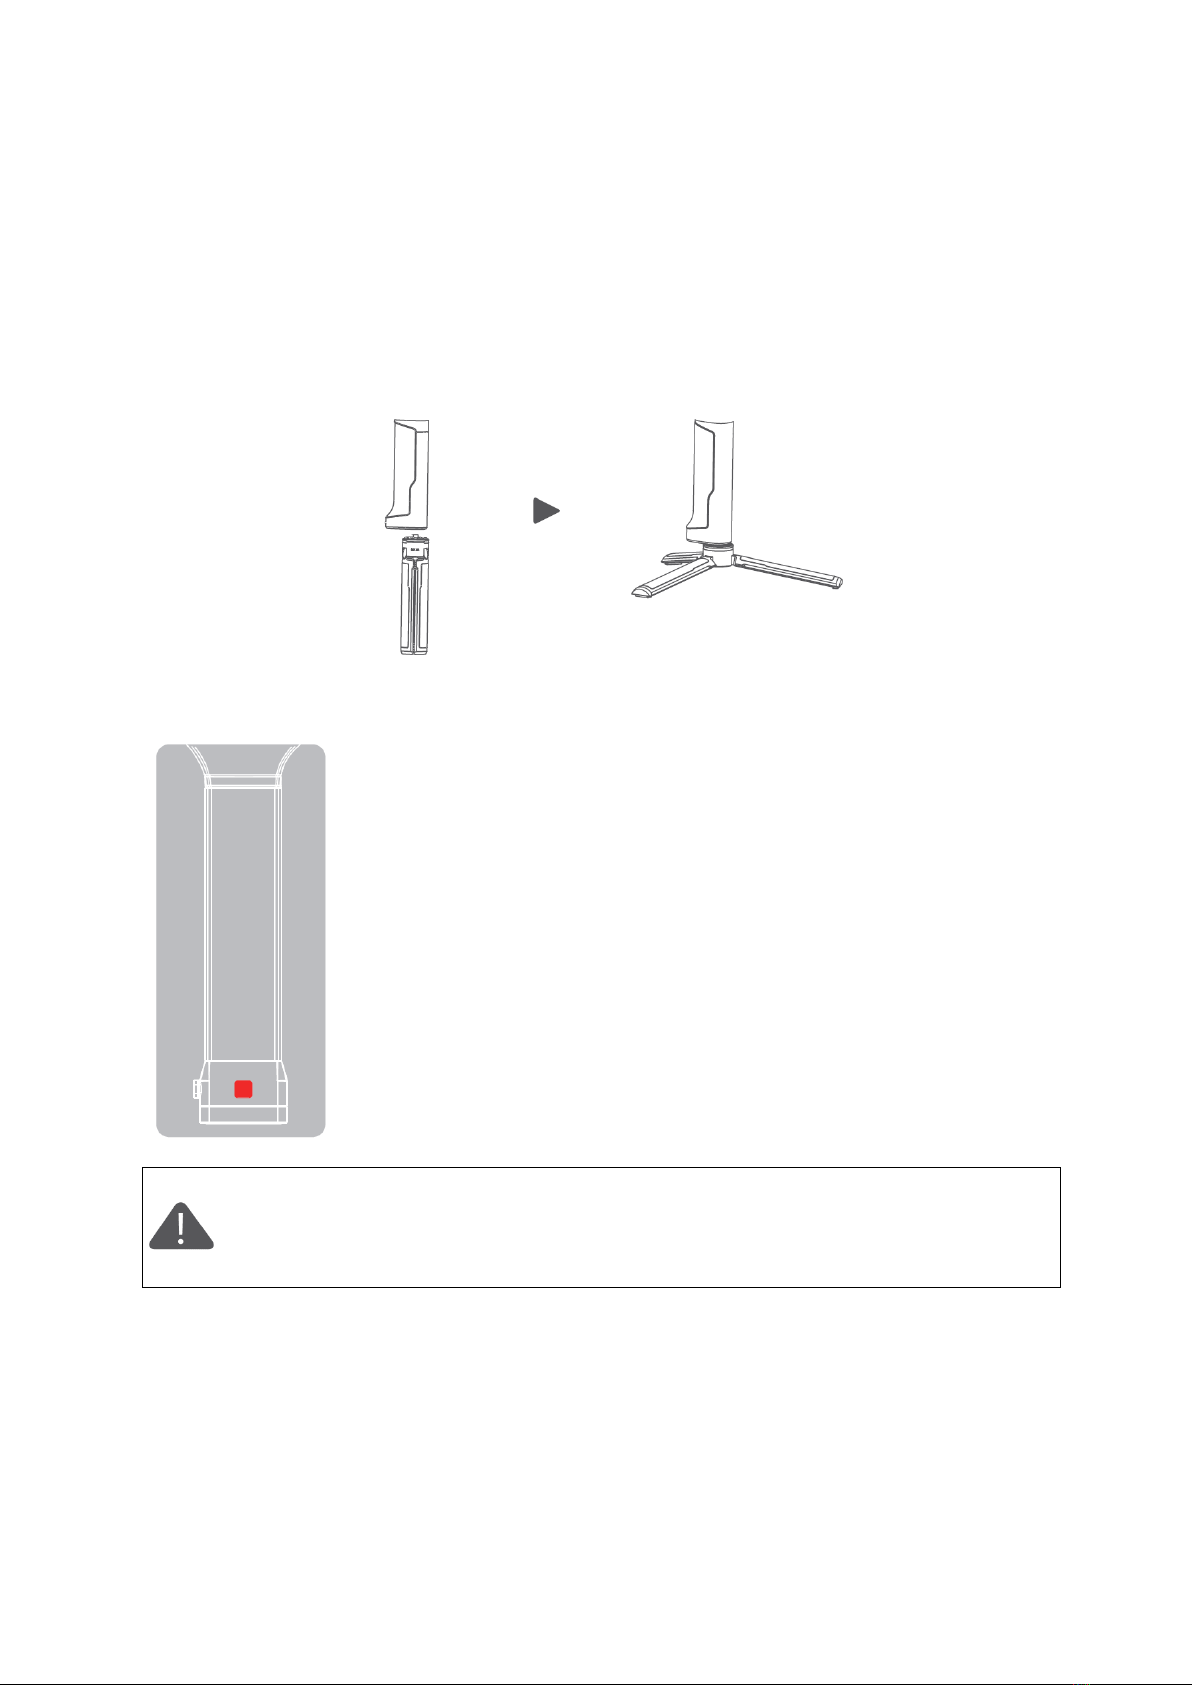
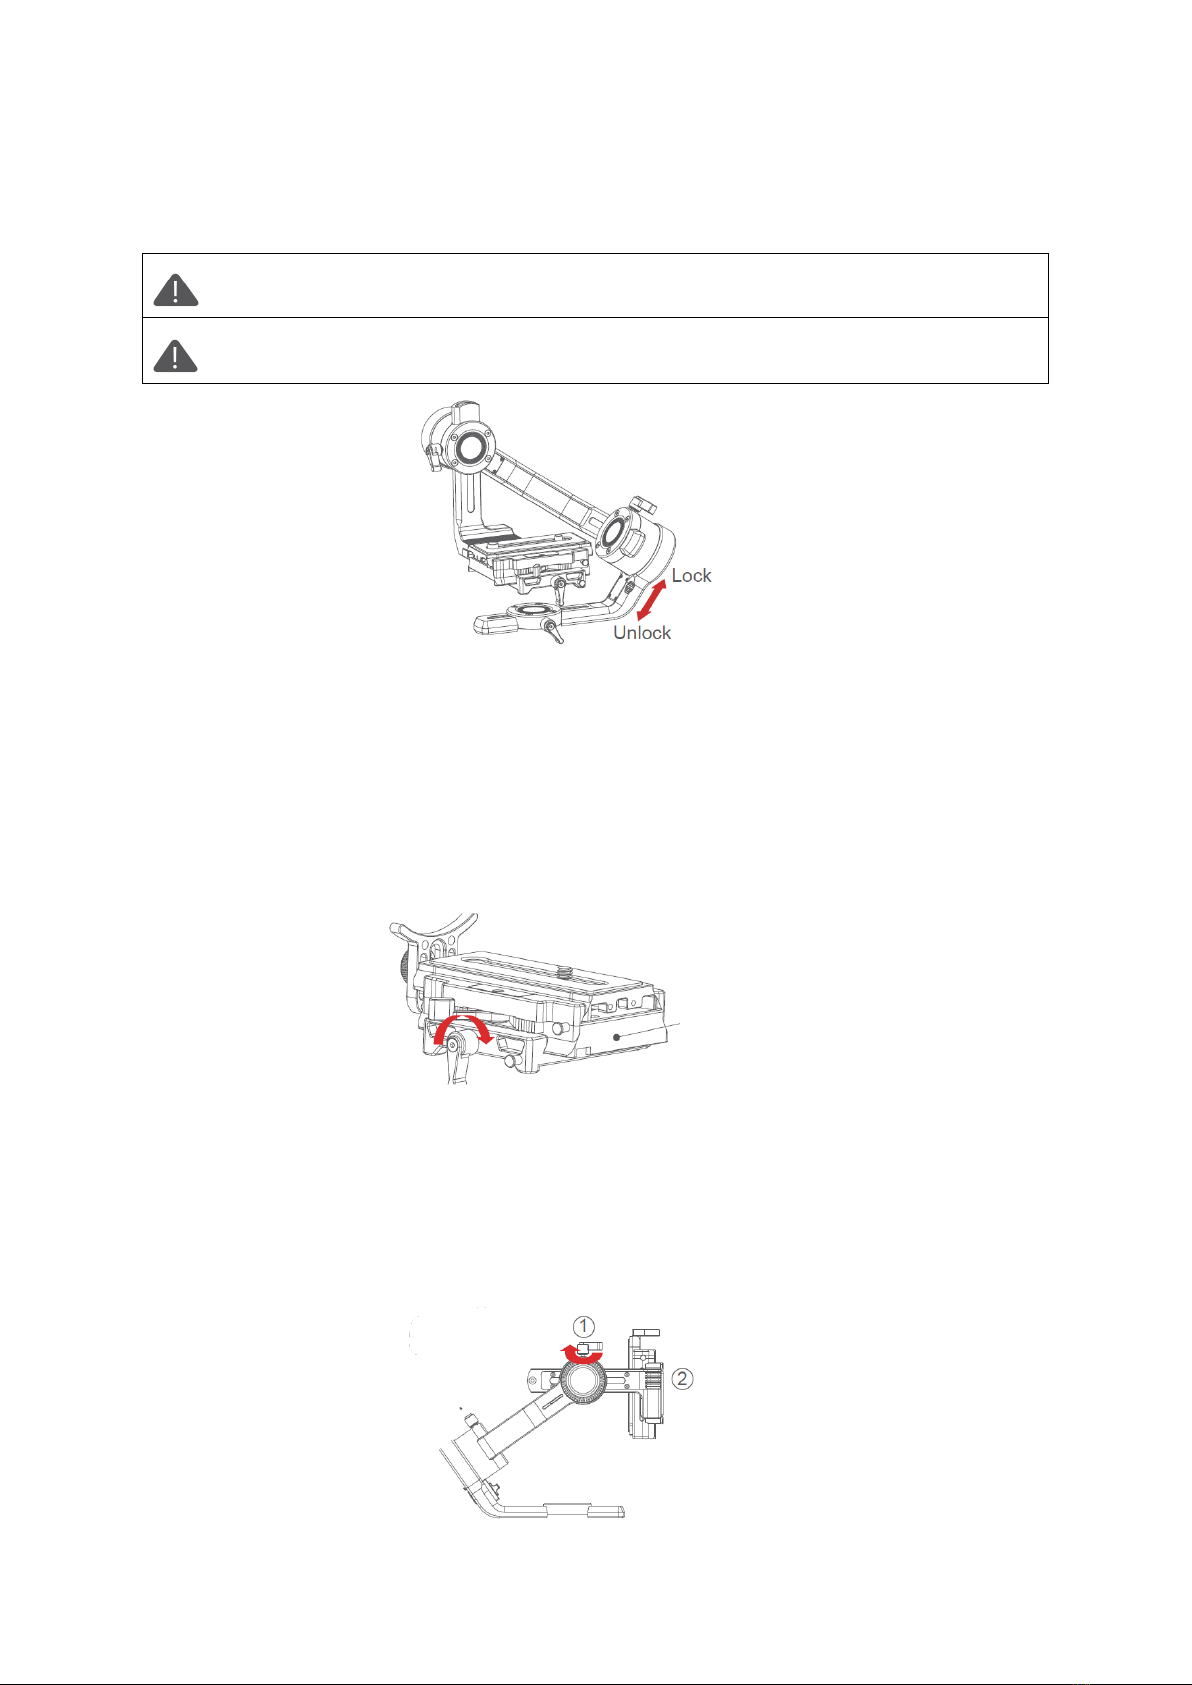
Attaching the Tripod
2 screw holes are equipped at the bottom of grip: 1/4” for mini tripod and 3/8” for large
accessories like slider and big tripod. Screw the mini tripod, then expand as shown
below.
Battery startup and shutdown
a. Long press the power button
b. Press the power button of battery, then long press the power
button again three seconds later. After the battery indicator lights
turn off from left to right, release the battery on key and the
battery will turn off.
c. When the battery is in the off state of PTZ, it will automatically
turn off 10 minutes later. To start the PTZ, you need to turn on the
battery first.
It is recommended to press the on / off key of the stabilizer for a long time
to turn off the stabilizer, and then turn off the battery according to the
operation when shutting down.

9
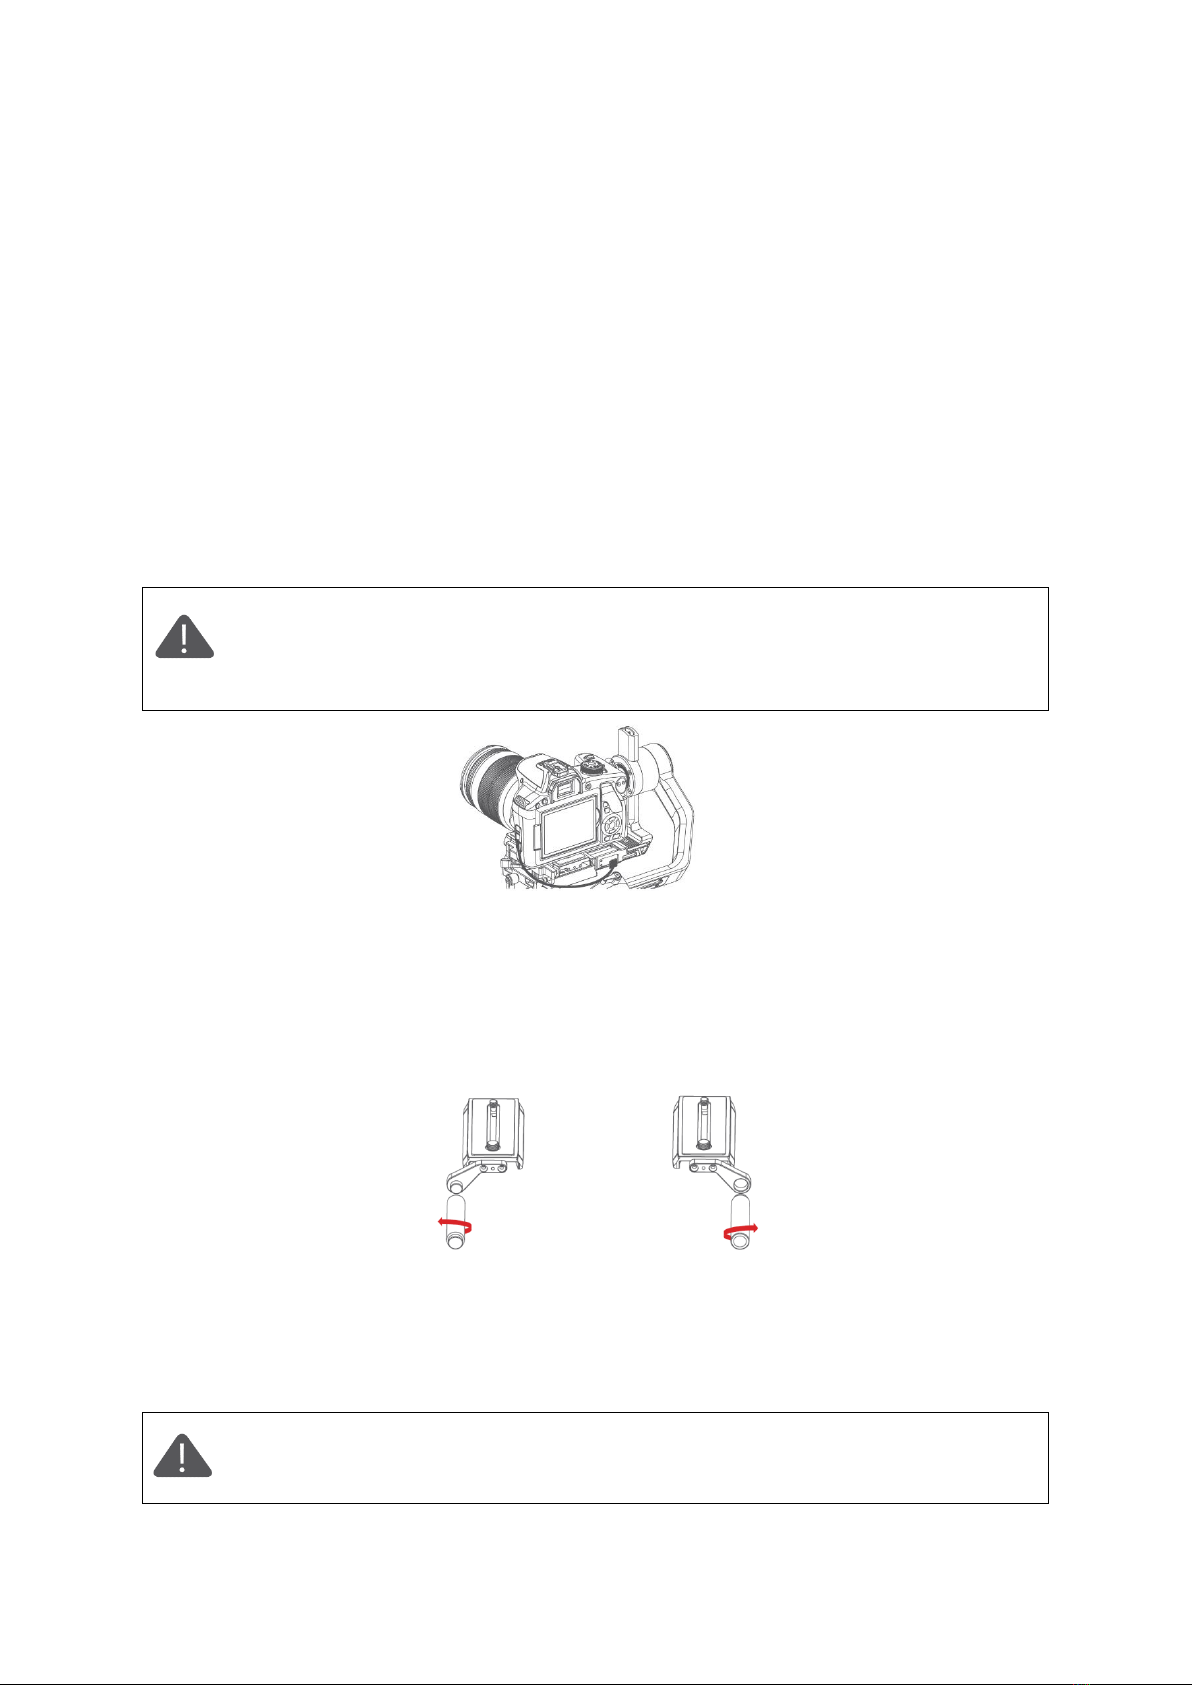
Mounting the Camera
The Air 2S quick release plate is equipped with 2 screws, select an appropriate one
according to the camera type. There is no limit to the installing direction of the quick
release plate. When mounting the camera, make sure the lens slightly extends beyond
the quick release plate in order to reserve extra room for lens support and rod adaptor
After mounting the camera onto the quick release plate, loosen the lever A, then slide
the quick release plate onto the baseplate. The quick release plate can be installed from
both back and forth.
Please make sure the safety lock 1 and 2 will eject once each, and a rough back and
forth balance is reached.
Press the safety lock 1, the quick release plate will be removed in the direction shown
below.
Press the safety lock 1, slide the plate as shown below, then press the lock 2 when the
plate is moved to the end. The quick release plate will be removed in the reverse
direction.
Note: It is recommended to use the lens support for the best effect.
10
Connecting Camera Control Cable
4 different control cables are stored in the tool box
1. M3C-Mini cable: For cameras with Mini port like Canon 5D3, etc
2. M3C-Micro cable: For cameras with Micro port like Canon 5D4, etc
3. MCSC-Remote cable: For Panasonic cameras with 2.5mm port like GH3, GH4, etc
4. MCSC-Multi cable: For Sony cameras with Multi port like A7s II, A7 III, etc
5. MCSC-Multi/C cable: For Sony cameras with Multi port and USB power supply like
A7s II, A7 III, etc
Connect the control cable to the CAM CTRL port on the Air 2S gimbal, and then the other
end to the control port on the camera. The camera icon will be displayed on the OLED
screen. Then parameters adjusting, video recording or photo taking, and follow focus
can be directly operated on the gimbal.
Note:
1. For details of different cameras and lenses, please refer to ‘Camera Control’.
2. If USB control is not supported, the camera icon won’t display on the
screen, please choose your camera control protocol manually.
Installing the Support Rod
Please install the rod before using the follow focus.
Take out the rod adaptor, M3x10 screws, Allen wrench first. Fix the adaptor on the front
or back of the quick release plate with M3x10 screws, then revolve the support rod into
the adaptor.
When installed at the left side, please
match the stud of the rod adapter and the
screw hole of the support rod, then
tighten the support rod counterclockwise.
When installed at the right side, please
match the screw hole of the rod adapter
and the stud of the support rod, then
tighten the support rod clockwise.
Note: 1. Please install the support rod and rod adatptor according to the
position shown above for fear of falling off. 2. Can’t assiemble 2 support rods
together as extending use
11
Balance Adjustment
Attention: Balance Adjustment can refer to the function of Air 2S’ balance check,
and it will be more convenient to adjust according to the instructions of check.
Attention: If the roll arm is locked at the overlapping position with the heading
arm, please unlock the roll motor first, and do not drag it by force.
Balancing the Camera
•Mount the camera onto the Air 2S, release hands to check the direction of camera
•If lens is tilted upward, then the camera position is backward. Loosen quick release
base and tighten the knob, move the quick release plate until lens points to frontage.
•If lens is tilted downward, then the camera position is forward. Loosen quick release
base and tighten the knob, move the quick release plate until lens points to frontage.
•Tighten the quick release base and knob.
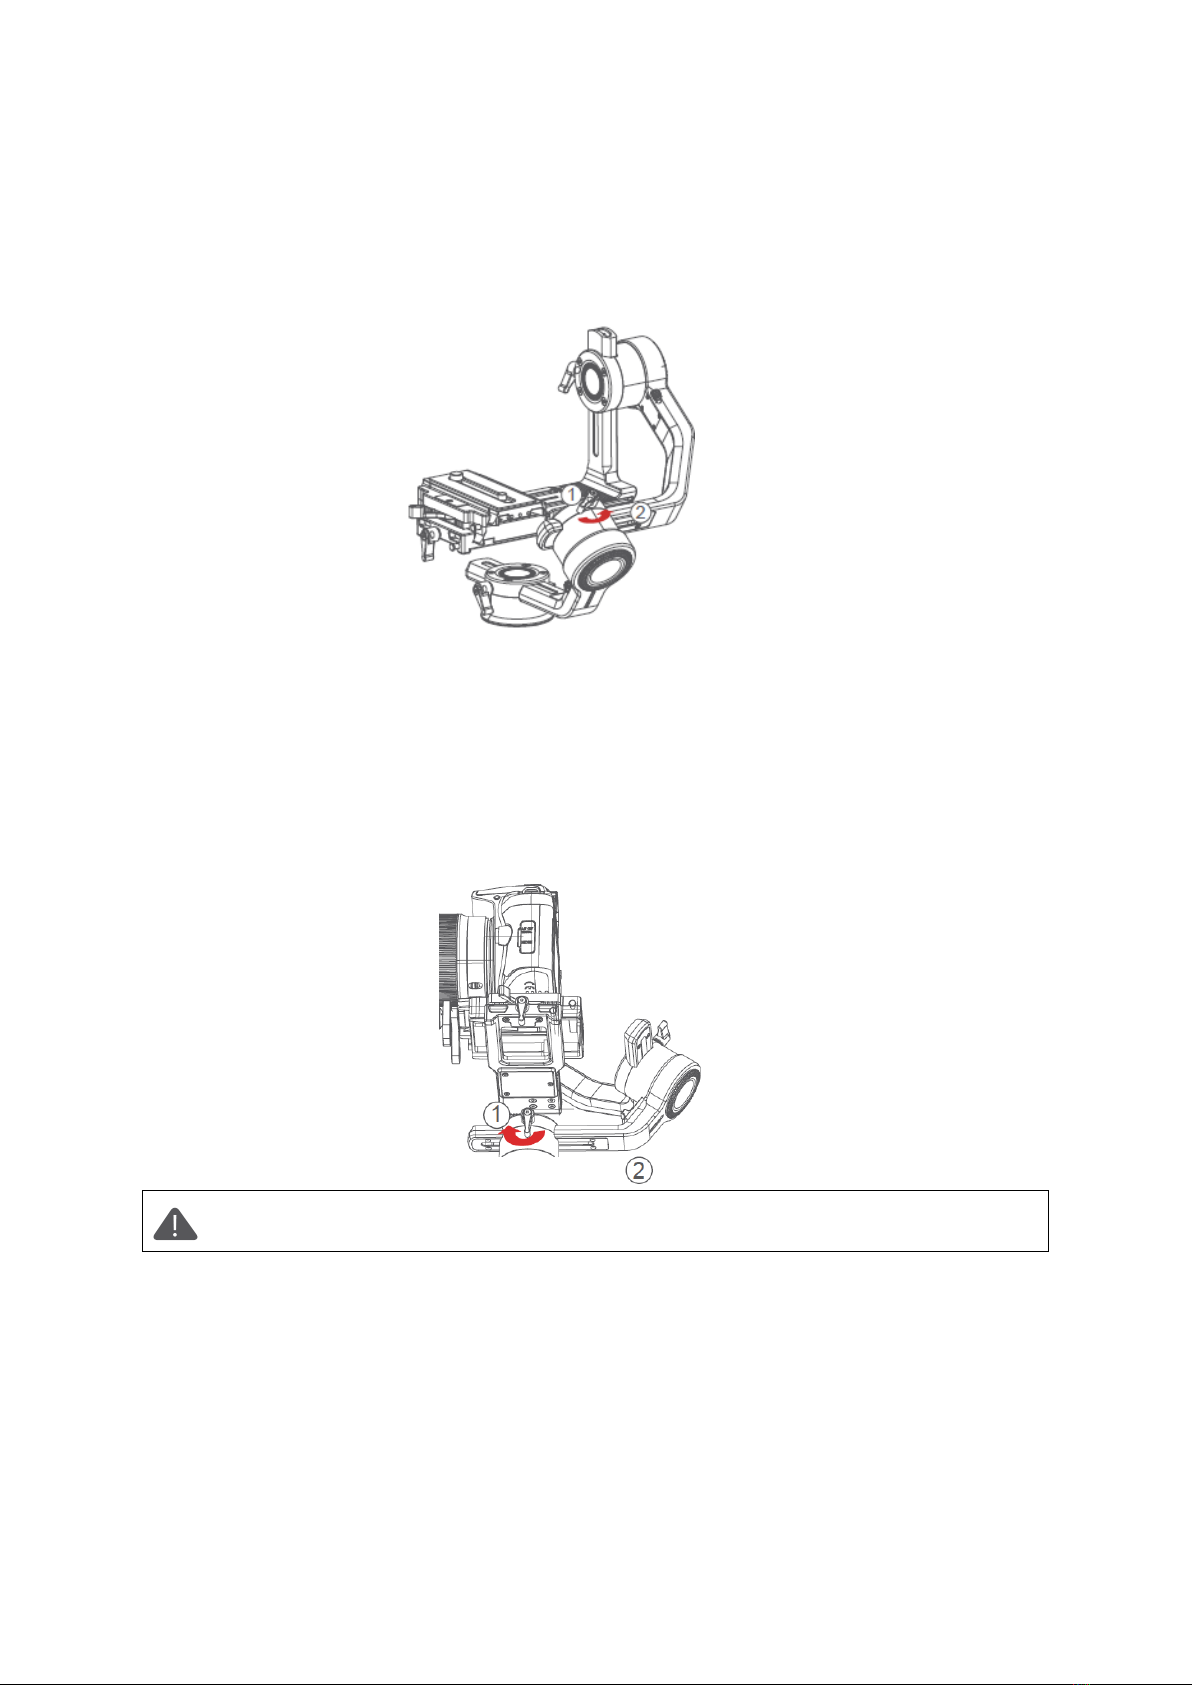
Balancing the Tilt Axis
•Rotate the camera so that the lens is pointing upward, release hands to check the
direction in which the camera swings.
•Loosen the knob 1 on the tilt motor to slide the tilt arm 2 until the camera stays still
without tilting it up or down.
•Tighten the knob 1.
Quick release baseplate
12
Balancing the Roll Axis
•Move the roll motor lock switch to the unlock end.
•Release hands to observe the direction in which the roll axis swings.
•Loosen the roll axis knob 1 to slide the roll arm 2 until the roll arm 2 stays still.
•Tighten the knob 1.
Balancing the Pan Axis
•Grab the Air 2S horizontally, make the pan arm level. Release hands to check the
direction in which the camera swings.
•Loosen the knob 1 on the pan motor. Move the pan arm 2 leftwards or rightwards
until it keeps level.
•Tighten the knob 1.
Note: If the balance of the pan axis is not adjusted properly, the pan axis may
become hot, and the inception mode cannot be used properly.

13
Buttons and OLED Display
Button Functions:
Button
Operation
Function
Customizable Function
Menu
Trigger
1 X
-
N/A
Focus
Shutter
-
-
-
The same
2 X
Re-Center
N/A
Re-
Center
Selfie
-
-
-
The same
3 X
Selfie
N/A
Re-
Center
Selfie
-
-
-
The same
Press
Pan-Tilt
Follow
N/A
Pan-
Tilt
Follow
All lock
Sport
gear
mode
FPV
mode
-
The same
Power
Button
1 X
Video
recording
-
-
-
-
-
-
The same
2 X
Take photo
-
-
-
-
-
-
The same
3s
ON/OFF
-
-
-
-
-
-
The same
Wheel
Turn
Pan axis
Focus
motor1
Focus
motor2
E-focus
Tilt
axis
Roll
axis
-
The same
M
Button
1 X
Switch
wheel
modes
-
-
-
-
-
-
The same
S
Button
1 X
Sport gear
mode
-
-
-
-
-
-
The same
2 X
Inception
mode
-
-
-
-
-
-
The same
3 X
FPV mode
-
-
-
-
-
-
The same
3s
Auto tune
-
-
-
-
-
-
The same
Joystick
Push Up-
Down
Move the
tilt axis
Tilt
axis
Roll
axis
Pan
axis
-
-
-
The same
Push Left-
Right
Move the
pan axis
Tilt
axis
Roll
axis
Pan
axis
-
-
-
The same
Top
1 X
TV
-
-
-
-
-
-
Option-up
2 X
Tilt follow
-
-
-
-
-
-
-
Down
1 X
AV
-
-
-
-
-
-
Option-
down
2 X
Pan follow
-
-
-
-
-
-
-
Left
1 X
ISO
-
-
-
-
-
-
Return
2 X
Roll follow
-
-
-
-
-
-
-
Right
1 X
Enter/Exit
preview
-
-
-
-
-
-
Confirm/
Next
menu
Menu
Button
1 X
Enter the
menu
-
-
-
-
-
-
The same
3 X
Language
-
-
-
-
-
-
The same
3s
Sleep/wake
up
-
-
-
-
-
-
The same
Dial
Turn
Follow
speed
-
-
-
-
-
-
Adjust
relevant
Combo
Menu+Power
Upgrade
mode
-
-
-
-
-
-
-
14
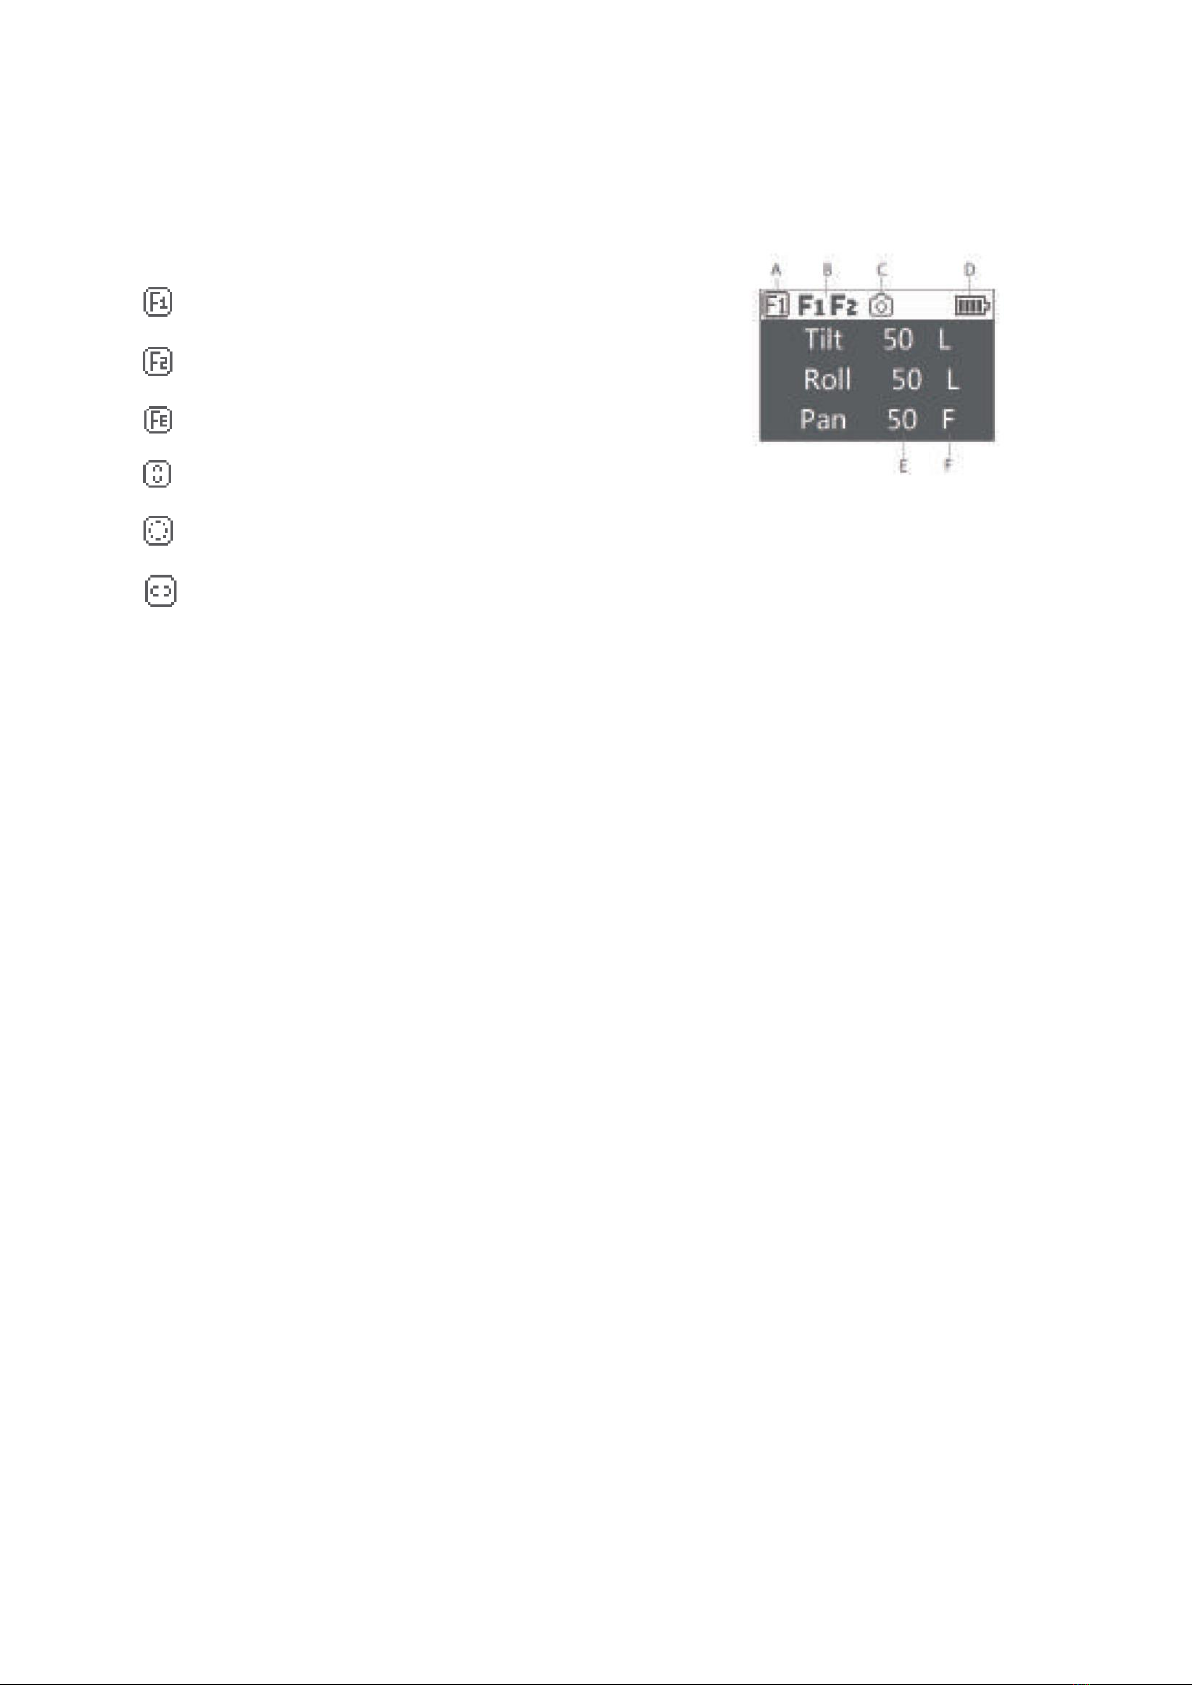
Main Interface
A: Smart wheel working modes
Controlling external follow focus motor 1
Controlling external follow focus motor 2
Electronic follow focus
Controlling the tilt axis
Controlling the roll axis
Controlling the pan axis
B: Focus motor connection status. Icon will be displayed after connection, otherwise it
won’t be displayed. Up to two focus motors can be connected at the same time.
C: Camera connection status. Icon will be displayed after USB connection, otherwise it
won’t be displayed.
D: Battery quantity. Each grid represents 25% battery level. When the battery is empty,
please charge the battery in time.
E: Follow speed value: 0-100. Turn the dial to adjust the value
F: Follow status
L: Lock. The axis locks and doesn’t follow.
F: Follow. The axis follows.
Q: Sport Gear Mode
15
Menu Description
L1
L2
L3
L4
L5
Value
Function
Camera
Choice
Shutter
Cable
*
set the connection type to
universal shutter cable
MCSC-
Multi
*
set the connection type to
sony-multi port
MCSC-
Multi/C
*
set the connection type to
sony-multi port and power
supply
MCSC-
Remote
*
set the connection type to
panasonic-remote port
M3C-USB
*
set the connection type to
usb port
Parameters
ISO
32--106400
set the camera iso
TV
30--1/8000
set the camera shutter
AV
F1--F22
set the camera aperture
Gimbal
Motor
switch
? /ok
turn on/off motor
power
autotune
? /ok
tuning/tuned
level
ultra
light
*
set motor level to the
minimum
light
*
set motor level to light
medium
*
set motor level to medium
heavy
*
set motor level to heavy
ultra
heavy
*
set motor level to ultra
heavy
custom
tilt
0 - 100
set tilt motor power
roll
0 - 100
set roll motor power
pan
0 - 100
set pan motor power
filter
tilt
0 - 100
set tilt motor filter
roll
0 - 100
set roll motor filter
pan
0 - 100
set pan motor filter
Follow
switch
tilt
on/off
enter/exit tilt follow mode
roll
on/off
enter/exit roll follow mode
pan
on/off
enter/exit pan follow mode
speed
tilt
0 - 100
set the following speed of
tilt motor
roll
0 - 100
set the following speed of
roll motor
pan
0 - 100
set the following speed of
pan motor
deadband
tilt
0 - 100
set the following initiation
angle of tilt motor
roll
0 - 100
set the following initiation
angle of roll motor
pan
0 - 100
set the following initiation
angle of pan motor
Operation
joystick
function
left-right
tilt/roll/pan
move the joystick left/right
to control the tilt/roll/pan
rotation
up-
down
tilt/roll/pan
move the joystick up/down
to control the tilt/roll/pan
rotation

16
L1
L2
L3
L4
L5
Value
Function
Gimbal
Operatio
n
joystick
sensitivity
left-right
0 –100
set sensitivity level of left-
right movement
up-
down
0 - 100
set sensitivity level of up-
down movement
habits
left-right
+/-
set the control habit of
joystick left/right
movement
up-
down
+/-
set the control habit of
joystick up/down
movement
wheel
function
focus-1
*
control the external focus
motor 1
focus-2
*
control the external focus
motor 2
focus-e
*
control the electronic focus
Tilt
*
control the pan axis
Roll
*
control the tilt axis
pan
*
control the roll axis
sensitivity
0-100
wheel sensitivity
habits
+/-
set the control direction of
wheel rotation
trigger
press
none
*
none
follow
*
enter pan-tilt follow mode
lock
*
enter all lock mode
quick
*
enter sport gear mode
FPV
*
enter FPV mode
click
none
*
none
shutter
*
take photo
focus
*
auto focus
double-
click
none
*
none
re-
center
*
re-center
selfie
*
rotate the gimbal 180° for
selfie
triple-click
none
*
none
re-
center
*
re-center
selfie
*
rotate the gimbal 180° for
selfie
dial
habits
+/-
rotate the dial clockwise to
increase/decrease value
Advanced
autotune
? /ok
auto tune
Balance
check
check the balance state of
camera
iFocus
F1
switch
? /ok/err
turn on/off the focus motor
1
set A
? /ok/err
set the point A of focus
motor 1
set B
? /ok/err
set the point B of focus
motor 1
clear AB
? /ok/err
Clear the calibration
information
guidance
>
Enter the guidance mode

17
L1
L2
L3
L4
L5
Value
Function
Advanced
iFocus
F2
switch
? /ok/err
turn on/off the focus motor 1
set A
? /ok/err
set the point A of focus motor 1
set B
? /ok/err
set the point B of focus motor 1
clear AB
? /ok/err
Clear the calibration information
guidance
>
Enter the guidance mode
Dolly Zoom
>
Enter the dolly zoom mode
Inception
speed
0-100
set the rotation speed of inception
mode
Motion
Control
switch
tilt
? /on/off
turn on/off the motion control of tilt
axis
roll
? /on/off
turn on/off the motion control of
roll axis
pan
? /on/off
turn on/off the motion control of
pan axis
speed
0-100
set the rotation speed of motion
control
Tracking
speed
0-100
set the max speed of tracking
Manual
Positioning
tilt
on/off
turn on/off the manual positioning
of tilt axis
roll
on/off
turn on/off the manual positioning
of roll axis
pan
on/off
turn on/off the manual positioning
of pan axis
Calibration
gyro
? /ok
calibrating/calibrated the gyroscope
acc
? /ok
calibrating/calibrated the
accelerometer
angle
offset
tilt
0-100
set the offset value of tilt axis
roll
0-100
set the offset value of roll axis
pan
0-100
set the offset value of pan axis
General
Language
English
*
switch display language to English
中文
*
switch display language to Chinese
Config
config1
save
? /ok
save to configuration 1
load
? /ok
load configuration 1
config2
save
? /ok
save to configuration 2
load
? /ok
load configuration 2
config3
save
? /ok
save to configuration 3
load
? /ok
load configuration 3
reset
? /ok
restore default parameter settings
About
device name and about firmware
information
Menu type introduction:
If there is a “>”mark at the right side of the selected item, press the dial right button for
the next menu.
If the selected item has a “[]”and contains a number, rotate the dial to adjust its value.
If the selected item has a “()”and contains an option, press the right button to switch
among options.

18
Notes:
1. If there is a “*” at the right side of one item, the current list is the final option,
press the dial right button to launch it.
2. If the selected item and other items in the menu list don’t have any marks,
press the dial right button to launch the option once. “>” is displayed during the
process. “OK” is displayed after the process is completed, and “ERR” is displayed
if the option fails.
3. Filtering parameters: When the motor vibrates with high frequency, the value
should be turned down. When the motor vibrates with low-frequency, the value
should be increased.
4. The manual positioning function has lower priority than the following
function. When using manual positioning function normally, following function
of the axis should be turned off.

19
Features Description
Camera Control
The Air 2S can support camera video recording, photo taking and electronic focus
control. Please refer to the compatibility list for more details ( * Please set the lens to
"MF” mode)
Brand
Mode
Select
Cable
Shut
ter
Rec
ord
ISO
TV
AV
Auto
Focus
Focus
Control
Power
Supply
CANON
EOS R
M3C-USB
M3C-Micro+
Micro to
Type-C
Adapter
(optional)
√
√
√
√
√
√
√
—
EOS RP
√
√
√
√
√
√
√
—
EOS 6D
Mark II
M3C-Mini
*
√
√
√
√
√
√
—
EOS 6D
*
√
√
√
√
√
√
—
EOS 60D
*
√
√
√
√
√
√
—
EOS 70D
*
√
√
√
√
√
√
—
EOS 77D
*
√
√
√
√
√
√
—
EOS 80D
*
√
√
√
√
√
√
—
EOS 5D2
*
√
√
√
√
√
√
—
EOS 5D3
*
√
√
√
√
√
√
—
EOS 800D
*
√
√
√
√
√
√
—
EOS 5D
Mark IV
M3C-Micro
*
√
√
√
√
√
√
—
EOS 200D
Ⅱ
*
√
√
√
√
√
√
—
EOS M50
*
√
√
√
√
√
√
—
EOS M5
MCSC-C1
C1 Shutter
Cable
(optional
√
—
—
—
—
—
—
—
SONY
Alpha 7S
M3C-USB
M3C-Micro
—
√
√
√
√
√
—
√
Alpha 7R
—
√
√
√
√
√
—
√
Alpha 6300
—
√
√
√
√
√
—
√
Alpha 6400
—
√
√
√
√
√
√
Alpha 6500
—
√
√
√
√
√
—
√
Alpha 7S Ⅱ
—
√
√
√
√
√
—
√
Alpha 7R Ⅱ
—
√
√
√
√
√
—
√
Alpha 7 Ⅱ
—
√
√
√
√
√
—
√
Alpha 7 Ⅲ
—
√
√
√
√
√
√
Alpha 7R Ⅲ
—
√
√
√
√
√
√
DSC-
RX100M3
—
√
√
√
√
√
—
√
DSC-
RX100M4
—
√
√
√
√
√
—
√
DSC-
RX100M5
—
√
√
√
√
√
—
√
Alpha 7S
MCSC-
Multi
MCSC-Multi
√
√
—
—
—
√
—
√
Alpha 7R
√
√
—
—
—
√
—
√
Alpha 6300
MCSC-
Multi/C
MCSC-
Multi/C
√
√
—
—
—
√
—
√
Alpha 6400
√
√
—
—
—
√
—
√
Alpha 6500
√
√
—
—
—
√
—
√
Alpha 7S Ⅱ
√
√
—
—
—
√
—
√
Alpha 7R Ⅱ
√
√
—
—
—
√
—
√
Alpha 7 Ⅱ
√
√
—
—
—
√
—
√
Alpha 7 Ⅲ
√
√
—
—
—
√
—
√
Alpha 7R Ⅲ
√
√
—
—
—
√
—
√

20
DSC-
RX100M3
√
√
—
—
—
√
—
√
DSC-
RX100M4
√
√
—
—
—
√
—
√
DSC-
RX100M5
√
√
—
—
—
√
—
√
Panaso
nic
DMC-
G7KGK
MCSC-
Remot
MCSC-
Remote
√
√
—
—
—
√
—
—
DMC-
G85GK
√
√
—
—
—
√
—
—
DMC-GH3
√
√
—
—
—
√
—
—
Lumix GH4
√
√
—
—
—
√
—
—
DC-S1GK-K
V
√
—
—
—
—
—
—
M3C-USB
M3C-Micro+
Micro to
Type-C
Adapter
(optional)
√
√
√
√
√
√
√
√
Lumix GH5
√
√
√
√
√
√
√
—
DC-
GHSSGK-K
√
√
√
√
√
√
√
—
Nikon
Z6
M3C-USB
M3C-Micro+
Micro to
Type-C
Adapter
(optional)
√
√
√
√
√
√
√
—
Z7
√
√
√
√
√
√
√
—
D850
M3C-Micro
√
√
√
√
√
√
√
—
FUJIFIL
M
X-T2
MCSC-C1
C1 Shutter
Cable
(optional)
√
√
—
—
—
√
—
—
X-T3
√
√
—
—
—
√
—
—
X-T20
√
√
—
—
—
√
—
—
X-T30
√
√
—
—
—
√
—
—
Note: please refer to the official website for the latest camera control list.
Table of contents
Languages:
Other Moza Camera Accessories manuals


Popular Camera Accessories manuals by other brands


Trojan
Trojan GC2 48V quick start guide

Calumet
Calumet 7100 Series CK7114 operating instructions

Ropox
Ropox 4Single Series User manual and installation instructions

Cambo
Cambo Wide DS Digital Series Main operating instructions

Samsung
Samsung SHG-120 Specification sheet

Ryobi
Ryobi BPL-1820 Owner's operating manual