Moza AIR User manual

User Manual
Product Name: Handheld Gimbal
Model: AIR, AIR-360, AIRCORSS
Brand: MOZA
Manufacture:Gudsen Technology Co., LTD
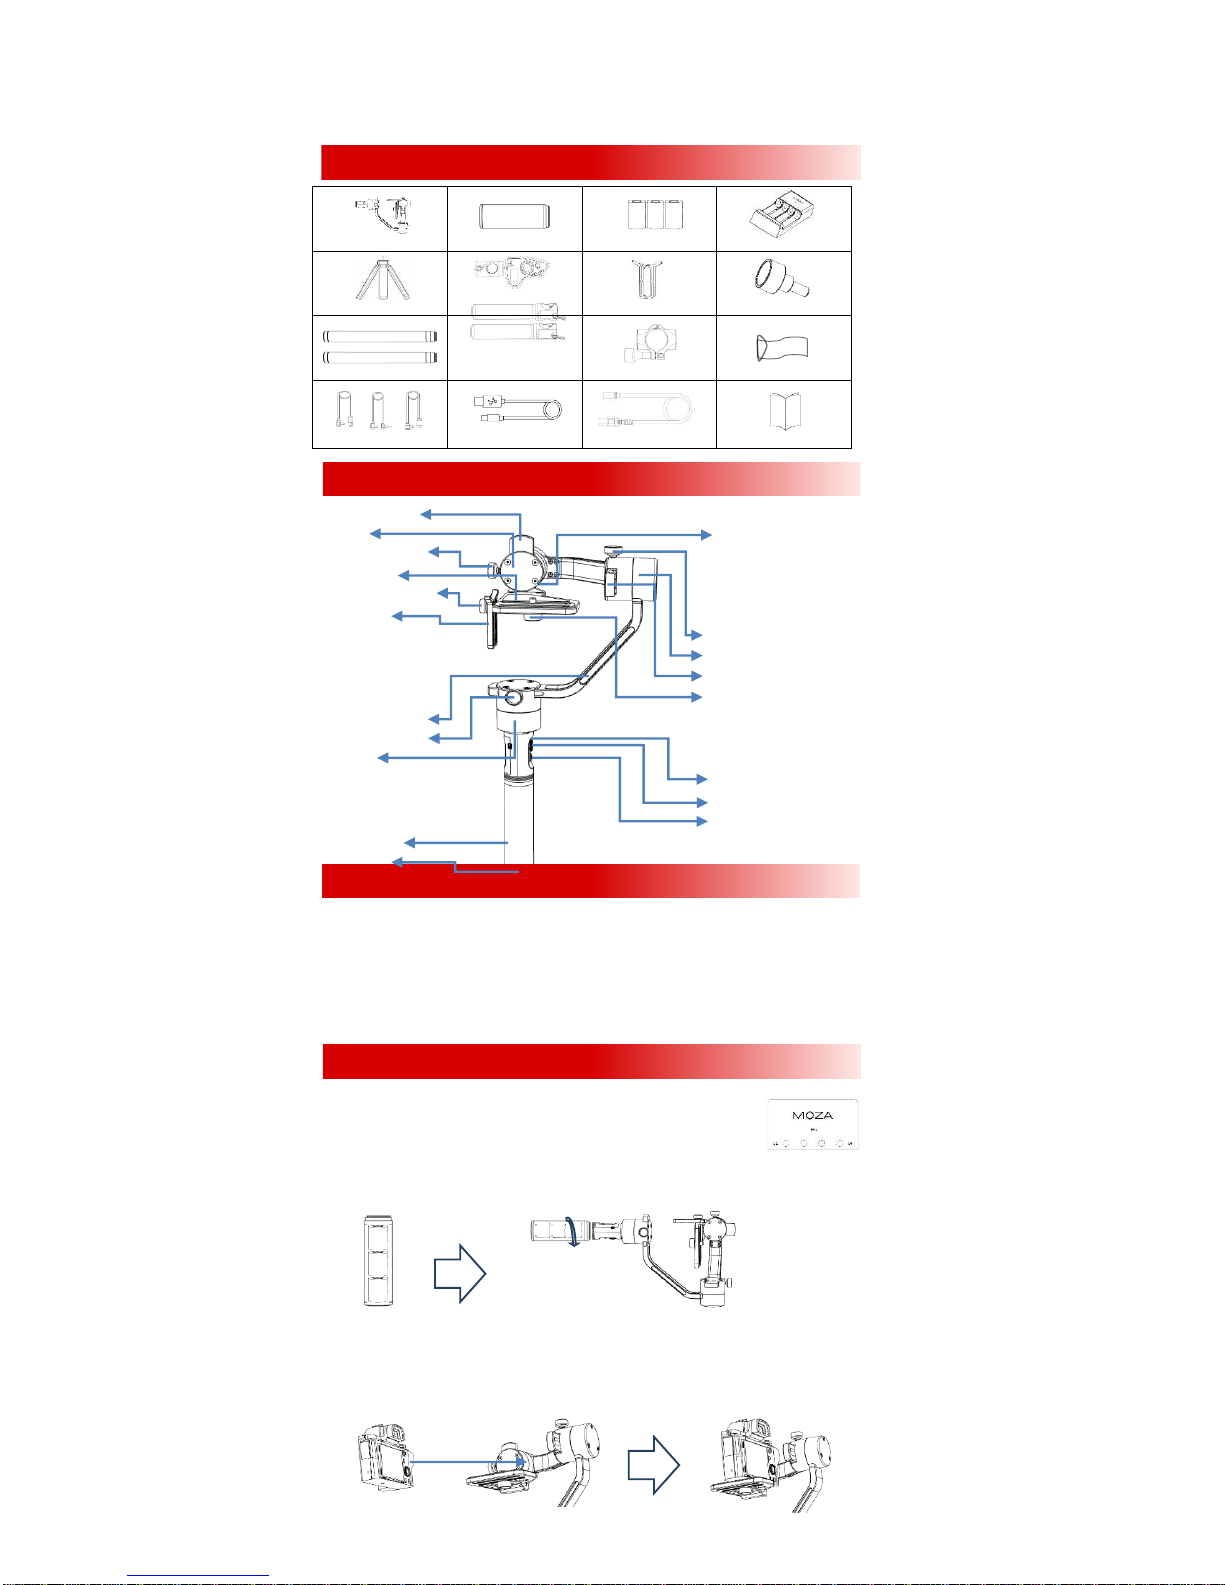
Gimbal x 1 Handgrip x 1 26350Battery X3 Charger X 1
Tripod (Optional)
Wireless Thumb
Controller (Optional)Lens Support X 1 Lens Support Screw X1
Handle Bar X 2
Side Handle X 2
Handle Clamp X 1 Tool Bag
Control Cable X 3 USBCable X 1 AC Cable (Adapter) X 1 User Manual X 1
Tilt Adjustment Arm
Tilt Motor USB Output
Tilt Adjustment Screw
Camera Holder
Lens Support Lock-knob
Lens Support
Roll Adjustment Screw
Roll Motor
Roll Adjustment Arm
Camera Lock-knob
Yaw Adjustment Arm
Yaw Adjustment Screw
Yaw Motor
Micro USBPort
Joystick
On/off Button&Indicator
Battery Handgrip
1/4“ Screw
On/Off button:Single Press: Start/Stop recordingDouble Press: Undefined
Triple Press: Re-centerLong Press: Turn on/off
Joystick:Up\Down\Left\Right:Control the gimbal movements
Single Press: Yaw-follow Double Press: Yaw-tilt follow Triple Press:All-locked
Long Press: StandbySingle Press in Standby Mode: Awaken the gimbal
USB Input:Adjust parameters;Upgrade firmwareUSB Output:Control camera recording
1. Charging Batteries.
Battery charger comes with 4 slots, each slot packs one piece of 26350 battery to charge
at the same time. Make sure the positive terminal is facing the charger indicator.
Charging starts when indicator changes to red after installation,the charger indicator
Turn to green when the battery is full of electricity.
2. Install Batteries.
Insert three 26350 batteries into the handgrip. Make sure the positive terminal is facing upwards.
Then screw the handgrip to the gimbal.
3. Mount the Camera.
Lay the gimbal horizontal, resting on it the roll motor as shown. Place the camera on the camera mount platform.
Align the camera’s ¼ mount by passing the 1/4''camera lock-knob through the camera mount platform.Tighten the
camera lock-knob to secure the camera.
Smaller cameras should choose the closest track to the tilt motor such as A7s. For larger bodied cameras the further
track from the tilt motor, such as Canon 5D.
A Packing List
CButtons&Ports
BMOZA Air
DSet up the MOZA Air
+
-
+
-
+
-

4. Attaching the Dual Handle.
Insert the handle bar into the side handles and tighten the lock-screw on each side. Loosen the lock-screw in the
middle of the handle bar. Attach the handgrip to the handle clamp and then adjust it properly, tighten the lock-screw.
5. How to connect Camera Control Cables.
Connectthe camera to the Mini-USB port on the tilt motorwith the control cable,Plug the
L-shaped end of the control cable into the USB output port, and plug the other end into t
he camera USB port or the shutter port. Please make sure the gimbal motor is not blocked
by the control cable. Press the On/Off button
on the handgrip to start or stop recording.
1. Balance the Tilt Axis.
(1)Put the MOZA Air upright, lock the yaw axis and roll axis. Rotate the tilt axis with your hand so that the
camera lens faces downwards.
If the camera lens rotates forward, loosen the
lock-screw on the tilt adjustment arm, move the tilt arm
backward till the lens is downward and not rotating due
to the gravity.If the camera lens rotates backward, loosen the
lock-screw on the tilt adjustment arm, move the tilt arm
forward till the lens is downward and cannot rotate.
Tighten the lock-screw after tilt balance is finished.
(2)Move the camera forward or backward
If the camera lens tilts up, loosen the camera
lock-knob, move the camera forward till the camera lens holds.
If the camera lens tilts down, loosen the camera
lock-knob, move the camera backwardtill the camera lens is
forward and holds still.
2. Balance the Yaw Axis.
Hold the MOZA Air in the way as shown in the picture below.
Then release the yaw arm.
If the roll motor descends and the camera ascends, loosen
the
lock-screw in the yaw axis adjustment arm and move the yaw
arm towards the camera till the yaw axis holds still.
If the roll motor ascends and the camera descends, loosen
the lock and move the yaw arm towards the roll motor till the yaw
axis holds still.After the yaw axis is properly balanced, tighten the
lock-screw.
Underslung Mode: Rotate the handgrip around the roll
motor till 180 degrees above the camera. If the roll axis
adjustment arm is to far out to the right, the tilt motor will not
rotate. The gimbal may shake when rotating to 90 degrees
. Do not stay too long in the 90-degree rotation.
Flashlight Mode: Rotate the handgrip around the tilt
motor by 90 degrees. Switching into the flashlight mode may fail
if the tilt axis adjustment arm is excessively upward.
OLED Screen
LOGO ConnectionGimbal Battery
Controller Battery
Recording Status
Focusing Speed
Gimbal Speed
Follow mode
REC:Ready: Ready to record;
Recording: recording。
SPEED: L Low;
MMedium;
H High。
FOLLOW MODE:Pan: Yaw Follow;
Tilt: Tilt Follow;
EAdjust Balance
FChanging Operating Modes
GWireless Thumb Controller (Optional)
Joystick:
Up: Move upward
Down: Move downward
Left: move the gimbal left; cancel
Right:move the gimbal right;OK
SPEED:
Single press: switch speed
Long press: switch between focus
adjustment/control
Press and hold to enter the DFU
upgradingmode with USB connection.
On/off Button: Single Press: start/stop
recording Long press: Turn on/off
OPTIONS:Single press: Switch follow
modes
Long press: Enter the menu Press and
hold to enter the DFU upgrading mode
with USB connection.
Roller: Control the focus adjustment
USB:Charging;Firmware upgrading

Functions:
Pair:Pairing is necessary when you change the wireless thumb controller, gimbal or upgrade the firmware.Long press ‘
OPTIONS’ to enter the menu. Then choose ‘Pair’ and move the joystick rightwards to enter the secondary menu.
Move the joystick downwards to choose the ‘YES’ option, and move the joystick rightwards again to enter the Pairing
mode. The interface of "Pairing"will appear.Then turn on MOZA Air gimbal,The screen of the thumb controller
shows‘OK’ in about 3 seconds.
Camera:Choose the camera type you will use with the gimbal to control the camera start/stop recording.
Profile:There are 4sets of parameters are optional for different camera and lens in different weights.
Follow Speed: Gimbal movement speed along with the operator. Three follow modes are available.
Power:Motor torque.
Gyro Calibrate:Calibrate the Gyro. Turn off the motor before calibration.
Habits:Set the motor and direction controlled by joystick, and time shown in the screen.
Motor:Turn on or off the motor.
Version:View the current firmware version of the wireless thumb controller.
APP:(Only for iOS)
Search for your MOZA MOZA Air status. Set controlChoose camera type. Change parameters.
Device.Speedand calibrate Gyro.
MOZA Assistant for iOS
Control the gimbal movements Firmware upgrade
GUI:(Currently supports Window & Mac OS system)
Download the file and install the driver. Turn on the MOZA Air and connect it to computer to enter the interface
for parameter adjustment.
Gimbal Interface: adjust Endpoint range, Control interface:adjust control Calibrate interface: calibrate Gyro
motor torque and follow mode. Speed and parameters of dead angle.
DownloadMOZA Assistant GUI
Info Interface: Check info about Firmware Upgrading Interface: Pressthe
version and battery level.joystick button to turn MOZA Air on. Enter
the firmware upgrading mode. Then connect
Upgrade Firmware:
1. MOZA Assistant Software:
2. Press the joystick to turn on MOZA Air and enter
the firmware upgrading mode. The indicator will blink and
the motors will power off. Connect the gimbal to computer
with USB cable and then launch GUI. GUI will automatically
recognize MOZA Air's status and enter the firmware
upgrading interface. Connect to the network and click
"Upgrade". The GUI will automatically download the latest
firmware and rewrite it to the
MOZA Air. After upgrading is 100%. Disconnect the USB cable and restart the MOZA Air.
3. MOZA Assistant App:
Press the joystick to turn MOZA Air on and enter the firmware upgrading mode. The
indicator will blink and the motors power will off. Turn on Bluetooth and search your
MOZA device to connect. The MOZA Assistant App will recognize MOZA Air's status and enter the firmware upgrading
interface.Make sure network is connected and click "Upgrade". The App will automatically download the latestfirmware
and rewrite it to the MOZA Air. After the upgrading is 100%, disconnect and restart the MOZA Air.。It can take around 20
minutes to upgrade firmware on the mobile phone.
HAPP & GUI
SensorCalibration:
Use GUI to calibrate sensor. Click “Motor” to turn off motors. Place the gimbal on a sturdy vibration-free
surface. Then click “Simple Gyro Calibration”. The computer screen will show “success” after the calibration is
finished, than restart MOZA Air.
Use App to calibrate sensor. Click “Motor” to turn off motors in the APP. Place the gimbal on a sturdy
vibration-free surface. Click "Sensor Calibration">Gyro Calibration>Start buttons step in step. Disconnect after
the screen shows "Back", than restart MOZA Air.
Use the Wireless Thumb Controller to calibrate sensor. Place the gimbal on a sturdy vibration-free surface.
Click “Gyro Calibrate>Yes” buttons. Once the screen shows “success”, restart the MOZA Air.
Gimbal
Weight:1100g(without battery)
Dimensions:336*115*40mm
Max Payload:2500g
Tilt Rotation Range:360°
Roll Rotation Range:360°
Yaw Rotation Range:360°
Working Voltage:10—15V
Dynamic Current:200mA
Static Current:100mA
Battery Life:≥6hrs
Bluetooth:Bluetooth 4.0
valid range: 5m
USB Input:Micro USB 2.0
Warranty Terms
The gimbal and charger are covered by a 12-month warranty. The motor and battery come with a 3-month warranty.
The one-year limited warranty does not apply to consumable parts such as the user manual, USB cables, and outer
box. Shipping costs are not covered. Check the detailed warranty policy for your region on www.gudsen.com
Exchange & Repair
If the product has manufacturing defects within 15 calendar days of purchasing the product can be exchanged.
The replacement applies only to the gimbal. Other accessories without qualifying issues are not covered.
Warranty repair service will not be provided if the conditions are:
1. Warranty expired;
2. No legal proof of purchase, receipt or invoice is not provided;
3. Product labels, serial numbers, waterproof marks, etc. show signs of tampering or alteration.
4. Any damage of the product is caused by unauthorized use or modification of the product.
5. Damage that is caused to the product by uncontrollable external factors.
6. Damage that is caused by improper usage and maintenance.
TwitterFacebookInstagram
E-mail:SUPPOR[email protected]OM
Website:WWW.GUDSEN.COM
JSpecs
Battery
Type:Li-ion
Model:26350
Capacity:2000mAh
Output Voltage:4.2V(max)
Output Current:2A(max)
Charger
Input Voltage:110~220V AC
Output Voltage:4.2V
Output Current:1000mA X 4 / 500mA X 4
Charging Time:3hrs
Wireless Thumb Controller
Weight :100g
Battery Capacity:600mAh
Battery Voltage:3.7V
Working Current: 50mA
Rest Current: 10mA
Standby Time: 24h
Wireless Type: 2.4G
Control Range:50M
Charging Voltage: 5V
Charging Time: 2h
KAfter-sales Policy
LContact Us

FCC Caution.
This device complies with part 15 of the FCC Rules. Operation is subject
to the following two conditions: (1) This device may not cause harmful
interference, and (2) this device must accept any interference received,
including interference that may cause undesired operation.
Any Changes or modifications not expressly approved by the party
responsible for compliance could void the user's authority to operate
the equipment.
Note: This equipment has been tested and found to comply with the
limits for a Class B digital device, pursuant to part 15 of the FCC Rules.
These limits are designed to provide reasonable protection against
harmful interference in a residential installation. This equipment
generates uses and can radiate radio frequency energy and, if not
installed and used in accordance with the instructions, may cause
harmful interference to radio communications. However, there is no
guarantee that interference will not occur in a particular installation. If
this equipment does cause harmful interference to radio or television
reception, which can be determined by turning the equipment off and
on, the user is encouraged to try to correct the interference by one or
more of the following measures:
-Reorient or relocate the receiving antenna.
-Increase the separation between the equipment and receiver.
-Connect the equipment into an outlet on a circuit different from that to
which the receiver is connected.
-Consult the dealer or an experienced radio/TV technician for help.
The device has been evaluated to meet general RF exposure
requirement. The device can be used in portable exposure condition
without restriction.
This manual suits for next models
2
Other Moza Camera Accessories manuals


