Moza Mini-P User manual

Mini-P
User manual

Battery and Charging
The MOZA Mini-P has a built-in lithium battery. Fully charge the
battery before first use. The LED power indicator blinks when the
battery level is less than 20%. Charge it with an universal USB-C
cable, Mini-P can be charged through a phone charger and
mobile power supplier. The charging stops automatically when
the battery is fully charged.
Notes:
1. Please do not over-charge or over-discharge the battery.
Otherwise the battery will be damaged;
2. Recharge and discharge the battery every 3 months to keep it
intact if it is left unused for a long time.
EN.......................................................................................................1

1
Mini-P Overview
Camera Control Port
Roll Storage Lock
L-Bracket Quick
Release Plate
Pan Motor Lock
Power Button
USB-C Charging Port
ļ3RUW
Trigger
Pan Knob
Roll Knob
Slide Lock
Joystick
Dial Wheel
Battery Level Indicator
Tilt Knob
Tilt Storage Lock
L-Bracket Quick
Release Plate
Lock Knob

2
([SDQGLQJDQG)ROGLQJWKH0LQL3PDLQERG\
a. Folded Status
Slide the slide lock and rotate the gimbal 180° anticlockwise.Then it
locks automatically.
E([SDQGHG6WDWXV
Slide the slide lock and rotate the gimbal 180° clockwise. Then it
locks automatically.
Mini-P Installation
6WRUDJHDQG([SDQGWKH0LQL3
0LQL3LVHTXLSSHGZLWKWKUHHD[HVVWRUDJHORFNIRUJLPEDOVWRUDJHWR
protect from constant movement.
a. Slide the tilt storage lock on the roll arm(Picture a), slide the tilt arm
downwards(Picture b), place the L-Bracket lock knob into the tilt
storage lock groove, then the tilt motor storage is complete.
b. Slide the roll arm downwards, place the roll arm between the 2
bosses on the silicone sleeve of the pan motor (Picture b), then
the roll motor storage is complete.
c. Slide the pan motor lock upwards(Picture c) then the pan motor
storage is complete.
5HYHUVHWKHDERYHVWHSVWRH[SDQGWKHJLPEDO
$WWDFKLQJWKH7ULSRG
a. Screw the tripod tightly into the 1/4" hole at the bottom of the
gimbal.
E([WHQGWKHWKUHHVXSSRUWIHHWSODFHWKHJLPEDORQDIODWVXUIDFH
G
G H I
H
G H
1
2
1
2

3
0RXQWLQJWKH&DPHUD
Horizontal Mounting
a. Place the longer side of the L-Bracket under the camera, and
secure the camera with a 1/4”screw.
b. Loosen the L-Bracket quick release plate lock knob, slider the
shorter side of the L-Bracket quick release plate into center of the
quick-release base, then lock the knob.
Vertical Mounting
a. Place the longer side of the L-Bracket under the camera to secure
it, and lock the camera with a 1/4”screw.
b. Loosen the L-Bracket quick release plate lock knob, slider the
longer side of the L-Bracket quick release plate into center of the
quick-release base, then lock the knob.
0RXQWLQJWKH0RELOH3KRQH
D)L[WKHSKRQHKROGHURQWKHORQJHUVLGHRIWKH/%UDFNHWTXLFN
release plate with 1/4”screw, make sure that front side with clips is
backward;
b. Put the phone in the phone holder, ensure that the clips do not
touch the power key or volume key;
c. Loosen the L-Bracket quick release plate lock knob, slider the
shorter side of the L-Bracket quick release plate into center of the
quick-release base, then lock the knob.
Note: Please hold your phone or camera tight when loosen the
L-Bracket quick release plate lock knob and remove the L-Bracket
quick release plate to prevent the camera or mobile phone from
falling to the ground.
G H
G H
G H I

4
a. After the camera is installed, you can use the camera control
cable to connect the gimbal and the camera, and you can
control the gimbal through the MOZA Master App. You will need
to balance with the camera control cable attached.
b. After the mobile phone is installed, use the MOZA Genie App,
connect the gimbal, and you can take photos or videos through
the gimbal.
NOTE: For camera functions and features, please use Moza Master
App. For Phone controls, please use Moza Genie App.
1RWH:KHQDGMXVWLQJWKHEDODQFHRIDQD[LVSOHDVHXQORFNWKH
PRWRUORFNRIWKHD[LVILUVWRWKHUZLVHLWFDQQRWEHDGMXVWHGDFFXUDWHO\LI
the balance is not adjusted accurately, it will cause the abnormal motor
work, motor overheat, unstable video, unavailable of certain functions,
and also shorten battery life, please make sure it is completely balanced
before turning on the gimbal.
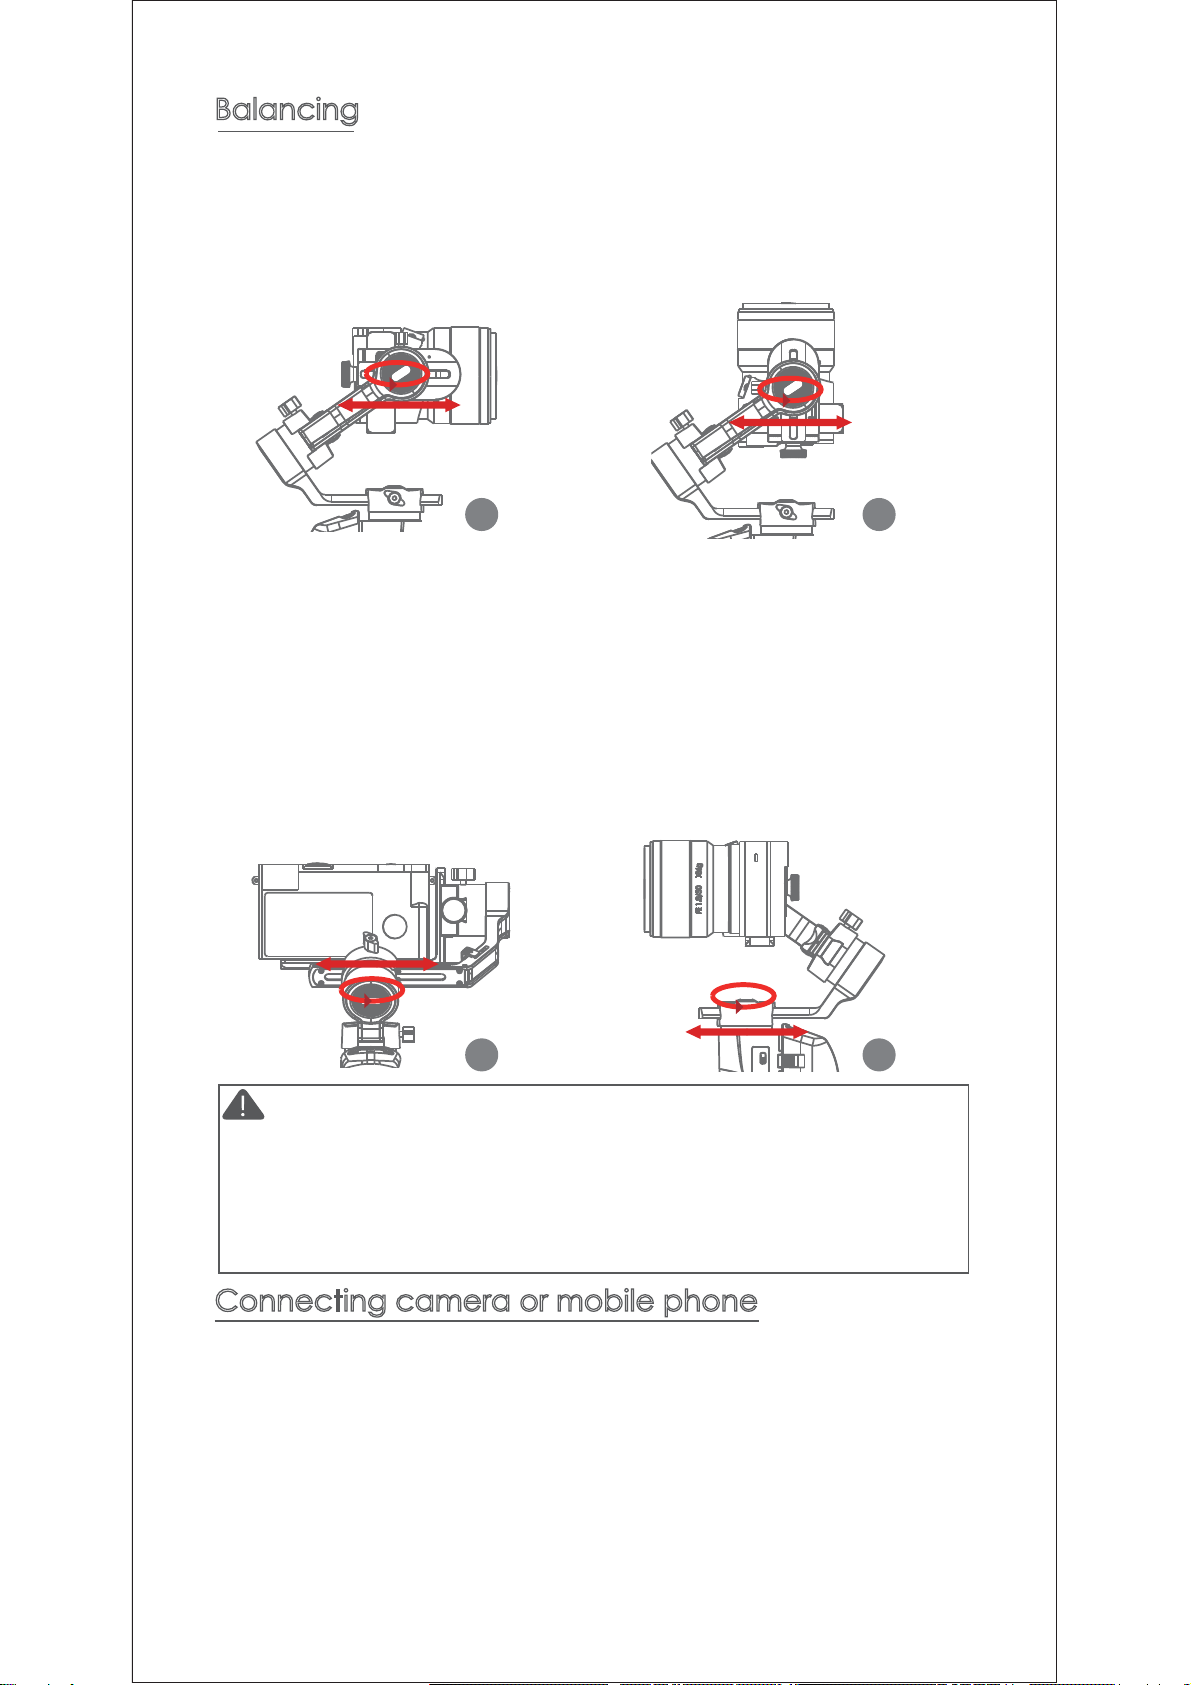
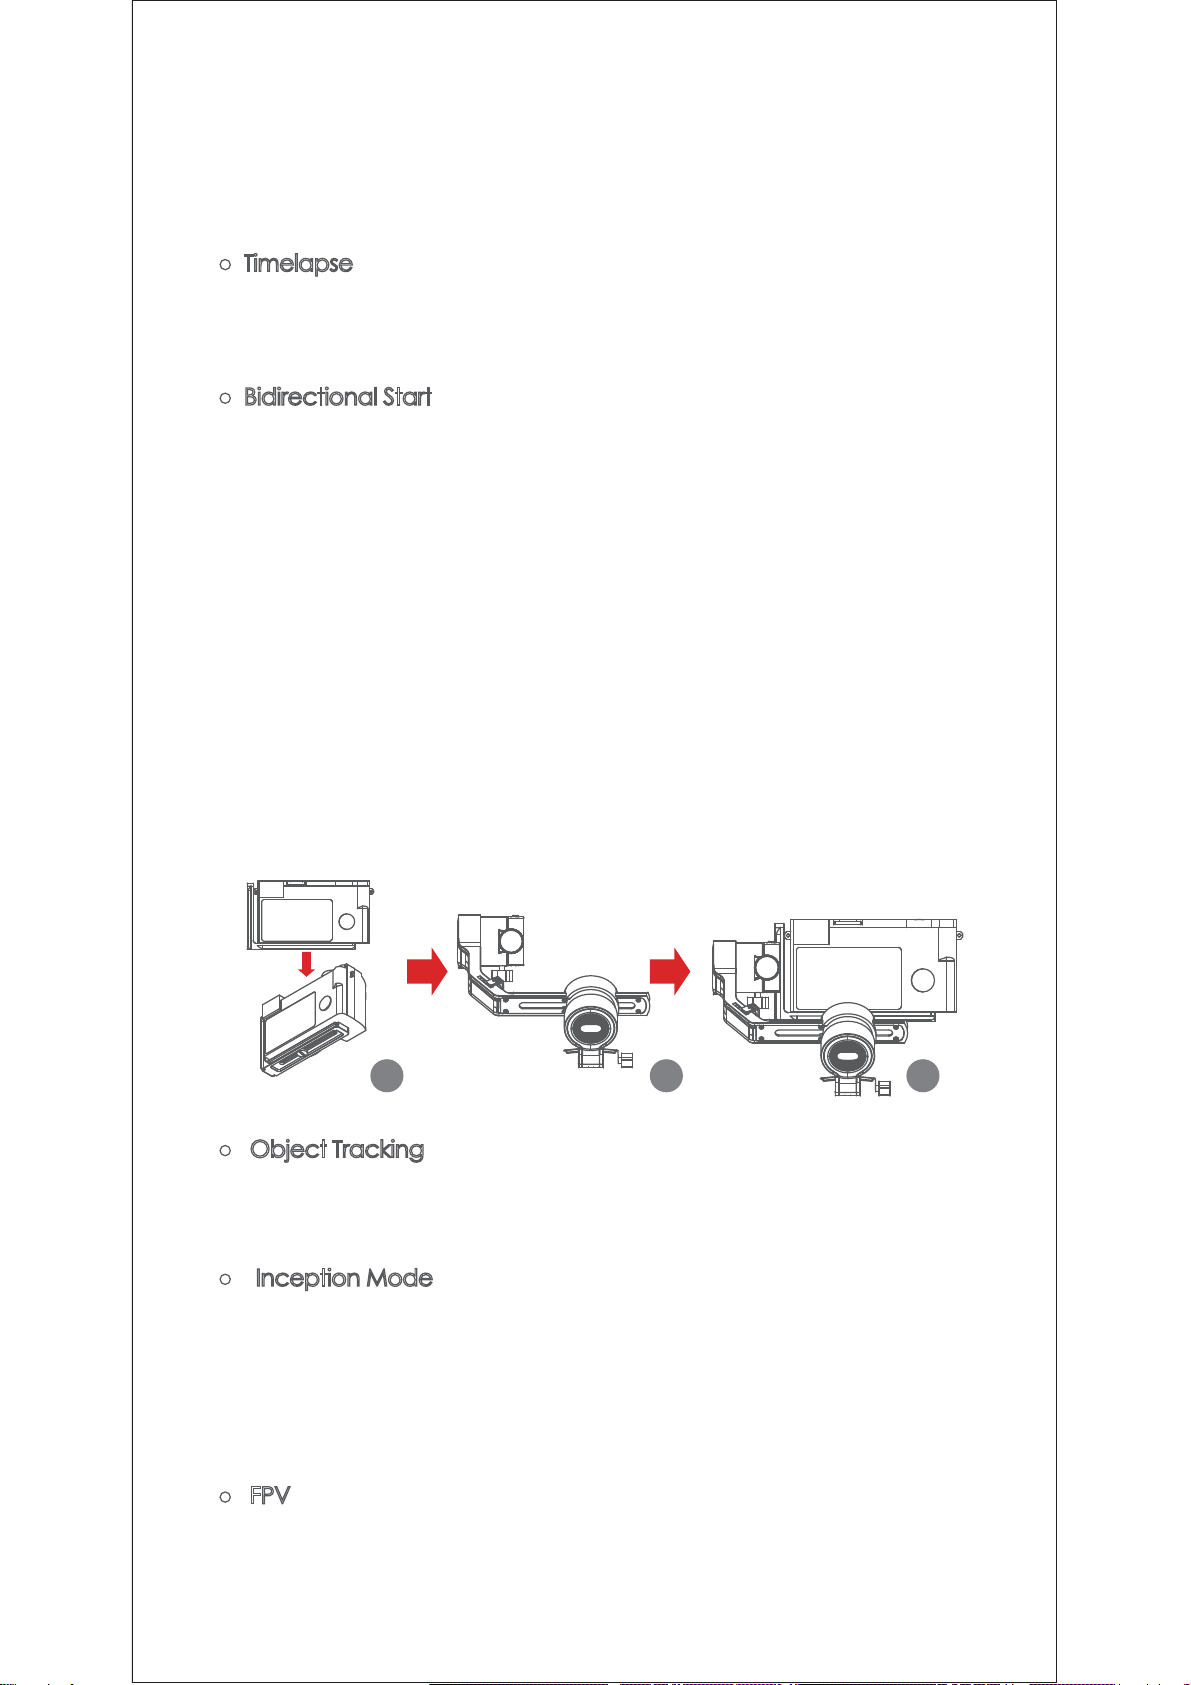
Balancing
Connecting camera or mobile phone
a. Loosen the tilt knob, and adjust the tilt arm back and forth until the
lens is horizontally forward, then lock the knob.
b. Rotate the camera until the lens is facing up, loosen the L-Bracket
quick release plate lock knob, and adjust the L-Bracket quick
release plate back and forth until the lens is straight up (leveled),
then lock the knob.
c. Loosen the roll knob, adjust the roll arm left and right until the roll
arm remains horizontal, then lock the knob; The camera or phone
should be leveled and can be positioned in any direction (up or
down) and it stays there.
d. Hold the stabilizer horizontally and make the pan arm parallel to
the ground, then loosen the pan knob, adjust the pan arm left
and right until the pan arm remains horizontal, and then lock the
knob. Your camera or phone should be leveled and can be
move to any direction (tilt, pan, roll) and stays on that position
without hands holding it.
G H
I J

5
Button Features
Simplified Operation
Down Button
ŏ'RXEOHSUHVV6SRUWV*HDU0RGH
ŏ7ULSOHSUHVV,QFHSWLRQ0RGH
Trigger
ŏDouble press: Re-center
ŏPress once+hold: Switch to tilt follow
ŏ'RXEOHSUHVVKROG6ZLWFKWR$OOORFNHG
Joystick
ŏ0RYHXSZDUGVSKRQHFDPHUDWXUQVXS
ŏ0RYHGRZQZDUGVSKRQHFDPHUDWXUQVGRZQ
ŏ0RYHOHIWZDUGVSKRQHFDPHUDWXUQVOHIW
ŏ0RYHULJKWZDUGVSKRQHFDPHUDWXUQVULJKW
The speed of camera moving increases with the
larger moving range of joystick
Check the Battery Level
Battery Level Indicators
ŏ7KUHHEOXH/('VRQEDWWHU\OHYHO
ŏ7ZREOXH/('VRQEDWWHU\OHYHO
ŏ2QHEOXH/('RQEDWWHU\OHYHO
ŏ%OLQNLQJEHORZEDWWHU\OHYHO
ŏ6ROLGUHGOLJKW&KDUJLQJ
ŏ5HGOLJKWRII&KDUJLQJFRPSOHWHG
Follow Function
ŏ/HIW%XWWRQ
Press twice the left button: FPV mode. Press
twice again to stop

6
ŏ &RQWUROWKHFDPHUDRUSKRQHWRUHFRUGDYLGHRRUWDNHDSKRWR
a. Install the camera on the gimbal, then you can use the shutter
control cable to connect the gimbal and camera. Press the
center button once to take a photo in photo mode. Press the
center button once to start/stop recording in video mode.
b. Install the phone on the gimbal, then turn on the MOZA Genie
App and connect the gimbal to the MOZA Genie App. Press the
center button once to take a photo in photo mode. Press the
center button once to start/stop recording in video mode.
c. Double press the top button to switch the video mode/photo
mode
ŏ 0LPLF0RWLRQ&RQWURO
(requires 2 smartphones: one on gimbal and one to control the
mimic. If plan to use the camera on gimbal, only one smartphone is
required)
Press the center button once: start/ stop recording
(only valid in video mode)
Press twice the center button during recording:
take one photo (in video mode)
Long press the center button:confirm to move
timelapse point (in advanced timelapse mode)
After the completion of timelapse points setting, long
press the right button: start/stop advanced timelapse
shooting (in advanced timelapse mode)
Press twice the left button: FPV mode
Press twice again to stop
Double press the down button: Sport gear mode
Press twice the top button: switch to video mode/photo
mode
Press the top button once: open the menu
Long press the top button for 3s: switch to front camera/
rear camera
Triple press the down button: Inception mode (±115°)
Press the right button once: photo playback in album.
Press once again to return to the camera
Hold the down focus button: Focus-
Double press the down focus button: Automatic uniform focus
-
Hold the top focus button: Focus+
Double press the top focus button: Automatic uniform focus+
Control via Mobile Phone
(once paired through MOZA Genie App)
Functions Description of the Gimbal

7
a. Place the smartphone on the Gimbal through the phone holder;
b. Use a 2nd smartphone and pen the “MOZA Master App, connect
it to the gimbal and enter Mimic Motion Control Mode;
c. Rotate the 2nd phone and it will control the movement of the
gimbal.
ŏ 7LPHODSVH
Use the MOZA Master App or MOZA Genie App to connect the
gimbal, select“Creative video”button and there will be multiple
timelapse modes for shooting.
ŏ %LGLUHFWLRQDO6WDUW
By default, we mount the camera handle near the tilt motor so that
WKHFDPHUDFRQWUROSRUWFDQEHH[SRVHG%XWLQVRPHVSHFLDOFDVHV
we need to mount the camera control port near the tilt motor for
normal use.
The following situations will require reverse mounting:
a. The camera is too wide for forward mounting.
b. The lens used is too heavy to be balanced when forward
mounting.
Reverse mounting steps:
D3ODFHWKHVKRUWHUVLGHRIWKH/%UDFNHWQH[WWRWKHOHQVDQGPRXQW
it on the bottom of the camera;
E5RWDWHWKHUROOD[LVDURXQGWKHUROOPRWRUWKHQWKHWLOWPRWRUZLOO
be on the left of the roll motor.
c. Mount the shorter side of the L-Bracket to the quick release
baseplate.
ŏ 2EMHFW7UDFNLQJ
Mount the phone on the gimbal, connect the Genie App to enter
object tracking mode, select subject/object on the screen to be
tracked and the gimbal will start object tracking shooting.
ŏ ,QFHSWLRQ0RGH
The Inception Mode is used to control the camera to rotate in the roll
direction for shooting upside down and rotating footage. Triple press
the down button on the dial to enter the Inception Mode. Press the
left/right button on the dial then the motor rotates to the left/right
automatically.
7ULSOHSUHVVWKHGRZQEXWWRQRQWKHGLDOWRH[LWWKH,QFHSWLRQ0RGH
ŏ)39
Double press the left button on the dial to enter the FPV mode.
G H I

8
ŏ )LUPZDUH8SJUDGHYLD0RELOH$SS
a. When the gimbal is powered off, long press the center button,
then press the power button with the other handuntil the battery
indicator start flashing (Boot Mode).
b. Start the MOZA Master App, press Bluetooth to search for device
then connect it.
c. The App will automatically enter the firmware upgrade interface,
After the firmware download is complete, click the "Upgrade"
button to start the upgrade.
d. After the upgrade is complete, turn the gimbal off and back on
again. Then calibrate the gyroscope and accelerometer to get
started. You can connect to the “MOZA Master App” to check
the version number of the Mini-P.
ŏCalibration
The MOZA Mini-P needs to be calibrated when:
a. The device works abnormally;
b.There is a deviation in the horizontal angle after the gimbal is
turned on (not leveled), and it is unable to resolve after one-click
re-center;
c. Deviation caused by the environment in which the gimbal is used.
Calibration method: Please scan the QR code at the end of the
page for details.
ŏ 0RELOH$SS
If you use the camera on the gimbal, you can scan the QR code to
download the MOZA Master App, or you can search for "MOZA
Master" directly in the mobile app store to download. (See App
download QR code at the end of the page)
Note:
1. Make sure the gimbal is fully charged and the computer or
mobile phone network connection is normal during the upgrade.
2. Do not disconnect the gimbal from power, USB-C cable or
Bluetooth during the upgrade, otherwise the upgrade will fail.
3. When using the App upgrade, the upgrade process takes a
ORQJHUWLPHSOHDVHZDLWSDWLHQWO\'RQRWH[LWWKHDSSWRWKH
background, and do not turn off the screen to avoid upgrade
failure.
4. If all fails, reboot the gimbal and try to upgrade again until the
upgrade is completed.
Note:
1. The mobile phone system supported by MOZA Master are iOS
and Android.
2. Smartphone cannot be paired with the gimbal directly via
Bluetooth. You must use the MOZA Master App to connect.

9
3URGXFW6SHFLÀFDWLRQ
Roll310°
Payload JOEV0D[LPXP
Specs
Weight
Dimensions (mm) Gimbal (folded): 165*200*100
Supported Phone Size 58 ~ 88mm
Battery Life
1.5 (h)
Pan360°
Tilt20°
12 (h)
6WDQGDUG9ROWDJH9
Charging Time
Mechanical
Endpoint Range
JOEV
Gimbal (unfolded): 320*140*150
Battery Specs
Note
1. When using the Mini-P with a mobile phone to take photos,
please use the app “MOZA Genie”, which is customized for the
Mini-P, so that you can use various functions of gimbal more
creatively.
2. Please check for the latest version of the App, which is subject to
update without notice. For updates or latest information, please visit
MOZA's official website,WeChat subscription account and mobile
application stores.
If you use a mobile phone on the gimbal, you can directly scan the
QR code to download "MOZA Genie "(Android 5.0 or higher, IOS 9.0
or higher), or you can search for" MOZA Genie "directly in the mobile
app store to download. (See the QR code at the end of the page)
)&&,'$0-50,1,3

)&&:DUQLQJ
$Q\&KDQJHVRUPRGLILFDWLRQVQRWH[SUHVVO\DSSURYHGE\WKH
SDUW\UHVSRQVLEOHIRUFRPSOLDQFHFRXOGYRLGWKHXVHU·VDXWKRULW\
WRRSHUDWHWKHHTXLSPHQW
7KLVGHYLFHFRPSOLHVZLWKSDUWRIWKH)&&5XOHV2SHUDWLRQLV
VXEMHFWWRWKHIROORZLQJWZRFRQGLWLRQV7KLVGHYLFHPD\QRW
FDXVHKDUPIXOLQWHUIHUHQFHDQGWKLVGHYLFHPXVWDFFHSW
DQ\LQWHUIHUHQFHUHFHLYHGLQFOXGLQJLQWHUIHUHQFHWKDWPD\
FDXVHXQGHVLUHGRSHUDWLRQ
1RWH7KLVHTXLSPHQWKDVEHHQWHVWHGDQGIRXQGWRFRPSO\
ZLWKWKHOLPLWVIRUD&ODVV%GLJLWDOGHYLFHSXUVXDQWWRSDUWRI
WKH)&&5XOHV7KHVHOLPLWVDUHGHVLJQHGWRSURYLGHUHDVRQDEOH
SURWHFWLRQDJDLQVWKDUPIXOLQWHUIHUHQFHLQDUHVLGHQWLDO
LQVWDOODWLRQ7KLVHTXLSPHQWJHQHUDWHVXVHVDQGFDQUDGLDWH
UDGLRIUHTXHQF\HQHUJ\DQGLIQRWLQVWDOOHGDQGXVHGLQ
DFFRUGDQFHZLWKWKHLQVWUXFWLRQVPD\FDXVHKDUPIXO
LQWHUIHUHQFHWRUDGLRFRPPXQLFDWLRQV+RZHYHUWKHUHLVQR
JXDUDQWHHWKDWLQWHUIHUHQFHZLOOQRWRFFXULQDSDUWLFXODU
LQVWDOODWLRQ,IWKLVHTXLSPHQWGRHVFDXVHKDUPIXOLQWHUIHUHQFH
WRUDGLRRUWHOHYLVLRQUHFHSWLRQZKLFKFDQEHGHWHUPLQHGE\
WXUQLQJWKHHTXLSPHQWRIIDQGRQWKHXVHULVHQFRXUDJHGWRWU\
WRFRUUHFWWKHLQWHUIHUHQFHE\RQHRUPRUHRIWKHIROORZLQJ
PHDVXUHV
³5HRULHQWRUUHORFDWHWKHUHFHLYLQJDQWHQQD
³,QFUHDVHWKHVHSDUDWLRQEHWZHHQWKHHTXLSPHQWDQG
UHFHLYHU
³&RQQHFWWKHHTXLSPHQWLQWRDQRXWOHWRQDFLUFXLWGLIIHUHQW
IURPWKDWWRZKLFKWKHUHFHLYHULVFRQQHFWHG
³&RQVXOWWKHGHDOHURUDQH[SHULHQFHGUDGLR79WHFKQLFLDQIRU
KHOS
The device has been evaluated to meet general RF exposure
requirement. The device can be used in portable exposure
condition without restriction
Other manuals for Mini-P
1
Table of contents
Other Moza Camera Accessories manuals