MSSC QM1610 User manual

QM1610
Large Character Ink-jet Printer
Operator Manual
P/N 462376-01
Revision: AE, May 2013
All manuals and user guides at all-guides.com
all-guides.com

© 2013. Used with permission.
MSSC, LLC
926 McDonough Lake Road, Phone: (618) 343-1006
Collinsville, Phone: (800) 854-8905
IL 62234 USA Fax: (618) 343-1016
www.msscllc.com
All manuals and user guides at all-guides.com

Rev AE 1
Table of Contents
Chapter 1 — Introduction
QM1610 Printer. . . . . . . . . . . . . . . . . . . . . . . . . . . . . . . . . . . . . . . . . . . . . 11
About the Manual. . . . . . . . . . . . . . . . . . . . . . . . . . . . . . . . . . . . . . . . . . . 11
Standard Product Features . . . . . . . . . . . . . . . . . . . . . . . . . . . . . . . . . . . 12
Chapter 2 — Product Safety
Introduction. . . . . . . . . . . . . . . . . . . . . . . . . . . . . . . . . . . . . . . . . . . . . . . . 21
Chapter 3 — Fast Installation
Printer Overview . . . . . . . . . . . . . . . . . . . . . . . . . . . . . . . . . . . . . . . . . . . 31
Standard Components . . . . . . . . . . . . . . . . . . . . . . . . . . . . . . . . . . . 31
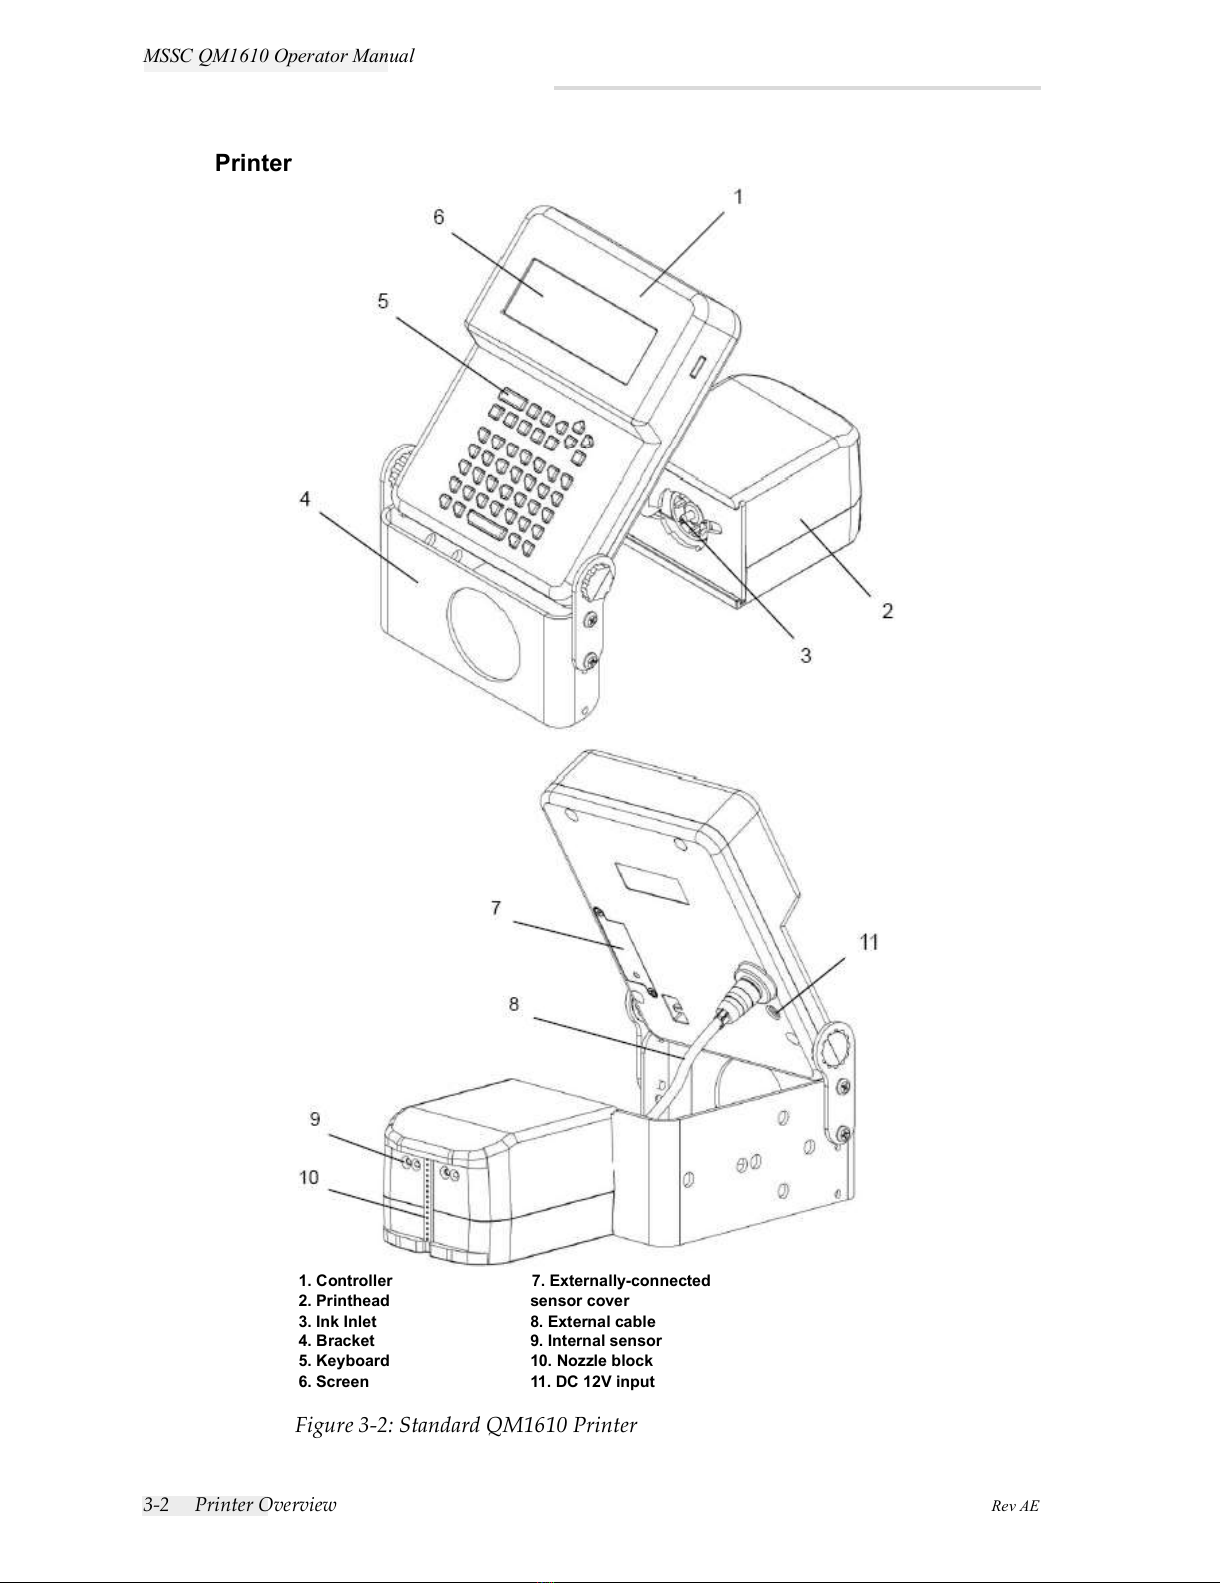
Printer . . . . . . . . . . . . . . . . . . . . . . . . . . . . . . . . . . . . . . . . . . . . . . . . . 32
Fast Installation. . . . . . . . . . . . . . . . . . . . . . . . . . . . . . . . . . . . . . . . . . . . . 33
Installation Procedure . . . . . . . . . . . . . . . . . . . . . . . . . . . . . . . . . . . . 33
Chapter 4 — Operation and Setup
Overview . . . . . . . . . . . . . . . . . . . . . . . . . . . . . . . . . . . . . . . . . . . . . . . . . . 41
Keyboard Description . . . . . . . . . . . . . . . . . . . . . . . . . . . . . . . . . . . . . . . 42
Print On/Off. . . . . . . . . . . . . . . . . . . . . . . . . . . . . . . . . . . . . . . . . . . . 43
Dot Size . . . . . . . . . . . . . . . . . . . . . . . . . . . . . . . . . . . . . . . . . . . . . . . . 44
Purge . . . . . . . . . . . . . . . . . . . . . . . . . . . . . . . . . . . . . . . . . . . . . . . . . . 44
Print Delay . . . . . . . . . . . . . . . . . . . . . . . . . . . . . . . . . . . . . . . . . . . . . 45
Character Width. . . . . . . . . . . . . . . . . . . . . . . . . . . . . . . . . . . . . . . . . 45
Date . . . . . . . . . . . . . . . . . . . . . . . . . . . . . . . . . . . . . . . . . . . . . . . . . . . 46
Time . . . . . . . . . . . . . . . . . . . . . . . . . . . . . . . . . . . . . . . . . . . . . . . . . . . 46
Count Display. . . . . . . . . . . . . . . . . . . . . . . . . . . . . . . . . . . . . . . . . . . 47
Number/Special Character Key Lock . . . . . . . . . . . . . . . . . . . . . . 47
Backspace/Delete . . . . . . . . . . . . . . . . . . . . . . . . . . . . . . . . . . . . . . . 47
Exit . . . . . . . . . . . . . . . . . . . . . . . . . . . . . . . . . . . . . . . . . . . . . . . . . . . . 47
Input Method Switch. . . . . . . . . . . . . . . . . . . . . . . . . . . . . . . . . . . . . 48
Capital Lock . . . . . . . . . . . . . . . . . . . . . . . . . . . . . . . . . . . . . . . . . . . . 48
User Interface . . . . . . . . . . . . . . . . . . . . . . . . . . . . . . . . . . . . . . . . . . . . . . 49
Start Screen . . . . . . . . . . . . . . . . . . . . . . . . . . . . . . . . . . . . . . . . . . . . . 49
Main Menu Structure . . . . . . . . . . . . . . . . . . . . . . . . . . . . . . . . . . . . 49
Chapter 5 — Maintenance
Frequently Used Printer . . . . . . . . . . . . . . . . . . . . . . . . . . . . . . . . . . . . . 51
Maintenance of the Keyboard and the
All manuals and user guides at all-guides.com

MSSC QM1610 Operator Manual
2 Rev AE
External Shell of the Printer . . . . . . . . . . . . . . . . . . . . . . . . . . . . . 51
Maintenance of the Nozzle and the Internal Sensor . . . . . . . . . . .52
Startup Procedure . . . . . . . . . . . . . . . . . . . . . . . . . . . . . . . . . . . . . . . . . . .53
Shutdown Procedure . . . . . . . . . . . . . . . . . . . . . . . . . . . . . . . . . . . . . . . .54
All manuals and user guides at all-guides.com

Rev AE QM1610 Printer 1-1
Introduction
QM1610 Printer
Thank you for purchasing MSSC's next generation large character ink-jet
printer QM1610.
The QM1610 large character ink-jet printer is a contactless ink-jet printer.
It is used to spray-print large character messages on product outer cases
by using porous inks.
About the Manual
This manual is intended for operator use and offers relevant information
on how to operate the printer. Unless otherwise stated, printer operators
can execute all the tasks described in this manual.
All occurrences of the word printerare references to the QM1610 printer.
Warning
PERSONAL INJURY. If you wish to perform your own service and
maintenance on the printer, make sure that only qualified personnel
execute the operating programs pertaining to printer maintenance.
Warning
PERSONAL INJURY. The term Qualified Personnel refers to
individuals who are technically trained (have completed relevant
training courses on printer operations), have relevant printer
operating experience, and are aware of the potential hazards.
Note: This Operator Manual is intended to be a supplement to (and not a
replacement for) customer training.
All manuals and user guides at all-guides.com

1-2 Standard Product Features Rev AE
MSSC QM1610 Operator Manual
Keep this manual in a safe place for easy reference. Even if you choose
MSSC (or one of its dealers) to provide maintenance for your printer,
retain a copy of this Operator manual for future reference.
MSSC reserves the rights to update the contents of the manual and printer
performance.
Standard Product Features
The product features are listed below:
Simple system composition
Character size includes 1 line of 16 dots or 2 lines of 7 dots
Self-defined time and date format
Automatic date rollover time
Automatic valid date printing
Automatic shift setup (a maximum of four shifts)
Automatic count setup (a maximum of ten digits)
Print delay distance setup (maximum delay of 50 cm)
Adjustable character width
Integrated internal product sensor (external sensor can be connected)
Standard printing character height (20 mm)
Automatic detection and manual setup of production line speed
Production line speed range: 6 meter/minute to 60 meter/minute
Each message may contain upto 40 characters of 16 dot font or 160
characters of7 dot font (upto 80 characters perline).
Message storage capability (maximum 40 messages)
Work temperature is 4°C to 49°C
Global universal power supply capability
Self-adjusted-pressure ink system
All manuals and user guides at all-guides.com
all-guides.com

Rev AE Introduction 2-1
Product Safety
Introduction
MSSC is committed to producing contactless spray coding/coding
systems and ink consumables, that meet high performance and reliability
standards. We adopt rigid quality control technology to eliminate
possibilities of product defects and hazards.
The QM1610 large character printers are used to print messages on the
outer casing of packing packages. Any other usage of the printer may
result in injury to the operator.
Caution
Read through this chapter before using the printer.
Warning
PERSONAL INJURY. While installing, operating, servicing or
performing maintenance activities on the printer or relevant devices,
you must obey the safety rules listed in this chapter.
Warning
PERSONAL INJURY. All electrical wiring and connections must
comply with applicable local codes. Consult the appropriate
regulatory agency for further information.
Caution
EQUIPMENT DAMAGE. Use only the attached AC power supply
adapter for QM1610.
All manuals and user guides at all-guides.com

2-2 Introduction Rev AE
MSSC QM1610 Operator Manual
Caution
EQUIPMENT DAMAGE. Do not use the printer in a wet or dusty
environment.
Warning
PERSONAL INJURY. To remove power in case of emergency,
disconnect the power supply from the AC Main.
Warning
PERSONAL INJURY. The inks and solvents are irritating to the eyes
and the respiratory system. To prevent personal injury while
handling these substances:
Always wear protective rubber gloves and clothing.
Always wear goggles with side-shields or a face mask. It is also
advisable to wear safety glasses when carrying out maintenance.
If solvent contaminates the skin, rinse off with running water for at
least 15 minutes.
Warning
PERSONAL INJURY. While operating with inks or solvents, wear
butyl rubber gloves to avoid contact with skin and mucosa (nasal
canal and throat). If skin contact occurs, immediately take off the
contaminated clothes and use soap and water to rinse the affected
area. If the burning sensation persists, go to the nearest hospital.
Caution
EQUIPMENT DAMAGE. Only use the approved ink and solvent
produced by MSSC.
All manuals and user guides at all-guides.com

Rev AE Printer Overview 3-1
Fast Installation
Printer Overview
Standard Components
The standard QM1610 product package contains the following
components.
1. QM1610 printer
2. Ink (230ml)
3. Stainless steel tube (outer diameter 1 inch and
length 15 inches)
4. Stainless steel tube (outer diameter 1 inch an
d
length 9 inches)
5. Fastening and fixing components
6. Power supply adapter and cable
Figure 3-1: Standard QM1610 Packing Components
All manuals and user guides at all-guides.com

3-2 Printer Overview Rev AE
MSSC QM1610 Operator Manual
Printer
1. Controller
2. Printhead
3. Ink Inlet
4. Bracket
5. Keyboard
6. Screen
7. Externally-connected
sensor cover
8. External cable
9. Internal sensor
10. Nozzle block
11. DC 12V input
Figure 3-2: Standard QM1610 Printer
All manuals and user guides at all-guides.com

Rev AE Fast Installation 3-3
MSSC QM1610 Operator Manual
Fast Installation
Installation Procedure
Prepare for Installation
Select a mounting location where there are guide bars on the conveyor. If
necessary, install the guide bars. This will keep the product at a correct
distance from the printhead (no further away than 6 mm) and prevent any
damage to the unit. Refer to Figure 3-4 on page 3-4.
Figure 3-3: Printer Installation
All manuals and user guides at all-guides.com
all-guides.com

3-4 Fast Installation Rev AE
MSSC QM1610 Operator Manual
Warning
PERSONAL INJURY. Avoid any contact between QM1610 and the
product as this will result in poor print quality.
Procedure
Note: For pictorial guidance on the installation steps, refer to Figure 3-3 on
page 3-3.
1Attach the aluminium clamp to the printer controller mounting frame
using the two screws and two nuts. Refer to Figure 3-5 on page 3-5.
Note: Make sure the mounting clamp hole faces the floor.
6 mm maximum
throw distance
Figure 3-4: QM1610 and Conveyor
All manuals and user guides at all-guides.com

Rev AE Fast Installation 3-5
MSSC QM1610 Operator Manual
2Attach another aluminium clamp to the production line.
For floor mounting, secure the aluminium clamp to the floor using
concrete anchors. Use standard stainless steel tubes with an outer
diameter of 2.5 cm (1 inch).
Note: The conveyor side rails channel should be a 0.32 cm x 6.3 cm (1/8
inches x 2.5 inches) or greater steel.
Note: Make sure the QM1610 mounting bracketry is mounted securely.
Avoid any sway or vibration of the printhead. If not, this will affect the print
quality.
%PYQMRMYQ'PEQT
Figure 3-5: Printer Controller Mounting Frame
All manuals and user guides at all-guides.com

3-6 Fast Installation Rev AE
MSSC QM1610 Operator Manual
3Attach a stainless steel tube to the aluminium clamp installed in
Step 2.
4Attach the combined aluminium clamp to the stainless steel tube
installed in Step 3.
5Attach the vertical stainless steel tube to the combined aluminium
clamp (refer to Figure 3-6).
6Attach the printer (with the controller) to the vertical stainless steel
tube installed in Step 5.
Note: Adjust the printhead by loosening the cross clamp with the ratchet
handles.
Note: The QM1610 printhead should be perpendicular to the product. If
some nozzles are further away from the product than the others, the print
quality will suffer.
7Install the plastic end-cap on the surface of the stainless steel tube to
protect the production line operator from being hurt.
The installed printer and assembled bracketry are shown in Figure 3-7
on page 3-7.
Note: After the QM1610 is in position, tighten the bracketry.
4VSHYGXMSR0MRI+YMHIPMRIW
Figure 3-6: QM1610 Production Line Guidelines
All manuals and user guides at all-guides.com

Rev AE Fast Installation 3-7
MSSC QM1610 Operator Manual
Note: To achieve optimal print quality, position the printhead nozzles to a
maximum throw distance of 6 mm from the substrate. (refer Figure 3-8).
Prevent any strong wind (like that from a fan) from blowing onto the nozzle.
Note: There are two methods of installing the printer brace. This enables the
printer to move forward and backward by 55.7 mm distance. Refer to Figure 3-9
on page 3-8.
Figure 3-7: Printer Assembly
Figure 3-8: Print Distance Adjustment
All manuals and user guides at all-guides.com

3-8 Fast Installation Rev AE
MSSC QM1610 Operator Manual
Controller Screen Setup
Adjust the angle of the controller to monitor the screen and operate the
keyboard as shown in Figure 3-10 on page 3-9.
a. Follow direction 1 (in the following figure) to push the controller to
release it from the rotation restriction.
b. Follow direction 2 (in the following figure) to rotate the controller
to the angle convenient for operation and monitoring.
Figure 3-9: Movement Distance
All manuals and user guides at all-guides.com
all-guides.com

Rev AE Fast Installation 3-9
MSSC QM1610 Operator Manual
Externally-connected Sensor
If the customer orders an externally-connected sensor, perform the
installation according to the following steps:
1Peel off 80 mm length of the protection cover from the sensor-
connecting end wire.
2Peel off 5 mm length of the external cover of the core wire.
3Open the cover of the externally-connected sensor.
4Insert the wire of the externally-connected sensor through the orifice
on the cover. The total length of the wire should be around 140 mm
(Figure 3-9 on page 3-8).
Figure 3-10: Printer Movement
Figure 3-11: Wires
All manuals and user guides at all-guides.com

3-10 Fast Installation Rev AE
MSSC QM1610 Operator Manual
Note: Install tie-wrap to act as strain relief for the wire.
5Refer to Figure 3-12 while performing the wiring. Also, refer to the
sensor description provided in Table 3-1.
The wiring description for the sensor (PN: 35464) is as listed in the
following table:
6Replace the cover of the externally-connected sensor and fasten the
bolt.
7Fix the sensor onto the production line. Make sure that the distance
from the sensor to the nozzle is not greater than 500 mm.
Note: You must set the printer software properly while using the external
photocell. With an external photocell, Auto Detectis not used to set speed or
direction. Use the 'Set Line' option in the main menu (Set Production Line
on page 4-21) to manually set the speed, the direction and to set the 'Select
Sensor' setting to 'External'.
8Power supply installation:
Warning
PERSONAL INJURY. Make sure that the mains socket outlet is
installed in the vicinity of the equipment so that it is easily
accessible.
Sensor
Wire
Color
Controller Wiring
Base
Remarks
Red 12 V Short connected 12 V and SIG+ by using
wire
White SIG -
Black GND
Table 3-1: Wiring Description
Figure 3-12: Wiring Details
All manuals and user guides at all-guides.com

Rev AE Fast Installation 3-11
MSSC QM1610 Operator Manual
a. Connect the power supply cable to the power supply adapter, as
shown in Figure 3-13.
b. Connect the male plug from the power supply adapter to the
printer controller (refer Figure 3-14).
c. Connect the power supply to an appropriate voltage power source.
Note: Before printing, fix the power supply adapter with the cable tie
provided by MSSC, or the customized brace, as shown in Figure 3-15 on
page 3-12. This holds the cord in position and reduces the strain on the power
cord connector.
Figure 3-13: Power Supply Cable Connection
Figure 3-14: Adapter Connection
All manuals and user guides at all-guides.com

3-12 Fast Installation Rev AE
MSSC QM1610 Operator Manual
9Ink bottle installation:
a. Insert the ink bottle through the orifice and position the mouth of
the ink bottle towards the printhead.
b. Push the ink bottle forward and twist it clock-wise until it is tightly
connected to the printer.
Figure 3-15: Adapter Fixture
Figure 3-16: Ink Bottle Installation
All manuals and user guides at all-guides.com
Other manuals for QM1610
2
Table of contents
Other MSSC Printer manuals

MSSC
MSSC QM2-101 User manual

MSSC
MSSC Smart-Jet Plus User manual

MSSC
MSSC qm7500 User manual

MSSC
MSSC Smart-Jet DL200 User manual

MSSC
MSSC Smart-Jet DL100 User manual

MSSC
MSSC QM2-101 User manual

MSSC
MSSC Smart-Jet BLUE User manual

MSSC
MSSC QM1610 User manual

MSSC
MSSC Smart-Jet Plus Installation guide

MSSC
MSSC Smart-Jet BLUE User manual