MSSC Smart-Jet Plus User manual

USER MANUAL
Pro Pack Solutions, Inc. 770-554-1187
www.ProPackSolutions.com

2
Smart‐Jet Plus Manual v04 | 2015‐07‐30 | by MSSC, LLC
Contents
Contents...................................................................................................................................................2
ABOUT SMART-JET PLUS.......................................................................................................... 4
TECHNICAL SPECIFICATIONS...............................................................................................................4
FEATURE MENU .....................................................................................................................................5
WIRELESS KEYBOARDDEFINITION......................................................................................................8
INSTALLATION PROCEDURES .................................................................................................. 8
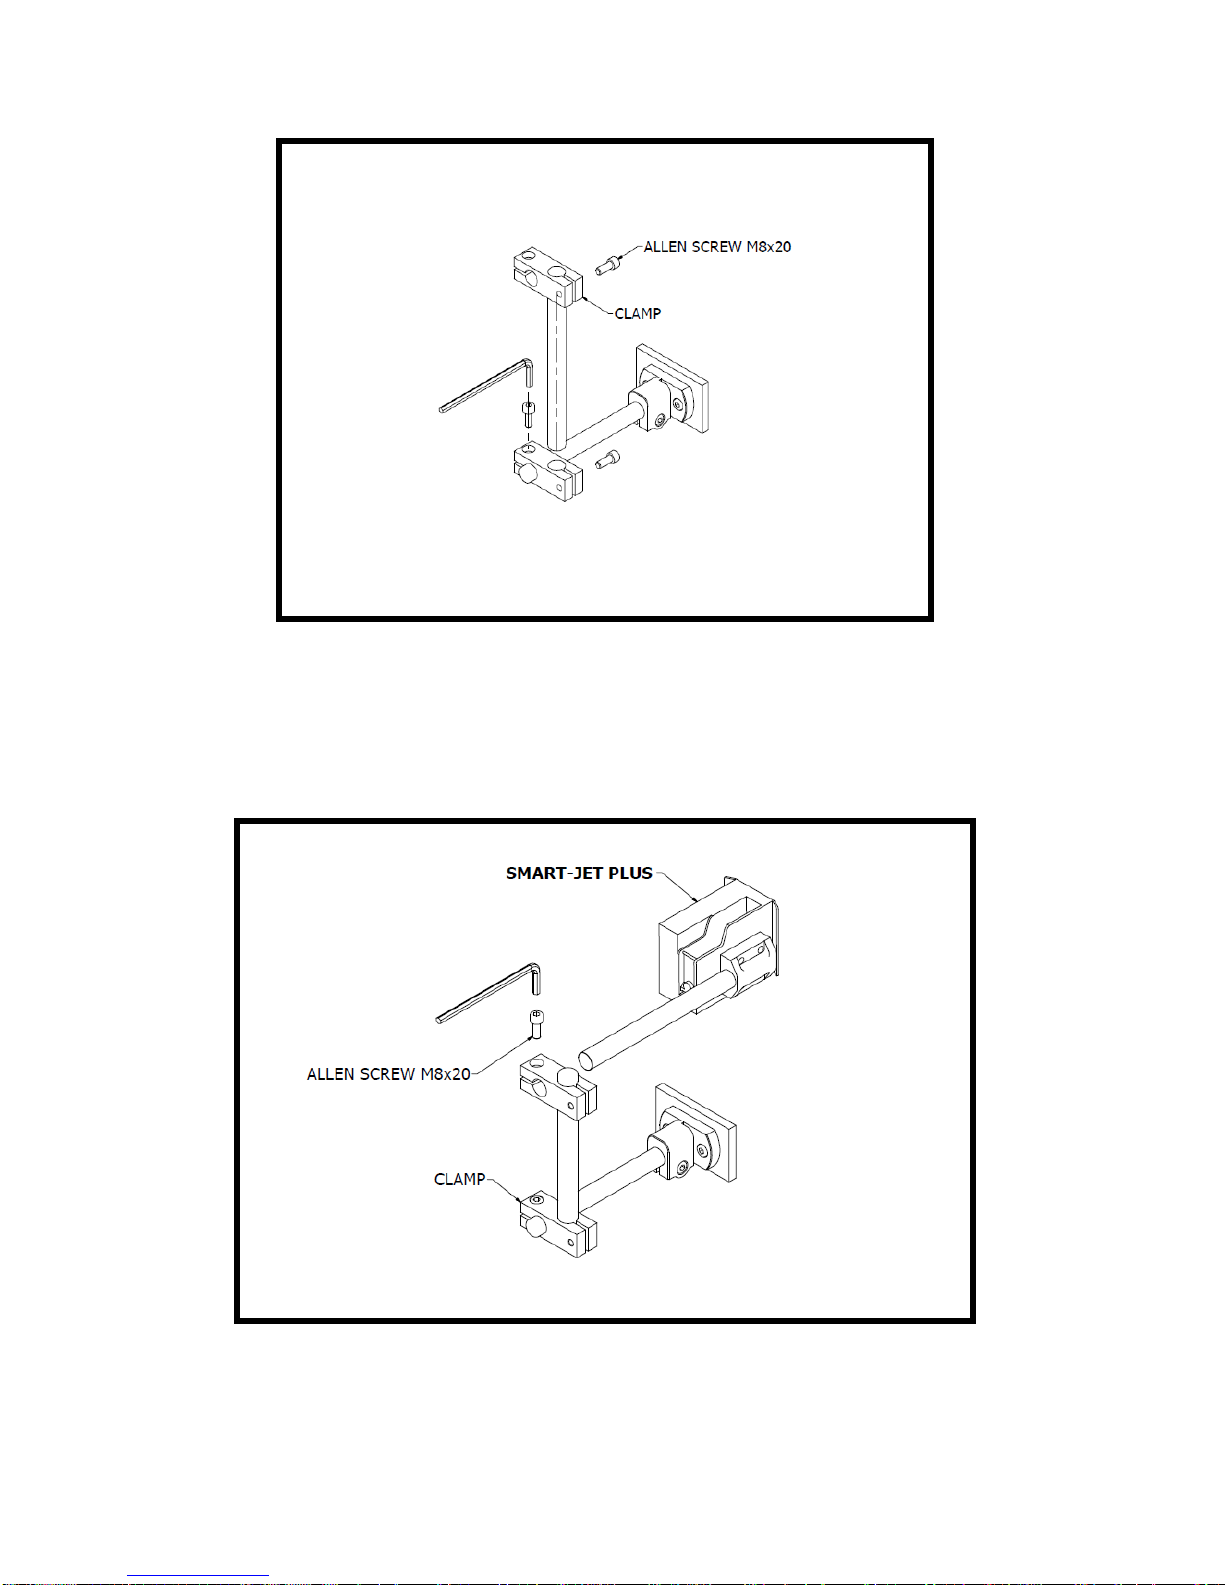
MOUNTING THE BRACKETS..................................................................................................................8
MOUNTING OPTIONS...........................................................................................................................10
EXTERNAL DEVICECONNECTION......................................................................................... 12
EXTERNAL SENSOR.............................................................................................................................12
ENCODER..............................................................................................................................................
OPERATIONAL CHART.........................................................................................................................14
SMART-JET PLUS OPERATION
Message.................................................................................................................................................
OPERATION WITH WI-FI VIA MOBILE DEVICES
...........................................................................................................................
13
OUTPUT................................................................................................................................................... 13
RS485 PROTOCOL ............................................................................................................................... 14
QUICK STARTUP................................................................................................................................... 16
............................................................................................... 19
OPERATION WITH WIRELESS KEYBOARD 17
.........................................................................................
............................................................................................... 19
Compatible WirelessKeyboards
Connect to Keyboard................................................................................................................ 19
Procedure in Details ................................................................................................................. 19
Operation
Settings...................................................................................................................................................
..................................................................................
26
27
32
CONNECT TO WI-FI................................................................................................................ 32
PROCEDURE IN DETAIL
....................................................................................................... 33
OPERATION WITH PC 33
MINIMUM PC REQUIREMENTS............................................................................................ 33
CONNECT SMART-JET PLUS TO PC
..................................................................................... 34
Install Smart-Jet Plus software on your PC- Contact: strope@msscllc.com ............................................34
Install Drive for Smart-Jet Plus Printer Controller on PC .........................................................................
36
19
................................................................................................................................................

3
Smart‐Jet Plus Manual v04 | 2015‐07‐30 | by MSSC, LLC
.....
INK CARTRIDGE STORAGE PROCEDURE:.........................................................................................
Smart-Jet Plus FAQ................................................................................................................................
..................................................................................................................
............................................................................................................................................
......................................
Install Driver 38
1Plug printer into computer with USB cord that was provided with the unit. 38
2. Power on the printer, go to operate, and “Connect PC.” 38
3. You should hear a beep and computer will search for driver. ........................................................
.........................................................................................................
57
PRODUCT WARRANTY ............................................................................................................ 59
APPENDIX ................................................................................................................................. 60
INK CARTRIDGE MAINTENANCE 60
Print head cleaning:.................................................................................................................. 60
Wiping ...................................................................................................................................... 60
Purging..................................................................................................................................... 61
62
For short term storing (less than one day):............................................................................... 62
For long term storing (more than one day): .............................................................................. 62
63
UPDATE FIRMWARE INSTRUCTIONS .................................................................................................65
Wireless Device, Apple (iOS) 68
Smart-Jet Plus Replacement Parts.........................................................................................................70
.................................................................
38
41
Uses of Smart-Jet Plus Controller Interface ............................................................................................
Create new message.............................................................................................................................46
Using Smart-Jet Plus Convert Logo........................................................................................................

4
Smart‐Jet Plus Manual v04 | 2015‐07‐30 | by MSSC, LLC
ABOUT SMART-JET PLUS
Thank you for purchasing the Smart-Jet Plus Thermal Inkjet Coder, a product of MSSC, LLC. This
printer is designed for packaging printing applications powered by HP Thermal Inkjet Technology.
The Smart-Jet Plus is capable of being controlled via PC connection to print variable data and
barcodes, Wi-Fi connection via mobile devices running on iOS operating systems, and wireless
keyboards. Each option provides a full set of applications.
Smart-Jet Plusproduces crisp text, logos, variable data and barcodes on porous and non-porous media
by automatically recognizing aqueous or solvent inks and applying the appropriate
printing
parameters.
The complete system includes one Smart-Jet Plus printer, power supply with On/Off switch,
wireless keyboard, mounting brackets.
TECHNICAL SPECIFICATIONS
Item
No.
Description
Specifications
1.
Model
Smart-Jet Plus
2.
Display
LCD 2.8” automatic rotation
3.
Dimensions (LxWxH)
106x53x83mm / 4.17x2.09x3.27in
4.
Weight
450g 1.00lb
5.
Power supply
AC 100V –240V, 50/60Hz, 1.4A
6.
Maximum power consumption
48W
7.
Maximum printing resolution
300x300dpi
8.
Print speed
76m/min@300x300dpi
9.
Optical density
5 levels
10.
Operation selection
PC, Wireless keyboard, Wi-Fi
11.
Message memory
100 messages
12.
Ink solution
Aqueous and Solvent
13.
Menu language
Multiple / selectable
14.
Printable characters
Windows true fonts with PC connection
15.
No. of lines
Maximum 6 lines
16.
Character height
Maximum 12.7mm / 0.5”
17.
Printability
Alphanumeric, logos, date/time, expiry date, Julian date,
shift code, data and barcodes
18.
Operating temperature
5°C –50°C 41-122°F
19.
External connections
External sensor, encoder, etc…

5
Smart‐Jet Plus Manual v04 | 2015‐07‐30 | by MSSC, LLC
FEATURE MENU
Message Operation Settings
Open Create New Information Purge Speed
Message List Select Font Start Resolution
Type Message Connect PC Density
Delay
Use Symbol Cartridge
Edit Logo Update Logo
Delete Counter String
Date Random Jet
Expired Print Side
Time Sensor
String Direction
Barcode Print Mode
Shiftcode Unit
Wi-Fi
Update Font
Rollover
System Clock
Rotate
Password
Default
Language
IO Signals
Custom String
Coder Name
RS485
LCD Backlight
Reset
About
From the main screen of Smart-Jet Plus, use the , ,, arrow keys to move the cursor to the
desired object.
Press Enter to save and apply settings. Otherwise, press ESC.
Message: Insert Fields into your message:
Create: Create new message
Open: Open existing messages on the printer memory
Use: Use existing message
Edit: Edit existing message
Delete: Delete message
Information: Displays setting information
Symbol: Insert symbols
Logo: Insert logo or image from your printer memory
Counter: Insert product counter
Date: Insert current date
Expired: Insert expired date
Time: Insert current time
String: Insert string
Barcode: Insert barcodes
Shiftcode: Insert shift code
Press
Insert
to
insert
fields
into
messages.
Main Menu

6
Smart‐Jet Plus Manual v04 | 2015‐07‐30 | by MSSC, LLC
Operation
Start: Start printing
Stop: Stop printing
Purge: Clean the print head
Connect PC / Disconnect PC: Connect and disconnect Smart-Jet Plus with PC
Settings
Speed: Set print speed for the Smart-Jet Plus
Resolution: Set your desired resolution
Density: Set optical density of the print
Delay: Set the distance since the sensor receives signal to the start of printing
Cartridge: Display the current level of ink in the cartridge
Update Logo: Update logo or image from USB to the printer memory
String: Set the chain of data to insert into the print
Random Jet: Prevents the print head from clogging due to the extended down time between
prints
Print Side: Select nozzle side Odd, Even, or Auto Switch
Sensor: Select External or Internal sensor
Directions: Set print direction: : left right, : right left, :reverse left right, :
reverse
right left.
Print Mode: Select your print mode: Sensor mode and Continuous mode
Unit: Select your desired measurement inch/mm
Wi-Fi: Connect Wi-Fi to control Smart-Jet Plus by mobile devices
Update Fonts: Update different font sizes for Smart-Jet Plus
Rollover: Set different date depending on specific production hour
System Clock: Set time and date for your system clock
Rotate: Select your screen modes: Auto-rotate or Lock rotate
Password:Set to authorize different level of users, or to protect the printer from unauthorized users.
Default: Reset Smart-Jet Plus to factory defaults
Language: Select your interface language
IO Signals: The extend button to re-start machine
Custom String: Where a commonly used string of data can be entered for inserting into a message
Coder Name: The name given to the printer
RS485: Port to connect with external devices such as PC or PLC for advanced function
LCD Backlight: Edi t timer for backlight shut off
Reset: This brings the printer back to distributor settings
About: See current firmware on Smart-Jet Plus and update firmware

7
Smart‐Jet Plus Manual v04 | 2015‐07‐30 | by MSSC, LLC
KEY LAYOUT
Light indicators
1. Sensor:
- Set default with black conveyor.
- Internal sensor: Red light; External sensor: Green light.
- Sensor is activated when receives signals.
2. Alarm: Reports errors during operation
3. Wi-Fi/PC: Remains ON when being connected
4. Print: Remains ON when it’s on printing mode
Main ports
1. USB flash port for updating firmware, fonts andlogo
2. For Wireless Keyboard receiver
3. For PC Connection
4. For External sensor, Encoder, etc…
5. Power supply
1 2 3 4
1,2 3 4 5

8
Smart‐Jet Plus Manual v04 | 2015‐07‐30 | by MSSC, LLC
WIRELESS KEYBOARDDEFINITION
No.
Key
Uses
1
Enter
Confirm, save or apply
2
ESC
Go to previous session
3
/
Move your cursor to left/right
4
/
Move your cursor up/down
5
Shift
Press and hold “Shift” to input capitalized characters
6
Insert
Press “Insert” to insert Symbol, Logo, Counter, Date, Expired,
Time, String, Barcode, and Shift into the message
7
Backspace
Delete your message from right to left
8
Tab
Move your cursor faster
9
Home/End
Move your cursor to Home/End
INSTALLATION PROCEDURES
MOUNTING THE BRACKETS
123
4
56
7
8
9
10
11
12
13

9
Smart‐Jet Plus Manual v04 | 2015‐07‐30 | by MSSC, LLC
Step 1: Installing the clamps to the side of the conveyor

10
Smart‐Jet Plus Manual v04 | 2015‐07‐30 | by MSSC, LLC
Step 2: Installing the clamps to the round bar
MOUNTING OPTIONS
Select the suitable bar length
Horizontal setup

11
Smart‐Jet Plus Manual v04 | 2015‐07‐30 | by MSSC, LLC
Vertical setup
Step 1:
Step 2:
NOTES:
Make sure the brackets are mounted firmly to avoid vibration and sway of the print head.This
will affect the print quality.

12
Smart‐Jet Plus Manual v04 | 2015‐07‐30 | by MSSC, LLC
EXTERNAL DEVICE CONNECTION
NOTES:
EXTERNAL SENSOR
Connect sensor to Smart-Jet Plus using external power supply. Below demonstration isfor
external power supply of 5V
-
Smart-Jet Plus is able to operate with External Sensor, and Encoder. Consultyour
supplier
for further support on the settings and connections.
Smart-Jet Plus supports NPN, PNP and Push-pull sensor types.
Connect sensor using power supply on Smart-Jet Plus
-
To connect Smart-Jet Plus with External Sensor, Encoder, etc…, an additional connector
DB15
(male) will be required. (Maximum DB15 output via pin #12 is 12V and 3A)

13
Smart‐Jet Plus Manual v04 | 2015‐07‐30 | by MSSC, LLC
An encoder is recommended to ensure the best print quality regardless the inconsistent speedof
conveyor.
OUTPUT
Output: active at 0V
Output 14 is available for additional device installation with Smart-JetPlus.
ENCODER
Connect Dry - Contact Switch to Smart-Jet Plus using external power supply.

RS485 PROTOCOL
Allow control machine via RS485 network from other devices like: PLC, PC…
Step 1
Connect PIN 1 (RS485B) and PIN 11 (RS485A) to RS485 network as picture below.
Machine extended port detail:
CASE A: use the PC as MASTER with USB to RS485 converter.
Before the use of this protocol you need to set parameterson machine as below:
The Diagram connectssome machines to RS485 network with PCL and PC to control the printer. The
PC needsto use some converters to support RS485 protocol.
14
Smart‐Jet Plus Manual v04 | 2015‐07‐30 | by MSSC, LLC

CASE B: use the PLC as MASTER. Then connect PLC to a PC.
Step 2
On machine, go to Setting RS485 Enter.
Status: set to ENABLE.
Address: identification of machine on RS485 network. Value from 0-255.
Baud rate: select value from 4800-115200
Parity: checksum of protocol. Select ODD or EVEN. Otherwise select NONE.
Data bits: length of data. Select 8 or 9.
Stop bits: length of STOP BITS. Select 1 or 2.
Step 3
Build a PLC/PC application (NOTE: You need developer to do this) use our RS485 commands detail.
Then send command to machines.
Please ask us to get this commands detail.
15
Smart‐Jet Plus Manual v04 | 2015‐07‐30 | by MSSC, LLC

QUICK STARTUP
OPERATIONAL CHART
REQUIRED COMPONENTS TO OPERATE THE SMART-JET PLUS
No.
Basic Components
With Wireless
Keyboard
With
Mobile
Device
s
With PC
Optional
1.
Smart-Jet Plus Coder
2.
Wireless Keyboard
3.
Power Supply
4.
Mounting Brackets
5.
USB
6.
Ink Cartridge
7.
Wi-Fi router
8.
Smart Devices
9.
Smart-Jet Plus
Application
10.
PC
11.
PC Connection Cable
12.
Smart-Jet Plus
Software
Email: strope@msscllc.com
13.
Driver
14.
Encoder (P/N: 80865)
15.
External Sensor (P/N: 80870)
16
Smart‐Jet Plus Manual v04 | 2015‐07‐30 | by MSSC, LLC

Setup Smart-Jet Plus
Mount Smart-Jet Plus on your conveyor according to the installationinstructions
Set print direction and appropriate throw distance to obtain best print quality (2-
3mm).
Insert ink cartridge.
Plug the power cord into an appropriate power source to start up the Smart-Jet Plus.
NOTES: The Smart-Jet Plus will function with WATER and SOLVENT ink from MSSC
only.
Trying to use unapproved cartridges may damage the printer and void the
warranty.
Connect Smart-Jet Plus to wirelesskeyboard
Connect wireless keyboard USB port (port 2) on Smart-Jet Plus
Remove sticker in battery port on keyboard.
Turn on the keyboard to begin operating Smart-Jet Plus
Connect Smart-Jet Plus to Wi-Fi network
Install the wireless router that meets the parameters on the COMPATIBLE WI-FI
ROUTERS chart located on page (28). Check to make sure the router is putting out a
usable signal, usually indicated by this symbol.
On Smart-Jet Plus printer’s main menu screen, go to Settings > WI-FI > ON. The printer
will then begin searching for available wireless networks to connect to. Once the
preferred network appears on the screen arrow down and press enter. Then follow the
next steps that include security (password) which only support WPA or WPA2 (NOT
WEP), and confirming the connection between the printer and router. All of these menu
screens can be navigated by using the arrow and the Enter key.
On the wireless device, the user will first have to install the MSSC Printer app, available
on the App Store. (Quick Access QR Codes)
ANDROID: APPLE:
The device will also have to be connected to the same network as the printer to make a
connection. Once the application is downloaded, the user can open the application and begin
the connection process. First type in the username: Administrator, and
password: mssc@smartjet. The Smart-Jet Plus icon should be selected, then go to
the Printers tab on the main menu and select the blue Search bar on the bottom of the
screen. Once the printer appears, the icon can be selected and the user should select the red
Connect tab on the top of the menu to end the connection process. In the case that the printer
does not show up after the automatic search, a manual connection can be done by selecting
the Plus sign (+) in the upper right-hand corner of the screen. After selecting the plus sign, the
user can type in the Printer Name and IP address of the printer that was given when it was
connected to the router. When the information has been entered, the user can press done in
the upper right-hand corner to find the printer and continue to finish the connection process.
17
Smart‐Jet Plus Manual v04 | 2015‐07‐30 | by MSSC, LLC

Connect Smart-Jet Plus to PC
Be sure you have a PC plugged in connected with Smart-Jet Plus via a USB A-B
cable.
Install Smart-Jet Plus Printer Controller and Driver Smart-Jet Plus on your PC
From the main screen of Smart-Jet Plus, go to Operation and select Connect to
PCto
connect Smart-Jet Plus with PC
Turn on Smart-Jet Plus Printer Controller on your PC to begin creating a message
Insert
Information
OR
18
Smart‐Jet Plus Manual v04 | 2015‐07‐30 | by MSSC, LLC

Setup External Devices (If required)
Install external sensor
Install encoder
Create Message and Print
Create a message from your PC, Smart-Jet Plus screen, or mobile devices
Setup necessary parameters to achieve your desired print on the products
Press Start Print to print your message
SMART-JET PLUS OPERATION
OPERATION WITH WIRELESS KEYBOARD
Compatible WirelessKeyboards
The Smart-Jet Plus is currently compatible with all wireless 2.0 keyboards available on
the
market.
Connect to Keyboard
Insert the receiver of wireless keyboard to USB port (port 2) on Smart-Jet Plus,
removethe
interleave paper in the battery slot and turn on the button at the back of
the keyboard to
begin operating Smart-Jet Plus with wireless keyboard.
From the main screen of Smart-Jet Plus, use , , , arrow keys to move the
cursor to
Settings and begin implementing initial setups for the machine. Press Enter
to save and
apply settings. Otherwise, press ESC.
Procedure in Details
From the main screen, use and arrow keys to select the desired menu: Message,
Operation, or Settings. Press Enter to select. Press ESC to go back to the main screen.
Message
Create new or open existing messages on the printer
memory.
NOTES: While doing this, please be sure you stop
printing
Create new:
Go to Create new to select your desired fonts Normal or Uppercase
Select Normal font to create your message with lower and uppercase fonts. Then select
your
desired font size, number of line and insert fields into message. Otherwise, go to
Uppercase
font to print in all capital letters.
19
Smart‐Jet Plus Manual v04 | 2015‐07‐30 | by MSSC, LLC

Available fonts and sizes include:
Input message by using the following keys:
-
Arrow keys , , , : move the cursor
-
Enter
: go to the next line
-
Backspace
: delete characters
-
ESC
: escape and save/unsave messages
While creating message, press Insert on the wireless keyboard to insert your desired
fields
Symbol: Insert the following symbols into the message (extended ASCII).
€
‚
ƒ
„
…
†
‡
ˆ
‰
‹
‘
’
“
”
•
–
—
˜
™
›
¡
¢
£
¤
¥
¦
§
¨
©
ª
«
¬
-
®
¯
°
±
²
³
´
µ
¶
·
¸
¹
º
»
¼
½
¾
¿
×
Ø
Þ
In the input section on Smart-Jet Plus, press Insert and use or arrow keys to move the
cursor to Symbol and press Enter. Use the arrow keys to move your cursor to thedesired
object and press Enter to insert the symbols into message.
Below symbols are required be inserted from your wireless keyboard:
!
“
#
$
%
‘
(
)
*
+
,
-
.
/
:
;
<
=
>
?
@
[
\
]
^
_
`
{
|
}
~
Logo: Insert logo or image from Smart-Jet Plus into
message
your logo should be updated or setup in the
Settings menu
In the input section, press Insert and use or arrow keys to move your cursor to Logo
and
press Enter. Move your cursor to the desired Logo and press Enter.
NOTES:
-
Insert logo first, then input message if you need to print a logo at the beginning of
the
message.
-
Input message, then insert logo if you need to print a logo at the end of the message.
-
Logo should be inserted in the last line of your message if you are printing
multiplelines
to ensure it is fully printed.
Counter: Insert product counter into the message. There are Single andBox/Lot
In the input section, press Insert and use or arrow keys to move the cursor to
Counter
and press Enter. Select your desired object and press Enter.
20
Smart‐Jet Plus Manual v04 | 2015‐07‐30 | by MSSC, LLC
Lines
Arial
1
12.7mm
2
5.93mm
3
3.89mm
4
2.54mm
6
1.69mm
Other manuals for Smart-Jet Plus
2
Table of contents
Other MSSC Printer manuals

MSSC
MSSC Smart-Jet DL200 User manual

MSSC
MSSC Smart-Jet Plus Installation guide

MSSC
MSSC QM2-101 User manual

MSSC
MSSC QM1610 User manual

MSSC
MSSC Smart-Jet DL100 User manual

MSSC
MSSC Smart-Jet BLUE User manual

MSSC
MSSC QM2-101 User manual

MSSC
MSSC Smart-Jet Plus User manual

MSSC
MSSC QM1610 User manual

MSSC
MSSC Smart-Jet BLUE User manual