25636 2/18 | 85-000869_INST_C
MINIAC GPS-322 CYCLING COMPUTER INSTRUCTIONS
6400 WEST 105TH STREET // BLOOMINGTON, MN 55438 // 1-855-883-6563 // WWW.MSWBIKE.COM
MEMORY FULL
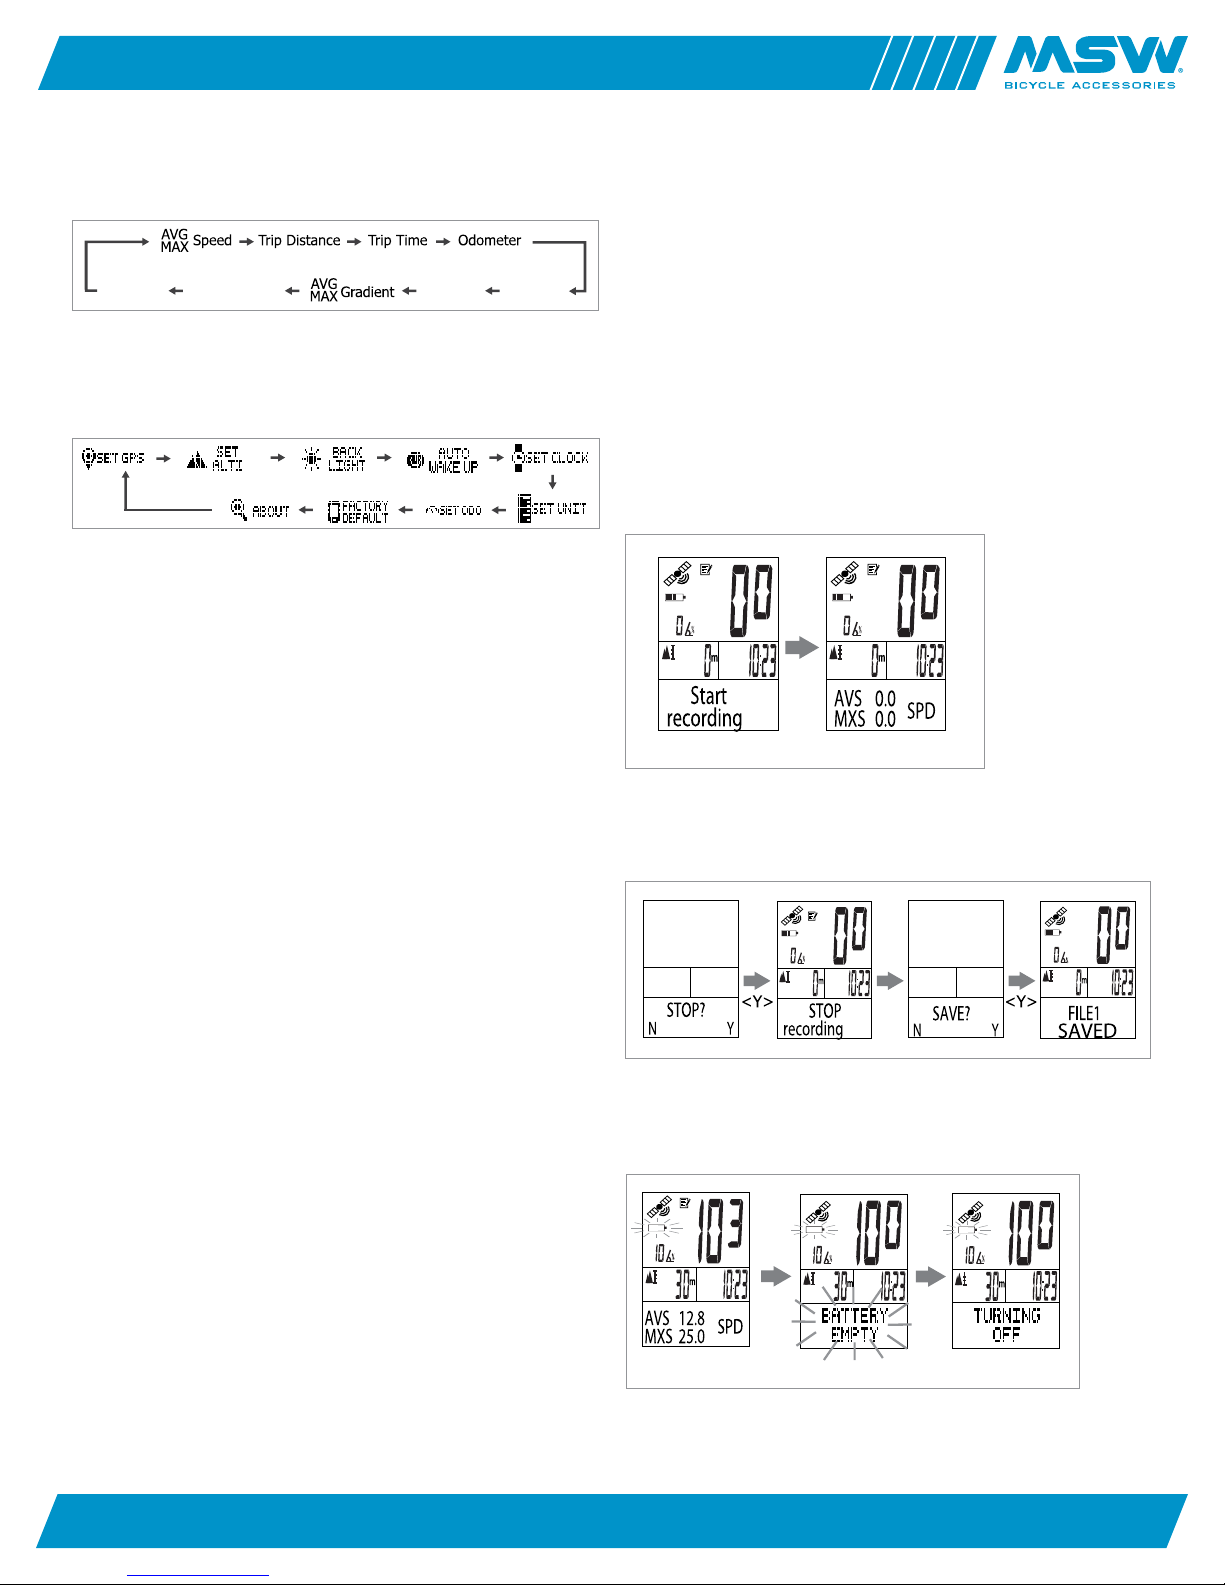
When the storage space is full, the device will automatically stop recording
and store.
If the space is full, when pressing the Record Button, the device will prompt
and the information will not be recorded.
HOW TO CONNECT TO PC SOFTWARE
Install the software on a Microsoft PC.
Insert the USB cable into the device and connect it to the computer’s USB port.
Start the PC software.
1. Under “File”, select “Import from device.”
2. Choose the device and press “OK”
3. Choose the data you want to use and press “Upload Select File”
4. After uploading the data, press “Cancel” to start review
NOTE: We strongly suggest users use the USB cable that is included to connect
to the PC.
MAINTENANCE
If the display contrast changes and becomes faint, it’s time to recharge
the battery.
NOTE: Do not expose Miniac wired computer to extremely cold or hot
temperatures. Avoid leaving the unit in direct sunlight for extended periods
of time.
TROUBLESHOOTING
Q1. Display is black or very light:
The battery power may be low. Make sure the battery is properly charged.
Check battery indicator on display.
Q2. Display becomes dark or black:
The unit is too hot. Place the unit in a shaded area and it will return to normal.
Q3. The unit operates slowly or struggles:
The unit is too cold. Warm the unit and it will return to normal.
Q4. Data in display varies enormously:
Check the surroundings for electromagnetic or high energy interference e.g.
power lines and move away from the source of interference.
Q5. Data in display shows slowly:
The unit may be too cold. When the temperature rises, the data reading will
return to normal.
SPECIFICATIONS
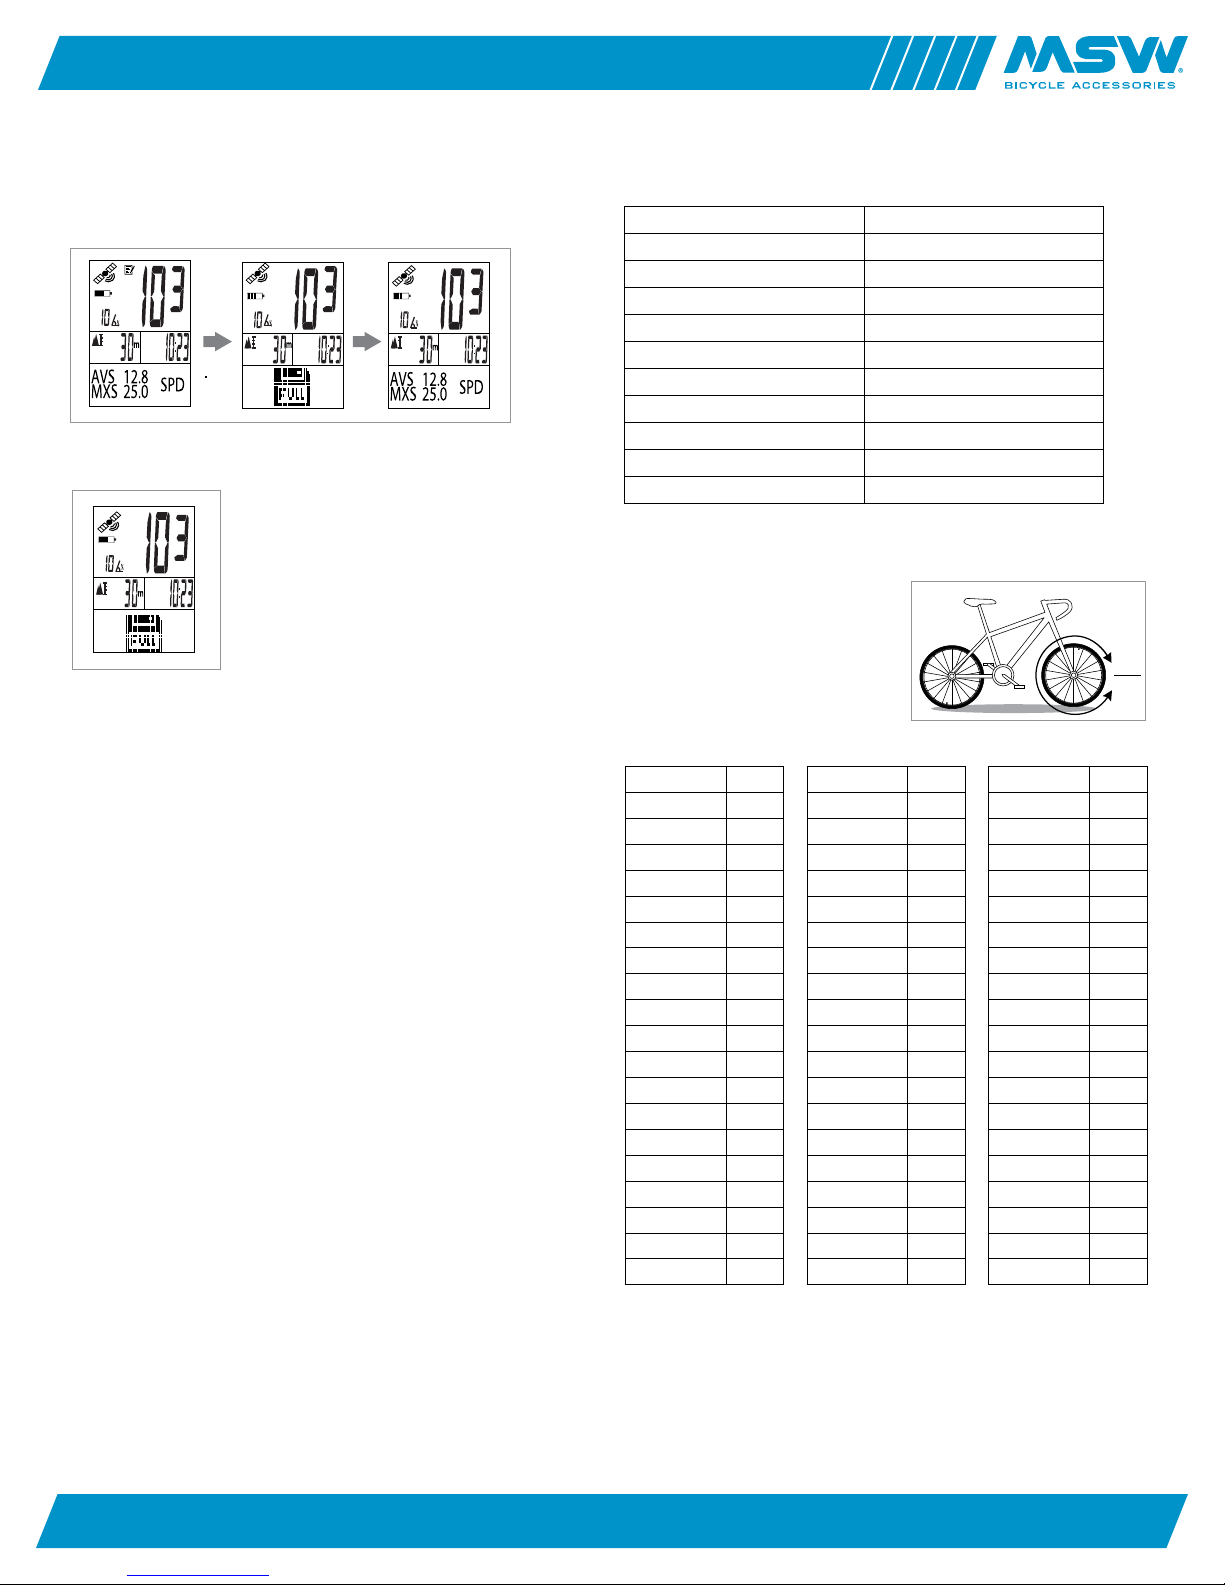
WHEEL SIZE CHART
CALCULATING WHEEL CIRCUMFERENCE
To get the most accurate speed and
distance data, the wheel size must be
correct. Mark the tire or position the valve
stem at the 6 o’clock position and push
the bike until the mark or valve stem is
back to 6 o’clock. Then measure the
length between two points to get the
circumference.
Operating Temp 32–104°F (0–40°C)
Storage Temp 14–122°F (-10–50°C)
Battery USB Rechargeable
Battery life (computer) 15 hrs
Weight 54g
Timer Range 99 (hour) : 59 (minute) : 59 (mi)
Current Speed Range 0~99.9kph / 0~62.4 mph
Average Speed Range 0~99.9kph / 0~62.4 mph
MAX Speed Range 0~99.9kph / 0~62.4 mph
(Trip) Distance Range 0~9999.99km / 0~6249.99 mi
Odometer Range 0~999999km / 0~624999 mi
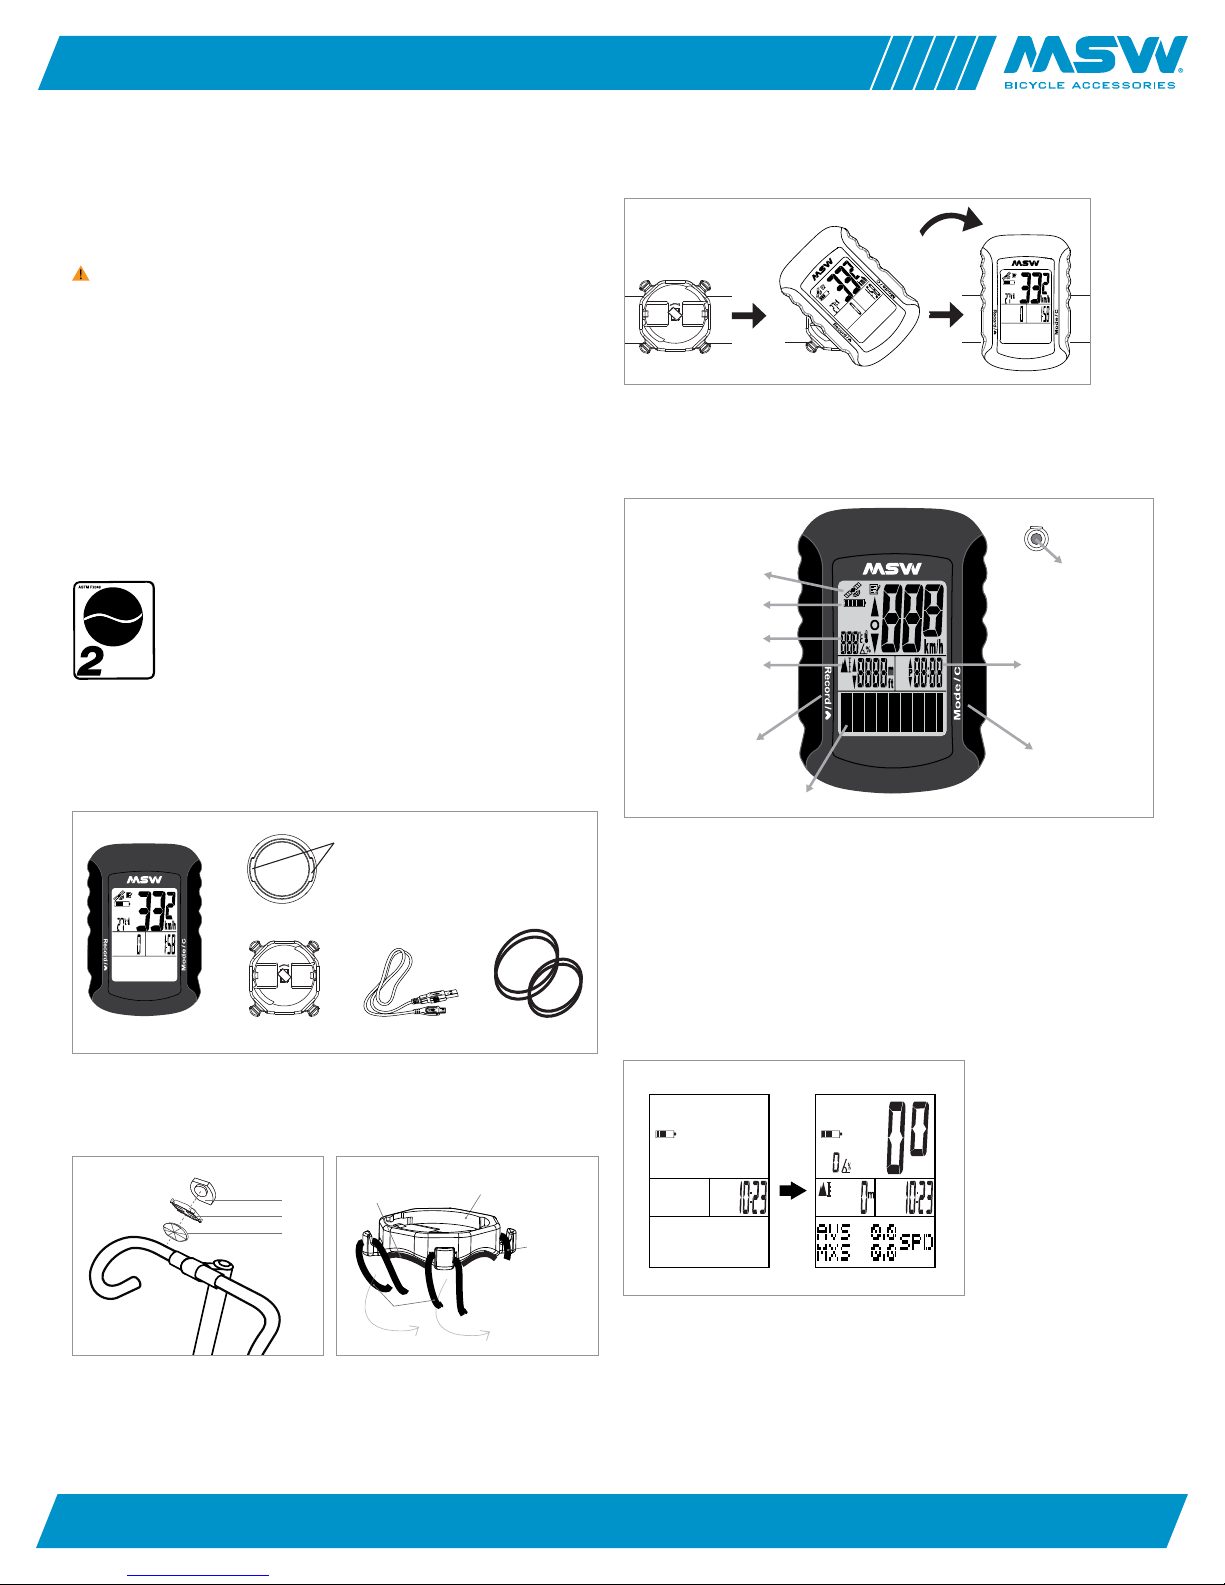
Bracket
Nylon Ties
Rubber
Bracket
Cycle Computer
Rubber
Bracket
Cycle Computer
Sensor
1~5m m
Magnet
Magnet
Screw
Rubber
Shim
Tire Scale L (mm)
14 x 1.50" 1020
14 x 1.75 1055
16 x 1.50 1185
16 x 1.75 1195
18 x 1.50 1340
18 x 1.75 1350
20 x 1.75 1515
20 x 1-3/8 1615
22 x 1-3/8 1770
22 x 1-1/2 1785
24 x 1 1753
24 x 3/4 Tubular 1785
24 x 1-1/8 1795
24 x 1-1/4 1905
24 x 1.75 1890
24 x 2.00 1925
24 x 2.125 1965
26 x 7/8 1920
26 x 1 (59) 1913
Tire Scale L (mm)
26 x 1 (65) 1952
26 x 1-1/8 1970
26 x 1-3/8 2068
26 x 1-1/2 2100
26 x 1.40 2005
26 x 1.50 2010
26 x 1.75 2023
26 x 1.95 205
26 x 175 2023
26 x 1.95 2050
26 x 2.00 2055
26 x 2.10 2068
26 x 2.125 2070
26 x 2.35 2083
26 x 3.00 2170
27 x 1 2145
27 x 1-1/8 2155
27 x 1-1/4 2161
27 x 1-3/8 2169
Tire Scale L (mm)
27.5 x 2.10 2170
27.5 x 2.30 2202
29 x 2.10 2288
29 x 2.30 2326
650 x 35A 2090
650 x 38A 2125
650 x 38B 2105
700 x 18C 2070
700 x 19C 2080
700 x 20C 2086
700 x 23C 2096
700 x 25C 2105
700 x 28C 2136
700 x 30C 2146
700 x 32C 2155
700c Tubular 2130
700 x 35C 2168
700 x 38C 2180
700 x 40C 2200