NEC NVM-2000 Guide

NVM-2000
Hard Drive
Replacement Instructions
Part No. 17569HDINS02
Issue 1-0, May 2001

This manual has been developed by NEC America. It is intended for the use of its customers and service personnel,
and should be read in its entirety before attempting to install or program the system. Any comments or suggestions
for improving this manual would be appreciated. Forward your remarks to:
NEC America, Inc., Corporate Networks Group
4 Forest Parkway
Shelton, CT 06484
Attention: Manager, Technical Publications
Nothing contained in this manual shall be deemed to be, and this manual does not constitute, a warranty of, or
representation with respect to, any of the equipment covered. This manual is subject to change without notice and
NEC America has no obligation to provide any updates or corrections to this manual. Further, NEC America also
reserves the right, without prior notice, to make changes in equipment design or components as it deems
appropriate. No representation is made that this manual is complete or accurate in all respects and NEC America
shall not be liable for any errors or omissions. In no event shall NEC America be liable for any incidental or
consequential damages in connection with the use of this manual. This document contains proprietary information
that is protected by copyright. All rights are reserved. No part of this document may be photocopied or reproduced
without prior written consent of NEC America.
©2001 by NEC America, Inc. All Rights Reserved
Printed in U.S.A.

Table of Contents
i
Introduction..........................................................................................................1
AMIS and FAX Mail............................................................................................1
Important Notes....................................................................................................1
Tools and Materials Needed.................................................................................1
Locally Back Up the Voice Mail Database..........................................................1
Remove the Old Hard Drive.................................................................................3
Install the Replacement Hard Drive .....................................................................6
Write the Hardware Settings for the New Drive to CMOS ..................................8
Locally Restore the Voice Mail Database..........................................................12


Replacing the Hard Drive in the NVM-2000
1
Introduction The instructions in this supplement may be used for replacing the
current hard drive in the NVM-2000 with any of the following hard
drives:
17569-24 - 24 Hour Replacement Hard Drive for E, G, and H Series.
17569-65 - 65 Hour Replacement Hard Drive for J and K Series.
You will use the information contained in these instructions to:
1. Back up the current Voice Mail Database.
2. Remove the existing hard drive installed in your NVM.
3. Install the new hard drive.
4. Write the hardware settings for the new drive to CMOS.
5. Restore the Voice Mail database that you previously backed up.
AMIS and FAX Mail
■ If the installed system (with the old hard drive) had either of these
options, contact NEC America, Inc.
Important Note ■ All work should be performed by a qualified technician.
Tools and Materials Needed
■ Phillips-head Screwdriver
■ ESD Wrist Strap (to be worn on wrist and attached to a grounded
metal object at all times)
■ 3 ½ inch floppy disk(s) (Required for backing up the Voice Mail
database.) Four or more diskettes may be required depending on
the system’s number of mailboxes, greetings, Welcome messages
and Instruction messages.
■ Monitor and keyboard connected to NVM
■ Replacement Hard Drive (one of the part numbers from above)
Locally Back Up the Voice Mail Database
You should back up the current Voice Mail database. Backing up the
database should be performed locally and not through a modem.
During the procedure, you will have the option to back up messages for
individual mailboxes. This is a lengthy and extensive process. For
this reason, it is recommended that you suggest that users delete as
many (if not all) of their messages. This will save you time and reduce
the number of mailboxes you will have to back up.
The backup instructions listed on the following page assume you are in
the Full Screen Editor mode of programming the Voice Mail.

Replacing the Hard Drive in the NVM-2000
2
Locally Back Up the Voice Mail Database (cont’d)
To locally back up the Voice Mail database:
1. Insert a floppy disk into the Voice Mail’s floppy disk drive.
2. From the Main Menu, select Install.
3. Type the password, if the system requests it.
4. Select View Current Settings. Write down on paper the phone
system that is installed with the Voice Mail as well as the
following settings:
Number of Voice Mail Ports
Voice Compression Rate
Mailbox Default Security Code
Default Bilingual Mode
Mailbox Range
Extension Range
You will need this information after you install the new hard drive.
5. Return to the Main Menu,and select Maintenance.
6. Type the password, if the system requests it.
7. Select Local Backup.
The system prompts you through the backup procedure:
Select the files to be processed:
- System Database D
- Mailbox Messages M
File Type (enter Q to Quit)? [D]
8. Default is D(which is the selection you need). Press Enter.
The system provides you with information about the Backup
Utility.
9. When you see the prompt, Do you wish to continue? [Y/N], enter
Y. The Voice Mail System will shut down and exit to the
SYSTEM SAVE FILE CREATION utility in DOS.
10. When you see the prompt, Do you wish to save the history data at
this time [Y/N], enter N.
11. The system displays prompts as the Backup Utility progresses.
When you see the prompt, Press any key to continue…, press any
key.
12. The system displays status prompts as the data files are copied
onto the floppy disk. When complete, you will see a list of files on
your disk as well as a list of files to compare them against. These
are the files that should have been copied onto your disk.
Note: If all files were not copied, complete this procedure through
step 13 to reboot the Voice Mail. Repeat steps 5 through 13 to try
to back up the files again.
13. Remove the disk from the disk drive. When you see the prompt,
Press any key to continue… (and after you removed the disk from
the disk drive), press any key. The Voice Mail will reboot.
Note: If you do not remove the disk in step 13, when the Voice
Mail tries to reboot, the system prompts with a Non-System
disk or disk error.

Replacing the Hard Drive in the NVM-2000
3
Locally Back Up the Voice Mail Database (cont’d)
14. Repeat steps 5 through 7 to back up messages in a mailbox. At the
prompt: Select the files to be processed:
- System Database D
- Mailbox Messages M
File Type (enter Q to Quit)? [D]
Enter Mand Enter. Follow the screen prompts.
15. When finished, return to the NVM Main Menu.
Remove the Old Hard Drive
WARNING
Do not turn off the NVM without first shutting it down. If
you do not shut down first, you may corrupt the NVM
database when you turn it off.
To remove the old hard drive:
Note: Instructions assume you are in Full Screen Editor mode.
1. From the Main Menu, select Exit, and type the password, if the
system requests it.
2. Select Shutdown Voice Mail System to shut down NVM.
3. After NVM shuts down, turn off the system power and remove the
power cord.
4. Remove the Monitor cord and the keyboard cord from the NVM
cabinet.
5. Remove and retain the five hex-head screws from the rear of the
cabinet. See Figure 1.
Figure 1

Replacing the Hard Drive in the NVM-2000
4
Remove the Recalled Hard Drive (cont’d)
6. Remove the cabinet cover by sliding it towards you and lifting it
up. See Figure 2.
Figure 2
7. Remove and retain the four screws that secure cage assembly from
the chassis. (The cage assembly houses the hard drive.) See Figure
3.
Figure 3

Replacing the Hard Drive in the NVM-2000
5
Remove the Recalled Hard Drive (cont’d)
8. Slide the cage assembly back toward the rear of the chassis so that
the assembly clears the mounting bracket.
9. Disconnect the ribbon cable and power supply connector from the
hard drive. See Figure 4.
10. Remove and retain the four screws securing the hard drive to the
cage assembly. See Figure 4. (Your cage assembly may only
contain two screws.)
11. Carefully slide the hard drive out of the cage assembly. See Figure
4. Set the removed hard drive on a clean surface.
Figure 4
Replacing the Hard Drive in the NVM-2000
6
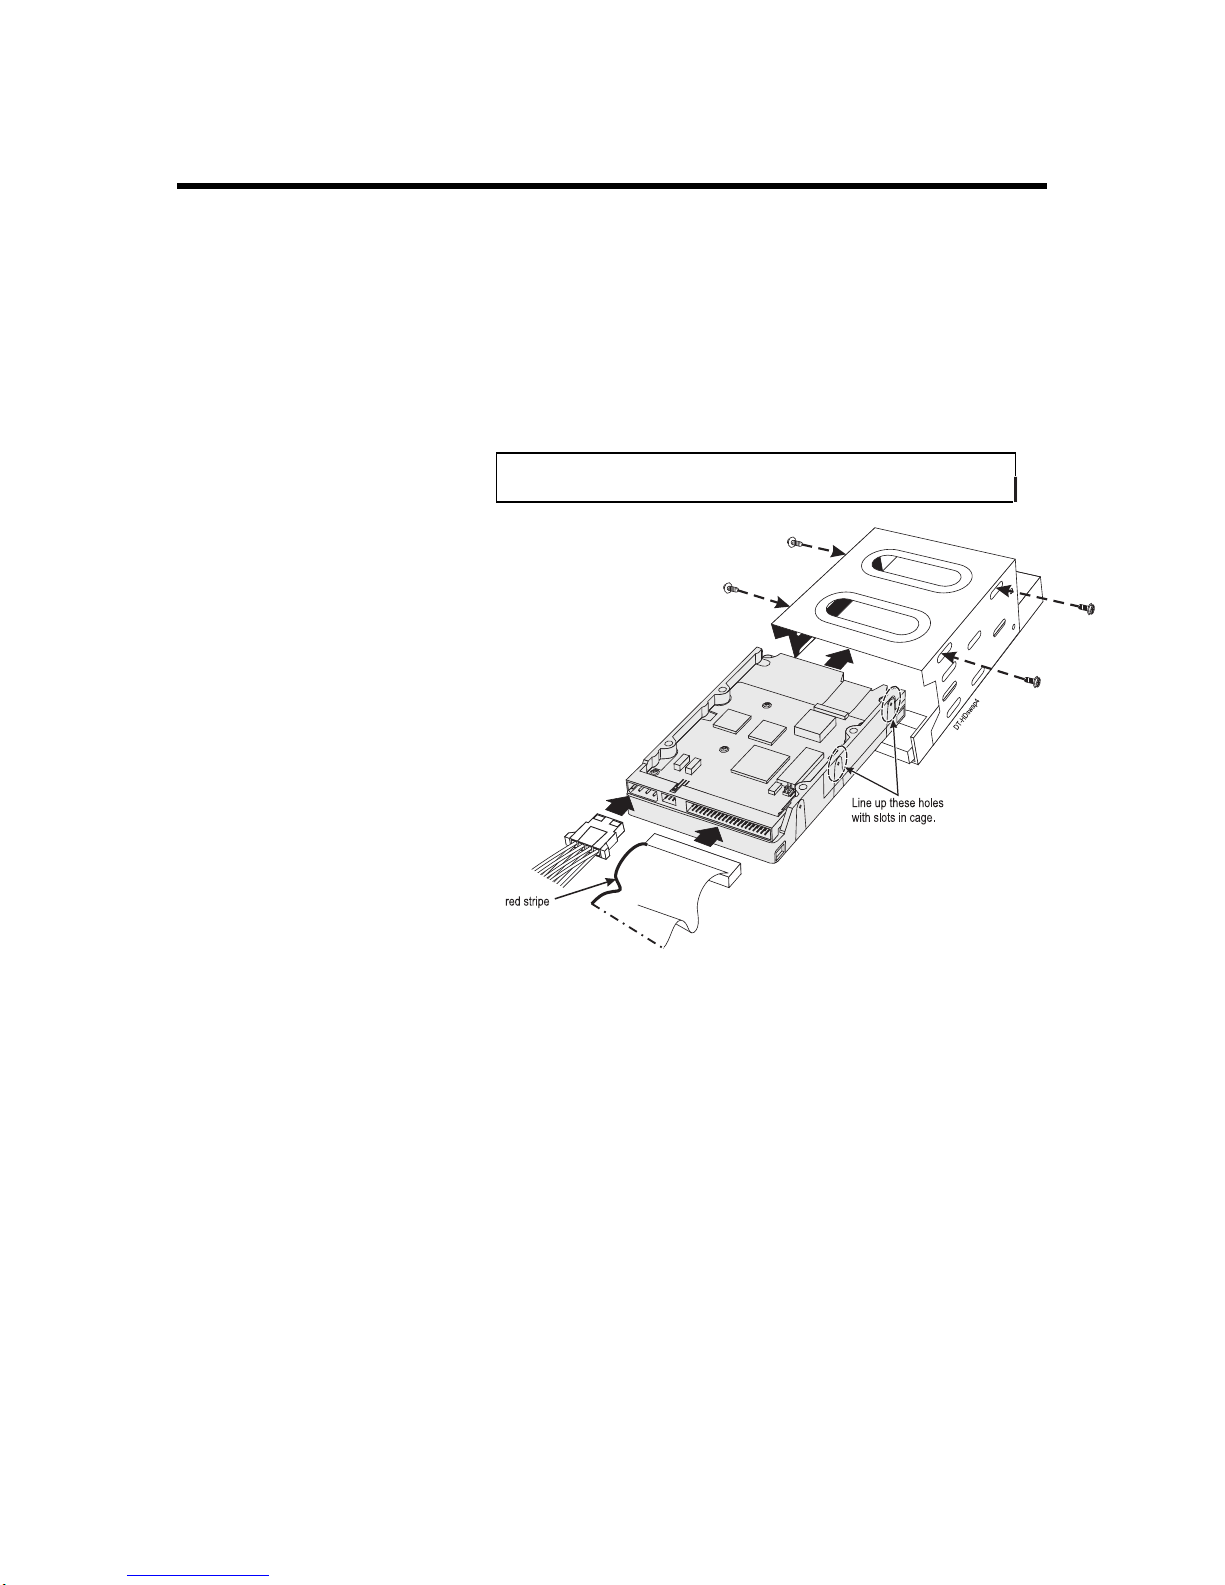
Install the Replacement Hard Drive
To install the replacement hard drive:
1. Carefully slide the replacement hard drive into the cage assembly.
Be sure to line up the screw holes on the hard drive with the screw
slots on the cage assembly. See Figure 5.
2. Secure the hard drive in place with the four screws (removed and
retained in step 10 of Remove the Old Hard Drive). See Figure 5.
3. Plug the ribbon cable and the power supply connector into the new
hard drive. See Figure 5.
Important: Be sure that the red stripe on the ribbon cable is
closest to the power supply connector wires.
Figure 5
Other manuals for NVM-2000
4
Table of contents
Other NEC Storage manuals


NEC
NEC N8151-34B User manual

NEC
NEC N8102-686 User manual

NEC
NEC LL009F User manual

NEC
NEC N8151-54 User manual

NEC
NEC LL030F User manual

NEC
NEC N8151-143 User guide

NEC
NEC VERSA S1300 Series User manual

NEC
NEC NS170 User manual

NEC
NEC FZ110A - Zip 100MB - 100 MB ZIP Drive User manual

NEC
NEC M100 User manual


