NEC DS1000 User manual

Feature Handbook
Supplement

This manual has been developed by NEC America, Inc. It is intended for the use of its customers and service personnel, and
should be read in its entirety before attempting to install or program the system. Any comments or suggestions for improving
this manual would be appreciated. Forward your remarks to:
NEC America, Inc., Corporate Networks Group
4 Forest Parkway
Shelton, CT 06484
cng.nec.com
Nothing contained in this manual shall be deemed to be, and this manual does not constitute, a warranty of, or representation
with respect to, any of the equipment covered. This manual is subject to change without notice and NEC America, Inc. has no
obligation to provide any updates or corrections to this manual. Further, NEC America, Inc. also reserves the right, without
prior notice, to make changes in equipment design or components as it deems appropriate. No representation is made that this
manual is complete or accurate in all respects and NEC America, Inc. shall not be liable for any errors or omissions. In no
event shall NEC America, Inc. be liable for any incidental or consequential damages in connection with the use of this
manual. This document contains proprietary information that is protected by copyright. All rights are reserved. No part of this
document may be photocopied or reproduced without prior written consent of NEC America, Inc.
©2002 by NEC America, Inc. All Rights Reserved.
Printed in U.S.A.

Table of Contents
DS1000/2000 Feature Handbook Supplement
i
Table of Contents
Table of Contents
Features
Auto Redial. . . . . . . . . . . . . . . . . . . . . . . . . . . . . . . . . . . . . . . . . . . . . . . . . 1
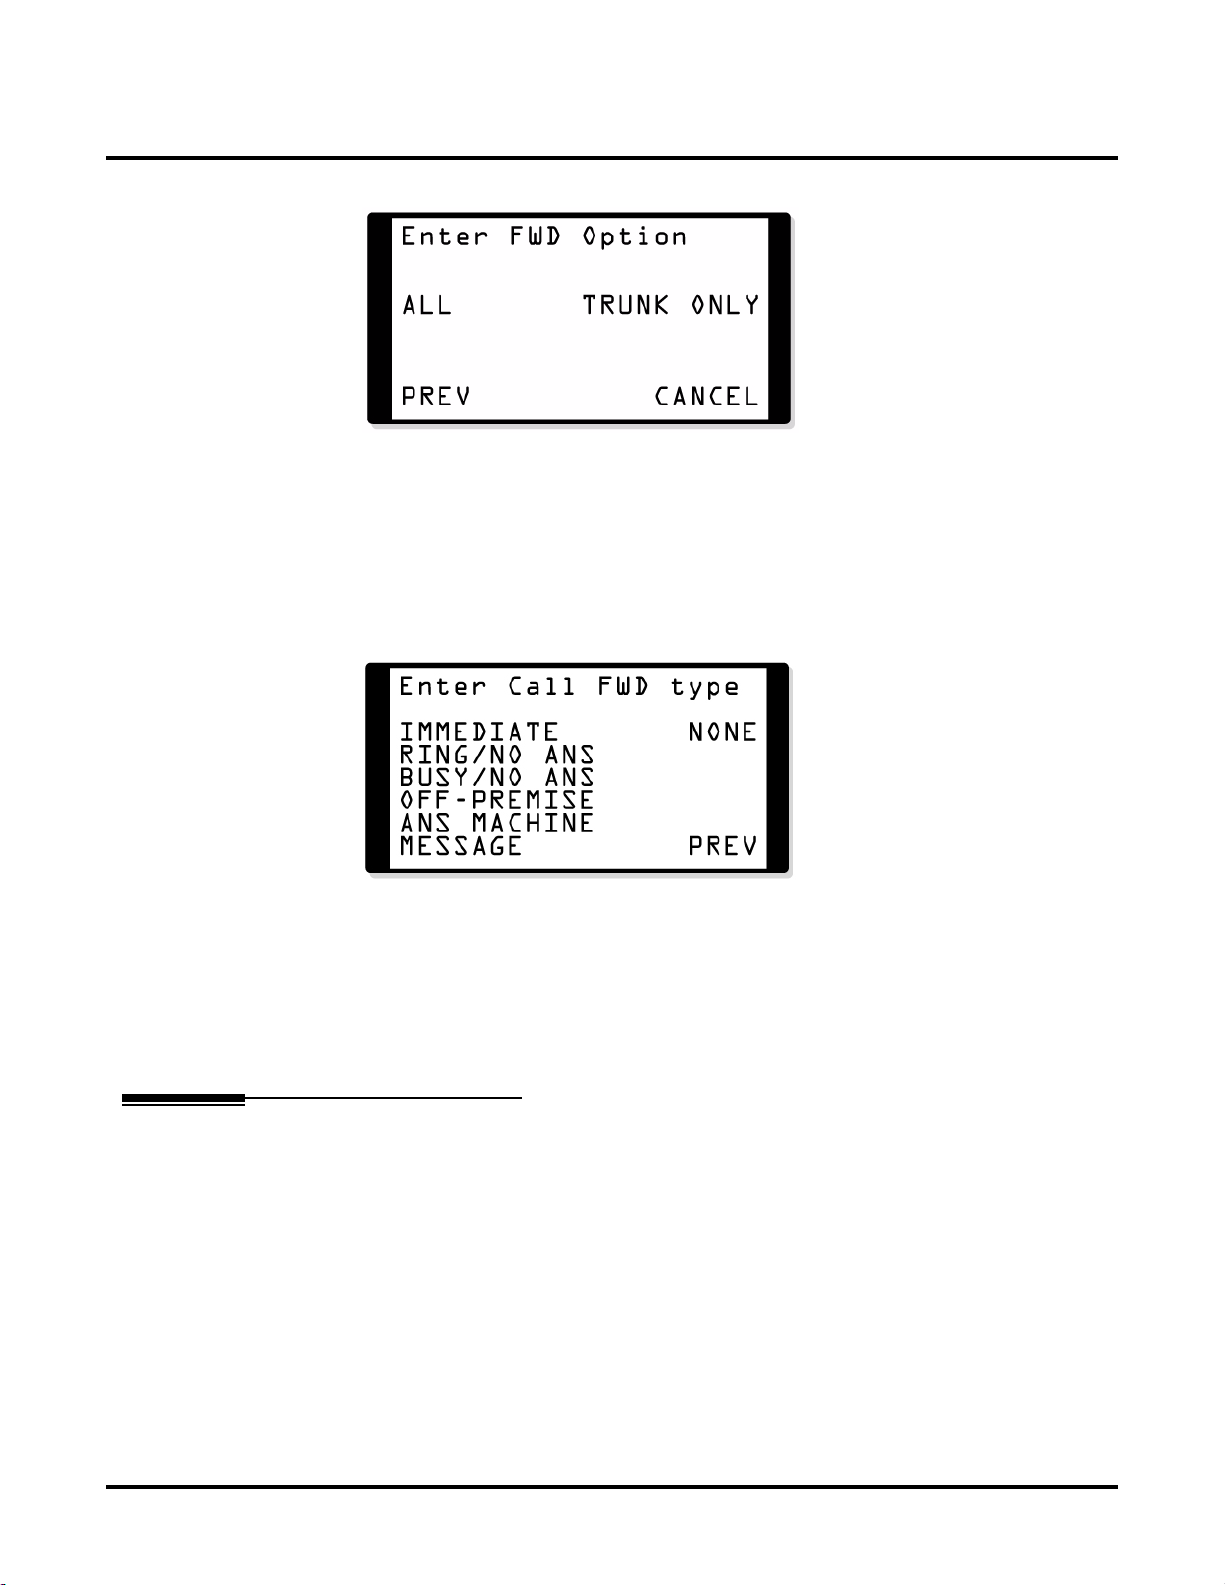
Call Forwarding . . . . . . . . . . . . . . . . . . . . . . . . . . . . . . . . . . . . . . . . . . . . . 2
Call Forwarding Key. . . . . . . . . . . . . . . . . . . . . . . . . . . . . . . . . . . . 2
Confirmation Tone Added . . . . . . . . . . . . . . . . . . . . . . . . . . . . . . . 2
Soft Key And Type Enhancements. . . . . . . . . . . . . . . . . . . . . . . . . 2
If you have a 22-Button or 34-Button Display
Telephone. . . . . . . . . . . . . . . . . . . . . . . . . . . . . . . . . . . . 2
If you have a Super Display Telephone . . . . . . . . . . . . . . . 4
Call Forwarding Off Premise . . . . . . . . . . . . . . . . . . . . . . . . . . . . . . . . . . . 6
If you have a 22-Button or 34-Button Display Telephone . . . . . . . 7
If you have a Super Display Telephone . . . . . . . . . . . . . . . . . . . . . 9
If you have a 22-Button Non-Display Telephone. . . . . . . . . . . . . 11
Call Timer. . . . . . . . . . . . . . . . . . . . . . . . . . . . . . . . . . . . . . . . . . . . . . . . . 12
Enhanced Call Timer . . . . . . . . . . . . . . . . . . . . . . . . . . . . . . . . . . 12
Manual Call Timer . . . . . . . . . . . . . . . . . . . . . . . . . . . . . . . . . . . . 12
Automatic Call Timer. . . . . . . . . . . . . . . . . . . . . . . . . . . . . . . . . . 12
Do Not Disturb . . . . . . . . . . . . . . . . . . . . . . . . . . . . . . . . . . . . . . . . . . . . . 13
Do No Disturb Override . . . . . . . . . . . . . . . . . . . . . . . . . . . . . . . . 13
Do Not Disturb Options . . . . . . . . . . . . . . . . . . . . . . . . . . . . . . . . 13
Do Not Disturb BLF for Hotline and Call Coverage
Keys . . . . . . . . . . . . . . . . . . . . . . . . . . . . . . . . . . . . . . . 14
If you have a 22-Button or 34-Button Display
Telephone. . . . . . . . . . . . . . . . . . . . . . . . . . . . . . . . . . . 14
If you have a Super Display Telephone . . . . . . . . . . . . . . 15
Extension Locking . . . . . . . . . . . . . . . . . . . . . . . . . . . . . . . . . . . . . . . . . . 16
Locking and Unlocking Your Extension . . . . . . . . . . . . . . . . . . . 16
Entering or Changing Your PIN Number. . . . . . . . . . . . . . . . . . . 16
Headset Compatibility . . . . . . . . . . . . . . . . . . . . . . . . . . . . . . . . . . . . . . . 20
Enhanced Headset Operation . . . . . . . . . . . . . . . . . . . . . . . . . . . . 20
Headset Key . . . . . . . . . . . . . . . . . . . . . . . . . . . . . . . . . . . . . . . . . 21
Last Number Redial . . . . . . . . . . . . . . . . . . . . . . . . . . . . . . . . . . . . . . . . . 21
Enhanced Last Number Redial . . . . . . . . . . . . . . . . . . . . . . . . . . . 21
If you have a 22-Button or 34-Button Display
Telephone. . . . . . . . . . . . . . . . . . . . . . . . . . . . . . . . . . . 22
If you have a Super Display Telephone . . . . . . . . . . . . . . 22
Microphone Mute . . . . . . . . . . . . . . . . . . . . . . . . . . . . . . . . . . . . . . . . . . . 23
Handsfree Reply Soft Key . . . . . . . . . . . . . . . . . . . . . . . . . . . . . . 23
If you have a 22-Button or 34-Button Display
Telephone. . . . . . . . . . . . . . . . . . . . . . . . . . . . . . . . . . . 23
If you have a Super Display Telephone . . . . . . . . . . . . . . 24

Table of Contents
ii
DS1000/2000 Feature Handbook Supplement
Handset Mute . . . . . . . . . . . . . . . . . . . . . . . . . . . . . . . . . . . . . . . . 25
Paging . . . . . . . . . . . . . . . . . . . . . . . . . . . . . . . . . . . . . . . . . . . . . . . . . . . . 25
Ringing Over Page . . . . . . . . . . . . . . . . . . . . . . . . . . . . . . . . . . . . 25
Prime Line Preference. . . . . . . . . . . . . . . . . . . . . . . . . . . . . . . . . . . . . . . . 25
Prime Line Enhancements . . . . . . . . . . . . . . . . . . . . . . . . . . . . . . 25
Selectable Display Messaging . . . . . . . . . . . . . . . . . . . . . . . . . . . . . . . . . 25
Soft Key Enhancement . . . . . . . . . . . . . . . . . . . . . . . . . . . . . . . . . 25
If you have a 22-Button or 34-Button Display
Telephone. . . . . . . . . . . . . . . . . . . . . . . . . . . . . . . . . . . 25
If you have a Super Display Telephone . . . . . . . . . . . . . . 26
Voice Mail . . . . . . . . . . . . . . . . . . . . . . . . . . . . . . . . . . . . . . . . . . . . . . . . 27
Simplified Voice Mail Access . . . . . . . . . . . . . . . . . . . . . . . . . . . 27
Simplified Conversation Record Disconnect . . . . . . . . . . . . . . . . 27
Personal Answering Machine Emulation Soft Key
Enhancements. . . . . . . . . . . . . . . . . . . . . . . . . . . . . . . . . . . . . . . . 28
If you have a 22-Button or 34-Button Display
Telephone. . . . . . . . . . . . . . . . . . . . . . . . . . . . . . . . . . . 28
If you have a Super Display Telephone . . . . . . . . . . . . . . 28
Handling Personal Answering Machine Emulation
Calls . . . . . . . . . . . . . . . . . . . . . . . . . . . . . . . . . . . . . . . 29
Walking Class of Service . . . . . . . . . . . . . . . . . . . . . . . . . . . . . . . . . . . . . 29

Features
DS1000/2000 Feature Handbook Supplement
1
Features
Auto Redial
Auto Redial periodically redials a busy outside number. If you place an outside call and the call
recipient is busy, you can press a soft key to enable Auto Redial. You don’t have to retry the num-
ber, hoping it will go through.
Auto Redial will periodically retry the number up to 15 times.Auto Redial cancels when the called
party rings or answers, or when you:
●
Place or answer another outside call.
●
Receive an Intercom voice announcement or answer an Intercom call by lifting the hand-
set or pressing
SPK
.
●
Press
SPK
to cancel Auto Redial.
●
Press any other fixed feature key except
MIC
.
●
Lift and replace the handset.
●
Press the
CANCEL
soft key (Super Display only).
To enable Auto Redial:
1. Place an outside call and receive busy tone + Press
AUTO REDIAL (ALND)
soft key.
OR
2. Press a line key + Press
AUTO REDIAL (ALND)
soft key.
The system enables Auto Redial for the last outside call you dialed.
3. At a 22-Button or 34-Button Display, you see:
At a Super Display, you see:
The display shows the interval between callout attempts (e.g., 30 seconds), as well as
how many times redial has occurred (e.g., 1 of 15).
Your SPK key winks on to indicate your phone is in the Auto Redial mode.
4. The system periodically redials the call, up to 15 times, or until you:
●
Place or answer another outside call.

Features
2
DS1000/2000 Feature Handbook Supplement
●
Receive an Intercom voice announcement or answer an Intercom call by lifting the hand-
set or pressing
SPK
.
●
Press
SPK
to cancel Auto Redial.
●
Lift and replace the handset.
●
Press the
CANCEL
soft key (Super Display only).
Note: If a Caller ID call rings whileAuto Redial is enabled, your display will show the number
and optional name of the incoming caller. However, the ringing does not cancelAuto Redial.
In addition, the Auto Redial display will be restored after the Caller ID call stops ringing.
Call Forwarding
Call Forwarding Key
You can have a key on your telephone or DSS Console assigned as a Call Forwarding key.
●
While the extension is idle
, pressing the key puts your extension in the Call Forwarding pro-
graming mode - the same as pressing ICM and dialing *3.
If you have Call Forwarding enabled, and you press the key and wait (for at least 6
seconds), Call Forwarding automatically cancels.
If you have Call Forwarding disabled, and you press the key and wait (for at least 6
seconds), the prior Call Forwarding mode is automatically enabled (if any).
●
While your extension is busy
, pressing the key switches Call Forwarding on and off.
To set up your Call Forwarding Key, use the
#KP
User Programmable Features (code 27).Ask your
Communications Manager if you have access to the Use Programmable Features.
Confirmation Tone Added
You will hear a single confirmation beep after enabling or cancelling Call Forwarding.
Soft Key And Type Enhancements
If you have a display telephone, you can set up Call Forwarding by using your dial pad
or
your new
soft keys. In addition, you can set up Call Forwarding to reroute all calls or just trunk calls.
If you have a 22-Button or 34-Button Display Telephone
To activate Call Forwarding:
1. Press
ICM
and dial
*3
, or press your Call Forwarding key.
OR
Press
PGM
+
CFWD
.
Call Forwarding Key BLF
This flash rate: Means:
Off Call Forwarding is disabled.
Fast flash The extension is in the Call For-
warding programming mode.
Wink off Call Forwarding is enabled at the
extension

Features
DS1000/2000 Feature Handbook Supplement
3
2. Dial
4
or press
IMM
for Call Forwarding Immediate.You see:
OR
Dial
6
or press
RNA
for Call Forwarding No Answer.You see:
OR
Dial
2
or press
BNA
for Call Forwarding Busy/No Answer.You see:
OR
Dial
3
or press
MORE
+
OFFP
for Off Premise Call Forwarding. (See Call Forwarding Off
Premise in the
New Features
section for more.)You see:
OR
Dial
7
or press
MORE
+
AME
for Personal Answering Machine Emulation. (See Voice Mail
in this section for more.)You see:
OR
Dial
8
or press
MORE
+
MSG
to select a Selectable Display Message. (See Selectable Dis-
play Messaging in this section for more.)
3. Dial destination extension (or
0
for your operator).
OR
Dial the Voice Mail master number.
OR
Press
MW
.
4. Select the Call Forwarding type:
- Dial
2
or press
ALL
to forward all calls.
- Dial
8
or press
TRNK
to forward just trunk calls.
It is no longer necessary to press
SPK
to hang up.

Features
4
DS1000/2000 Feature Handbook Supplement
To cancel Call Forwarding
1. Press
ICM
and dial
*3
, or press your Call Forwarding key.
OR
Press
CLEAR
+
PGM
+
CFWD
.You see:
2. Dial
0
, press
CLEAR
, or press
NONE
to cancel forwarding.
It is no longer necessary to press
SPK
to hang up.
3. Call Forwarding is cancelled.
If you have a Super Display Telephone
To activate Call Forwarding:
1. Press
ICM
and dial
*3
,
or press your Call Forwarding key.
OR
Press
PROGRAM
+
CALL FWRD
.
2. Dial
4
or press
IMMEDIATE
for Call Forwarding Immediate.You see:
OR
Dial
6
or press
RING/NO ANS
for Call Forwarding No Answer.You see:
OR

Features
DS1000/2000 Feature Handbook Supplement
5
Dial
2
or press
BUSY/NO ANS
for Call Forwarding Busy/No Answer.You see:
OR
Dial
3
or press
OFF-PREMISE
for Off Premise Call Forwarding. (See Call Forwarding Off
Premise for more.)You see:
OR
Dial
7
or press
ANS MACHINE
for PersonalAnswering Machine Emulation. (SeeVoice Mail
for more.)You see:
OR
Dial
8
or press
MESSAGE to select a Selectable Display Message. (See Selectable Display
Messaging for more.)
3. Dial destination extension (or 0for your operator).
OR
Dial the Voice Mail master number.
OR

Features
6DS1000/2000 Feature Handbook Supplement
Press MW.
4. Select the Call Forwarding type:
- Dial 2or press ALL to forward all calls.
- Dial 8or pressTRUNK ONLY to forward just trunk calls.
It is no longer necessary to press SPK to hang up.
To cancel Call Forwarding
1. Press ICM and dial *3, or press your Call Forwarding key.
OR
Press PROGRAM + CALL FWRD.You see:
2. Dial 0.
OR
Press NONE.
OR
Press CLEAR.
It is no longer necessary to press SPK to hang up.
3. Call Forwarding is cancelled.
Call Forwarding Off Premise
If you have a display keyset, Off Premise Call Forwarding allows you to forward your calls to an
off-site location (such as a cell phone or remote office).You can stay in touch by having Off
Premise Call Forwarding automatically forward your calls while you are away from the office. To
set up Off Premise Call Forwarding, select the trunk or trunk group over which the call should
route, as well as the number the system should dial. The number dialed can be one of your Personal
Speed Dial bins containing an outside number, or you can enter an outside number directly into
Personal Speed Dial bin 720. When a call rings your extension, the system selects the specified
trunk or group and then outdials the stored number.
Off Premise Call Forwarding reroutes:
●Intercom calls
●Transferred calls

Features
DS1000/2000 Feature Handbook Supplement 7
●Direct Inward Lines (Remember that a trunk can be a regular trunk during the day and a DIL
at night, and visa versa.)
●UTRF (unscreened transfer) calls routed from the Voice Mail Automated Attendant
●Circular and Terminal Extension Hunting calls
Off Premise Call Forwarding does not reroute:
●Key Ring calls
●Calls to a UCD Group master number.
●Group Ring calls (i.e., calls to a Ring Group master number)
●UCD Hunting Calls (i.e., calls to a UCD master number)
●Ringing Call Coverage key calls
You can set up Off Premise Call Forwarding to reroute all calls or just trunk calls.
If you have a 22-Button or 34-Button Display Telephone
To set up Call Forwarding Off Premise:
1. Press the ICM key and dial *3,or press your Call Forwarding key.
OR
Press PGM +CFWD.You see:
2. Dial 3and skip to step 5.
OR
Press MORE.You see:
3. Press OFFP.
4. You see:
- Press BIN to select a Speed Dial bin as your Off Premise Call Forwarding number.
- Press NUM to store a new Off Premise Call Forwarding number (automatically in bin 720).
- PressVIEW to view the currently enabled Off Premise Call Forwarding number (if any).
5. If you press
BIN
to store the number in a Speed Dial bin, you see:
- Select the Speed Dial bin (dial 701-720 or press the bin key) you want to use +
HOLD
to exit.
OR
If you press
NUM
to store a new number (automatically in Speed Dial bin 720), you see:

Features
8DS1000/2000 Feature Handbook Supplement
- Enter the trunk number (e.g., 1 for trunk 1), trunk group number (e.g., 90 for group 0), or
ICM
to store Intercom codes +
HOLD
. (Check with your Communications Manager for your trunk
and trunk group numbers.)
- Following Speed Dial programming methods, enter the number you want to store (up to 16
digits long, including
MIC
to store a pause and
FLASH
to store a Flash) +
HOLD
to exit.
-You cannot enter a name using this option.
- If you already have a number stored in bin 20, you see:
- Press
Yes
to enter a new number or
No
to back up to step 4.
OR
If you pressed
VIEW
to view your currently stored number, you see:
- Press
SPK
to exit the
VIEW
mode.
6. You see:
7. Select the Call Forwarding type:
- Dial 2or press ALL to forward all calls.
- Dial 8or pressTRNK to forward just trunk calls.
8. Once returning to idle, your telephone display will show:
- FWD OFP indicates that Off Premise Call Forwarding is enabled, followed by the number.
- If you selected a Speed Dial bin with a stored name, the name will display instead.
To cancel Call Forwarding Off Premise:
1. Press the ICM key and dial *3,or press your Call Forwarding key.
OR
Press CLEAR + PGM +CFWD.You see:
2. Press NONE.
OR
Dial 0.
OR
Press CLEAR.
3. Off Premise Call Forwarding is cancelled.

Features
DS1000/2000 Feature Handbook Supplement 9
If you have a Super Display Telephone
To set up Call Forwarding Off Premise:
1. Press the ICM key and dial *3,or press your Call Forwarding key
OR
Press PROGRAM + CALL FWRD.You see:
2. Dial 3or press OFF-PREMISE.You see:
- Press SPEED DIAL BIN to select a Speed Dial bin as your Off Premise Call Forwarding
number.
- Press NUMBER to store a new Off Premise Call Forwarding number (automatically in bin
720).
- PressVIEW to view the currently enabled Off Premise Call Forwarding number (if any).
3. If you press SPEED DIAL BIN to store the number in a Speed Dial bin, you see:
- Select the Speed Dial bin (701-720) you want to use + HOLD to exit.
OR

Features
10 DS1000/2000 Feature Handbook Supplement
If you press NUMBER to store a new number (automatically in Speed Dial bin 720), you see:
- Enter the trunk number (e.g., 1 for trunk 1), trunk group number (e.g., 90 for group 0), or
ICM to store Intercom codes + HOLD.
(Check with your Communications Manager for your
trunk and trunk group numbers.)
- Following Speed Dial programming methods, enter the number you want to store (up to 16
digits long, including MIC to store a pause and FLASH to store a Flash) + HOLD to exit.
-You cannot enter a name using this option.
- If you already have a number stored in bin 20, you see:
- PressYes to enter a new number or No to back up to step 3.
OR
If you pressedVIEW to view your currently stored number, you see:
- Press SPK to exit theVIEW mode.
4. You see:
5. Select the Call Forwarding type:

Features
DS1000/2000 Feature Handbook Supplement 11
- Dial 2or press ALL to forward all calls.
- Dial 8or pressTRUNK ONLY to forward just trunk calls.
6. Once returning to idle, your telephone display will show:
- FWD OFP indicates that Off Premise Call Forwarding is enabled, followed by the number.
- If you selected a Speed Dial bin with a stored name, the name will display instead.
To cancel Call Forwarding Off Premise:
1. Press the ICM key and dial *3,or press your Call Forwarding key
OR
Press PROGRAM + CALL FWRD.You see:
2. Press NONE.
OR
Dial 0.
OR
Press CLEAR.
3. Off Premise Call Forwarding is cancelled.
If you have a 22-Button Non-Display Telephone
It is strongly recommended that you use a display telephone when setting up Off Premise Call For-
warding. If you don’t have a display telephone, the following procedure explains how you can use a
22-button non-display set to enable Off Premise Call Forwarding.
To set up Call Forwarding Off Premise:
1. Program the number you want Call Forwarding Off Premise to dial into one of your Personal
Speed Dial bins (701-720).
You must do this before proceeding to step 2 below.
For example, the following sequence programs the number 12039265400 with the
name NEC to go out over trunk group 0:
#77 + 701 + HOLD + 90 + HOLD + 12039265400 + HOLD + 62 + 32 + 23 +
HOLD + SPK.
2. Press the ICM key and dial *33.
3. Dial 2and enter the Personal Speed bin number you programmed in step 1 above + HOLD.

Features
12 DS1000/2000 Feature Handbook Supplement
4. Select the Call Forwarding type:
- Dial 2or press ALL to forward all calls.
- Dial 8or pressTRNK to forward just trunk calls.
Your DND key flashes.
To cancel Call Forwarding Off Premise:
●Press the ICM key and dial *30.
Your DND key goes out.
Call Timer
Enhanced Call Timer
In addition to the capabilities of the Call Timer feature, Enhanced Call Timer provides (if you have
a display set):
●Review of Previously Timed Call
Any time after hanging up from a timed call, you can press your Manual orAutomatic Call
Timer key to review the duration of that call.
●Timer Reset for Current Call
While your phone is timing your call, you can press CLEAR at any time to reset the Call
Timer to 00:00:00.
●Automatic Timer Stop
The system assigns the Call Timer to the active call. When you hang up on your active call,
the Call Timer automatically shuts down.
●Wrap-up Timer Display
After hanging up a timed call, your display will show the Call Timer data for 6 seconds before
returning to idle. This gives you time to make a record of the timed call.
Manual Call Timer
Any time while placing a call or while on a call, you can press your Manual Call Timer key to start
the Call Timer. The Call Timer will continue until you hang up or press your Manual Call Timer
key again.
The Manual Call Timer key no longer works like a stopwatch while the phone is idle.
Automatic Call Timer
In addition to the features of the Manual Call Timer key, the Automatic Call Timer key provides
automatic timing for trunk calls only. If your phone has an Automatic Call Timer key, the Call
Timer automatically starts when you place or answer an outside call.
The Automatic Call Timer does not automatically start for Intercom calls.
To time your trunk call if you have an Automatic Call Timer key:
●Place or answer outside call.
The Call Timer starts automatically. The Automatic Call Timer key lights red while the
system times the call.
To manually time your Intercom or outside call:
●While placing or while on the call, press the Manual or Automatic Call Timer key.
The Call Timer key lights red while the system times the call.

Features
DS1000/2000 Feature Handbook Supplement 13
To stop the Call Timer:
●Hang up.
The timer automatically stops after 6 seconds.
OR
●Press the Manual or Automatic Call Timer key.
To reset the Call Timer to 00:00:00 while it is running (i.e., timing your call):
●Press CLEAR.
To review the duration of your last timed call:
●While idle, press the Manual or Automatic Call Timer key.
Press CLEAR or wait 6 seconds to return to idle Time/Date display.
Do Not Disturb
Do No Disturb Override
Do Not Disturb Override allows you to override another extension’s Do Not Disturb.You can get
through to a co-worker right away while their phone is in Do Not Disturb. To use this option, you must
have DND Override enabled in your Class of Service or be a Hotline partner for your co-worker.
To use Do Not Disturb Override:
1. Dial your co-worker.
2. When you hear DND tone and see “DO NOT DISTURB” in your telephone’s display:
- Press OVRD (DND OVERRIDE at Super Display).
OR
- Dial 1.
3. The system automatically places a ringing Intercom call to your co-worker.
If you hear busy or ring/busy tone after step 2, your co-worker is busy on a call.
Do Not Disturb Options
Do Not Disturb is enhanced to provide you with the following 4 DND options:
(1) Incoming trunk calls blocked
(2) Incoming Intercom calls blocked
(3) All incoming calls blocked
(0) Cancel Do Not Disturb
Do Not Disturb Options
This DND option: Blocks these calls:
(1) Incoming Trunk Calls Blocked Ringing for outside calls, including:
• Key Ring calls
• Off Hook Ringing
• Call Coverage Keys
• Group Call Pickup keys
• Transferred trunk calls
• Hold, Park, and Transfer recalls
• Extension Hunting calls
• DILs to the extension (if the extension is the
night mode termination)
• DILs to a Ring Group master number (if the
extension is in the group)

Features
14 DS1000/2000 Feature Handbook Supplement
Note that Call Forwarding has priority over Do Not Disturb. If both are enabled simultaneously
at an extension, Call Forwarding is in force.
Do Not Disturb BLF for Hotline and Call Coverage Keys
The following chart shows the Do Not Disturb Busy Lamp Field flash rates for Hotline and Call
Coverage keys.
If you have a 22-Button or 34-Button Display Telephone
To enable or disable DND:
1. Do not lift the handset or press the SPK key.
2. Press your DND key.You see:
The first line of the display shows the currently selected DND type.
3. Select the soft key for the DND type you want to select.
OR
Dial a digit (0-3) for the DND type you want to select.
1 (or EXT) = Incoming trunk calls blocked
2 (or ICM) = Incoming Intercom calls blocked
3 ( or ALL) = All calls blocked
0 (or OFF) = Cancels DND.
(2) Incoming Intercom Calls Blocked • Incoming Intercom calls
• Transferred calls
• Paging announcements
• Ringing from Intercom calls to the Ring Group
master number (if the extension is in the group)
• Extension hunting calls that normally ring the
extension
(3) All Incoming Calls Blocked • All calls blocked by Option 1 and Option 2.
(0) Cancel Do Not Disturb • Option 0 cancels Do Not Disturb
Hotline and Call Coverage Key Busy Lamp Indications
When the key is: The covered extension is:
Off Idle or not installed
On Busy
Flashing slowly1Ringing
Wink off In DND for trunk calls (option 1)
Flashing fast In DND for Intercom calls
(option 2) or All Calls (option 3)
1Available on Call Coverage key only.
Do Not Disturb Options
This DND option: Blocks these calls:

Features
DS1000/2000 Feature Handbook Supplement 15
If you are on a call (or anytime your phone is not idle), pressing DND automatically
enables DND for all calls (type 3). If DND is enabled, pressing DND automatically dis-
ables DND.
When DND types 2 or 3 are enabled, Intercom callers hear DND tone and see “DO
NOT DISTURB” in their telephone’s display.
If you don’t make an entry for 10 seconds:
- If DND is disabled, the system automatically enables DND All Calls.
- If DND is disabled, the system automatically cancels DND.
If you have a Super Display Telephone
To enable or disable DND:
1. Do not lift the handset or press the SPK key.
2. Press your DND key.You see:
The first line of the display shows the currently selected DND type.
3. Select the soft key for the DND type you want to select.
OR
Dial a digit (0-3) for the DND type you want to select.
1 (or EXTERNAL) = Incoming trunk calls blocked
2 (or INTERCOM) = Incoming Intercom calls blocked
3 ( or ALL) = All calls blocked
0 (or OFF) = Cancels DND.
If you are on a call (or anytime your phone is not idle), pressing DND automatically
enables DND for all calls (type 3). If DND is enabled, pressing DND automatically dis-
ables DND.
When DND types 2 or 3 are enabled, Intercom callers hear DND tone and see “DO
NOT DISTURB” in their telephone’s display.
If you don’t make an entry for 10 seconds:
- If DND is disabled, the system automatically enables DND All Calls.
- If DND is disabled, the system automatically cancels DND.
To check your extension’s DND type:
●Look at the second line of your display. When you enable Do Not Disturb, the display will
show one of the following:
DND ALL
DND EXTERNAL
DND INTERCOM

Features
16 DS1000/2000 Feature Handbook Supplement
Extension Locking
Use Extension Locking to secure your phone when you leave your office.You may want to do this
if your phone has Toll Restriction and Class of Service options enabled that could be easily abused.
While locked, the restrictions set up in Class of Service 15 and Toll Level 7 are in force at your
extension. When you return, just unlock your extension to return it to normal operation.
Locking and Unlocking Your Extension
To lock your extension:
●Press ICM and dial ##5.
Your DND key winks on while your extension is locked. In addition, you hear pulsating
Intercom dial tone when you press ICM.
To unlock your extension:
1. Press ICM.
You hear pulsating Intercom dial tone.
2. Dial ##5.
At a 22- or 34- Button Display telephone, you see:
At a Super Display Telephone, you see:
3. Enter your PIN number + HOLD.
When entering your PIN number:
- CLEAR erases your entire entry.
- LND backspaces over (erases) the last digit entered.
Entering or Changing Your PIN Number
To enter your PIN number (if you don’t have one assigned to your extension):
1. Press ICM.
2. Dial ##6.
At a 22- or 34-Button Display Telephone, you see:
Other manuals for DS1000
15
This manual suits for next models
1
Table of contents
Other NEC Telephone manuals

NEC
NEC Univerge SV9100 User manual

NEC
NEC SL1000 User manual

NEC
NEC Xen Master Instruction manual

NEC
NEC SL1100 User manual

NEC
NEC Dterm Series i User manual

NEC
NEC Univerge SV9100 User manual

NEC
NEC Xen Topaz User manual

NEC
NEC AT-35 User manual

NEC
NEC DTERM Series User manual

NEC
NEC Univerge SV8100 DT310 User manual

NEC
NEC SL1100 User manual

NEC
NEC Univerge SV9100 Instruction Manual

NEC
NEC AT-40 User manual

NEC
NEC UNIVERGE SL2100 Owner's manual

NEC
NEC DTERM 2400 PBX User manual

NEC
NEC Univerge DT820 User manual

NEC
NEC SV8300 User manual

NEC
NEC DTR-1HM-1 User manual

NEC
NEC Univerge SV8100 Setup guide

NEC
NEC DT930 Series User manual