NEC OW5000 User manual

NEC
NEC Infrontia Corporation
OW5000
Incoming Call Assistant
An OW5000 Solution
User Guide
September 2008
NDA-30143, Revision 4

Liability Disclaimer
NEC Infrontia Corporation reserves the right to change the
specifications, functions, or features, at any time, without notice.
NEC Infrontia Corporation has prepared this document for the
exclusive use of its employees and customers. The information
contained herein is the property of NEC Infrontia Corporation and shall
not be reproduced without prior written approval from
NEC Infrontia Corporation
© 2004-2008 NEC Infrontia Corporation
Microsoft and Windows are registered
trademarks of Microsoft Corporation.
All other brand or product names are or may be trademarks or
registered trademarks of, and are used to identify products or services
of, their respective owners.

i
OW5000 Incoming Call Assistant User Guide - Revision 4
Contents
Introduction 1-1
Overview . . . . . . . . . . . . . . . . . . . . . . . . . . . . . . . . . . . . . . . . . . . . . . . . . . . . . . 1-1
How This Guide is Organized . . . . . . . . . . . . . . . . . . . . . . . . . . . . . . . . . . . . . . 1-2
Incoming Call Assistant Keys and Prompts. . . . . . . . . . . . . . . . . . . . . . . . . . . . 1-2
Keypad Conventions. . . . . . . . . . . . . . . . . . . . . . . . . . . . . . . . . . . . . . . . . . . . . 1-3
Incoming Call Assistant Prompts . . . . . . . . . . . . . . . . . . . . . . . . . . . . . . . . . . . 1-3
Using Incoming Call Assistant 2-1
Basic Operating Procedures . . . . . . . . . . . . . . . . . . . . . . . . . . . . . . . . . . . . . . . 2-2
Using Incoming Call Assistant. . . . . . . . . . . . . . . . . . . . . . . . . . . . . . . . . . . . . . 2-3
Viewing Inbound Call Information . . . . . . . . . . . . . . . . . . . . . . . . . . . . . . . . . . . 2-5
Order of Inbound Call Information Displays . . . . . . . . . . . . . . . . . . . . . . . . . . . 2-6
Returning A Call . . . . . . . . . . . . . . . . . . . . . . . . . . . . . . . . . . . . . . . . . . . . . . . . 2-9
Viewing Outbound Call Information. . . . . . . . . . . . . . . . . . . . . . . . . . . . . . . . . 2-10
Order of Outbound Call Information Displays . . . . . . . . . . . . . . . . . . . . . . . . . 2-10
Redialing A Call. . . . . . . . . . . . . . . . . . . . . . . . . . . . . . . . . . . . . . . . . . . . . . . . 2-12
Changing User Passwords . . . . . . . . . . . . . . . . . . . . . . . . . . . . . . . . . . . . . . . 2-12
Exiting Incoming Call Assistant . . . . . . . . . . . . . . . . . . . . . . . . . . . . . . . . . . . . 2-13

ii Contents
OW5000 Incoming Call Assistant User Guide - Revision 4

iii
OW5000 Incoming Call Assistant User Guide - Revision 4
Figures
Figure Title Page
1-1 Dterm Components . . . . . . . . . . . . . . . . . . . . . . . . . . . . . . . . . . . . . . . . . 1-2
1-2 Scroll List Function Keys . . . . . . . . . . . . . . . . . . . . . . . . . . . . . . . . . . . . . 1-3
2-1 Extension Prompt . . . . . . . . . . . . . . . . . . . . . . . . . . . . . . . . . . . . . . . . . . 2-3
2-2 Multiple User Prompt . . . . . . . . . . . . . . . . . . . . . . . . . . . . . . . . . . . . . . . . 2-3
2-3 New Password Prompt . . . . . . . . . . . . . . . . . . . . . . . . . . . . . . . . . . . . . . 2-4
2-4 Skip Password Prompt . . . . . . . . . . . . . . . . . . . . . . . . . . . . . . . . . . . . . . 2-4
2-5 Inbound/Outbound Prompt . . . . . . . . . . . . . . . . . . . . . . . . . . . . . . . . . . . 2-5
2-6 New Calls. . . . . . . . . . . . . . . . . . . . . . . . . . . . . . . . . . . . . . . . . . . . . . . . . 2-5
2-7 DID Display . . . . . . . . . . . . . . . . . . . . . . . . . . . . . . . . . . . . . . . . . . . . . . . 2-6
2-8 Caller Name or Number Display . . . . . . . . . . . . . . . . . . . . . . . . . . . . . . . 2-6
2-9 Call Time and Date Display . . . . . . . . . . . . . . . . . . . . . . . . . . . . . . . . . . . 2-7
2-10 Calling Party Number Display . . . . . . . . . . . . . . . . . . . . . . . . . . . . . . . . . 2-7
2-11 XFR Display. . . . . . . . . . . . . . . . . . . . . . . . . . . . . . . . . . . . . . . . . . . . . . . 2-8
2-12 Rang Display . . . . . . . . . . . . . . . . . . . . . . . . . . . . . . . . . . . . . . . . . . . . . . 2-8
2-13 FWD Number Display . . . . . . . . . . . . . . . . . . . . . . . . . . . . . . . . . . . . . . . 2-9
2-14 New Calls. . . . . . . . . . . . . . . . . . . . . . . . . . . . . . . . . . . . . . . . . . . . . . . . 2-10
2-15 Caller Name or Number Display . . . . . . . . . . . . . . . . . . . . . . . . . . . . . . 2-10
2-16 Call Time and Date Display . . . . . . . . . . . . . . . . . . . . . . . . . . . . . . . . . . 2-11
2-17 Calling Party Number Display . . . . . . . . . . . . . . . . . . . . . . . . . . . . . . . . 2-11
2-18 New Password Prompt . . . . . . . . . . . . . . . . . . . . . . . . . . . . . . . . . . . . . 2-12
2-19 Skip Password Prompt . . . . . . . . . . . . . . . . . . . . . . . . . . . . . . . . . . . . . 2-13

iv Figures
OW5000 Incoming Call Assistant User Guide - Revision 4

v
OW5000 Incoming Call Assistant User Guide - Revision 4
Tables
Table Title Page
1-1 Incoming Call Assistant Prompts . . . . . . . . . . . . . . . . . . . . . . . . . . . . . . . 1-3

vi Tables
OW5000 Incoming Call Assistant User Guide - Revision 4

1-1
OW5000 Incoming Call Assistant User Guide - Revision 4
1
Introduction
Welcome to the OW5000 Incoming Call Assistant User Guide. The
OW5000 Incoming Call Assistant User Guide provides the information
you need to work with the Incoming Call Assistant application.
Chapter Topics •Overview
• How This Guide is Organized
• Incoming Call Assistant Keys and Prompts
Overview
Incoming Call Assistant (ICA) is an OW5000 Windows service that gives
Dterm users a powerful tool to manage incoming and outgoing calls.
Using any Dterm phone with an associated function key, you can use
ICA to:
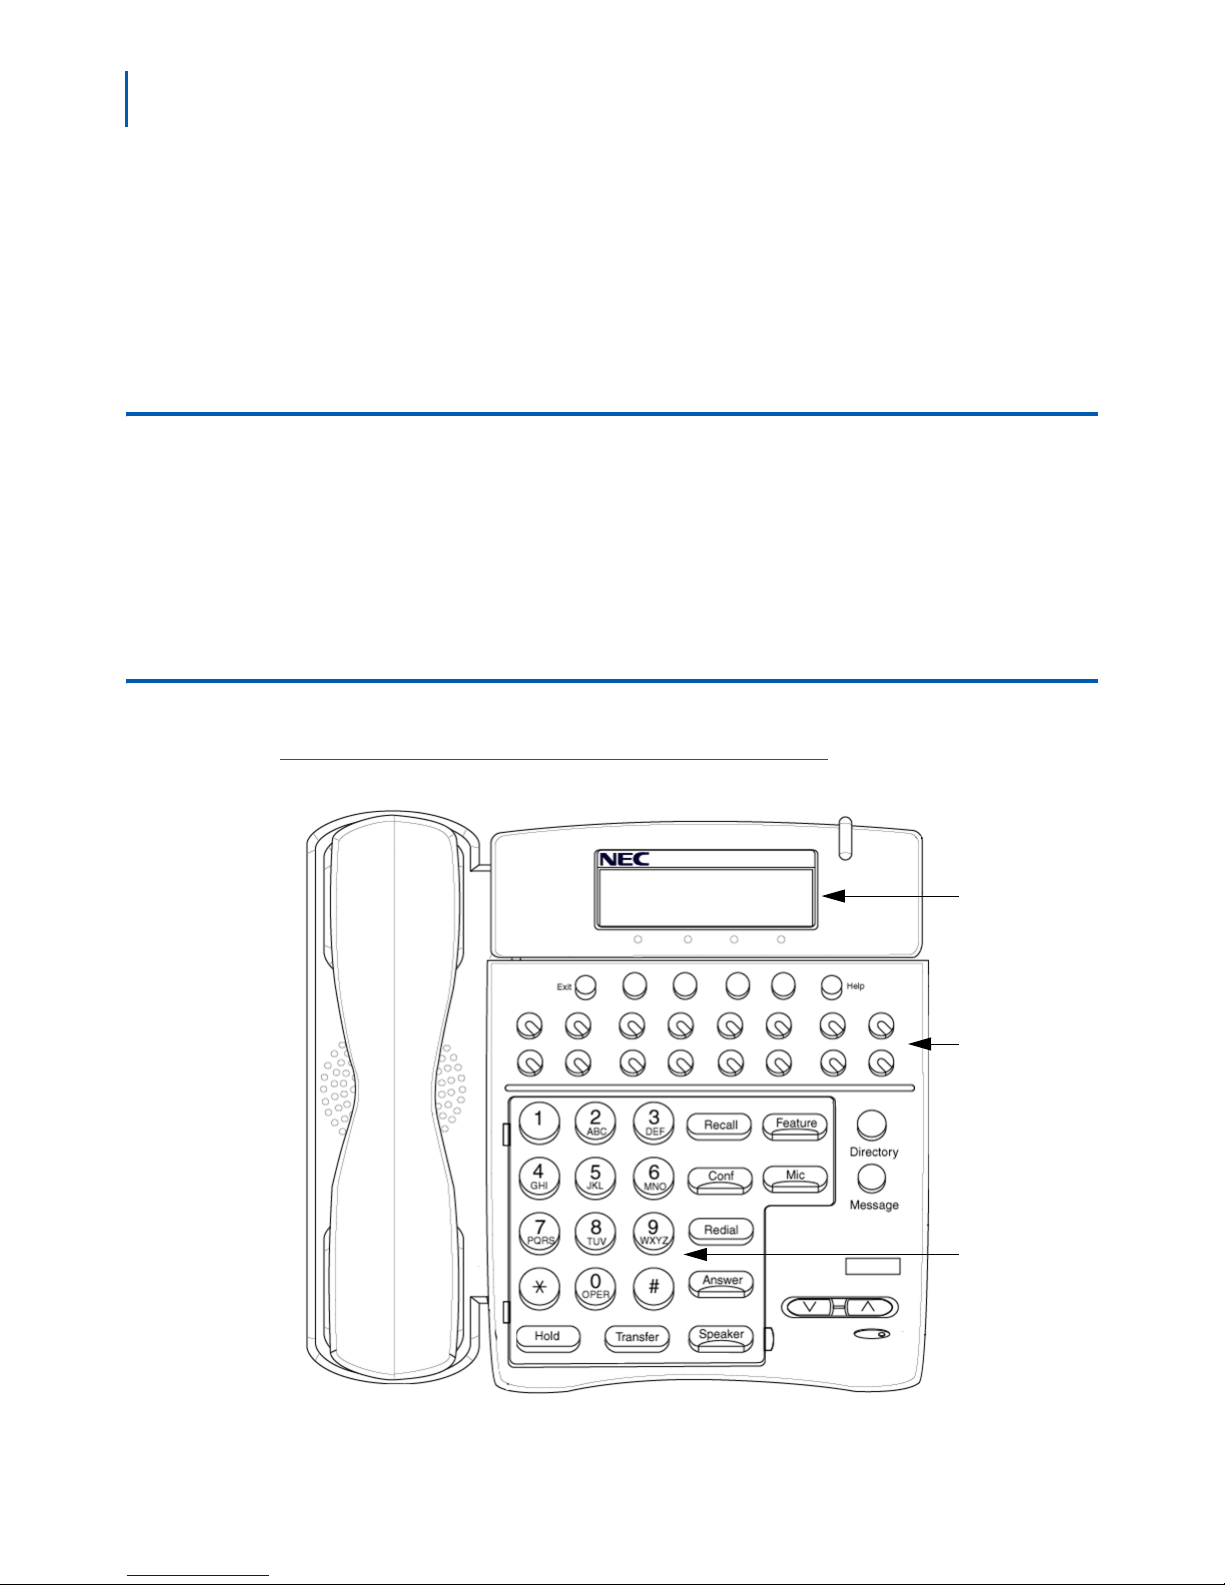
• Automatically view your caller’s name or telephone number on the
LCD display when a new call is received on your prime or sublines.
• Check for incoming calls from any Dterm on the PBX by entering your
extension and password, if applicable.
• Track up to 99 inbound calls from your office or from anywhere in the
building even if your callers do not leave a message.
• View a history of up to 99 calls placed from your extension, and retry
these calls with a single key stroke.
• Use your outbound call history to call recently dialed numbers from
any Dterm with ICA configured.
Incoming Call Assistant integrates with the OW5000 database. The
following information is available for calls that you receive or place when
you use ICA:
• Caller’s name as it is listed in the OW5000 employee, external, or
personal contact tables.
NOTE
Your personal contact table can be imported from other sources such as Microsoft
Outlook Contacts or other text files using the separately available UC700 application.

1-2 Introduction
OW5000 Incoming Call Assistant User Guide - Revision 4
• Caller’s phone number.
• Date and time of the call.
• If an inbound call was transferred and by whom.
• If an inbound call was forwarded and by what line.
• The direct number that was dialed for inbound calls (if ICA is
configured to show this information).
How This Guide is Organized
Chapter 1
Introduction
This chapter outlines how to use the manual, including the actual
manual organization, chapter layout, conventions, and function keys for
the Incoming Call Assistant application.
Chapter 2
Using Incoming Call Assistant
This chapter explains how to manage incoming calls using the Incoming
Call Assistant application.
Incoming Call Assistant Keys and Prompts
Figure 1-1
Dterm Components
Display
Function Keys
Keypad

Introduction 1-3
OW5000 Incoming Call Assistant User Guide - Revision 4
Keypad Conventions
The general keys used throughout the Incoming Call Assistant
application are listed in Figure 1-2.
Figure 1-2
Scroll List Function Keys
Incoming Call Assistant Prompts
Tab le 1- 1 details the standard prompts encountered throughout the
Incoming Call Assistant application.
Table 1-1 Incoming Call Assistant Prompts
Scroll Up
Scroll Right
Scroll Left
Return to Main Menu Change Password
Dial
Scroll Down
Prompt All listings are circular
[Extension: ]
At this prompt, enter the extension where the last nine calls you want
to view are located. Entering #at this prompt will assume the current
extension. If multiple users are assigned to an extension, x Users
displays for name selection.
[X Users: ]
Indicates an extension assigned to multiple users. Use 2or 8to scroll
through the available users. Enter #to select the desired user and
continue.
[New Password: ]
At this prompt, enter the new password or press #to skip the user
password. If you have selected to skip the password, this prompt will
not appear again when you attempt to view your calls. However, if you
want to add a password later, press 9to bring up the New Password
prompt and enter the new password.
[Skip PW? Y-1 N-2]
Displays after entering #at the New Password prompt. Select 1 to
skip entering the user password in ICA.
[Password: ]
Enter the user password.
[InBnd-1 OutBnd-2]
Choose if you wish to view previously received inbound calls or
previously placed outbound calls for the extension you entered when
logging in to ICA.

1-4 Introduction
OW5000 Incoming Call Assistant User Guide - Revision 4
[1 * John Smith]
or
[1 (555) 555-1212]
Displays the name (if available) and telephone number of the calling
party. Calls can be numbered from 1 to 99, depending on the
configuration, beginning with the latest call received. An asterisk
[*]
displays before the caller’s name or telephone number if that call has
not yet been reviewed.
[DID: ]
Displays the name associated with the extension that the call was
forwarded from when an outside caller dialed directly to a number that
is in the OW5000 DID (Direct Inward Dial) database and the call was
forwarded to your extension.
[XFR: ]
Displays the name or number of the party who transferred an incoming
call. This display will not appear if the call was not transferred.
[Rang: ]
Displays the number that the calling party actually rang.
[FWD: ]
Displays the name or number of the party who forwarded the call. This
display will not appear if the call was not forwarded.
[Invalid, Retry]
Indicates an input error.
Prompt All listings are circular

2-1
OW5000 Incoming Call Assistant User Guide - Revision 4
2
Using Incoming Call Assistant
Chapter Topics • Basic Operating Procedures
• Using Incoming Call Assistant
•ViewingInboundCall Information
• Viewing Outbound Call Information
• Redialing A Call
• Changing User Passwords
• Exiting Incoming Call Assistant
Incoming Call Assistant (ICA) gives you the ability to track your calls
from your own office or from anywhere in the building, even if the caller
does not leave a message. It also lets you track calls you manually
placed from your Dterm or from any telephony application.
Using any Dterm phone with an associated function key, you can use
ICA to:
• Immediately review or hold call information on your display so that
you can decide whether to release your current call or let the new call
follow your forward no answer setting (typically to voice mail).
• Review call information for transferred and/or forwarded calls.
• Return a call by the single press of a button.
• View your previous outbound call history, and redial a number with a
single button press.
Incoming Call Assistant integrates with the OW5000 database. The
following information is available for calls that you receive when you use
ICA:
• Caller’s name as it is listed in the OW5000 database (employee,
external record, personal entry).
• Caller’s phone number.
• Date and time of the call.
• If the call was transferred and by whom.
• If the call was forwarded and by what line.
• The direct number that was dialed (if ICA is configured to show this
information).

2-2 Using Incoming Call Assistant
OW5000 Incoming Call Assistant User Guide - Revision 4
When viewing your information about calls that you placed, the
following information is available when you use ICA:
• The name of the party called is listed in the OW5000 database
(employee, external record, personal entry).
• The phone number of the party called.
• Date and time of the call.
Basic Operating Procedures
When using Incoming Call Assistant, incoming calls will ring as
configured in the PBX, and you will see the caller’s name on the display
for eight seconds. If the caller’s name is not listed in the OW5000
database, the caller's number displays for eight seconds, if available.
The route and trunk will appear if the caller’s name and number is
inaccessible. If you are on another line and you would like to answer the
second call, you may do one of the following:
• Place your current call on hold by pressing the Hold button.
— Press the flashing Subline button to answer the second call.
— To retrieve your first call and disconnect from your current caller,
press the held line and begin speaking.
• Hang up your current call by pressing the Switch Hook.
— Press the flashing Subline button to answer the second call.
If you are already on the line, and you do not want to answer the
incoming call, the second call will follow your Dterm phone’s no answer
forwarding pattern for your subline. Contact your phone system
administrator for more information on how to set forwarding on your
Dterm.
Calls that ring your phone are automatically recorded so that you may
view the inbound call history at a later time by using the assigned ICA
function key on your Dterm. Calls that are placed from your phone are
also recorded and may be viewed via the same mechanism. Both
inbound and outbound calls can be easily recalled/redialed when they
are viewed.

Using Incoming Call Assistant 2-3
OW5000 Incoming Call Assistant User Guide - Revision 4
Using Incoming Call Assistant
Use the following procedures to start ICA on any Dterm with an
associated function key:
Step 1 Press the function key on the Dterm associated with ICA. The
Extension: prompt displays (Figure 2-1), requesting the extension
number you want to review.
Figure 2-1
Extension Prompt
If you are away from your own extension when you want to check your
calls, you must enter your extension’s number to check the calls that you
have received. If you are at your own extension, press the #key to
default to your number.
Do one of the following:
—Press the #key to default to the current extension.
—Enter the extension number for your extension and press the # key.
Step 2 If multiple users are assigned to this extension, ICA will display the
number of users assigned to this extension. To select the correct user, do
one of the following at the x Users prompt (Figure 2-2).
Figure 2-2
Multiple User Prompt
—Press 8to scroll down the list of names. when the desired name
appears in the display, press # to select that name.
—Press 2to scroll up the list of names. When the desired name appears
in the display, press # to select that name.
Extension:
NOTE
You can exit the Incoming Call Assistant application at any time by pressing the
associated ICA function key again.
NOTE
If the extension number was not a valid entry, the error message Invalid, Retry will
display. Enter a valid extension number and press #to clear the message.
x Users:

2-4 Using Incoming Call Assistant
OW5000 Incoming Call Assistant User Guide - Revision 4
—Press 4to go back to the Extension: prompt.
—Press #to select the displayed user name.
Step 3 If you are logging in for the first time, ICA prompts you to create a new
password by displaying the New Password: prompt (Figure 2-3).
Figure 2-3
New Password Prompt
Do one of the following:
—If you want to create a password, enter a password and then press the
#key.
—If you do not want to create a password, press the #key.
The Skip PW? Y-1 N-2 prompt displays (Figure 2-4) if this is an available
option allowed by your OW5000 Administrator. Otherwise, the prompt
does not change, and you are required to enter a password:
Figure 2-4
Skip Password Prompt
Do one of the following:
—To skip entering a password, press 1for Yes.
—To enter a password in the future, press 2for No.
Step 4 After making your password choice, press the #key and you will be
prompted if you would like to view calls that you received (“InBnd”) or
calls that you placed (“OutBnd”). See Figure 2-5.
New Password:
Skip PW? Y-1 N-2:
NOTE
If you select option 1, you can still activate or change a password at a later date. See
Changing User Passwords.
NOTE
Selecting this option prevents others without a valid password from viewing your
Incoming Call Assistant call information.

Using Incoming Call Assistant 2-5
OW5000 Incoming Call Assistant User Guide - Revision 4
Figure 2-5
Inbound/Outbound Prompt
—Press 1 to view call received by the extension entered. Proceed to
Viewing Inbound Call Information.
—Press 2to view calls placed from the extension entered. Proceed to
Viewing Outbound Call Information.
Viewing Inbound Call Information
Reviewing received calls on Incoming Call Assistant is very simple. New
calls are displayed before old calls and are marked with an asterisk (*) if
they have not yet been viewed (Figure 2-6). Once a call’s information is
viewed the (*) will be removed.
Figure 2-6
New Calls
ICA display screens only hold 16 characters. A dash after the last
character indicates that additional characters will be continued on the
following screen.
1. Press #to return a call while viewing any of the call information screens.
2. To navigate through all of the available screens, do one of the following:
• Press 2to return to the previous call and 8 to view the next call.
• Press 4 to scroll left and 6 to scroll right.
• Press 7to return to the Inbnd/Outbnd prompt.
3. Not all screens described below will appear with every call. If the screen is
present, it will be appear in the following order:
InBnd-1 OutBnd-2:
1*Harrison, An-
NOTE

2-6 Using Incoming Call Assistant
OW5000 Incoming Call Assistant User Guide - Revision 4
Order of Inbound Call Information Displays
1. DID (Direct Inward Dialing) Display
This display shows the name assigned to the extension in the
OW5000 DID Database that received a directly dialed call and
forwarded the call to you. See Figure 2-7.
Figure 2-7
DID Display
—Press 6to view the caller’s name and/or number.
—Press 4to scroll left and see on what line the call arrived.
—Press #to return the call or 8to view the next oldest call.
—Press 2to scroll up one call. If you are at the first call in the list when
you press 2, you will go to the last call in the list.
—Press 7to return to the Inbnd/Outbnd prompt.
2. Name OR Number Display
Calls are numbered 1 through 99, beginning with the latest call
received. Then the caller’s name or number displays. See Figure 2-8.
Figure 2-8
Caller Name or Number Display
—Press 6to scroll right one screen to view the date and time that the call
was received.
—Press 4to scroll left one screen to view the last display.
—Press 2to scroll up one call. If you are at the first call in the list when
you press 2, you will go to the last call in the list.
—Press #to return the call or 8to view the next oldest call.
—Press 7to return to the Inbnd/Outbnd prompt.
1 DID: *PC Help
NOTE
If this is not a DID call, you will not see this display.
1 *Home
NOTE
If you do not see 99 calls stored in your inbound call history, your OW5000
administrator has selected a lower number for your site.

Using Incoming Call Assistant 2-7
OW5000 Incoming Call Assistant User Guide - Revision 4
3. Rcv: Display
Figure 2-9 shows the date and time that the call was received.
Figure 2-9
Call Time and Date Display
—Press 6to scroll right one screen to view the calling party’s number.
—Press 4to scroll left one screen to view the last display.
—Press 2to scroll up one call. If you are at the first call in the list when
you press 2, you will go to the last call in the list.
—Press #to return the call or 8to view the next oldest call.
—Press 7to return to the Inbnd/Outbnd prompt.
4. Calling Party Number Display
Figure 2-10 shows the calling party’s number, if it is available. If the
number is unavailable, the PBX information showing how the call
arrived will be displayed.
Figure 2-10
Calling Party Number Display
—Press 6to scroll right one screen to view the extension number of the
person that transferred the call if the call was transferred.
—If the call was not transferred, you will view the Rang: display next.
—Press 4to scroll left one screen to view the previous display.
—Press 2to scroll up one call. If you are at the first call in the list when
you press 2, you will go to the last call in the list.
—Press #to return the call or 8to view the next oldest call.
—Press 7to return to the Inbnd/Outbnd prompt.
Rcv:Fri 29 08:23A
(214) 845-4357

2-8 Using Incoming Call Assistant
OW5000 Incoming Call Assistant User Guide - Revision 4
5. XFR (Call Transfer) Display
If a call was transferred internally to your extension, then the
extension number of the person that transferred the call will display
(Figure 2-11).
Figure 2-11
XFR Display
—Press 6to scroll right one screen to view the number that the calling
party called.
—Press 4to scroll left one screen to view the last display.
—Press 2to scroll up one call. If you are at the first call in the list when
you press 2, you will go to the last call in the list.
—Press #to return the call or 8to view the next oldest call.
—Press 7to return to the Inbnd/Outbnd prompt.
6. Rang Display
This is the number that the calling party called. See Figure 2-12.
Figure 2-12
Rang Display
—Press 6to scroll right one screen to view the number of the extension
that forwarded the call.
—Press 4to scroll left one screen to view the last display.
—Press 2to scroll up one call. If you are at the first call in the list when
you press 2, you will go to the last call in the list.
—Press #to return the call or 8to view the next oldest call.
—Press 7to return to the Inbnd/Outbnd prompt.
XFR: 2256
NOTE
If the call was not transferred from another extension, this screen will not appear.
Rang: 2222
NOTE
If the call was not forwarded, then the Rang Display will be the last screen for this
number. If the Rang Display is your last screen, then pressing 6will scroll back to the
first screen to display the Caller's Information as displayed in Figure 2-1.
Table of contents
Other NEC Telephone manuals