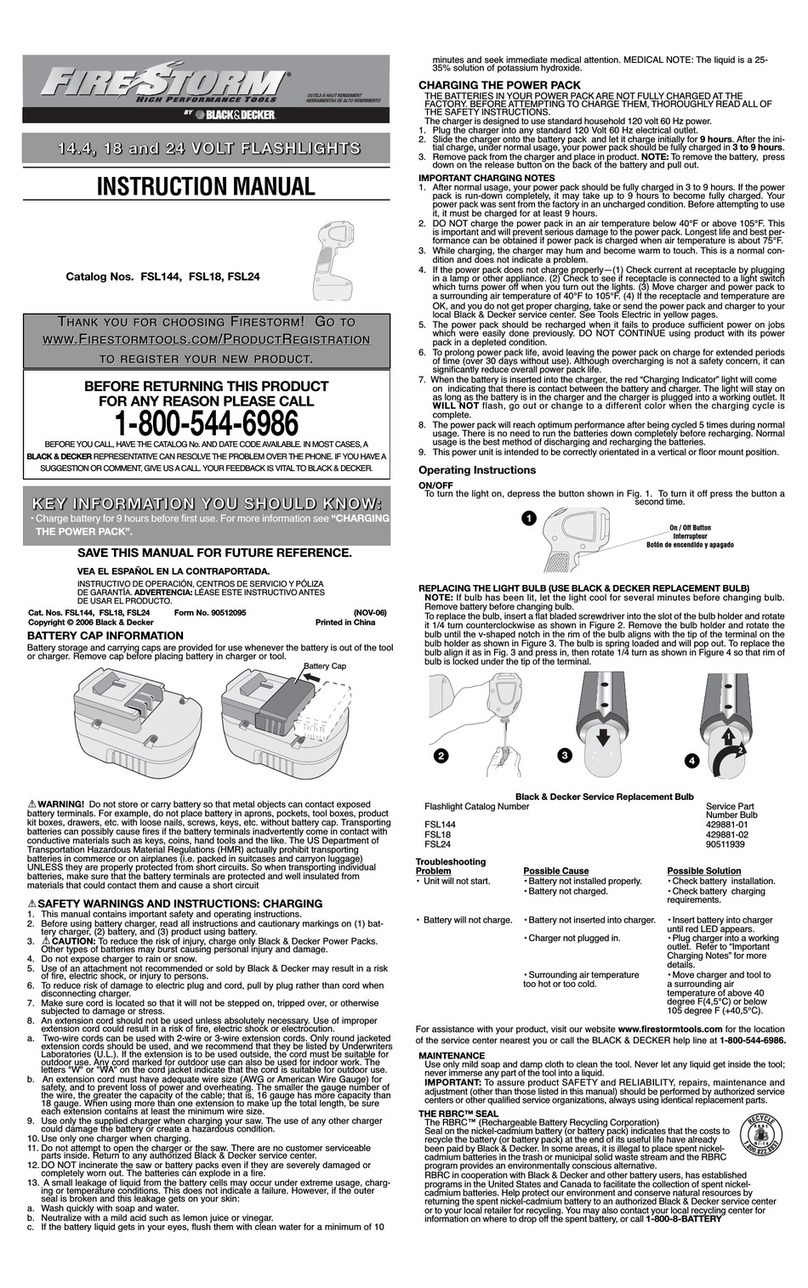
Utilisation de la lampe de poche
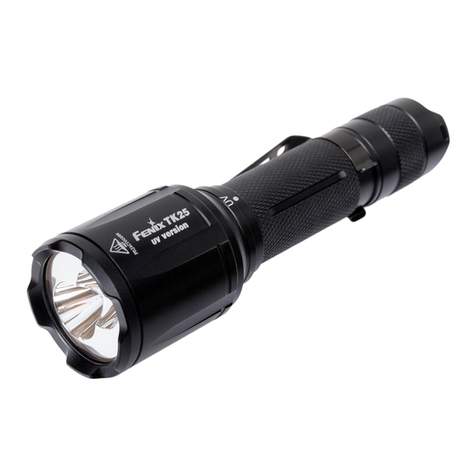
Cet appareil comporte quatre modes de lumière: haut, bas, SOS et stroboscope.
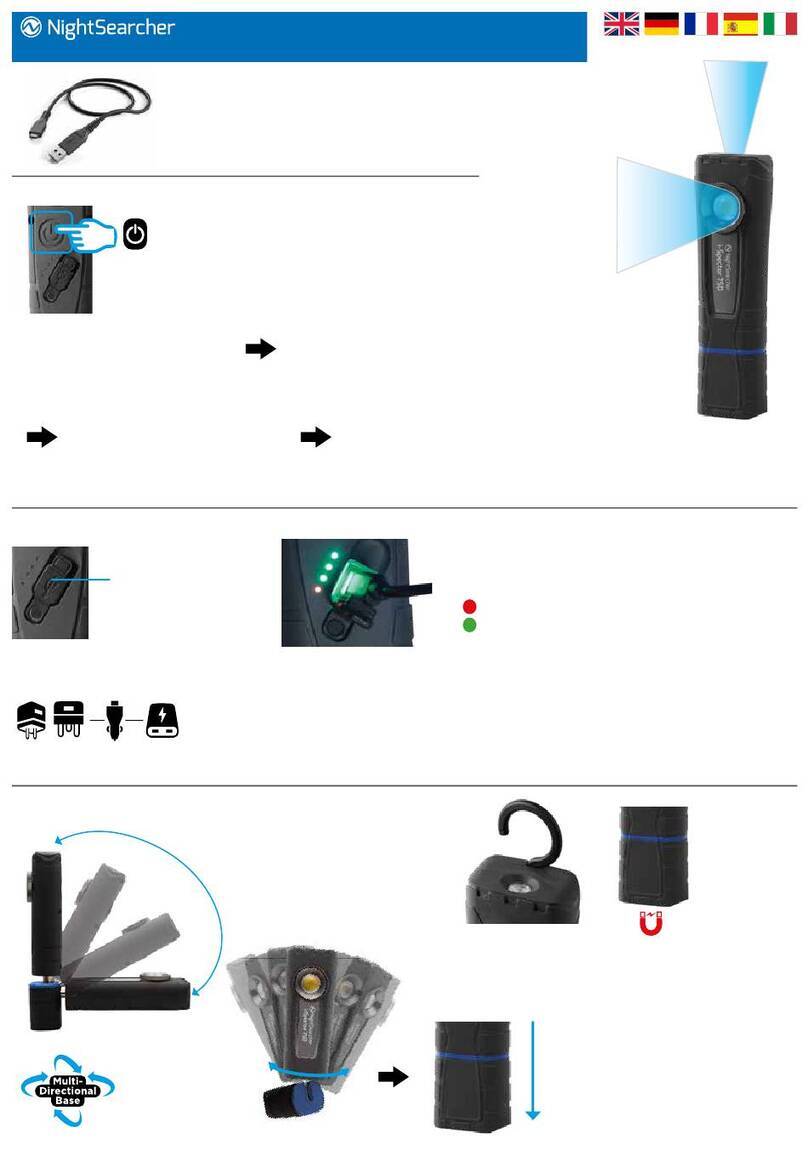
1. Pour allumer la lumière, appuyez sur le bouton “On / Off” jusqu’à ce qu’il clique et que la lumière s’allume. C’est en mode haute.
2. Pour changer le mode lumière en Bas, appuyez à nouveau sur le bouton “Marche / Arrêt”.
3. Pour changer le mode de lumière sur Strobe, appuyez à nouveau sur le bouton “On / Off”.
4. Pour changer le mode de lumière sur SOS, appuyez sur le bouton “On / Off” et maintenez-le enfoncé pendant trois secondes, dans
n’importe quel mode ou lorsque vous éteignez.
Utilisation de la lanterne
Tirez la tête de l’unité loin du corps pour révéler la lanterne. Suivez les instructions ci-dessus pour allumer la lanterne.
Charger
Le câble USB à mini USB fourni est utilisé lors de la charge de l’appareil ou lorsqu’il est utilisé comme source d’alimentation pour
recharger d’autres appareils.
Chargement du Dual Star
1. Branchez la prise Mini USB dans le port mini USB (ci-dessus) sur le côté du Dual Star.
2. Connectez l’autre extrémité du l de charge au port USB de l’adaptateur secteur ou à la prise appropriée du chargeur USB.
3. Une fois connecté, les voyants du voyant de charge clignotent indiquant que l’unité est en cours de chargement.
4. Pour réduire le temps de charge, assurez-vous que la lampe de poche n’est pas allumée.
5. Lorsque les quatre voyants afchent une lumière stable, la charge est terminée et la batterie est complètement chargée.
Indicateur de charge
Directement au-dessus du commutateur “Marche / Arrêt” sont 4 LED bleues qui afchent la batterie restante pendant l’utilisation et
lorsque l’appareil se charge. Quatre LED éclairées indiquent que l’appareil est complètement chargé. Le nombre de voyants allumés
diminue à mesure que la batterie est épuisée indiquant quand la batterie devrait être
Utilisation en tant que Power Bank
1. Si le périphérique à charger utilise une mini prise USB, vous pouvez utiliser le cordon inclus, sinon vous devrez utiliser votr
cordon.
2. Branchez l’extrémité plus petite du cordon de charge dans le port de charge de l’appareil chargé.
3. Branchez la che USB dans le port USB (ci-dessus) sur le côté du Dual Star.
4. Pour réduire le temps de charge, assurez-vous que la lampe de poche n’est pas allumée.
5. Une fois que le périphérique connecté est complètement chargé, débranchez l’appareil que vous chargez pour conserver la batte-
rie restante stockée dans Dual Star.
Entretien
N’ouvrez pas le boîtier extérieur du DUAL STAR car il n’y a pas de pièces réparables par l’utilisateur. L’ouverture ou la tentative d’ouver-
ture du Dual Star annulera la garantie (à l’exception de l’insertion de la batterie selon ce mode d’emploi). Les ampoules à LED ne doivent
pas s’user dans des conditions normales et ne doivent pas être remplacées.
N’essayez jamais de démonter la batterie.
Uso de la linterna
Esta unidad cuenta con cuatro modos de luz: Alta, Baja, SOS y Strobe.
1. Para encender la luz, presione el botón “On / Off” hasta que haga clic y la luz se encienda. Este es el modo alto.
2. Para cambiar el modo de luz a Bajo, presione el botón “On / Off” nuevamente.
3. Para cambiar el modo de luz a Strobe, presione de nuevo el botón “On / Off”.
4. Para cambiar el modo de luz a SOS, mantenga presionado el botón “On / Off” durante tres segundos, en cualquier modo o
mientras esté apagado.
Uso de la linterna
Tire de la cabeza de la unidad lejos del cuerpo para revelar la linterna. Siga las instrucciones anteriores para encender la linterna.
Cargando
El cable USB a mini USB suministrado se utiliza al cargar la unidad o cuando se utiliza como fuente de alimentación para recargar otros
dispositivos.
Carga del Dual Star
1. Conecte el enchufe Mini USB en el puerto mini USB (mostrado arriba) en el lado del Dual Star.
2. Conecte el otro extremo del cable de carga en el puerto USB del adaptador de la clavija de alimentación o en el tomacorriente
USB apropiado.
3. Una vez conectados, los indicadores luminosos de carga parpadearán indicando que la unidad está cargando.
4. Para reducir el tiempo de carga, asegúrese de que la linterna no esté encendida.
5. Cuando los cuatro LEDs están mostrando una luz constante, la carga está completa y la batería está completamente cargada.
Indicador de carga
Directamente encima del interruptor “On / Off” hay 4 LEDs azules que muestran la energía de batería restante durante el uso y
cuando la unidad se está cargando. Cuatro LEDs iluminados indican que la unidad está completamente cargada. El número de LEDs
encendidos disminuirá a medida que la batería se agota, indicando cuando la batería debe estar
Uso como banco de energía
1. Si el dispositivo a cargar utiliza un mini enchufe del USB usted puede utilizar el cable incluido, si no usted necesitará utilizar su
propio cable.
2. Enchufe el extremo más pequeño del cable de carga en el puerto de carga del dispositivo para cargarlo.
3. Conecte el enchufe USB en el puerto USB (mostrado arriba) en el lado del Dual Star.
4. Para reducir el tiempo de carga, asegúrese de que la linterna no esté encendida.
5. Una vez que el dispositivo conectado esté completamente cargado, desconecte el dispositivo que está cargando para conservar la
energía restante de la batería almacenada en el Dual Star.
No abra la carcasa exterior del DUAL STAR, ya que no hay piezas que el usuario pueda reparar. Abrir o intentar abrir el Dual Star
anulará la garantía (con la excepción de insertar la batería según este manual del usuario). Los bulbos del LED no deben usarse en
condiciones normales y no necesitan ser substituidos.
Nunca intente desmontar la batería.
Utilizzando la torcia elettrica
Questa unità dispone di quattro modalità luce: Alta, Basso, SOS e Strobe.
1. Per accendere la luce, premere il pulsante “On / Off” nché non scatta e la spia si accende. Questa è High Mode.
2. Per cambiare la modalità luce su Bassa, premi nuovamente il pulsante “On / Off”.
3. Per cambiare la modalità luce su Strobe, premi nuovamente il pulsante “On / Off”.
4. Per cambiare la modalità luce su SOS, tenere premuto il pulsante “On / Off” per tre secondi, in qualsiasi modo o quando è spento..
Utilizzando la Lanterna
Tirare la testa dell’unità lontano dal corpo per rivelare la lanterna. Seguire le istruzioni riportate sopra per accendere la lanterna.
ricarica
Il cavo USB da mini USB fornito viene utilizzato quando si carica l’unità o quando viene utilizzato come fonte di alimentazione per
ricaricare altri dispositivi.
Caricamento del Dual Star
1. Inserire la spina Mini USB nella porta Mini USB (illustrata sopra) sul lato del Dual Star.
2. Collegare l’altra estremità del cavo di carica nella porta USB dell’adattatore della spina di rete o della presa appropriata del
caricatore USB.
3. Una volta collegato, i LED Indicatore di carica lampeggiano indicando che l’unità sta caricando.
4. Per ridurre il tempo di carica assicurarsi che la torcia elettrica non sia accesa.
5. Quando tutti e quattro i LED mostrano una luce costante, la ricarica è completa e la batteria è completamente carica.
Indicatore di carica
Direttamente sopra l’interruttore “On / Off” sono 4 LED blu che visualizzano la capacità residua della batteria durante l’uso e quando
l’unità è in carica. Quattro LED illuminati indicano che l’unità è completamente carica. Il numero di LED illuminati diminuirà quando la
batteria diventa esaurita indicando quando dovrebbe essere la batteria
Uso come banca di potenza
1. Se il dispositivo da caricare utilizza una spina mini USB è possibile utilizzare il cavo incluso, se non è necessario utilizzare il
proprio cavo.
2. Inserire l’estremità inferiore del cavo di carica nella porta di carica del dispositivo da caricare.
3. Inserire la spina USB nella porta USB (mostrata sopra) sul lato del Dual Star.
4. Per ridurre il tempo di carica assicurarsi che la torcia elettrica non sia accesa.
5. Una volta che il dispositivo collegato è completamente caricato, scollegare il dispositivo che si sta caricando per conservare la
potenza residua della batteria memorizzata nel Dual Star.
Manutenzione
Non aprire l’involucro esterno della DUAL STAR, in quanto non vi sono parti da riparare dall’utente. L’apertura o il tentativo di aprire la
Dual Star annulla la garanzia (ad eccezione dell’inserimento della batteria in base al presente manuale d’uso). Le lampadine a LED non
dovrebbero esaurirsi in condizioni normali e non devono essere sostituite.
Non tentare mai di smontare la batteria.
Mit der Taschenlampe
Dieses Gerät verfügt über vier Lichtmodi: High, Low, SOS und Strobe.
1. Um das Licht einzuschalten, drücken Sie die Taste “Ein / Aus”, bis es einrastet und das Licht einschaltet. Dies ist High Mode.
2. Um den Lichtmodus auf Niedrig zu stellen, drücken Sie erneut die Taste “Ein / Aus”.
3. Um den Lichtmodus auf Strobe zu ändern, drücken Sie erneut die Taste “Ein / Aus”.
4. Um den Lichtmodus auf SOS zu ändern, drücken Sie die Taste “Ein / Aus” für drei Sekunden, in jedem Modus oder während
ausgeschaltet.
Mit der Laterne
Ziehen Sie den Kopf der Einheit weg vom Körper, um die Laterne zu zeigen. Folgen Sie den Anweisungen oben, um die Laterne
einzuschalten.
Auaden
Das mitgelieferte USB-Mini-USB-Kabel wird beim Laden des Gerätes verwendet oder wenn es als Stromquelle zum Auaden anderer
Geräte verwendet wird.
Auaden des Dual Star
1. Stecken Sie den Mini-USB-Stecker in den Mini-USB-Port (siehe oben) auf der Seite des Dual Star.
2. Verbinden Sie das andere Ende des Ladekabels mit dem USB-Anschluss am Netzsteckeradapter oder dem entsprechenden
USB-Ladegerät.
3. Nach dem Anschließen blinken die Blinkanzeige-LEDs an, dass das Gerät aufgeladen wird.
4. Um die Ladezeit zu verkürzen, ist die Taschenlampe nicht eingeschaltet.
5. Wenn alle vier LEDs ein solides Dauerlicht aufweisen, ist der Ladevorgang abgeschlossen und der Akku ist voll aufgeladen.
Ladeanzeige
Direkt oberhalb des “On / Off” -Schalters benden sich 4 blaue LEDs, die während des Gebrauchs die verbleibende Batterieleistung
anzeigen und wenn das Gerät geladen wird. Vier beleuchtete LEDs zeigen an, dass das Gerät voll aufgeladen ist. Die Anzahl der
beleuchteten LEDs sinkt, wenn die Batterie erschöpft wird, wenn die Batterie vorhanden ist
Fortsetzung auf der nächsten Seite / Continued on the next page
Utilisation de la lampe de poche
Cet appareil comporte quatre modes de lumière: haut, bas, SOS et stroboscope.
1. Pour allumer la lumière, appuyez sur le bouton “On / Off” jusqu’à ce qu’il clique et que la lumière s’allume. C’est en mode haute.
2. Pour changer le mode lumière en Bas, appuyez à nouveau sur le bouton “Marche / Arrêt”.
3. Pour changer le mode de lumière sur Strobe, appuyez à nouveau sur le bouton “On / Off”.
4. Pour changer le mode de lumière sur SOS, appuyez sur le bouton “On / Off” et maintenez-le enfoncé pendant trois secondes, dans
n’importe quel mode ou lorsque vous éteignez.
Utilisation de la lanterne
Tirez la tête de l’unité loin du corps pour révéler la lanterne. Suivez les instructions ci-dessus pour allumer la lanterne.
Charger
Le câble USB à mini USB fourni est utilisé lors de la charge de l’appareil ou lorsqu’il est utilisé comme source d’alimentation pour
recharger d’autres appareils.
Chargement du Dual Star
1. Branchez la prise Mini USB dans le port mini USB (ci-dessus) sur le côté du Dual Star.
2. Connectez l’autre extrémité du l de charge au port USB de l’adaptateur secteur ou à la prise appropriée du chargeur USB.
3. Une fois connecté, les voyants du voyant de charge clignotent indiquant que l’unité est en cours de chargement.
4. Pour réduire le temps de charge, assurez-vous que la lampe de poche n’est pas allumée.
5. Lorsque les quatre voyants afchent une lumière stable, la charge est terminée et la batterie est complètement chargée.
Indicateur de charge
Directement au-dessus du commutateur “Marche / Arrêt” sont 4 LED bleues qui afchent la batterie restante pendant l’utilisation et
lorsque l’appareil se charge. Quatre LED éclairées indiquent que l’appareil est complètement chargé. Le nombre de voyants allumés
diminue à mesure que la batterie est épuisée indiquant quand la batterie devrait être
Utilisation en tant que Power Bank
1. Si le périphérique à charger utilise une mini prise USB, vous pouvez utiliser le cordon inclus, sinon vous devrez utiliser votre propre
cordon.
2. Branchez l’extrémité plus petite du cordon de charge dans le port de charge de l’appareil chargé.
3. Branchez la che USB dans le port USB (ci-dessus) sur le côté du Dual Star.
4. Pour réduire le temps de charge, assurez-vous que la lampe de poche n’est pas allumée.
5. Une fois que le périphérique connecté est complètement chargé, débranchez l’appareil que vous chargez pour conserver la batte-
rie restante stockée dans Dual Star.
Entretien
N’ouvrez pas le boîtier extérieur du DUAL STAR car il n’y a pas de pièces réparables par l’utilisateur. L’ouverture ou la tentative d’ouver-
ture du Dual Star annulera la garantie (à l’exception de l’insertion de la batterie selon ce mode d’emploi). Les ampoules à LED ne doivent
pas s’user dans des conditions normales et ne doivent pas être remplacées.
N’essayez jamais de démonter la batterie.
Uso de la linterna
Esta unidad cuenta con cuatro modos de luz: Alta, Baja, SOS y Strobe.
1. Para encender la luz, presione el botón “On / Off” hasta que haga clic y la luz se encienda. Este es el modo alto.
2. Para cambiar el modo de luz a Bajo, presione el botón “On / Off” nuevamente.
3. Para cambiar el modo de luz a Strobe, presione de nuevo el botón “On / Off”.
4. Para cambiar el modo de luz a SOS, mantenga presionado el botón “On / Off” durante tres segundos, en cualquier modo o
mientras esté apagado.
Uso de la linterna
Tire de la cabeza de la unidad lejos del cuerpo para revelar la linterna. Siga las instrucciones anteriores para encender la linterna.
Cargando
El cable USB a mini USB suministrado se utiliza al cargar la unidad o cuando se utiliza como fuente de alimentación para recargar otros
dispositivos.
Carga del Dual Star
1. Conecte el enchufe Mini USB en el puerto mini USB (mostrado arriba) en el lado del Dual Star.
2. Conecte el otro extremo del cable de carga en el puerto USB del adaptador de la clavija de alimentación o en el tomacorriente
USB apropiado.
3. Una vez conectados, los indicadores luminosos de carga parpadearán indicando que la unidad está cargando.
4. Para reducir el tiempo de carga, asegúrese de que la linterna no esté encendida.
5. Cuando los cuatro LEDs están mostrando una luz constante, la carga está completa y la batería está completamente cargada.
Indicador de carga
Directamente encima del interruptor “On / Off” hay 4 LEDs azules que muestran la energía de batería restante durante el uso y
cuando la unidad se está cargando. Cuatro LEDs iluminados indican que la unidad está completamente cargada. El número de LEDs
encendidos disminuirá a medida que la batería se agota, indicando cuando la batería debe estar
Uso como banco de energía
1. Si el dispositivo a cargar utiliza un mini enchufe del USB usted puede utilizar el cable incluido, si no usted necesitará utilizar su
propio cable.
2. Enchufe el extremo más pequeño del cable de carga en el puerto de carga del dispositivo para cargarlo.
3. Conecte el enchufe USB en el puerto USB (mostrado arriba) en el lado del Dual Star.
4. Para reducir el tiempo de carga, asegúrese de que la linterna no esté encendida.
5. Una vez que el dispositivo conectado esté completamente cargado, desconecte el dispositivo que está cargando para conservar la
energía restante de la batería almacenada en el Dual Star.
No abra la carcasa exterior del DUAL STAR, ya que no hay piezas que el usuario pueda reparar. Abrir o intentar abrir el Dual Star
anulará la garantía (con la excepción de insertar la batería según este manual del usuario). Los bulbos del LED no deben usarse en
condiciones normales y no necesitan ser substituidos.
Nunca intente desmontar la batería.
Utilizzando la torcia elettrica
Questa unità dispone di quattro modalità luce: Alta, Basso, SOS e Strobe.
1. Per accendere la luce, premere il pulsante “On / Off” nché non scatta e la spia si accende. Questa è High Mode.
2. Per cambiare la modalità luce su Bassa, premi nuovamente il pulsante “On / Off”.
3. Per cambiare la modalità luce su Strobe, premi nuovamente il pulsante “On / Off”.
4. Per cambiare la modalità luce su SOS, tenere premuto il pulsante “On / Off” per tre secondi, in qualsiasi modo o quando è spento..
Utilizzando la Lanterna
Tirare la testa dell’unità lontano dal corpo per rivelare la lanterna. Seguire le istruzioni riportate sopra per accendere la lanterna.
ricarica
Il cavo USB da mini USB fornito viene utilizzato quando si carica l’unità o quando viene utilizzato come fonte di alimentazione per
ricaricare altri dispositivi.
Caricamento del Dual Star
1. Inserire la spina Mini USB nella porta Mini USB (illustrata sopra) sul lato del Dual Star.
2. Collegare l’altra estremità del cavo di carica nella porta USB dell’adattatore della spina di rete o della presa appropriata del
caricatore USB.
3. Una volta collegato, i LED Indicatore di carica lampeggiano indicando che l’unità sta caricando.
4. Per ridurre il tempo di carica assicurarsi che la torcia elettrica non sia accesa.
5. Quando tutti e quattro i LED mostrano una luce costante, la ricarica è completa e la batteria è completamente carica.
Indicatore di carica
Direttamente sopra l’interruttore “On / Off” sono 4 LED blu che visualizzano la capacità residua della batteria durante l’uso e quando
l’unità è in carica. Quattro LED illuminati indicano che l’unità è completamente carica. Il numero di LED illuminati diminuirà quando la
batteria diventa esaurita indicando quando dovrebbe essere la batteria
Uso come banca di potenza
1. Se il dispositivo da caricare utilizza una spina mini USB è possibile utilizzare il cavo incluso, se non è necessario utilizzare il
proprio cavo.
2. Inserire l’estremità inferiore del cavo di carica nella porta di carica del dispositivo da caricare.
3. Inserire la spina USB nella porta USB (mostrata sopra) sul lato del Dual Star.
4. Per ridurre il tempo di carica assicurarsi che la torcia elettrica non sia accesa.
5. Una volta che il dispositivo collegato è completamente caricato, scollegare il dispositivo che si sta caricando per conservare la
potenza residua della batteria memorizzata nel Dual Star.
Manutenzione
Non aprire l’involucro esterno della DUAL STAR, in quanto non vi sono parti da riparare dall’utente. L’apertura o il tentativo di aprire la
Dual Star annulla la garanzia (ad eccezione dell’inserimento della batteria in base al presente manuale d’uso). Le lampadine a LED non
dovrebbero esaurirsi in condizioni normali e non devono essere sostituite.
Non tentare mai di smontare la batteria.
Mit der Taschenlampe
Dieses Gerät verfügt über vier Lichtmodi: High, Low, SOS und Strobe.
1. Um das Licht einzuschalten, drücken Sie die Taste “Ein / Aus”, bis es einrastet und das Licht einschaltet. Dies ist High Mode.
2. Um den Lichtmodus auf Niedrig zu stellen, drücken Sie erneut die Taste “Ein / Aus”.
3. Um den Lichtmodus auf Strobe zu ändern, drücken Sie erneut die Taste “Ein / Aus”.
4. Um den Lichtmodus auf SOS zu ändern, drücken Sie die Taste “Ein / Aus” für drei Sekunden, in jedem Modus oder während
ausgeschaltet.
Mit der Laterne
Ziehen Sie den Kopf der Einheit weg vom Körper, um die Laterne zu zeigen. Folgen Sie den Anweisungen oben, um die Laterne
einzuschalten.
Auaden
Das mitgelieferte USB-Mini-USB-Kabel wird beim Laden des Gerätes verwendet oder wenn es als Stromquelle zum Auaden anderer
Geräte verwendet wird.
Auaden des Dual Star
1. Stecken Sie den Mini-USB-Stecker in den Mini-USB-Port (siehe oben) auf der Seite des Dual Star.
2. Verbinden Sie das andere Ende des Ladekabels mit dem USB-Anschluss am Netzsteckeradapter oder dem entsprechenden
USB-Ladegerät.
3. Nach dem Anschließen blinken die Blinkanzeige-LEDs an, dass das Gerät aufgeladen wird.
4. Um die Ladezeit zu verkürzen, ist die Taschenlampe nicht eingeschaltet.
5. Wenn alle vier LEDs ein solides Dauerlicht aufweisen, ist der Ladevorgang abgeschlossen und der Akku ist voll aufgeladen.
Ladeanzeige
Direkt oberhalb des “On / Off” -Schalters benden sich 4 blaue LEDs, die während des Gebrauchs die verbleibende Batterieleistung
anzeigen und wenn das Gerät geladen wird. Vier beleuchtete LEDs zeigen an, dass das Gerät voll aufgeladen ist. Die Anzahl der
beleuchteten LEDs sinkt, wenn die Batterie erschöpft wird, wenn die Batterie vorhanden ist
Fortsetzung auf der nächsten Seite / Continued on the next page


