manuals.online logo
Brands
  1. Home
  2. •
  3. Brands
  4. •
  5. Niigata seiki
  6. •
  7. Measuring Instrument
  8. •
  9. Niigata seiki EOM133 Series User manual

Niigata seiki EOM133 Series User manual

SR44
ON/OFF
SET
0
0
45
40
5
30
35
40
ON/OFF
SET
ABS
25 30 3
0
45
40
5
ON/OFF
SET
0
0
45
40
5
30
35
40
25
ON/OFF
SET
0 5 1
0
45
40
5
ON/OFF
SET
0
45
40
5
ON/OFF
SET
ABS
0
45
40
5
ON/OFF
SET
ABS
0
45
40
5
DIGITAL OUTSIDE MICROMETER
Niigata seiki Co., Ltd.
5-3-14, Tsukanome, Sanjo, Niigata, Japan, 955-0055
Tel. : +81-256-33-5522 Fax. : +81-256-33-5518
MAIL [email protected]
URL http://www.niigataseiki.co.jp
Clean measuring surfaces
with cloth.
Confirm 0-Point setting and
re-zero withlong press of
[SET] Button (> 2 sec.)
Cycle power by removing
and replacing battery.
Replace battery with new
one.
Measured value is
wrong.
PRECISION OUTSIDE MEASURING INSTRUMENT
EOM133
-
***
Model
No.
INSTRUCTION MANUAL
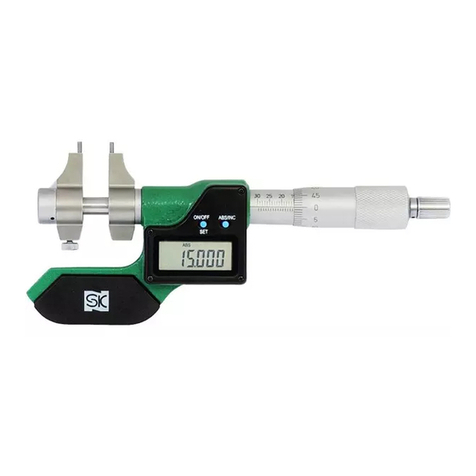
Thank you for purchasing the Niigata Seiki DIGITAL OUTSIDE MICROMETER.
This precision gauge measures outside dimension of object placed between the Anvil and Spindle.
For safe and proper use of this product, please read this instruction manual before use and follow the procedures described.
Please keep manual where it is accessible to user for future reference.
Keep this manual with the instrument if transferred or leased to a third party.
For inquiries about this product, please contact dealer or Niigata Seiki at the address listed on the following page.
■
PART
IDENTIFICATION
SPECIFICATIONS
FEATURES
TROUBLESHOOTING
Weight
(g)
265
380
460
600
515
560
4
6
Accuracy
※
(µ
m
)
Meas. Range
(mm)
0−25
25−50
50−75
75−100
100−125
125−150
Model No.
EOM133
-
25
EOM133
-
50
EOM133
-
75
EOM133
-
100
EOM133
-
125
EOM133
-
150
Resolution:0.001mm
Power:SR44 (Silver Oxide Battery)
Ratchet stop.Carbide measuring surfaces.
Spherical Anvil Attachment (SR2.5) included.
Auto-display-off function (approx. 6 minutes.)
SR44 (silver oxide battery) included for testing.
Insulating cover・Thermal shield
SAFETY PLEASE OBSERVE
Always follow the procedures specified below in order to prevent harm
to yourself or others, and to prevent damage to property.
Indicates risk of personal injury or property
damage if not followed.
CAUTION
Always clean measuring surfaces with soft cloth before use.
Do not turn spindle more than 3mm above upper
measurement range.
This is a precision instrument, handle with care. Do not
drop or subject to excessive forces.
Keep away form high voltage and strong magnetic fields.
Instrument damage may result.
Keep instrument away from direct sunlight or high
temperatures such as in a car, or near a stove or heat source.
Do not disassemble or modify.
Please do not use organic solvents to clean the body of
the instrument.
When not being used for long period of time, please
remove battery.
Only use
as directed. Improper use may cause accident or injury.
※
Not incl. quantization error (±1 count)
Clamp
Spindle
Anvil
(Fixed Side)
0-Point
Adj. Hole
Frame
Insulating
Cover
[ON/OFF] Button,
[SET] Button
LCDDisplay
Meas. SurfacesSleeve
Thimble
Ratchet Stop
(Carbide Tips)
Battery
Cover
Spherical (Ball)
Attachment
【REAR】 【FRONT】
【ACCS.】
Spanner
Calibration Std.
(Not w/ EOM133-25)
SR44
(Silver Oxide Cell)
※For Test
The gauge is now ready totake measurements.
EOM133-25・・・・・ 0.000 ●EOM133-50・・・・ 25.000
EOM133-75・・・・ 50.000 ●EOM133-100・・・75.000
EOM133-125・・ 100.000 ●EOM133-150・・125.000
SETTINGTHEZERO-POINT
BATTERYOPERATIONBALLANVIL
①Remove any grease or dust from the measuring surfaces
using a clean cloth, such as lens cleaning cloth. Make sure
no foreign objects are adhered tothe measuring surfaces.
②Place object to be measured between the Anvil and Spindle.
③With the Thimble Clamp loose, turn the Thimble to capture
the measured object between the measuring surfaces.
Stop after 1~3 “Clicks” from the Ratchet Stop. (Fig. 5)
④The measured value is displayed on the LCD display.
※Measurement can also be read off Thimble and Sleeve as
with a standard micrometer.
POWER
The Spherical (Ball) Anvil Attachment can be attached
as required.
After mounting, please set 0-Point following the procedure
“Setting the Zero-Point” above.
※
CARE
Meas. surfaces touch
Press for > 2 sec.
Match origin lines
Rotate until origins match
When the Spherical Attachment is attached, the measurement
indicated on the Sleeve scale will read 5mm larger than
actual size. (Fig. 6)
If any cutting fluid or moisture gets on the instrument body, wipe
using a soft dry cloth to prevent corrosion.
After use, remove any cutting chips or contamination using a soft
cloth and apply rust preventative oil. Keep out of reach of children.
Fig.3
Lock
Loosen
Fig. 4
Fig.5
Fig.6
Fig.2
Fig.1
①Remove any grease or dust from the measuring surfaces
using a clean cloth, such as a lenscleaning cloth. Make sure
no foreign matter is adhered to the measuring surfaces.
②With Spindle Clamp loose, turn until measuring surfaces
touch. Turn until Ratchet Stop clicks 1~3 times. (Fig. 1)
※For models other than EOM133-25, please insert the
supplied Calibration Standard between measuring surfaces.
③To align the Thimble Scale 0-Point reference lines.(Fig.2)
1. Tighten Spindle Clamp to lock Spindle.
2. Insert the spanner into 0-point Adjustment Hole on rear
of Thimble.
3. Use spanner to rotate Sleeve to align the 0-Point lines. (Fig. 3)
④Press the [SET] Button for more than two seconds. (Fig. 4)
LCD will display “SET” for 0.5 seconds, and then the
display will read as shown below:
"Click Click"
Ratchet
Stop
Clamp
Workpiece
Sleeve reading = Meas. + 5mm
Spherical Attachment
[SET] Button
Spanner
Thimble
Ratchet
Stop
Battery
Cover
①Rotate the Battery Cover on rear
using coin or similar tool.
②Insert battery with“+” side up.
③Replace Battery Cover.
When [ON/OFF] Button is pressed, power is turned ON, and
measurement is displayed on the LCD.
Press [ON/OFF] Button a second time to turn power OFF.
Setting the origin used for measurements.
Once set, even when power is off the origin is saved and
does not have to be reset with each use.
When battery is replaced origin will go to default setting,
please reset.
Make sure the Battery Cover is closed
securely. Please make sure the gasket is
in the proper place on the Battery Cover.
Only use SR44 type
battery.
CAUTION
Open
ERROR CORRECTIVE ACTION
LCD does not display.
Displayed value is
unstable.
Display is not clear.
※If problem persists, or if you have any questions, please contact
distributor or place of purchase.
※Please note, manufacturer is unable to respond to inquires or provide
service directly. Please contact distributor or place of purchase.
EOM133-125
EOM133-150
※No Insulating Cover
Thermal
Shield
●
●
●
●
●
●●
●
●
●
●
●
●
●
●
●
●
●
●
●
●
●
●
●
●
●
●
●
●
●
●
●
●
"ClickClick"
All manuals and user guides at all-guides.com
SR44
ON/OFF
SET
0
0
45
40
5
30
35
40
ON/OFF
SET
ABS
25 30 3
0
45
40
5
ON/OFF
SET
0
0
45
40
5
30
35
40
25
ON/OFF
SET
0 5 1
0
45
40
5
ON/OFF
SET
0
45
40
5
ON/OFF
SET
ABS
0
45
40
5
ON/OFF
SET
ABS
0
45
40
5
デジタル外側マイクロメータ
精密外側測定器
EOM133
-
***
品番
取扱説明書
この度は「デジタル外側マイクロメータ」をお買上げいただきありがとうございます。
この商品はアンビルとスピンドルで測定対象物を挟み、外側長さを測定する精密測定器です。
●正しく安全にお使いいただくため、ご使用の前に本取扱説明書を必ず読み、記載の手順に従ってご使用ください。
お読みになった後は、お使いになる方がいつでも見ることができる場所に大切に保管してください。
●第三者に譲渡・貸与される場合も、この説明書を必ず添付してください。
●当商品に関するお問い合わせは、お買い求めの販売店もしくは当社にご連絡ください。
■各部の名称
発売元
〒955-0055
新潟県三条市塚野目5丁目3番14号
(0256)33-5502(代)FAX(0256)33-5528
URL http://www.niigataseiki.co.jp
20062000E1141-Q
製品仕様 特長
トラブルと対応
質量
(g)
265
380
460
600
515
560
4
6
最大許容誤差
※
(µm)
測定範囲
(mm)
0−25
25−50
50−75
75−100
100−125
125−150
品 番
EOM133
-
25
EOM133
-
50
EOM133
-
75
EOM133
-
100
EOM133
-
125
EOM133
-
150
●最小読取値:0.001mm
●電源:SR44(酸化銀電池)
●測定面は超硬チップ付   ●防熱カバー・防熱板付 
●球面アタッチメント付(SR2.5)    ●定圧装置付
●オートディスプレイオフ機能付(約6分)
●SR44(酸化銀電池)テスト用1個付属
安全上のご注意 必ずお守りください
お使いになる人や他の人への危害、財産への損害を未然に防止するた
め、必ずお守りいただくことを下記のように説明しています。
お守りいただかないと『傷害を負う、また は 物的損害が発生
するおそれがある内容』です。
注意
●ご使用の前に、必ずグラスペーパなどで測定面の汚れを
除去してください。
●測定範囲の上限を3mm以上上回って、スピンドルを回さ
ないでください。
●精密機器ですので、落としたりぶつけたり、強い力を加
えたりしないでください。
●強い磁気や高電圧に近付けないでください。故障の恐れ
があります。
●直射日光の当たる場所や炎天下の車の中、火のそばなど
での使用、保管はしないでください。
●分解・改造をしないでください。
●本体の手入れに有機溶剤を使用しないでください。
●長期間使用しない場合は、本体から電池を外して保管し
てください。
●用途以外のご使用は、事故やけがの原因となりますので
絶対におやめください。
※ 量 子 化 誤 差( ± 1カ ウ ン ト )含 ま ず
クランプ
スピ ンドル
アンビル
(固定側)
0点調整穴
フレーム
防熱カバー
ON/OFFボタン、
SETボタン
LCD表示部
測定面 スリーブ
シンブル
ラ チェットストップ
( 超 硬 チ ップ )
電池蓋
球面
アタッチメント
【裏面】 【表面】
【付属品】
キ ース パ ナ
基準棒
(EOM133-25を 除く)
SR44(酸化銀電池)
※テスト用
通常測定で使用する原点を設定します。
この原点は、電源をOFFにしても記憶されますので、毎回設
定し直す必要はありません。
電池交換後はリセットされますので、再度設定し直してくだ
さい。
①アンビル・スピンドルの測定面を脱脂し、グラスペーパな
どで拭き取って異物が付着していない状態にしてください。
②クランプを回してゆるめ、ラチェットストップを持って回
し、測定面を合わせます。
測定面が合ってから、ラチェットが「カチカチ」と1〜3回
鳴った所で停止してください。
※EOM133-25以外は、測定面の間に付属の基準棒をはさんで
合わせてください。
③基準線目盛の『0』にシンブルの『0』目盛が一致していれ
ば、スリーブ・シンブルの0点が合っています。
一致していない場合は、下記の手順で0点を合わせてください。
 1. クランプを回してシンブルを固定する。
 2. キースパナをスリーブ裏面の0点調整穴に入れる。
 3. 0点 が 一 致 す る ま で 、キ ー ス パ ナ で ス リ ー ブ を 回 す 。
④SETボタンを2秒以上長押ししてください。
LCD表示部に『Set』が0.5秒ほど点灯後、数字の表示が下
記のように表示されます。
  ●EOM133-25・・・・・ 0.000 ●EOM133-50・・・・25.000
 ●EOM133-75・・・・50.000 ●EOM133-100・・・75.000
 ●EOM133-125・・100.000 ●EOM133-150・・125.000
 これで測定の準備ができました。
原点の設定
電池の入れ方
使用方法
球面アタッチメント
①アンビル・スピンドルの測定面を脱脂し、グラスペーパな
どで拭き取って異物が付着していない状態にしてください。
②アンビルとスピンドルの間に被測定物を入れます。
③クランプを回してゆるめ、ラチェットストップを持ってシ
ンブルを回し、測定面で被測定物を挟みます。ラチェット
が『カチカチ』と鳴ったところから1〜3回転させたところ
で停止してください。
④LCD表示部に表示された数値が、測定値となります。
※通常のマイクロメータ同様にスリーブとシンブルの目盛を
読み取ることもできます。
電源
ON/OFFボタンを押すと電源がONになり、LCD表示部に数値
が表示されます。もう一度押すと電源がOFFになります。
必要に応じてアンビルまたはスピンドルの測定面に、球面ア
タッチメントを取り付けてください。
球面アタッチメント取付後、上記『原点の設定』を参照して
0点を合わせてください。
※球面アタッチメント取付時にスリーブとシンブルの目盛を
読む場合は、測定値はスリーブの表示値より5mmマイナス
としてください。
使用後の
お手入れ
●切削液等が本体にかかった場合は、柔らかい乾いた布で水分を拭き
取ってください。そのまま放置すると錆の原因となります。
●使用後は、柔らかい布などでゴミや切粉などを取り除き、防錆油を
塗布してお子様の手の届かない場所へ保管してください。
測定面を合わせる
2秒以上長押し
原点が合っていることを確認
原点が合うまで回す
図5
図6
図4
図3
図3
締める
ゆるめる
図4
図5
図6
図2
図1
図2
図1
カチカチ
ラ チェット
ストップ
クランプ
被測定物を挟む
スリーブの表示値より5マイナス
カチカチ
球面アタッチメント
SETボタン
キースパナ
シンブル
ラ チェット
ストップ
電池蓋
①本体裏面の電池蓋を、矢印の向きに
コインなどで回して開けます。
②電池を必ず(+)側を表にしてセット
してください。
③電池蓋を元通りに装着してください。
電池蓋は確実に閉めてください。
パッキンが電池蓋から外れていないこ
とを確認してください。
電池は必ずSR44をお使いく
ださい。
ご注意
開ける
トラブ ル の 内 容 対応策
●測定値が間違ってい
る
●
測定面の汚れをグラスペー
パなどで拭き取ってください。
●0点 が 合 って い る か 確 認 し 、
SETボタン を2秒 以 上 長 押
してくだ さ い 。
●LCD表示部に何も表
示されない
●表示が安 定しない
●表示が不明確である
●電 池 を 入 れ 直 してくだ さ い 。
●新 し い 電 池 と 交 換してくだ
さい。
※症状が改善されない場合や不明な点がございましたらお買い上げの販
売店、または発売元までご連絡ください。
※お問い合わせや、ご連絡が無いまま直接発売元に修理品などを送付さ
れても処理、対応ができない場合がありますのでご了承ください。
EOM133-125
EOM133-150
※防 熱カバーなし
防熱板
All manuals and user guides at all-guides.com

This manual suits for next models

6

Other Niigata seiki Measuring Instrument manuals

Niigata seiki DITG-30PJ User manual

Niigata seiki

Niigata seiki DITG-30PJ User manual

Niigata seiki WCDI-50D User manual

Niigata seiki

Niigata seiki WCDI-50D User manual

Niigata seiki WR-100 User manual

Niigata seiki

Niigata seiki WR-100 User manual

Niigata seiki DUP-360AN User manual

Niigata seiki

Niigata seiki DUP-360AN User manual

Niigata seiki TVC-60 User manual

Niigata seiki

Niigata seiki TVC-60 User manual

Niigata seiki WCDI-35D User manual

Niigata seiki

Niigata seiki WCDI-35D User manual

Niigata seiki DTW-DG02 User manual

Niigata seiki

Niigata seiki DTW-DG02 User manual

Niigata seiki S Series User manual

Niigata seiki

Niigata seiki S Series User manual

Niigata seiki DP-90G EX User manual

Niigata seiki

Niigata seiki DP-90G EX User manual

Niigata seiki CJU BKD Series User manual

Niigata seiki

Niigata seiki CJU BKD Series User manual

Niigata seiki JLVC-30 User manual

Niigata seiki

Niigata seiki JLVC-30 User manual

Niigata seiki QEM394 Series User manual

Niigata seiki

Niigata seiki QEM394 Series User manual

Niigata seiki GDCS-150D User manual

Niigata seiki

Niigata seiki GDCS-150D User manual

Niigata seiki TVC-15S User manual

Niigata seiki

Niigata seiki TVC-15S User manual

Niigata seiki GDCS-150NP User manual

Niigata seiki

Niigata seiki GDCS-150NP User manual

Niigata seiki LSL-26 User manual

Niigata seiki

Niigata seiki LSL-26 User manual

Niigata seiki D IP67S Series User manual

Niigata seiki

Niigata seiki D IP67S Series User manual

Niigata seiki GDCS-150D User manual

Niigata seiki

Niigata seiki GDCS-150D User manual

Niigata seiki GVC KDE Series User manual

Niigata seiki

Niigata seiki GVC KDE Series User manual

Niigata seiki GVC Series User manual

Niigata seiki

Niigata seiki GVC Series User manual

Niigata seiki MCD3385-0608HTN User manual

Niigata seiki

Niigata seiki MCD3385-0608HTN User manual

Niigata seiki BB-180A User manual

Niigata seiki

Niigata seiki BB-180A User manual

Niigata seiki DP-180 User manual

Niigata seiki

Niigata seiki DP-180 User manual

Niigata seiki TVC-15S User manual

Niigata seiki

Niigata seiki TVC-15S User manual

Popular Measuring Instrument manuals by other brands

Thermo Scientific iS5N Series user guide

Thermo Scientific

Thermo Scientific iS5N Series user guide

PASCO PS-2600 BATTERY REPLACEMENT INSTRUCTIONS

PASCO

PASCO PS-2600 BATTERY REPLACEMENT INSTRUCTIONS

ZyXEL Communications VANTAGE REPORT 2.3 - datasheet

ZyXEL Communications

ZyXEL Communications VANTAGE REPORT 2.3 - datasheet

Keysight 3458A Assembly-Level Repair Manual

Keysight

Keysight 3458A Assembly-Level Repair Manual

OWL OWL user manual

OWL

OWL OWL user manual

Luna LSM Series Maintenance and user manual

Luna

Luna LSM Series Maintenance and user manual

Fluke 1630 Calibration information

Fluke

Fluke 1630 Calibration information

Enerdis Enerium 100 installation manual

Enerdis

Enerdis Enerium 100 installation manual

Sper scientific 840045 manual

Sper scientific

Sper scientific 840045 manual

YOKOGAWA 700929 user manual

YOKOGAWA

YOKOGAWA 700929 user manual

Tektronix VM700A VMTB user manual

Tektronix

Tektronix VM700A VMTB user manual

Aplisens PMS-970 user manual

Aplisens

Aplisens PMS-970 user manual

HP 437B Service manual

HP

HP 437B Service manual

Boshi Electronic Instrument GY-4 user manual

Boshi Electronic Instrument

Boshi Electronic Instrument GY-4 user manual

Worldcast Systems Audemat FM Monitor Quick Start Notice

Worldcast Systems

Worldcast Systems Audemat FM Monitor Quick Start Notice

RS PRO RS-171V instruction manual

RS PRO

RS PRO RS-171V instruction manual

Kaiweets HT200B user manual

Kaiweets

Kaiweets HT200B user manual

Aktakom ATK-2001 user manual

Aktakom

Aktakom ATK-2001 user manual

manuals.online logo
manuals.online logoBrands
  • About & Mission
  • Contact us
  • Privacy Policy
  • Terms and Conditions

Copyright 2025 Manuals.Online. All Rights Reserved.