manuals.online logo
Brands
  1. Home
  2. •
  3. Brands
  4. •
  5. Niigata seiki
  6. •
  7. Measuring Instrument
  8. •
  9. Niigata seiki SCG Series User manual

Niigata seiki SCG Series User manual

20
30
38
36 24
34 26
22
32 28
0.01 mm
2:1
0
10
20
30
40
60
160
140
50 150
70
170
130
80
180
120
90
190
110
100
20
30
38
36 24
34 26
22
32 28
0.01 mm
2:1
0
10
20
30
40
60
160
140
50 150
70
170
130
80
180
120
90
190
110
100
20
30
38
36 24
34 26
22
32 28
0.01 mm
2:1
0
10
20
30
40
60
160
140
50 150
70
170
130
80
180
120
90
190
110
100
19,58
HOLECHAMFERMEASUREMENT
SCG-***
Model
No.
INSTRUCTION MANUAL
Thank you for purchasing the S-LINE CHAMFER GAUGE.
This precision instrument performs a simple yet highly accurate measurement of chamfer maximum diameter.
Forsafe and proper use of this product, please read this instruction manual before use and follow the procedures
described. Please keep manual where it is accessible to user for future reference.
Keep this manual with the instrument if transferred or leased to a third party.
For inquiries about this product, please contact dealer or Niigata Seiki at the address listed on the following page.
※Model SCG-4090shownAlways follow the procedures specified below in order to
prevent harm to yourself or others, and to prevent damage to
property.
If Gauge does not operate properly, or if you have any
questions, please contact distributor or place of purchase.
Please note, manufacturer is unable to respond to inquires or
provide service directly. Please contact distributor or place of
purchase.
Clean outside surfaces regularly using a cloth to remove any dirt or contamination.
After use, place in a rust preventive bag or use a corrosion inhibiting oil for protection.
If surfaces are dirty, wipe with a clean cloth moistened with a cleaner such as Niigata Seiki STC-500.
Store in location protected from direct sunlight and humidity, and accessible only to authorized personnel.
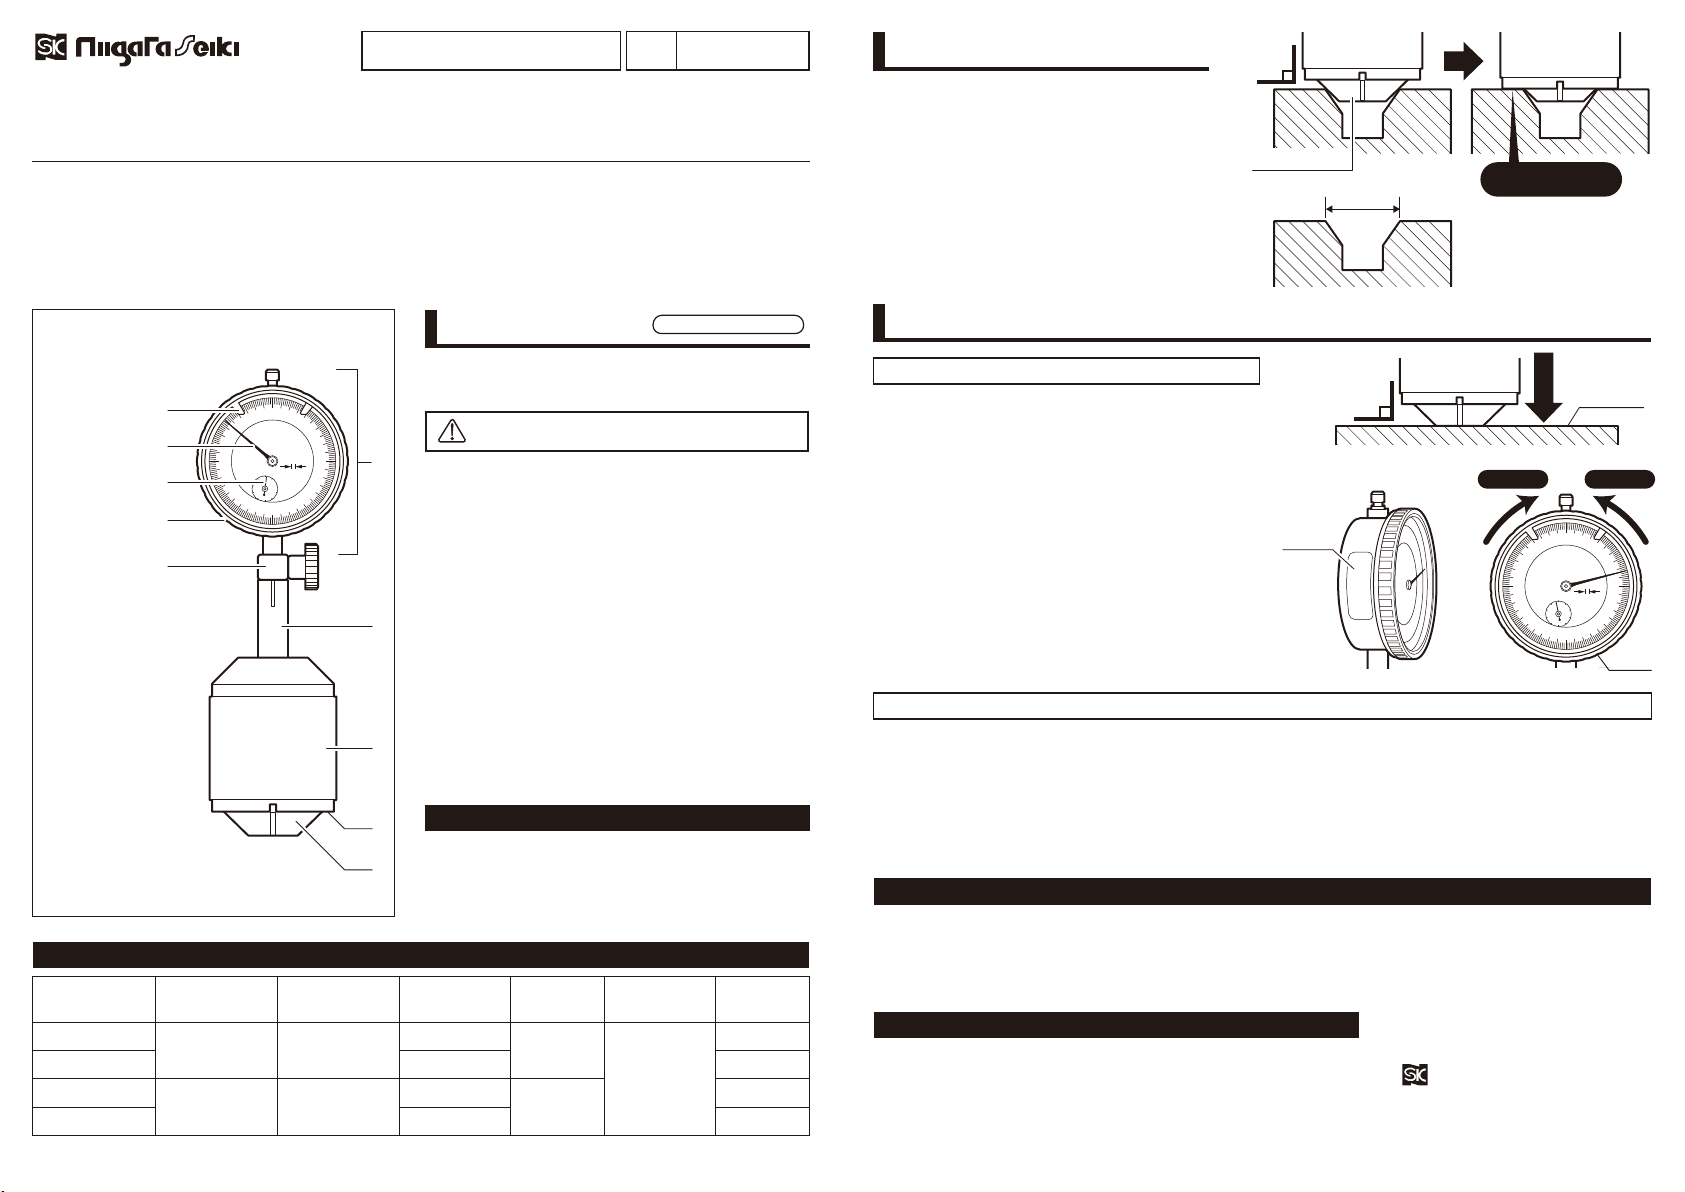
①
②
A smooth, hard surface is required as Reference
Surface.
Place the Measurement Head perpendicular to
the Flat Reference Surface and slowly push in
until there is no gap. (Fig 3)
The number printed on the side of the Dedicated
Gauge is the Reference Value used for zero
adjustment. (Fig. 4)
Adjust the reading to match the Reference Value
by rotating the Bezel of the Dedicated Gauge.
(Fig. 5)
When the Gauge Reading matches the Reference
Value, the zero adjustment is complete.
③
※Repeat the measurement several times to
confirm that the value is stable.
①
②
Hold the Measurement Head perpendicular
to the workpiece and slowly push in until
there is no gap between the workpiece
and the Measurement Head Reference
Surface. (Fig. 1)
The Dial Gauge will indicate the maximum
diameter of the chamfer. (Fig. 2)
※Zero point is set at factory, but we recommend
periodic adjustment as required.
①Prepare an ID Chamfer Reference Standard for use.
②Hold the Measurement Head perpendicular to the Reference Standard and slowly push in until
there is no gap between the Reference Standard and the Measurement Head Reference Surface.
③Adjust the reading to match the Reference Standard by rotating the Bezel of the Dedicated Gauge.
(Fig. 5) When the Gauge Reading matches the Reference Standard, the Zero Adjustment is complete.
※Repeat the measurement several times to confirm that the Value is stable.
SCG
−
2090
Model Measurement
Taper Angle
Range
(mm)
Graduations
(mm)
Accuracy
(mm)
Weight
(mm)
Usable Chamfer
Angle Range
SCG
−
4090
SCG
−
20127
SCG
−
40127
90°
127°
90°
or Less
90°〜120°
0.5〜20
20〜40
0.5〜20
20〜40
0.01
0.02
±0.015
340
640
340
640
1.
Dedicated Dial Gauge
※Can not be removed
or replaced.
2. Limit Markers
3. Pointer
4. Short Hand
5. Bezel
6. Gauge Mount
7. Shaft
8. Meas. Head
9. Ref. Surface
10. Meas. Taper
3
4
2
1
5
6
7
8
10
9
(Fig.1)
Meas. Head
Meas. Head
Bezel
Reference
Surface
Ref.
Value
(Fig.2)
(Fig.5)
(Fig.3)
(Fig.4)
●
●
●
Measurement Head and Measurement Taper are
hardened steel and sensitive to corrosion. Please
keep well protected with rust inhibitor when not in
use.
Only use with the dedicated Dial Gauge. Use of
any other gauge will cause reading error.
Do not remove Dial Gauge, or loosen the holding
screw. Loosening screw will cause reading
inaccuracy.
Use care when contacting Measuring Head to
workpiece and avoid impact; there is risk of
damage to Measurement Taper.
Instrument is designed for measuring the ID
chamfer max. diameter.
Use for any other purpose may cause accident or
injury.
●
●
The chamfer diameter (max diameter) for a
range of chamfer angles can be measured.
Dedicated Dial Gauge for direct reading of
measurement.
Meas. Taper
●
●
●
Indicates risk of or
if not followed.
●
●
●
●
●
●
●
●
S-LINE INTERNAL CHAMFER GAUGE
SAFETY PLEASE OBSERVE
CAUTION:
personal injury
property damage
APPLICATIONS & FEATURES
AFTER USE CARE, STORAGE
REPAIRS AND SERVICE
SPECIFICATION
■PART IDENTIFICATION
MEASUREMENT
Push in until there
is no gap
Value+
Press
Value−
Diam.
90°
90°
ZERO ADJUSTMENT
Setting Zero Point on Flat Reference Surface
Setting Zero Point Using a Reference Standard
Niigata seiki Co., Ltd.
5-3-14, Tsukanome, Sanjo, Niigata, Japan, 955-0055
Tel. : +81-256-33-5522 Fax. : +81-256-33-5518
MAIL [email protected]
URL http://www.niigataseiki.co.jp
20
30
38
36 24
34 26
22
32 28
0.01 mm
2:1
0
10
20
30
40
60
160
140
50 150
70
170
130
80
180
120
90
190
110
100
20
30
38
36 24
34 26
22
32 28
0.01 mm
2:1
0
10
20
30
40
60
160
140
50 150
70
170
130
80
180
120
90
190
110
100
20
30
38
36 24
34 26
22
32 28
0.01 mm
2:1
0
10
20
30
40
60
160
140
50 150
70
170
130
80
180
120
90
190
110
100
19,58
Sライン内径面取りゲージ
面取り加工穴測定器
SCG-***
品番
取扱説明書
この度は「Sライン内径面取りゲージ」をお買上げいただきありがとうございます。
この商品は内径面取り及びテーパ部の最大径を、簡単・高精度に測定することが可能な精密測定器です。
●正しく安全にお使いいただくため、ご使用の前に本取扱説明書を必ず読み、記載の手順に従ってご使用ください。
お読みになった後は、お使いになる方がいつでも見ることができる場所に大切に保管してください。
●第三者に譲渡・貸与される場合も、この説明書を必ず添付してください。
●当商品に関するお問い合わせは、お買い求めの販売店もしくは当社にご連絡ください。
■各部の名称 ※イラストは SCG-4090 安全上のご注意 必ずお守りください
お使いになる人や他の人への危害、財産への損害を未然に防
止するため、必ずお守りいただくことを下記のように説明し
ています。
お守りいただかないと『傷害を負う、また は物
的損害が発生するおそれがある内容』です。
注意
測定方法
●正常に作動しない場合や、不明な点がございましたらお買い上
げの販売店または、発売元までご連絡ください。
●お問い合わせや、ご連絡が無いまま直接発売元に修理品などを
送付されても処理、対応ができない場合がありますのでご了承
ください。
修理の際は
●外部から触れることのできる研磨部品は、定期的に清潔な布で拭いて汚れを除去してください。
●汚れがひどい場合は別売の工具クリーナ STC-500 等を使用して清潔な布でふき取ってください。
●防錆油を薄く塗るか、防錆袋に入れるなどの防錆処理を行ってください。
●直射日光や湿気を避け、管理者以外が触れない状態で保管してください。
使用後のお手入れ・保管方法
ゼロ点の調整
①平滑で硬質な基準平面をご用意ください。
②測定テーパ部先端を基準平面に直角に当て、測定
基準面と基準平面の間に隙間が無くなるまで、測
定ヘッドを押し込んでください。( 図 3 )
③専用ダイヤルゲージ側面に記載されている数値が、
基準平面で合わせる場合の基準値です。( 図 4 )
この基準値に合うよう、専用ダイヤルゲージの外
枠を回転させて、測定値を調整してください。
( 図5)
測定値と基準値のサイズが一致したら、ゼロ点が
合っています。
※ゼロ点調整は数回繰返し、数値が安定しているこ
とを確認してください。
①測定テーパ部を測定物に直角に当て、測
定物と基準平面の間に隙間が無くなるま
で、測定ヘッドを押し込んでください。
( 図1)
②専用ダイヤルゲージの示す測定値が、内
径面取部の最大径となります。( 図 2 )
※出荷時にゼロ点を調整済ですが、使用頻度に合わせて調整をお勧め致します。
基準平面でゼロ点を合わせる場合
①内径面取用の基準マスタをご用意ください。
②測定テーパ部を基準マスタに直角に当て、測定基準面と基準マスタの間に隙間が無くなるまで、測定
ヘッドを押し込んでください。
③基準マスタのサイズに合うよう、専用ダイヤルゲージの外枠を回転させて、測定値を調整してくださ
い。( 図 5 ) 測定値と基準マスタのサイズが一致したら、ゼロ点が合っています。
※ゼロ点調整は数回繰返し、数値が安定していることを確認してください。
お手持ちの基準マスタでゼロ点を合わせる場合
発売元
〒955-0055
新潟県三条市塚野目5丁目3番14号
(0256)33-5502
(代)
FAX(0256)33-5528
URL http://www.niigataseiki.co.jp
2003I411-K
製品仕様
用途・特長
品 番
SCG
−
2090
SCG
−
4090
SCG
−
20127
SCG
−
40127
90°
127°
90°以下
90°〜120°
測定範囲
(mm)
使用可能
面取角度範囲
測定テーパ部
角度
0.5〜20
20〜40
0.5〜20
20〜40
目量
(mm)
0.01
0.02
精度
(mm)
±0.015
質量
(g)
340
640
340
640
1. 専用ダイヤルゲージ
※ 交 換・取り 外し 不 可
2. リミット 針
3. 長針
4. 短針
5. 外枠
6. ダイヤルゲージ
ホルダ
7. 外筒
8. 測定ヘッド
9. 測定基準面
10. 測定テーパ部
3
4
2
1
5
6
7
8
10
9
数値を+
直角
数値を−
(図1)
測定ヘッド
測定ヘッド
外枠
基準平面
基準値
(図2)
(図5)
(図3)
(図4)
測定値
隙間が無くなるまで
押し込 む
●測定ヘッド・測定テーパ部は焼入れ鋼であるた
め、使用後は必ず防錆処理を行ってください。
●専用ダイヤルゲージ以外のダイヤルゲージをご
使用になると、正確な数値が表示されませんの
で、使用しないでください。
●ダイヤルゲージホルダのねじをゆるめたり、専
用ダイヤルゲージを取り外したりしないでくだ
さい。測定値・精度に影響が出ます。
●測定器をワークに当てる際は、強い衝撃を与え
ないようワークに対してゆっくりと測定器を当
ててください。測定テーパ部を破損させる危険
があります。
●本製品は内径面取り及びテーパ部の最大径測定
器です。用途以外のご使用は、事故やけがの原
因となりますので絶対におやめください。
●内径C面取部及び任意角度の面取部の最大径を測
定できます。
●測定値は、専用ダイヤルゲージで直接読み取る
ことができます。
押し込む
直角
測定テーパ部

This manual suits for next models

4

Other Niigata seiki Measuring Instrument manuals

Niigata seiki KMC-1001 User manual

Niigata seiki

Niigata seiki KMC-1001 User manual

Niigata seiki GDCS Series User manual

Niigata seiki

Niigata seiki GDCS Series User manual

Niigata seiki DP-90G EX User manual

Niigata seiki

Niigata seiki DP-90G EX User manual

Niigata seiki GVC Series User manual

Niigata seiki

Niigata seiki GVC Series User manual

Niigata seiki GDCS-150D User manual

Niigata seiki

Niigata seiki GDCS-150D User manual

Niigata seiki GDCS-150IK User manual

Niigata seiki

Niigata seiki GDCS-150IK User manual

Niigata seiki D-HL Series User manual

Niigata seiki

Niigata seiki D-HL Series User manual

Niigata seiki GDCS-150F User manual

Niigata seiki

Niigata seiki GDCS-150F User manual

Niigata seiki BB-180A User manual

Niigata seiki

Niigata seiki BB-180A User manual

Niigata seiki DITG-30PJ User manual

Niigata seiki

Niigata seiki DITG-30PJ User manual

Niigata seiki FTM-52FN User manual

Niigata seiki

Niigata seiki FTM-52FN User manual

Niigata seiki KAIDAN GVC-10 User manual

Niigata seiki

Niigata seiki KAIDAN GVC-10 User manual

Niigata seiki D IP67S Series User manual

Niigata seiki

Niigata seiki D IP67S Series User manual

Niigata seiki DT-150 User manual

Niigata seiki

Niigata seiki DT-150 User manual

Niigata seiki SIC EMH-25F User manual

Niigata seiki

Niigata seiki SIC EMH-25F User manual

Niigata seiki VH-30D User manual

Niigata seiki

Niigata seiki VH-30D User manual

Niigata seiki CDI-18D User manual

Niigata seiki

Niigata seiki CDI-18D User manual

Niigata seiki WCDI-6 User manual

Niigata seiki

Niigata seiki WCDI-6 User manual

Niigata seiki GDCS-100WR User manual

Niigata seiki

Niigata seiki GDCS-100WR User manual

Niigata seiki DP-180 User manual

Niigata seiki

Niigata seiki DP-180 User manual

Niigata seiki MCD-0608IPS User manual

Niigata seiki

Niigata seiki MCD-0608IPS User manual

Niigata seiki DHG-35M User manual

Niigata seiki

Niigata seiki DHG-35M User manual

Niigata seiki VHS-30D User manual

Niigata seiki

Niigata seiki VHS-30D User manual

Niigata seiki LSL-26 User manual

Niigata seiki

Niigata seiki LSL-26 User manual

Popular Measuring Instrument manuals by other brands

insize ISH-DSD Operation manual

insize

insize ISH-DSD Operation manual

ProParts Spek 14820 Wiring & installation instructions

ProParts

ProParts Spek 14820 Wiring & installation instructions

Trotec MultiMeasure Basic BA15 operating manual

Trotec

Trotec MultiMeasure Basic BA15 operating manual

Tria HAIR REMOVAL LASER 4X Instructions for use

Tria

Tria HAIR REMOVAL LASER 4X Instructions for use

Dentech AYRDYNE Installation, operation and maintenance manual

Dentech

Dentech AYRDYNE Installation, operation and maintenance manual

ELGO Electronic EMAX2 Series Operation manual

ELGO Electronic

ELGO Electronic EMAX2 Series Operation manual

PCB Piezotronics PM119B11 Installation and operating manual

PCB Piezotronics

PCB Piezotronics PM119B11 Installation and operating manual

Precision Medical 7MFA1001 quick start guide

Precision Medical

Precision Medical 7MFA1001 quick start guide

Sony TC-252 D manual

Sony

Sony TC-252 D manual

Bosch GLL3-300 Operating/safety instructions

Bosch

Bosch GLL3-300 Operating/safety instructions

Ardo 63.00.113 instructions

Ardo

Ardo 63.00.113 instructions

PPI neuro 100Z user manual

PPI

PPI neuro 100Z user manual

HW Group Poseidon 3265 Starting guide

HW Group

HW Group Poseidon 3265 Starting guide

Teledyne 514 instruction manual

Teledyne

Teledyne 514 instruction manual

Hanyoung BS Series instruction manual

Hanyoung

Hanyoung BS Series instruction manual

Amprobe AT-3500 user manual

Amprobe

Amprobe AT-3500 user manual

MADDALENA SJ PLUS quick start guide

MADDALENA

MADDALENA SJ PLUS quick start guide

EXFO OSA20 Getting started

EXFO

EXFO OSA20 Getting started

manuals.online logo
manuals.online logoBrands
  • About & Mission
  • Contact us
  • Privacy Policy
  • Terms and Conditions

Copyright 2025 Manuals.Online. All Rights Reserved.