manuals.online logo
Brands
  1. Home
  2. •
  3. Brands
  4. •
  5. Niigata seiki
  6. •
  7. Measuring Instrument
  8. •
  9. Niigata seiki SIC EMH-25F User manual

Niigata seiki SIC EMH-25F User manual

⬏⬎⫰⫰
sv
tq
sq
sv
tq
sq
トラブルの内容対応策
q
v
uv
q v r
q
v
uv
q v r
q
v
uv
q vr
q
v
uv
ABS
q
v
uv
q vr
q
v
uv
ABS
q
v
uv
q vr
q
v
uv
ABSSet
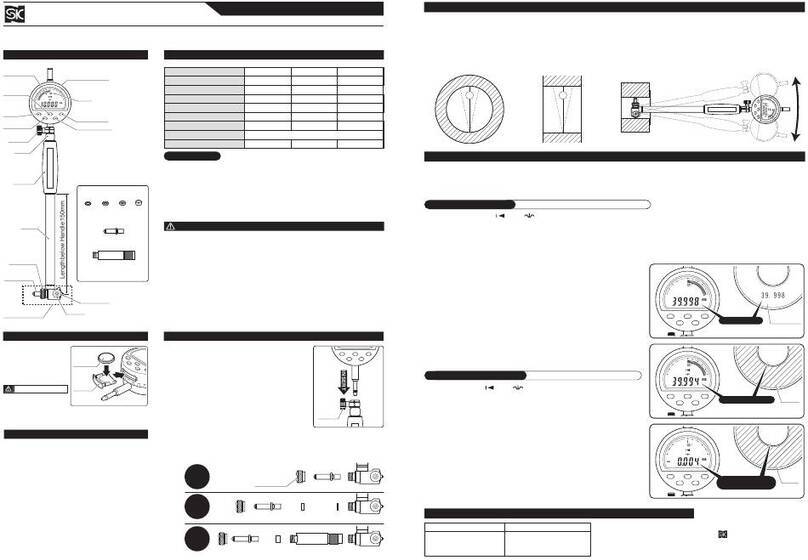
デジタルマイクロメータヘッド品番:EMH-25F/EMH-25S<兼用>この度はデジタルマイクロメータヘッドをお買上げ頂きありがとうございます。ご使用前に、本書をよくお読み頂き正しくお使いくださいますようお願い申し上げます。●送り量がデジタル表示され、位置決めが高精度かつ簡単に行えます。●測定範囲0-25mmの標準型、汎用シリーズです。●測定面は超硬チップ付●定圧装置付●オートディスプレイオフ機能付(約6分)●SR44(酸化銀電池) テスト用1個付属取扱説明書電池蓋【付属品】キースパナSR44(酸化銀電池)※テスト用電池は必ずSR44をお使いください。ご注意開ける※症状が改善されない場合や不明な点がございましたらお買い上げの販売店、または発売元までご連絡ください。※お問い合わせや、ご連絡が無いまま直接発売元に修理品などを送付されても処理、対応ができない場合がありますのでご了承ください。平面球面(SR5)ストレートステムȭ6.5×28.5ȭ12×17.50.0013162
EMH-25FEMH-25S
先端形状ステム形状スピンドル(mm)ステム(mm)
目量
(mm)シンブル径(mm)18仕 様特 長各部の名称測定面(超硬チップ)スピンドルステムスリーブ(図:EMH-25F)クランプ電池蓋0点調整穴ラチェットストップLCD表示部ON/OFF・SETボタン【裏面】【表面】シンブル最大許容誤差(μm)全長(mm)●精密機器や精密機械に取り付け、測定・送り・位置決め等に使用します。●X-Yテーブルなど、精密機械や精密機器等と組み合わせてご使用ください。用 途原点設定・プリセット機能トラブルと対応使用方法①スピンドルの先端と、組み合わせる機器などの接触する箇所を脱脂し、グラスペーパなどで拭き取って異物が付着していない状態にしてください。②クランプを回してゆるめ(図1)、シンブルを回し、スピンドルの先端と、組み合わせる機器などを接触させます。※必要に応じて、ラチェットストップもご使用ください。 アナログ目盛を使って移動量を見ることもできます。※デジタル表示を調整する必要がある場合は、下記の『原点設定・プリセット機能』の操作を行います。電  源電池の入れ方ON/OFF・SETボタンを押すと電源がONになり、LCD表示部に数値が表示されます。もう一度押すと電源がOFFになります。●ご使用の前に、必ずグラスペーパなどで測定面の汚れを除去してください。●測定範囲の上限を3mm以上上回って、スピンドルを回さないでください。●精密機器ですので、落としたりぶつけたり、強い力を加えたりしないでください。●強い磁気や高電圧に近付けないでください。故障の恐れがあります。●直射日光の当たる場所や炎天下の車の中、火のそばなどでの使用、保管はしないでください。●水や油のかかるところで使用しないでください。●分解・改造をしないでください。●使用後は柔らかい布などでゴミや切粉などを取り除き、防錆油を塗布してお子様の手の届かない場所へ保管してください。●本体の手入れに有機溶剤を使用しないでください。●長期間使用しない場合は、本体から電池を外して保管してください。●用途以外のご使用は、事故やけがの原因となりますので絶対におやめください。ご注意図1シンブルI418-K2009クランプ図2図3ON/OFF・SETボタン長押し点滅①本体裏面の電池蓋を、矢印の向きにコインなどで回して開けます。②電池を必ず(+)側を表にしてセットしてください。③電池蓋を元通りに装着してください。発売元
〒955-0055
新潟県三条市塚野目5丁目3番14号
(0256)33-5502(代)FAX(0256)33-5528
URL http://www.niigataseiki.co.jp
●測定値が間違っている●測定面の汚れをグラスペーパなどで拭き取ってください。●原点を設定し直してください。●LCD表示部に何も表示されない●表示が安定しない●表示が不明確である●電池を入れ直してください。●新しい電池と交換してください。●測定値以外が表示される●電池を入れ直してください。●新しい電池と交換してください。●原点を設定し直してください。固定ゆるめる①スピンドルの先端と、組み合わせる機器などの接触する箇所を脱脂し、グラスペーパなどで拭き取って異物が付着していない状態にしてください。②クランプを回してゆるめ、シンブルを回して原点とする場所に合わせ、再びクランプを回して固定します(図1)。③ON/OFF・SETボタンを長押しすると(図2)、『Set』が点滅し、原点設定モードになります。(図3)原点に設定する数値が表示されている場合ON/OFF・SETボタンを短押しすると、表示の値で原点が設定されます。原点に設定する数値を変更したい場合(プリセット機能)1.ON/OFF・SETボタンを長押しすることで、プリセットモードになります。2.プリセットモードになると、最初に百の位の値が点滅し、この設定ができるようになります。ボタンを1回短押しするたびに、『1→2→3…9→0→1』と循環します。値を確定させる時は、ボタンを長押しします。3.百の位が確定すると、次は十の位を2.と同様の方法で設定できます。上記と同様に、一の位→小数第一位→小数第ニ位→小数第三位と値を設定していきます。4.小数第三位の値の設定が完了すると、『Set』が点滅するので、この状態でボタンを短押しします。これによって、プリセットでの原点設定が完了します。※初期状態でのプリセットの値は『0.000』となっています。
⬏⬎⫰⫰
sv
tq
sq
Error Condition Corrective Action
q
v
uv
q vr
q
v
uv
ABS
q
v
uv
q vr
q
v
uv
ABS
q vr
ABSSet
q
v
uv
q v r
q
v
uv
q v r
sv
tq
sq
Battery Cover
Open
REFERENCE POINT SETTING
・
PRESET FUNCTION
TROUBLESHOOTING
OPERATION
POWER
INSERTING THE BATTERY
CAUTION
Thimble
Clamp
[ON/OFF・SET]Button
LongPress
Flashing
●Measured value is wrong ●Clean measuring surfaces with cloth.
●Make sure Reference Point is correct.
●LCD does not display
●
Displayed value is unstable
●Display is not clear ●Cycle power by removing and replacing
battery.
●Replace battery with new one.
●Value displayed is not
correct ●
Cycle power by removing and replacing battery.
●Replace battery with new one.
●Make sure Reference Point is correct.
Tight
Loosen
①Before use, use a lens cloth or similar to wipe off any
grime or dust from tip of Spindle and the contact
surface of the part being measured.
②Loosen the Clamp and turn the Thimble until the
Spindle is at the desired reference point, then tighten
the Clamp again. (Fig.1)
③Press and hold the [ON/OFF・SET]Button as shown in
Fig.2 until “Set”flashes on the Display. (Fig. 3)
Instrument is now in the mode for setting the
Reference Point (or Zero Point).
To set the Reference Point to the value displayed.
A short press of the [ON/OFF・SET]Button will set the current position to the value displayed.
To change the value of the Reference Point. (Preset Function)
1. Press and hold the [ON/OFF・SET]Button to enter Preset Mode.
2. Press the button to change the flashing digit, each press will cycle through the numbers (1→2→3...9→0→1). When the desired number is displayed, a long press on the button will confirm and
move to the next digit.
3. In the same way as above, set each digit in turn to enter the desired value.
4. When the right most digit is completed, “Set”will blink on the Display. A short press of the button
sets the position to the value entered and the Reference Point setting procedure is complete.
※Preset Value is initialized to “0.000”at the factory.
DIGITAL
MICROMETER
HEAD
Thank you for purchasing the Digital Micrometer Head.
Please read this manual thoroughly before use for proper operation.
●Digital display for high accuracy of measurements.
●0-25mm measurement range for general purpose use.
●Carbide measuring surfaces.
●Constant pressure ratchet mechanism.
●Auto-display-off function (approx. 6 minutes)
●SR44 (silver oxide battery)included for testing.
INSTRUCTION MANUAL
Flat
Ball(SR5)Straight
Stem 6.5×28.5 12×17.5 0.001 3 162
EMH
-
25F
EMH
-
25S
Tip ShapeModel No. Stem Shape Spindle
(mm)Stem
(mm)
Resolution
(mm)
Thimble Diameter
(mm)18
Maximum
Instrument Error(μm)Total Length
(mm)●Use for precise measurement of position and feed on equipment and machinery.
●Use as indicator for X-Y Stage on precision equipment.
Model No.:
EMH-25F/EMH-25S
<combined>
SPECIFICATIONS
FEATURES
APPLICATIONS
※If problem persists, or if you have any questions, please contact distributor or
place of purchase.
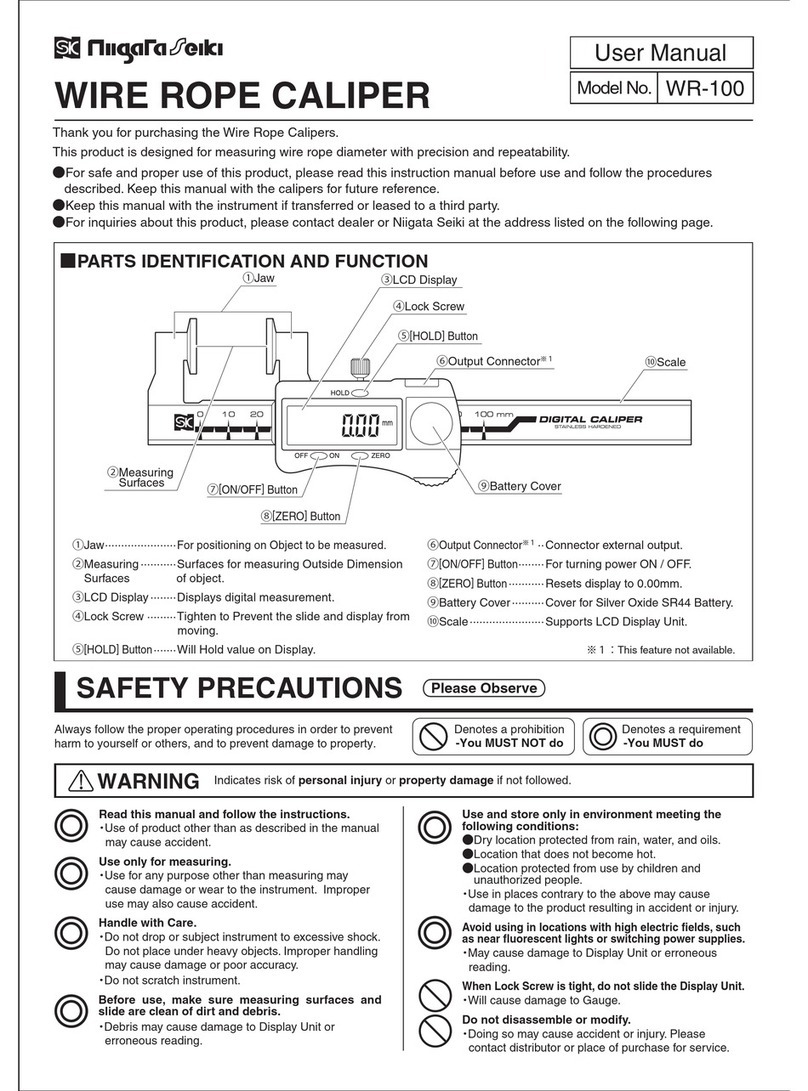
※
Please note, manufacturer is unable to respond to inquires or provide service directly.
 Please contact distributor or place of purchase. Only use SR44 type Battery.
①Rotate the battery cover on
rear using coin or similar tool.
②Insert battery with “+”side up.
③Replace battery cover.
CAUTION
Spindle
Stem Sleeve
Clamp
Battery Cover
0-Point
Adjustment Hole
RatchetStop
LCD Display
[ON/OFF・SET]Button
【FRONT】Thimble
【REAR】Measuring Surfaces
(Carbide)
(Model EMH-25F shown)PART IDENTIFICATION 【ACCESSORIES】Spanner
SR44
(Silver Oxide Battery)
※for test ●Always remove dirt from measuring surfaces with lens cloth before use.
●Do not turn spindle more than 3mm above upper measurement range.
●This is a precision instrument, handle with care. Do not drop or subject to excessive forces.
●Keep away form high voltage and strong magnetic fields; instrument damage may result.
●Do not use or store in direct sunlight or locations with high temperatures such as in a car, or near a stove
or heat source.
●Not for use in exposure to water or oil.
●Please do not disassemble or modify.
●After use, wipe off any cutting chips or dust using a soft cloth, and protect using a rust preventive oil.
Keep out of reach of children.
●
Do not use organic solvents to clean the body of the instrument.
●
When not being used for long period of time, please remove
battery.
●Only use as directed. Improper use may cause accident or
injury.
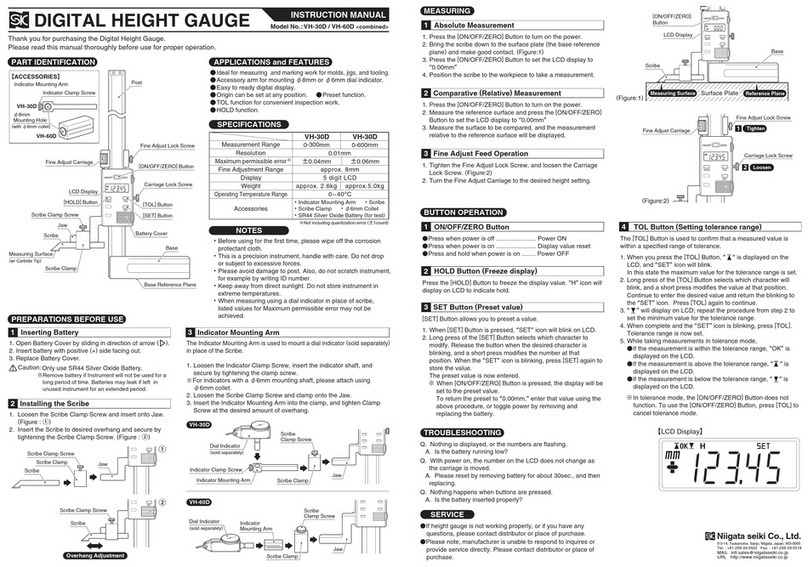
When [ON/OFF・SET]Button is pressed, power is turned
ON, and measurement is displayed on the LCD.
Press Button a second time to turn power OFF.
①Before use, use a lens cloth or similar to wipe off any
grime or dust from tip of Spindle and the contact
surface of the part being measured.
②
Loosen the Clamp
(Fig.1)and turn the Thimble to move
the Spindle into contact with the surface.
※Use the Ratchet Stop to control the contact force; The
Sleeve scale also will also show the Spindle position.
※To set the display to read a relative position, refer to
section below on
Reference Point Setting・Preset Function.
Figure 2
Figure 3
Figure 1

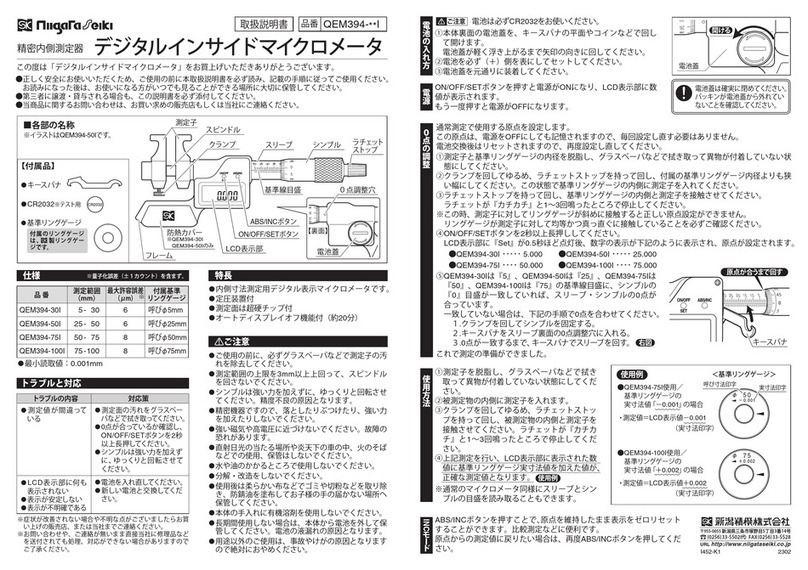
This manual suits for next models

1

Other Niigata seiki Measuring Instrument manuals

Niigata seiki GDCS-150DCD User manual

Niigata seiki

Niigata seiki GDCS-150DCD User manual

Niigata seiki GDCS-150IK2 User manual

Niigata seiki

Niigata seiki GDCS-150IK2 User manual

Niigata seiki QEM394 Series User manual

Niigata seiki

Niigata seiki QEM394 Series User manual

Niigata seiki GVC Series User manual

Niigata seiki

Niigata seiki GVC Series User manual

Niigata seiki DITG-30PJ User manual

Niigata seiki

Niigata seiki DITG-30PJ User manual

Niigata seiki WCDI-50 User manual

Niigata seiki

Niigata seiki WCDI-50 User manual

Niigata seiki DT Series User manual

Niigata seiki

Niigata seiki DT Series User manual

Niigata seiki GDCS Series User manual

Niigata seiki

Niigata seiki GDCS Series User manual

Niigata seiki DHG-35M User manual

Niigata seiki

Niigata seiki DHG-35M User manual

Niigata seiki TVC-60 User manual

Niigata seiki

Niigata seiki TVC-60 User manual

Niigata seiki GDCS-150D User manual

Niigata seiki

Niigata seiki GDCS-150D User manual

Niigata seiki WCDI-35D User manual

Niigata seiki

Niigata seiki WCDI-35D User manual

Niigata seiki WCDI-6D User manual

Niigata seiki

Niigata seiki WCDI-6D User manual

Niigata seiki GVC KDE Series User manual

Niigata seiki

Niigata seiki GVC KDE Series User manual

Niigata seiki VH-30D User manual

Niigata seiki

Niigata seiki VH-30D User manual

Niigata seiki GDCS-150DR User manual

Niigata seiki

Niigata seiki GDCS-150DR User manual

Niigata seiki BEVEL BOX User manual

Niigata seiki

Niigata seiki BEVEL BOX User manual

Niigata seiki TVC-60 User manual

Niigata seiki

Niigata seiki TVC-60 User manual

Niigata seiki GHS Series User manual

Niigata seiki

Niigata seiki GHS Series User manual

Niigata seiki CJU BKD Series User manual

Niigata seiki

Niigata seiki CJU BKD Series User manual

Niigata seiki SCG Series User manual

Niigata seiki

Niigata seiki SCG Series User manual

Niigata seiki EOM133 Series User manual

Niigata seiki

Niigata seiki EOM133 Series User manual

Niigata seiki VHS-30D User manual

Niigata seiki

Niigata seiki VHS-30D User manual

Niigata seiki SCDI S Series User manual

Niigata seiki

Niigata seiki SCDI S Series User manual

Popular Measuring Instrument manuals by other brands

Honeywell NOTIFIER UDS-3 USER MANUAL, INSTALLING AND OPERATING MANUAL

Honeywell

Honeywell NOTIFIER UDS-3 USER MANUAL, INSTALLING AND OPERATING MANUAL

wtw Cond 340i operating manual

wtw

wtw Cond 340i operating manual

Lovato DME D111 MID installation manual

Lovato

Lovato DME D111 MID installation manual

TSI Instruments SidePak AM520 user guide

TSI Instruments

TSI Instruments SidePak AM520 user guide

TSI Instruments AccuBalance 8370 Operation and service manual

TSI Instruments

TSI Instruments AccuBalance 8370 Operation and service manual

Adash A4900 - Vibrio M user manual

Adash

Adash A4900 - Vibrio M user manual

DeWalt DW055PL-KR user manual

DeWalt

DeWalt DW055PL-KR user manual

janitza UMG 605 operating manual

janitza

janitza UMG 605 operating manual

Garnet PC-732G manual

Garnet

Garnet PC-732G manual

UNITY Lasers ELITE 2 ILDA user manual

UNITY Lasers

UNITY Lasers ELITE 2 ILDA user manual

DIEBOLD AccuVote-OS 1.94 Hardware guide

DIEBOLD

DIEBOLD AccuVote-OS 1.94 Hardware guide

Surecom SW-102 user manual

Surecom

Surecom SW-102 user manual

EA Technology UltraTEV Plus2 operating manual

EA Technology

EA Technology UltraTEV Plus2 operating manual

Rapsodo HITTING 2.0 quick start guide

Rapsodo

Rapsodo HITTING 2.0 quick start guide

Bender RCMB-35-30 Series quick start guide

Bender

Bender RCMB-35-30 Series quick start guide

Bender ISOMETER IR423-D4 manual

Bender

Bender ISOMETER IR423-D4 manual

TESTO 350 Maritime V2 instruction manual

TESTO

TESTO 350 Maritime V2 instruction manual

Siemens SITRANS F M MAG 3100 operating instructions

Siemens

Siemens SITRANS F M MAG 3100 operating instructions

manuals.online logo
manuals.online logoBrands
  • About & Mission
  • Contact us
  • Privacy Policy
  • Terms and Conditions

Copyright 2025 Manuals.Online. All Rights Reserved.