Nissei ds-1902 User manual

INSTRUCTIONS
ENGLISH
INSTRUKCJA OBSŁUGI
JĘZYK POLSKI
GEBRAUCHSANWEISUNG
DEUTSCH
INSTRUCTIONS
FRANÇAIS
ISTRUZIONI
ITALIANO
INSTRUCCIONES
ESPANÕL
DIGITAL
BLOOD PRESSURE
MONITOR Model DS-1902

PARTS NAMES AND PRODUCT COMPONENTS . . . . . . . . . . . . . . . . . 4
PICTORIALS . . . . . . . . . . . . . . . . . . . . . . . . . . . . . . . . . . . . . . . . . . . 5
BASIC PRODUCT INFORMATION . . . . . . . . . . . . . . . . . . . . . . . . . . . 11
PRECAUTIONS FOR USE . . . . . . . . . . . . . . . . . . . . . . . . . . . . . . . . . 12
TIPS ON TAKING YOUR BLOOD PRESSURE . . . . . . . . . . . . . . . . . . . 12
INSTALLING BATTERIES AND SETTING THE CLOCK . . . . . . . . . . . . 13
NAZWY PODSTAWOWYCH CZĘŚCI I KOMPONENTÓW . . . . . . . . . . . . . 4
ILUSTRACJE . . . . . . . . . . . . . . . . . . . . . . . . . . . . . . . . . . . . . . . . . . . 5
PODSTAWOWE INFORMACJE O PRODUKCIE . . . . . . . . . . . . . . . . . . . 61
ŚRODKI OSTROŻNOŚCI . . . . . . . . . . . . . . . . . . . . . . . . . . . . . . . . . . 62
UWAGI DOTYCZĄCE POMIARÓW CIŚNIENIA . . . . . . . . . . . . . . . . . . . 62
WKŁADANIE BATERII I USTAWIANIE ZEGARA . . . . . . . . . . . . . . . . . . 63
NOMBRE DE LAS PIEZAS Y COMPONENTES DEL PRODCUTO . . . . . 4
FIGURAS . . . . . . . . . . . . . . . . . . . . . . . . . . . . . . . . . . . . . . . . . . . . . 5
INFORMACIÓN BÁSICA DEL PRODUCTO . . . . . . . . . . . . . . . . . . . . . 51
PRECAUCIONES PARA EL USO . . . . . . . . . . . . . . . . . . . . . . . . . . . . 52
CONSEJO PARA TOMARSE LA PRESION SANGUINEA . . . . . . . . . . 52
INSTALACION DE PILAS Y AJUSTE DEL RELOJ . . . . . . . . . . . . . . . 53
DENOMINAZIONE DELLE PARTI E COMPONENTI . . . . . . . . . . . . . . . 4
ILLUSTRAZIONI . . . . . . . . . . . . . . . . . . . . . . . . . . . . . . . . . . . . . . . . 5
INFORMAZIONI GENERALI SULL’APPARECCHIO . . . . . . . . . . . . . . . 41
PRECAUZIONI PER L’USO . . . . . . . . . . . . . . . . . . . . . . . . . . . . . . . . 42
CONSIGLI SULLA MISURAZIONE DELLA PRESSIONE SANGUIGNA . . . 42
INSTALLAZION DELLE BATTERIE E REGOLAZION DELL'OROLOGIO . . . 43
NOMENCLATURE ET COMPOSANTS DE L’APPAREIL . . . . . . . . . . . . 4
IMAGES . . . . . . . . . . . . . . . . . . . . . . . . . . . . . . . . . . . . . . . . . . . . . . 5
INFORMATIONS DE BASE SUR L’APPAREIL . . . . . . . . . . . . . . . . . . 21
PRÉCAUTIONS À L’USAGE . . . . . . . . . . . . . . . . . . . . . . . . . . . . . . . . 32
CONSEILS POUR PRENDRE SA TENSION ARTÉRIELLE . . . . . . . . . . 32
MISE EN PLACE DES PILES ET RÉGLAGE DE L’HORLOGE . . . . . . . . 33
TEILEBEZEICHNUNGEN UND PRODUKTKOMPONENTEN . . . . . . . . . . 4
ABBILDUNGEN . . . . . . . . . . . . . . . . . . . . . . . . . . . . . . . . . . . . . . . . . 5
GRUNDLEGENDE PRODUKTINFORMATION . . . . . . . . . . . . . . . . . . . 21
VORSICHTSMASSREGELN ZUR VERWENDUNG . . . . . . . . . . . . . . . . 22
TIPPS ZUR BLUTDRUCKMESSUNG . . . . . . . . . . . . . . . . . . . . . . . . . 22
EINSETZEN VON BATTERIEN UND EINSTELLEN DER UHR . . . . . . . . 23
CONTENTS
INHALT
TABLE DES
MATIÈRES
INDICE
ÍNDICE
SPIS TREŚCI
- 2 -

CORRECT MEASURING POSTURE . . . . . . . . . . . . . . . . . . . . . . . . . . 14
WRAPPING THE CUFF . . . . . . . . . . . . . . . . . . . . . . . . . . . . . . . . . . . 15
MEASUREMENT PROCEDURES . . . . . . . . . . . . . . . . . . . . . . . . . . . . 15
MEMORY FUNCTION . . . . . . . . . . . . . . . . . . . . . . . . . . . . . . . . . . . . 17
ERROR DISPLAYS AND TROUBLESHOOTING . . . . . . . . . . . . . . . . . . 18
CARE AND MAINTENANCE . . . . . . . . . . . . . . . . . . . . . . . . . . . . . . . 20
WŁAŚCIWA POZYCJA PODCZAS POMIARU . . . . . . . . . . . . . . . . . . . 64
ZAKŁADANIE MANKIETU . . . . . . . . . . . . . . . . . . . . . . . . . . . . . . . . . 65
KOLEJNE CZYNNOŚCI POMIAROWE . . . . . . . . . . . . . . . . . . . . . . . . . 65
FUNKCJE PAMIĘCI . . . . . . . . . . . . . . . . . . . . . . . . . . . . . . . . . . . . . . 67
ROZWIĄZYWANIE PROBLEMÓW POMIAROWYCH . . . . . . . . . . . . . . . 68
OCHRONA APARATU I KONSERWACJA . . . . . . . . . . . . . . . . . . . . . . . 70
POSTURA CORRECTA DE MEDICIÓN . . . . . . . . . . . . . . . . . . . . . . . . 54
ENROLLADO DEL BRAZALETE . . . . . . . . . . . . . . . . . . . . . . . . . . . . . 55
METODO DE MEDICION . . . . . . . . . . . . . . . . . . . . . . . . . . . . . . . . . 55
FUNCION DE MEMORIA . . . . . . . . . . . . . . . . . . . . . . . . . . . . . . . . . . 57
INDICACIONES DE ERROR Y LOCALIZACIÓN DE AVERÍAS . . . . . . . 58
CUIDADO Y MANTENIMIENTO . . . . . . . . . . . . . . . . . . . . . . . . . . . . . 60
POSIZIONE CORRETTA DI MISURAZIONE . . . . . . . . . . . . . . . . . . . . 45
AVVOLGIMENTO DEL BRACCIALE . . . . . . . . . . . . . . . . . . . . . . . . . . 45
METODO DI MISURAZIONE . . . . . . . . . . . . . . . . . . . . . . . . . . . . . . . 45
FUNZIONE DI MEMORIA . . . . . . . . . . . . . . . . . . . . . . . . . . . . . . . . . 47
VISUALIZZAZIONE DEGLI ERRORI E RISOLUZIONE DEI PROBLEMI . . . 48
PULIZIA E MANUTENZIONE . . . . . . . . . . . . . . . . . . . . . . . . . . . . . . . 50
POSITION CORRECTE POUR LA MESURE . . . . . . . . . . . . . . . . . . . . 35
ENROULEMENT DU BRASSARD . . . . . . . . . . . . . . . . . . . . . . . . . . . 35
MÉTHODE DE MESURE . . . . . . . . . . . . . . . . . . . . . . . . . . . . . . . . . . 35
FONCTION DE MÉMOIRE . . . . . . . . . . . . . . . . . . . . . . . . . . . . . . . . 37
AFFICHAGES DES ERREURS ET RECHERCHE DES PANNES . . . . . . 38
ENTRETIEN . . . . . . . . . . . . . . . . . . . . . . . . . . . . . . . . . . . . . . . . . . . 40
RICHTIGE HALTUNG BEIM MESSEN . . . . . . . . . . . . . . . . . . . . . . . . 24
ANLEGEN DER MANSCHETTE . . . . . . . . . . . . . . . . . . . . . . . . . . . . . 25
MESSVERFAHREN . . . . . . . . . . . . . . . . . . . . . . . . . . . . . . . . . . . . . . 25
SPEICHERFUNKTION . . . . . . . . . . . . . . . . . . . . . . . . . . . . . . . . . . . 27
FEHLERANZEIGEN UND STÖRUNGSSUCHE . . . . . . . . . . . . . . . . . . . 28
PFLEGE UND WARTUNG . . . . . . . . . . . . . . . . . . . . . . . . . . . . . . . . . 30
- 3 -

MONITOR
1
MEMORY BUTTON
cMEMORY SELECTOR
dAIR CONNECTOR
e
AC ADAPTER JACK
f
DISPLAY (SYS:systolic/DIA:diastolic/PUL:pulse)
aSTART/STOP BUTTON
b
PARTS NAMES AND PRODUCT COMPONENTS
2CUFF g"D" RING hAIR HOSE iTUBE PLUG
4CARRYING BAG
34 AA BATTERIES 5INSTRUCTION MANUAL
MISURATORE VISUALIZZAZIONE (SYS:systolica/DIA:diastolica/PUL:pulsazioni)
TASTO DI MEMORIA SELETTORE DI MEMORIA
CONNETTORE DELL’ARIA PRESA DELL’ADATTATORE CA
TASTO DI AVVIO/ARRESTO
1
c d
ef
2g h i
3 5
a
b
DENOMINAZIONE DELLE PARTI E COMPONENTI
FASCIA ANELLO “D” TUBO FLESSIBILE DELL’ARIA PRESA DEL TUBO
4 x BATTERIE TIPO AA 4BORSA DI TRASPORTO MANUALE D’ISTRUZIONI
MONITEUR
1
TOUCHE MEMOIRE
c
SELECTEUR DE MEMOIRE
dRACCORD AIR
ePRISE ADAPTEUR CA
f
AFFICHAGE (SYS:systolique/DIA:diastolicue/PUL:pouls)
a
TOUCHE DEMARRAGE/ARRET
b
NOMENCLATURE ET COMPOSANTS DE L’APPAREIL
2BRASSARD gBAGUE “D” hTUYAU D’AIR iANNEAU DU BRASSARD
34 x AA BATTERIES 3SAC DE RANGEMENT 4MANUEL D’INSTRUCTIONS
MONITOR
1
SPEICHER-TASTE
cSPEICHER-WAHLSCHALTER
dLUFTANSCHLUSS
e
NETZTEILBUCHSE
f
ANZEIGE (SYS:systolische/DIA:diastolische/PUL:Puls)
aEIN/AUS-Taste
b
2MANSCHETTE g"D"-RING hLUFTSCHLAUCH iRÖHRENSTECKER
34 x AA SÄUREBATTERIEN 4TRAGETASCHE 5BEDIENUNGSANLEITUNG
TEILEBEZEICHNUNGEN UND PRODUKTKOMPONENTEN
a
1
2
eih
g
43 5
d
c
b
f
- 4 -

fig.1
INSTALLING BATTERIES AND SETTING THE CLOCK p.13 EINSETZEN VON BATTERIEN UND EINSTELLEN DER UHR p.23
MISE EN PLACE DES PILES ET RÉGLAGE DE L’HORLOGE p.33
INSTALLAZION DELLE BATTERIE E REGOLAZION DELL'OROLOGIO
p.43
INSTALACION DE PILAS Y AJUSTE DEL RELOJ p.53 WKŁADANIE BATERII I USTAWIANIE ZEGARA p.63
1. 2. 3.
4. 5.
YEAR
JAHR
ANNEE
ANNO
AÑO
ROK
MONTH
MONAT
MOIS
MESE
MES
MIESIĄC
MONITOR
1
BOTÓN DE MEMORIA
cSELECTOR DE MEMORIA
d
CONECTOR DE AIRE
eTOMA DEL ADAPTADOR DE CA
f
INDICADOR (SYS:sistólica/DIA:diastólica/PUL:pulsaciones)
a
BOTÓN DE INICIO/PARADA
b
NOMBRE DE LAS PIEZAS Y COMPONENTES DEL PRODCUTO
2PUÑO gANILLO “D” hMANGUERA DE AIRE iENCHUFE DEL TUBO
4BOLSA DE TRANSPORTE
34 PILAS TAMAÕ AA 5MANUAL DE INSTRUCCIONES
APARAT
1
WŁĄCZNIK PAMIĘCI
cWYBÓR PAMIĘCI
d
GNIAZDO MANKIETU
eGNIAZDO ZASILACZA
f
WYŚWIETLACZ (SYS:systoliczne (górne)/DIA:diastoliczne (dolne) /PUL:puls)
a
PRZYCISK START/STOP
b
NAZWY PODSTAWOWYCH CZĘŚCI I KOMPONENTÓW
2MANKIET gKLAMRA MANKIETU hPRZEWÓD POWIETRZA iWTYCZKA MANKIETU
4ETUI
34 BATERIE AA 5INSTRUKCJA OBSŁUGI
- 5 -

fig.2
CORRECT MEASURING POSTURE p.14 RICHTIGE HALTUNG BEIM MESSEN p.24
POSITION CORRECTE POUR LA MESURE p.35 POSIZIONE CORRETTA DI MISURAZIONE p.45
POSTURA CORRECTA DE MEDICIÓN p.54 WŁAŚCIWA POZYCJA PODCZAS POMIARU p.64
fig.1
6.
8.
7.
DAY
TAG
JOUR
GIORNO
DIA
DZIEŃ
MINUTE
MINUTEN
MINUTE
MINUTO
MINUTOS
MINUTY
HOUR
STUNDE
HEURE
ORA
HORAS
GODZINA
FUNCTIONING CLOCK
FUNKTIONIERENDE UHR
HORLOGE DE FONCTIONNEMENT
OROLOGIO DI FUNZIONAMENTO
RELOJ DE FUNCIONAMIENTO
USTAWIONY ZEGAR
- 6 -
2~3cm
dfhfgjtkdfghhg!
..............
sfhdfrejrgyk;
relax... entspannen...
relaxer... rilassarsi...
relájese... odpocznij...
fig.3
WRAPPING THE CUFF p.15 ANLEGEN DER MANSCHETTE p.25
ENROULEMENT DU BRASSARD p.35 AVVOLGIMENTO DEL BRACCIALE p.45
ENROLLADO DEL BRAZALETE p.55 ZAKŁADANIE MANKIETU p.65
fig.4
MEASUREMENT PROCEDURES p.15 MESSVERFAHREN p.25
MÉTHODE DE MESURE p.35 METODO DI MISURAZIONE p.45
METODO DE MEDICION p.55 KOLEJNE CZYNNOŚCI POMIAROWE p.65
1
1.
2
3
- 7 -
see page 16.
siehe Seite 26.
voir page 36.
vedere a pagina 46.
véase la página 56.
patrz str 66.
fig.4
2.
3.
SYSTOLIC SYSTOLISCH
SYSTOLIQUE SISTOLICA
SISTOLICO SYSTOLICZNE
mmHg
DIASTOLIC mmHg
DIASTOLISCH
DIASTOLIQUE
DIASTOLICA
DIASTOLICO
DIASTOLICZNE
PULSE RATE /min
PULSRATE POULS
BATTITO CARDIACO
RAPIDEZ DEL PULSO
WARTOŚĆ PULSU
IRREGULAR PULSE RHYTHM
INDICATION
ANZEIGE FÜR UNREGELMÄSSIGEN
PULSRHYTHMUS
INDICATION DE POULS IRRÉGULIER
INDICAZIONE DI ARITMIA CARDIACA
INDICACIÓN DE RITMO DE PULSO
IRREGULAR
SYMBOL NIEREGULARNEGO RYTMU
PULSU
MEMORY BANK NUMBER
SPEICHERBANKNUMMER
NUMÉRO BANQUE DE MÉMOIRE
NUMERO DI BANCHI DI MEMORIA
NUMERO DE BANCO DE MEMORIA
NUMER BANKU PAMIĘCI
DEFLATION MARK
DEFLATIONSMARKE
MARQUE DE DÉGONFLEMENT
SIMBOLO DI SGONFIAMENTO
MARCA DE DESINFLADO
SYMBOL SPUSTU POWIETRZA
PULSE RATE MARK
PULSRATENMARKE
MARQUE DU POULS
SIMBOLO DEL BATTITO CARDIACO
MARCA DE RAPIDEZ DEL PULSO
SYMBOL PULSU
INFLATION MARK
AUFBLASMARKE
MARQUE DE GONFLEMENT
SIMBOLO DI GONGIAMENTO
MARCA DE INFLADO
SYMBOL POMPOWANIA
- 8 -
ERROR DISPLAYS see page 18.
FEHLERANZEIGEN siehe Seite 28.
AFFICHAGE D’ERREURS voir page 38.
VISUALIZZAZIONE DEGLI ERRORI vedere a pagina 48.
INDICACIONES DE ERROR véase la página 58.
WYŚWIETLENIE BŁĘDU POMIAROWEGO patrz str 68.
fig.5
MEMORY FUNCTION p.17 SPEICHERFUNKTION p.27
FONCTION DE MÉMOIRE p.37 FUNZIONE DI MEMORIA p.47
FUNCION DE MEMORIA p.57 WKŁADANIE BATERII I USTAWIANIE ZEGARA p.67
fig.4
1.
2.
4.
SYSTOLIC
SYSTOLISCH
SYSTOLIQUE
SISTOLICA
SISTOLICO
SYSTOLICZNE
mmHg
: AVERAGE
DURCHSCHNITT
MOYENNE
MEDIA
PROMEDIO
ŚREDNIA
DIASTOLIC
DIASTOLISCH
DIASTOLIQUE
DIASTOLICA
DIASTOLICO
DIASTOLICZNE
mmHg
PULSE RATE PULSRATE
POULS BATTITO CARDIACO
RAPIDEZ DEL PULSO
WARTOŚĆ PULSU
/min
NUMBER OF STORED DATA
ANZAHL DER GESPEICHERTEN DATEN
NUMÉRO DES DONNÉES MÉMORISÉES
NUMERO DI DATI MEMORIZZATI
NUMERO DE DATOS MEMORIZADOS
NUMER POMIARU
MEMORY BANK NUMBER
SPEICHERBANKNUMMER
NUMÉRO BANQUE DE MÉMOIRE
NUMERO DI BANCHI DI MEMORIA
NUMERO DE BANCO DE MEMORIA
NUMER BANKU PAMIĘCI
- 9 -
fig.5
3.
4.
: 2nd LATEST DATA
ZWEITLETZTE DATEN
LES AVANT-DERNIÈRES DONNÉES
PENULTIMI DATI
2º DATO MAS RECIENTE
PRZEDOSTATNI POMIAR
: OLDEST DATA
ÄLTESTE DATEN
LES PLUS ANCIENNES DONNÉES
DATI PIÙ VECCHI
DATO MAS VIEJO
NAJSTARSZY POMIAR
DATE day/month
DATUM Tag/Monat
DATE jour/mois
DATA giorno/mese
FECHA día/mes
DATA dzień/miesiąc
TIME
ZEIT
HEURE
ORA
TIEMPO
GODZINA
DELETING STORED DATA
LÖSCHEN DER
GESPEICHERTEN DATEN
EFFACEMENT DES
DONNÉES MÉMORISÉES
CANCELLAZIONE DEI
DATI MEMORIZZATI
BORRADO DE DATOS
MEMORIZADOS
KASOWANIE
ZACHOWANYCH DANYCH
MEMORY DATA NUMBER
SPEICHERDATENNUMMER
NUMÉRO DES DONNÉES DE MÉMOIRE
NUMERO DI DATI IN MEMORIA
NUMERO DE DATO DE MEMORIA
MEMORY DATA NUMBER
SPEICHERDATENNUMMER
NUMÉRO DES DONNÉES DE MÉMOIRE
NUMERO DI DATI IN MEMORIA
NUMERO DE DATO DE MEMORIA
NUMER POMIARU
: LATEST DATA
LETZTE DATEN
LES DERNIÈRES
DONNÉES
DATI PIÙ RECENTI
DATO MAS
RECIENTE
OSTATNI POMIAR
- 10 -

PRODUCT SPECIFICATIONS
This manual is intended to assist the user in the safe and efficient operation of Digital Blood Pressure
Monitor DS-1902. The product must be used in accordance with the procedures contained in this manual
and must not be used for purposes other than those described herein. It is important to read and understand
the entire manual. In particular, please read carefully and become familiar with the section entitled “TIPS ON
TAKING YOUR BLOOD PRESSURE”.
Indications for Use
The DS-1902 system is intended for the non-invasive measurement of systolic and diastolic blood pressure
and determination of pulse rate in adults, i.e., age 12 and above; this unit is not designed for neonatal use.
Also, an inaccurate reading may result if this instrument is used on a child's arm. Consult your physician if you
wish to take a child's blood pressure. The product is recommended for use by patients with labile blood
pressure or known hypertension in a home care environment as an adjunct to medical management. The
cuff will accommodate an upper arm circumference range of approximately 23 to 43 centimeters. Pressure
is measured over a range of 0 to 300 mmHg and pulse rate over a range of 40 to 160 beats/minute.
Method of Measurement
This product employs the oscillometric method for measurement of blood pressure and pulse rate. The cuff is
connected to the main unit and wrapped around the arm. As START/STOP BUTTON is pressed, the system starts
automatic pressurization, during which measurement of blood pressure is done. Circuits within the cuff sense the
small oscillations in pressure against the cuff produced by the expansion and contraction of the arteries in the arm in
response to each heart beat. Pressurization stops when the cuff is inflated enough to determine diastolic and systolic
blood pressures and air is exhausted from the cuff. The amplitude of each pressure waves is measured, converted
to millimeters of mercury, and displayed on the LCD as a digital value. If the pulse rhythm detected during
measurment was irregular, irregular pulse rate rhythm indication be displayed.A memory circuit stores the 30 most
recent measurement results with date and time for comparison and computes the average value of stored data.
DS-1902 meets the stringent requirements of German Hypertension League to carry its quality
marking.
Model : DS-1902
Operating Principle : Oscillometric method
Indicator : 12 digits liquid crystal display
Pressure Indicating Range
: 0 to 300 mmHg (Cuff pressure)
Measuring Range : 50 to 250 mmHg (systolic)
40 to 140 mmHg (diastolic)
40 to 160 bpm (pulse rate)
Accuracy : ±3 mmHg (Cuff pressure),
±5% of reading (pulse rate)
Inflation : Automatic inflation
Exhaust : Automatic exhaust valve
Power Supply : 4 pcs. 1.5 volt "AA" (R6P/LR6) type
batteries or AC adapter
Power Consumption : 4W (max.)
Memory : 30 measurements x2 and averages
Operating Environment : +10˚C to+40˚C, 85% relative humidity or
below
Storage Environment : -5˚C to+50˚C, 85% relative humidity or
below
Cuff : Coverage arm circumference ; 23 to 43cm
Main Unit : Weight ; Approx. 330 g (without batteries)
Size ; 148 x 115 x 54 mm (W x D x H)
Key to symbols
: Type BF equipment
: Important ; Read operating instructions
This device complies with EMC (IEC60601-1-2), EN1060-1 and
EN1060-3.
Specifications are subject to change without notice due to improvements
in performance.
BASIC PRODUCT INFORMATION
- 11 -
20
40
60
80
100
120
140
160
180
200
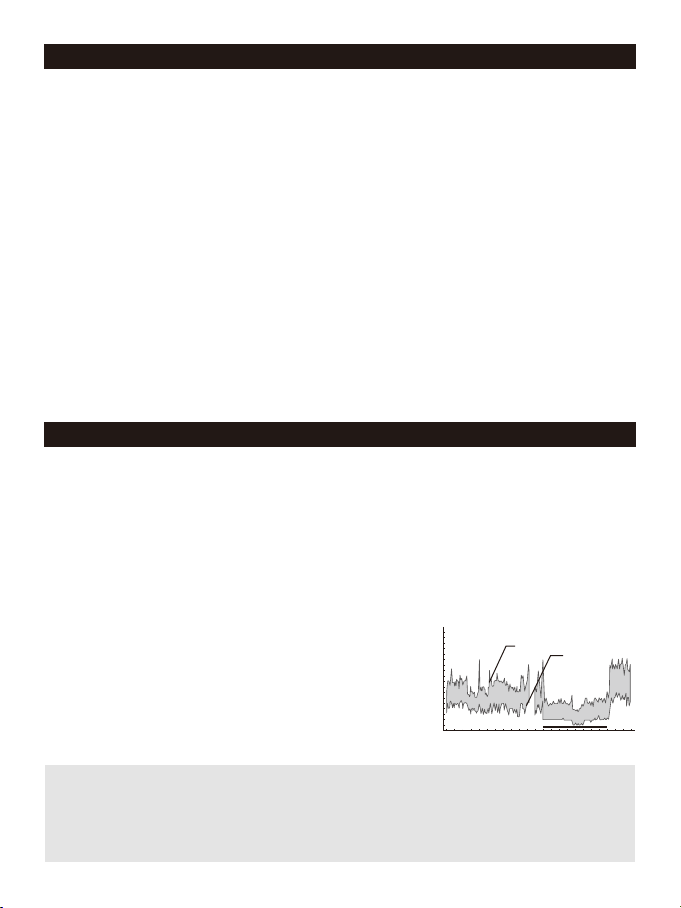
12 13 14 15 16 17 18 19 20 21 22 23 24 1 2 3 4 5 6 7 8 9 10 11
Blood pressure (mmHg)
Systolic Diastolic
Time
Blood pressure is a measurement of the force exerted by the heart in pumping the blood through the arteries
and the resistance by the veins in this flow.
Blood pressure varies all the time, influenced by mental and physical factors and is
never constant.
In general, blood pressure is highest during the working hours and gradually decreases during the afternoon and
evening hours. It is low during sleep and increases at a relatively fast rate after arising from bed.
Causes for Changes in Blood Pressure
• Body movement • Conversation • Mental Tension
• Emotions • Eating • Drinking Alcohol • Smoking
• Recent Urination or Bowel Movement • Temperature
• Changes in the surroundings such as movement or noise, etc.
Before taking blood pressure, rest for approximately five minutes and take your
blood pressure while relaxed in a quiet environment.
Measure blood pressure using the correct posture and do not move or speak during
measurement.
Do not use cuffs other than the original cuff included with this product.
The system may fail to yield specified measurement accuracy if operated or stored in
temperature or humidity conditions outside the limits stated in the specifications section
of this manual.
Do not use this instrument without consultation with your doctor if you are under dialysis
therapy or on anticoagulants, antiplatelets or steroids. Use of this instrument under such
conditions could cause internal bleeding.
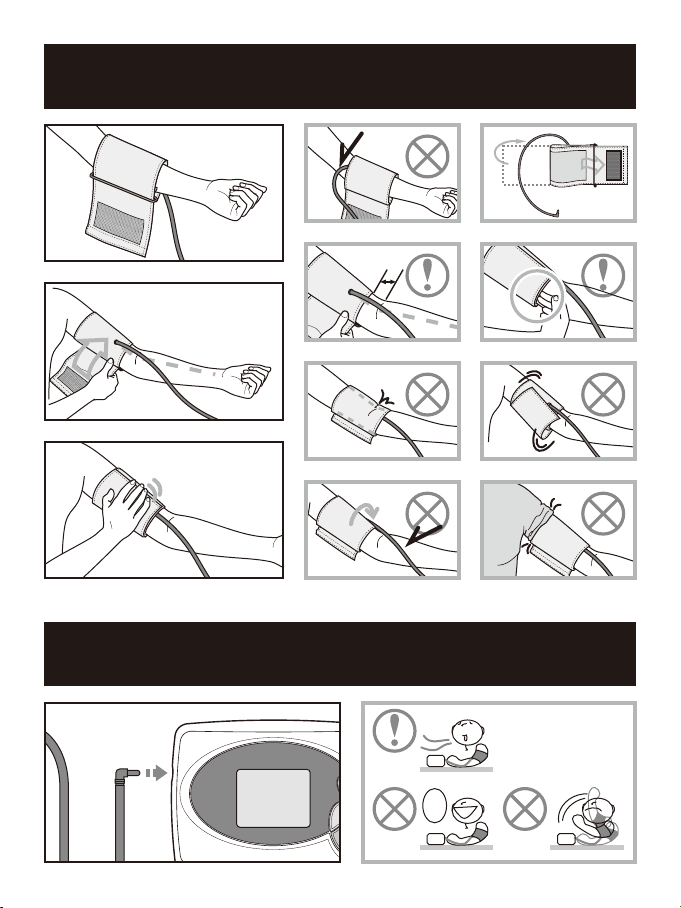
To avoid any possibility of accidental strangulation, keep this unit away from children
and do not drape AIR HOSE around your neck.
For specific information on your blood pressure, contact your physician. Never make any
judgment on your own regarding measurement results.
Use of this device in areas near portable phones, microwave ovens or other devices with
strong electromagnetic field may cause malfunctions.
Blood pressure changes shown below.
Upper arm blood pressure data
PRECAUTIONS FOR USE
TIPS ON TAKING YOUR BLOOD PRESSURE
- 12 -

180~
160~179
140~159
130~139
120~129
~120
80
11080
84
85
89
90
99
100
109
DIA
SYS
mmHg
Hypertension
(severe)
(moderate)
(mild)
~
~
~
~
~
~
High Normal
Normal
Optimal
Open the battery compartment cover.
Install four “AA” type batteries into the
compartment.
Make sure that the polarities correspond to
the (+) and (–) marks inside the battery
compartment.
The batteries can be easily installed by pressing their (–)
side against the spring.
Close the battery compartment cover.
Do not force the battery cover into position.
BATTERY REPLACEMENT
INDICATION
Replace all the batteries when the
battery replacement indication appears
on the display or nothing is displayed.
Use alkaline batteries to increase battery life.
Use of regular Carbon-Zinc batteries will
necessitate more frequent replacement. The
enclosed batteries are for monitoring, and
their life may be shorter than that of
commercial batteries.
Avoid exercise, eating, drinking alcohol, smoking and other activities that affect
your blood pressure right before a measurement.
Take your blood pressure at the same time every day.
The ambient temperature should be approximately 20˚C when you take your blood
pressure.
Blood pressure measured at home tends to be lower than when measured in a hospital,
clinic or doctor's office.
This is because you are tense at the hospital and relaxed at home. It is important to know your stable normal
blood pressure at home.
Let a qualified physician interpret your blood
pressure readings.
Depending on your age, weight and general condition, blood
pressure can be slightly different. Consult with your doctor on
determining what blood pressure is normal for you.
Blood pressure classification – WHO (1999)
INSTALLING BATTERIES AND SETTING THE CLOCK
TIPS ON TAKING YOUR BLOOD PRESSURE
1.
2.
3.
fig.1
- 13 -
The used electrical and
electronic products are not
household waste. Follow your
national/local recycling rules to
dispose of them properly. In the EU
countries, please refer to waste
management symbol(s) marked on
the package or the instrument.
Operation with an AC adapter
AC ADAPTER
JACK is located
on the right side
of the unit.
Do not use any adapters other
than the one specified below.
Model : JPI2245
Output voltage : 6 VDC ±5%
Input voltage range : Standard voltage ±15%
Maximum electric load : 600mA or higher
Output plug polarity : Center Minus
Remove the batteries when
operating the unit with
AC adapter for extended
period of time.
Clock is reset when AC
adapter is unplugged.
Sit at the table and let the table support your arm as you take the blood pressure
measurement.
Make sure that the measurement location on the upper arm is at approximately the
same height as the heart, and that the forearm is extended naturally on the table and
does not move.
CORRECT MEASURING POSTURE
INSTALLING BATTERIES AND SETTING THE CLOCK
4.
5.
6.
7.
8.
Year flashes on the display.
Clock can be set only after the batteries are reinstalled.
Adjust the clock so that measurement results are stored
with correct date and time.
Use MEMORY BUTTON to increase the flashing
year and MEMORY SELECTOR to decrease the
year.
Press START/STOP BUTTON to confirm and move
to next step.
Month flashes.
Adjust the month with MEMORY BUTTON and/or
MEMORY SELECTOR, press START/STOP BUTTON
to confirm.
Day flashes.
Adjust the day with MEMORY BUTTON and/or
MEMORY SELECTOR, press START/STOP BUTTON
to confirm.
Hour flashes.
The clock is in 24 hour mode.
Adjust the hour with MEMORY BUTTON and/or
MEMORY SELECTOR, press START/STOP BUTTON
to confirm.
Minute flashes.
Adjust the minute with MEMORY BUTTON and/or
MEMORY SELECTOR, press START/STOP BUTTON
to confirm.
Clock is set and the unit is turned off.
The clock is displayed while the unit is turned off.
fig.2
- 14 -

Place the cuff on your left arm with the air hose positioned toward your hand.
Wrap the cuff around your arm with the edge of the cuff approximately 2~3 cm
above the elbow. AIR HOSE should be on the palm side of the arm.
Press the surface of the cuff to make sure that the hook & loop fastens securely.
When wrapping the cuff, wrap it loosely enough around the arm so that two fingers
can be placed between the cuff and the arm. If the cuff is wrapped more tightly or
loosely than this, inaccurate blood pressure readings may result.
If you are wearing a shirt that might restrict circulation in your upper arm or you
roll your sleeve up over the upper arm, the blood flow will be restricted, preventing
accurate measurement.
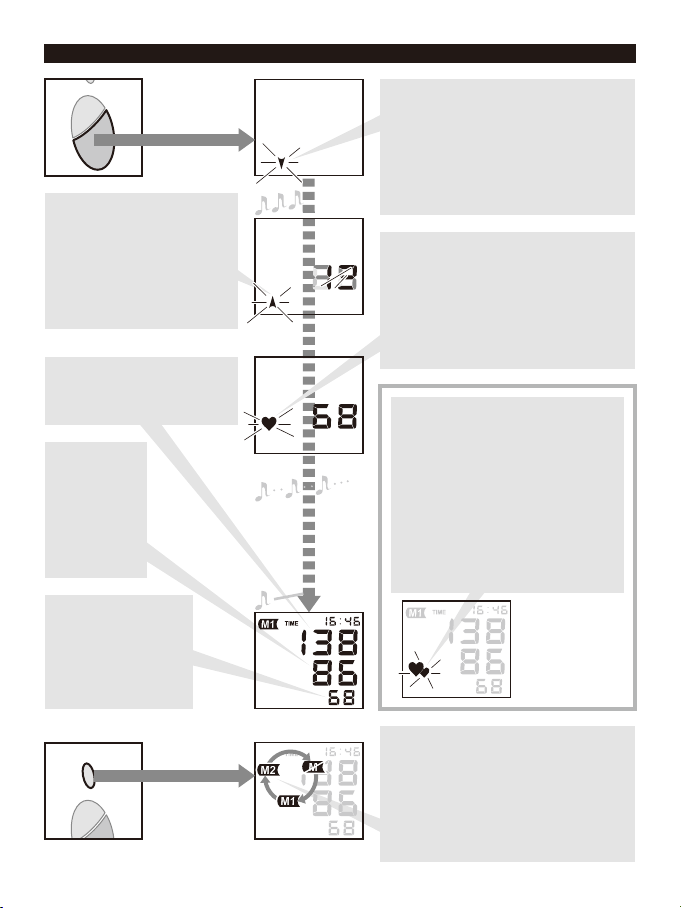
Insert TUBE PLUG into AIR CONNECTOR.
Press START/STOP BUTTON.
Deflation mark flashes.
Beep sounds when the cuff is deflated completely.
Automatic inflation starts and inflation mark flashes.
Inflation mark disappears and measurement begins.
Heart mark flashes with synchronizing beep as pulse is detected.
Long beep sounds as the measurement is
complete.
Blood pressures and pulse rate are displayed.
The unit automatically exhausts the air from the cuff.
Take deep breaths and relax.
Do not move, chat or strain
your arm or hand during
measurement.
To stop measurement
Press START/STOP BUTTON and
inflation stops, air is exhausted,
and monitor turns off.
CORRECT MEASURING POSTURE
1.
2.
3.
1.
2.
WRAPPING THE CUFF
fig.3
MEASUREMENT PROCEDURES
fig.4
You may lie on your back and take the measurement. Look at the ceiling, stay calm, and do not move your neck or
body during the measurement. Again, make sure that the measurement location on the arm is at approximately
the same height as the heart.
Measured data may vary slightly depending on the posture during measurement.
If the cuff is lower (higher) than the heart, the measured reading tends to become
larger (smaller).
- 15 -
pressure
time
rapid inflation
gradual inflation
rapid exhaust
pressure
time
Press MEMORY SELECTOR and select M1 or M2
to save the result or
not to save the result.
The result is stored in the bank selected when the unit
is turned off. Irregular pulse rhythm indication will not be
stored, only blood pressure and pulse rate are stored.
When a measurement resulted in an error, it will not be
stored.
Press START/STOP BUTTON to turn off the
power.
If you forget to turn off the unit, it will be automatically
turned off after 3 minutes.
An example of irregular pulse ryhthm
compared to regular pulse rhythm
regular pulse rhythm
MEASUREMENT PROCEDURES
3.
4.
Automatic Repressurization
If noise was detected or diastolic
blood pressure suspected to be low,
measurement is interrupted and cuff is
deflated once and inflation starts again.
Do not execute repeated
measurements for congestion
of blood could result in false
measurement. Let your arm
rest for at least 5 minutes.
IRREGULAR PULSE RHYTHM INDICATION
A flashing heart mark in the measurement result
display indicates irregular pulse rhythm. Irregular pulse rhythm can
be a result of body movement during measurement or arrhythmias.
Although continuous appearance of the indication under quiet
measurements may suggest arrhythmias, do not make any
judgment on your own before consulting with your doctor.
Measurement during inflation
Initially the cuff is rapidly pressurized to approximately 25 mmHg at the
beginning of a measurement, during which the inflation mark is
displayed. After the pressure reaches this point, the inflation mark
disappears and the cuff is pressurized more gradually. During this
gradual inflation, pulse is detected and heart mark flashes. Measurement
ends when systolic blood pressure is determined and air is exhausted
from the cuff.
"Personal Mode"
This blood pressure monitor employs what is called "Personal Mode" to
shorten the measurement time and improves comfort. With "Personal
Mode", the pressure to which the monitor rapidly inflates is adjusted
based on the last three measurements. For example, high diastolic blood
pressure values from past three measurements will lead to higher
inflated pressure value than the initial value. In the event that this value is
too high for your current blood pressure, the cuff will rapidly deflate and
measurement will restart.
initial pressure change
an example of pressurization
determined with "Personal Mode"
- 16 -
30 30
"Personal Mode"
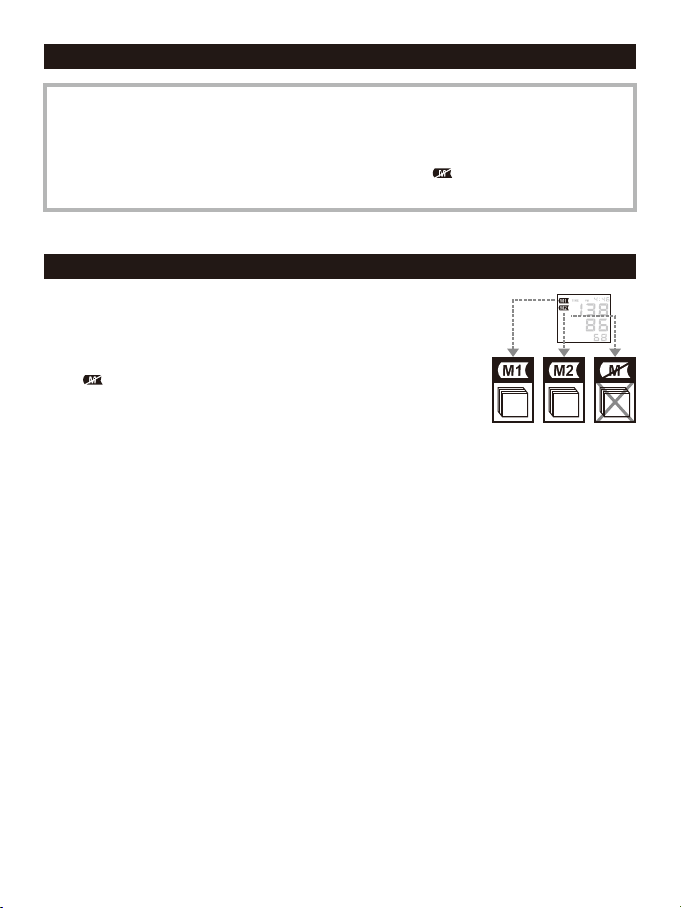
To use "Personal Mode" efficiently, select your memory bank before starting a measurement; press
MEMORY SELECTOR to see which memory bank is selected, press MEMORY SELECTOR button to
change the memory bank number, then press START/STOP BUTTON once to turn off the monitor, and
then press START/STOP BUTTON to start a measurement. Select
to avoid using the "Personal
Mode".
Insert TUBE PLUG into AIR CONNECTOR.
Press START/STOP BUTTON.
Deflation mark flashes.
Beep sounds when the cuff is deflated completely.
Automatic inflation starts and inflation mark flashes.
Inflation mark disappears and measurement begins.
Heart mark flashes with synchronizing beep as pulse is detected.
Long beep sounds as the measurement is
complete.
Blood pressures and pulse rate are displayed.
The unit automatically exhausts the air from the cuff.
After a measurement, to add current reading to memory, press START/STOP
BUTTON once while measurement result is being displayed. Measured result is
stored in either M1 or M2. Make sure disired memory bank is selected before
turning the monitor off after a measurement. The result will not be saved
when
is selected. Each of two memory banks, M1 and M2, can hold up
to 30 results and their average. When the number of measurements exceeds
30, the oldest data will be deleted to record new data.
Press MEMORY BUTTON to see stored data.
Press START/STOP BUTTON once while measurement result is being displayed after a measurement.
The average of the stored results is displayed.
When there is only a single result, this reading will be displayed as the average.
The memory data is displayed for approximately 30 seconds. Approximately 30 seconds after MEMORY
BUTTON is released, the apparatus will turn off.
Press MEMORY SELECTOR to change memory bank.
Press MEMORY BUTTON to move to next data.
The memory data number 1 is the latest among the stored data.
Indication at the top alternates from memory data number to date and to time of measurement.
Every depression of the key switches among the memory data.
As MEMORY BUTTON is pressed, the memory data number increases; the bigger the number, the older
the result.
Press START/STOP BUTTON to turn off the unit.
DELETING STORED DATA
Display the data to be erased or the average to erase all the data in the memory.
Press and hold down MEMORY BUTTON.
The displayed data starts flashing.
Hold down the button until measurement result disappears.
Take deep breaths and relax.
Do not move, chat or strain
your arm or hand during
measurement.
To stop measurement
Press START/STOP BUTTON and
inflation stops, air is exhausted,
and monitor turns off.
MEASUREMENT PROCEDURES
MEMORY FUNCTION
fig.5
1.
2.
3.
4.
1.
2.
3.
- 17 -

Do not move during
measurement.
Remain still and quiet during
measurement.
Reinsert TUBE PLUG and make
sure that it is securely inserted.
Do not move during
measurement.
Replace all batteries with new
ones.
Reinsert the batteries in the
correct position.
Clean with a dry cloth.
Check the AC adapter connection.
Replace all batteries with new
ones.
Press START/STOP BUTTON to
turn off the power once and
press it again to start a
measurement.
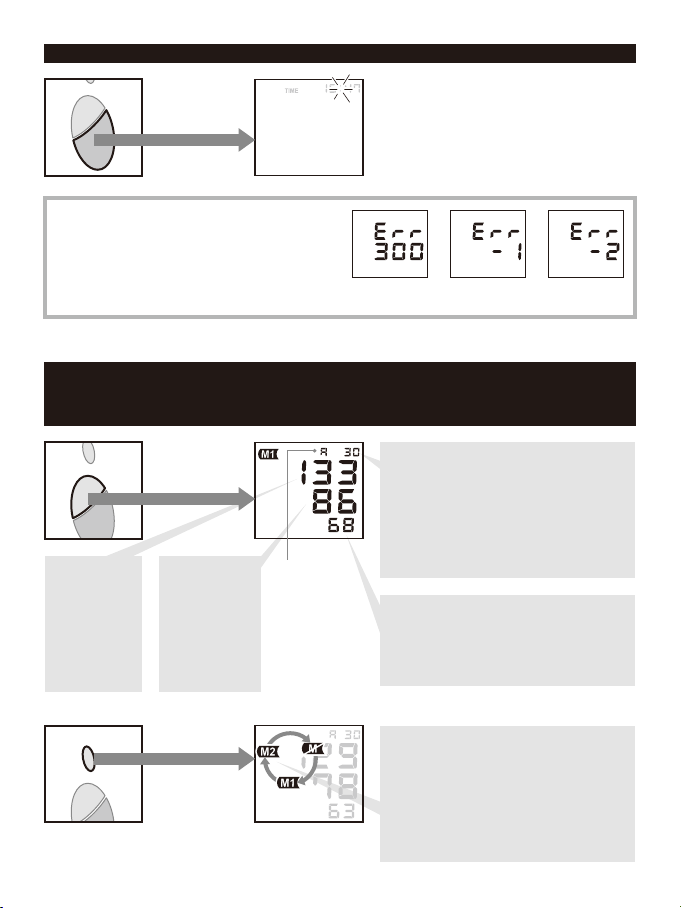
OVER-PRESSURIZATION;
The cuff was inflated to the
maximum pressure because of
movement of body etc.
MEASUREMENT ERROR;
Measurement could not be made
because of moving or talking during
measurement.
INFLATION ERROR;
TUBE PLUG is not correctly
inserted.
Noise was detected.
NO POWER;
Batteries are exhausted.
Have the batteries polarities been
positioned incorrectly?
Are the battery terminals clean?
AC adapter is not properly connected.
LOW BATTERY;
Battery is weak.
IMPROPER OPERATION;
START/STOP BUTTON was
accidentally pressed during battery
replacement.
CAUSE / CHECK POINT
ERROR SYMBOL/SYMPTOM
REMEDY
no display
ERROR DISPLAYS AND TROUBLESHOOTING
- 18 -

Measurement is
interrupted once and
cuff is deflated and
inflated again.
Cannot make great
number of
measurements.
Cannot complete the
measurement.
Blood pressure is
different each time. The
reading is extremely
low (or high).
Pulse rate is too low
(or too high).
Measurement result is
not stored.
The power is
automatically turned
off.
ERROR SYMBOL/SYMPTOM
This does not indicate a
problem.
Do not move during
measurement.
Use alkaline batteries to
increase battery life.
Replace all four batteries with
new ones.
Measure with the correct
posture.
See TIPS ON TAKING YOUR BLOOD
PRESSURE.
Remain still during the
measurement.
Measure again after resting for
more than 5 minutes.
Confirm the memory bank
number.
Make sure desired memory bank
is selected before turning off the
monitor after a measurement.
When is
displayed the result
will not be saved.
This does not indicate a problem.
The instrument automatically
turns off 3 minutes after a
measurement or 30 seconds
after memory display.
When noise is detected or diastolic
blood pressure is low, the cuff is
deflated and inflated again.
Did you move during measurement?
Are you using alkaline batteries?
Have the batteries run down?
Are you measuring with correct
posture?
Blood pressure readings constantly
vary with time of measurement and
nervous condition.
Did you move during the
measurement?
Did you take measurement
immediately after exercise?
Is it the right memory bank?
Did you select correct memory
bank number after the
measurement?
Have you left the instrument
untouched after the measurement?
If you cannot get correct measurement with the methods above, do not tamper with the internal mechanism.
Contact your dealer. If the unit malfunctions, please return it to the dealer or an authorized service representative
for service according to the warranty.
ERROR DISPLAYS AND TROUBLESHOOTING
CAUSE / CHECK POINT REMEDY
- 19 -
GASOLINE
PAINT
THINNER
Because the unit includes precision parts, care should be taken to avoid extreme temperature variations,
humidity, shock, dust, and direct sunlight. Do not drop or strike the unit. Make sure not to expose the unit to
moisture. This unit is not water resistant.
Use only a soft, dry cloth to clean the unit. Do not use gasoline, paint thinner, or other strong solvents on the
unit. Since the cuff may absorb perspiration and other fluids, inspect it for stain and discoloration after each use.
When cleaning the cuff, do not machine wash or scrub it. Use a synthetic detergent and gently rub the surface.
Air dry thoroughly. Make sure fluid never gets in AIR HOSE.
When storing the unit, do not place heavy objects on it and do not coil AIR HOSE too tightly. When the unit has
been stored at a temperature below the freezing point, keep it for at least 1 hour in a warm place before using.
Remove the batteries if the instrument is to be stored for an extended period of time. Keep the batteries
out of reach of children.
We suggest that you have your blood pressure monitor checked every 2 years. This operation may only be
performed by the manufacturer or by firms authorized by the manufacturer.
Do not inflate the cuff when it is not wrapped around your arm.
Do not disassemble or modify the unit.
CARE AND MAINTENANCE
- 20 -
Table of contents
Languages:
Other Nissei Blood Pressure Monitor manuals

Nissei
Nissei WS-1011 User manual

Nissei
Nissei WS-820 User manual

Nissei
Nissei DSK-1031 User manual

Nissei
Nissei WS-820 User manual

Nissei
Nissei DS-B10 User manual

Nissei
Nissei WS-1300 User manual

Nissei
Nissei DSK-1031 User manual

Nissei
Nissei DS-1011 User manual

Nissei
Nissei DS-10 User manual

Nissei
Nissei WSK-1011 User manual

Nissei
Nissei WSK-1011 User manual

Nissei
Nissei DSK-1011J User manual

Nissei
Nissei DSK-1011 User manual

Nissei
Nissei DS-137 User manual

Nissei
Nissei DS-10a User manual

Nissei
Nissei DS-S10 User manual

Nissei
Nissei DSK-1031 User manual

Nissei
Nissei DS-500 User manual

Nissei
Nissei DSK-1031 User manual

Nissei
Nissei DS-400 User manual


