Nissei WS-820 User manual

JAPAN
INSTRUCTOIN MANUAL
DIGITAL BLOOD PRESSURE MONITOR
WS-820
INSTRUKCJA OBSŁUGI
CIŚNIENIOMIERZA CYFROWEGO WS-820
РЪКОВОДСТВО ЗА ЕКСПЛОАТАЦИЯ
НА ЦИФРОВ ТОНОМЕТЪР WS-820
UŽIVATELSKÝ NÁVOD
K DIGITÁLNÍMU TONOMETRU WS-820
A
WS-820
TÍPUSÚ DIGITÁLIS TONOMÉTER
HASZNÁLATI UTASÍTÁSA
MANUAL DE UTILIZARE
A TENSIOMETRULUI DIGITAL WS-820
ROU HUN CZE BGR POL ENG
“M” CUFF
®
ENG
2
This manual contains information useful for safe and efficient operation of digital blood pressure
monitor model WS-820 (hereinafter “Device”). Do not use this device in any manner other than
that specified in this manual. Please look thoroughly through this manual and particularly “Rec-
ommendations for Correct Measurement”.
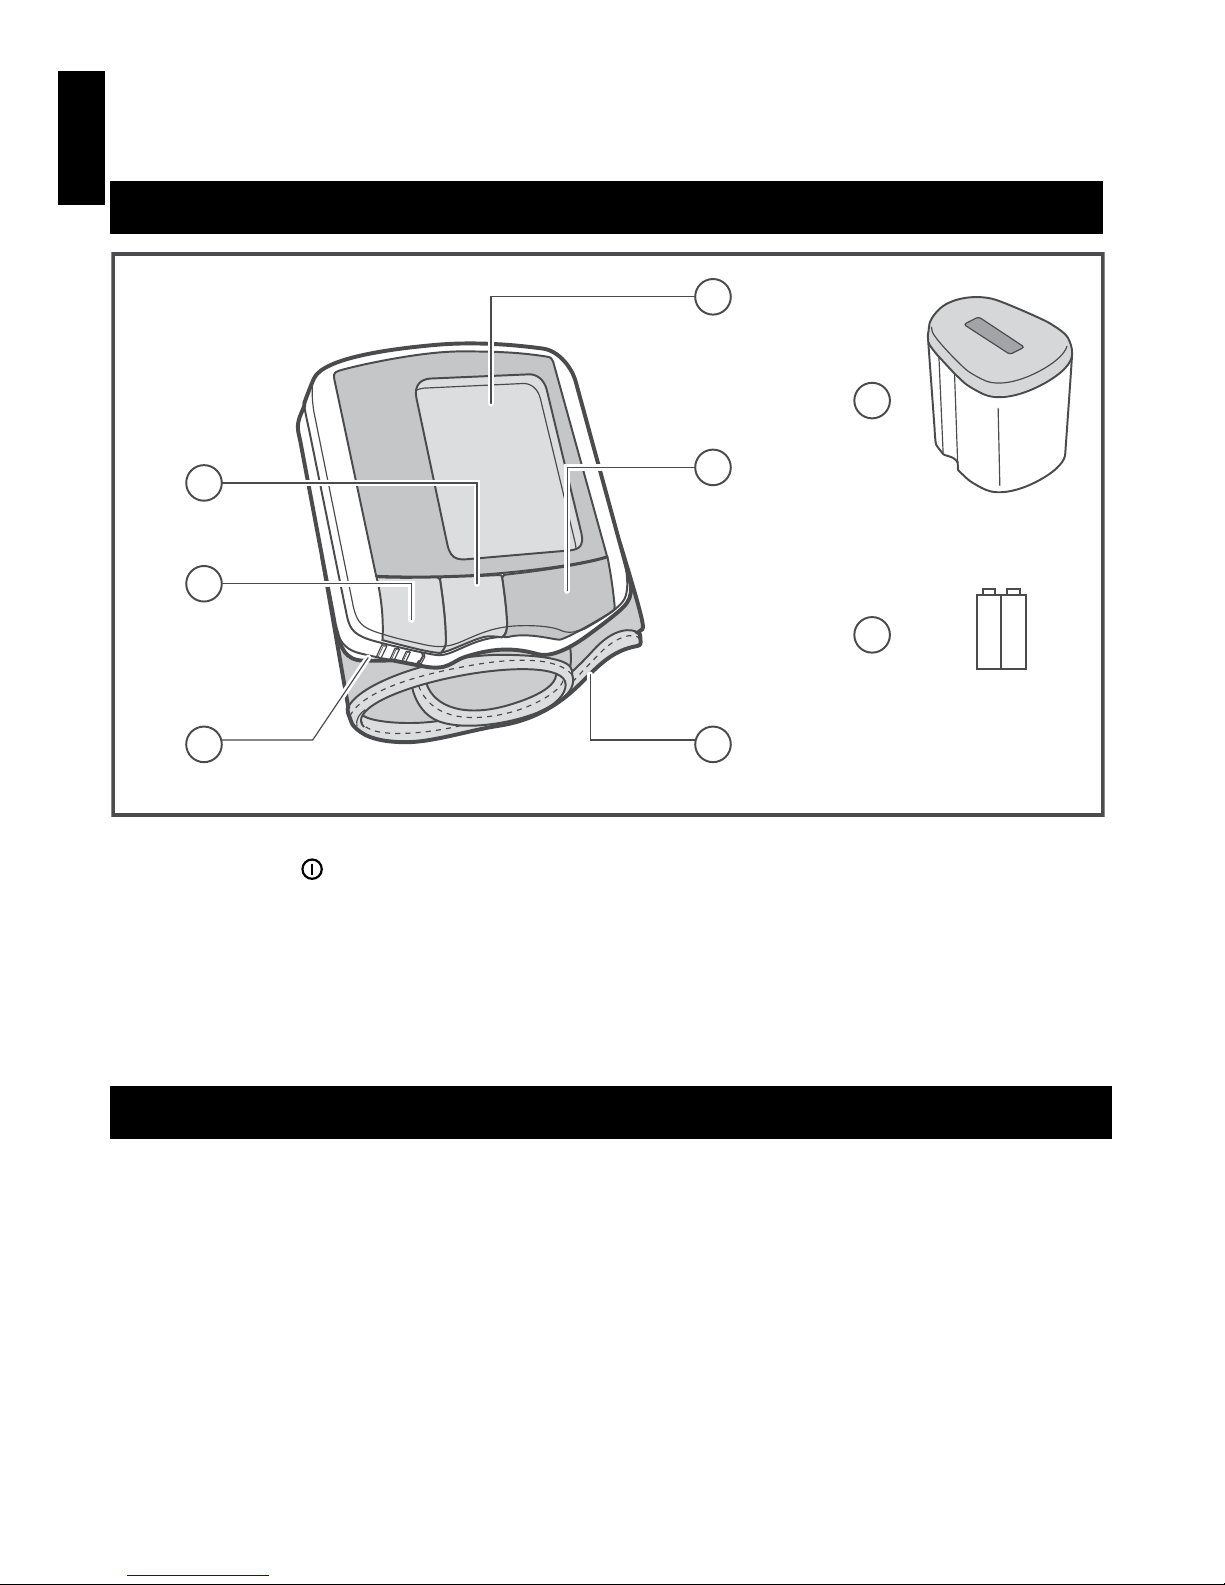
PARTS AND COMPONENTS
1 LCD DISPLAY
2START BUTTON « » (START, ON/OFF)
3 BUTTON М1
4 BUTTON М2
5 BATTERY COMPARTMENT COVER
6 CUFF
7 CASE
8 BATTERIES
GENERAL INFORMATION
INDICATIONS FOR USE
WS-820 device is intended for measuring systolic and diastolic arterial pressure and for rating
pulse in patients aged from 15 and elder with a cuff wrapped around a wrist. The device is recom-
mended for use in patients with unstable (nonpermanent) blood pressure or hypertension at
home as a supplement to medical surveillance. The cuff is suitable for a wrist with a circumfer-
ence of about 12,5 - 21,5 cm. Blood pressure is measured in the range from 50 to 250 mmHg for
systolic and 40 to 180 mmHg for diastolic, in the range from 40 to 160 heartbeats per minute.
The product is not designed for neonatal or infant use. Also, the effectiveness of the product is
not established in person in pregnancy (including preeclamptic condition) as measurement ac-
curacy has not been verified. Please consult with your doctor or physician to use this product for
such subject group. The product is not intended for use during professional transport of a patient
outside a healthcare facility.
7
8
2
5
3
4
1
6

ENG
3
OPERATION PRINCIPLES
The device uses the oscillometric method of measurement. Connect a cuff to an electronic unit and
wrap it around your wrist. When you press the
« »
button the device starts the automatic inflation,
which is followed by the blood pressure measurement.
The sensor element of the device detects slight pressure oscillations in the cuff produced by the ex-
pansion and contraction of the brachial artery in response to each heartbeat. Rhythm and amplitude
of the pressure waves are measured and displayed on the LC display as a numerical value in millim-
eters of mercury.
The device has an irregular pulse rhythm indicator, as well as two memories with
30 cells in each calculating the average value.
NISSEI New Technologies
IQ SYSTEM is an intelligent system developed by NISSEI engineers with due regard for
the specific nature of each person's heartbeat, thus providing high accuracy of read-
ings within minimal measurement time.
Irregular pulse rhythm indicator is a special icon on the display that informs on the
irregular heartbeat, while the measurement result is correct. Please be noted that the
irregular pulse can be caused by arrhythmia. To control this at an early stage we rec-
ommend you visit your doctor.
“M” CUFF
M-Cuff series is a unique cuff unit designed and patented by NISSEI. M-shaped cuff
can read pulse wave simultaneously from two arteries.
WS-820 is the most accurate instrument following up the results of the tests held by
the German Hypertension Society*. About 40 devices of different manufacturers were
tested both on wrist and upper arm, and WS-820 got the highest score in terms of
accuracy as of August 2006.
* “GEK-Besser leben”, 2/2006
COMPLETE SET
The complete set WS-820 includes:
- Electronic unit with cuff – 1 pc.
- Batteries – 2 pc.
- Case – 1 pc.
- Instruction Manual – 1 pc.
- Warranty - 1 pc.
- Packaging – 1 pc.
RECOMMENDATIONS ON CORRECT MEASUREMENTS
1
If treated with hemodialysis or anticoagulants, antiplatelets or steroids, refer to your doctor about
the blood pressure measurement. Use of this instrument under such conditions could cause internal
bleeding.
2 Malfunctions are possible when the device is used near working mobile phones, microwave ovens
and other equipment generating electromagnetic radiation (e.g. The product should be used 3.3m
away from the wireless communication device with a maximum output power of 2W).
3 Do not use this product along with implantable and wearable medical electrical equipment such
as pacemaker, defibrillator, or electrocardiographic monitor. This product is not also intended to
be used with HF surgical equipment as the use with such equipment may cause the malfunction
of the product.

ENG
4
4 Do not use this product in an explosive environment such as near flammable anesthetics or in-
side oxygen chamber.
5 The system may fail to yield specified measurement accuracy if operated or stored in tempera-
ture or humidity conditions outside the limits stated in the specifications section of this manual.
6 Do not use any accessories other than those specified by the manufacturer. Otherwise, correct
measurement readings cannot be obtained.
7 Do not apply the cuff over wounded wrist, wrist of which side is under an intravascular access
or therapy or an arterio-venous shunt, or wrist on the side of a mastectomy. Otherwise injury may
be resulted.
8 Make sure that inflation of the cuff is not causing prolonged impairment of blood circulation.
Also, be cautious about temporary loss of the functions of any other medical equipment if any
monitoring equipment is used on the same limb with the blood pressure measuring cuff.
9 Do not take out batteries when the monitor is turned on. Make sure that the monitor is turned
off before removing batteries.
10 Do not inflate the cuff when it is not wrapped around your wrist.
11 This product is not designed for self-use by unspecified persons in public areas.
12 Do not apply the cuff on the limb which the intravenous drip infusion is implemented.
13 F
or correct measurement it is necessary to know that the BLOOD PRESSURE IS SUBJECT TO
SHARP FLUCTUATIONS EVEN IN SHORT TIME INTERVALS. The blood pressure level depends on
many factors. It is commonly lower in summer and higher in winter. Blood pressure varies along
with atmospheric pressure and depends on the physical exertion, emotional excitability, stress
and diet. Medical drugs, alcohol and smoking exert great influence as well. Occasionally, meas-
urements in the clinic cause an increase in pressure values. Therefore, blood pressure measured
at home is often different from that measured in the clinic. Since blood pressure increases at
low temperatures, measurements should be made at room temperature (about 20°C). In case
the product is stored in the environment with ambient temperature above 40˚C or below 10˚C,
please leave it for at least 2 hours before taking a measurement.
Blood pressure variations during a day
Systolic
Diastolic
Arterial pressure (mmHg)
Time of day
During the day, the difference in the readings in healthy people may attain 30-50 mm Hg for
systolic (upper) pressure and up to 10 mm Hg for diastolic (lower) pressure. Dependence of
blood pressure on various factors is individual for each person. Therefore it is recommend-
ed to keep a special recording of blood pressure readings. ONLY A DOCTOR MAY ANALYZE
TRENDS IN CHANGING YOUR BLOOD PRESSURE BASED ON CORRESPONDING RECORDINGS.
14 In case of cardiovascular diseases and a number of other diseases that require the blood
pressure monitoring, measurements should be carried out in the hours specified by a doc-

ENG
5
tor. REMEMBER THAT THE DIAGNOSTICS AND ANY TREATMENT OF ARTERIAL HYPERTENSION
SHOULD BE CARRIED OUT ONLY BY A DOCTOR BASED ON BLOOD PRESSURE READINGS OB-
TAINED BY A DOCTOR. MEDICAL DRUG ADMINISTRATION OR CHANGE OF DOSAGES SHOULD
BE MADE ONLY BY PRESCRIPTION OF AN ATTENDING DOCTOR.
15
In case of disorders such as deep vascular sclerosis, weak pulse wave and break in rhythm of
heart contractions, the correct blood pressure measurement can be complicated. IN THIS CASE,
A DOCTOR SHALL PROVIDE RECOMMENDATIONS IN RELATION TO USE OF THIS DEVICE
.
16 KEEP QUIET DURING THE MEASUREMENT TO OBTAIN THE CORRECT BLOOD PRESSURE
READING WHEN USING THE ELECTRONIC DEVICE. The blood pressure measurement should
be carried out in a quiet comfortable atmosphere at room temperature. Exclude meal an hour
before the measurement, and exclude smoking, soft drinks, and alcohol 1.5-2 hours before
the measurement.
17 Accuracy of the blood pressure measurement depends on matching the device cuff and size
of your wrist. THE CUFF SHOULD NOT BE TOO SMALL OR TOO BIG.
18 Repeated measurements are carried out at 5-minute intervals to recover the blood circulation
and to avoid the injury due to blood flow interference. However, persons suffering from severe
atherosclerosis, due to a significant loss of elasticity of blood vessels, need longer intervals between
measurements (10-15 minutes).
This also concerns patients suffering from long-term diabetes. For more accurate determination of
blood pressure it is recommended to carry out a series of three consecutive measurements and to
calculate the average value of measurement results
.
POWER SUPPLY OF THE DEVICE

ENG
6
1 Remove the battery compartment. Do not use excessive force when removing the cover.
2 Install two “ААА”. Make sure that polarity corresponds to signs (+) and (-) shown inside the
compartment. Batteries are readily installed by pressing the end “-“ on the spring.
3 Close the battery compartment cover. After the installation of batteries, set date and time.
Battery Replacement Indicator
Replace all the batteries when the display continuously shows the battery replacement indicator
“” or there is no indication on the display. The battery replacement indicator does not show
a discharge degree.
Installation of new alkaline batteries provides up to 300 measurements. The supplied batteries are
used for testing the device in the sale and service life may be shorter than that recommended alkaline
batteries. Attention should be paid for the expiry date of the batteries especially in case the monitor
is not used frequently.
Since neither the device nor the batteries are the waste that can be utilized at
home, follow your national/local regulations for waste recycling and take them to
corresponding collection facilities.
ATTENTION! Do not use rechargeable batteries or the batteries other than the ones with
designated type. The specified performance of the product may not be retained if those
batteries are used. Do not touch another person while touching the battery terminals of the
monitor when changing batteries.
SETTING DATE AND TIME
Date and time can be set after installing batteries. Setting the date and time guarantees the
preservation of measurement results with indicated correct date and time.
If you do not want to enter date and time after batteries installation, press START button « » five times.
1 Setting the Year
After batteries installation, the LCD display shows flashing digits of the year. Enter the current year
using M1 button to increase the year value, and M2 button to decrease it.
Press the START button « » to confirm and to pass to the next step.
2 Setting the Month
Upon entering the current year, enter the current month (month digits flash on LCD display). Enter
the current month using M1 button to increase the month value, and M2 button to decrease it.
Press the START button
« »
to confirm and to pass to the next step
.
3 Setting the Day
Upon entering the current month, enter the current date (date digits flash on LCD display). Enter
the current date using M1 button to increase the day value, and M2 button to decrease it.
Press
the START button
« »
to confirm and to pass to the next step
.
4 Setting the Time
Watch uses a 24-hour time format of day.
Upon entering the date, enter the hour using M1 and M2 buttons. Press the START button « » to
confirm the settings. using M1 button to increase the minute value, and M2 button to decrease
it. Press the START button « » to confirm the settings. The clock has been set, and the unit is
prepared for operation. LCD monitor will display the time even when the unit is switched off.

ENG
7
CUFF PREPARATION
1 Holding your left hand with the palm facing up place a cuff on
a wrist so that the meter display is on the palm side. Should you
fail to put the cuff on your left wrist, place it on the right one.
2 Place the cuff on your hand so that its edge is spaced by 5-10
mm off the palm end. Place the meter on the center of your
wrist.
3 Snugly wrap the cuff on your wrist without leaving any space between the cuff and the wrist.
Make sure that the cuff comfortably fits your wrist.
Put the cuff on a bare wrist only. Be careful to prevent your cloth being caught by the cuff.
CORRECT POSITION DURING MEASUREMENT
Measurement in the sitting position
1. Sit down on a chair that you can be comfortably seated with your legs
uncrossed, feet flat on the floor and back supported. Your arm should also
be supported on the table.
2. Lightly raise your left hand with the palm facing up and put your elbow
on the table.
3. Bring the cuff to the heart level placing your hand on a case or folded towel.
In case of unavailability of a table
1. Sit down on a chair. that you can be comfortably seated with your legs
uncrossed, feet flat on the floor and back supported.
2. Bring the cuff to the heart level lightly pressing your left hand to the
chest.
3. While measuring lightly support your left hand by the right one.
Lie on your back
1. Lie on your back.
2. Bring the cuff to the heart level using a case and folded towel.
Try to use the same wrist and position for measurement.
If the cuff is positioned above/below the heart, any reading obtained will tend to be out of the
allowance.
MEASUREMENT PROCEDURE
Before measurement, take a few breaths and relax.
During the measurement, do not talk and do not move.
1 Press the START « ».
Press the START« » button to stop
forcedly the measurement: the
device will stop inflation and quickly
release the air and switch off.
The unit will automatically start pumping the air into the
cuff. When the cuff pressure reaches ~190 mm Hg, the unit will stop pumping the air.
ENG
8
The pressure in the cuff (the value shown on the display) starts to decrease, and heart rate is
displayed in the form of icon (heart).
When the measurement is completed, the air is automatically released from the cuff.
The display shows systolic, diastolic blood pressure and pulse rate
.
If irregular pulse rhythm is detected during the
measurement, then, upon completion of the test,
the irregular pulse rhythm icon will appear (two
hearts, one of them flashing).
2 Press the M1 button or M2, button and the result will
remain in the selected memory unit.
AUTOMATIC PRESSURE BOOSTING
If during measurement the initial
cuff pressure (190 mm Hg) is not
enough or arm is moved, the
Device will stop measurement and
pressurize the cuff to the next,
higher pressure level. Automatic
cuff pressure boosting will
continue until measurement is
completed successfully. This is not
a malfunction.
The number of the selected memory cell is shown on the
display. The result is stored in the memory determined at
the time the device is turned off. Only the blood pressure
and heart rate icons will be saved, not the irregular pulse
rhythm icon. If the measurement ended up with an error,
the result will not be saved.
3 Press the START « » button to turn off the device.
If you forget to turn off the device, it will do so automatically after 3 minutes.
To change over to manual pressure pump control, press START « » button immediately after
beginning of air pumping into the cuff, and release it when the pressure reaches the level that
is 50 mm Hg higher than the expected maximum systolic pressure. Air pumping will be
stopped after releasing the button, if the pressure exceeds the value of 180 mm Hg. The
pressure may be increased up to 300 mm Hg.
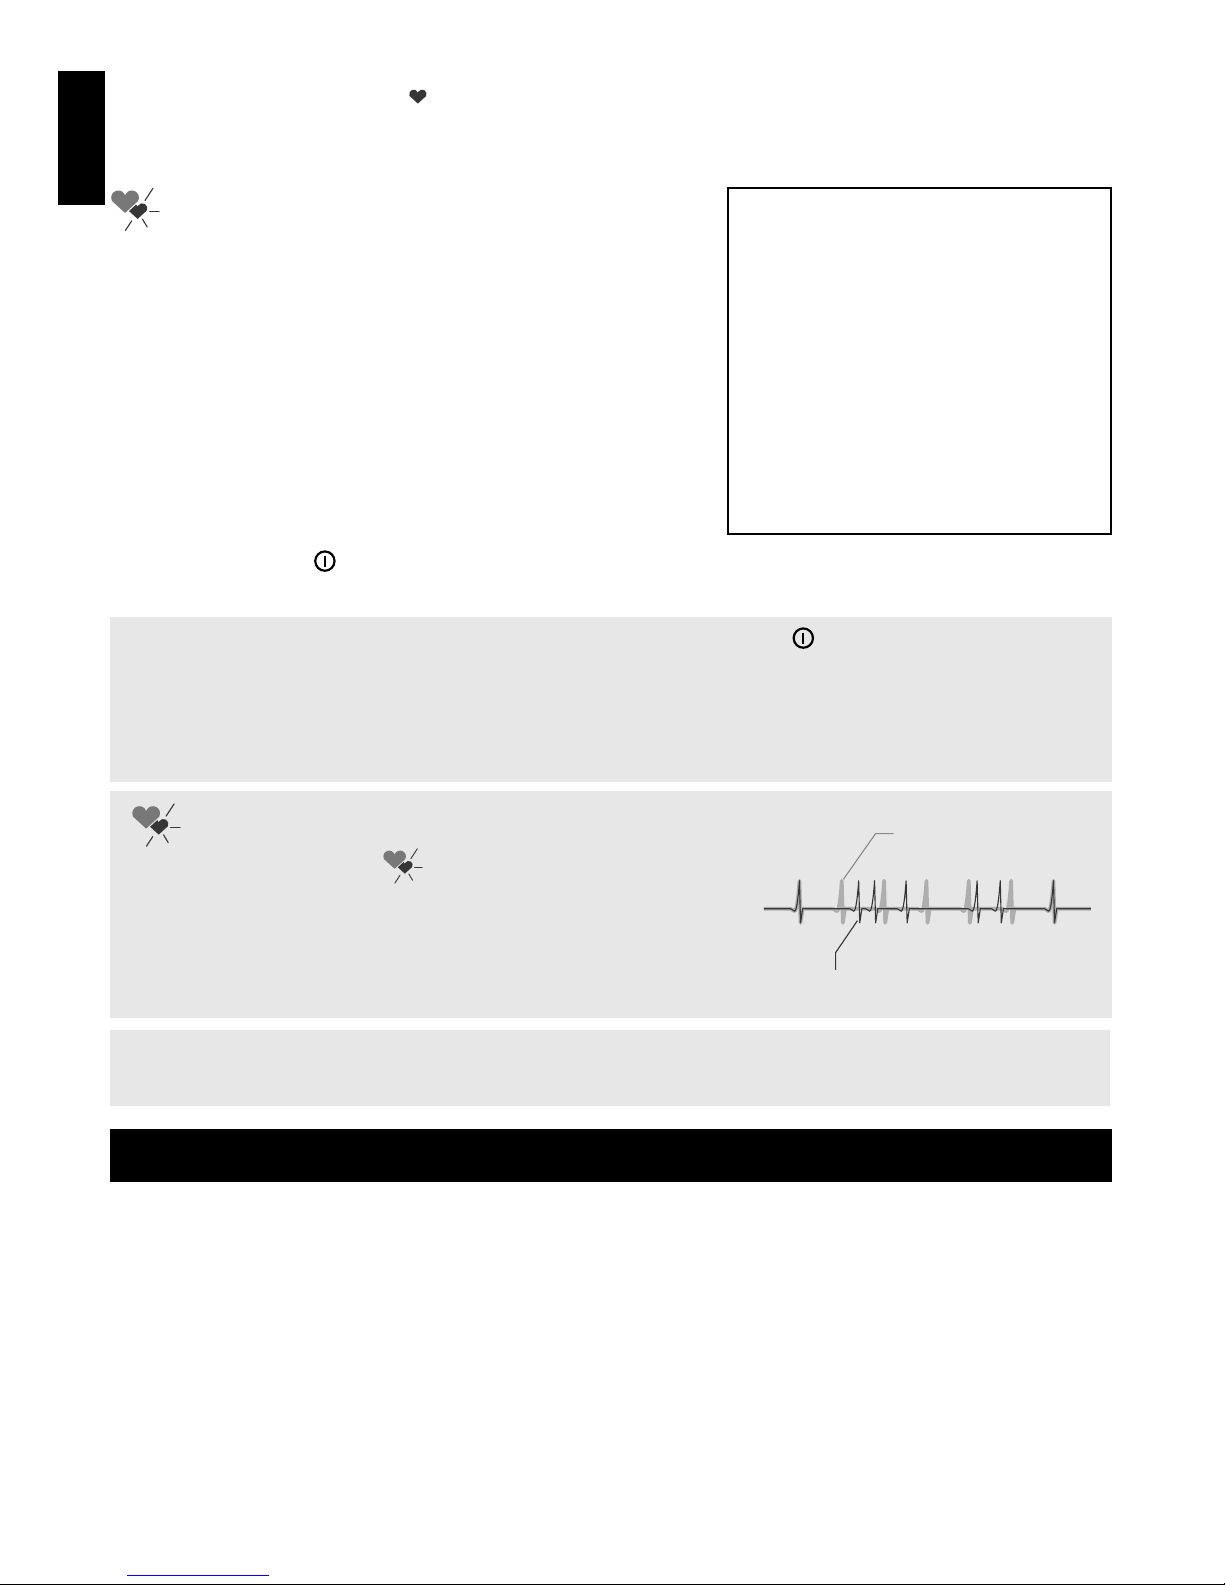
INDICATION OF IRREGULAR PULSE RHYTHM
Normal pulse rhythm
Irregular pulse rhythm
The flashing symbol “ ”, appeared on the display
reports on an irregular pulse rhythm. The irregular pulse
rhythm indicator occurrence can be also caused by body
movements in the course of the measurement. If this
symbol appears from time to time, refer to your doctor.
Do not perform several measurements in a row. This will cause numbing the hand and can
affect the measurement result. Give your hand a break for at least 5 minutes.
MEMORY FUNCTOIN
The measured values are automatically saved for later viewing in the selected memory unit. These
memory units can be used to save separately the measurement results of two different persons or
to save separately the results of morning and evening measurements.
Each unit can keep up to 30 measurement results and the average value thereof. When the
number of kept values exceeds 30, the oldest readings are deleted to record new values.
Saved values are kept with the measurement date and time, if set. If you want to save time
and date together with the measurement values, date and time should be set before the
measurement.
When an error occurs (ERR), the measurement results are not saved.

ENG
9
Viewing the Saved Data
"A" index
THE NUMBER OF THE MEMORY
SELECTED
AMOUNT OF CELLS
IN WHICH THE RESULTS
HAVE BEEN SAVED
SYSTOLIC
(mmHg)
DIASTOLIC
(mmHg)
PULSE RATE
(bpm)
1 Press M1 or M2 button to view
the data saved.
2 Initially, the average value of
results saved in the selected
memory is displayed on the LCD
screen. The «A» index stands for
the average value.
If there is only one measurement
result available, only this result
is displayed, and if there are no
results saved, the display shows
the time.
The indication in the upper part
of the display alternately changes
from the number of memory data to the date
and the time. Memory data will be shown for
about 30 sec, and then the device automatically
switches to the time display mode.
MEMORY
CELL
NUMBER
MEASUREMENT
DATE
MEASUREMENT
TIME
LAST RESULT
3 To view the next memory cell, press M1 button
again (or M2, respectively, to view the content
of memory M2). The result displayed in a cell
No. 1 is the latest among the data saved in the
selected memory.
4 Every press of M1 or M2 button results in a
transition to the next memory cell. The bigger
is the number of the memory cell, the older is
the result.
5 Press the START
«» button to turn off the
device
.
Deletion of Saved Data
The unit features the option of cleaning both a certain memory cell and the entire memory M1
(or M2) at once.
1 Select a value from the memory unit to be deleted or the average value (unit with index «А»)
to clear the whole memory unit..
2 Press and hold the button until the sign «---» appears on the display.
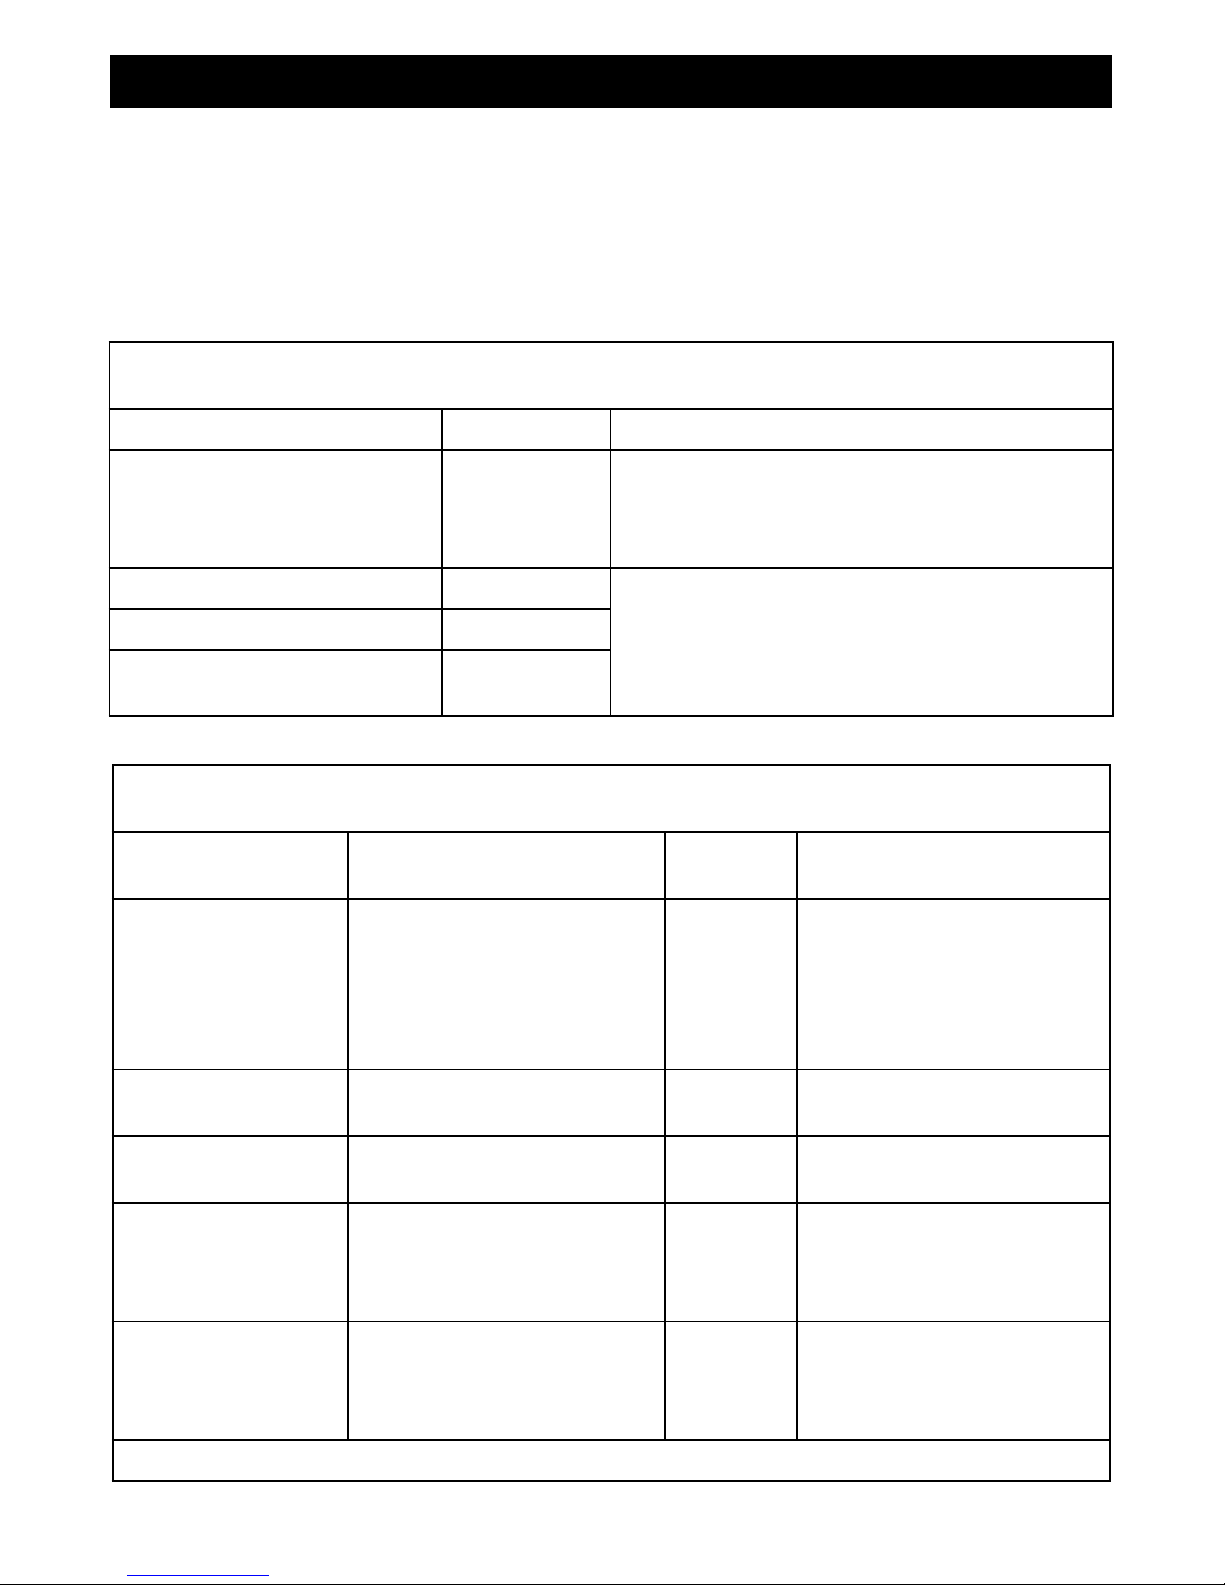
INFORMATION ABOUT ERRORS
INDICATION
LIKELY CAUSE
METHODS OF CORRECTION
Excess of pumping
pressure
Maximum allowable pressure:
pressure can not be measured due
to movement or talking during
the measurement, in spite of the
fact that the cuff was pumped at
maximum.
Be calm and quiet during the
measurement.

ENG
10
Measurement error During the measurement, a person
was talking or moving. Do not talk and do not move
during the measurement.
Pumping error The cuff is put on incorrectly.
The cuff has been damaged
Put on the cuff properly and
repeat the measurement. If the
Err-2 error repeats, that means
the cuff has been damaged.
Contact your local service center.
Air release error
During the measurement, a person
was talking or moving. Turn off the device and perform
the measurement again. Do not
talk and do not move during the
measurement.
Test mode
You touched the START « » button
when installing the batteries. Turn off the device by pressing
the START
« »
button and
perform the measurement again.
No indication. Batteries are discharged.
Batteries are installed incorrectly
.
Connecting terminals are
contaminated.
Replace all batteries with new ones.
Install batteries properly.
Wipe connecting terminals with
a dry cloth.
Blood pressure is too
low or too high. The cuff is not at the heart level.
The cuff has not been not wrapped
tightly around the wrist.
Your shoulders and arms are
strained.
Probably your talking and
moving your arm was the case at
measurement.
Put on the cuff at the heart level.
Attach the cuff correctly.
Relax and repeat the procedure.
Stay calm and be silent during
measurement.
Blood pressure
values vary between
measurements.
Measurement values
are too low (high).
Blood pressure values continuously
change depending on the
measurement time and nervous
excitation.
Take some deep breaths to relax
before the measurement.
If, despite the above-given recommendations, you fail to obtain the right measurements, stop the opera-
tion and contact the service center (addresses and telephone numbers of authorized organizations are pro-
vided in the warranty certificate). Do not attempt to adjust the device internal mechanism on your own.

ENG
11
TECHNICAL SPECIFICATIONS
Operating Principle Oscillometric method
Indicator 4-line LCD display
Indicating Range:
cuff pressure, mmHg 0-300
Measuring Range:
cuff pressure, mmHg
pulse rate, bpm 50-250 (systolic), 40-180 (diastolic)
40 - 160
Accuracy:
cuff pressure, mmHg
pulse rate, % ±3
±5
Inflation Automatic inflation (air pump)
Deflation Automatic Deflation (electric valve)
Electric supply voltage, V
3
Electric supply type
Two AAА (LR03) batteries
Power Consumption , W 2
Memory
2 units, 30 values per each + average value
Operating Condition
temperature, ˚C
humidity, % Rh +10 to +40
85 and lower
Storage Condition
temperature, ˚C
humidity, % Rh
-5 to +50
85 and lower
Cuff Cuff WS-820
Cuff Size
adult (circumference of the wrist 12,5-21,5 cm)
Overall dimensions:
Size (electronic unit), mm
Weight (without packaging,
bags and batteries), g
63,5 x 71 x 33
100
Manufacture year:
specified on the device housing in the device serial number
after the letters «SN»
Protection class IP: IP20; Protected against solid foreign particles with a
diameter of more than 12.5 mm, no protection against
water.
Protection against electric shock:
Internally powered equipment, Type BF applied part (cuff)
Mode of operation: Continuous operation
Classification: Internally Powered Equipment
KEY TO SYMBOLS:
Important: Please read the Manual
European Authorized Representative
Type BF applied part
Name and address of the manufacturer
Environmentally safe packaging
When utilizing the waste, refer to current rules
applicable in your region
Compliance with the Directive 93/42/EEC
Keep dry

ENG
12
The measurement accuracy of the product has been proven according to ISO 81060-2 protocol. In
the clinical study, K5 was used for the determination of diastolic pressure values at all auscultatory
measurements.
This product is intended to be used in the condition of one atmospheric pressure.
Revision date of the present Manual is indicated on the last page as EXXX/YYMM/XX, where YY is
the year and MM is the month of revision.
WARRANTY
1. The manufacturer guarantees the warranty period of 5 years for the device from the sale date
provided that the consumer observes operation, transportation and storage requirements. The
warranty period for the cuff and the power source is 12 months from the sale date.
2. Warranty liabilities are documented with the warranty certificate upon selling the device to the
buyer. The guarantee is valid provided that the device has not been opened or damaged by
the buyer.
3. Addresses of organizations engaged in the warranty service are specified in the warranty
certificate.
CARE, STORAGE, REPAIR AND DISPOSAL
1 This device should be protected from excessive temperature or moisture, direct sunlight,
strokes, dust, lint and vibration. THE DEVICE IS NOT WATERPROOF!
2 Do not keep or do not use the device in close proximity to heaters and open flame.
3 If the device has not been used for a long time, remove the batteries. Leaking of batteries
can cause damage to the device and terminate the warranty. KEEP BATTERIES AWAY FROM
CHILDREN!
4 Do not contaminate the device and protect it from dust. Check and ensure the monitor is not
dirty before use. In case the cleaning is necessary, clean the body with a cloth moistened with
water and a mild detergent, and then wipe dry.
5 Do not allow the contact between the device and its parts with water, solvents, alcohol, and
gasoline.
6 Keep the cuff away from sharp objects, and do not try to pull out the cuff.
7 Do not expose the device to strong strokes and do not throw it.
8 The device does not contain any adjustment controls for settings. Unauthorized opening of the
electronic device is forbidden. If needed, repair the device only in specialized organizations.
9 On the expiry of the specified operation term, refer to specialists (specialized repair
organizations) on a periodic basis to check the technical condition of the device. We suggest
that you have your monitor checked every 2 years.
10 When utilizing the waste, refer to current rules applicable in your region. No special utilization
conditions are specified by the manufacturer for this device
.
11 The cuff is resistant to repeated sanitation. The cuff internal fabric surface (being in contact
with a patient’wrist) can be treated with a cotton swab moistened in a 3% solution of hydrogen
peroxide. Partial discoloration of the cuff covering tissue is possible if used for a long time. Do
not wash the cuff and do not treat it with a hot iron.
12 Make sure that the monitor is stored in a secure place where children or pets cannot reach.
13 Do not replace the parts, disassemble or modify the monitor as it causes malfunction of the
monitor or danger to users.
14 Stop using the monitor immediately and contact your dealer or the manufacturer in case any
visible damage is found on the monitor.

ENG
13
CERTIFICATION AND STATE REGISTRATION
The production of devices is certified pursuant to international standards such as ISO 9001, ISO
13485, ISO 14001. The device meets international standards IEC60601-1+A1+A2, IEC60601-1-
2+A1/IEC60601-1-2 CISPR 11+A1. Device comply with the requirements of European Directive
MDD 93/42/ЕЕС.
Produced by Nihon Seimitsu Sokki Co., Ltd.
Address: 2508-13 Nakago Shibukawa Gunma 377-0293 Japan
website: http://www.nissei-kk.co.jp/english/
EC-Representative: Nissei Healthcare (UK) Ltd.
Henfield, BN5 9SJ UK
website: http://www.nisseihealthcare.com
TECHNICAL DESCRIPTION
WS-820 complies with the EMC, electromagnetic compatibility, standard, IEC60601-1-2. Refer to the following tables for specific
information regarding compliance to the standard. WS-820, as a medical electrical equipment, needs special precautions regarding
EMC and needs to be installed and put into service according to the EMC information provided below.
• Portable and mobile RF communications equipments can affect the device.
• The use of accessories other than those specified in this manual may result in increased emissions or decreased immunity of the
device.
•WS-820 should not be used adjacent to or stacked with other equipment.
Table 1 - Guidance and manufacturer’s declaration - electromagnetic emissions -
WS-820 is intended for use in the electromagnetic environment specified below.The customer or the user ofWS-820 should assure
that it is used in such an environment.
Emissions test Compliance Electromagnetic environment - guidance
RF emissions CISPR 11 Group 1 WS-820 uses RF energy only for its internal function. Therefore,
its RF emissions
are very low and are not likely to cause any interference in
nearby electronic equipment.
RF emissions CISPR 11 Class B Note: Operate by DC Power
Harmonic emissions IEC 61000-3-2 N/A
Voltage fluctuations/flicker emissions
IEC 61000-3-3 N/A
Table 2 - Guidance and manufacturer’s declaration - electromagnetic immunity -
WS-820 is intended for use in the electromagnetic environment specified below.The customer or the user of WS-820 should
assure that it is used in such an environment.
Immunity test IEC 60601 test level Compliance
level Electromagnetic environment -
guidance
Electrostatic discharge (ESD)
IEC 61000-4-2 ±6 kV contact
±8 kV air ±6 kV contact
±8 kV air Floors should be wood, concrete or
ceramic tile.
If floors are covered with synthetic
material, the
relative humidity should be at least
30 %.
Electrical fast transient/
burst IEC 61000-4-4 ±2 kV for power supply lines
±1 kV for input/output lines N/A Note: Operate by DC Power.
Surge IEC 61000-4-5 ±1 kV differential mode
±2 kV common mode N/A Note: Operate by DC Power.
Voltage dips , short
interruptions and voltage
variations on power supply
input lines IEC 61000-4-11
<5% U
T
(>95% dip in U
T
) for 0,5 cycle
40% U
T
(60% dip in U
T
) for 5 cycles
70% U
T
(30% dip in U
T
) for 25 cycles
<5% U
T
(>95% dip in U
T
) for 5 sec
N/A Note: Operate by DC Power.
Power frequency (50/ 60
Hz) magnetic field IEC
61000-4-8
3 A/m 3 A/m Power frequency magnetic fields
should be at levels characteristic of
a typical location in a typical com-
mercial or hospital environment.
NOTE U
T
is the a.c. mains voltage prior to application of the test level.

Table 4 - Guidance and manufacturer’s declaration - electromagnetic immunity -
WS-820 is intended for use in the electromagnetic environment specified below.The customer or the user of WS-820 should
assure that it is used in such an environment.
Immunity test IEC 60601 test
level Compliance
level Portable and mobile RF communications equipment should be used no
closer to any part ofWS-820, including cables, than the recommended
separation distance calculated from the equation applicable to the
frequency of the transmitter.
Conducted RF
IEC 61000-4-6
Radiated RF IEC
61000-4-3
3Vrms,
150 kHz to 80 MHz
3V/m, 80 MHz
to 2.5 GHz
N/A
3V/m
Recommended separation distance
d=[3.5/V1]√P
d =[3.5/E1]√P, 80MHz-800MHz d =[7/E1]√P, 800MHz-2.5GHz
Where P is the maximum output power rating of the transmitter in
watts (W) according to the transmitter manufacturer and d is the
recommended separation distance in metres (m).
Field strengths from fixed RF transmitters, as determined by an
electromagnetic site survey
a
should be less than the compliance level in
each frequency range
b
Interference may occur in the vicinity of equipment marked with the
following symbol:
NOTE1 At 80 MHz and 800 MHz, the higher frequency range applies.
NOTE2 These guidelines may not apply in all situations. Electromagnetic propagation is affected by absorption and reflection from
structures, objects and people.
a
Field strength from fixed transmitters, such as base stations for radio (cellular/cordless) telephones and land mobile radios,
amateur radio, AM and FM radios broadcast andTV broadcast cannot be predicted theoretically with accuracy.To assess the
electromagnetic environment due to fixed RF transmitters, an electromagnetic site survey should be considered. If the measured
field strength in the location in which WS-820 is used exceeds the applicable RF compliance level above,WS-820 should be
observed to verify normal operation. If abnormal performance is observed, additional measures may be necessary, such as
reorienting or relocatingWS-820.
b
Over the frequency range 150 kHz to 80 MHz, field strengths should be less than 3 V/m.
Table 6 - Recommended separation distances between portable and mobile RF communications equipment andWS-820 -
WS-820 is intended for use in an electromagnetic environment in which radiated RF disturbances are controlled.The customer or
the user ofWS-820 can help prevent electromagnetic interference by maintaining a minimum distance between portable and
mobile RF communications equipment (transmitters) andWS-820 as recommended below, according to the maximum output
power of the communications equipment.
Rated maximum
output power of
transmitter,W
Separation distance according to frequency of transmitter, m
150 kHz to 80 MHz, d=[3.5/V1]√P
80 MHz to 800 MHz, d=[3.5/E1]√P
800 MHz to 2.5 GHz, d=[7/E1]√P
0,01 0,12 0,12 0,23
0,1 0,38 0,38 0,73
1 1,2 1,2 2,3
10 3,8 3,8 7,3
100 12 12 23
For transmitters rated at a maximum output power not listed above, the recommended separation distance d in metres (m) can
be estimated using the equation applicable to the frequency of the transmitter, where P is the maximum output power rating of
the transmitter in watts (W) according to the transmitter manufacturer.
NOTE1 At 80 MHz and 800 MHz, the separation distance for the higher frequency range applies.
NOTE2 These guidelines may not apply in all situations. Electromagnetic propagation is affected by absorption and reflection from
structures, objects and people.

NIHON SEIMITSU SOKKI CO., LTD.
2508-13 Nakago Shibukawa Gunma 377-0293 Japan
®Registered trademark.
©
Copyright 2017.
E253/1701/02
Nissei Healthcare (UK) Ltd.
Rede House, New Barn Lane Henfield West Sussex BN5 9SJ UNITED KINGDOM
Other manuals for WS-820
1
Table of contents
Other Nissei Blood Pressure Monitor manuals

Nissei
Nissei WSK-1011 User manual

Nissei
Nissei DS-10 User manual

Nissei
Nissei DSK-1031 User manual

Nissei
Nissei DS-1873 User manual

Nissei
Nissei DS-10 User manual

Nissei
Nissei DSK-1031 User manual

Nissei
Nissei WSK-1011 User manual

Nissei
Nissei DS-500 User manual

Nissei
Nissei WS-1300 User manual

Nissei
Nissei DSK-1011 User manual

Nissei
Nissei DS-137 User manual

Nissei
Nissei DS-10a User manual

Nissei
Nissei DSK-1031 User manual

Nissei
Nissei WS-820 User manual

Nissei
Nissei DS-B10 User manual

Nissei
Nissei ds-1902 User manual

Nissei
Nissei DSK-1011 User manual

Nissei
Nissei DSK-1031 User manual

Nissei
Nissei DS-S10 User manual

Nissei
Nissei WS-1011 User manual


