Nissei WSK-1011 User manual
WSK-1011
INSTRUCTOIN MANUAL
DIGITAL BLOOD PRESSURE MONITORWSK-1011
INSTRUKCJA OBSŁUGI
CIŚNIENIOMIERZA CYFROWEGO WSK-1011
РЪКОВОДСТВО ЗА ЕКСПЛОАТАЦИЯ
НА ЦИФРОВ ТОНОМЕТЪР WSK-1011
UŽIVATELSKÝ NÁVOD
K DIGITÁLNÍMU TONOMETRU WSK-1011
A WSK-1011 TÍPUSÚ DIGITÁLIS TONOMÉTER
HASZNÁLATI UTASÍTÁSA
MANUAL DE UTILIZARE
A TENSIOMETRULUI DIGITAL WSK-1011
ROU HUN CZE BGR POL ENG

2
ENG
This manual contains information useful for safe and efficient operation of digital blood pressure monitor model WSK-1011 (hereinafter “De-
vice”). Do not use this device in any manner other than that specified in this manual. Please look thoroughly through this manual and particu-
larly“Recommendations for Correct Measurement”.
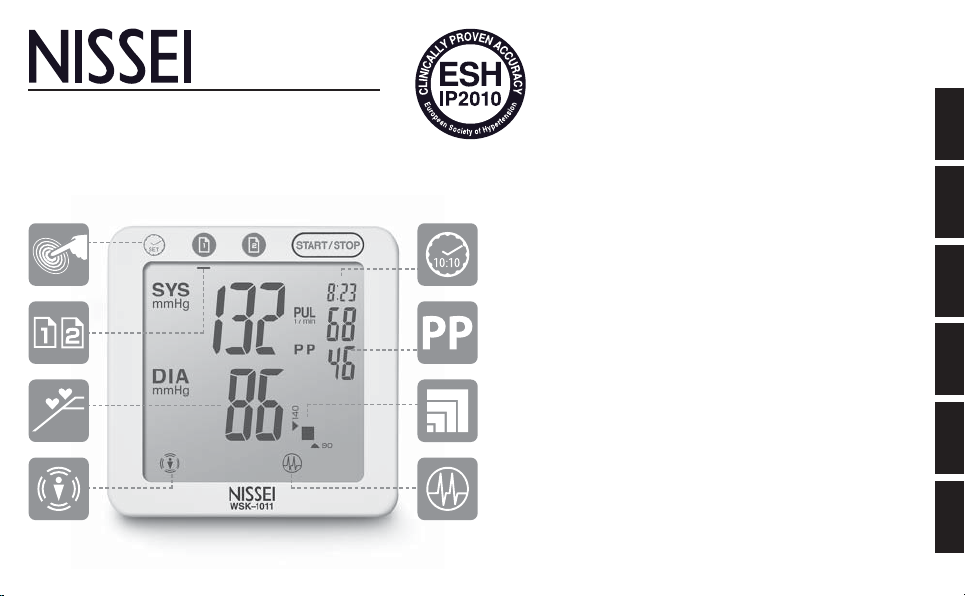
PARTS AND COMPONENTS
1. ELECTRONIC UNIT
2. BATTERIES
3. BAG
A.
SET BUTTON (SETTINGS)
B. BUTTON (MEMORY 1)
C. BUTTON (MEMORY 2)
D. START/STOP BUTTON (START/STOP)
E. LCD DISPLAY
F. CUFF
G. BATTERY COMPARTMENT

3
ENG
GENERAL INFORMATION
INDICATIONS FOR USE
WSK-1011 device is intended for measuring systolic and diastolic arterial pressure and for rating pulse in patients aged from 15 and elder
with a cuff wrapped around a wrist. The device is recommended for use in patients with unstable (nonpermanent) blood pressure or hyper-
tension at home as a supplement to medical surveillance. The cuff is suitable for a wrist with a circumference of about 12,5 - 22,5 cm. Blood
pressure is measured in the range from 40 to 250 mm Hg and heart rate, in the range from 40 to 160 heartbeats per minute.
OPERATION PRINCIPLES
The device uses the oscillometric method of measurement. Connect a cuff to an electronic unit and wrap it around your wrist. When you press the
START/STOP button, the device starts the automatic inflation, which is followed by the blood pressure measurement. The sensor element of the
device detects slight pressure oscillations in the cuff produced by the expansion and contraction of the brachial artery in response to each heart-
beat. Rhythm and amplitude of the pressure waves are measured and displayed on the LC display as a numerical value in millimeters of mercury.
The device has an arrhythmia indicator, as well as two memories with 60 cells in each calculating the average value.
NISSEI New Technologies
Fuzzy Inflation Algorithm – is an algorithm for automatic selection of the cuff inflation pressure. Using this algorithm, the device by
itself determines the pressure level to which it is necessary to inflate the cuff based on the patient’s systolic pressure. Owing to the
Fuzzy Inflation algorithm the device becomes easier to use, while the measurement gets more comfortable and more accurate.
Arrhythmia indicator is a special icon on the display that informs on the irregular heartbeat, while the measurement result is
correct.
Touch control
–
is control of the device by slight touching it
.
Detection of interference noises
–
indicator informs on the occurrence of noises that can affect the measurement result
.
Pulse pressure
–
along with the measurement result the device displays the pulse pressure value. Pulse pressure is a difference
between systolic and diastolic pressure
.
M-Cuff series is a unique cuff unit designed and patented by NISSEI. M-shaped cuff can read pulse wave simultaneously from two
arteries.
4
ENG
COMPLETE SET
The complete set WSK-1011 includes:
- Electronic unit with cuff – 1 pc.
- Batteries – 2 pc.
- Bag – 1 pc.
- Instruction Manual – 1 pc.
- Packaging – 1 pc.
RECOMMENDATIONS ON CORRECT MEASUREMENTS
1. If treated with hemodialysis or anticoagulants, antiplatelets or steroids, refer to your doctor about the blood pressure measurement.
2. Malfunctions are possible when the device is used near working mobile
phones, microwave ovens and other equipment generating electromagnetic
radiation.
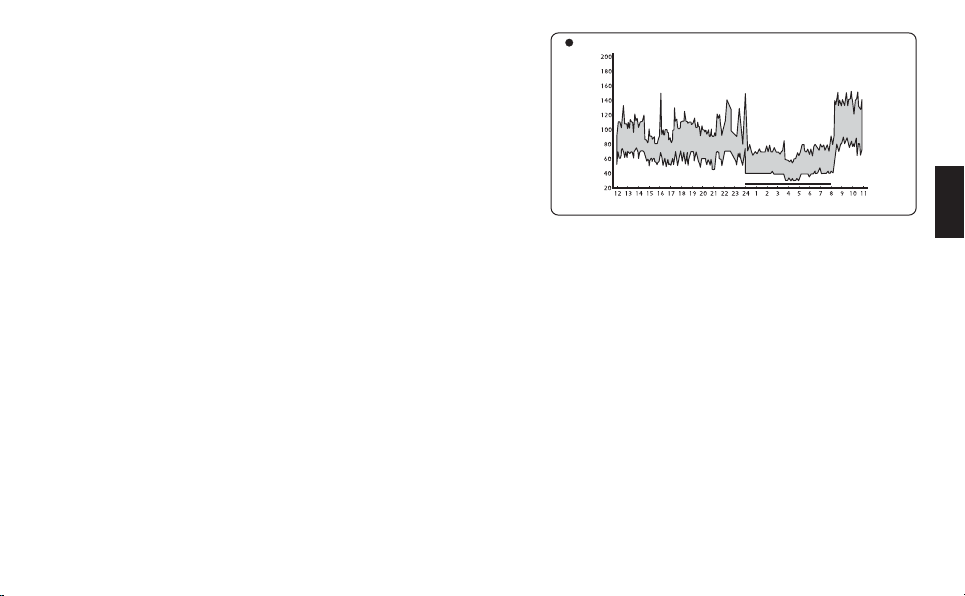
3. For correct measurement it is necessary to know that the BLOOD PRES-
SURE IS SUBJECT TO SHARP FLUCTUATIONS EVEN IN SHORT TIME INTERVALS.
The blood pressure level depends on many factors. It is commonly lower in
summer and higher in winter. Blood pressure varies along with atmospheric
pressure and depends on the physical exertion, emotional excitability, stress
and diet. Medical drugs, alcohol and smoking exert great influence as well.
Occasionally, measurements in the clinic cause an increase in pressure val-
ues. Therefore, blood pressure measured at home is often different from that
measured in the clinic. Since blood pressure increases at low temperatures,
measurements should be made at room temperature (about 20°C). If the device was stored at low temperature, prior to using it should
be kept for at least 1 hour at room temperature, otherwise the measurement result can be erroneous. During the day, the difference in
the readings in healthy people may attain 30-50 mm Hg for systolic (upper) pressure and up to 10 mm Hg for diastolic (lower) pressure.
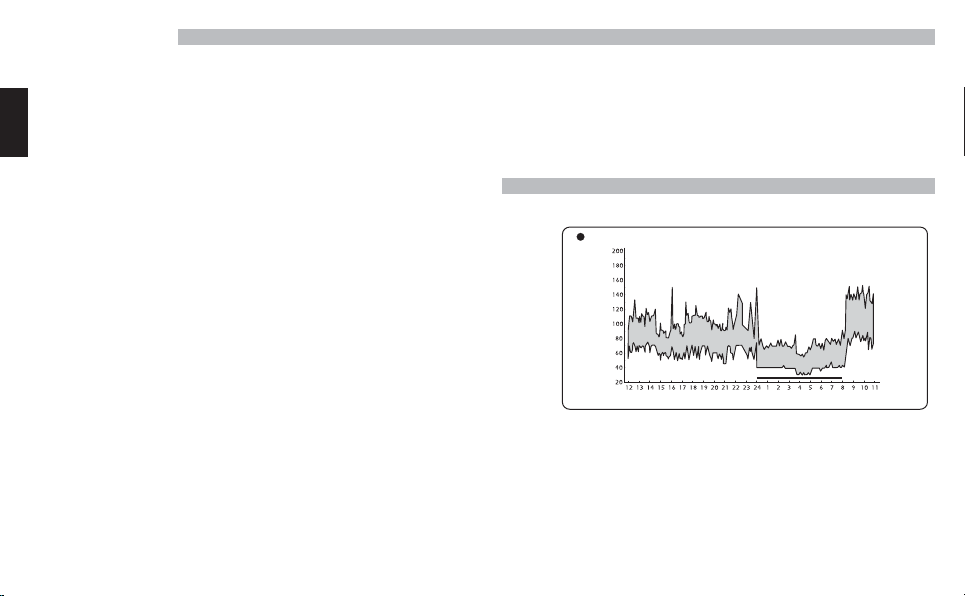
Dependence of blood pressure on various factors is individual for each person. Therefore it is recommended to keep a special recording
of blood pressure readings. ONLY A DOCTOR MAY ANALYZE TRENDS IN CHANGING YOUR BLOOD PRESSURE BASED ON CORRESPONDING
RECORDINGS.
Fig.1
Blood pressure variations during a day
Systolic
Diastolic
Arterial pressure (mmHg)
Time of day
5
ENG
4. In case of cardiovascular diseases and a number of other diseases that require the blood pressure monitoring, measurements should
be carried out in the hours specified by a doctor. REMEMBER THAT THE DIAGNOSTICS AND ANY TREATMENT OF ARTERIAL HYPERTENSION
SHOULD BE CARRIED OUT ONLY BY A DOCTOR BASED ON BLOOD PRESSURE READINGS OBTAINED BY A DOCTOR. MEDICAL DRUG ADMINIS-
TRATION OR CHANGE OF DOSAGES SHOULD BE MADE ONLY BY PRESCRIPTION OF AN ATTENDING DOCTOR.
5. In case of disorders such as deep vascular sclerosis, weak pulse wave and break in rhythm of heart contractions, the correct blood pressure
measurement can be complicated. IN THIS CASE, A DOCTOR SHALL PROVIDE RECOMMENDATIONS IN RELATION TO USE OF THIS DEVICE.
6. KEEP QUIET DURING THE MEASUREMENT TO OBTAIN THE CORRECT BLOOD PRESSURE READING WHEN USING THE ELECTRONIC DEVICE.
The blood pressure measurement should be carried out in a quiet comfortable atmosphere at room temperature. Exclude meal an hour be-
fore the measurement, and exclude smoking, soft drinks, and alcohol 1.5-2 hours before the measurement.
7. Accuracy of the blood pressure measurement depends on matching the device cuff and size of your hand. THE CUFF SHOULD NOT BE
TOO SMALL OR TOO BIG.
8. Repeated measurements are carried out at 5-minute intervals to recover the blood circulation. However, persons suffering from severe
atherosclerosis, due to a significant loss of elasticity of blood vessels, need longer intervals between measurements (10-15 minutes).
This also concerns patients suffering from long-term diabetes. For more accurate determination of blood pressure it is recommended to carry out
a series of three consecutive measurements and to calculate the average value of measurement results
.
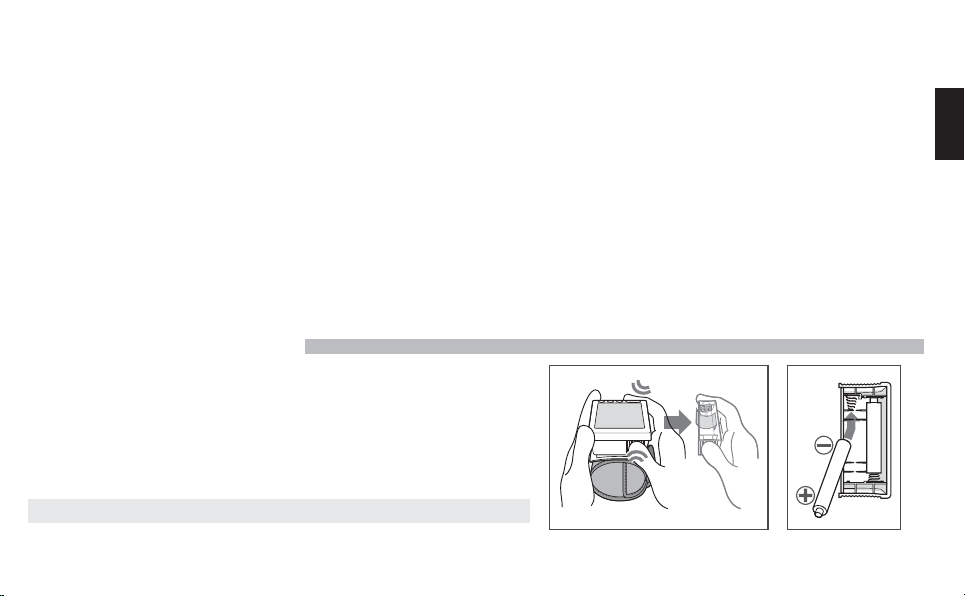
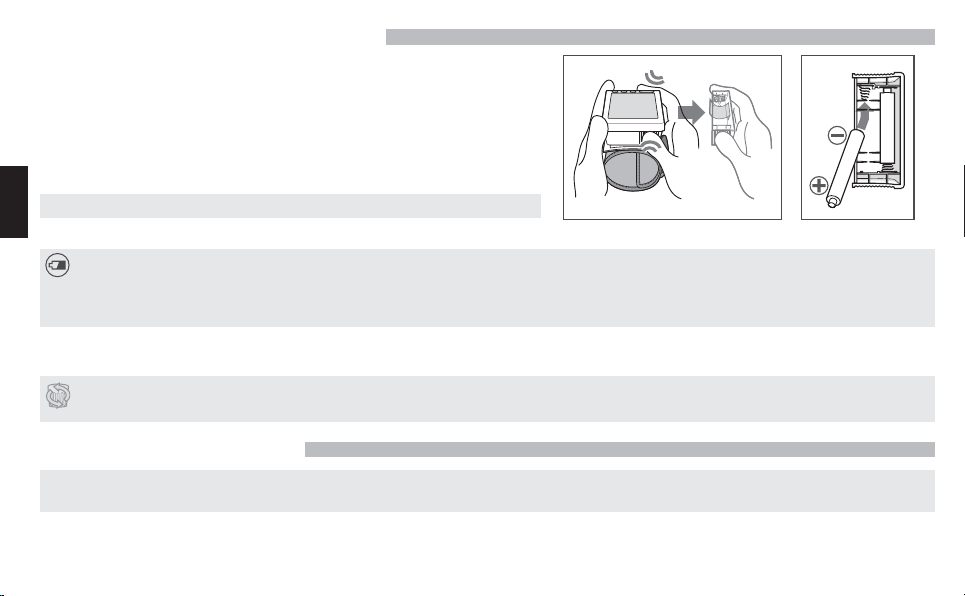
POWER SUPPLY OF THE DEVICE
Fig.2 Fig.3
1. Disconnect the battery compartment (Fig.2).
2.
Install two “AA”batteries in the compartment.
Make sure that polarity corresponds to signs (+) and (-) shown inside the
compartment (Fig. 3).
Batteries are readily installed by pressing the end“-“ on the spring.
3. Close the battery compartment.
Do not use excessive force when removing the cover.
6
ENG
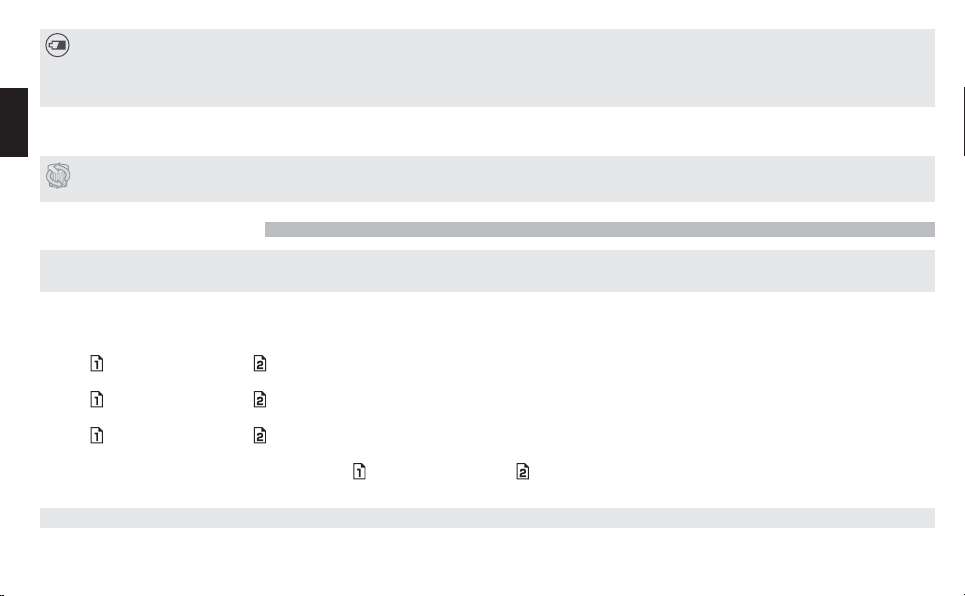
Battery Replacement Indicator
Replace all the batteries when the battery replacement indicator is flashing on the display during the measurement. If upon the
device turning on the indicator is steadily flashing, the measurement will not be possible until all the batteries are replaced. The battery
replacement indicator does not show a discharge degree.
.
Use alkaline batteries to increase the device operation duration. Ordinary zinc-carbon batteries require more frequent replacement. The enclosed
batteries are meant for testing the sold device, and their operation period can be less than that of batteries acquired in the trade network.
Since neither the device nor the batteries are the waste that can be utilized at home, follow your national/local regulations for waste recycling and
take them to corresponding collection facilities
SETTING DATE AND TIME
Date and time can be set after installing batteries. Setting the date and time guarantees the preservation of measurement results with indicated
correct date and time. The device can be used without setting the date and time.
Press and hold the SET button until the display flashes the value of the year. Date and time are set in the following order: year, month, day, hour and
minute.
1. Setting the Year
Use the
button to increase and
button to decrease the year value. Press the SET button to confirm and to pass to the next step
.
2. Setting the Month
Use the
button to increase and
button to decrease the month value. Press the SET button to confirm and to pass to the next step
.
3. Setting the Day
Use the
button to increase and
button to decrease the day value. Press the SET button to confirm and to pass to the next step
.
4. Setting the Time
Watch uses a 12-hour time format of day. Use the button to increase and button to decrease the hour or minute value. Press the SET but-
ton to confirm the settings. To stop the setting, press the «START/STOP» button.
IMPORTANT! If the date and time are set, then when turned off the device display will show the current time.

7
ENG
CUFF PREPARATION
1. Holding your left hand with the palm facing up place a cuff on a wrist so that the meter display is on the palm side. Should you
fail to put the cuff on your left wrist, place it on the right one
2.
Place the cuff on your hand so that its edge is spaced by 5-19 mm off the palm end. Place the meter on the center of your
wrist (Fig.4).
3. Snugly wrap the cuff on your wrist without leaving any space between the cuff and the wrist. Make sure that the cuff comfortably
fits your wrist.
Put the cuff on a bare wrist only. Be careful to prevent your cloth being caught by the cuff.
CORRECT POSITION DURING MEASUREMENT
Measurement in the sitting position
1. Sit down on a chair.
2. Lightly raise your left hand with the palm facing up and put your elbow on the table.
3. Bring the cuff to the heart level placing your hand on a case or folded towel (Fig.5).
In case of unavailability of a table
1. Sit down on a chair.
2. Bring the cuff to the heart level lightly pressing your left hand to the chest (Fig.6).
3. While measuring lightly support your left hand by the right one.
Measurement in the lying position
1. Lie on your back.
2. Bring the cuff to the heart level using a case and folded towel (Fig.7).
Try to use the same wrist and position for measurement.
If the cuff is positioned above/below the heart, any reading obtained will tend to be out of the allowance.
5~10mm
Fig.4
Fig.5 Fig.6 Fig.7

8
ENG
MEASUREMENT PROCEDURE
IMPORTANT! The device has touch-sensitive buttons that are pressed by slight touching. Moisture, dirt and extraneous
objects between the finger and the device panel can affect the ability of buttons to respond to touching.
Before measurement, take a few breaths and relax. During the measurement, do not talk and do not move.
1.
Press the START/STOP button. The deflating symbol
« »
will flash on the display, and the device will release the remaining air
from the cuff
(Fig.8).
2. Beep will be heard, and air will be pumped into the cuff. The symbol « » will flash, and the displayed value will increase (Fig.9).
Inflation will stop at optimum level owing to the Fuzzy Inflation algorithm.
3. The symbol « » will disappear and measurement will start up. The pressure cuff will slowly deflate.
Noise Interference Detection
This device detects the presence of extraneous sounds or noises that can affect the measurement results. When such
interference is detected, the symbol
« »
appears on the display. In this case, it is recommended to repeat the measurement
to eliminate the interference
.
Press the START/STOP button to stop forcedly the measurement: the device will stop inflation and quickly release the air
.
4. Symbol
«
»
will start flashing simultaneously with the beep immediately after the pulse rate is detected
(Fig.10)
.
5. When the measurement is completed, the display will show the values of blood pressure, pulse
pressure, WHO scale and heart rate
(Fig.11).
The device will automatically release the air from the cuff.
6.
Press the
button or
button and the result will remain in the selected memory unit
.
7. Press the START/STOP button to turn off the device.
If you forget to turn off the device, it will do so automatically after 3 minutes.
Do not perform several measurements in a row.
This will cause numbing the hand and can affect the measurement result. Give your hand a break for
at least 5 minutes.
Fig.8
Fig.9
Fig.10
Pulse, stroke/min.
Systolic pressure,
mmHg
Diastolic pressure,
mmHg
Puls pressure,
mmHg
Fig.11

9
ENG
INDICATION OF ARRHYTHMIA
The flashing symbol « », appeared on the display reports on an irregular heartbeat rhythm
(Fig.12). If this symbol appears from time to time, refer to your doctor. The arrhythmia indicator oc-
currence can be also caused by body movements in the course of the measurement.
INDICATION OF READINGS BY THE WHO SCALE
In addition to pressure numerical values, the result is also displayed as a graphic scale. This scale makes it
possible to classify the obtained blood pressure value in accordance with the World Health Organization
recommendations. The scale appears along with the numerical value of blood pressure in the lower right
corner of the display
(Fig.13)
.
Table of Results by the WHO Scale
Indication WHO Classification SYS DIA
Hypertension (severe) >180 >110
Hypertension (moderate) 160-179 100-109
Hypertension (slight) 140-159 90-99
Increased normal pressure 130-139 85-89
Normal pressure 120-129 80-84
Optimal <120 <80
Normal pulse
Pulse with arrhythmia
Fig.12
WHO indicator
Fig.13

10
ENG
Indication of Pulse Pressure
This device calculates and displays the pulse pressure value (Fig. 14). Pulse pressure – a difference be-
tween the systolic and diastolic pressures – tends to increase with aging.
Systolic blood pressure continues to increase with aging, while diastolic blood pressure tends to decrease
since the age of about 50 years.
It is considered that a high pulse pressure is related to poor elasticity of arteries and is one of the risk
factors for circulatory diseases. Pulse pressure is considered to be normal when it attains 35±10 mm Hg.
MEMORY FUNCTOIN
The measured values are automatically saved for later viewing in the selected memory unit. These memory
units can be used to save separately the measurement results of two different persons or to save separately
the results of morning and evening measurements
.
Each unit can keep up to 60 measurement results and the average value thereof. When the number of kept
values exceeds 60, the oldest readings are deleted to record new values
.
Saved values are kept with the measurement date and time, if set. If you want to save time and date
together with the measurement values, date and time should be set before the measurement
.
When an error occurs (ERR), the measurement results are not saved
.
Viewing the Saved Data
1.
Turn off the device by pressing the START/STOP button. To view the results stored in the memory unit
1, press , and to view the results stored in the memory unit 2, press . The selected memory unit will be
underlined on the display.
The display shows the average value of stored results indicated with index « » (Fig.15). Average value is
displayed when the selected memory unit contains two or more saved measurement results.
2.
Each time you press the
button or
button, saved measurement results will be displayed in a sequential manner
.
3.
Memory unit number, measurement date and time will be displayed one by one in the upper right corner of the display
.
4.
The result saved in the memory unit 1 is the most recent among the saved data in the selected memory. The higher memory number, the
older the result.
The memory data are displayed for about 30 seconds and after that, if no button is pressed, the device is automatically turned off
.
Pulse pressure
mmHg
Fig.14
Selected memory
indicator Average
value
index
Number of saved measurements
Fig.15

11
ENG
Pressing the
button switches the display from records in the memory unit 1 to records in the memory unit 2, while pressing the
button
results in returning to data recorded in the memory unit 1
.
5.
Press the START/STOP button to turn off the device
.
Deletion of Saved Data
Readings can be deleted unit by unit: all together or separately. The memory may be cleared when the selected memory unit contains two
or more results.
1 . Select a value from the memory unit to be deleted or the average value (unit with index
« »)
to clear the whole memory unit
.
2 .
Press and hold the
button or
until the sign «---» appears on the display
.
INFORMATION ABOUT ERRORS
INDICATION LIKELY CAUSE METHODS OF CORRECTION
Blood pressure is too
low or too high. The cuff is not at the heart level.
The cuff is put on incorrectly.
During the measurement, a person was talking or moving.
Put on the cuff at the heart level.
Check the cuff position on the hand.
Be calm and quiet during the measurement.
Measurement results are
different each time.
Effect of measurement conditions, physical or mental state. Take measurements under the same conditions.
Measurement results are
different in clinic and
at home.
Effect of relaxed state at home and tension in clinic. Show the pressure records made at home to your doctor for advice.
Inflation is repeated.. If the initial pressure is insufficient, inflate the cuff again. Inflate the
cuff till your pressure will be successfully measured. Re-inflation is not a malfunction of the device. Do not talk and do not
move during the measurement.
Maximum allowable pressure: pressure can not be measured due to
movement or talking during the measurement, in spite of the fact that
the cuff was pumped at maximum.
Do not talk and do not move during the measurement.

12
ENG
or
Pressure can not be measured due to movement or talking. Do not talk and do not move during the measurement.
Cuff is not securely connected to the device.
Cuff is not put on properly. Check the connection.
Make sure that the cuff is put on correctly.
Batteries are discharged. Replace all batteries with new ones.
No time indication on
the display.
Time was not set.
Note: there is no time indication when batteries and/or power source
are not provided.
Set time and date.
Install batteries and connect the power source.
Date and time are
displayed as «--/--». Time was not set or measurements were carried out before setting
the time. Set date and time.
Date and time can not be saved without setting.
Nothing is shown on
the display. Batteries are discharged.
Batteries are installed incorrectly.
Connecting terminals are contaminated.
Power source is not connected.
Insufficient contact when touching the button.
Replace all batteries with new ones.
Install batteries properly.
Wipe connecting terminals with a dry cloth.
Connect the power source.
Ensure stronger pressing the button.
You touched the START/STOP button when installing the batteries. Turn off the device by pressing the START/STOP button and perform
the measurement again.
If, despite the above-given recommendations, you fail to obtain the right measurements, stop the operation and contact the service center (addresses and
telephone numbers of authorized organizations are provided in the warranty certificate). Do not attempt to adjust the device internal mechanism on your own
.

13
ENG
WARRANTY
1.
The manufacturer guarantees the warranty period of 5 years for the device from the sale date provided that the consumer observes
operation, transportation and storage requirements. The warranty period for the cuff and the power source is 12 months from the sale date.
2. Warranty liabilities are documented with the warranty certificate upon selling the device to the buyer. The guarantee is valid provided
that the device has not been opened or damaged by the buyer.
3. Addresses of organizations engaged in the warranty service are specified in the warranty certificate.
TECHNICAL SPECIFICATIONS
Operating Principle Oscillometric method
Indicator 15 digits liquid crystal display
Indicating Range
:
cuff pressure, mmHg
3-300
Measuring Range :
cuff pressure, mmHg
pulse rate, bpm
40-250
40-160
Accuracy:
cuff pressure, mmHg
pulse rate, %
±3
±5
Inflation Automatic inflation (air pump, Fuzzy Inflation algorithm)
Deflation Automatic Deflation (electric valve)
Electric supply voltage, V 6
Electric supply type Two 1.5 volt LR6 (AA alkaline) batteries
Power Consumption , W 4
Memory 2 units, 60 values per each + average value
Operating Condition
temperature, ˚C
humidity, % Rh
atmospheric pressure, hPa
+10 to +40
15 to 85
700-1060

14
ENG
Storage Condition
temperature, ˚C
humidity, % Rh
-20 to +60
10 to 95
Cuff Size adult
(
circumference of the wrist
12,5-22,5 cm)
Overall dimensions:
Size (electronic unit), mm
Weight (without packaging, bags and batteries), g
70 x 70 x 27
110
Manufacturing Country
Indonesia
Manufacture year: specified on the device housing (in the battery compartment) in the device serial number
after the letters «SN»
Protection level
IPX0 (IEC 60601-1)
Key to Symbols
Type BF applied part
Refer to instruction manual/booklet
When utilizing the waste, refer to current rules applicable in your region
CARE, STORAGE, REPAIR AND DISPOSAL
1.
This device should be protected from excessive moisture, direct sunlight, strokes, and vibration. THE DEVICE IS NOT WATERPROOF!
2 .
Do not keep or do not use the device in close proximity to heaters and open flame
.
3 . If the device has not been used for a long time, remove the batteries. Leaking of batteries can cause damage to the device and terminate
the warranty. KEEP BATTERIES AWAY FROM CHILDREN
!
4 . Do not contaminate the device and protect it from dust. The device can be cleaned with a dry, soft cloth.
5 . Do not allow the contact between the device and its parts with water, solvents, alcohol, and gasoline.
6. Keep the cuff away from sharp objects, and do not try to pull out the cuff.
7. Do not expose the device to strong strokes and do not throw it.
8. The device does not contain any adjustment controls for settings. Unauthorized opening of the electronic device is forbidden. If needed,
repair the device only in specialized organizations.

15
ENG
9.
On the expiry of the specified operation term, refer to specialists (specialized repair organizations) on a periodic basis to check the technical
condition of the device
.
10.
When utilizing the waste, refer to current rules applicable in your region. No special utilization conditions are specified by the manufacturer
for this device
.
11.The cuff is resistant to repeated sanitation. The cuff internal fabric surface (being in contact with a patient’ hand) can be treated with a
cotton swab moistened in a 3% solution of hydrogen peroxide. Partial discoloration of the cuff covering tissue is possible if used for a
long time. Do not wash the cuff and do not treat it with a hot iron.
CERTIFICATION AND STATE REGISTRATION
The production of devices is certified pursuant to international standards such as ISO 9001, ISO 13485, ISO 14001:2004.
The device meets international standards IEC60601-1:1988+A1:1991+ A2:1995, IEC60601-1-2:2001+A1:2004/IEC60601-1-2:2007 CISPR
11:2009+A1:2010.
Complaints and requests should be addressed to:
Little Doctor Europe Sp. z o.o.
57G Zawila Street, 30-390, Krakow, Poland
Service phone: +48 12 2684748, 2684749
Produced by Nihon Seimitsu Sokki Co., Ltd.
Address: 2508-13 Nakago Shibukawa Gunma 377-0293 Japan
Manufacturer: Pt. Nss Indonesia
Address of Manufacturer: Blok A-2 No. 29 St4a Kawasan, Berikat Besland Pertiwi, Kota Bukit Indah Purwakarta 41181, Indonesia
Exporter: Little Doctor International (S) Pte. Ltd.
Address of Exporter: 35 Selegie Road #09-02 Parkline Shopping Centre, Singapore 188307

16
POL
Dana instrukcja obsługi jest przeznaczona do pomocy użytkownikowi w celu bezpiecznej i skutecznej obsługi urządzenia cyfrowego do
pomiaru ciśnienia krwi i tętna, model WSK-1011 (dalej: URZĄDZENIE). Urządzenie musi być użytkowane zgodnie z zaleceniami opisanymi w
niniejszej instrukcji i nie może być używane do celów innych, niż zaleca się w danej instrukcji. Prosimy o dokładne zapoznanie się i zrozumienie
instrukcji, szczególnie rozdziału “Zalecenia dotyczące poprawnego pomiaru”.
PODSTAWOWE CZĘŚCI I KOMPONENTY
1. JEDNOSTKA ELEKTRONICZNA
2.
BATERIE
3.
ETUI
A.
PRZYCISK SET (USTAWIENIA))
B. PRZYCISK (PAMIĘĆ 1)
C. PRZYCISK (PAMIĘĆ 2)
D. PRZYCISK «START/STOP»
E. WYŚWIETLACZ LCD
F.
MANKIET
G. KOMORA BATERII

17
POL
INFORMACJA OGÓLNA
PRZEZNACZENIE URZĄDZENIA
Urządzenie WSK-1011 jest przeznaczone do pomiaru ciśnienia skurczowego (górnego) i rozkurczowego (dolnego) wraz z ustaleniem tętna u
pacjentów w wieku 15 lat i starszych, ciśnieniomierz przeznaczony do pomiaru ciśnienia na nadgarstku.
Zaleca się korzystanie z urządzenia w
warunkach domowych przez pacjentów ze zmiennym ciśnieniem lub stwierdzonym nadciśnieniem tętniczym jako uzupełnienie obserwacji medycz-
nej
.
Mankiet przeznaczony dla osób, których obwód
nadgarstka
wynosi około
12,5 – 22,5 cm.
Ciśnienie tętnicze mierzone jest w zakresie od 40 do
250 mmHg, a częstotliwość tętna - od 40 do 160 uderzeń na minutę
.
SPOSÓB POMIARU
Aparat wykorzystuje oscylometryczną metodę pomiaru
. Mankiet wbudowany w moduł elektroniczny, zakładany wokół nadgarstka.
Po naciśnię-
ciu przycisku START/STOP urządzenie zaczyna automatycznie pompować powietrze i w tym czasie mierzone jest ciśnienie tętnicze. Czujnik
aparatu wyłapuje słabe wahania ciśnienia w mankiecie, powstające w wyniku kurczenia się i rozkurczania tętnicy ramiennej w odpowiedzi
na każde uderzenie serca. Pompowanie kończy się, gdy mankiet jest dostatecznie napompowany, by określić ciśnienie skurczowe i rozkur-
czowe, po czym powietrze jest spuszczane z mankietu. Rytm i amplituda fal ciśnienia są mierzone i wyświetlane na wyświetlaczu LCD w
postaci wartości cyfrowych w milimetrach słupa rtęci. Przyrząd wyposażono we wskaźnik arytmii, a także w 2 bloki pamięci po 60 komórek
w każdej, z funkcją obliczania średniej wartości pomiarów
.
Nowe technologie NISSEI
Algorytm Fuzzy Inflation – algorytm automatycznego wyboru wysokości ciśnienia, do osiągnięcia której pompowany jest mankiet. Korzysta-
jąc z tego algorytmu, urządzenie samo - na podstawie wysokości ciśnienia skurczowego pacjenta - określa wysokość ciśnienia, do której należy
pompować mankiet. Dzięki algorytmowi Fuzzy Inflation urządzenie jest łatwiejsze w eksploatacji, a pomiar bardziej komfortowy i dokładny.
Wskaźnik arytmii – specjalny znaczek na wyświetlaczu urządzenia, który informuje o nieregularnym tętnie, przy czym wynik pomiaru
będzie prawidłowy
.
Sterowanie dotykowe – obsługa urządzenia za pomocą dotyku
.
Określanie zakłóceń – wskaźnik informuje o zakłóceniach, które mogą wpłynąć na wynik pomiaru
.
Ciśnienie tętna – wraz z wynikiem pomiaru aparat wyświetla wartość ciśnienia tętna, które stanowi różnicę między ciśnieniem
skurczowym, a ciśnieniem rozkurczowym
.
Mankiet M-Cuff – unikatowa forma mankietu opracowana i opatentowana przez firmę NISSEI. Forma mankietu w kształcie litery “M”
zapewnia niezawodny odczyt tętna z dwóch tętnic jednocześnie.

18
POL
W ZESTAWIE
W zestawie urządzenia WSK-1011 znajdują się:
- jednostka elektroniczna z mankietem – 1
szt
.
-
baterie
– 2
szt
.
- etui – 1
szt
.
- instrukcja obsługi – 1
szt
.
- opakowanie – 1
szt
.
ZALECENIA DOTYCZĄCE PRAWIDŁOWEGO POMIARU
1. W przypadku dializ, stosowania leków przeciwzakrzepowych, anty trombocytów lub sterydów w kwestii pomiaru ciśnienia tętniczego
należy uprzednio skonsultować się z lekarzem.
2. W przypadku korzystania z aparatu w pobliżu działających telefonów komórkowych, kuchenek mikrofalowych lub innych urządzeń będą-
cych źródłem promieniowania elektromagnetycznego mogą pojawić się zakłócenia.
3.
Aby prawidłowo dokonać pomiaru, należy pamiętać, że CIŚNIENIE TĘTNICZE PODLEGA SILNYM WAHANIOM NAWET W KRÓTKIM PRZE-
DZIALE CZASOWYM. Wysokość ciśnienia tętniczego zależy od wielu czynników. Zazwyczaj jest ono niższe latem, a wyższe zimą. Zmie-
nia się wraz z ciśnieniem atmosferycznym, zależy od obciążenia fizycznego, pobudliwości emocjonalnej, stresu i stylu odżywiania. Duży
wpływ mają przyjmowane leki, napoje alkoholowe oraz palenie.
W przypadku wielu osób nawet sam proces pomiaru ciśnienia w szpitalu powoduje podwyższenie wyników, dlatego też ciśnienie tętnicze
mierzone w warunkach domowych często różni się od ciśnienia zmierzonego w szpitalu. W związku z tym, że przy niskich temperaturach
ciśnienie tętnicze podnosi się, należy więc dokonywać pomiarów w temperaturze pokojowej (ok. 20°C). Jeśli przed pomiarem aparat był
przechowywany w niskiej temperaturze, przynajmniej przez godzinę należy pozostawić go w temperaturze pokojowej. W przeciwnym
wypadku wynik pomiaru może okazać się nieprawidłowy. W ciągu doby różnica między wynikami u osoby dorosłej może wynosić 30 - 50
mmHg w przypadku ciśnienia skurczowego (górnego) i do 10 mmHg w przypadku ciśnienia rozkurczowego (dolnego). Wahania ciśnienia
u różnych ludzi mogą mieć różne podstawy, dlatego zaleca się prowadzenie dziennika pomiarów.
NA POSTAWIE DANYCH Z TEGO DZIENNIKA TYLKO LEKARZ MOŻE PRZEANALIZOWAĆ TENDECJĘ ZMIAN CIŚNIENIA TĘTNICZEGO PACJENTA.
19
POL
4.
Osoby cierpiące na choroby układu sercowo-naczyniowego i szereg in-
nych, w przypadku których konieczne jest monitorowanie ciśnienia tętnicze-
go, powinny dokonywać pomiarów w godzinach wskazanych przez lekarza
prowadzącego
.
NALEŻY PRZY TYM PAMIĘTAĆ, ŻE DIAGNOSTYKĘ I JAKIE-
KOLWIEK LECZENIE NADCIŚNIENIA MOŻE PROWADZIĆ TYLKO LEKARZ NA
PODSTAWIE WYNIKÓW POMIARÓW CIŚNIENIA TĘTNICZEGO, KTÓRE SAM
UZYSKAŁ. ZMIANY DOTYCZĄCE PRZYJMOWANIA LUB DAWKOWANIA LE-
KÓW MOGĄ ZOSTAĆ WPROWADZONE WYŁĄCZNIE ZA ZGODĄ LEKARZA
.
5.
W przypadku takich zaburzeń jak głębokie stwardnienie naczyń czy sła-
by puls, a także u pacjentów z wyraźnymi zaburzeniami rytmu serca doko-
nanie prawidłowego pomiaru ciśnienia tętniczego może być utrudnione. W
TAKICH PRZYPADKACH NALEŻY SKONSULTOWAĆ SIĘ Z LEKARZEM W CELU
OKREŚLENIA NAJLEPSZEJ METODY POMIARU
.
6.
ABY UZYSKAĆ PRAWIDŁOWE WYNIKI POMIARU CIŚNIENIA TĘTNICZEGO PRZY WYKORZYSTANIU URZĄDZENIA ELEKTRONICZNEGO, W
TRAKCIE POMIARU NALEŻY ZACHOWAĆ CISZĘ. Pomiar powinien być przeprowadzony w spokojnych, komfortowych warunkach, w tem-
peraturze pokojowej. Na godzinę przed pomiarem nie należy spożywać posiłków, a w ciągu 1,5 - 2 godzin nie palić, nie pić napojów
wzmacniających i alkoholu
.
7.
Dokładność pomiarów ciśnienia tętniczego zależy również od prawidłowego
dobrania mankietu do rozmiaru ramienia oraz prawidłowego ułożenia mankietu. MANKIET NIE POWINIEN BYĆ ZA MAŁY ANI ZA DUŻY
.
8. Powtórnego pomiaru można dokonać po upływie 5 minut, aby przywrócić krążenie krwi. W przypadku osób cierpiących na stwierdzone
stwardnienie tętnic odstępy między pomiarami powinny być dłuższe 10 - 15 minut, ponieważ ich naczynia są znacznie mniej elastyczne.
Dotyczy to również pacjentów, którzy od dłuższego czasu cierpią na cukrzycę. Aby dokładnie określić ciśnienie tętnicze, zaleca się przeprowa-
dzanie serii składających się z 3 kolejnych pomiarów i obliczanie średniej z uzyskiwanych wyników
.
Rys.1
Wahania ciśnienia tętniczego w cyklu dobowym
Skurczowe
Rozkurczowe
Ciśnienie tętnicze (mmHg)
Pora dnia
20
POL
ZASILANIE ELEKTRYCZNE URZĄDZENIA
Rys.2 Rys.3
1.
Odpiąć komorę baterii
(
rys
.2).
2.
Włożyć do komory dwie baterie typu «AA».
Należy upewnić się, że polaryzacja jest prawidłowa, tj. odpowiada oznaczeniom (+)
i (-) wskazanym wewnątrz komory (rys. 3)
.
Baterie można lekko włożyć, naciskając końcówką “-”na sprężynę.
3.
Zamknąć pokrywę komory
.
W celu otworzenia pokrywy nie należy używać zbyt wiele siły
.
Wskaźnik wymiany baterii
Wszystkie baterie należy wymienić, kiedy w czasie pomiaru na wyświetlaczu miga wskaźnik wymiany baterii. Jeżeli przy wyłączaniu
urządzenia wskaźnik świeci się przez cały czas, pomiar będzie możliwy dopiero po wymienieniu wszystkich baterii. Wskaźnik nie
pokazuje, w jakim stopniu baterie są rozładowane.
Aby wydłużyć czas pracy urządzenia, należy stosować baterie alkaliczne. Baterie cynkowo-węglowe wymagają częstszej wymiany. Załączone
baterie przeznaczone są do sprawdzania urządzenia podczas sprzedaży i ich okres eksploatacji może być krótszy w stosunku do nowych.
Jako że ani urządzenie, ani baterie nie są odpadami, które można utylizować w warunkach domowych, należy postępować zgodnie z krajowymi/
lokalnymi przepisami w zakresie przetwarzania odpadów i oddawać je w odpowiednie miejsca zajmujące się utylizacją sprzętu elektronicznego.
USTAWIANIE DATY I GODZINY
Data i godzina mogą być wyświetlane po włożeniu baterii. Ustawienie daty i godziny gwarantuje zapisanie wyników wraz z prawidłową datą i
godziną danego pomiaru. Korzystanie z urządzenia możliwe jest bez ustawienia daty i godziny.
Należy naciskać przycisk SET, dopóki na wyświetlaczu nie zacznie migać wskaźnik roku. Data i godzina ustawiane są w następującej kolejności:
rok, miesiąc, dzień, godzina, minuta
.
Other manuals for WSK-1011
2
Table of contents
Languages:
Other Nissei Blood Pressure Monitor manuals

Nissei
Nissei WSK-1011 User manual

Nissei
Nissei WSK-1011 User manual

Nissei
Nissei DS-1873 User manual

Nissei
Nissei DSK-1031 User manual

Nissei
Nissei WS-820 User manual

Nissei
Nissei DS-10 User manual

Nissei
Nissei DS-400 User manual

Nissei
Nissei DS-10a User manual

Nissei
Nissei DS-B10 User manual

Nissei
Nissei DSK-1031 User manual

Nissei
Nissei WS-820 User manual

Nissei
Nissei DSK-1031 User manual

Nissei
Nissei DS-500 User manual

Nissei
Nissei DS-10 User manual

Nissei
Nissei WS-1300 User manual

Nissei
Nissei DSK-1011J User manual

Nissei
Nissei ds-1902 User manual

Nissei
Nissei DS-S10 User manual

Nissei
Nissei DSK-1011 User manual

Nissei
Nissei DS-1011 User manual


