Nissei DS-10a User manual

JAPAN
DS-10/DS-10a
Digital blood pressure monitor DS-10, DS-10a
Instructoin manual
ENG
Вимірювач артеріального тиску та частоти серцевих скорочень
DS-10, DS-10a (Digital blood pressure monitor DS-10, DS-10a)
Інструкція з експлуатації
Прибор для измерения артериального давления
и частоты пульса цифровой, исполнения DS-10, DS-10a
Руководство по эксплуатации
RUSUKRKAZUZB
Kүретамырдың қан қысымы мен тамырдың соғу жиілігін
өлшеуге арналған сандық DS-10, DS-10a аспабы
Пайдалану жөніндегі басшылық құжат
Артериал босим ва пульс частотасини ўлчаш асбоби,
рақамли DS-10, DS-10a ижроси
Фойдаланиш бўйича қўлланма

2
ENG
PARTS NAME AND PRODUCT COMPONENTS
2
3
1
4
a
e
b
c
d
5
f
g
h
1. MAIN UNIT
2. CUFF
3. BAG
4. AA (LR6) BATTERIES
5. AC ADAPTOR (only for DS-10A,
not included in DS-10)
a. LCD-display
b.
« »
START/STOP BUTTON
c. AC ADAPTOR JACK
d. AIR CONNECTOR
e. BATTERY COMPARTMENT
f. METAL RING
g. AIR HOSE
h. AIR PLUG
3
ENG
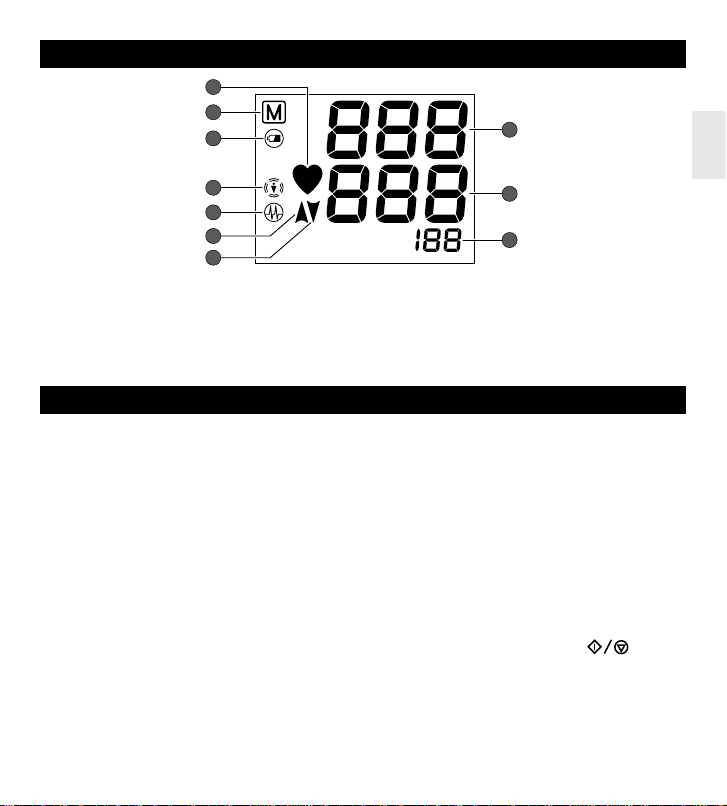
DISPLAYS
8
9
10
5
6
7
1
4
2
3
1. PULSE RATE MARK
2. MEMORY BANK SYMBOL
3. BATTERY REPLACEMENT INDICATION
4. BODY MOTION SYMBOL
5. IRREGULAR PULSE RHYTHM SYMBOL
6. INFLATION SYMBOL
7. DEFLATION SYMBOL
8. SYSTOLIC
9. DIASTOLIC
10.PULSE RATE
GENERAL INFORMATION
This manual is intended to assist you in the safe and efficient operation of BLOOD PRESSURE
MONITOR DS-10 (DS-10A). The product must be used in accordance with the procedures contained in
this manual and must not be used for purposes other than those described herein. It is important to
read and understand the entire manual. In particular, please read carefully and become familiar with
the section entitled “TIPS ON TAKING YOUR BLOOD PRESSURE”.
INDICATIONS FOR USE
This product is intended for noninvasive measurement of systolic and diastolic blood pressure and
determination of pulse rate in adults in a home healthcare environment. The product is not designed
for neonatal use. Please consult with your doctor or physician to use this product to take blood pressure
of child or person in pregnancy or under pre-eclamptic condition.
METHOD OF MEASUREMENT
This product employs the oscillometric method for measurement of blood pressure and pulse rate.
The cuff is connected to the main unit and wrapped around the arm. When the
« »
button
is pressed, the device starts to pump automatically, during which the blood pressure is measured.
Circuits within the cuff sense the small oscillations in pressure against the cuff produced by the
expansion and contraction of the arteries in the arm in response to each heart beat. The amplitude of
each pressure waves is measured, converted to millimeters of mercury, and displayed on the LCD as
a digital value.

4
ENG
NISSEI New Technologies
Measurement on inflation – is a technology that makes it possible to define the pressure
in the course of the cuff inflation.
Irregular Pulse Rhythm indicator – is a special icon on the display that informs on the
irregular heartbeat, while the measurement result is correct.
“Body motion indicator” – is an adaptation of the measurement algorithm based on
previous results.
COMPLETE SET
The complete set DS-10 (DS-10a) includes:
- Electronic unit – 1 pc.
- Cuff model Cuff DS-10 (including Air hose and Air plug) – 1 pc.
- Batteries – 4 pcs.
- AC Adaptor model ADP-W5 (for DS-10a only) – 1 pc.
- Bag – 1 pc.
- Instruction Manual – 1 pc.
- Warranty – 1 pc.
- Packaging – 1 pc.
RECOMMENDATIONS ON CORRECT MEASUREMENTS
1. If treated with hemodialysis or anticoagulants, antiplatelets or steroids, refer to your doctor about
the blood pressure measurement.
2. Malfunctions are possible when the device is used near working mobile phones, microwave ovens
and other equipment generating electromagnetic radiation.
3. For correct measurement it is necessary to know that the BLOOD PRESSURE IS SUBJECT TO SHARP
FLUCTUATIONS EVEN IN SHORT TIME INTERVALS. The blood pressure level depends on many factors.
It is commonly lower in summer and higher in winter. Blood pressure varies along with atmospheric
pressure and depends on the physical exertion, emotional excitability, stress and diet. Medical drugs,
alcohol and smoking exert great influence as well. Occasionally, measurements in the clinic cause an
increase in pressure values. Therefore, blood pressure measured at home is often different from that
measured in the clinic. Since blood pressure increases at low temperatures, measurements should be
made at room temperature (about 20°C). If the device was stored at low or high temperature outside
the operational temperature range prior to using, it should be kept for at least 2 hours at room tem-
perature. Otherwise the measurement result can be erroneous. During the day, the difference in the
readings in healthy people may attain 30-50 mm Hg for systolic (upper) pressure and up to 10 mm Hg
for diastolic (lower) pressure. Dependence of blood pressure on various factors is individual for each
person. Therefore it is recommended to keep a special recording of blood pressure readings. ONLY A
DOCTOR MAY ANALYZE TRENDS IN CHANGING YOUR BLOOD PRESSURE BASED ON CORRESPONDING

5
ENG
RECORDINGS.
4 In case of cardiovascular diseases and a number of other diseases that require the blood pres-
sure monitoring, measurements should be carried out in the hours specified by a doctor. REMEMBER
THAT THE DIAGNOSTICS AND ANY TREATMENT OF ARTERIAL HYPERTENSION SHOULD BE CARRIED
OUT ONLY BY A DOCTOR BASED ON BLOOD PRESSURE READINGS OBTAINED BY A DOCTOR. MEDICAL
DRUG ADMINISTRATION OR CHANGE OF DOSAGES SHOULD BE MADE ONLY BY PRESCRIPTION OF AN
ATTENDING DOCTOR.
Blood pressure variations during a day
Systolic
Diastolic
Arterial pressure (mmHg)
Time of day
Fig.1
5 In case of disorders such as deep vascular sclerosis, weak pulse wave and break in rhythm of heart
contractions, the correct blood pressure measurement can be complicated. IN THIS CASE, A DOCTOR
SHALL PROVIDE RECOMMENDATIONS IN RELATION TO USE OF THIS DEVICE.
6 KEEP QUIET DURING THE MEASUREMENT TO OBTAIN THE CORRECT BLOOD PRESSURE READING WHEN
USING THE ELECTRONIC DEVICE. The blood pressure measurement should be carried out in a quiet
comfortable atmosphere at room temperature. Exclude meal an hour before the measurement, and exclude
smoking, soft drinks, and alcohol 1.5-2 hours before the measurement.
7 Accuracy of the blood pressure measurement depends on matching the device cuff and size of
your arm. THE CUFF SHOULD NOT BE TOO SMALL OR TOO BIG.
8
Repeated measurements are carried out at 5-minute intervals to recover the blood circulation.
However, persons suffering from severe atherosclerosis, due to a significant loss of elasticity of
blood vessels, need longer intervals between measurements (10-15 minutes).
This also concerns patients suffering from long-term diabetes. For more accurate determination of
blood pressure it is recommended to carry out a series of three consecutive measurements and to
calculate the average value of measurement results.
9. Do not use this device in an explosive environment such as near flammable anesthetics or inside
oxygen chamber.
10. The system may fail to yield specified measurement accuracy if operated or stored in temperature
or humidity conditions outside the limits stated in the specifications section of this manual.
11. Do not use cuffs or accessories other than those specified by the manufacturer. Otherwise, correct
measurement readings cannot be obtained.

6
ENG
12. Do not apply the cuff over wounded arm, arm under an intravascular access or therapy or an
arterio-venous shunt, or arm on the side of a mastectomy or lymph node clearance. Otherwise injury
may be resulted.
13. Make sure that inflation of the cuff is not causing prolonged impairment of blood circulation. Also,
be cautious about temporary loss of the functions of any other medical equipment if any monitoring
equipment is used on the same limb with the blood pressure measuring cuff.
14. To avoid harmful injury due to interfered blood flow from cuff inflation, make sure that AIR HOSE is not
kinking before measurement. Otherwise, cuff inflation may not be conducted properly and prolonged.
15. Do not take out batteries or unplug the AC adaptor when the device is turned on. Make sure to
switch off the device before removing batteries or AC adaptor.
16. Do not touch the output plug of AC adaptor during measurement.
17. Do not inflate the cuff when it is not wrapped around your arm.
18. Do not apply the cuff on the limb which the intravenous drip infusion is implemented.
POWER SUPPLY OF THE DEVICE
Fig.2
1. 2.
3. 4.
1.
Open the battery compartment (fig.2.1).
2. Install four“AA” batteries in the compartment.
Make sure that polarity corresponds to signs (+) and (-) shown
inside the compartment (fig
.2.2).
Batteries are readily installed by pressing the end “-“ on the
spring.
3. Close the battery compartment. Do not use excessive force
when removing the cover (
fig
.2.3).
Do not use excessive force when removing the cover
.
Battery Replacement Indicator
Replace all the batteries when
the battery
replacement indicator is
flashing on the display during the
measurement. If upon the device turning
on the indicator is steadily flashing, the
measurement will not be possible until
all the batteries are replaced. The battery
replacement indicator does not show a
discharge degree.
Use alkaline batteries to increase the de-
vice operation duration. Ordinary zinc-
carbon batteries require more frequent
replacement. The enclosed batteries are
meant for testing the sold device, and
their operation period can be less than
that of batteries acquired in the trade
network.
Since neither the device nor the
batteries are the waste that can be
utilized at home
, follow your national/local
regulations for waste recycling and take
them to corresponding collection facilities.
7
ENG
USE OF THE DEVICE WITHTHE AC ADAPTOR
Socket for the AC Adaptor is arranged on the right side of the
device (fig. 2.4).
To use the device with the AC Adaptor, connect it to the de-
vice, install the power plug of AC Adaptor into the socket out-
let, and press the « » button.
When finished, turn off the device by pressing
the
« »
, button, unplug the AC Adaptor from the
socket outlet and disconnect it from the device.
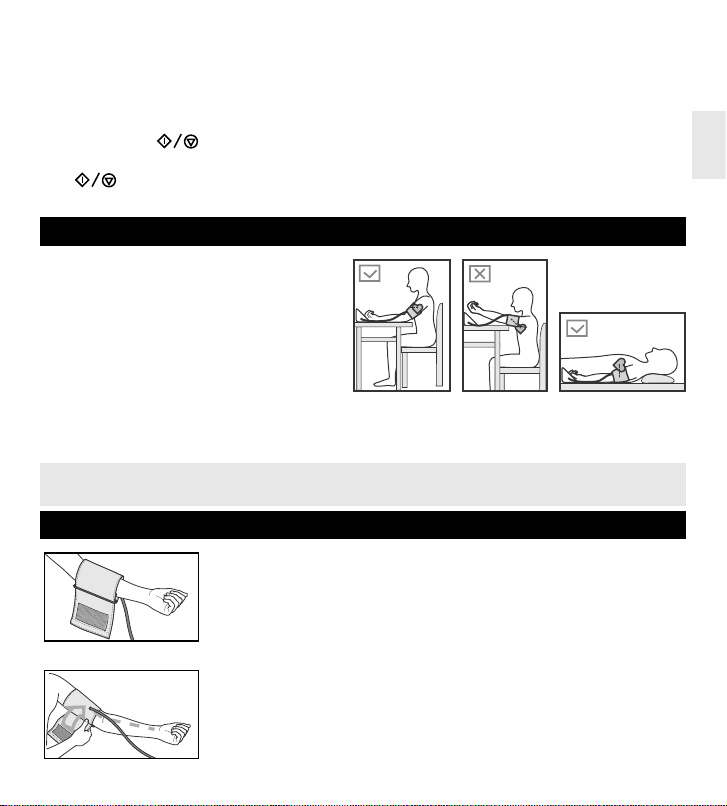
CORRECT POSITION DURING MEASUREMENT
Sit down at the table with your back supported
and feet flat on the floor so that during the blood
pressure measurement your forearm and hand
are on its surface.
Make sure that the place where the cuff is put on
the upper arm is about the same level as the heart
and the forearm and hand freely lie on the table
and does not move (fig. 3).
You can also measure your blood pressure when
lying on your back. Look up, stay calm and do not move during the measurement. Make sure that the place
where the cuff is put on the upper arm is about the same level as the heart (fig. 5).
Measured values may vary slightly, depending on the position during the measurement. If the
cuff is above/below the level of the heart, resulting reading may be incorrect (lower/higher).
CUFF PREPARATION
Fig.6
1 Apply the cuff to your left upper arm so that the Air hose is directed to
your palm (fig.6). If the measurement on your left arm is difficult, you may
use your right arm. In this case remember that the readings may differ by
5-10 mmHg and even more.
Fig.7
2 Wrap the cuff around your upper arm so that the bottom of the cuff is
approximately 2-3 cm above your elbow. Air tube should be directed to-
wards the palm (fig.7).
Fig.3 Fig.4 Fig.5

8
ENG
Fig.8
3 Fix the cuff so that it fits tightly to the arm, but see that it is not over-
tight (fig. 8). Too tight or too free placement of the cuff may give inaccurate
readings.
Fig.9
4 If the arm is cone-shaped, it is recommended to put the cuff spirally, as
shown in the figure (fig.9).
Fig.10
5 If the rolled-up sleeve squeezes the arm interfering with free blood flow
the Device may give inaccurate figures not corresponding to your actual
blood pressure (fig.10).
MEASUREMENT PROCEDURE
1. Insert the Air Plug into the Air connector
(fig.11)
.
Do not move, do not speak and do not toughen your arm.
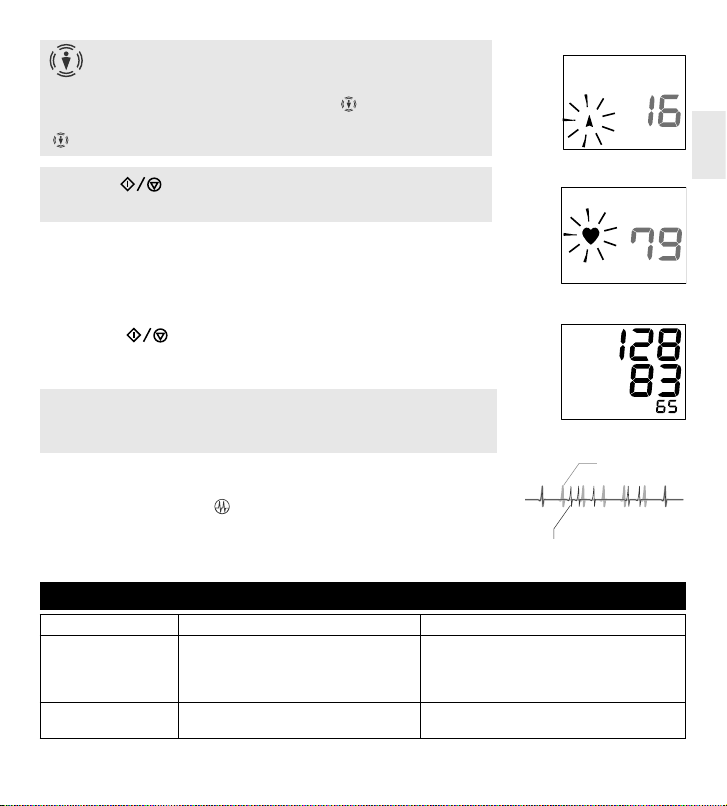
2. Press « » button. The screen will, for a short time, display all
the characters. Then, the result of the previous measurement will ap-
pear on the screen, the release symbol will flash, and the device will
release the remaining air from the cuff (fig. 12).
If the measurement is taken after installing the batteries, only the re-
lease symbol « » appears.
3. Rapid air injection into the cuff will start. At this, the « » symbol will
flash and the value displayed will be increasing (fig. 13).
4. The « » symbol will disappear, and the measurement will start. Dur-
ing this, the pressure in the cuff will slowly be increasing.
Fi
g
.12
Fig.11
9
ENG
Body Motion Indication
Blood pressure value taken while moving cannot be said to be the
correct value because body movement can affect blood pressure.
This product analyzes pulse wave and displays « » when body motion
is detected.
«» indicates the results might be affected by body movement.
Press the «»button to stop forcedly the measurement: the de-
vice will stop inflation and quickly release the air.
5. Heart mark flashes as pulse is detected «».
The unit automatically exhausts the air from the cuff as the measure-
ment is complete.
6. Blood pressures and pulse rate are displayed.
The reading is automatically saved in the bank.
7. Press the
« »
START/STOP button to turn off the device.
If you forget to turn off the device, it will do so automatically after 3
minutes.
Do not perform several measurements in a row.
This will cause numbing the arm and can affect the measurement
result. Give your arm a break for at least 5 minutes.
IRREGULAR PULSE RHYTHM INDICATION
Pulse rhythm can be disturbed from talking, moving or arrhythmi-
as. This product displays « », indicating irregular pulse. (fig.16).
Although continuous appearance of the indication under quiet
measurements may suggest arrhythmias, do not make any judg-
ment on your own before consulting with your doctor.
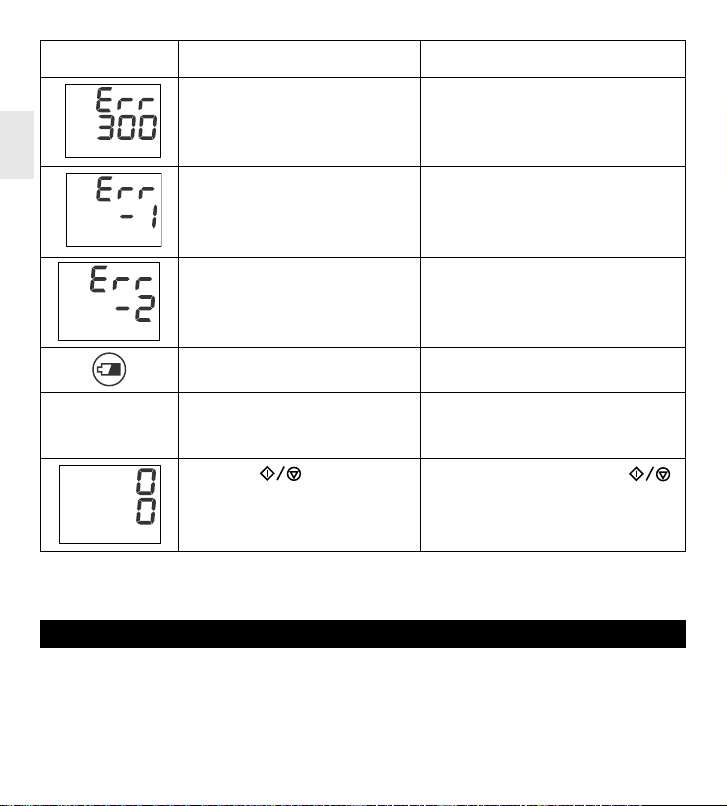
INFORMATION ABOUT ERRORS
INDICATION LIKELY CAUSE
METHODS OF CORRECTION
Blood pressure is
extremely high or low.
The cuff is not at the heart level.
The cuff is put on incorrectly.
During the measurement, a person was
talking or moving.
Put on the cuff at the heart level.
Check the cuff position on the arm.
Be calm and quiet during the measurement.
Measurement results are
different each time.
Effect of measurement conditions,
physical or mental state.
Take measurements under the same
conditions
Fig.14
Fi
g
.15
Normal pulse
Pulse with arrh
y
thmia Fig.16
Fig.13
10
ENG
Measurement results are dif-
ferent in clinic and at home.
Effect of relaxed state at home and
tension in clinic.
Show the pressure records made at home to
your doctor for advice.
Maximum allowable pressure: the
pressure cannot be measured because
of movement or conversation during
the measurement, although the cuff has
been pumped to the maximal extent
.
Do not talk and do not move during the
measurement.
Pressure can not be measured due to
movement or talking.
Do not talk and do not move during the
measurement.
Cuff is not securely connected to the device.
Cuff is not put on properly.
Check the connection.
Make sure that the cuff is put on correctly.
Batteries are discharged. Replace all batteries with new ones.
No time indication on
the display.
Batteries are discharged.
Batteries are installed incorrectly.
Connecting terminals are contaminated.
AC Adaptor is not connected.
Replace all batteries with new ones.
Install batteries properly.
Wipe connecting terminals with a dry cloth.
Connect the AC Adaptor.
You pressed
« »
button when
installing the batteries
.
Turn off the device by pressing the « »
button and perform the measurement again
If, despite the above-given recommendations, you fail to obtain the right measurements, stop the operation and
contact the service center (addresses and telephone numbers of authorized organizations are provided in the
warranty certificate). Do not attempt to adjust the device internal mechanism on your own.
WARRANTY
1. The manufacturer guarantees the warranty period of 5 years for the device from the sale date pro-
vided that the consumer observes operation, transportation and storage requirements. The war-
ranty period for the cuff and the AC Adaptor is 12 months from the sale date.
2. Warranty liabilities are documented with the warranty certificate upon selling the device to the buyer.
The guarantee is valid provided that the device has not been opened or damaged by the buyer.
3. Addresses of organizations engaged in the warranty service are specified in the warranty certificate.

11
ENG
TECHNICAL SPECIFICATIONS
Operating Principle Oscillometric method
Indicator 9 digits liquid crystal display
Pressure Indicating Range 0 to 300 mmHg (cuff pressure)
Measuring Range:
cuff pressure
pulse rate
40 to 250 mmHg
40 to 180 mmHg
Accuracy:
cuff pressure
pulse rate
±3
±5
Cuff Cuff DS-10
Cuff size, cm 22-32
Operation conditions:
Temperature, °C
Relative humidity, % Rh
from 10 to 40
from 15 to 85
Storage and transportation conditions:
Temperature, °C
Relative humidity, % Rh from -20 to 60
from 15 to 85
Power Supply ,
V6
Inflation
automatic (air pump, Measurment on Inflation)
Deflation automatic
Type of power supply
4“AA” size batteries (LR6) or adapter not less than 600 mA
AC ADAPTOR ADP-W5 (included in DS-10A)
Output voltage, V
Max load current, А
Input voltage, В/Гц
6
0,5
100-240/50
Dimension, mm 120х125х70
Weight (without batteries and adapter), g 345
Year of manufacture: year the manufacture is given in the bottom of the Device
body in a serial number after symbols “AA”.
Protection class IP IP20: Protected against solid foreign particles with a
diameter of more than 12.5 mm, no protection against
water.
Protection against electric shock Internally powered equipment/Class II equipment, Type
BF applied part
Mode of operation Continuous operation
Classification Class II / Internally powered equipment
12
ENG
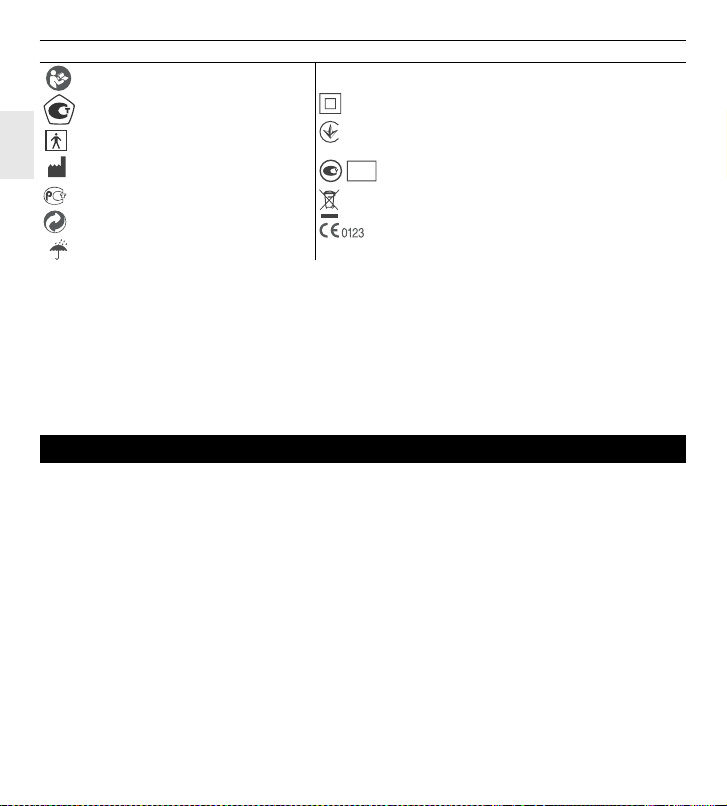
SYMBOLS:
Important: Read the instructions
Approval mark of the type of measuring devices
Type BF
Manufacturer
GOST conformity mark
Environment-friendly package
Protect from moisture
IP20
IP protection class
Class II
UA.TR.001
Mark of conformity of the Ukraine
19
Mark of approval of the type of measuring devices of the Ukraine
When utilizing the waste, refer to current rules applicable in your region
Compliance with Directive 93/42 / EEC
*This device complies with EN1060-1:1995+A2:2009 Non-invasive sphygmomanometers Part 1: General
requirements and EN1060-3:1997+A2:2009 Non-invasive sphygmomanometers Part 3: Supplementary
requirements for electro-mechanical blood pressure measuring system
*Accuracy is guaranteed with the measured values that are within the measuring range.
*The measurement accuracy of the device has been proven according to ISO 81060-2 protocol. In the clinical
study, K5 was used for the determination of diastolic pressure values at all auscultatory measurements.
*This device is intended for use in the environment with one atmospheric pressure.
*Specifications are subject to change without notice due to improvements in performance.
Revision date of the present Manual is indicated on the last page as IXXX/YYMM/NN, where YY is the year, MM
is the month and NN is the number of revision.
CARE, STORAGE, REPAIR AND DISPOSAL
1 This device should be protected from excessive moisture, extreme temperature variations, direct
sunlight, strokes, dust, lint and vibration. THE DEVICE IS NOT WATERPROOF!
2 Do not keep or do not use the device in close proximity to heaters and open flame.
3 In case the product is stored in the environment with ambient temperature above 40˚C or below
10˚C, please leave it for at least 2 hours before taking a measurement.
4 If the device has not been used for a long time, remove the batteries. Leaking of batteries can
cause damage to the device and terminate the warranty. KEEP BATTERIES AWAY FROM CHILDREN!
5 Do not contaminate the device and protect it from dust. The device can be cleaned with a dry,
soft cloth.
6 Do not allow the contact between the device and its parts with water, solvents, alcohol,
and gasoline.
7 Keep the cuff away from sharp objects, and do not try to pull out the cuff.
8 Do not expose the device to strong strokes and do not throw it.
9 The device does not contain any adjustment controls for settings. Unauthorized opening of the
electronic device is forbidden. If needed, repair the device only in specialized organizations.

13
ENG
10 On the expiry of the specified operation term, refer to specialists (specialized repair organizations)
on a periodic basis to check the technical condition of the device.
11 When utilizing the waste, refer to current rules applicable in your region. No special utilization
conditions are specified by the manufacturer for this device
12 Keep the device clean. Inspect its cleanliness after use. To clean, use only a soft dry cloth. Do not
use gasoline, paint thinner, or other strong solvents. The cuff is resistant to repeated sanitation.
The cuff internal fabric surface (being in contact with a patient’ arm) can be treated with a cotton
swab moistened in a 3% solution of hydrogen peroxide. Partial discoloration of the cuff covering
tissue is possible if used for a long time. Do not wash the cuff and do not treat it with a hot iron.
13 Do not leave unattended the device plugged into the network.
14 Stop using the device immediately and contact your dealer or the manufacturer in case any visible
damage is found on the device.
15To avoid any possibility of accidental strangulation, keep this device away from children and do
not drape AIR HOSE around your neck.
16 Do not press the display or place the device with display face down.
17 The device contains small parts and batteries which could be swallowed by children or pets. They
should therefore be kept out of the reach of children and pets at all times.
18 This device is not designed for self-use by unspecified persons in public areas.
19 Any serious incident occurred in relation to the device should be reported to the manufacturer and
the competent authority in your country/area. If you have no contact information of such authority,
please contact the manufacturer or EU authorized representative whose contact information is
indicated in this instruction manual.
CERTIFICATION AND STATE REGISTRATION
The production of devices is certified pursuant to international standards ISO 9001, ISO 13485, ISO 14001.
The device meets international standards IEC 60601-1:2005+A1:2012 and IEC 60601-1-2:2014.
AC Adaptor ADP-W5
meets international standard
IEC60601-1 by JQA, class II.
Produced by Nihon Seimitsu Sokki Co., Ltd.
Address: 2508-13 Nakago Shibukawa Gunma 377-0293 Japan
website: www.nissei.pl
EC-Representative: MDSS GmbH Schiffgraben 41, 30175 Hannover, Germany
TECHNICAL DESCRIPTION FOR ELECTROMAGNETIC DISTURBANCES
DS-10 (DS-10a) complies with the Electromagnetic Disturbances standard, IEC60601-1-2:2014.
As a medical electrical equipment, special precautions regarding the electromagnetic disturbances shall
be taken at usage of the device according to the information provided below.
• The device is not intended for use in environments where the intensity of electromagnetic disturbance
is high, such as near active HF surgical equipment and MRI (magnetic resonance imaging) equipment etc.

14
ENG
• Use of the device adjacent to or stacked with other equipment must be avoided because it could result
in improper operation.
• Use of accessories other than those specified or provided by the manufacturer could result in increased
electromagnetic emissions or decreased electromagnetic immunity of the device and result in improper
operation.
• Portable RF communications equipment (including peripherals such as antenna cables and external
antennas) should be used at least 30cm away from any part of the device, including specified cables.
Otherwise, degradation of the performance of this equipment could result.
Please contact your dealer or the manufacturer for specific information regarding the compliance to the
standard.

I467/1903/15
UA.TR.001
IP20
®Зарегистрированный товарный знак.
©Copyright 2019.
NIHON SEIMITSU SOKKI CO., LTD.
2508-13 Nakago Shibukawa Gunma 377-0293 Japan
web site: http://www.nissei-kk.co.jp/english/
MDSS GmbH
Schiffgraben 41, 30175 Hannover, Germany
19
This manual suits for next models
1
Table of contents
Other Nissei Blood Pressure Monitor manuals

Nissei
Nissei WSK-1011 User manual

Nissei
Nissei DS-10 User manual

Nissei
Nissei WS-1300 User manual

Nissei
Nissei DSK-1011J User manual

Nissei
Nissei DSK-1031 User manual

Nissei
Nissei DS-S10 User manual

Nissei
Nissei WSK-1011 User manual

Nissei
Nissei DS-10 User manual

Nissei
Nissei DS-400 User manual

Nissei
Nissei WS-820 User manual

Nissei
Nissei DSK-1031 User manual

Nissei
Nissei DS-B10 User manual

Nissei
Nissei ds-1902 User manual

Nissei
Nissei DS-1011 User manual

Nissei
Nissei DS-1873 User manual

Nissei
Nissei DSK-1031 User manual

Nissei
Nissei DS-500 User manual

Nissei
Nissei DS-137 User manual

Nissei
Nissei WS-1011 User manual

Nissei
Nissei WS-820 User manual


