Nissei DSK-1031 User manual

DSK-1031 INSTRUCTOIN MANUAL
DIGITAL BLOOD PRESSURE MONITOR DSK-1031
INSTRUKCJA OBSŁUGI
CIŚNIENIOMIERZA CYFROWEGO DSK-1031
РЪКОВОДСТВО ЗА ЕКСПЛОАТАЦИЯ
НА ЦИФРОВ ТОНОМЕТЪР DSK-1031
UŽIVATELSKÝ NÁVOD
K DIGITÁLNÍMU TONOMETRU DSK-1031
A DSK-1031 TÍPUSÚ DIGITÁLIS TONOMÉTER
HASZNÁLATI UTASÍTÁSA
MANUAL DE UTILIZARE
A TENSIOMETRULUI DIGITAL DSK-1031
ROU HUN CZE BGR POL ENG

2
ENG
GENERAL INFORMATION
INDICATIONS FOR USE
This Instruction Manual is designed to assist the user with safe and effective operation of
the digital blood pressure monitor DSK-1031 (hereinafter – the “Device”). The device is de-
signed to measure systolic and diastolic blood pressure and heart rate reading in patients
aged 13 years and older. This device should not be used for neonate or infant. Consult your
doctor for blood pressure measurement in children or person in pregnancy or under pre-
eclamptic condition. The device is recommended for use in patients with unstable (non-
permanent) blood pressure or hypertension at home as a supplement to medical surveil-
lance. The cuff is suitable for a upper arm with a circumference of about 22 - 42 cm.
Blood
pressure is measured in the range from 50 to 250 mmHg for systolic and 40 to 180
mmHg for diastolic, in the range from 40 to 160 heartbeats per minute.
OPERATION PRINCIPLES
The device uses the oscillometric method of measurement. The cuff connected to the
electronic module is wrapped around the upper arm.
When you press the START/STOP button, the device starts the automatic inflation,
which is followed by the blood pressure measurement. The sensor element of the de-
vice detects slight pressure oscillations in the cuff produced by the expansion and
contraction of the brachial artery in response to each heartbeat. Inflation is stopped
when the cuff is pumped enough to determine diastolic and systolic pressure, where-
upon the air is discharged from the cuff. Rhythm and amplitude of the pressure waves
are measured and displayed on the LC display as a numerical value in millimeters of
mercury. The device has an arrhythmia indicator, as well as two memories with 60
cells in each calculating the average value.
NISSEI New Technologies
Fuzzy Inflation Algorithm – is an algorithm for automatic selection of the
cuff inflation pressure. Using this algorithm, the device by itself determines
the pressure level to which it is necessary to inflate the cuff based on the
patient’s systolic pressure. Owing to the Fuzzy Inflation algorithm the device
becomes easier to use, while the measurement gets more comfortable and
more accurate.
Arrhythmia indicator is a special icon on the display that informs on the
irregular heartbeat, while the measurement result is correct.
PARTS AND COMPONENTS
1. CUFF
2. AC ADAPTOR
3. BATTERIES
4. ELECTRONIC UNIT
A. AIR PLUG
B. BATTERY COMPARTMENT
C. AC ADAPTOR JACK
D.
SET BUTTON (SETTINGS)
E. BUTTON (MEMORY 1)
F. BUTTON (MEMORY 2)
G. START/STOP BUTTON (START/STOP )
H. LCD DISPLAY
I. AIR CONNECTOR
K. AIR TUBE

3
ENG
crease in pressure values. Therefore, blood pressure measured at home is often differ-
ent from that measured in the clinic. Since blood pressure increases at low tempera-
tures, measurements should be made at room temperature (about 20°C). In case the
product is stored in the environment with ambient temperature above 40˚C or below
10˚C, please leave it for at least 2 hours before taking a measurement. During the day,
the difference in the readings in healthy people may attain 30-50 mm Hg for systolic
(upper) pressure and up to 10 mm Hg for diastolic (lower) pressure. Dependence of
blood pressure on various factors is individual for each person. Therefore it is recom-
mended to keep a special recording of blood pressure readings. ONLY A DOCTOR MAY
ANALYZE TRENDS IN CHANGING YOUR BLOOD PRESSURE BASED ON CORRESPONDING
RECORDINGS.
4. In case of cardiovascular diseases and a number of other diseases that require
the blood pressure monitoring, measurements should be carried out in the hours
specified by a doctor. REMEMBER THAT THE DIAGNOSTICS AND ANY TREATMENT OF
ARTERIAL HYPERTENSION SHOULD BE CARRIED OUT ONLY BY A DOCTOR BASED ON
BLOOD PRESSURE READINGS OBTAINED BY A DOCTOR. MEDICAL DRUG ADMINISTRA-
TION OR CHANGE OF DOSAGES SHOULD BE MADE ONLY BY PRESCRIPTION OF AN AT-
TENDING DOCTOR.
Blood pressure variations during a day
Systolic
Diastolic
Arterial pressure (mmHg)
Time of day
Fig.1
5. In case of disorders such as deep vascular sclerosis, weak pulse wave and break in
rhythm of heart contractions, the correct blood pressure measurement can be com-
plicated. IN THIS CASE, A DOCTOR SHALL PROVIDE RECOMMENDATIONS IN RELATION
TO USE OF THIS DEVICE.
6. KEEP QUIET DURING THE MEASUREMENT TO OBTAIN THE CORRECT BLOOD PRES-
SURE READING WHEN USING THE ELECTRONIC DEVICE. The blood pressure measure-
Touch control – is control of the device by slight touching it.
Detection of interference noises – indicator informs on the occurrence of
noises that can affect the measurement result.
Control of correct fixing the cuff – shows if the cuff is fastened too tight
or too loose.
Indication of reliability – this symbol is displayed when all stages of
proper measurement procedure are observed.
Pulse pressure – along with the measurement result the device displays
the pulse pressure value. Pulse pressure is a difference between systolic
and diastolic pressure.
WARNING! Using a cuff that is different from that supplied with this device is not allowed.
COMPLETE SET
The complete set includes
- Electronic unit - 1 pc.
- Cuff (including air hose and air hose plug) - 1 pc.
- Batteries - 4 pcs.
- Power supply source - 1 pc.
- Bag - 1 pc.
- Instruction Manual - 1 pc.
- Warranty - 1 pc.
- Packaging - 1 pc.
RECOMMENDATIONS ON CORRECT MEASUREMENTS
1. If treated with hemodialysis or anticoagulants, antiplatelets or steroids, refer to
your doctor about the blood pressure measurement.
2. Malfunctions are possible when the device is used near working mobile phones,
microwave ovens and other equipment generating electromagnetic radiation.
3. For correct measurement it is necessary to know that the BLOOD PRESSURE IS SUB-
JECT TO SHARP FLUCTUATIONS EVEN IN SHORT TIME INTERVALS. The blood pressure
level depends on many factors. It is commonly lower in summer and higher in winter.
Blood pressure varies along with atmospheric pressure and depends on the physical
exertion, emotional excitability, stress and diet. Medical drugs, alcohol and smoking
exert great influence as well. Occasionally, measurements in the clinic cause an in-

4
ENG
ment should be carried out in a quiet comfortable atmosphere at room temperature.
Exclude meal an hour before the measurement, and exclude smoking, soft drinks, and
alcohol 1.5-2 hours before the measurement.
7. Accuracy of the blood pressure measurement depends on matching the device
cuff and size of your arm. THE CUFF SHOULD NOT BE TOO SMALL OR TOO BIG.
8. Repeated measurements are carried out at 5-minute intervals to recover the blood
circulation. However, persons suffering from severe atherosclerosis, due to a significant
loss of elasticity of blood vessels, need longer intervals between measurements (10-15
minutes). This also concerns patients suffering from long-term diabetes. For more ac-
curate determination of blood pressure it is recommended to carry out a series of three
consecutive measurements and to calculate the average value of measurement results.
9. Do not use this device in an explosive environment such as near flammable anes-
thetics or inside oxygen chamber.
10. The system may fail to yield specified measurement accuracy if operated or stored
in temperature or humidity conditions outside the limits stated in the specifications
section of this manual.
11. Do not use cuffs or accessories other than those specified by the manufacturer.
Otherwise, correct measurement readings cannot be obtained.
12. Do not apply the cuff over wounded arm, arm under an intravascular access or
therapy or an arterio-venous shunt, or arm on the side of a mastectomy or lymph
node clearance. Otherwise injury may be resulted.
13. Make sure that inflation of the cuff is not causing prolonged impairment of blood
circulation. Also, be cautious about temporary loss of the functions of any other medi-
cal equipment if any monitoring equipment is used on the same limb with the blood
pressure measuring cuff.
14. To avoid harmful injury due to interfered blood flow from cuff inflation, make sure
that AIR HOSE is not kinking before measurement. Otherwise, cuff inflation may not
be conducted properly and prolonged.
15. Do not take out batteries or unplug the AC adaptor when the device is turned on.
Make sure to switch off the device before removing batteries or AC adaptor.
16. Do not touch the output plug of AC adaptor during measurement.
17. Do not inflate the cuff when it is not wrapped around your arm.
18. Do not apply the cuff on the limb which the intravenous drip infusion is imple-
mented.
POWER SUPPLY OF THE DEVICE
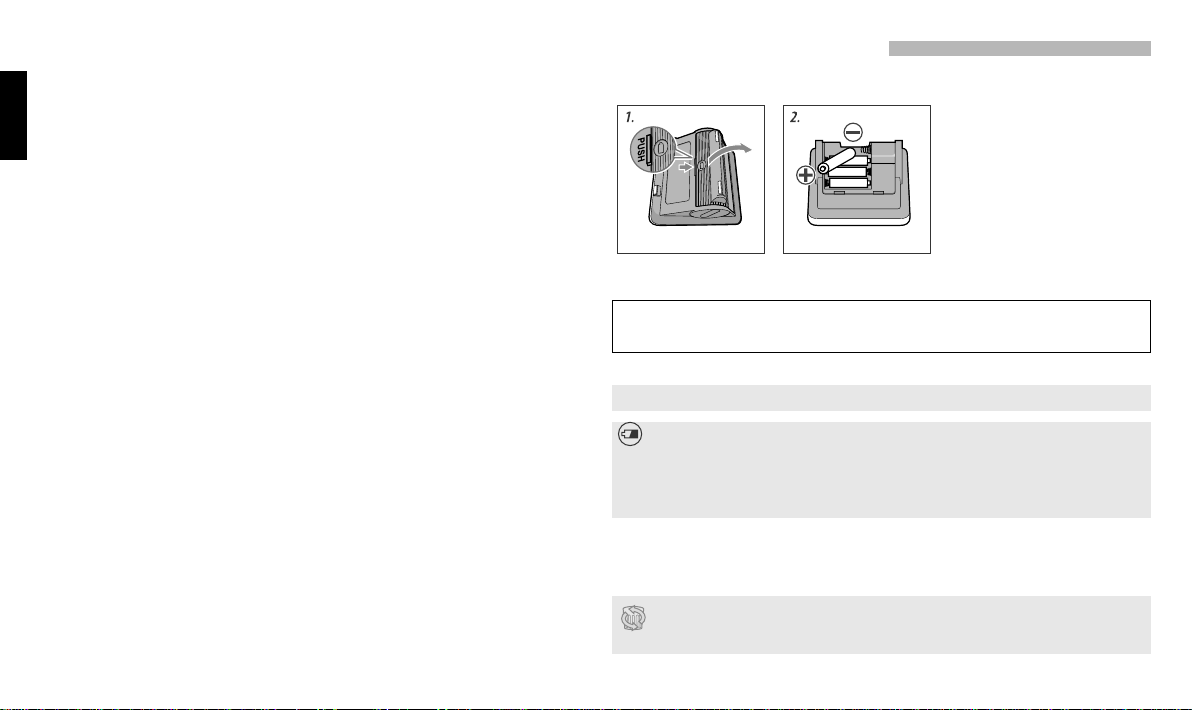
INSTALLATION OF BATTERIES
Fig.2 Fig.3
1.
Open the battery compart-
ment (Fig. 2).
2. Install four “AA” batteries in
the compartment.
Make sure that polarity corre-
sponds to signs (+) and (-) shown
inside the compartment (Fig. 3).
Batteries are readily installed
by pressing the end “-“ on the
spring.
Allowed to rechargeable batteries. To charge the batteries, use the special charger
(not included).
3. Close the battery compartment. Do not use excessive force when removing the cover.
Do not use excessive force when removing the cover.
Battery Replacement Indicator
Replace all the batteries when the battery replacement indicator is flashing on
the display during the measurement. If upon the device turning on the indicator
is steadily flashing, the measurement will not be possible until all the batteries are
replaced. The battery replacement indicator does not show a discharge degree.
Use alkaline batteries to increase the device operation duration. Ordinary zinc-carbon
batteries require more frequent replacement. The enclosed batteries are meant for
testing the sold device, and their operation period can be less than that of batteries
acquired in the trade network.
Since neither the device nor the batteries are the waste that can be utilized at home,
follow your national/local regulations for waste recycling and take them to corre-
sponding collection facilities.

5
ENG
USE OF THE DEVICE WITH THE POWER SOURCE
Socket for the power source is arranged on the left side of the device. To use the device
with the power source, connect the power source connector to the device, install the
power source plug into the socket outlet, and press the «START/STOP» button.
When finished, turn off the device by pressing the «START/STOP» button, unplug the
power source from the socket outlet and disconnect the power source connector
from the device.
NOTE! If there is no battery in the device, turning off the power source will result in
zeroing of measurement results stored in the device memory and set date and time. If
you do not want to make the data erased, do not remove the batteries from the device
when using the power source.
SETTING DATE AND TIME
Date and time can be set after installing batteries. Setting the date and time guarantees
the preservation of measurement results with indicated correct date and time. The de-
vice can be used without setting the date and time.
Press and hold the SET button until the display flashes the value of the year.
Date and time are set in the following order: year, month, day, hour and minute.
1. Setting the Year
Use the button to increase and button to decrease the year value. Press the SET
button to confirm and to pass to the next step.
2. Setting the Month
Use the button to increase and button to decrease the month value. Press the
SET button to confirm and to pass to the next step.
3. Setting the Day
Use the button to increase and button to decrease the day value. Press the SET
button to confirm and to pass to the next step.
4. Setting the Time
Watch uses a 12-hour time format of day. Use the button to increase and button
to decrease the hour or minute value. Press the SET button to confirm the settings. To
stop the setting, press the «START/STOP» button.
IMPORTANT! If the date and time are set, then when turned off the device display will
show the current time.
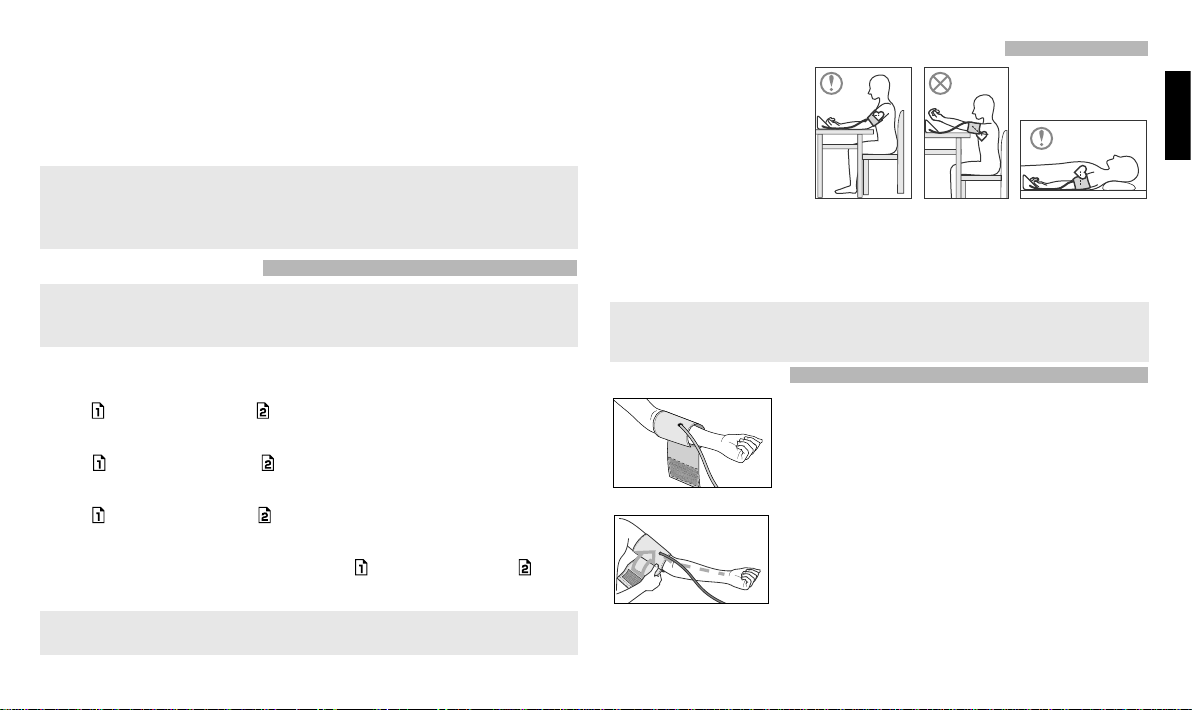
CORRECT POSITION DURING MEASUREMENT
Fig.4 Fig.5 Fig.6
Sit at the table, let the chair and
table support your back and
arm, and keep your feet flat on
the floor as you take the blood
pressure measurement (Fig. 4).
Make sure that the measure-
ment location on the upper
arm is at approximately the
same height as the heart, and
that the forearm is extended naturally on the table and does not move.
You may lie on your back and take the measurement (Fig.6). Look at the ceiling, stay calm,
and do not move your neck or body during the measurement. Again, make sure that the
measurement location on the arm is at approximately the same height as the heart.
Measured values may vary slightly, depending on the position during the
measurement. If the cuff is above/below the level of the heart, resulting reading
may be incorrect (lower/higher)
CUFF PREPARATION
Fig.7
1. Apply the cuff to your left upper arm so that the air
tube is directed to your palm
(Fig. 7)
. If the measurement
on your left arm is difficult, you may use your right arm. In
this case remember that the readings may differ by 5-10
mmHg and even more.
Fig.8
2.
Wrap the cuff around your upper arm so that the bottom
of the cuff is approximately 2-3 cm above your elbow. Air
tube should be directed towards the palm (Fig. 8).

6
ENG
Fig.9
3. Fix the cuff so that it fits tightly to the arm, but see that
it is not overtight (Fig. 9). Too tight or too free placement
of the cuff may give inaccurate readings.
Fig.10
4. If the arm is cone-shaped, it is recommended to put
the cuff spirally, as shown in the figure (Fig. 10).
Fig.11
5. If the rolled-up sleeve squeezes the arm interfering
with free blood flow the Device may give inaccurate
figures not corresponding to your actual blood pressure
(Fig. 11).
MEASUREMENT PROCEDURE
IMPORTANT! The device has touch-sensitive buttons that
are pressed by slight touching. Moisture, dirt and extraneous
objects between the finger and the device panel can affect
the ability of buttons to respond to touching.
1. Insert the Air Tube Plug into the Cuff Jack.
Before measurement, take a few breaths and relax. During the
measurement, do not talk and do not move.
2. Press the START/STOP button. The deflating symbol « » will
flash on the display, and the device will release the remaining air
from the cuff (Fig. 12)
3. Beep will be heard, and air will be pumped into the cuff. The symbol « » will flash,
and the displayed value will increase (Fig. 13). Inflation will stop at optimum level
owing to the Fuzzy Inflation algorithm.
Fi
g
.12
4. The symbol « » will disappear, and the measurement will
start. The cuff pressure will decrease slowly.
.
Noise Interference Detection
This device detects the presence of extraneous
sounds or noises that can affect the measurement results.
When such interference is detected, the symbol « ». ap-
pears on the display. In this case, it is recommended to re-
peat the measurement to eliminate the interference.
Control of Correct Fixing the Cuff
The symbol « » indicates that the cuff is applied
correctly, the symbol « » indicates that the cuff is fastened too
tight or too loose. In this case, it is recommended to repeat the
measurement after proper fixing the cuff.
Press the START/STOP button to stop forcedly the measure-
ment: the device will stop inflation and quickly release the air.
Automatic Additional Inflation.
If on starting the measurement, the operating pressure appears to be insufficient due to
arm movements or due to excessive tension in a arm, the cuff will be filled with air again to
the level of about 30 mm Hg higher than the original level. Automatic additional inflation
will be repeated until the measurement is completed successfully. This is not a malfunction.
5. The symbol «» will start flashing synchro-
nously with a sound signal, as soon as the
sensor catches the pulse pressure (Fig. 14)
6. When the measurement is completed, the
display will show the values of blood pressure,
pulse pressure, WHO scale and heart rate (Fig.
15). The device will automatically release the
air from the cuff.
7. Press the button or button and the result
will remain in the selected memory unit
.
Fig.13
Fi
g.
14
Pulse, stroke/min.
The Cuff Symbol
The Reliability Symbol
Systolic pressure,
mmHg
Diastolic pressure,
mmHg
Puls pressure, mmHg
Fi
g
.15

7
ENG
Table of Results by the WHO Scale
Indication WHO Classication SYS DIA
Hypertension (severe) ≥180 ≥110
Hypertension (moderate) 160-179 100-109
Hypertension (slight) 140-159 90-99
Increased normal pressure 130-139 85-89
Normal pressure 120-129 80-84
Optimal <120 <80
Indication of Pulse Pressure
This device calculates and displays the pulse
pressure value (Fig. 18). Pulse pressure – a dif-
ference between the systolic and diastolic pres-
sures – tends to increase with aging.
Systolic blood pressure continues to increase
with aging, while diastolic blood pressure tends
to decrease since the age of about 50 years.
It is considered that a high pulse pressure is re-
lated to poor elasticity of arteries and is one of the risk factors for circulatory diseases.
Pulse pressure is considered to be normal when it attains 35±10 mm Hg.
MEMORY FUNCTOIN
The measured values are automatically saved for later viewing in the selected memory
unit. These memory units can be used to save separately the measurement results
of two different persons or to save separately the results of morning and evening
measurements.
Each unit can keep up to 60 measurement results and the average value thereof.
When the number of kept values exceeds 60, the oldest readings are deleted to
record new values.
Pulse pressure
mmH
g
Fi
g.
1
8
8. Press the START/STOP button to turn off the device.
If you forget to turn off the device, it will do so automatically after 3 minutes.
Indication of Reliability
Important aspects in measuring the blood pressure imply the correct
application of the cuff and proper posture during the measurement. These aspects
may influence the measurement result. The device displays the symbol « », when
the measurement procedure is carried out properly. If this symbol is not displayed,
it is recommended to repeat the measurement observing the guidelines for proper
measurement described in this manual.
Do not perform several measurements in a row.
This will cause numbing the arm and can affect the measurement result. Give your
arm a break for at least 5 minutes.
INDICATION OF ARRHYTHMIA
The flashing symbol « », appeared on the
display reports on an irregular heartbeat rhythm
(Fig. 16). If this symbol appears from time to
time, refer to your doctor. The arrhythmia
indicator occurrence can be also caused by body
movements in the course of the measurement.
INDICATION OF READINGS BY THE WHO SCALE
In addition to pressure numerical values, the
result is also displayed as a graphic scale. This
scale makes it possible to classify the obtained
blood pressure value in accordance with the
World Health Organization recommendations.
The scale appears along with the numerical
value of blood pressure in the lower right corner
of the display (Fig. 17).
N
orma
l
pu
l
se
Pulse with arrhythmia
Fi
g.
1
6
WHO indicator
Fig.17

8
ENG
Saved values are kept with the measurement date and time, if set. If you want to save
time and date together with the measurement values, date and time should be set
before the measurement.
When an error occurs (ERR), the measurement results are not saved.
Viewing the Saved Data
1. Turn off the device by pressing the START/STOP
button. To view the results stored in the memory
unit 1, press , and to view the results stored in the
memory unit 2, press . The selected memory unit
will be underlined on the display.
The display shows the average value of stored
results indicated with index « » (Fig. 19). Average
value is displayed when the selected memory unit
contains two or more saved measurement results.
2. Each time you press the button or button,
saved measurement results will be displayed in a
sequential manner.
3. Memory unit number, measurement date and
time will be displayed one by one in the upper right corner of the display.
4. The result saved in the memory unit 1 is the most recent among the saved data in
the selected memory. The higher memory number, the older the result.
The memory data are displayed for about 30 seconds and after that, if no button is
pressed, the device is automatically turned off.
Pressing the button switches the display from records in the memory unit 1 to
records in the memory unit 2, while pressing the button results in returning to data
recorded in the memory unit 1.
5. Press the START/STOP button to turn off the device.
Deletion of Saved Data
Readings can be deleted unit by unit: all together or separately. The memory may be
cleared when the selected memory unit contains two or more results.
1. Select a value from the memory unit to be deleted or the average value (unit with
index « ») to clear the whole memory unit.
2. Press and hold the button or until the sign «---» appears on the display.
Selected memory
indicator Average
value
index
Number of saved measurements
Fi
g
.19
INFORMATION ABOUT ERRORS
INDICATION LIKELY CAUSE METHODS OF CORRECTION
Blood pressure is too
low or too high. The cuff is not at the heart level.
The cuff is put on incorrectly.
During the measurement, a person
was talking or moving.
Put on the cuff at the heart level.
Check the cuff position on the arm.
Be calm and quiet during the
measurement.
Measurement results
are different each time.
Effect of measurement conditions,
physical or mental state. Take measurements under the same
conditions.
Measurement results
are different in clinic
and at home.
Effect of relaxed state at home and
tension in clinic. Show the pressure records made at
home to your doctor for advice.
Inflation is repeated. Pressure can not be measured due to
movement or talking. Re-inflation is not a malfunction of
the device. Do not talk and do not
move during the measurement.
Maximum allowable pressure:
pressure can not be measured due
to movement or talking during
the measurement, in spite of the
fact that the cuff was pumped at
maximum.
Do not talk and do not move during
the measurement.
or
Pressure can not be measured due to
movement or talking. Do not talk and do not move during
the measurement.
Cuff is not securely connected to
the device.
Cuff is not put on properly.
Check the connection.
Make sure that the cuff is put on
correctly.
No time indication on
the display.
Time was not set.
Note: there is no time indication when
batteries and/or power source are not
provided.
Set time and date.
Install batteries and connect the
power source.

9
ENG
Date and time are
displayed as «--/--». Time was not set or measurements
were carried out before setting the
time.
Set date and time.
Date and time can not be saved
without setting.
Batteries are discharged. Replace all batteries with new ones.
Nothing is shown on
the display. Batteries are discharged.
Batteries are installed incorrectly.
Connecting terminals are
contaminated.
Power source is not connected.
Insufficient contact when touching
the button.
Replace all batteries with new ones.
Install batteries properly.
Wipe connecting terminals with a
dry cloth.
Connect the power source.
Ensure stronger pressing the button.
You touched the START/STOP button
when installing the batteries. Turn off the device by pressing the
START/STOP button and perform the
measurement again.
If, despite the above-given recommendations, you fail to obtain the right measurements, stop
the operation and contact the service center (addresses and telephone numbers of authorized
organizations are provided in the warranty certificate). Do not attempt to adjust the device
internal mechanism on your own.
WARRANTY
1. The manufacturer guarantees the warranty period of 5 years for the device from
the sale date provided that the consumer observes operation, transportation and
storage requirements. The warranty period for the cuff and the power source is 12
months from the sale date.
2. Warranty liabilities are documented with the warranty certificate upon selling the
device to the buyer. The guarantee is valid provided that the device has not been
opened or damaged by the buyer.
3. Addresses of organizations engaged in the warranty service are specified in the
warranty certificate.
TECHNICAL SPECIFICATIONS
Operating Principle Oscillometric method
Indicator 15 digits liquid crystal display
Pressure Indicating Range , mmHg 0-300
Measuring Range :
cuff pressure, mmHg
pulse rate, bpm 50-250(systolic), 40-180(diastolic)
40-160
Accuracy:
cuff pressure, mmHg
pulse rate, %
±3
±5
Inflation Automatic inflation (air pump, Fuzzy Inflation algorithm)
Deflation Automatic Deflation (electric valve)
Electric supply voltage, V 6
Electric supply type Four 1.5 volt LR6 (AA alkaline) batteries or AC adaptor
Memory 2 units, 60 values per each + average value
ADP-W5 Power Source
Output voltage, V
Maximum load current, A
Input voltage, V/Hz
6
0,5
100-240/50
Operating Condition
temperature, ˚C
humidity, % Rh +10 to +40
15 - 85
Transportation / Storage Condition
temperature, ˚C
humidity, % Rh
-20 to +60
10 - 95
Cuff Size adult (circumference of the upper arm 22-42 cm)
Overall dimensions:
Size (electronic unit), mm
Weight (without packaging,
bags, batteries and power
source), g.
115 x 115 х 65
406
Manufacture year: is specified on the device housing (in the battery
compartment) in the device serial number after the
letters «SN»

10
ENG
Protection level IP20: Protected against solid foreign particles with a
diameter of more than 12.5 mm, no protection against
water.
Protection against electric shock: Internally powered equipment/Class II equipment, Type
BF applied part
Mode of operation: Continuous operation
Classification: Class II / Internally powered equipment
Expected Service Life: 5 years
Key to Symbols Type BF applied part
Class II equipment
Refer to instruction manual/booklet
Keep dry
When utilizing the waste, refer to current rules
applicable in your region
*This device complies with EN1060-1:1995+A2:2009 Non-invasive sphygmomanometers Part
1: General requirements and EN1060-3:1997+A2:2009 Non-invasive sphygmomanometers
Part 3: Supplementary requirements for electro-mechanical blood pressure measuring system
*Accuracy is guaranteed with the measured values that are within the measuring range.
*The measurement accuracy of the device has been proven according to ISO 81060-2
protocol. In the clinical study, K5 was used for the determination of diastolic pressure values at
all auscultatory measurements.
*This device is intended for use in the environment with one atmospheric pressure.
*Specifications are subject to change without notice due to improvements in performance.
CARE, STORAGE, REPAIR AND DISPOSAL
1. Because the product includes precision parts, avoid extreme temperature vari-
ations, humidity, shock, dust, lint, and direct sunlight. Do not drop or strike the
product. Make sure not to expose it to moisture. This product is not water resistant.
2. Do not keep or do not use the device in close proximity to heaters and open flame.
3. In case the product is stored in the environment with ambient temperature above
40˚C or below 10˚C, please leave it for at least 2 hours before taking a measure-
ment.
4. If the device has not been used for a long time, remove the batteries. Leaking of
batteries can cause damage to the device and terminate the warranty. KEEP BAT-
TERIES AWAY FROM CHILDREN!
5. Do not contaminate the device and protect it from dust. The device can be cleaned
with a dry, soft cloth.
6. Do not allow the contact between the device and its parts with water, solvents,
alcohol, and gasoline.
7. Keep the cuff away from sharp objects, and do not try to pull out the cuff.
8. Do not expose the device to strong strokes and do not throw it.
9. The device does not contain any adjustment controls for settings. Unauthorized
opening of the electronic device is forbidden. If needed, repair the device only in
specialized organizations.
10.
On the expiry of the specified operation term, refer to specialists (specialized repair
organizations) on a periodic basis to check the technical condition of the device.
11.When utilizing the waste, refer to current rules applicable in your region. No special
utilization conditions are specified by the manufacturer for this device.
12. Keep the product clean. Inspect its cleanliness after use. To clean, use only a soft
dry cloth. Do not use gasoline, paint thinner, or other strong solvents. Since the
cuff may absorb perspiration and other fluids, inspect it for stain and discoloration
after each use. The cuff is resistant to repeated sanitation. The cuff internal fabric
surface (being in contact with a patient’ arm) can be treated with a cotton swab
moistened in a 3% solution of hydrogen peroxide. Partial discoloration of the cuff
covering tissue is possible if used for a long time. Do not wash the cuff and do not
treat it with a hot iron.
13. Do not leave the device plugged into the network unattended.
14. Stop using the device immediately and contact your dealer or the manufacturer in
case any visible damage is found on the device.
15. To avoid any possibility of accidental strangulation, keep this device away from
children and do not drape AIR HOSE around your neck.
16. Do not press the display or place the device with display face down.
17. The device contains small parts and batteries which could be swallowed by chil-
dren or pets. They should therefore be kept out of the reach of children and pets
at all times.
18. This device is not designed for self-use by unspecified persons in public areas.
19. Any serious incident occurred in relation to the device should be reported to the
manufacturer and the competent authority in your country/area. If you have no

11
POL
contact information of such authority, please contact the manufacturer or EU au-
thorized representative whose contact information is indicated in this instruction
manual.
CERTIFICATION AND STATE REGISTRATION
The production of devices is certified pursuant to international standards such as ISO
9001, ISO 13485, ISO 14001.
The device meets international standards IEC 60601-1:2005+A1:2012 and IEC 60601-
1-2:2014.
Complaints and requests should be addressed to:
Little Doctor Europe Sp. z o.o.
57G Zawila Street, 30-390, Krakow, Poland
Tel.: +48 (12) 268-47-46, (12) 268-47-47
Fax: +48 (12) 268-47-53
E-mail: biuro@littledoctor.pl
Produced by Nihon Seimitsu Sokki Co., Ltd.
Manufacturer: NIHON SEIMITSU SOKKI CO., LTD.
2508-13 Nakago Shibukawa Gunma 377-0293 Japan
web site www.nissei.pl
PODSTAWOWE CZĘŚCI I KOMPONENTY
1.
MANKIET
2.
ZASILACZ
3.
BATERIE
4. JEDNOSTKA ELEKTRONICZNA
A. ZŁĄCZE PRZEWODU POWIETRZA
B. KOMORA BATERII
C. GNIAZDO DO PRZYŁĄCZENIA ZASILACZA
D.
PRZYCISK SET (USTAWIENIA)
E. PRZYCISK (PAMIĘĆ 1)
F. PRZYCISK (PAMIĘĆ 2)
G. PRZYCISK «START/STOP»
H. WYŚWIETLACZ LCD
I. GNIAZDO POWIETRZA
K. PRZEWÓD POWIETRZA

59
TECHNICAL DESCRIPTION
CERTIFICAREA ȘI ÎNREGISTRAREA DE STAT
Fabricarea de dispozitive certificate la standarde internaţionale ISO 9001, ISO 13485,
ISO 14001.
Dispozitivulcorespunde cerinţelor standardelor internaţionaleIEC 60601-1:2005+A1:2012
and IEC 60601-1-2:2014.
Producător: NIHON SEIMITSU SOKKI CO., LTD.
2508-13 Nakago Shibukawa Gunma 377-0293 Japan
web site www.nissei.pl
TECHNICAL DESCRIPTION
DSK-1031 complies with the Electromagnetic Disturbances standard, IEC60601-
1-2:2014.
As a medical electrical equipment, special precautions regarding the
electromagnetic disturbances shall be taken at usage of the device according
to the information provided below.
• The device is not intended for use in environments where the intensity of
electromagnetic disturbance is high, such as near active HF surgical equipment
and MRI (magnetic resonance imaging) equipment etc.
• Use of the device adjacent to or stacked with other equipment must be
avoided because it could result in improper operation.
• Use of accessories other than those specified or provided by the manufacturer
could result in increased electromagnetic emissions or decreased
electromagnetic immunity of the device and result in improper operation.
• Portable RF communications equipment (including peripherals such as
antenna cables and external antennas) should be used at least 30cm away from
any part of the device, including specified cables. Otherwise, degradation of
the performance of this equipment could result.
Please contact your dealer or the manufacturer for specific information
regarding the compliance to the standard.

E473/1901/05
MDSS GmbH, Schiffgraben 41, 30175 Hannover, Germany
http://www.nissei-kk.co.jp/english/
NIHON SEIMITSU SOKKI CO., LTD.
2508-13 Nakago Shibukawa Gunma 377-0293 Japan
© Copyright Nihon Seimitsu Sokki Co., Ltd., 2019.
® Registered Trade Mark.
Other manuals for DSK-1031
3
Table of contents
Other Nissei Blood Pressure Monitor manuals

Nissei
Nissei DSK-1031 User manual

Nissei
Nissei DS-1873 User manual

Nissei
Nissei DSK-1031 User manual

Nissei
Nissei DS-10 User manual

Nissei
Nissei DSK-1011 User manual

Nissei
Nissei DSK-1011 User manual

Nissei
Nissei WS-820 User manual

Nissei
Nissei DS-10 User manual

Nissei
Nissei WS-820 User manual

Nissei
Nissei WS-1011 User manual

Nissei
Nissei WSK-1011 User manual

Nissei
Nissei DS-B10 User manual

Nissei
Nissei DS-S10 User manual

Nissei
Nissei DSK-1031 User manual

Nissei
Nissei WS-1300 User manual

Nissei
Nissei DS-10a User manual

Nissei
Nissei DS-500 User manual

Nissei
Nissei DSK-1011J User manual

Nissei
Nissei DS-400 User manual

Nissei
Nissei DS-137 User manual