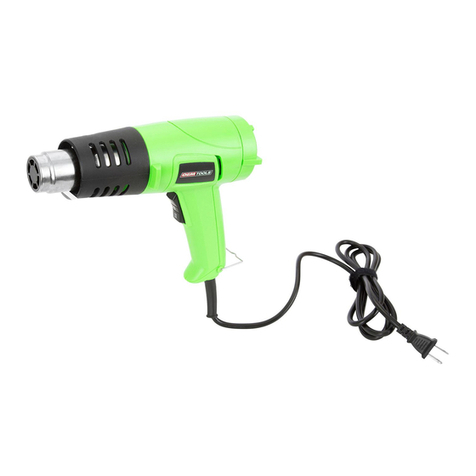
OEM Tools 24498 Service manual

HEAT GUN
10/18
2018 OEMTOOLS™
Operating Instructions and Parts Manual 24498
Please read and save these instructions. Read through this owner’s manual carefully before using product.
Protect yourself and others by observing all safety information, warnings, and cautions. Failure to comply with
instructions could result in personal injury and/or damage to product or property. Please retain instructions for
future reference.
Thank you very much for choosing an OEMTOOLS®Product!
For future reference, please register your new tool at www.oem-tools.com and complete the owner’s record below:
Model: _______________ Purchase Date: ___________
Save the receipt, warranty and these instructions. It is important that you read the entire manual to become familiar with this
product before you begin using it. This product is designed for certain applications only. OEMTOOLS®cannot be responsible
for issues arising from modification. We strongly recommend this product is not modified and/or used for any application
other than that for which it was designed. If you have any questions relative to a particular application, DO NOT use the
product until you have first contacted customer service to determine if it can or should be performed on the product.
WARNING:This product can expose you to chemicals, including acrylonitrile, which are known to the State of California to
cause cancer and birth defects or other reproductive harm. For more information, go to www.P65Warnings.ca.gov.
UNPACKING
After unpacking unit, inspect carefully for
any damage that may have occurred during
transit. Check for loose, missing, or damaged
parts. If any damage is observed, a shipping
damage claim must be filed with carrier. Do
not use the OEMTOOLS®Heat Gun if broken,
bent, cracked or damaged parts (including
labels) are noted. Any Heat Gun that appears
damaged in any way, operates abnormally
or is missing parts should be removed from
service immediately. If you suspect that the
Heat Gun was subjected to shock load (a load
that was dropped suddenly, unexpectedly,
etc.) immediately discontinue use until it has
been checked by a factory authorized service
center.
The following safety information is provided as a guideline to help you operate your Heat Gun under the safest possible
conditions. Any tool or piece of equipment can be potentially dangerous to use when safety or safe handling instructions
are not known or not followed. The following safety instructions are to provide the user with the information necessary
for safe use and operation. Please read and retain these instructions for the continued safe use of your tool. Failure to
follow instructions listed below may result in serious injury. In addition, make certain that anyone who uses the equipment
understands and follows these safety instructions as well.
WARNING
Explanation of Safety Signal Words
WARNING: Indicates a potentially hazardous situation which, if not avoided, could result in death or serious injury.
CAUTION:Indicates a potentially hazardous situation which, if not avoided, may result in minor or moderate injury.
CAUTION:Used without the safety alert symbol indicates a potentially hazardous situation which, if not avoided, may result in
property damage.
NOTES:Provide clarity and helpful information.

2
Operating Instructions and Parts Manual 24498
HEAT GUN
10/18
2018 OEMTOOLS™
POWER TOOL SAFETY
Read and understand all instructions. Failure to follow
all instructions listed below may result in electric
shock, fire and/or serious personal injury.
WORK AREA
1. Keep your work area clean and well lit. Cluttered
benches and dark areas invite accidents.
2. Do not operate power tools in potentially explosive
environments, such as in the presence of
flammable liquids, gas or dust. Power tools create
sparks which may ignite the dust or fumes.
3. Keep bystanders, children and visitors away while
operating the tool. Distractions can cause you to
lose control.
ELECTRICAL SAFETY
1. Double insulated tools are equipped with a
polarized plug (one blade is wider than the other).
This plug will fit in a polarized plug only one way.
2. If the plug does not fit fully into the outlet, reverse
the plug. If it still does not fit, contact a qualified
electrician to install a polarized outlet. Do not alter
the plug in any way. Double insulation eliminates
the need for the three-prong grounded power cord
and grounded power supply system.
3. Avoid body contact with grounded surfaces such
as pipes, radiators, ranges and refrigerators.
There is increased risk of electric shock if your
body is grounded.
4. Do not expose power tools to rain or wet
conditions. Water entering the power tool will
increase the risk of electric shock.
5. Do not abuse the cord. Never use the cord to carry
the tool or pull the plug from an outlet. Keep cord
away from heat, oil, sharp edges or moving parts.
Replace damaged cords immediately. Damaged
cords increase the risk of electric shock.
6. When operating a power tool outdoors, use an
outdoor extension cord marked “W-A” or “W”.
These cords are rated for outdoor use and reduce
the risk of electric shock.
7. When not in use, disconnect from the power
source and store in a safe, dry childproof location.
8. Avoid body contact with grounded surfaces such
as pipes, radiators, ranges and refrigerators.
PERSONAL SAFETY
1. DO NOT operate power tools in explosive
atmospheres, such as in the presence of
flammable liquids, gasses or dust. Power tools
create sparks which may ignite the dust or fumes.
2. Stay alert, watch what you are doing and use
common sense when operating a power tool. Do
not use the tool while tired or under the influence
of drugs, alcohol or medication. A moment of
inattention while operating power tools may result
in serious personal injury.
3. Dress properly. Do not wear loose clothing or jewelry.
4. Wear approved safety eye/face shield, ear
defenders and hand protection.
5. Contain long hair. Keep your hair, clothing and
gloves away from moving parts. Loose clothing,
jewelry or long hair can be caught in moving parts.
6. DO NOT disassemble the Heat Gun. Take it to a
qualified professional when service or repair
is required.
7. DO NOT use this Heat Gun for tasks it is not
designed to perform.
WARNING
To avoid fire or toxic reaction, never use gasoline,
naphtha, acetone, lacquer thinner or similar highly
volatile solvents to clean the tool.
ASSEMBLY AND OPERATION
WARNING
• Disconnect the plug from the power source before
making any adjustments, changing accessories or
storing the tool.
• To avoid electrical hazards, fire hazards or damage
to the Heat Gun, use proper circuit protection.
• Do not abuse the cord. Never use the cord to carry
the tools or pull the plug from an outlet. Keep cord
away from heat, oil, sharp edges or moving parts.
Replace damaged cords immediately.
NOTE: If air flow is blocked to nozzle, causing
overheating, the gun will turn off and come back on
when it has cooled. DO NOT leave gun unattended
when it has stopped, since it will restart and could
cause fire or injury.
Important Safety Instructions
The warnings, precautions, and instructions discussed
in this manual cannot cover all possible conditions
and situations that may occur. The operator must
understand that common sense and caution are
factors which cannot be built into this product, but
must be supplied by the operator.
WARNING
This product, when used for soldering and similar
applications, produces chemicals known to the State
of California to cause cancer and birth defects or other
reproductive harm.
WARNING

3
Operating Instructions and Parts Manual 24498
HEAT GUN
10/18
2018 OEMTOOLS™
TOOL USE AND CARE
1. Use clamps or another practical way to secure
and support the workpiece to a stable platform.
Holding the work by hand or against your body is
unstable and may lead to loss of control.
2. DO NOT force the tool. Use the correct tool for
your application. The correct tool will do the job
better and safer at the rate for which it was
designed.
3. DO NOT use the tool if the power switch does not
turn it ON or OFF. Any tool that cannot be controlled
with the switch is dangerous and must be repaired.
4. Disconnect the plug from the power source before
making any adjustments, changing accessories or
storing the tool. Such preventive safety measures
reduce the risk of starting the tool accidentally.
5. Store idle tools out of reach of children and other
untrained persons. Tools are dangerous in the
hands of untrained users.
6. Maintain tools with care. Keep cutting tools sharp
and clean. Properly maintained cutting tools with
sharp cutting edges are less likely to bind and are
easier to control.
7. Check for misalignment or binding of moving
parts, breakage of parts and any other condition
that may affect the tool’s operation. If damaged,
have the tool serviced before using. Many
accidents are caused by poorly maintained tools.
8. Use only accessories that are recommended by
the manufacturer for your model. Accessories that
may be suitable for one tool may become
hazardous when used on another tool.
DISPOSAL
At the end of the useful life of the OEMTOOLS®Heat
Gun, dispose of the components according to all state,
federal, and local regulations.
PURPOSE
The OEMTOOLS®Heat Gun is built with power and
comfort to get the job done, featuring temperature
settings of 482° F (250° C) and 842° F (450° C). The
gun is great for a variety of applications such as:
removing paint, heating shrink wrap, thawing pipes
and loosening seized bolts and nuts.
PRODUCT SPECIFICATIONS
Heating Power: 1500 Watt
Trigger:
3 position switch for
on/off and
temperature setting
Motor: 120V/60Hz, AC
Max. Temperature: 842° F
WARNING
Double insulated tools are equipped with a polarized
plug (one blade is wider than the other). This plug will
fit in a polarized plug only one way. If the plug does not
fit fully in the outlet, reverse the plug. If it still does
not fit, contact a qualified electrician to install a
polarized outlet. Do not change the plug in any way.
Double insulation eliminates the need for the three
wire grounded power cord and grounded power
supply system.
WARNING
POISON HAZARD: Extreme care must be
taken when using a Heat Gun to strip paint. The
softened paint, residue and vapors of the paint
may contain lead which is poisonous. Any paint
used in the construction industry prior to 1977
may contain lead. Once paint is applied to the
surface, hand-to-mouth contact can result in the
ingestion of lead. Breathing the vapor resulting
from the heating process or dust from a sanding
process may also result in the ingestion of lead.
Exposure to any amount of lead can cause
irreversible damage to the brain and nervous
system. Young and unborn children are particularly
vulnerable to lead poisoning.
NOTE: Before starting any paint removal process,
you should determine if the paint you are removing
contains lead. Your local health authority or a
professional who uses a paint analyzer can determine
the level of lead contained in the paint to be removed.
Lead-based paint must only be removed by a
professional and must not be removed using a
Heat Gun.

4
Operating Instructions and Parts Manual 24498
HEAT GUN
10/18
2018 OEMTOOLS™
SPECIFIC SAFETY RULES
1. Move the workpiece outdoors wherever possible.
If this is not practical, keep the work area well
ventilated. Open all windows. Place an exhaust
fan in one window, making sure it is moving the air
from inside the work area to the outdoors.
2. Remove all cooking utensils and food from the
work area.
3. Remove all carpets, rugs and furniture from
the work area where practical. If removal is not
practical, move furniture to the middle of the room
and cover them with a plastic drop cloth.
4. Seal off work areas from the rest of the dwelling by
sealing off doorways with drop cloths.
5. Cover all air ducts.
6. Place a drop cloth in the work area to catch paint
chips or peelings.
7. Wear protective clothing to reduce the amount of
exposed skin.
8. Children, pregnant or potentially pregnant women
and nursing mothers should not be present in the
work area until the work and cleanup have
been completed.
9. Use a respirator mask for dust and fumes which
has been approved by “OSHA” or “NIOSH”. These
masks and replaceable filters are available at most
major hardware stores. Make sure the mask fits
properly. Beards and facial hair may prevent the
mask from fitting properly. Change filters often.
Disposable paper dust masks are NOT adequate
for protecting against inhaling lead fumes.
10. Keep the Heat Gun moving while heating the
paint. Excessive heat will generate increased
amounts of fumes which can be inhaled by the
operator.
11. Keep food and drinks out of the work area. Always
wash hands, arms and face and rinse mouth with
water before eating or drinking. Never smoke or
chew gum or tobacco in the work area.
12. When the paint stripping operation is completed,
clean up all removed paint and dust by wet mopping
the floors. Do NOT sweep or vacuum dusty areas.
Use a solution of trisodium phosphate (TSP) in water
to wet mop the floors and clean all walls, sills and
any other surface where paint dust has settled.
13. Use protective gloves to protect your hands
from burns.
14. Use extreme caution if the opposite side of the
work surface such as siding is not accessible. The
hidden side could catch fire if it becomes too hot.
Some buildings contain flammable material behind
the siding, floors, fascia, soffit boards and other
such panels. Check these areas before applying
heat. Do not use the Heat Gun if flammable
materials are present or if you are unsure of the
flammability of the hidden material.
15. Do not use the Heat Gun near surfaces with
cracks or near metal pipes, flashings, etc. Heat
may be conducted behind the work surface and
ignite hidden material. The ignition of hidden
material may not be readily apparent and can
cause property damage and injury.
16. At the end of each work session, place the paint
chips and dust in a double plastic bag. Close the
bag with a twist tie and dispose of it in accordance
with local regulations.
17. Remove protective clothing and shoes in the work
area to avoid transferring dust into other areas of
the building. Wash work clothes separately using
a high quality detergent. Wipe shoes off with wet
rag and then wash the rag with the work clothes or
dispose of it in the bag of dust and debris.
18. Do not use the Heat Gun in the presence of
flammable liquids or gases.
19. Do not use the Heat Gun near combustible
materials such as dry grass, leaves or paper,
which can catch fire.
20. Do not lay the Heat Gun on a flammable surface
during operation or immediately after turning it
OFF. The nozzle becomes very hot. Always set the
Heat Gun on a flat level surface so the nozzle is
directed upward and away from the
supporting surface.
21. Keep the Heat Gun in constant motion. Do not
stop or dwell in one spot.
22. Never touch the nozzle immediately after use. It
will be very hot and can cause severe burns.
23. Never use the Heat Gun as a hair dryer. The extreme
heat will burn your scalp and scorch your hair.
24. Always use gloves while operating the Heat Gun.
Tools and scrapings become very hot.
25. Always treat the Heat Gun with the same respect
as an open flame. It can burn you and cause a fire
if not handled and used with extreme caution.
WARNING
EXPLOSION OR FIRE HAZARD: This heat gun
produces extremely high temperatures which can
reach up to 842° F (450° C). Use extreme caution to
prevent combustible materials from igniting. Never
use the heat gun near volatile liquids such as cleaning
solvents, lacquers, gasoline, etc.

5
Operating Instructions and Parts Manual 24498
HEAT GUN
10/18
2018 OEMTOOLS™
Never operate the Heat Gun if the blower motor does
not turn ON. Turn the Heat Gun OFF immediately.
Operating the Heat Gun without the blower motor
running will burn the element out.
EXTENSION CORD SAFETY
1. Keep the extension cord clear of the work area.
Position the cord so that it will not get caught on
the workpiece, a tool, or any other obstruction
while the power tool is in use.
2. If an extension cord is used with this heat gun,
verify that it is in good condition. When using an
extension cord, be sure to use one that is heavy
enough to carry the current that the tool will
draw. An undersized cord will cause a drop in line
voltage, which will result in a loss of power and
overheating.
3. The below table shows the correct size to use
according to cord length and the amperage rating
that is listed on the tool’s nameplate.
4. When in doubt, use the next heavier gauge. The
smaller the gauge number, the heavier the cord.
5. Verify that the extension cord is properly wired and
in good condition. Replace a damaged extension
cord immediately, or have it repaired by a qualified
electrician before using it. Keep the extension cord
away from sharp objects, excessive heat, and
damp or wet areas.
6. Use a separate electrical circuit for power tools.
This circuit must consist of not less than 14 gauge
wire, and should be protected by either a 15 Amp
time-delayed fuse or a circuit breaker. Before
connecting the power tool to the outlet, verify
that the switch is in the OFF position, and that the
voltage of the power source is the same as the
voltage that is indicated on the tool’s nameplate.
Running this Heat Gun at lower voltage will
damage the motor.
HEAT GUN APPLICATIONS
The Heat Gun is a tool that can be used for many
different applications. As with any power tool, there
are many factors that will affect its effectiveness and
safety. It is important to be aware of these factors
before you begin to use the tool. The chart below
illustrates examples of several Heat Gun applications
and the ideal temperature settings.
Heating applications are affected by several factors.
The density of the material being heated, ambient
temperature, wind, distance between the nozzle and
the surface being heated and the heating technique
will affect the speed at which the surface will be
heated. It is always safer to start heating the surface
with the Heat Gun temperature set to LOW. Using the
above chart, increase the temperature setting to HIGH
for those applications requiring additional heat.
During the heating process, it is very important to
maintain a consistent distance between the nozzle and
the surface being heated.
NOTE: The nozzle must be at least 2” (25 mm) from
the surface being heated to permit adequate air flow
and to prevent overheating.
Always keep the Heat Gun in motion during the
heating process. Inadequate motion will result in
overheating and possible damage to the surface or to
the Heat Gun.
WARNING
Everytime you use the Heat Gun, you should verify
the following:
1. The nozzle is not obstructed with debris.
2. Appropiate safety glasses, respirator mask and
protective clothing are being worn.
3. Area adjacent to the heating application is clear of
all combustible materials.
4. Availability of water or fire extinguisher in case of
a fire.
Application Temp. Setting
Removing adhesive backed floor coverings Low
Removing paint High
Drying paint or plaster Low
Heating electrical shrink tube Low
Heating shrink wrap Low
Thawing frozen locks
Low
Thawing frozen metal water pipes
High
Loosening seized bolts & nuts
High
Molding and bending plastics
Low
Waxing skis & snowboards
Low
Sealing ends of nylon or polypropylene rope
Low
MINIMUM GAUGE (AWG) EXTENSION
CORDS (120 V use only)
Amperage rating Total length
More
than
Not
more
than
25'
(7.5 m)
50'
(15 m)
100'
(30 m)
150'
(45 m)
0 6 18 16 16 14
6 10 18 16 14 12
10 12 16 16 14 12
12 16 14 12 Not Applicable
WARNING

6
Operating Instructions and Parts Manual 24498
HEAT GUN
10/18
2018 OEMTOOLS™
3 POSITION TRIGGER SWITCH
The Heat Gun has a 3-position trigger switch that acts
as both an ON/OFF switch and a temperature selector
switch (Fig. 1).
To turn the Heat Gun ON at the lower temperature
(250° C or 482° F), squeeze the upper part of the
switch (1). To turn the Heat Gun OFF from the lower
temperature setting, squeeze the lower part of the
switch (2) half way until it clicks into the OFF position
and the Heat Gun turns OFF.
To turn the Heat Gun ON at the higher temperature
(450°C or 842°F), squeeze the lower part of the
switch (2). To turn the Heat Gun OFF from the higher
temperature setting, squeeze the upper part of the
switch (1) half way until it clicks into the OFF position
and the Heat Gun turns OFF.
NOTE: When the switch is set to the lower
temperature setting, the motor speed will be slower
and there will be a reduced flow of hot air through the
nozzle. The temperature of the air will also be reduced
to 482° F (250° C). When the switch is set to the higher
temperature setting, the motor speed will be higher
and there will be an increased flow of hot air through
the nozzle. The temperature of the air will also be
increased to 842°F (450°C).
NOTE: When the Heat Gun is first turned ON, smoke
may appear due to the burning of manufacturing oils
on the element. The smoke will disappear within five
minutes of operation.
STRIPPING PAINT FROM DWELLING
The most common application for the Heat Gun is
in stripping paint from fascia, soffit and siding of a
dwelling (Fig. 2). Although the Heat Gun will work
extremely well in this application, it is important to
take specific precautions and prevent potentially
serious mistakes.
WARNING
Use extreme caution if the opposite side of the work
surface such as siding is not accessible. The hidden side
could catch fire if it becomes too hot. Some buildings
contain flammable material behind siding, floors, fascia,
soffit boards and other such panels. Check these
areas before applying heat. Do not use the Heat Gun if
flammable materials are present or if you are unsure of
the flammability of the hidden material.
DO NOT use the Heat Gun on surfaces that can be
damaged by heat, such as vinyl siding, vinyl coated
siding or vinyl window frames.
DO NOT use the Heat Gun on any glass surface such
as windows. The rapid expansion may break the glass
or damage the seal in thermo pane windows.
The Heat Gun will soften putty in window frames. Be
careful not to gouge the soft putty with the scraper.
The putty will firm up as it cools.
When removing paint from the fascia, do not overheat
the edge of the shingles. Too much heat will melt the
shingles.
PAINT STRIPPING PROCESS
WARNING
Never touch the Heat Gun nozzle during use or soon
after use. It becomes very hot and will cause severe
burns. Wear gloves to protect your hands from hot
paint scrapings.
When turned ON, the Heat Gun will heat the paint
causing it to soften so it can be easily scraped off
without damaging the surface. Some paints may
soften when heated even though they show no signs
of blistering. Some paints will blister when heated,
while others may become rubbery. Some paints
will require more heat than others to soften them
sufficiently for easy removal.
NOTE: Paint that has been absorbed into the wood
will not be removed with the Heat Gun.
When working with several layers of paint, completely
heating the surface all the way to the wood will speed
up the scraping process. This will allow all layers of
paint to be scraped at one time.
Use a soft wire brush to remove paint from very
intricate surfaces. Mineral paints and finishes such
as cement paint and porcelain do not soften when
heated, so they cannot be removed using a Heat Gun.
For best paint removal results, move the gun slowly
and steadily forward at an angle to the surface to be
Fig. 2
Inside
Wall
Fascia
Soffit
Siding
Fig. 1
1
2

7
Operating Instructions and Parts Manual 24498
HEAT GUN
10/18
2018 OEMTOOLS™
stripped. This allows you to safely scrape behind the
hot air stream and keeps the scraper and scraped
surface cooler. Holding the Heat Gun at an angle also
preheats the paint as you scrape.
The chart below explains the four zones for the paint
removal process (Fig. 3).
WARNING
When servicing, use only identical replacement parts.
Use of any other part may create a hazard or cause
product damage.
DO NOT abuse power tools. Abusive practices can
damage the tool as well as the workpiece.
WARNING
DO NOT attempt to modify tools or create
accessories. Any such alteration or modification is
misuse and could result in a hazardous condition
leading to possible serious injury. It will also void the
warranty.
CLEANING
Keep air vents clean and unobstructed to allow
maximum airflow through the Heat Gun.
DO NOT use solvents when cleaning plastic parts.
Most plastics are susceptible to damage from various
types of commercial solvents and may be damaged
by their use. Use a clean cloth dampened with a mild
detergent to remove dirt, dust, oil, grease, etc.
Zone Description
1 Warm air preheats the paint
2 Hot air softens the paint
1 + 2 Heat penetrates complete area
3 Paint can be easily scraped off as soon as it is
softened and the Heat Gun is moved forward
4 Stripped surface is allowed to cool
Fig. 3
WARNING
DO NOT at any time allow brake fluids, gasoline,
petroleum-based products, penetrating oils, etc.
to come in contact with plastic parts. They contain
chemicals that can damage, weaken or destroy plastic.
LUBRICATION
All of the bearings in this Heat Gun are lubricated with
a sufficient amount of high-grade lubricant for the
life of the unit under normal conditions. Therefore, no
further lubrication is required.
This symbol designates that this tool is listed with
U.S. requirements by ETL Testing Laboratories, Inc.
Conforms to UL Std. 60745-1 and 60745-2-2.
Intertek
3042597
JD3932U

8
Operating Instructions and Parts Manual 24498
HEAT GUN
10/18
2018 OEMTOOLS™
CONTACT US
OEMTOOLS®ONE YEAR WARRANTY
If for up to one year from the date of purchase of this
OEMTOOLS®product you find any defect in material or
workmanship, through normal usage, return it to the place of
purchase, or to OEMTOOLS®for repair or replacement at our
discretion. In order to obtain this service send your tool and
proof of purchase, transportation pre-paid, to OEMTOOLS®Q.A.
Dept, 3580 E. Raines Road #3, Memphis, TN 38118. We will not
be responsible for lost or damaged goods during transportation;
please insure your package. If our inspection verifies the defect,
we will either repair or replace the product at our election, or we
may elect to refund the purchase price if we cannot readily and
quickly provide you with a replacement. We will return repaired
products at our expense, but if we determine there is no defect,
or that the defect resulted from causes not within the scope of
our warranty, then you must bear the cost of returning
the product.
OEMTOOLS®does not provide warranty for products labeled
other than OEM or OEMTOOLS®. OEMTOOLS®will not provide
any warranty for products subjected to abnormal use. Abnormal
use includes, but is not limited to, abuse, accident, alteration,
neglect, and unauthorized or unreasonable use or repairs.
This warranty does not cover bits, blades, files, batteries,
or calibration. We recommend that you maintain your tools
and sharpen or replace blades, bits, files, and batteries as
necessary. OEMTOOLS®reserves the right to make any changes
in construction or design at any time without any obligation in
incorporating such changes to tools or equipment
previously sold.
OEMTOOLS®makes every effort to assure that its products meet
high quality and durability standards, and warrants to the original
purchaser that this product is free from defects in materials
and workmanship for the period of one year from the date of
purchase. This warranty does not apply to damage due directly
or indirectly to misuse, abuse, negligence or accidents, repairs
or alterations outside our facilities, criminal activity, improper
installation, normal wear and tear or to lack of maintenance.
We shall in no event be liable for death, injuries to persons or
property, or for incidental, contingent, special or consequential
damages arising from the use of our product. Some states do
not allow the exclusion or limitation of incidental or consequential
damages, so the above limitation of exclusion may not apply
to you. THIS WARRANTY IS EXPRESSLY IN LIEU OF ALL
OTHER WARRANTIES, EXPRESS OR IMPLIED, INCLUDING
THE WARRANTIES OF MERCHANTABILITY AND FITNESS. This
warranty gives you specific legal rights, and you may also have
other rights, which vary from state to state.
Don’t forget to register your new OEMTOOLS®product at
www.oem-tools.com.
3580 E. Raines Road, Suite 3, Memphis, TN 38118
Tel: 1-866-458-2472
www.oem-tools.com
A
B
C
D
E
F
G
H
IJKLJMNOPQ
RS
TUV
W
Item # Description Qty.
A Cord 1
B Cord Guard 1
C Connection Pole 1
D Cord Clamp 1
E Screw ST3.9 x 14 2
F Switch 1
G Left Housing 1
H Back Housing 1
I Peg Plank 1
J Screw ST2.9 x 12 5
K Motor 1
L Motor Board 1
M Screw M2.5 x 5 2
N Fan 1
O Screw ST2.9 x 9 3
P Air Deflector 1
Q Chinaware 1
R Wind Duct 1
S Orientation Ring 1
T Right Housing 1
U Screw ST3.9 x 19 5
V Guard 1
W Hang Loop 1
NOTE:
Not all components of the Heat Gun are replacement items, but
are illustrated as a convenient reference for location and position
in the assembly sequence.
Parts List
Parts Diagram
Table of contents
Other OEM Tools Power Tools manuals

OEM Tools
OEM Tools 24494 Service manual

OEM Tools
OEM Tools 24662 Service manual

OEM Tools
OEM Tools 24495 Service manual

OEM Tools
OEM Tools 24489 Service manual

OEM Tools
OEM Tools 24664 Service manual

OEM Tools
OEM Tools 24412 Service manual

OEM Tools
OEM Tools 24491 Service manual

OEM Tools
OEM Tools 24685 Service manual

OEM Tools
OEM Tools 24529 Service manual

OEM Tools
OEM Tools 26038 Service manual