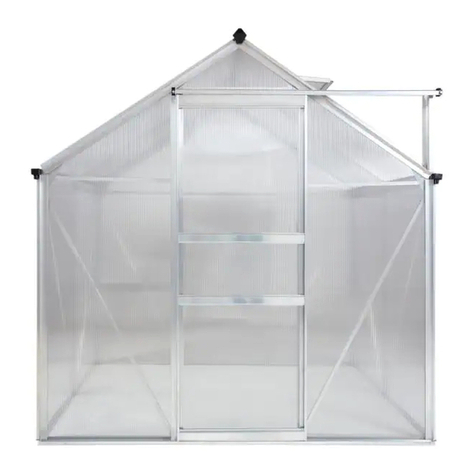
oGrow OGAL-866 User manual


Step 1:
is procedure will assist you with assembling the
OGrow Walk-In 6 . by 8 . Lawn and Garden
Greenhouse with Heavy Duty Aluminum Frame.
Step 2:
To complete this procedure, you will need a Phillips
Screwdriver, Needle Nose Pliers, and Gloves. Option-
ally, you may need a Step Ladder, a Caulking Gun,
and Silicone Glass Glue.
Note: Make sure the Greenhouse is located on a at,
level surface.
Step 3:
Attach (F - C 0 2) and (F - C 0 2 A) using (C - 6 4).
Secure with (2) Bolts (F - C 1 4 A) and (2) Nuts (F - C
1 4 A). Repeat for the other side.

Step 4:
Insert (2) Bolts (F - C 1 4) into (F - C 0 2 A) and (F - C
0 2). Attach (1) Nut (F - C 1 4) to each Bolt. Do not
fully tighten.
Step 5:
Slide (F - 0 5) into position and make sure the Bolts
slide into the grooves. Fully tighten the Nuts.
Step 6:
Lay assembled portion on the ground.

Step 7:
Insert (2) Bolts (F - C 1 4) into (F - C 0 2 A) and (F - C
0 2). Attach (1) Nut (F - C 1 4) to each Bolt. Do not
fully tighten.
Step 8:
Slide (F - 0 5) into position and make sure the Bolts
slide into the grooves. Fully tighten the Nuts.
Step 9:
Lay assembled portion on the ground.

Step 10:
Attach (F - 2 9) and (F - 1 7) to (F - 0 5) using (1) Bolt
(F - C 1 4) and (1) Nut (F - C 1 4). Leave a three-quar-
ter inch distance from the top of (F - 0 5) to the Bolt.
Repeat for the other 3 corners. Make sure beams are
oriented to be able to rotate.
Note: Do not fully tighten the Nuts until later.
Step 11:
Connect (F - 2 9) and (F - C 0 2) / (F - C 0 2 A) with
(1) Bolt and (1) Nut. Do not fully tighten the Nuts.
Repeat for the other 3 connections.
Step 12:
Insert (F - 2 3) into the Bolt and (F - C 0 2) / (F - C 0 2
A). Tighten the Nuts at these connections.

Step 13:
Insert (2) Bolts into each (F - 2 3) beam. Attach (F - 2
3) to (F - 1 7) using the upper Bolt. Tighten the Nut to
the Bolt.
Note: Leave a three-quarter inch distance from the
edge of (F - 1 7) to the top of (F - 2 3). Tighten Nuts
at the indicated areas. e lower Bolt will be used in a
later step.
Step 14:
Position (F - 0 3 B), (F - 0 4), and the assembled parts
to a right angle. Make sure the grooves of (F - 0 4) and
(F - 0 3 B) are on the outside.
Step 15:
Insert (2) Bolts into (F - 0 3 B) and (F - 0 4). Attach (1)
Nut to each Bolt. Do not fully tighten the Nuts.

Step 16:
Attach one section of the assembly to (F - 0 3 B) and (F
- 0 4). Tighten all Nuts of the assembly.
Note: Make sure to always support the assembly until
the structure is able to support itself.
Step 17:
Attach the other section of the assembly to (F - 0 3 B)
and (F - 0 4). Tighten all Nuts of the assembly.
Note: Make sure to always support the assembly until
the structure is able to support itself.
Step 18:
Insert (2) Bolts into (F - 0 5). Align the Bolts with the
indicated holes on (F - 1 9 B).
Note: Hold in place until secured.

Step 19:
Connect (F - 0 5), (F - 1 9 B), and (F - 1 8) using the
upper Bolt. When the notch on (F - 1 9 B) is aligned
with the top of (F - 0 5), attach (1) Nut onto the Bolt.
Do not fully tighten the Nut.
Step 20:
Insert (2) Bolts into (F - 0 5). Attach (F - 1 9 B) to the
Bolts. Attach (F - 1 8) to the top Bolt and secure with
(1) Nut. Tighten all Nuts attached to (F - 1 8).
Step 21:
Attach (F - 3 0) to (F - 0 5) to the lower notch of (F - 1
9 B) with (1) Nut. Repeat for the other side.
Note: e notch of (F - 1 9 B) must be aligned with the
top of (F - 0 5).

Step 22:
Attach (1) Bolt into (F - 3 0) and (F - 0 4) using (1)
Nut. Repeat for other side.
Step 23:
Tighten all the Nuts in the indicated locations.
Note: Structure should be self supporting at this step, if
not, tighten all loose Nuts.
Step 24:
Insert (2) Bolts into (F - 0 5). Attach (F - 3 0) and (F
- 0 5) to the lower notch of (F - 1 9 B) using the lower
Bolt. Secure with (2) Nuts. Insert the top Bolt into the
lower hole of (F - 1 9 B).
Note: e notch of (F - 1 9 B) must be aligned with the
top of (F - 0 5).

Step 25:
Repeat for the other side.
Step 26:
Connect (F - 1 7) to (F - 1 9 B) using (1) Nut. Repeat
on the other side. Do not fully tighten the Nuts.
Step 27:
Attach (1) Bolt into (1) (F - 3 0) and (F - 0 3 B) using
(1) Nut. Do not fully tighten the Nut. Repeat for other
side.

Step 28:
Attach (F - 4 1) to (F- 2 3) using (2) Nuts and the pre-
viously installed (2) Bolts. Make sure the shelf part is
facing upward. Repeat on the other side.
Step 29:
Insert (F – 0 8), (F – 0 9), (F – 1 0), and (F – 1 1) into
the Bolts at each location. Tighten the Nuts at each
point.
Step 30:
Insert (1) Bolt into (F – 0 8). Connect (F – 1 8) and (F
– 0 8) using (1) Nut.

Step 31:
Insert (1) Bolt into (F – 0 9). Connect (F – 1 8) and (F
– 0 9) using (1) Nut.
Step 32:
Insert (1) Bolt into (F – 1 0). Connect (F – 1 7) and (F
– 1 0) using (1) Nut.
Step 33:
Insert (1) Bolt into (F – 1 1). Connect (F – 1 7) and (F
– 1 1) using (1) Nut.

Step 34:
Tighten the Nuts at the indicated locations.
Step 35:
Insert (2) Bolts and (2) Nuts into (F - C 0 2 A) in the
indicated areas. Do not fully tighten the Nuts.
Step 36:
Insert (F - 2 3) into the Bolt on the base. Slide (1) Bolt
into (F – 2 3). Attach (F - 2 3) to (F - 4 1) using (1)
Nut. Tighten all the Nuts.

Step 38:
When assembling the Panels, the UV-protected side of
the sheet is covered with Opal White Film and must
face towards the sun when attached to the Greenhouse.
Step 39:
Remove the Opal White Film from (8) (F - 3 4) Panels.
Note: Make sure the side with the Opal White Film
will face the outside.
Step 37:
Insert (F - 2 3) into the Bolt on the base. Slide (1) Bolt
into (F – 2 3). Attach (F - 2 3) to (F - 4 1) using (1)
Nut. Tighten all the Nuts.

Step 40:
Slide (8) (F – 3 4) Panels into the grooves of the beams
at each of the designated areas.
Step 41:
Remove the Opal White Film from (2) (F - 3 2) Panels.
Note: Make sure the side with the Opal White Film
will face the outside.
Step 42:
Slide (2) (F – 3 2) Panels into the grooves of the
beams at each of the designated areas.

Step 43:
Remove the Opal White Film from (2) (F - 3 3) Panels.
Note: Make sure the side with the Opal White Film
will face the outside.
Step 44:
Slide (2) (F – 3 3) Panels into the grooves of the beams
at each of the designated areas.
Step 45:
Remove the Opal White Film from (1) (F - 3 1) Panel.
Note: Make sure the side with the Opal White Film
will face the outside.

Step 47:
Insert the Bolts and Nuts into each hole of (F – C 0 6)
and (F - C 0 6 A). Do not fully tighten the Nuts.
Step 46:
Slide (1) (F – 3 1) Panel into the grooves of the beams
at the designated area.
Step 48:
Slide the Bolts on (F - C 0 6 A) into the grooves of (F –
2 3) and (F - 0 5). Tighten the Nuts.

Step 50:
Insert (1) Bolt and (1) Nut into each hole in (F - C 0 6)
and (F - C 0 6 A). Do not fully tighten the Nuts.
Step 49:
Slide the Bolts on (F - C 0 6) into the grooves of (F - 2
3) and (F – 0 5). Tighten the Nuts.
Step 51:
Slide (2) Bolts into (F – 0 8), (F – 0 9), (F – 1 0), and (F
– 1 1). ese Bolts will be used in a later step.

Step 53:
Insert (F – 0 6) and (F – 0 7) through the Bolts in the
(2) (F – 1 9 B) and (F – C 0 6 A) / (F – C 0 6). Tighten
the Nuts.
Step 52:
Insert (2) Bolts and (2) Nuts into the holes on the top
edge of (F – 1 9 B) as shown. Do not fully tighten the
Nuts.
Step 54:
Slide (2) Bolts into the grooves of (F – 0 6) and (2)
Bolts into the grooves of (F – 0 7).

Step 56:
Slide (2) Bolts into the grooves of (F – 0 6) and (2)
Bolts into the grooves of (F – 0 7).
Step 55:
Insert (F – 0 6) and (F – 0 7) through the Bolts in (F –
1 9 B) and (F – C 0 6 A) / (F – C 0 6) on the other side.
Tighten the Nuts.
Step 57:
Attach (4) (F – 1 9) Brackets to the Bolts and tighten
with (4) Nuts. Repeat with the 3 other (F - 1 9) Brack-
ets.
Note: Ensure that all (F – 1 9) Brackets are oriented so
the side with 3 holes is facing upward.
This manual suits for next models
2
Other oGrow Greenhouse Kit manuals

oGrow
oGrow OGAL-866A Quick start guide

oGrow
oGrow OGAL-46 User manual

oGrow
oGrow OG6834-S User manual

oGrow
oGrow OG03-PE5565E User manual

oGrow
oGrow OG03AL86-BKE User manual
oGrow
oGrow OGAL-46A User manual
oGrow
oGrow OGAL-466A User manual

oGrow
oGrow OGAL-666A User manual

oGrow
oGrow Walk-in OGAL-466 User manual
oGrow
oGrow OGAL-CF23 User manual