Olympia NC 315 User manual

NC 315
NC 335NC 325
DAc Banknotenprüfgerät
Giu Bank Note Validator
FBc Détecteur de billets de banque
Ic Verificatore di banconote
EVerificadora de dinero
nB Bankbiljettester
NC 315 / 325 / 335
12 / 2020

2DAc
DEUTSCH
Bedienungsanleitung
Bitte lesen und beachten
Sie die nachfolgenden In
formationen und bewahren Sie
diese Bedienungsanleitung zum
Nachschlagen auf!
WARNUNG!
• Erstickungsgefahr!
Kinder können Kleinteile, Verpackungs-
oder Schutzfolien verschlucken.
ÆHalten Sie Kinder vom Produkt und
dessen Verpackung fern!
VORSICHT!
• Gefahr durch Einzug!
ÆFinger, Haare usw. vom Einzug fernhal
ten.
• Stolpergefahr durch unsachgemäß
verlegte Kabel!
ÆVerlegen Sie Kabel so, dass niemand
darüber stolpern kann.
• Gefährdung von Gesundheit und Um
welt durch Akkus und Batterien!
Unsachgemäßer Umgang mit Batterien
kann Ihre Gesundheit und die Umwelt ge
fährden.
ÆBatterien nie öffnen, beschädigen, ver
schlucken oder in die Umwelt gelangen
lassen. Batterien können giftige und um
weltschädliche Schwermetalle enthalten.
ACHTUNG!
• Drohende Sachschäden!
ÆKeine Fremdkörper wie Büroklammern,
Gummibänder usw. in den Einzug ge
langen lassen.
• Sachschaden durch Umwelteinflüsse!
Ungünstige Umwelteinflüsse wie z. B.
Rauch, Staub, Erschütterungen, Chemi
kalien, Feuchtigkeit, Hitze oder direkte
Sonneneinstrahlung können das Produkt
beschädigen.
ÆUmwelteinflüsse wie z. B. Rauch, Staub,
Erschütterungen, Chemikalien, Feuchtig
keit, Hitze oder direkte Sonneneinstrah
lung vermeiden.
Bestimmungsgemäß
verwenden
Das Banknotenprüfgerät - im Folgenden Ge-
rät - dient dem Überprüfen von Banknoten auf
die wichtigsten Sicherheitsmerkmale. Jede
andere Verwendung gilt als nicht bestim-
mungsgemäß. Eigenmächtige Veränderungen
oder Umbauten sind nicht zulässig. Öffnen
Sie das Gerät in keinem Fall selbst und füh-
ren Sie keine eigenen Reparaturversuche
durch.
Trotz umfangreicher Prüfung durch eine
hierfür zugelassene Stelle kann ein ver-
bleibendes Restrisiko der Nicht-Erkennung
fehlerhafter Banknoten nicht ausgeschlossen
werden. Auch echte Banknoten können auf-
grund von Verunreinigungen oder anderer
äußerer Einwirkungen als fehlerhaft erkannt
werden. Prüfen Sie fehlerhafte Banknoten
deshalb mehrfach und wenden Sie sich im
Zweifelsfall an Ihr Bankinstitut.
Lieferumfang
• Banknotenprüfgerät
• Netzadapter
• Bedienungsanleitung
Darstellungen und Schreib
weisen
Auszuführende Aktion
Ergebnis der Aktion
[2] Position in Grafik
START Taste
Hilfreiche Information
Bedienung
Ein- und Ausschalten
Die Ladekapazität des Akkus reicht bei
voller Ladung für etwa 90 Minuten. Nach
Erreichen dieser Zeit schaltet das Gerät ohne
vorherige Signalisierung ab. Evtl. angezeigte
Daten werden nicht gespeichert. Beenden Sie
Ihre Arbeitsvorgänge rechtzeitig bzw. ver-

3
DAc
binden Sie das Gerät mit der externen Strom-
versorgung.
ÆVerbinden Sie den Netzadapter mit dem
Gerät und einer ordnungsgemäß installierten
Steckdose.
NC 325, 335
ÆDrücken und halten Sie die Taste CLEAR/
ON/OFF für 3 Sekunden.
Nach dem Einschalten führt das Gerät eine
Selbstdiagnose durch. Wenn die Selbst-
diagnose ohne Fehler abgeschlossen wurde,
erscheint X0 in der Anzeige. Wird ein Fehler
festgestellt, wird dieser entsprechend ange-
zeigt. Wenden Sie sich dann an den Service.
NC 315
ÆDrücken und halten Sie die Taste CLEAR/
ON/OFF für 3 Sekunden.
Wenn Sie das Gerät längere Zeit nicht
benutzen, trennen Sie dieses vom Strom-
netz.
Banknoten vorbereiten
Achten Sie auf folgende Punkte, um Funkti-
onsstörungen zu vermeiden.
ÆÜberprüfen Sie die Banknote vor dem Ein-
legen auf Papierschnipsel, Büroklammern,
Gummibänder und andere Fremdkörper und
entfernen Sie diese.
ÆLegen Sie keine beschädigten Banknoten
ein.
ÆGlätten Sie zerknitterte und gefaltete Bank-
noten, bevor Sie diese einlegen.
Banknoten einlegen
ÆLegen Sie die Banknoten einzeln und mit der
kurzen Seite voran in das Eingabefach. Die
Banknote wird automatisch eingezogen und
geprüft.
Bei einer falsch eingelegten oder nicht
erkannten Banknote wird neben dem Feh-
ler in der Anzeige auch ein akustischer Ton
ausgegeben.
ÆWarten Sie, bis die geprüfte Banknote voll-
ständig vom Ausgabefach ausgegeben wurde
und entnehmen Sie diese, bevor Sie die nächs-
te Banknote prüfen.
Falsch eingelegte Banknoten können zu
einer Fehlfunktion führen. Starke Magnet-
felder können den Sensor beeinflussen und
zu fehlerhaften Ergebnissen führen.
Bedienelemente
NC 335
1
234
5
6
7
1 Anzeige für Gesamtstückzahl bzw. Wert
der Banknote
2 Anzeige für ausgewählte Ausgabeseite
3 Anzeige mit Statusmeldungen und Fehler-
meldungen
4 Anzeige für Gesamtbetrag bzw. Stückzahl
der Banknote
5 Taste Report / MODE
6 Taste CLEAR / ON/OFF
7 vordere Ein-/Ausgabeseite
NC 325
8
910
11
12
13
8 Anzeige für Gesamtstückzahl bzw. Wert
der Banknote
9 Anzeige für ausgewählte Ausgabeseite
10 Anzeige für Gesamtbetrag bzw. Stückzahl
der Banknote
11 Taste Report / MODE
12 Taste CLEAR / ON/OFF
13 vordere Ein-/Ausgabeseite

4DAc
NC 315
14 15 16
17
18
19
14 Anzeige für echte Banknote
15 Anzeige für fehlerhafte Banknote
16 Anzeige für ausgewählte Ausgabeseite
17 Taste MODE
18 Taste ON/OFF
19 vordere Ein-/Ausgabeseite
20
21 22 23
20 hintere Ausgabeseite
21 USB-Schnittstelle (ohne Funktion)
22 Anschluss für Stromversorgung
23 Anschluss für microSD-Speicherkarte
Prüffunktionen
(NC 315, 325, 335)
Die besten Ergebnisse werden nach einer
Aufwärmphase von 3 Minuten erzielt.
Starkes Umgebungslicht kann den Sensor
beeinflussen und zu fehlerhaften Ergebnissen
führen. Die Prüffunktionen sind immer aktiv.
Prüfen der Abmessungen
Diese Funktion wird ausgelöst, wenn die Brei-
te der Banknote um 1/3 überschritten wird.
Infrarot
Diese Funktion erkennt fehlerhafte Banknoten
durch Infrarot-Licht.
Magnetisch
Diese Funktion erkennt magnetische Farbe
auf den Banknoten.
Metallstreifen
Diese Funktion prüft, ob der Metallstreifen in
der Banknote vorhanden ist.
Da sich die Sicherheitsmerkmale der
Banknoten auf beiden Seiten befinden,
führen Sie die Zählung für die sichere Er-
kennung von falschen Banknoten von beiden
Seiten durch.
Ausgabeseite wählen (NC 315)
Je nachdem, welche Ausgabeseite Sie wäh-
len, werden die Banknoten vorne - also auf
der Seite, auf der die Banknoten eingelegt
werden, oder auf der hinteren Seite des Ge-
räts wieder ausgegeben.
ÆDrücken Sie ggf. mehrfach die Taste MODE
zum Wählen der Ausgabeseite. Ê Ein Symbol
im Display zeigt die aktuell verwendete Aus-
gabeseite an.
Falsche oder nicht erkannte Banknoten
werden stets auf der vorderen Ausgabe-
seite ausgegeben.
Ausgabeseite wählen (NC 325, 335)
Je nachdem, welche Ausgabeseite Sie wäh-
len, werden die Banknoten vorne - also auf
der Seite, auf der die Banknoten eingelegt
werden, oder auf der hinteren Seite des Ge-
räts wieder ausgegeben.
ÆDrücken und halten Sie für 2 Sekunden die
Taste REPORT / MODE. Ê Ein Symbol im Dis-
play zeigt die aktuell verwendete Ausgabeseite
an.
Falsche oder nicht erkannte Banknoten
werden stets auf der vorderen Ausgabe-
seite ausgegeben.
Anzeigen
Der Umfang der Anzeigen ist geräteabhängig.
Modell NC 315
Das Modell NC 315 zeigt nur das Ergebnis
der Prüffunktionen an. Eine grüne Leuchte
zeigt an, dass alle Prüffunktionen bestanden
wurden. Eine rote Leuchte zeigt an, dass
mindestens eine Prüfung nicht bestanden
wurde.

5
DAc
Modell NC 325, 335
Bei diesen Geräten werden die Werte der ge-
zählten Banknoten addiert. Zunächst wird der
gerade geprüfte Wert angezeigt, dann
wechselt die Anzeige zum Gesamtwert. Auf
der linken Seite wird die Stückzahl der ge-
zählten Banknoten und auf der rechten Seite
des Displays wird der Wert (Gesamtbetrag)
der bisher gezählten Banknoten angezeigt.
Die Wertanzeige kann maximal einen Be-
trag in Höhe von 9.995 € (NC 325) bzw.
99.995 € (NC 335) anzeigen.
Stückelungen (NC 325, 335)
Sie können sich anzeigen lassen, wie viele
Banknoten eines bestimmten Banknotenwerts
(5 €, 10 €, 20 €, usw.) bisher gezählt wurden.
ÆDrücken Sie mehrfach die Taste
Report / MODE. Ê Auf der linken Seite des
Displays wird der jeweilige Wert der Banknote
angezeigt und auf der rechten Seite des Dis-
plays wird die Stückzahl des jeweils gezählten
Banknotenwerts angezeigt.
Einige Sekunden nachdem Sie die Taste
Report / MODE zuletzt gedrückt haben,
wechselt das Gerät wieder in den normalen
Modus.
Anzeige für Wert und Stückzahl zu
rücksetzen (NC 325, 335)
Sie können die gezählten Werte und Stück-
zahlen auf null zurücksetzen, um mit einer
neuen Zählung zu beginnen.
ÆDrücken Sie die Taste CLEAR / ON/OFF.
Ê Die Anzeige für Wert und Stückzahl ist auf
null zurückgesetzt.
Das Gerät hat keine Speicherfunktion.
Wenn Sie das Gerät ausschalten, ist der
Speicher für Wert und Stückzahl ebenfalls
gelöscht.
Akkubetrieb (NC 315, 325, 335)
Das Gerät kann optional mit einem Akku bis
zu 90 Minuten ohne externe Stromversorgung
betrieben werden. Verwenden Sie ausschließ-
lich den durch GO Europe vertriebenen Akku.
Akku einsetzen / wechseln
ÆLösen Sie die Schraube der Akkufachabde-
ckung auf der Unterseite des Geräts.
ÆÖffnen Sie die Akkufachabdeckung.
ÆVerbinden Sie den Stecker am Akku mit der
Buchse im Akkufach.
Im Akkufach befindet sich eine Buchse,
die zu dem Stecker am Akku passt. Der
Stecker ist verdrehsicher.
ÆSchließen Sie die Akkufachabdeckung.
ÆZiehen Sie die Schraube der Akkufachabde-
ckung fest.
Der Akku wird automatisch geladen,
Das Gerät schaltet sich im Akkubetrieb
automatisch aus, wenn es 5 Minuten lang
nicht verwendet wurde.
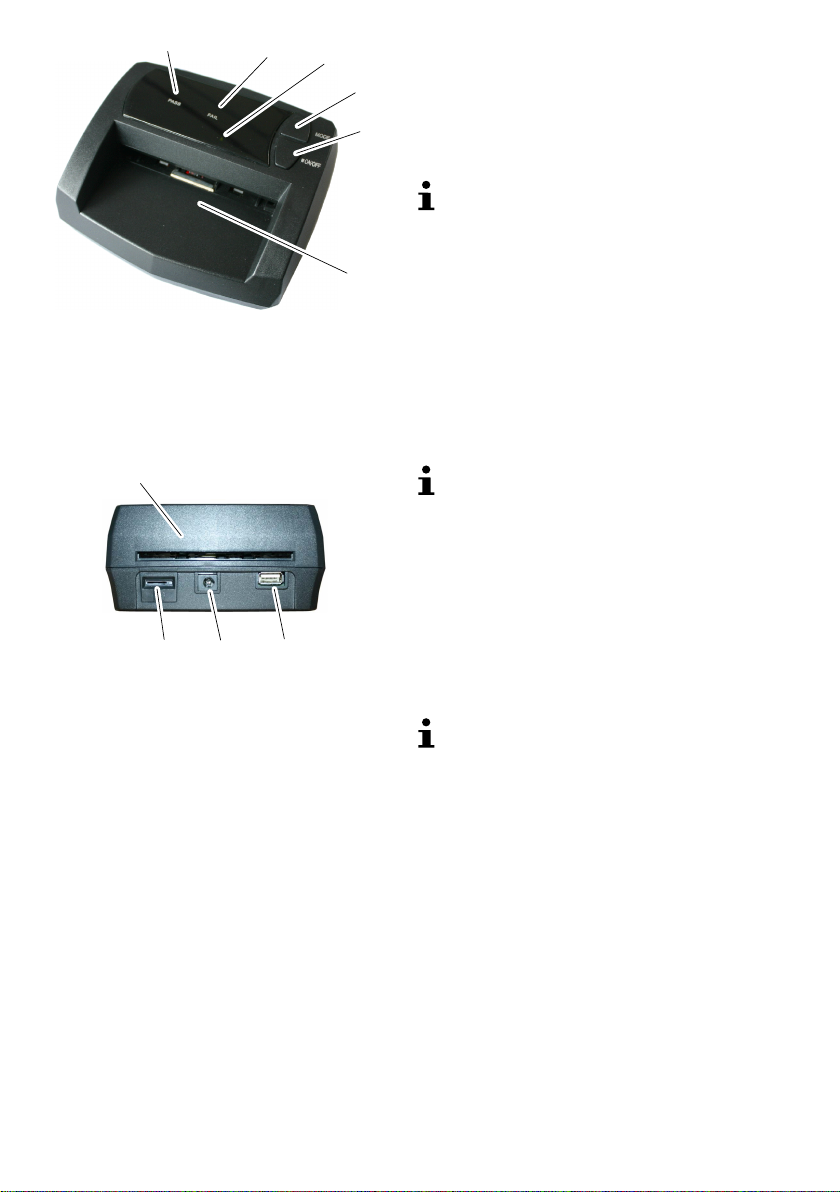
Softwareupdate
ÆLaden Sie die Datei „update.bin“ von der
GO Europe Homepage (www.go-europe.com)
herunter.
ÆLaden Sie die Datei „update.bin“ auf eine Mi-
cro-SD-Speicherkarte.
ÆSchalten Sie das Gerät aus.
ÆStecken Sie die microSD-Speicherkarte auf
der Rückseite des Geräts in den dafür vorgese-
henen Einschub ein. Die Kontakte zeigen dabei
nach unten.
ÆSchalten sie das Gerät ein. Ê Während des
Upgrade erzeugt das Gerät einen Ton und die
Anzeige ist leer.
Wenn das Upgrade beendet ist, hört der Ton
auf und die Anzeige zeigt wieder normal an.
Wenn Sie das Softwareupgrade auf meh-
reren Geräten durchführen wollen, stellen
Sie das Attribut der Datei „update.bin“ auf
schreibgeschützt (read-only).
sobald Sie das Gerät über den Netzadapter
mit Spannung versorgen. Ein Symbol auf dem
Display zeigt Ihnen den aktuellen Ladestand
des Akkus an.

6DAc
Technische Daten
Modell NC 315 / 325 / 335
Zählgeschwindigkeit 1 Banknote pro Sekunde
Kapazität 999 Stück (NC 325) / 9.999 Stück (NC 335)
9.995 € (NC 325) / 99.995 € (NC 335)
Dicke der Banknoten 0,075 mm bis 0,15 mm
Stromversorgung 230 V / 50 Hz
Stromverbrauch 10 W
Akku (optional) Lithium-Ion-Akku, 11,1 V, 700 mAh
Betriebszeit bei vollem
Akku
90 Minuten
Sensoren optisch, infrarot, magnetisch, Abmessungen
Temperatur und Luft-
feuchtigkeit
0 bis 40 °C; 30 bis 95 % relative Luftfeuchtigkeit
Abmessungen 130 x 106 x 62 mm
Gewicht 0,3 kg
Pflegehinweise
ÆGehäuseoberflächen mit einem weichen und fusselfreien Tuch reinigen.
ÆReinigen Sie die Sensoren nach jedem Gebrauch.
ÆKeine Reinigungs- oder Lösungsmittel verwenden.

7
DAc
Entsorgung
Wollen Sie Ihr Gerät entsorgen, bringen
Sie es zur Sammelstelle Ihres kommu-
nalen Entsorgungsträgers (z. B. Wert-
stoffhof). Nach dem Elektro- und Elektronik-
gerätegesetz sind Besitzer von Altgeräten
gesetzlich verpflichtet, alte Elektro- und
Elektronikgeräte einer getrennten
Abfallerfassung zuzuführen. Das neben-
stehende Symbol bedeutet, dass Sie das Ge-
rät auf keinen Fall in den Hausmüll werfen
dürfen!
Verpackungsmaterialien entsorgen Sie ent-
sprechend den lokalen Vorschriften.
Fragen und Service
Lieber Kunde,
wir freuen uns, dass Sie sich für dieses Gerät
entschieden haben.
Bei Fragen und Problemen steht Ihnen
unsere Service-Hotline unter der
Telefonnummer +49 (0)180 5 007514
(Kosten aus dem dt. Festnetz bei
Drucklegung: 14ct/Min., mobil maximal 42ct/
Min.) zur Verfügung.
Weitere Informationen finden Sie auch in
unserem Retouren-Portal (RMA) im Bereich
Support auf unserer Internetseite
www.go-europe.com.
Eine Rücksendung erfolgt unter Beifügung
des Kaufbelegs und idealerweise in der
Originalverpackung an:
WSG
Wilhelmshavener Service
Gesellschaft mbH
Krabbenweg 14
26388 Wilhelmshaven (Germany)

8Giu
ENGLISH
Operating Manual
Please read and observe
the following information
and keep this operating manual
safe for future reference!
WARNING:
• Risk of suffocation!
Children could swallow small parts, pack
ing materials or protective foil.
ÆKeep the product and packaging out of
reach of children!
CAUTION!
• Risk of entanglement!
ÆKeep fingers, hair etc. away from the in
feed.
• Risk of tripping due to improperly laid
cable!
ÆLay cables so that they do not represent
a risk of tripping.
• Risks to health and the environment
from batteries!
Improper handling of batteries can put
your health and the environment at risk.
ÆNever open, damage or swallow batter
ies or allow them to pollute the environ
ment. Batteries may contain toxic, ecologi
cally hazardous heavy metals.
ATTENTIONUNG!
• Risk of property damage!
ÆEnsure no foreign bodies, such as paper
clips, rubber bands, etc. get into the in
feed.
• Property damage through environmental
influences!
Harmful environmental influences such as
exposure to smoke, dust, vibration, chemi
cals, moisture, heat and direct sunlight,
could damage the product.
ÆPrevent exposing the device to environ
mental influences such as smoke, dust,
vibration, chemicals, moisture, heat or di
rect sunlight.
Intended Use
The bank note validator, subsequently re-
ferred to as the device, serves to control bank
notes according to their most important secu-
rity features. Any other use is considered un-
intended use. Unauthorised modification or
reconstruction is not permitted. Under no cir-
cumstances open the device or complete any
repair work yourself.
Despite comprehensive testing by an appro-
priately approved authority, it is impossible to
fully rule out the risk that a counterfeit bank
note is not detected. In the same way, an au-
thentic bank note can be detected as being
faulty due to soiling or some other external
influence. Therefore, test bank notes detected
as being faulty several times and, in the case
of doubt, consult your bank institution.
Scope of Delivery
• Bank note validator
•Power adapter
•Operating manual
Notation and Presentation
Action to be completed
Result of the action
[2] Reference in a graphic
START Button
Helpful information
Operation
Switching On and Off
The capacity of the battery when fully
charged is sufficient for about 90 minutes.
When this time has expired, the device
switches off without issuing any prior warning.
It is possible that data being displayed will not
be stored. Therefore, conclude your work in
good time or connect the device to an exter-
nal power supply.
ÆConnect the power cable to the device and
plug it into a properly installed power socket.

9
Giu
NC 325, 335
ÆPress and hold the CLEAR/ ON/OFF button
for 3 seconds.
After switching the device on, it performs a
self-diagnosis. When the self-diagnosis has
finished without any errors, X0 appears in the
display. If an error is detected, it is indicated
accordingly in the display. Then contact the
service.
NC 315
ÆPress and hold the CLEAR/ ON/OFF button
for 3 seconds.
If the device will not be used for a longer
period, disconnect it from the power sock-
et.
Preparing Bank Notes
Pay attention to the following points to prevent
malfunctions.
ÆCheck the bank notes for paper clippings, pa-
per clips, rubber bands and other foreign bod-
ies, and remove them before inserting the bank
notes in the device.
ÆDo not insert any damaged bank notes.
ÆSmooth any creased and folded bank notes
before inserting them.
Inserting Bank Notes
ÆLay the bank notes in the infeed tray individu-
ally, with the short side at the front. The bank
note is drawn in and controlled automatically.
In the case of a bank note which is wrong-
ly inserted or is not recognised, an error is
indicated in the display and an acoustic signal
is issued.
ÆWait unit the bank note controlled has been
fully ejected into the output tray and remove it
before inserting the next bank note to be con-
trolled.
Bank notes which are incorrectly inserted
can lead to a malfunction. Strong magnet-
ic fields can affect the sensor and falsify re-
sults.
Operating Elements
NC 335
1
234
5
6
7
1 Display of total quantity or value of the
bank note
2 Display of output side selected
3 Display for jam and error messages
4 Display for total amount or quantity of bank
notes
5Report / MODE button
6CLEAR / ON/OFF button
7 Front insert/output
NC 325
8
910
11
12
13
8 Indicates total quantity or value of the bank
note
9 Indicates output side selected
10 Indicates total amount or quantity of bank
notes
11 Report / MODE button
12 CLEAR / ON/OFF button
13 Front insert/output

10 Giu
NC 315
14 15 16
17
18
19
14 Indicates authentic bank note
15 Indicates faulty bank note
16 Indicates output side selected
17 MODE button
18 ON/OFF button
19 Front insert/output
20
21 22 23
20 Rear output
21 USB port (no function)
22 Power supply socket
23 MicroSD memory card slot
Validation Functions
(NC 315, 325, 335)
The best results are achieved after a warm-up
phase of 3 minutes.
Bright ambient light can affect the sensor and
falsify results. The validation functions are al-
ways active.
Controlling the Dimensions
This function is triggered when the width of
the bank note is exceeded by 1/3.
Infrared Test
Faulty bank notes are detected by means of
infrared light.
Magnetic Test
This function detects magnetic ink on the
bank notes.
Metallic Strips
This function controls whether the metallic
strips are present in the bank note.
Since the security features of bank notes
are provided on both sides of the notes,
the process for detecting counterfeit notes is
performed reliably on both sides.
Selecting the Output Side (NC 315)
Depending on the output side selected, the
bank notes are ejected at the front, on the
side in which the bank notes were inserted, or
at the rear.
ÆPress the MODE button, several times if nec-
essary, to select the output side. An icon in
the display indicates the output side currently
selected.
Faulty or unrecognised bank notes are
always ejected at the front.
Selecting the Output Side (NC 325,
335)
Depending on the output side selected, the
bank notes are ejected at the front, on the
side in which the bank notes were inserted, or
at the rear.
ÆPress and hold the REPORT / MODE button
for 2 seconds. An icon in the display indicates
the output side currently selected.
Faulty or unrecognised bank notes are
always ejected at the front.
Indicators
The range of indicators is dependent on the
device concerned.
Model NC 315
The NC 315 only displays the result of the val-
idation functions. A green lamp indicates that
all the validation tests were passed success-
fully. A red lamp indicates that at least one
test was not passed successfully.
Model NC 325, 335
These devices indicate the value of the bank
notes counted added together. Initially, the
value of the note just controlled appears and
the display then changes to indicate the total
value. The quantity of bank notes controlled

11
Giu
appears on the left-hand side of the display
and the value (total amount) of the bank notes
controlled until this moment appears on the
right.
The value indicator can display a maxi-
mum amount of 9,995 € (NC 325) or
99,995 € (NC 335).
Denominations (NC 325, 335)
You can display the number of bank notes of
a specific denomination (5 €, 10 €, 20 €, etc.)
which have been counted until now.
ÆPress the Report / MODE button, several
times, if necessary. The respective value of
the bank note appears on the left-hand side of
the display and the number of bank notes of the
specific denomination on the right.
A few seconds after the Report / MODE
button has been pressed, the device
switches back to its default operating mode.
Resetting the Display of Value and
Quantity (NC 325, 335)
You can reset the counted values and quanti-
ties to zero in order to begin a new counting
process.
ÆPress the CLEAR / ON/OFF button.
The value and quantity indicators are reset
to zero.
The device does not have a memory func-
tion. When you switch the device off, the
memory for values and quantities is deleted.
Battery Operation (NC 315, 325, 335)
The device can also be operated for up to 90
minutes without an external power supply by
means of a rechargeable battery. Only use
the rechargeable battery distributed by GO
Europe.
Inserting/Changing the Battery
ÆLoosen the screw in the battery compartment
cover on the underside of the device.
ÆOpen the battery compartment cover.
ÆConnect the plug on the battery with the sock-
et in the battery compartment.
There is a socket inside the battery com-
partment which fits to the plug on the bat-
tery. The plug cannot be connected wrongly.
ÆClose the battery compartment cover.
ÆTighten the screw in the battery compartment
cover.
The battery is automatically charged as
soon as the device is connected to the
power supply via the power adapter. An icon
in the display indicates the current charge
capacity of the battery.
When operating in battery mode, the de-
vice switches off automatically if it re-
mains unused for 5 minutes.
Software Update
ÆDownload the "update.bin" file from the
GO Europe homepage (www.go-europe.com).
ÆLoad the "update.bin" on a Micro-SD memory
card.
ÆSwitch the machine off.
ÆInsert the microSD memory card in the corre-
sponding slot provided on the rear of the ma-
chine. The contacts must point downwards.
ÆSwitch the machine on. During the up-
grade process, the device produces a noise and
the display remains empty.
When the upgrade has been completed, the
noise stops and the display appears as nor-
mal.
If you want to complete the software up-
date on several machines, set the "up-
date.bin" file attribute to "read only".

12 Giu
Technical Data
Model NC 315 / 325 / 335
Counting speed 1 bank note/second
Capacity 999 pieces (NC 325) / 9,999 pieces (NC 335)
9,995 € (NC 325) / 99,995 € (NC 335)
Thickness of bank notes 0.075 mm to 0.15 mm
Power supply 230 V/ 50 Hz
Power consumption 10 W
Rechargeable battery
(option)
Lithium-ion battery, 11.1 V, 700 mAh
Operating time, fully
charged battery
90 minutes
Sensors Optical, infrared, magnetic, dimensions
Temperature and
rel. humidity
0 to 40 °C; 30 to 95% relative humidity
Dimensions 130 x 106 x 62 [mm]
Weight 0.3 kg
Care Instructions
ÆClean the housing surfaces with a soft, fluff-free cloth.
ÆClean the sensors after each use.
ÆDo not use any cleaning agents or solvents.

13
Giu
Disposal
In order to dispose of your device, take
it to a collection point provided by your
local public waste authorities (e.g. recy-
cling centre). According to laws on the dispos-
al of electronic and electrical devices, owners
are obliged to dispose of old electronic and
electrical devices in a separate waste con-
tainer. The adjacent symbol indicates that the
device must not be disposed of in normal do-
mestic waste!
Packaging materials must be disposed of
according to local regulations.
Guarantee
Dear Customer,
we are pleased that you have chosen this
equipment.
In the case of a defect, please return the de-
vice together with the receipt and original
packing material to the point-of-sale.

14 FBc
FRANÇAIS
Mode d'emploi
Veuillez lire et observer les
informations suivantes
ainsi que conserver ce mode
d'emploi afin de pouvoir le
consulter en cas de besoin !
AVERTISSEMENT !
• Risque d'étouffement !
Les enfants peuvent avaler des petits
objets, des films d'emballage ou de protec
tion.
ÆTenez les enfants à l'écart du produit et
de son emballage !
PRUDENCE !
• Risque lié à l'introducteur !
ÆTenir les doigts, les cheveux, etc. à
l'écart de l'introducteur.
• Risque de trébucher en raison de câbles
posés de manière non professionnelle !
ÆPosez les câbles de sorte que personne
ne trébuche.
• Mise en danger de l’homme et l’environ
nement causée par les piles et batteries !
Une manipulation incorrecte des piles peut
nuire à votre santé et à l'environnement.
ÆNe jamais ouvrir, endommager, avaler
les piles ou ne jamais faire pénétrer leur
contenu dans l'environnement. Elles
peuvent contenir des métaux lourds
toxiques et nuisibles pour celui-ci.
ATTENTION!
• Menaces de dommages matériels !
ÆNe pas introduire de corps étrangers
tels que trombones, élastiques, etc. dans
l'introducteur.
• Dommage matériel causé par les im
pacts environnementaux
Des impacts environnementaux défavo
rables tels que fumée, poussière, vib
rations, produits chimiques, humidité,
grande chaleur ou ensoleillement direct
peuvent endommager le produit.
ÆÉviter des impacts environnementaux
tels que fumée, poussière, vibrations, pro
duits chimiques, humidité, grande chaleur
ou ensoleillement direct.
Utiliser l'appareil conformément
à son usage
Le détecteur de billets de banque - appelé par
la suite appareil - sert à contrôler les critères
de sécurité essentiels de billets de banque.
Toute autre forme d'utilisation n'est pas
conforme à son usage. Des modifications ou
changements effectués d'un propre gré sont
interdits. N'ouvrez en aucun cas l'appareil et
ne tentez pas de le réparer vous-même.
Malgré un ample contrôle effectué par un
centre agréé, il n'est pas possible d'exclure un
risque résiduel de non détection de billets de
banques suspects. Des billets de banque
authentiques peuvent également être détec-
tés comme suspects en raison de salissures
ou d'autres influences extérieures. C'est
pourquoi il vous faut vérifier plusieurs fois les
billets suspects et vous adresser à votre
banque en cas de doute.
Contenu du coffret
• Détecteur de billets de banque
•Adaptateur réseau
•Mode d'emploi
Représentations et notations
Action à effectuer
Résultat de l'action
[2] Position dans le graphique
START Touche
Informations utiles
Utilisation
Mise sous/hors tension
La capacité de la batterie complètement
chargée est d'env. 90 minutes. À
expiration de cette durée, l'appareil se déb-
ranche sans signalisation préalable. Les don-
nées éventuellement affichées ne sont pas
sauvegardées. Terminez à temps ce que

15
FBc
vous êtes en train de faire ou connectez
l'appareil à l'alimentation en courant externe.
ÆRaccordez le câble de réseau à l'appareil et
à une prise de courant installée de manière ré-
glementaire.
NC 325, 335
ÆAppuyez sur la touche CLEAR/ ON/OFF
pendant 3 secondes.
Après son branchement, l'appareil effectue un
autodiagnostic. Si l'autodiagnostic s'est termi-
né sans erreur, X0 s'affiche. Si une erreur est
constatée, celle-ci s'affiche. Veuillez contacter
le service.
NC 315
ÆAppuyez sur la touche CLEAR/ ON/OFF
pendant 3 secondes.
Retirez l'appareil du secteur si vous
n'avez pas l'intention d'utiliser pendant un
certain temps.
Préparer les billets
Respectez les points suivants afin d'éviter des
dérangements dans le fonctionnement.
ÆAvant d'introduire le billet, vérifiez si celui-ci
contient des rognures, des trombones, des
élastiques et autres corps étrangers et retirez-
lez le cas échéant.
ÆN'introduisez pas de billets endommagés.
ÆLissez les billets froissés et pliés avant de les
introduire.
Introduire les billets
ÆPosez les billets un par un dans le bac d'intro-
duction avec le côté court en avant. Le billet est
“aspiré” automatiquement et contrôlé.
Si vous avez posé incorrectement le billet
ou si l'appareil ne le peut l'identifier, une
erreur s'affiche et un bip est émis.
ÆAttendez que le billet contrôlé sorte com-
plètement dans le bac de sortie et retirez-le
avant de contrôler le prochain.
Des billets introduits incorrectement
provoquent une erreur de fonctionnement.
De forts champs magnétiques peuvent influer
sur le capteur et conduire à des résultats
erronés.
Eléments de manipulation
NC 335
1
234
5
6
7
1 Affichage de la quantité totale de billets ou
de la valeur du billet
2 Affichage du côté sortie sélectionné
3 Affichage avec messages d'état et d'erreur
4 Affichage du montant total ou de la
quantité de billets
5 Touche Report / MODE
6 Touche CLEAR / ON/OFF
7 Côté entrée/sortie avant
NC 325
8
910
11
12
13
8 Affichage de la quantité totale de billets ou
de la valeur du billet
9 Affichage du côté sortie sélectionné
10 Affichage du montant total ou de la
quantité de billets
11 Touche Report / MODE
12 Touche CLEAR / ON/OFF
13 Côté entrée/sortie avant

16 FBc
NC 315
14 15 16
17
18
19
14 Champ d'affichage des billets authentiques
15 Champ d'affichage des billets suspects
16 Affichage du côté sortie sélectionné
17 Touche MODE
18 Touche ON/OFF
19 Côté entrée/sortie avant
20
21 22 23
20 Côté sortie arrière
21 Interface USB (sans fonction)
22 Prise pour l'alimentation en courant
23 Port pour la carte mémoire microSD
Fonctions de contrôle
(NC 315, 325, 335)
Les meilleurs résultats sont obtenus après la
phase d'échauffement de 3 minutes.
Un fort éclairage environnant peut influer sur
le capteur et conduire à des résultats erronés.
Les fonctions de contrôle sont toujours
actives.
Contrôle des dimensions
Cette fonction se déclenche quand la largeur
du billet est dépassée d'1/3.
Infrarouge
Cette fonction détecte les billets suspects
grâce à la lumière infrarouge.
Magnétique
Cette fonction détecte l'encre magnétique sur
les billets.
Fil métallique
Cette fonction contrôle si le fil métallique est
présent dans le billet.
Les critères de sécurité des billets se trou-
vant sur les deux côtés, effectuer le
comptage des deux côtés pour parvenir à une
détection sûre de faux billets.
Sélectionner le côté sortie (NC 315)
Selon le côté de sortie que vous avez sélec-
tionné, les billets sortiront à l'avant - donc du
côté où vous avez posé les billets ou à
l'arrière de l'appareil.
ÆAppuyez plusieurs fois sur la touche MODE
pour sélectionner le côté sortie. Ê Une icône
sur l'écran indique le côté sortie actuellement
utilisé.
Les faux billets ou les billets non identifiés
sortent toujours côté sortie avant.
Sélectionner le côté sortie (NC 325,
335)
Selon le côté de sortie que vous avez sélec-
tionné, les billets sortiront à l'avant - donc du
côté où vous avez posé les billets ou à
l'arrière de l'appareil.
ÆAppuyez sur la touche REPORT / MODE
pendant 2 secondes. Ê Une icône sur l'écran
indique le côté sortie actuellement utilisé.
Les faux billets ou les billets non identifiés
sortent toujours côté sortie avant.
Affichages
Le nombre des affichages dépend de
l'appareil.
Modèle NC 315
Le modèle NC 315 n'affiche que le résultat
der fonctions de contrôle. Un témoin vert
indique que toutes les fonctions de contrôle
ont réussi. Un témoin rouge indique qu'au
moins un contrôle n'a pas réussi.

17
FBc
Modèle NC 325, 335
Ces appareils permettent d'additionner les
valeurs des billets comptés. La valeur
contrôlée actuellement s'affiche en premier
puis l'affichage passe à la valeur totale. La
quantité des billets comptés s'affiche sur le
côté gauche de l'écran et la valeur (montant
total) des billets comptés jusqu'à maintenant
s'affiche sur le côté droit.
Le montant de la valeur affichée peut être
de 9.995 € (NC 325) ou 99.995 €
(NC 335) maximum.
Comptages partiels (NC 325, 335)
Vous pouvez faire afficher le nombre de
billets d'une valeur définie qui ont été comptés
jusqu'à maintenant (5 €, 10 €, 20 €, etc.).
ÆAppuyez plusieurs fois sur la touche Re
port / MODE. Ê La valeur des billets s'affiche
sur le côté gauche de l'écran et la quantité des
billets comptés jusqu'à maintenant s'affiche sur
le côté droit.
Quelques secondes après que vous avez
appuyé sur la touche Report / MODE,
l'appareil commute sur le mode normal.
Remettre à zéro l'affichage de la va
leur et de la quantité (NC 325, 335)
Vous pouvez remettre les valeurs et les
quantités comptées sur zéro pour commencer
un nouveau comptage.
ÆAppuyez sur la touche CLEAR / ON/OFF.
Ê L'affichage de la valeur et de la quantité est
remise sur zéro.
L'appareil n'a pas de fonction mémoire.
En débranchant l'appareil, vous effacez
également la mémoire de la valeur et de la
quantité.
Fonctionnement sur batterie (NC 315,
325, 335)
En option, l'appareil peut fonctionner jusqu'à
90 minutes sur batterie sans alimentation en
courant externe. Utilisez uniquement la
batte-rie fournie par GO Europe.
Insérer / changer la batterie
ÆDesserrez la vis du cache batterie situé sous
l'appareil.
ÆOuvrez le cache.
ÆRaccordez la fiche de la batterie avec la
douille située dans le compartiment batterie.
Dans ce dernier se trouve une douille al-
lant avec la fiche de la batterie. La fiche
est résistante à la torsion.
ÆFermez le cache.
ÆSerrez la vis à fond.
ÆTéléchargez le fichier „update.bin“ du site
Internet GO Europe (www.go-europe.com).
ÆTéléchargez le fichier „update.bin“ sur une
carte mémoire microSD.
ÆDébranchez l'appareil.
ÆIntroduisez la carte-mémoire microSD à
l'arrière de l'appareil dans la fente prévue à cet
effet. S'assurer que les contacts sont orientés
vers le bas.
ÆBranchez l'appareil. Ê Pendant sa mise à
jour, l'appareil émet un son et l'affichage est
vide.
Lorsque celle-ci est terminée, le son s'arrête
et l'affichage redevient normal.
Si vous désirez effectuer la mise à jour
sur plusieurs appareils, placez l'attribut du
fichier „update.bin“ sur lecture seule (read-
only).
L'accu se recharge automatiquement dès
que vous alimentez l'appareil en tension via
l'adaptateur. Une icône sur l'écran affiche le
niveau de charge de la batterie.
En fonctionnement sur batterie, l'appareil
se débranche automatiquement si vous ne
l'utilisez pas pendant 5 minutes.
Mise à jour du logiciel

18 FBc
Données techniques
Modèle NC 315 / 325 / 335
Vitesse de comptage 1 billet par seconde
Capacité 999 billets (NC 325) / 9.999 billets (NC 335)
9.995 € (NC 325) / 99.995 € (NC 335)
Épaisseur des billets 0,075 mm à 0,15 mm
Alimentation en courant 230 V / 50 Hz
Consommation de courant 10 W
Batterie (en option) Lithium-Ion, 11,1 V, 700 mAh
Durée de fonctionnement
si batterie pleine
90 minutes
Capteurs optique, infrarouge, magnétique, dimensions
Température et humidité
de l'air
0 à 40 °C; 30 à 95 % d'humidité relative de l'air
Dimensions 130 x 106 x 62 mm
Poids 0,3 kg
Remarques d'entretien
ÆNettoyer les surfaces du boîtier avec un chiffon doux et non pelucheux.
ÆNettoyer les capteurs après chaque utilisation.
ÆNe pas utiliser de produits d'entretien ou de solvants.

19
FBc
Élimination des déchets
Si vous ne voulez plus vous servir de
votre appareil, veuillez l'apporter au
centre de collecte de l'organisme d'éli-
mination des déchets de votre commune (par
ex. centre de recyclage). D'après la loi relative
aux appareils électriques et électroniques, les
propriétaires d'appareils usagés sont tenus
d'apporter tous les anciens appareils
électriques et électroniques dans un collec-
teur séparé. L'icône ci-contre signifie que
vous ne devez en aucun cas jeter l'appareil
dans les ordures ménagères !
Éliminez les produits d'emballage conformé-
ment au règlement local.
Garantie
Cher client,
nous sommes très heureux que vous ayez
choisi cet appareil.
En cas de défaut, veuillez retourner l’appareil
dans son emballage d’origine et accompagné
du bon d’achat au magasin où vous l’avez
acheté.
L’appareil et les matériaux
d’emballage sont recyclables,
éliminez-les séparément pour une
meilleure gestion des déchets. Le logo Triman
est valable en France uniquement.

20 Ic
ITALIANO
Istruzioni d’uso
Si prega di leggere e os
servare le seguenti infor
mazioni e di conservare il pre
sente manuale d’uso per futura
consultazione!
AVVERTENZA!
• Pericolo di soffocamento!
I bambini possono ingerire parti piccole,
materiali d’imballo o pellicole protettive.
ÆTenere il prodotto e la confezione lonta
ni dalla portata dei bambini!
ATTENZIONE!
• Pericolo di trascinamento!
ÆTenere lontano dita, capelli ecc. dalla
bocca di alimentazione.
• Pericolo di inciampare dovuto alla posa
non corretta di cavi!
ÆPosare i cavi in modo che nessuno vi
possa inciampare!
• Batterie e pile possono provocare danni
alla salute e all'ambiente!
Un uso improprio delle batterie può provo
care danni alla salute e all’ambiente.
ÆNon aprire, danneggiare, ingerire o di
sperdere mai nell'ambiente le batterie. Le
batterie possono contenere metalli pesanti
nocivi e dannosi per l'ambiente.
ATTENZIONE!
• Pericolo di danni materiali!
ÆNon fare giungere corpi estranei come
graffette, elastici ecc. nella bocca di ali
mentazione.
• Danni materiali dovuti a influssi ambien
tali!
Influssi ambientali dannosi come ad es.
fumo, polvere, vibrazioni, sostanze chimi
che, umidità, calore o raggi solari diretti
possono danneggiare il prodotto.
ÆEvitare influssi ambientali come ad es.
fumo, polvere, vibrazioni, sostanze chimi
che, umidità, calore o raggi solari diretti.
Impiego conforme
Il verificatore di banconote - indicato qui di
seguito come apparecchio - è preposto alla
verifica di banconote rilevandone le principali
caratteristiche di sicurezza. Qualsiasi altro
impiego è considerato improprio. Non sono
consentite modifiche o trasformazioni non
autorizzate. Non è consentito per nessun
motivo aprire l'apparecchio autonomamente
per eseguire interventi di riparazione.
Nonostante il rigido controllo ad opera di un
istituto specificamente autorizzato, non è pos-
sibile escludere un rischio residuo di mancato
riconoscimento di banconote non conformi.
Anche banconote autentiche possono spesso
risultare erronee per la presenza di sporco o
altri influssi esterni. Verificate quindi ripetuta-
mente le banconote risultate non conformi e
rivolgetevi in caso di dubbio al vostro istituto
bancario.
Oggetto di fornitura
• Verificatore di banconote
•Adattatore di rete
•Istruzioni d’uso
Rappresentazioni e modi di sc
rittura
Azione da svolgere
Risultato dell’azione
[2] Posizione in figura
START Tasto
Informazioni supplementari
Funzionamento
Accensione e spegnimento
Se completamente carica, la batteria assi-
cura un’autonomia di funzionamento all’in-
circa di 90 minuti. Una volta trascorsa questa
durata, l’apparecchio si spegne senza pre-
cedente segnalazione. In tal caso, eventuali
dati visualizzati non sono salvati. Concludere
la procedura di lavoro in tempo oppure
This manual suits for next models
2
Table of contents
Languages:
Other Olympia Bank Note Validator manuals
Popular Bank Note Validator manuals by other brands

Crane
Crane NRI G-13.mft Standard operating instructions

Innovative Technology
Innovative Technology NV9 Spectral user manual

PRO Intellect Technology
PRO Intellect Technology PRO 12M user manual

Innovative Technology
Innovative Technology NV11 user manual

Kolibri
Kolibri Signature user manual

Money Controls
Money Controls SR3 manual