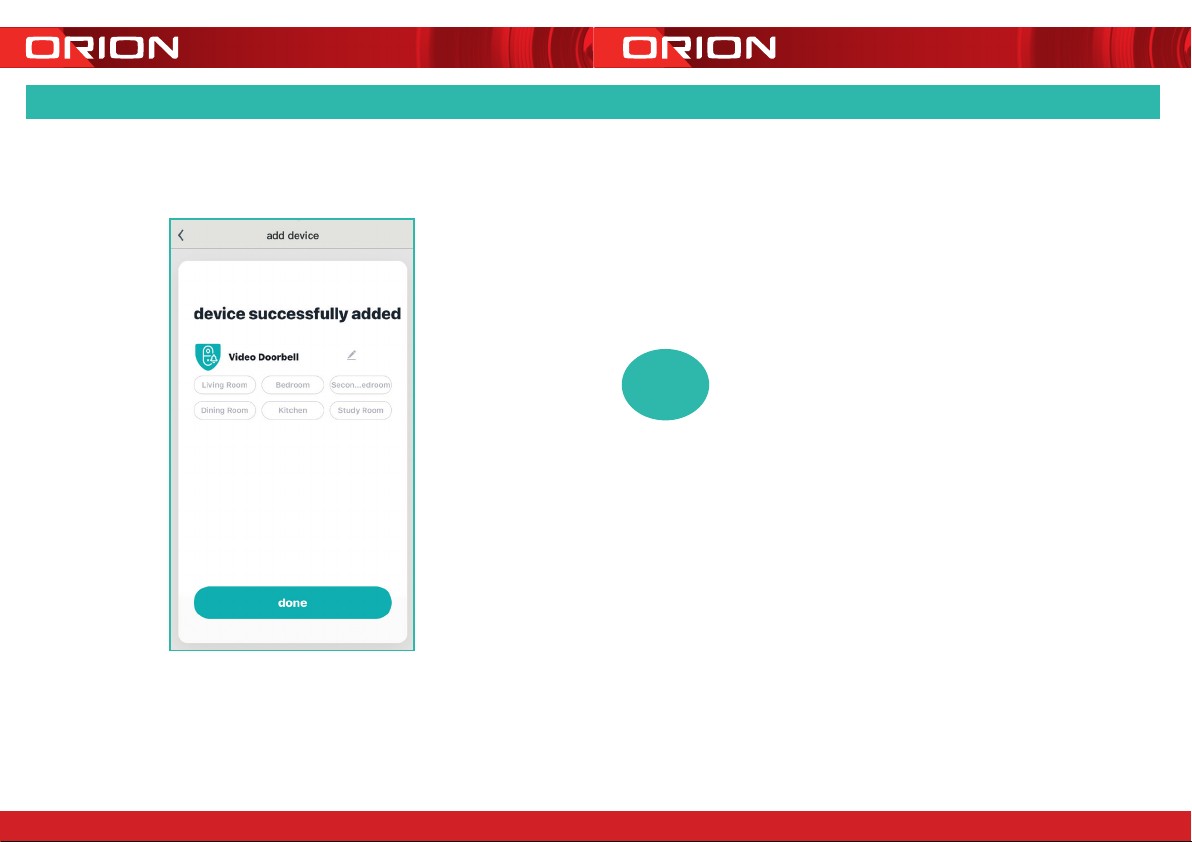
Orion DC55HA 2 Series User manual

SEE & RECORD EVERYTHING
THAT HAPPENS USING YOUR
SMARTPHONE
QUICK
START GUIDE
IMPORTANT! PLEASE READ THESE
INSTRUCTIONS CAREFULLY
SMART SMART WIRELESS
VIDEO DOORBELL
DC55HA Series 2
24 pages 105mm x 148mm (A6) 160gsm Gloss Art Stock 4 colour process double sided

24 pages 105mm x 148mm (A6) 160gsm Gloss Art Stock 4 colour process double sidedDC55HA Series 2 - CPIN005156/4
32
This SMART wireless door chime is designed for use in homes, apartments,
ofces, garages and sheds. It has been developed to be easily set up and operated,
giving you and your family the security and peace of mind that you deserve.
Install the Grid Connect mobile app, available for both iPhone and Android devices,
to monitor your doorbell remotely.
The Grid Connect app is free to download and is available from the Apple App Store
and Google Play.
1 x Smart Wireless Video Doorbell
including rechargeable batteries
1 x Indoor Chime Unit
1 x Wall Mount
1 x USB Cable
2 x Screws and Wall Plugs
1 x Micro SD Card
1 x L Shaped Screw Driver
1 x DC Power Adaptor
1 x Grub Screw
1 x Reset Pin
1INTRODUCTION
2CONTENTS
DOWNLOAD PAIR USE
Download from:
MONITOR FROM ANYWHERE
3IDENTIFICATION
Battery Compartment
Reset Button
Please refer to reset
process on page 19
Indoor Chime
Indoor chime unit is
already paired, if no
sound please refer
to pairing process
on page 14
Speaker
Two way audio
Grub Screw
Location
USB Port
Power with supplied
cable and DC adaptor
Micro SD Card Slot
Rolling storage micro
SD card 16GB included
(Max.128GB card supported)
Battery Isolation Strip
Remove before use
Status Light
RED Solid Light:
indicates the device
is resetting.
RED Blinking Light:
once per second:
pairing mode
twice per second:
lost Wi-Fi connection
BLUE Solid Light:
Device is paired and
running correctly or there
is Wi-Fi without internet
access
OFF: Standby - press
push button to activate
camera.
Push Button
Press to activate
doorbell
Camera Lens
1080p HD, with
140° angle of view
Microphone
Light Sensor/
Infrared LEDs
Detects low light and
turns on the infrared
lights which allow the
camera to capture
both day and night
images
Charging Indicator
Solid Red: Charging
Solid Blue: Fully Charged

4DOWNLOAD THE APP
NEW ACCOUNT
LOG IN SETUP
Download and install
GRID CONNECT App
from Play store (Android)
or App store (iOS).
5INSTALL THE APP
login to account
Open the GRID
CONNECT App. If you
are a new user, tap create
new account and follow
the prompts to complete
account setup.
Note: You must agree with the
Privacy Policy to be able to use
the App.
If you already have an existing
account, just tap login to
account and enter your login
details to continue.
create new account
54
24 pages 105mm x 148mm (A6) 160gsm Gloss Art Stock 4 colour process double sidedDC55HA Series 2 - CPIN005156/4

7PREPARING YOUR DEVICE
Remove the battery compartment cover.
Pull o the isolation strip to allow the
battery to make electrical contact.
Reinstall battery cover.
NOTE: Ensure the battery polarity (+/-)
matches the battery compartment sign. On the
Add location
setup page,
you can edit
Home name
, set up
Home location
and
Select rooms
or
Add room
.
This will help you manage your
GRID devices and assist you in
customising and scheduling the
time and order of one or multiple
devices, depending on your home
living needs.
Tap Done when you finish.
8.0 PAIRING YOUR DEVICE
Open the GRID CONNECT App. Tap
, then select
security
on the
add
device
page. Confirm the status light
around the push button is flashing
red, one flash per second before
tapping ‘ready to pair’ to proceed.
If the status light is not flashing
red, press the push button once
to activate the video doorbell then
press and hold the reset button
from the bottom of the video
doorbell for 5 seconds until a
prompt is heard. After 10 seconds,
the status light will start flashing red.
Tap ‘ready to pair’ to proceed.
76
24 pages 105mm x 148mm (A6) 160gsm Gloss Art Stock 4 colour process double sidedDC55HA Series 2 - CPIN005156/4

8.1 PAIRING YOUR DEVICE
Enter the Wi-Fi password
and tap
confirm
to proceed.
If needed, you can tap
change network
to switch
to another suitable Wi-Fi
network for your doorbell.
Make sure that your
Wi-Fi password is correct
otherwise pairing will not
be successful. Be aware of
case-sensitive passwords.
confirm
scan
QR
code
on screen
Press
continue
to scan QR code using
your doorbell. Hold the product 15cm
away from your mobile screen.
Press
heard the beep
after you hear a
sound from your doorbell. The status light
should change from flashing red to solid
blue during this process.
98
24 pages 105mm x 148mm (A6) 160gsm Gloss Art Stock 4 colour process double sidedDC55HA Series 2 - CPIN005156/4

8.2 PAIRING YOUR DEVICE
Once the pairing process is complete a page showing
device added
successfully
will appear.
You may choose to edit the device name or assign the device to a
dedicated room before tapping
done
to finish the pairing process.
Once your doorbell is paired to your Wi-Fi network, your doorbell
is able to view at anytime from your smartphone as long as there is
internet access.
If no device is found and the pairing process
is not successful, check below and repeat from Step 8
1
Wi-Fi network is 2.4GHz.
2
Wi-Fi password entered is correct and
the same Wi-Fi network is used on the mobile device.
3
GRID device is in pairing mode.
4
Check your Wi-Fi for network activity.
5
Trouble shooting guide on page 18.
?
1110
24 pages 105mm x 148mm (A6) 160gsm Gloss Art Stock 4 colour process double sidedDC55HA Series 2 - CPIN005156/4

24 pages 105mm x 148mm (A6) 160gsm Gloss Art Stock 4 colour process double sidedDC55HA Series 2 - CPIN005156/4
12
Once your doorbell is paired to your Wi-Fi network, you can view your doorbell
at anytime from your smartphone as long as there is internet access.
Back to Device
Screen
Switch video quality
between Standard
denition (smoother
movement with
smaller le size)
and High denition
(clearer images but
larger le size)
Tap to capture a photo/
video during live view.
Note: the photo and
video are saved to the
internal memory of your
smartphone Tap to enable the
talk function
Access to PIR mode
(motion detector
sensor) to set it on
off/low/medium/high
When detecting
movement, doorbell
starts recording
automatically on
SD card.
Switch to full
screen display
for live view
Enable motion
detection alerts
and adjust
sensitivity of
motion detection
Tap to mute or
hear the sound
Live Screen
Feature Controls
13
For more advanced features/functions, refer to
grid-connect.com.au for more details
Scroll up/down
playback video
on time slider
Pause playback
video
Access playback
screen
Access to select
desired date of
playback from
SD card
9OPERATING YOUR DOORBELL
Playback Screen
Feature Controls
Switch to full screen
display for playback.
Access to settings
including share
device, PIR (motion
detection setting),
ring setting, rmware
information, remove
device etc.
Access to SD
card setting
Access live screen

10 PAIRING INDOOR CHIME UNIT
Power on your indoor chime unit with
either a standard USB-A port or
provided DC power adaptor, ideally
some where near your door.
Your indoor chime unit should have
been paired with your video doorbell.
Please press the push button on the
video doorbell to test the indoor
chime. If the indoor chime does not
react, please follow step 1-3:
1. Press the reset button on the back
of the chime unit for 5 seconds to
reset the chime unit. The indicator
should flash blue quickly for 2
seconds then stop flashing, proceed
to step 2.
2. Press the reset button on the back of
the chime unit ONCE and release it
quickly. The indicator should flash blue
slowly and continuously.
3. While the chime unit is continues
flashing, you may chose one of the
following options to finish pairing:
a. Press the video doorbell’s push
button once to complete indoor
chime unit setup.
OR
b. Navigate from the video doorbell live
screen settings -> bell settings ->add to
complete indoor chime unit setup.
USB-A Port
DC Power Adaptor
1514
24 pages 105mm x 148mm (A6) 160gsm Gloss Art Stock 4 colour process double sidedDC55HA Series 2 - CPIN005156/4

24 pages 105mm x 148mm (A6) 160gsm Gloss Art Stock 4 colour process double sidedDC55HA Series 2 - CPIN005156/4
1.2m Ideal
Mounting Height
Wi-Fi Coverage
Camera Field
of View 140˚
Motion Detection
Range up to 8m
FIG. 01
16
Before choosing your location, check the Wi-Fi strength/coverage in that area.
IMPORTANT: Do not mount the doorbell unit on metal or near metal door
frames, security door, or proximity any metal door furniture. It might affect
the functionality of the doorbell.
Do not place doorbell at direct sunlight or extreme weather.
Please note below image for doorbell angle view. Install it in
a suitable location with Wi-Fi coverage (Fig.01).
CHARGING DEVICE
1. Plug DC power adaptor into a power
source and connect it with doorbell using
provided USB cable (Fig.02 & 03).
2. During charging, the charging indicator
should turn red and will turn blue when
fully charged. We suggest charging the
doorbell for 6-8 hours before installation.
17
11 CHARGING & INSTALLATION
Note:
• This doorbell requires network device (e.g. wireless/non-wireless router, network
switch etc.) that is connected to internet or internal network for setup and use.
Network device is not supplied with this kit.
• This doorbell might experience network, motion command and live transmission
delay issues. This is normal, due to the connected network, 3G/4G mobile network,
server overow or internet upstream speed, download speed and video resolution.
To reduce delay, it is recommended to reduce the video quality, or contact your
mobile/network service provider.
INSTALLATION
Note: Product should be fully charged
before installation.
1. Mark screw position through the bracket
holes (Fig.04).
2. Fix the mounting bracket on the wall by
using the included screws and wall plugs.
3. Install the doorbell to the bracket and
secure with the included grub screw and
screwdriver (Fig.05).
Wall Mount
Wall
Plugs
Mounting
Screw
Mounting
Screw
Grub
Screw
FIG. 04
FIG. 05
DC Power
Adaptor
Micro USB
Cable
FIG. 02
FIG. 03

What can I do if
I fail to pair my GRID
Connect device?
1. Check your mobile device is connected to a 2.4GHz Wi-Fi
network, refer to below question for how to check Wi-Fi
network frequency
2. Check password entered is correct and the same
Wi-Fi network is used on the mobile device as the device being
paired
3. Check GRID device is in pairing mode, the status
light is flashing red once per second.
4. Check the internet connection on your Wi-Fi network by
browsing any website
5. Check the FAQ under ‘help and support’ section in the Grid
Connect app.
If your problem persists, please refer to GRID website or contact
Customer Service team (detail in below) for further assistance
How can I find out
whether my network is
2.4GHz?
For iPHONE User
1. Navigate the Settings menu and click on Wi-Fi.
The sux of your network may be denoted by
either a 2.4G or 5G
2. If you are having trouble finding out if you are on a 2.4GHz
Wi-Fi network, it will be necessary to check your router
specifications. For more information on this process, please
consult your specific router’s manufacturer or user manual for
more details
For Android User
1. Navigate the Settings menu and click on Wi-Fi.
2. Tap the connected Wi-Fi network and the system
will show the Wi-Fi Frequency
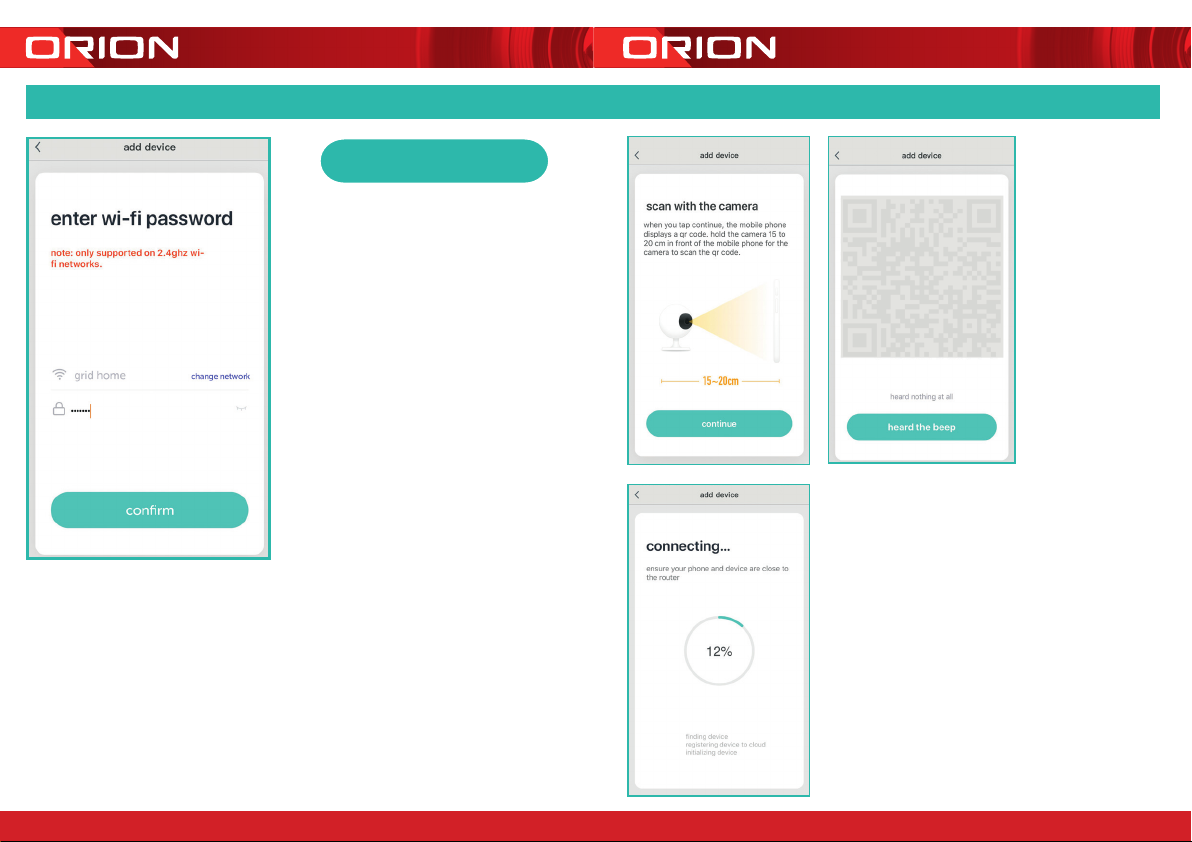
What can I do if I
cannot scan the QR
code or don’t hear the
prescribed beep
1. Ensure the status light is flashing red (once every second)
before scanning QR code
2. Ensure your Wi-Fi network is correct by checking
the above sections
3. Ensure to keep your smart phone 15cm to 20cm away from
your doorbell Avoid having the doorbell positioned in direct
sunlight during the pairing process as the QR code may not scan
4. It may take several seconds to scan QR code
Do our current GRID
products support AC
routers?
Yes - AC routers support both 2.4G and 5G connections. Please
connect your Grid Connect device to the 2.4G Wi-Fi network. Some
AC router by default use the same network name for both 2.4G and
5G signals, please refer to your router manual to allocate a separate
name for the 2.4G network.
If I forget my GRID
Connect app account
password, how can I
reset my password?
If you forget your password, you can tap forget password and
enter your GRID Connect registered account details to get a
verification code and reset your password
When pairing, should
my GRID device or
mobile phone be in
same room with Wi-Fi
router?
No - they do not need to be in the same room, but it is
recommended to pair the GRID device as close to the router as
possible to assist with a successful pair
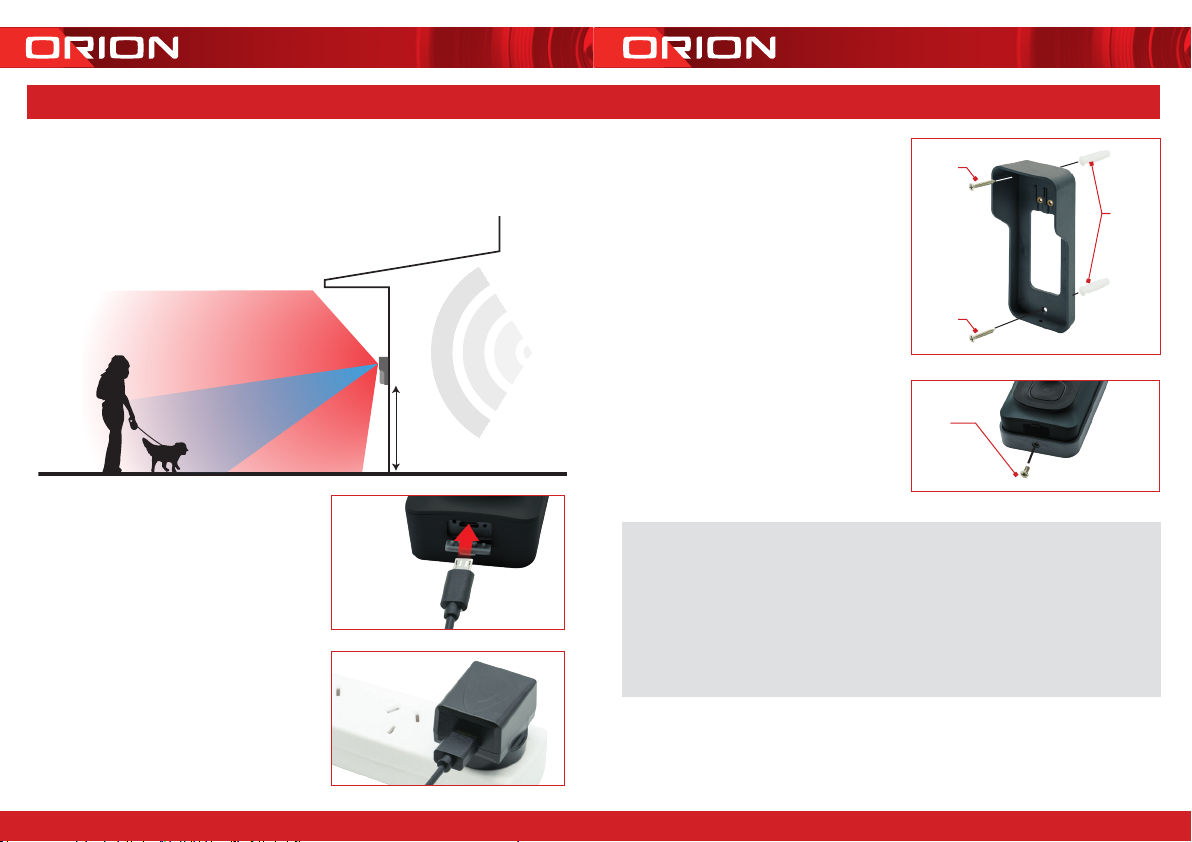
I want to pair my
doorbell and it isn’t
in pairing mode. How
do I put it into pairing
mode (reset process)?
Ensure the doorbell battery has been charged. Press the push
button once to activate the doorbell then use the reset pin to press
and hold the reset button for 5 seconds. The status light should
now be red and blinking rapidly to indicate it is ready for pairing.
12 TROUBLE SHOOTING
grid-connect.com.au
For further Online Assistance or Customer Service Team
1300 267 168
(toll free)
1918
24 pages 105mm x 148mm (A6) 160gsm Gloss Art Stock 4 colour process double sidedDC55HA Series 2 - CPIN005156/4

CPIN005156/4
Arlec guarantees this product in accordance with the Australian Consumer Law and all other applicable Australian
and New Zealand laws that are unable to be excluded.
Arlec also warrants to the original rst purchaser of this product (“you”) from a retailer with which this
document is given that this product will be free of defects in materials and workmanship for a period of
12 months from the date of purchase; provided the product is not used other than for the purpose, or in a
manner not within the scope of the recommendations and limitations, specied by Arlec, is new and not
damaged at the time of purchase, has been maintained in accordance with the recommendations specied
by Arlec, has not been subjected to abuse, misuse, neglect or damage, has not been modied or repaired
without the approval of Arlec and has not been used for commercial purposes (“Warranty”).
If you wish to claim on the Warranty, you must, at your own expense, return the product, and provide proof
of original purchase and your name, address and telephone number, to Arlec at the address below or the
retailer from whom you originally purchased the product within 12 months from the date of purchase.
Arlec will (or authorise the retailer to) assess any claim you may make on the Warranty in the above manner
and if, in Arlec’s reasonable opinion, the Warranty applies, Arlec will at its own option and expense (or
authorise the retailer to) replace the product with the same or similar product or repair the product and return
it to you or refund the price you paid for the product. Arlec will bear its own expenses of doing those things,
and you must bear any other expenses of claiming on the Warranty.
For goods purchased in Australia (only):
The Warranty is in addition to other rights and remedies you may have under a law in relation to the product
to which the Warranty relates.
Our goods come with guarantees that cannot be excluded under the Australian Consumer Law. You are
entitled to a replacement or refund for a major failure and for compensation for any other reasonably
foreseeable loss or damage. You are also entitled to have the goods repaired or replaced if the goods fail to
be of acceptable quality and the failure does not amount to a major failure.
For goods purchased in New Zealand (only):
The Warranty is in addition to, and does not affect, other rights and remedies you may have under a law in
relation to the product to which the Warranty relates.
Our goods come with guarantees that can only be excluded under the New Zealand Consumer Guarantees
Act 1993 to the extent you are acquiring the product for a business purpose and it would be fair and
reasonable for Arlec to contract out of those guarantees.
Arlec Australia Pty. Ltd. ACN 009 322 105 gives the Warranty for goods purchased from a retailer in Australia
by you and Arlec New Zealand Limited NZBN 9429030738294 gives the Warranty for goods purchased from a
retailer in New Zealand by you (collectively Arlec).
Arlec’s telephone number, address and email address for purposes of giving the Warranty are:
Telephone Number:
1800 826 859 (in Australia) • 0800 003 329 (in New Zealand)
Street Address:
Building 3, 31-41 Joseph Street, Blackburn North, Victoria, 3130, Australia
Postal Address:
Blackburn North LPO, P.O. Box 1065, Blackburn North, 3130, Australia
Email: [email protected]
20
24 pages 105mm x 148mm (A6) 160gsm Gloss Art Stock 4 colour process double sidedDC55HA Series 2 - CPIN005156/4
WARRANTY
Table of contents
Other Orion Accessories manuals

Orion
Orion 13039 User manual

Orion
Orion 8727 User manual

Orion
Orion EQ-1 Equatorial Mount 9011 User manual

Orion
Orion SKYLINE 5673 User manual

Orion
Orion APEX 9825 Instruction manual User manual

Orion
Orion OT-T07 User manual

Orion
Orion HCCA G27902 User manual

Orion
Orion CF-160G User manual

Orion
Orion Stargazer 5590 User manual

Orion
Orion 7358 User manual

Orion
Orion StarShoot 51450 User manual

Orion
Orion RKS250F1-S User manual

Orion
Orion 8450 User manual

Orion
Orion 4411 User manual

Orion
Orion STARSHOOT 52174 User manual

Orion
Orion 9019 User manual

Orion
Orion RKS400F-S User manual

Orion
Orion 52062 User manual

Orion
Orion SkyView Deluxe 9400 User manual

Orion
Orion OR-200W User manual