manuals.online logo
Brands
  1. Home
  2. •
  3. Brands
  4. •
  5. Panasonic
  6. •
  7. Cables And Connectors
  8. •
  9. Panasonic Y5S Series User manual

Panasonic Y5S Series User manual

Panasonic Corporation Automation Controls Business Unit industrial.panasonic.com/ac/e
AYF51
ACCTB19E 201201-T
ORDERING INFORMATION
PRODUCT TYPES
Note: Order unit;
For mass production: in 1-inner carton (1-reel) units
Samples for mounting check: in 50-connector units.
Samples: Small lot orders are possible. Please contact our sales office.
For FPC/FFC
Y5S Series
FPC connectors
(0.5mm pitch)
Slide lock
Height Number of pins Part number Packing
Inner carton Outer carton
1.9 mm 15 AYF511515 2,000 pieces 4,000 pieces
24 AYF512415
FEATURES
1. A wide variety of digital equipments
The 0.5mm pitch, 1.9mm height, and
5.2mm depth are suitable for a variety of
digital equipment.
2. Slide lock structure
The slide lock structure facilitates FPC
connection work.
3. Equipped with soldering terminals
for higher mounting strength
APPLICATIONS
Digital equipment, such as PCs, digital
TVs, HDDs, car navigation systems,
home-use game machines,
multifunction fax machines, and
security cameras
RoHS compliant
5.2 mm
1.9 mm
(15°)
51: FPC Connector 0.5 mm pitch
(Slide lock)
AYF 5 1 51
Number of contacts (2 digits)
Contact direction
1: Bottom contact
Surface treatment (Contact portion / Terminal portion)
5: Au plating/Au flash plating
Panasonic Corporation Automation Controls Business Unit industrial.panasonic.com/ac/e
AYF51
ACCTB19E 201201-T
SPECIFICATIONS
1. Characteristics
2. Material and surface treatment
DIMENSIONS (Unit: mm)
Item Specifications Conditions
Electrical
characteristics
Rated current 0.5A/pin contact
Rated voltage 50V AC/DC
Insulation resistance Min. 1,000MΩ(initial) Using 250V DC megger
Breakdown voltage 250V AC for 1 min. No short-circuiting or damage at a detection current of 1 mA
when the specified voltage is applied for one minute.
Contact resistance Max. 45mΩBased on the contact resistance measurement method
specified by JIS C 5402.
Mechanical
characteristics
FPC/FFC holding force Min. 0.2N/pin contacts ×pin contacts (initial)
Measurement of the maximum force applied until the
inserted compatible FPC is pulled out in the insertion axis
direction while the connector lever is closed
Contact holding force Min. 1.5N/pin contacts Measuring the maximum force.
As the contact is axially pull out.
Soldering terminal holding
force Min. 1.5N/pin contacts Measuring the maximum force.
As the soldering terminal is axially pull out.
Environmental
characteristics
Ambient temperature –55°C to +85°C
No freezing at low temperatures. No dew condensation.
Storage temperature –55°C to +85°C (product only)
–40°C to +50°C (emboss packing)
Thermal shock resistance
(with FPC/FFC inserted)
5 cycles,
contact resistance max. 45mΩ
Sequence
1. –40°C, 30 minutes
2. Normal temperature (+20 to 35°C), 5 to 15 minutes
3. +85°C, 30 minutes
4. Normal temperature (+20 to 35°C), 5 to 15 minutes
Humidity resistance
(with FPC/FFC inserted)
120 hours,
insulation resistance min. 500MΩ,
contact resistance max. 45mΩ
Bath temperature 40±2°C,
humidity 90 to 95% R.H.
Saltwater spray resistance
(with FPC/FFC inserted)
24 hours,
contact resistance max. 45mΩ
Bath temperature 35±2°C,
saltwater concentration 5±1%
H2S resistance
(with FPC/FFC inserted)
48 hours,
contact resistance max. 45mΩ
Bath temperature 40±2°C, gas concentration 3±1 ppm,
humidity 75% R.H.
Soldering heat resistance Peak temperature: 250°C or less Reflow soldering
300°C within 5 sec. 350°C within 3 sec. Soldering iron
Lifetime
characteristics Insertion and removal life 30 times Repeated insertion and removal: min. 10 sec./time
Unit weight 24 pin contact type: 0.32 g
Part name Material Surface treatment
Molded portion Housing: Polyamide resin
Slider: PPS resin —
Contact Copper alloy Contact portion; Base: Ni plating, Surface: Au plating
Te r minal portion; Base: Ni plating, Surface: Au plating
Soldering terminal portion Copper alloy Base: Ni plating, Surface: Sn plating
When the slider is opened (reference)
(15°)
(FPC insertion depth)
2.70
(0.20)
0.50
1.60
B±0.10
A±0.15
C±0.15
0.50±0.10
0.20±0.05
1.20
4.75
5.20
0.60
1.90
(1.55)
(0.45)
Number of pins/
dimension A B C
15 12.0 7.0 13.4
24 16.5 11.5 17.9
Panasonic Corporation Automation Controls Business Unit industrial.panasonic.com/ac/e
AYF51
ACCTB19E 201201-T
RECOMMENDED FPC/FFC DIMENSIONS
EMBOSSED TAPE DIMENSIONS (Unit: mm)
• Dimension table (Unit: mm)
• Connector orientation with respect to embossed tape feeding direction
NOTES
Number of pins Type of taping A B C D Quantity per reel
15 pin contacts Tape I 24.0 – 11.5 25.0 2,000
24 pin contacts Tape II 32.0 28.4 14.2 33.0 2,000
Reinforcing plate
0.30±0.05
(4.00)
3.00min.
(FFC)
(FPC)
0.30
0.35±0.03
+0.05
–0.02
B±0.05
0.50±0.05
0.50±0.10
(B+1) ±0.07
Surface finish: Au plating
Number of pins/
dimension B
15 7.0
24 11.5
• Specifications for taping • Specifications for reel
Tape I Tape II
(A±0.30)
(B)
(C) (1.75)
(4.0)(2.0)12.0
1.55+0.05 dia.
Leading direction after packaging
(A±0.30)
(C)
(1.75)
(4.0)(2.0)12.0
1.55+0.05 dia.
Taping reel
Top cover tape
Embossed carrier tape
370 dia.
(D±1)
Type
Direction
of tape progress
Y5S
1. Recommended PC board pattern 2. Precautions for insertion/removal of
FPC/FFC
A load applied to the slider unevenly or
on only one side may deform the slider.
Fully open the slider lock to insert an
FPC. Don’t further apply an excessive
load to the fully released slider lock;
otherwise, the slider may be deformed.
Remove the FPC in a direction parallel to
the board with the slider lock fully
released. If the slider is closed, or if the
FPC is forcedly pulled into a direction
parallel to the board, the connector may
break.
After an FPC is inserted, carefully handle
it so as not to apply excessive stress to
the base of the FPC.
Number of pins/
dimension B
15 7.0
24 11.5
Connector outline
0.50±0.05
3.30
2.10
B±0.05
1.10
(0.20)
2.80
0.50
0.30±0.05
(1.55)
(15°)Please refer to the latest product
specifications when designing your
product.
Panasonic Corporation Automation Controls Business Unit industrial.panasonic.com/ac/e ACCTB13E 201201-T
NOTES FOR USING FPC CONNECTORS
(Common)
PC board design
Design the recommended foot pattern in
order to secure the mechanical strength
in the soldered areas of the terminal.
FPC and equipment design
Design the FPC based with
recommended dimensions to ensure the
required connector performance.
Due to the FPC size, weight, or the
reaction force of the routed FPC.
Carefully check the equipment design
and take required measures to prevent
the FPC from being removed due to a fall,
vibration, or other impact.
Connector mounting
Excessive mounter chucking force may
deform the molded or metal part of the
connector. Consult us in advance if
chucking is to be applied.
Soldering
1) Manual soldering.
• Due to the connector’s low profile, if an
excessive amount of solder is applied
during manual soldering, the solder may
creep up near the contact points, or
solder interference may cause imperfect
contact.
• Make sure that the soldering iron tip is
heated within the temperature and time
limits indicated in the specifications.
• Flux from the solder wire may adhere to
the contact surfaces during soldering
operations. After soldering, carefully
check the contact surfaces and clean off
any flux before use.
• Be aware that a load applied to the
connector terminals while soldering may
displace the contact.
• Thoroughly clean the iron tip.
2) Reflow soldering
• Screen-printing is recommended for
printing paste solder.
• To determine the relationship between
the screen opening area and the PC
board foot pattern area, refer to the
diagrams in the recommended patterns
for PC boards and metal masks when
setting.
• Note that excess solder on the terminals
prevents complete insertion of the FPC,
and that excess solder on the soldering
terminals prevents the lever from rotating.
• Screen thickness of 120µm is
recommended for paste solder printing.
• Consult us when using a screen-printing
thickness other than that recommended.
• Depending on the size of the connector
being used, self alignment may not be
possible. Accordingly, carefully position
the terminal with the PC board pattern.
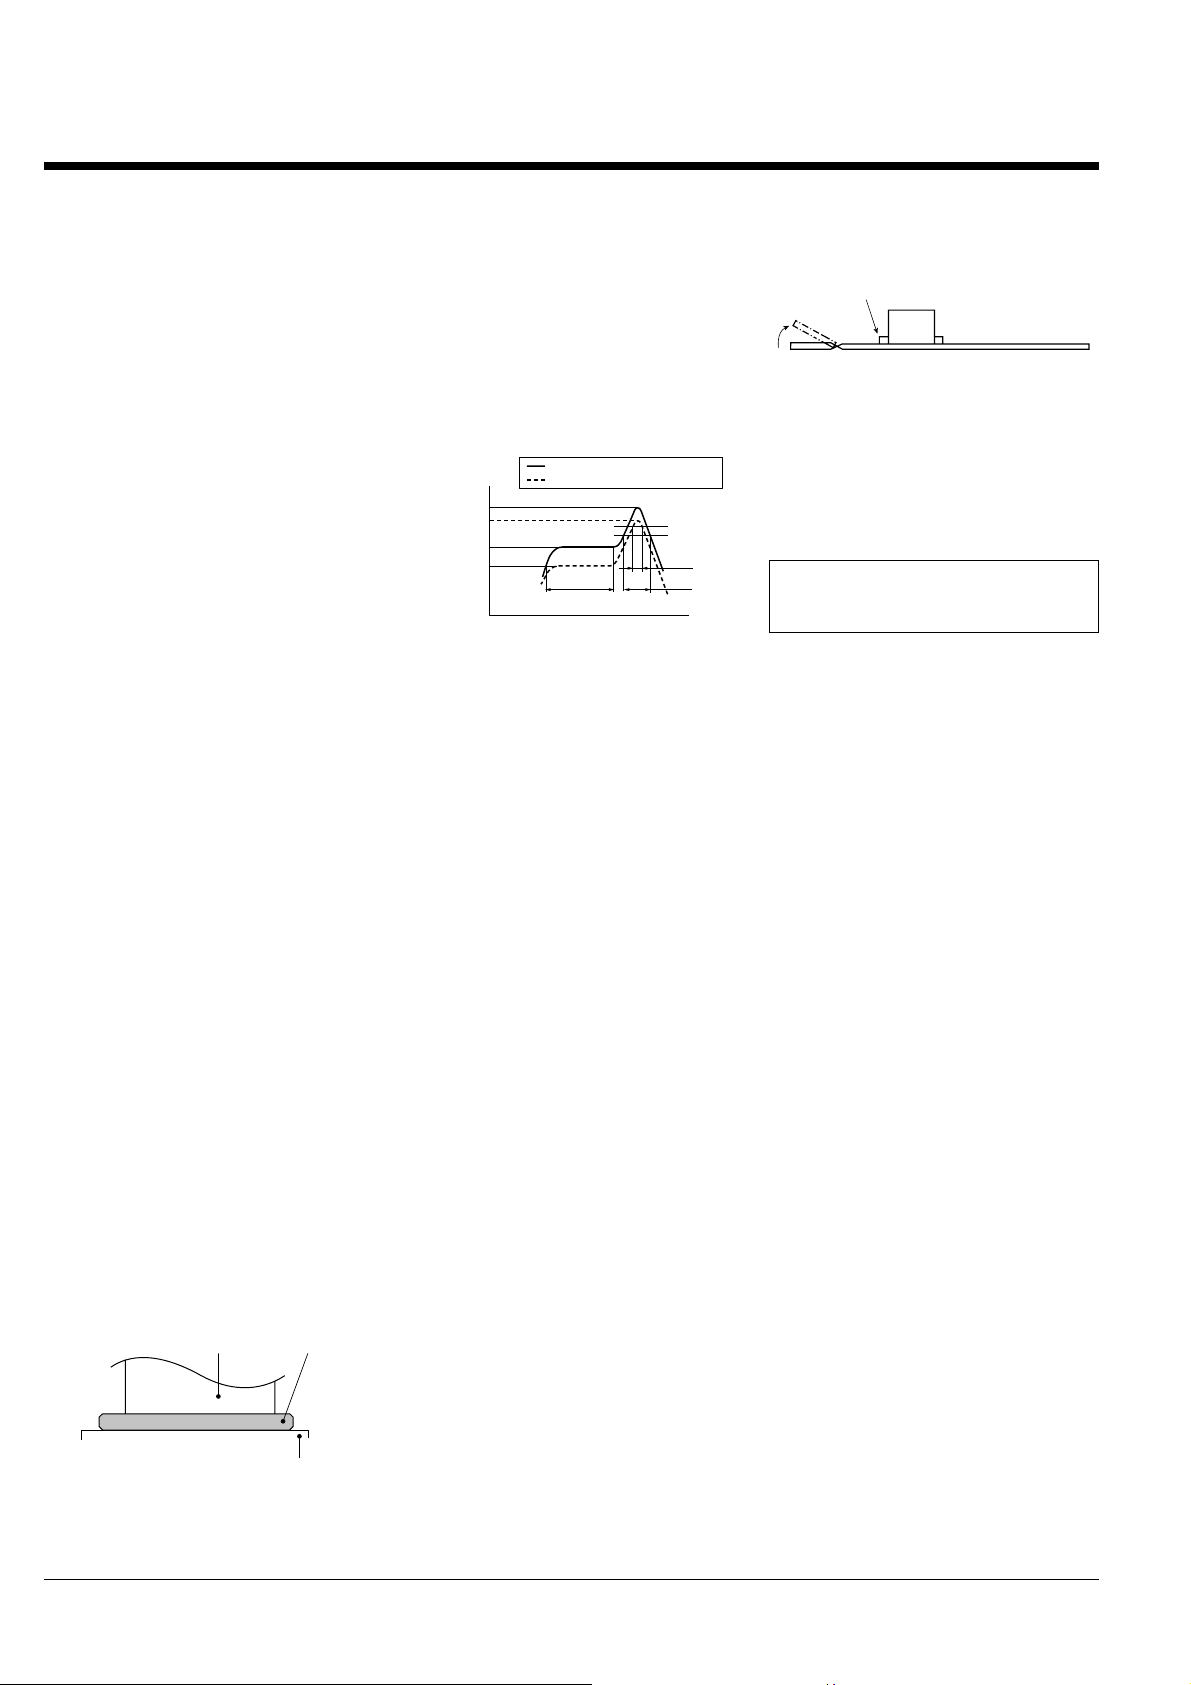
• The recommended reflow temperature
profile is given in the figure below
Recommended reflow temperature
profile
• The temperature is measured on the
surface of the PC board near the
connector terminal.
• Certain solder and flux types may cause
serious solder creeping. Solder and flux
characteristics should be taken into
consideration when setting the reflow
soldering conditions.
• When performing reflow soldering on
the back of the PC board after reflow
soldering the connector, secure the
connector using, for example, an
adhesive. (Double reflow soldering on the
same side is possible)
3) Reworking on a soldered portion
• Finish reworking in one operation.
• For reworking of the solder bridge, use
a soldering iron with a flat tip. Do not add
flux, otherwise the flux may creep to the
contact parts.
• Use a soldering iron whose tip
temperature is within the temperature
range specified in the specifications.
Do not drop or handle the
connector carelessly. Otherwise, the
terminals may become deformed due
to excessive force or applied
solderability may be during reflow
degrade.
Don’t open/close the lever or insert/
remove an FPC until the connector is
soldered. Forcibly applied external
pressure on the terminals can weaken
the adherence of the terminals to the
molded part or cause the terminals to
lose their evenness. In addition, do
not insert an FPC into the connector
before soldering the connector.
When cutting or bending the PC
board after mounting the connector,
be careful that the soldered sections
are subjected to excessive forces.
Other Notes
When coating the PC board after
soldering the connector (to prevent the
deterioration of insulation), perform the
coating in such a way so that the coating
does not get on the connector.
The connectors are not meant to be used
for switching.
Te r minal Paste solder
PC board foot pattern
150°C
180°C
230°C220°C
200°C
260°C
Temperature
Upper limit (Soldering heat resistance)
Lower limit (Solder wettability)
Preheating
Peak temperature
Time
25 sec.
70 sec.60 to 120 sec. Please refer to the latest product
specifications when designing your
product.
The soldered areas should not be subjected to forces.

This manual suits for next models

2

Other Panasonic Cables And Connectors manuals

Panasonic POVCAM AG-HCK10G User manual

Panasonic

Panasonic POVCAM AG-HCK10G User manual

Panasonic CF-VCF Series User manual

Panasonic

Panasonic CF-VCF Series User manual

Panasonic CF-VCF351W User manual

Panasonic

Panasonic CF-VCF351W User manual

Panasonic CN-66A User manual

Panasonic

Panasonic CN-66A User manual

Panasonic CF-VCF36U User manual

Panasonic

Panasonic CF-VCF36U User manual

Panasonic Mini USB Connectors AXJ4 User manual

Panasonic

Panasonic Mini USB Connectors AXJ4 User manual

Panasonic CF-VCF271W User manual

Panasonic

Panasonic CF-VCF271W User manual

Panasonic V Series User manual

Panasonic

Panasonic V Series User manual

Panasonic AXG7100J7 User manual

Panasonic

Panasonic AXG7100J7 User manual

Panasonic F4S User manual

Panasonic

Panasonic F4S User manual

Panasonic B01 User manual

Panasonic

Panasonic B01 User manual

Panasonic CA-DC300U User manual

Panasonic

Panasonic CA-DC300U User manual

Panasonic FZ-VSRG211 Series User manual

Panasonic

Panasonic FZ-VSRG211 Series User manual

Panasonic A4S User manual

Panasonic

Panasonic A4S User manual

Panasonic Y5B User manual

Panasonic

Panasonic Y5B User manual

Panasonic CA-LSR01U User manual

Panasonic

Panasonic CA-LSR01U User manual

Panasonic CA-VDC300N User manual

Panasonic

Panasonic CA-VDC300N User manual

Panasonic CA-VDC300U User manual

Panasonic

Panasonic CA-VDC300U User manual

Panasonic P5K User manual

Panasonic

Panasonic P5K User manual

Panasonic SH-ALL1CGN User manual

Panasonic

Panasonic SH-ALL1CGN User manual

Panasonic P4S User manual

Panasonic

Panasonic P4S User manual

Panasonic CF-ACC Series User manual

Panasonic

Panasonic CF-ACC Series User manual

Panasonic WV-QCA500A User manual

Panasonic

Panasonic WV-QCA500A User manual

Panasonic CA-CC30U User manual

Panasonic

Panasonic CA-CC30U User manual

Popular Cables And Connectors manuals by other brands

Philips SWV3434S specification

Philips

Philips SWV3434S specification

ADC Standard FTP Switchboard Cable Specification sheet

ADC

ADC Standard FTP Switchboard Cable Specification sheet

BK Radio KAA 0700 manual

BK Radio

BK Radio KAA 0700 manual

Marechal Electric MELTRIC SP Series operating instructions

Marechal Electric

Marechal Electric MELTRIC SP Series operating instructions

Philips SWF1321 Specifications

Philips

Philips SWF1321 Specifications

Amphenol H4YX instruction manual

Amphenol

Amphenol H4YX instruction manual

3M 5300 Series instructions

3M

3M 5300 Series instructions

COMSOL HD1024K user manual

COMSOL

COMSOL HD1024K user manual

OEZ CS-BD-B012 Instructions for use

OEZ

OEZ CS-BD-B012 Instructions for use

ODU MINI-SNAP K Series manual

ODU

ODU MINI-SNAP K Series manual

Samsung SEA-C101 user manual

Samsung

Samsung SEA-C101 user manual

Datalogic 94ACC0174 instructions

Datalogic

Datalogic 94ACC0174 instructions

DeLOCK 83647 user manual

DeLOCK

DeLOCK 83647 user manual

Ask HDSP0102N user manual

Ask

Ask HDSP0102N user manual

NTI XTENDEX Series Installation and operation manual

NTI

NTI XTENDEX Series Installation and operation manual

IBM 9008-22L manual

IBM

IBM 9008-22L manual

Holex 081193 15 instruction manual

Holex

Holex 081193 15 instruction manual

Bals INNOLINQ QUICK-CONNECT installation manual

Bals

Bals INNOLINQ QUICK-CONNECT installation manual

manuals.online logo
manuals.online logoBrands
  • About & Mission
  • Contact us
  • Privacy Policy
  • Terms and Conditions

Copyright 2025 Manuals.Online. All Rights Reserved.